Enhancia Neova User manual

Neova
Before using this unit, carefully read the section entitled: “Safety Regulation”. This section provide important informa-
tion regarding the appropriate usage of the unit. Additionally, in order to feel assured that you understand flawlessly
each feature provided by the unit, User’s manual should be read entirely.
User Manual
November 2019
Version 1.0
ENHANCIA

p. 2
ENHANCIA
The information in this document is subject to change without notice and does not represent a
commitment on the part of Enhancia SAS.
“Enhancia”, “Neova” and associated logos are registered trademarks of Enhancia SAS.
Mac, MacOS, OS X, GarageBand, Logic, are registered trademarks of Apple Inc.
All other trademarks are the property of their respective owners and use of them does not imply
any affiliation with or endorsement by them.
Document authored by Enhancia Team.
Enhancia Team
3 Parvis Louis Néel, 38000 Grenoble, FRANCE
www.enhancia.co

p. 3
ENHANCIA
Safety Regulation
The following instructions shall be read, understood and respected to prevent of fire, electric
shock or injury to persons.
• Before using this unit, make sure to read the instructions below, and the User’s Manual.
• Do not open (or modify in any way) the unit.
• Do not attempt to repair the unit, or replace parts within it. In case of any any encoun-
will pleased to help you out.
• Never use or store the unit in places that are:
• Subject to temperature extremes (e.g., direct sunlight in an enclosed vehicle, near
a heating duel, on top of heat-generating equipmenmt); or are
• Damp (e.g., baths, washrooms, on wet floors); or are
• Humid; or are
• Exposed to rain; or are
• Dusty; or are
• Subject to high levels of vibration.
• Make sure you always have the unit placed so it is level and sure to remain stable. Never
place it on o stands that could wobble, or on inclined surfaces.
• Be sure to use only the USB cable supplied or equivalent standard USB Type A to USB
Type C cable. The Hub require 500 mA to power correctly.
• Do not excessively twist or bend the cables, nor place heavy objects on it. Doing so can
damage the cord, producing severed elements and short circuits. Damaged cords are fire
and shock hazards!
• Enhancia are not responsible about any damage caused by universal USB - AC adapter
used to power supply the Hub. You are responsible of any issue caused by this third party
adapter. We recommend to power supply the Hub with a computer.
• Do not allow any objects (e.g., flammable material, coins, pins); or liquids of any kind
(water, soft drinks, etc.) to penetrate the unit.
• ln households with small children, an adult should provide supervision until the child is
capable of following all the rules essential for the safe operation of the unit.
• Protect the unit from strong impact. (Do not drop it!)

p. 4
ENHANCIA
Introduction
Thank you for purchasing Neova. At Enhancia, we firmly believe that expressivity should be
the very basis of music creation. Your instrument should always let you play in a controlled and
subtle way. You should be allowed to express every single musical idea that crosses your mind,
and the instrument should be a medium—not an obstacle!—to your music.
Neova was designed with this idea in mind, as a way to enhance the spontaneity of your mu-
sical creation.
This comprehensive manual will provide you all information on the product, either as a way to
get you started, or as a guide you can later refer to if you want to explore all of Neova’s possi-
bilities.

p. 5
ENHANCIA
TABLE OF CONTENTS
1. Getting Started 6
1.1. System Requirements 6
1.2. Register your product 6
1.3. Download & Update 6
1.4. Software Installation 6
2. Introducing Neova 7
2.1. Concept 7
2.2. Product Overview 7
2.3. Using Neova as a native MIDI Controller 11
2.4. Gestures 12
3. The Dashboard 16
3.1. Interface Overview 16
3.2. Configuring a Gesture 20
4. Support 21
4.1. TroubleShooting 21
4.2. Contact 21

p. 6
ENHANCIA
01. Getting Started 02. Introducing Neova 03. The Dashboard 04. Support
1. Getting Started
1.1. System Requirements
Operating System:
MacOS 10 (or higher)
Windows 10 (or higher)
Disk space:
4 GB free hard disk space (full installation)
1.2. Register your product
1.3. Download & Update
To unlock the full usage of Neova, you must download the Neova Dashboard Software using
the Neova installer. You can find the Neova installer on Enhancia’s website under the “down-
load” section:
https://sites.google.com/enhancia.co/dev/download
Download the latest version of the Neova installer for your operating system. When a new ver-
sion comes out, the website will be updated. To update your software, launch the latest installer
to override your outdated version of the software.
1.4. Software Installation
After downloading the installer, find it in your downloaded files and launch it. You may need to
authorize the application before you can launch it. Do not worry, our installer will only install the
Dashboard and a driver for Neova.
Installing the software on MacOS:
The installer is split into 2 separate steps. First, drag the Dashboard application to your Appli-
cation folder to install it. Then, click on the package and follow the wizard instructions to install
the Neova Driver. Please do not skip this step, as the driver is mandatory for the dashboard to
function properly. You will need to restart your computer when the driver is installed.
Installing the software on Windows:
The installer will let you choose the location for the Dashboard app. Once you’ve chosen one,
go through the next steps to install the app.
Once the installation is done, you’re all set to start using Neova!

p. 7
ENHANCIA
01. Getting Started 02. Introducing Neova 03. The Dashboard 04. Support
2. Introducing Neova
2.1. Concept
Neova is a ring-shaped device that adds expressivity to your other MIDI instruments or Digital
Audio Workstations. By catching the subtlest movements of your hand, Neova will allow you to
have a more spontaneous and richer musical experience.
Neova lets you simultaneously use up to 4 different Gestures that you can endlessly customize
to your liking.
You can save 4 separate sets of Gestures between which you can switch at will, allowing you
to set up neova for different controllers or to have multiple configuration to use on the same
device.
The following sections will provide further information on how to set up the Neova product, and
how to use it to control your Gesture configuration on the fly.
2.2. Product Overview
The Neova product includes the Neova Ring and the Neova HUB. The package also includes
a USB type C cable, two male mini-jack (3.5 mm) to female MIDI connectors. The following
diagram presents all parts of the product side by side.
figure 1: The Neova Product
A: Neova Ring
B: Neova HUB
C: USB type C cable
D: Male mini-jack to female MIDI connector
p. 8
ENHANCIA
01. Getting Started 02. Introducing Neova 03. The Dashboard 04. Support
The Ring and HUB communicate wirelessly over a 2 meters range, and should not be separated
over this distance for Neova to properly function.
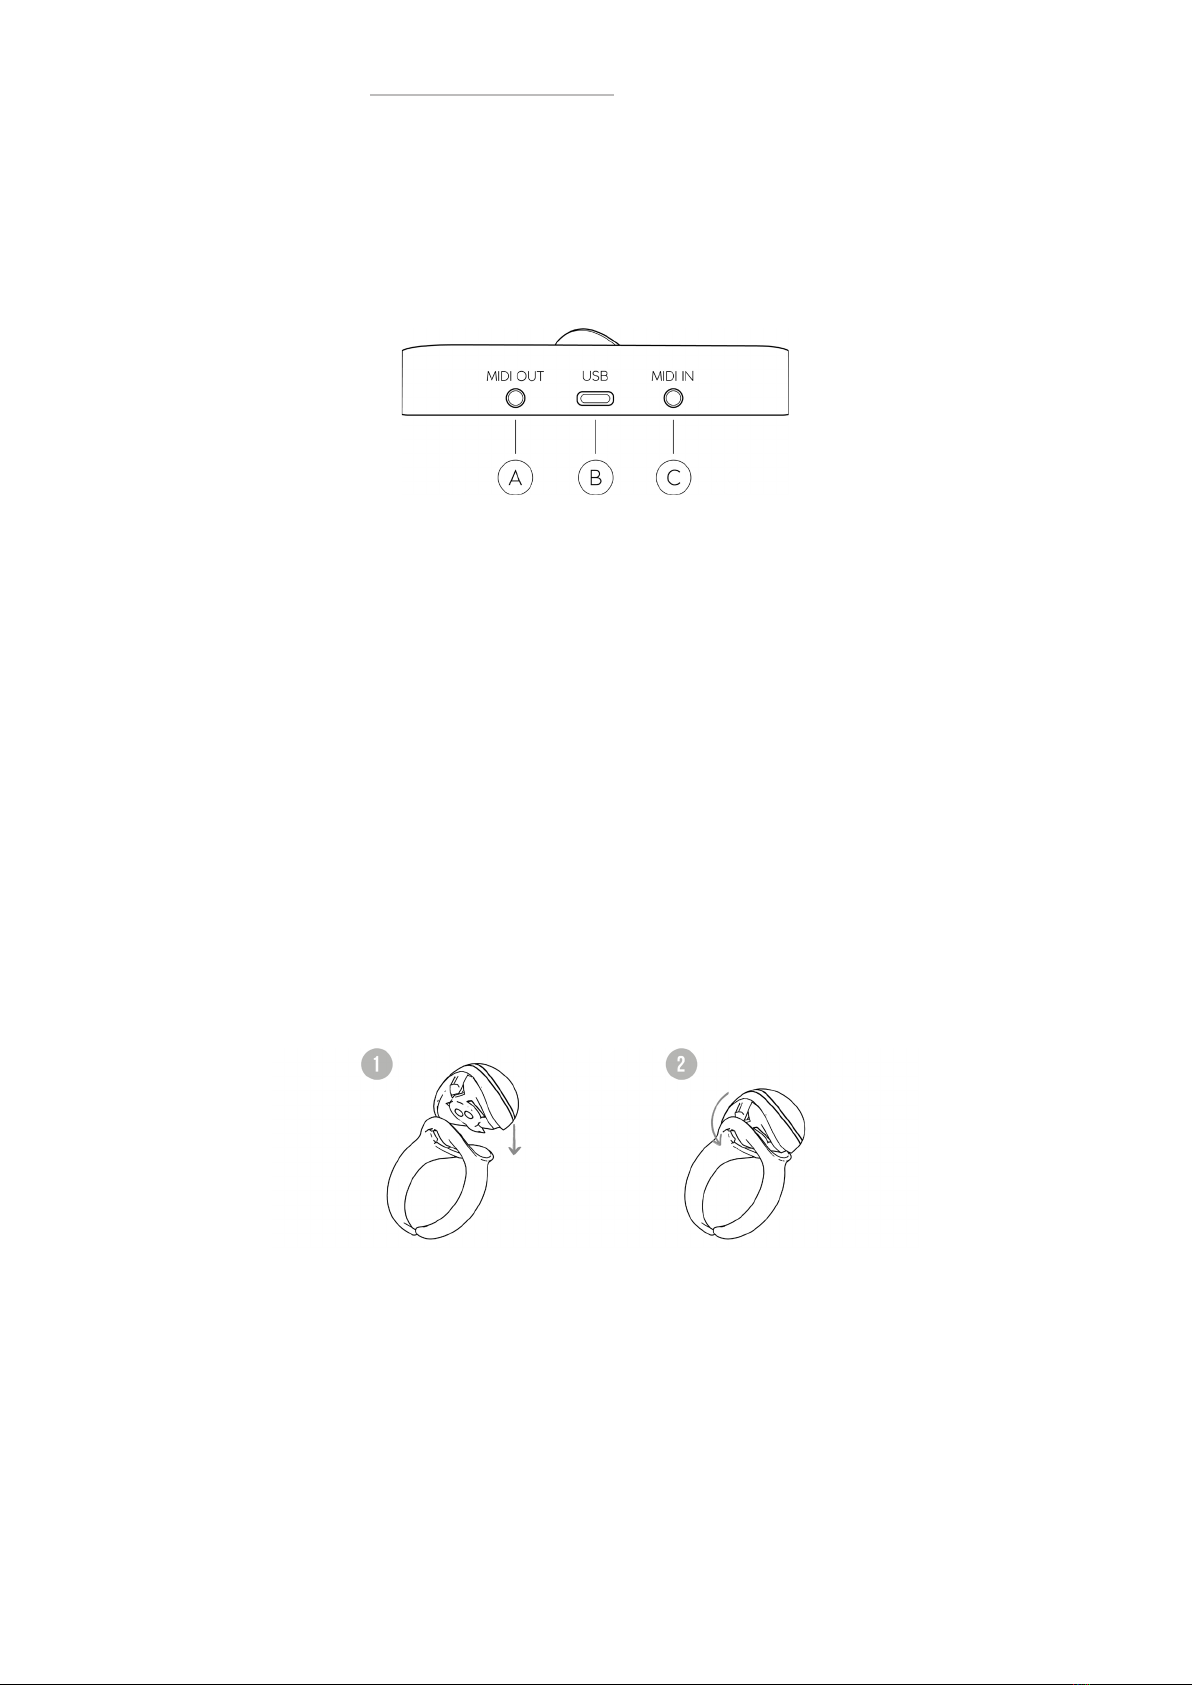
Neova’s connectivity is located on the Neova HUB’s back side:
figure 2: Neova’s connectivity, located on the back of the Neova HUB
A: Mini-jack (3.5 mm) MIDI Output
B: USB type C
C: Mini-jack (3.5 mm) MIDI Input
2.2.1. Ring
The Neova Ring is the wireless device that detects your hand movement. It is composed of two
separate parts: the Stone and the Ring, that need to be assembled before you start using the
product.
In the package you received, you will find a Stone along with a set of 8 different-sized rings. Pick
the ring that fits your right index finger. It must be tight enough to not move around when you
wear it, and large enough to be removed with no effort. If a ring is too tight, please do not force
it into your finger.
Once you have found a fitting ring, assemble the stone into it: fit the stone and the ring on their
flatter side, then push down on the top of the stone, as described in the following figure:
figure 3: Assembling the Neova Ring

p. 9
ENHANCIA
01. Getting Started 02. Introducing Neova 03. The Dashboard 04. Support
If you wish to change the ring size, the Neova Ring can be disassembled by pushing the clip
under the stone. The motion is described by the following diagram:
figure 4: Disassembling the Neova Ring
The Neova Ring has to be worn in your right index finger, with the thinner side facing left, as
shown in the following diagram. If you wear the Neova Ring in the wrong way, the hand move-
ment detection will not behave the intended way.
figure 5: Wearing the Ring
2.2.2. HUB
The Neova HUB acts as the link between Neova and your other devices, as well as a
controller and charging station for Neova.
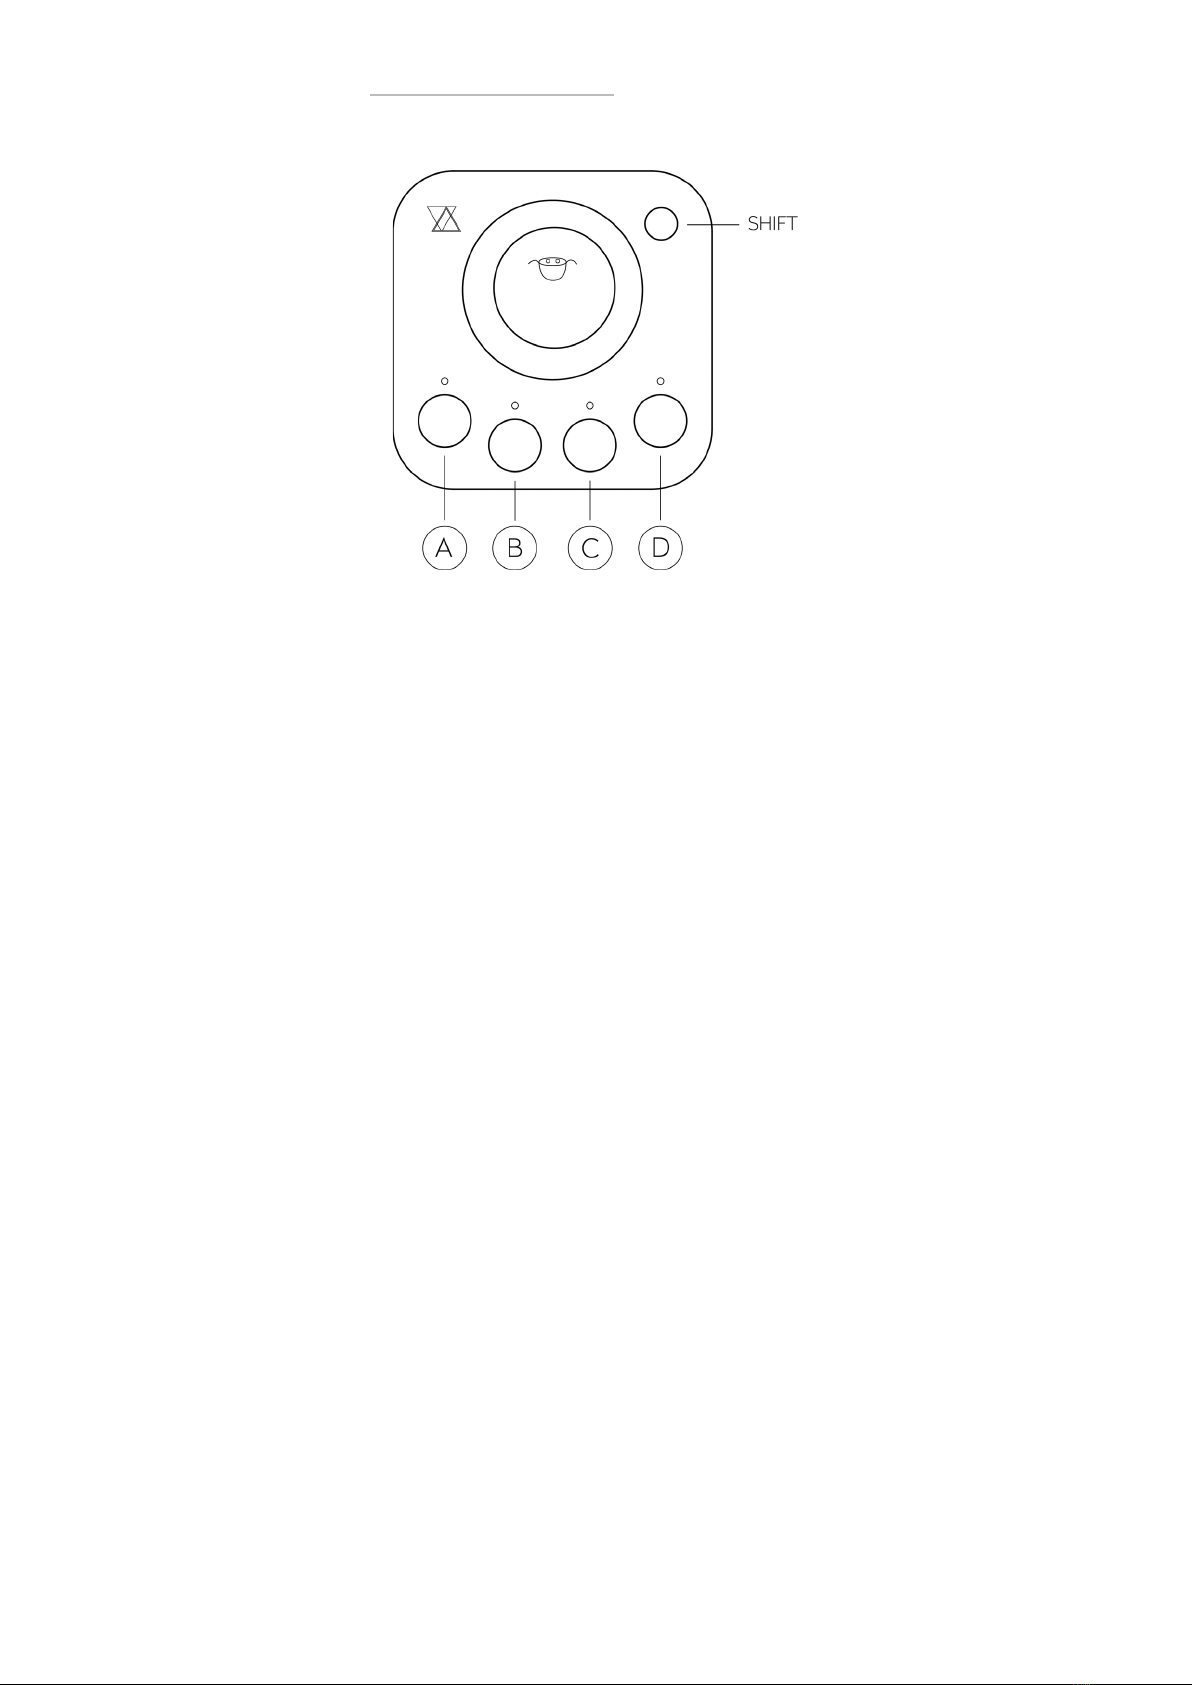
• Controls and LED display
The Neova HUB possesses 5 different buttons and 4 display LEDs, as shown in the following
diagram:
p. 10
ENHANCIA
01. Getting Started 02. Introducing Neova 03. The Dashboard 04. Support
figure 6: The Neova HUB’s LEDs and buttons
In its default behaviour, the Neova HUB displays the current gesture set, with each LED colour
representing one of the 4 gestures.
If the gesture is active, the LED will glow in a specific colour corresponding to the gesture type.
If the gesture is muted, the LED will instead faintly glow white.
Use the A, B, C or D buttons to mute or unmute the corresponding gesture.
The button in the top right hand corner is called the SHIFT button. It serves several functions,
depending on how you press it:
• Single press: pause or unpause
When the Neova HUB is paused, all gesture MIDI messages will be cut. It will however still
charge a docked ring and transfer the MIDI messages it receives.
• Single press and hold: slot select mode
When the Neova HUB is in slot select mode, its LED display will change, showing the active
gesture set with a bright white color.
To change the active gesture set, press the A, B, C or D button while holding SHIFT. You will no-
tice the white LED shifting to the button you just clicked.
Release the SHIFT button to return to default behaviour.
• Double press and hold: battery display mode
When the Neova HUB is in battery display mode, its LED display will change, showing the cur-
rent Ring battery with the 4 LEDs. The battery level reads left to right.
• 1 red LED means the battery is around 10%.
• 4 bright green LEDs mean the battery is fully charged.
• 4 red LEDs means the battery is empty or almost empty.
• The first LED glows blue when the ring is charging.
p. 11
ENHANCIA
01. Getting Started 02. Introducing Neova 03. The Dashboard 04. Support
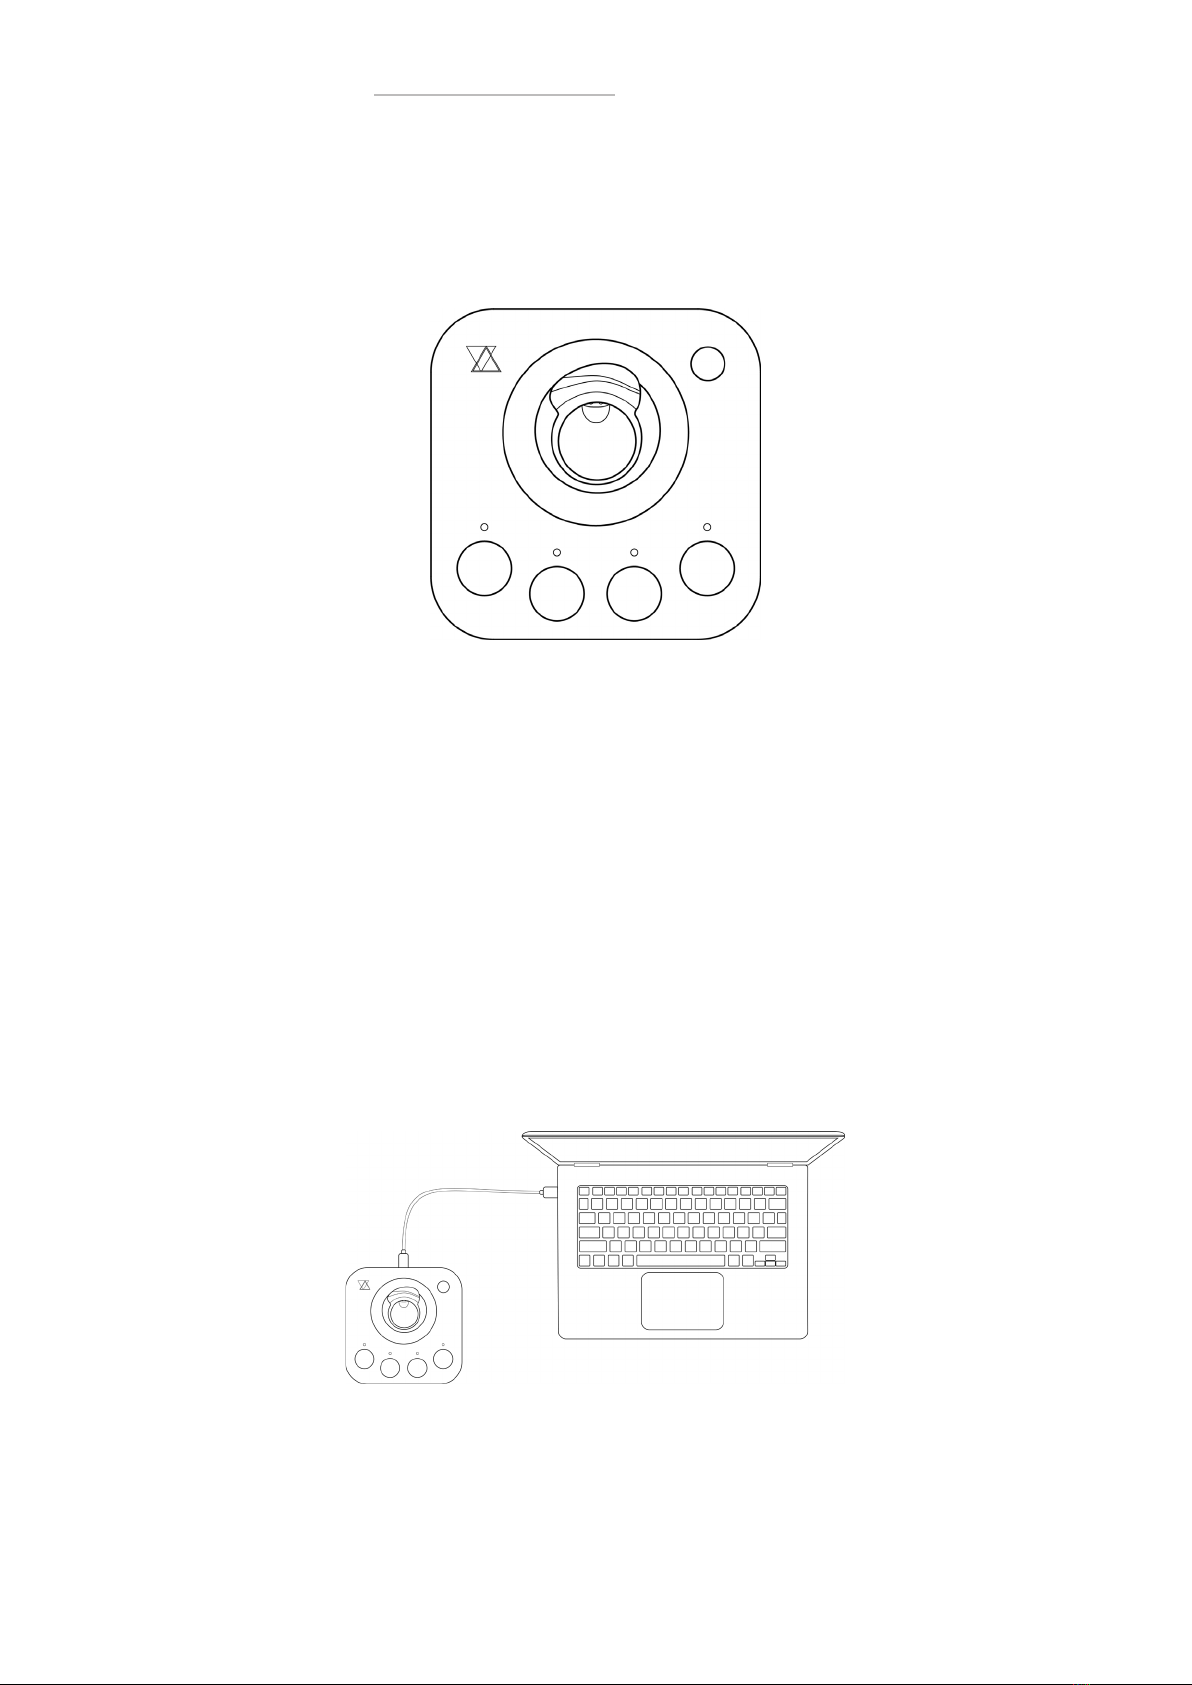
• Charging the Ring
When you are not using the ring, putting it down on its dedicated spot will charge it. The fol-
lowing figure displays the HUB with a charging ring:
figure 7: Neova HUB with a ring charging on top of it
When you take the ring off the HUB, it will let you use the Neova functionalities.
A full charge will let you use the product for approximately 8 hours. When the HUB is off, the ring
will automatically turn off after a few minutes. Remember that the HUB needs to be powered
up to properly charge the ring.
Note : Putting the ring down also powers it up. Your ring will turn off after several minutes of
Neova being disconnected and inactive. You will then need to put the ring down on a powered
up HUB to turn it back on.
2.3. Using Neova as a native MIDI Controller
To use Neova, you will need to connect it to the device you want to interact with.
The HUB has several ways to connect to compatible devices, as shown in figure 8:
figure 8: HUB with computer
Connect Neova to a computer by using the USB type C connection (see figure 8). Neova will
appear in compatible applications as a MIDI controller.
p. 12
ENHANCIA
01. Getting Started 02. Introducing Neova 03. The Dashboard 04. Support
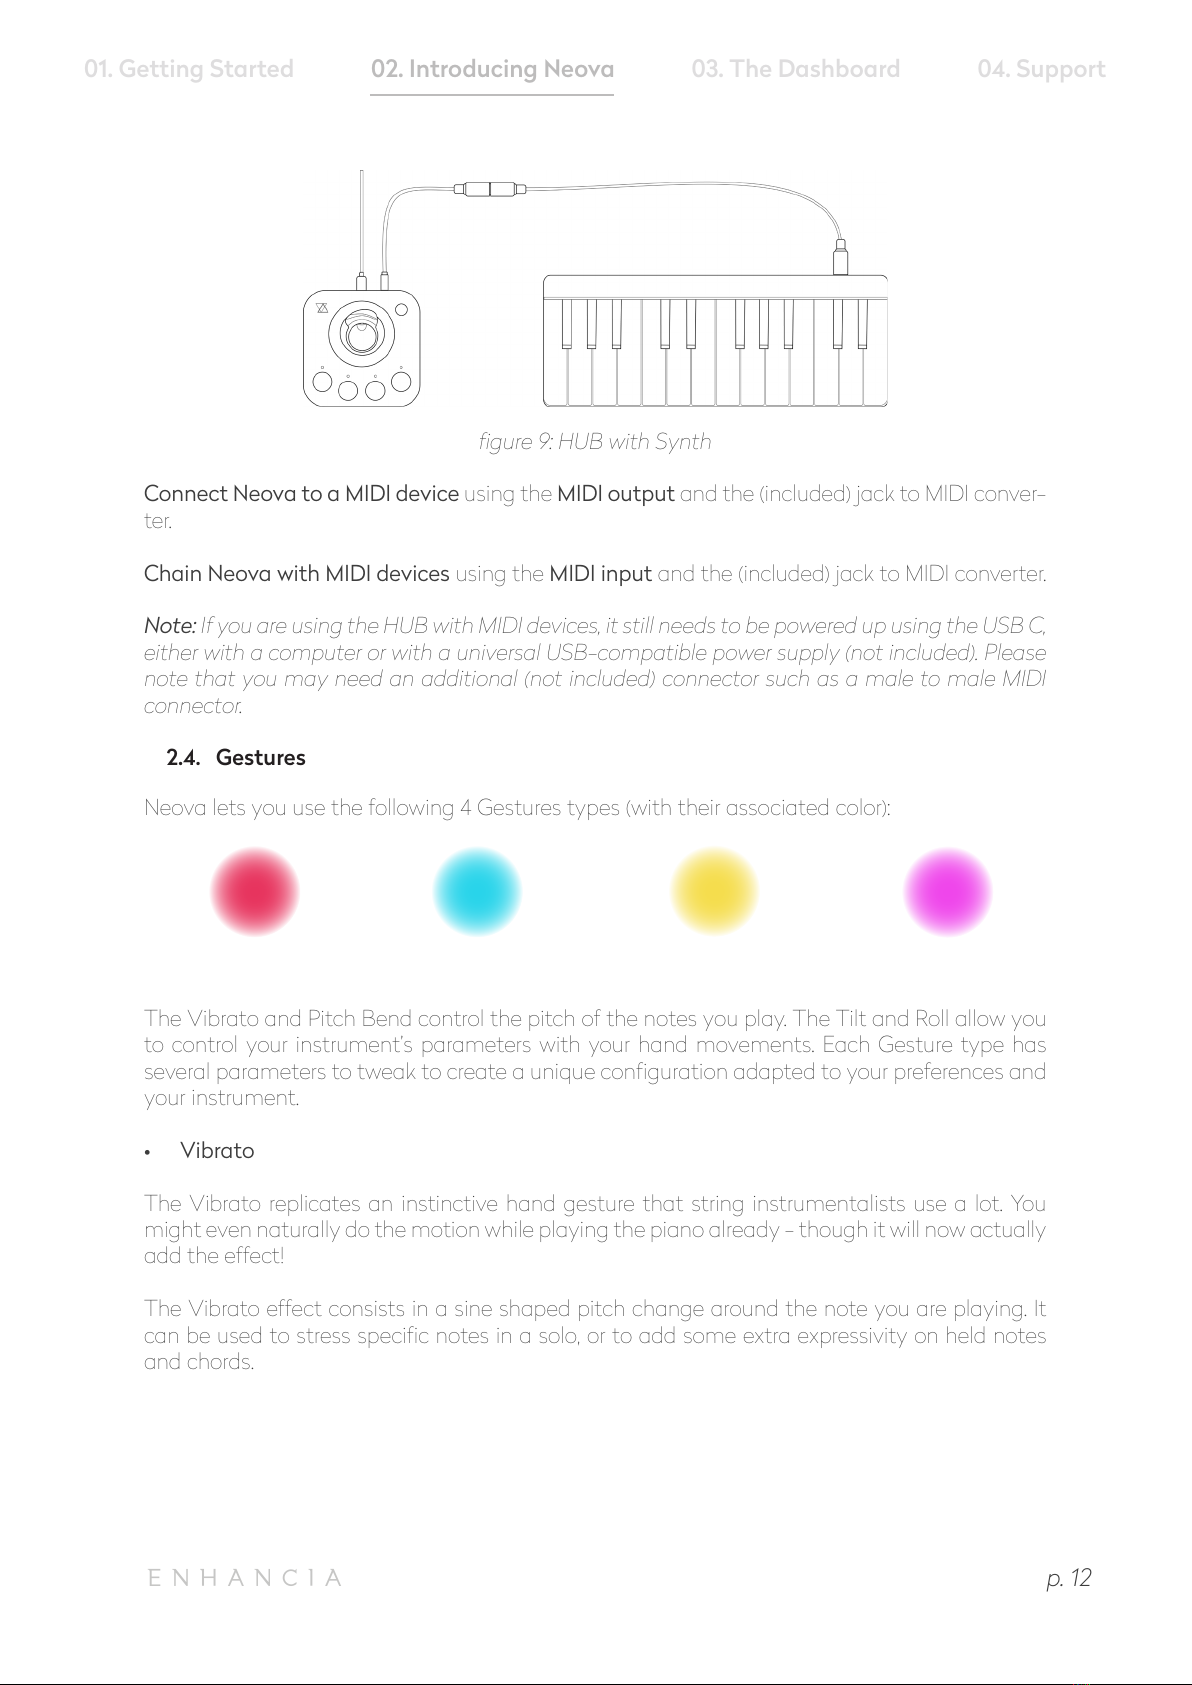
figure 9: HUB with Synth
Connect Neova to a MIDI device using the MIDI output and the (included) jack to MIDI conver-
ter.
Chain Neova with MIDI devices using the MIDI input and the (included) jack to MIDI converter.
Note: If you are using the HUB with MIDI devices, it still needs to be powered up using the USB C,
either with a computer or with a universal USB-compatible power supply (not included). Please
note that you may need an additional (not included) connector such as a male to male MIDI
connector.
2.4. Gestures
Neova lets you use the following 4 Gestures types (with their associated color):
The Vibrato and Pitch Bend control the pitch of the notes you play. The Tilt and Roll allow you
to control your instrument’s parameters with your hand movements. Each Gesture type has
several parameters to tweak to create a unique configuration adapted to your preferences and
your instrument.
• Vibrato
The Vibrato replicates an instinctive hand gesture that string instrumentalists use a lot. You
might even naturally do the motion while playing the piano already - though it will now actually
add the effect!
The Vibrato effect consists in a sine shaped pitch change around the note you are playing. It
can be used to stress specific notes in a solo, or to add some extra expressivity on held notes
and chords.
Vibrato (light red) Pitch Bend (turquoise) Tilt (yellow) Roll (light purple)

p. 13
ENHANCIA
01. Getting Started 02. Introducing Neova 03. The Dashboard 04. Support
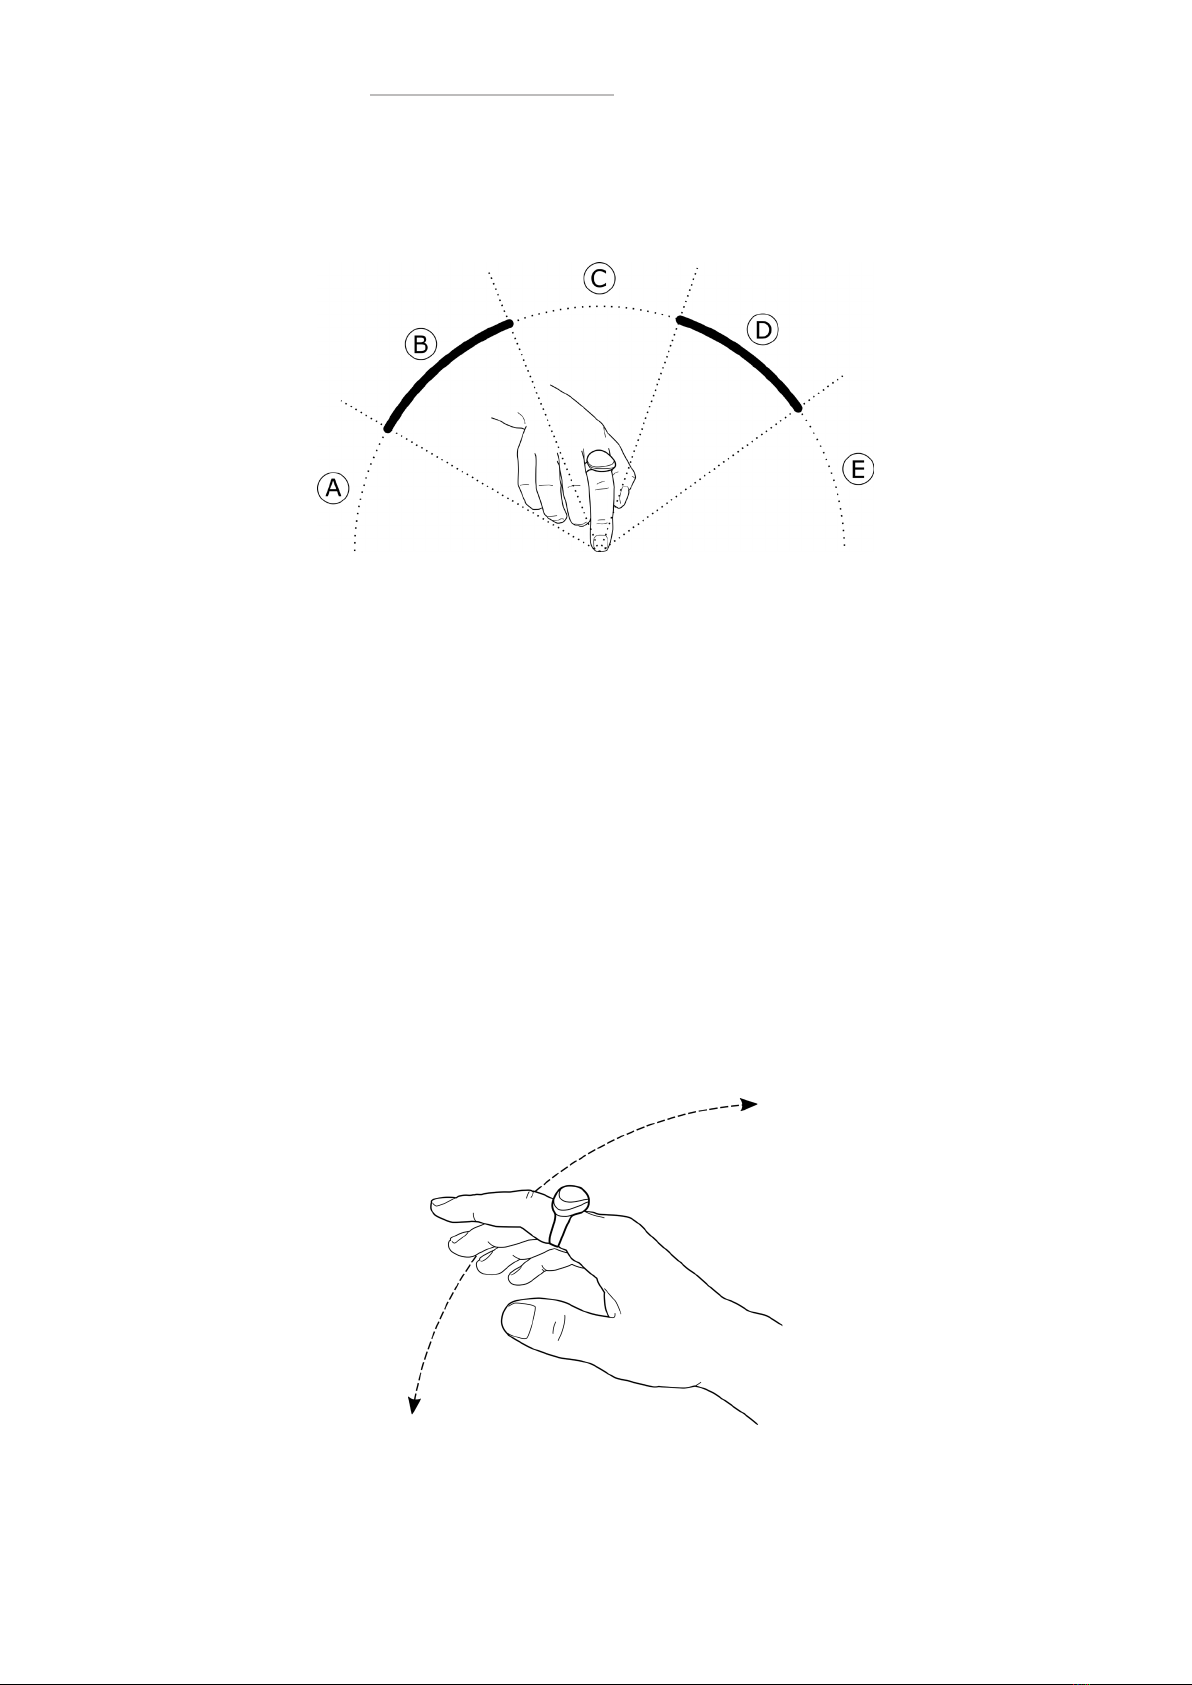
To trigger a Vibrato, quickly move your hand sideways in a back and forth motion, when playing
a note on your instrument. The effect’s speed and intensity will depend on your hand motion.
Figure 10 shows what the gesture looks like:
figure 10: The Vibrato motion
The vibrato can be customized with 2 settings: Threshold and Gain.
• Threshold: The higher the threshold, the stronger you will have to move your hand to trigger
the effect.
• Gain: The higher the gain, the stronger the vibrato effect will be for the same hand motion.
• Pitch Bend
The Pitch Bend emulates the famous string instrument technique extensively used by guita-
rists. The Gesture allows you to gradually change the pitch of your note to a higher or a lower
note.
To trigger a Pitch Bend, lean your hand sideways while holding a note on your instrument. The
direction you lean your hand to will dictate the pitch change: the left side drags the pitch down,
the right side lifts the pitch up. Figure 11 describes the motion:
figure 11: The Pitch Bend motion
p. 14
ENHANCIA
01. Getting Started 02. Introducing Neova 03. The Dashboard 04. Support
There are 4 parameters for the Pitch Bend, corresponding to the downwards pitch range and
the upwards pitch range. The following diagram shows a visual representation of the ranges
depending on the hand position.
figure 12: Visual representation of the Pitch Bend Ranges
• Zone C: the pitch is not affected.
• Zone B and D: the pitch gradually changes between its neutral and minimal (B) or between
neutral and maximal (D) value.
• Zone A and E: the pitch stays at its minimal (A) or maximal (E) value.
Customizing your Pitch Bend means changing the position of both transition ranges, to find
a motion you find comfortable and that does not unintentionally trigger the Gesture when
playing normally.
Note: Your instrument dictates the amount of semitones the pitch bend will add or remove
from your initial note. It usually is 2 semitones (or 1 note), and may be customized from your
instrument.
• Tilt and Roll
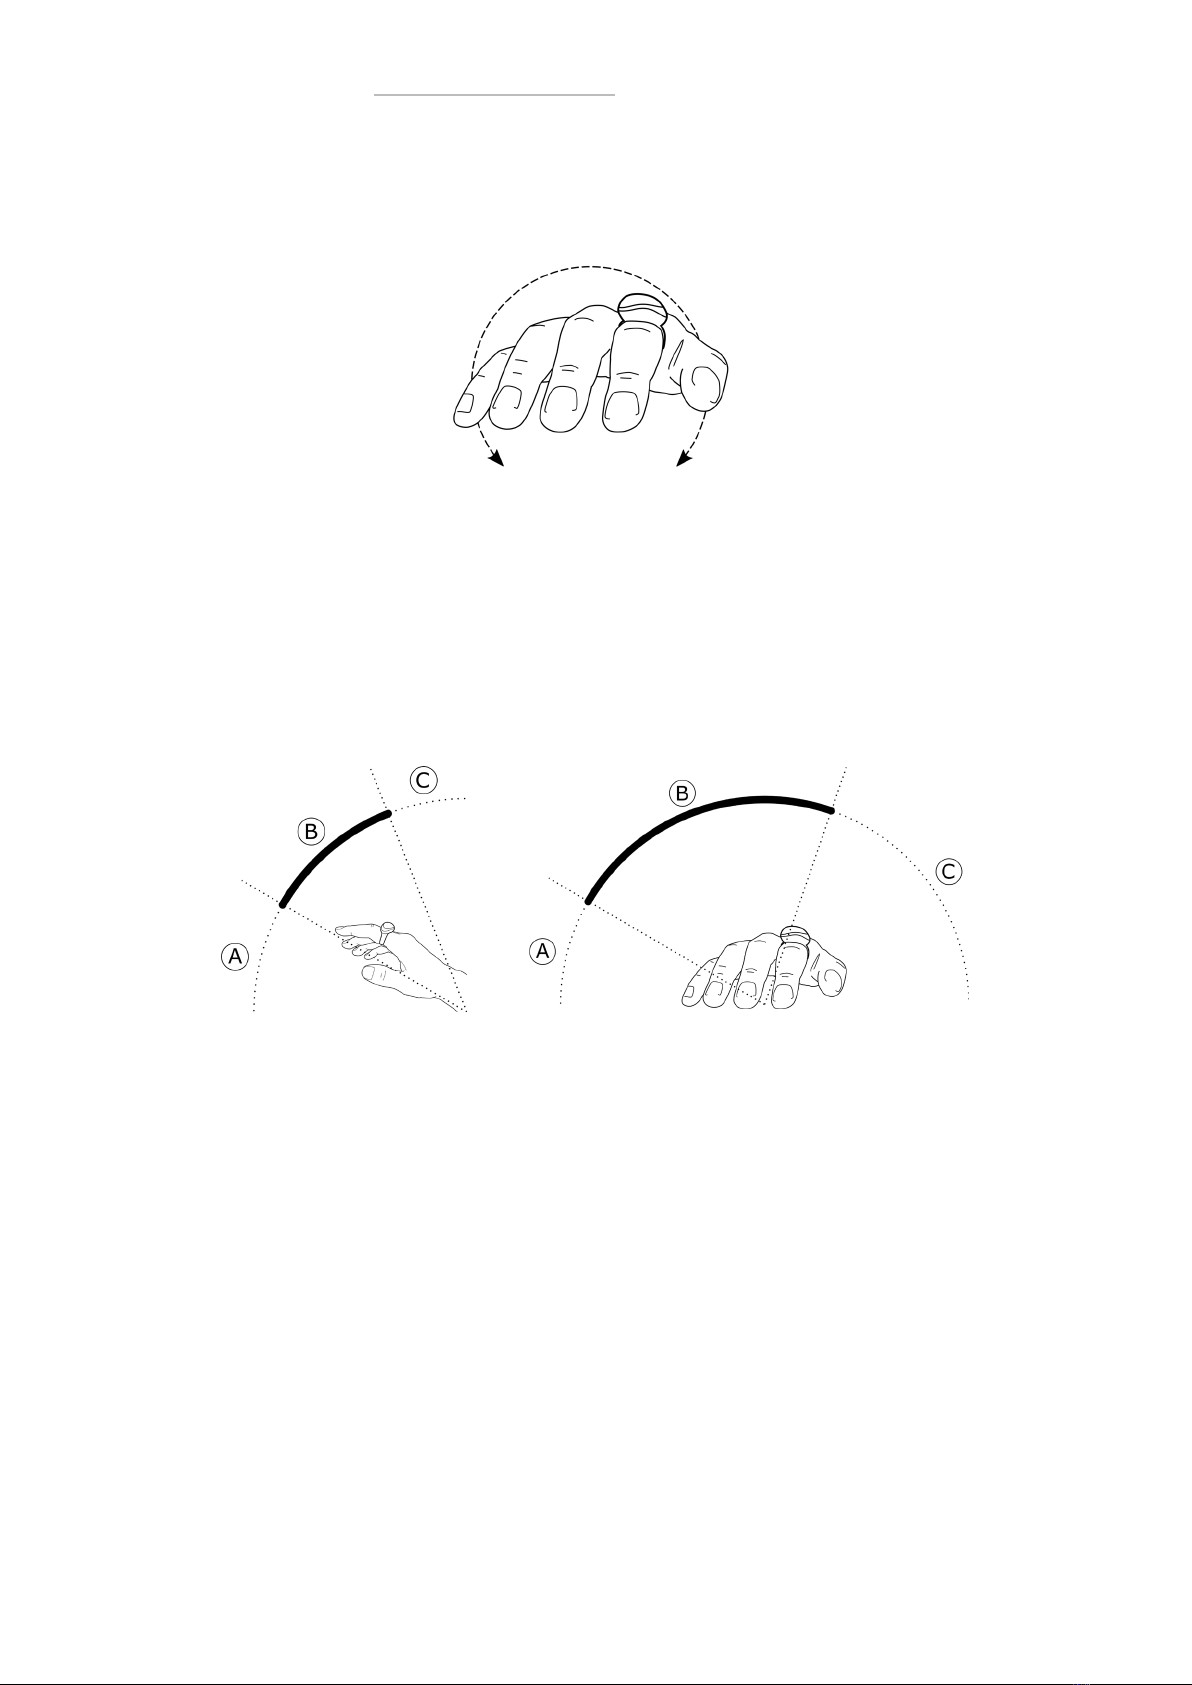
The Tilt lets you control effects from your instrument by leaning your hand upwards or downwar-
ds. It lets you shape your sound dynamically while playing a melody or chords. Figure 13 displays
how to perform the gesture:
figure 13: The Tilt motion
p. 15
ENHANCIA
01. Getting Started 02. Introducing Neova 03. The Dashboard 04. Support
The Roll lets you control effects from your instrument by rotating your hand in your forearm axis.
Figure 14 displays how to perform the gesture:
figure 14: The Roll motion
The Roll is mostly designed to be used while freeing the hand that wears the ring and playing
with the other. However, you can also trigger the Roll with the Pitch Bend motion.
The Tilt and Roll both use 2 parameters to set their range. The following figures depict how their
range work depending on the hand position:
figures 15: Visual representation of the Tilt and Roll ranges
• Zone A: Minimum value.
• Zone B: Gradual change between minimum and maximum value.
• Zone C: Maximum value.
Both gestures use MIDI Control Change messages to control the connected instrument. Refer
to your Synthetiser or DAW to know which message to send to control the desired parameters.

p. 16
ENHANCIA
01. Getting Started 02. Introducing Neova 03. The Dashboard 04. Support
3. The Dashboard
The Dashboard is Neova’s dedicated software, and a prominent part of the product. The
Dashboard lets you change your gesture configuration, and save it so you can bring it anywhere
with your Neova HUB and Ring. The following sections will introduce the software and describe
how to create and edit gesture configurations.
3.1. Interface Overview
3.1.1. General Overview
The following figure displays the Dashboard interface:
figure 16: Interface overview
• A: Header
• B: Hub Visualiser
• C: Gesture Panel
• D: Upload Button
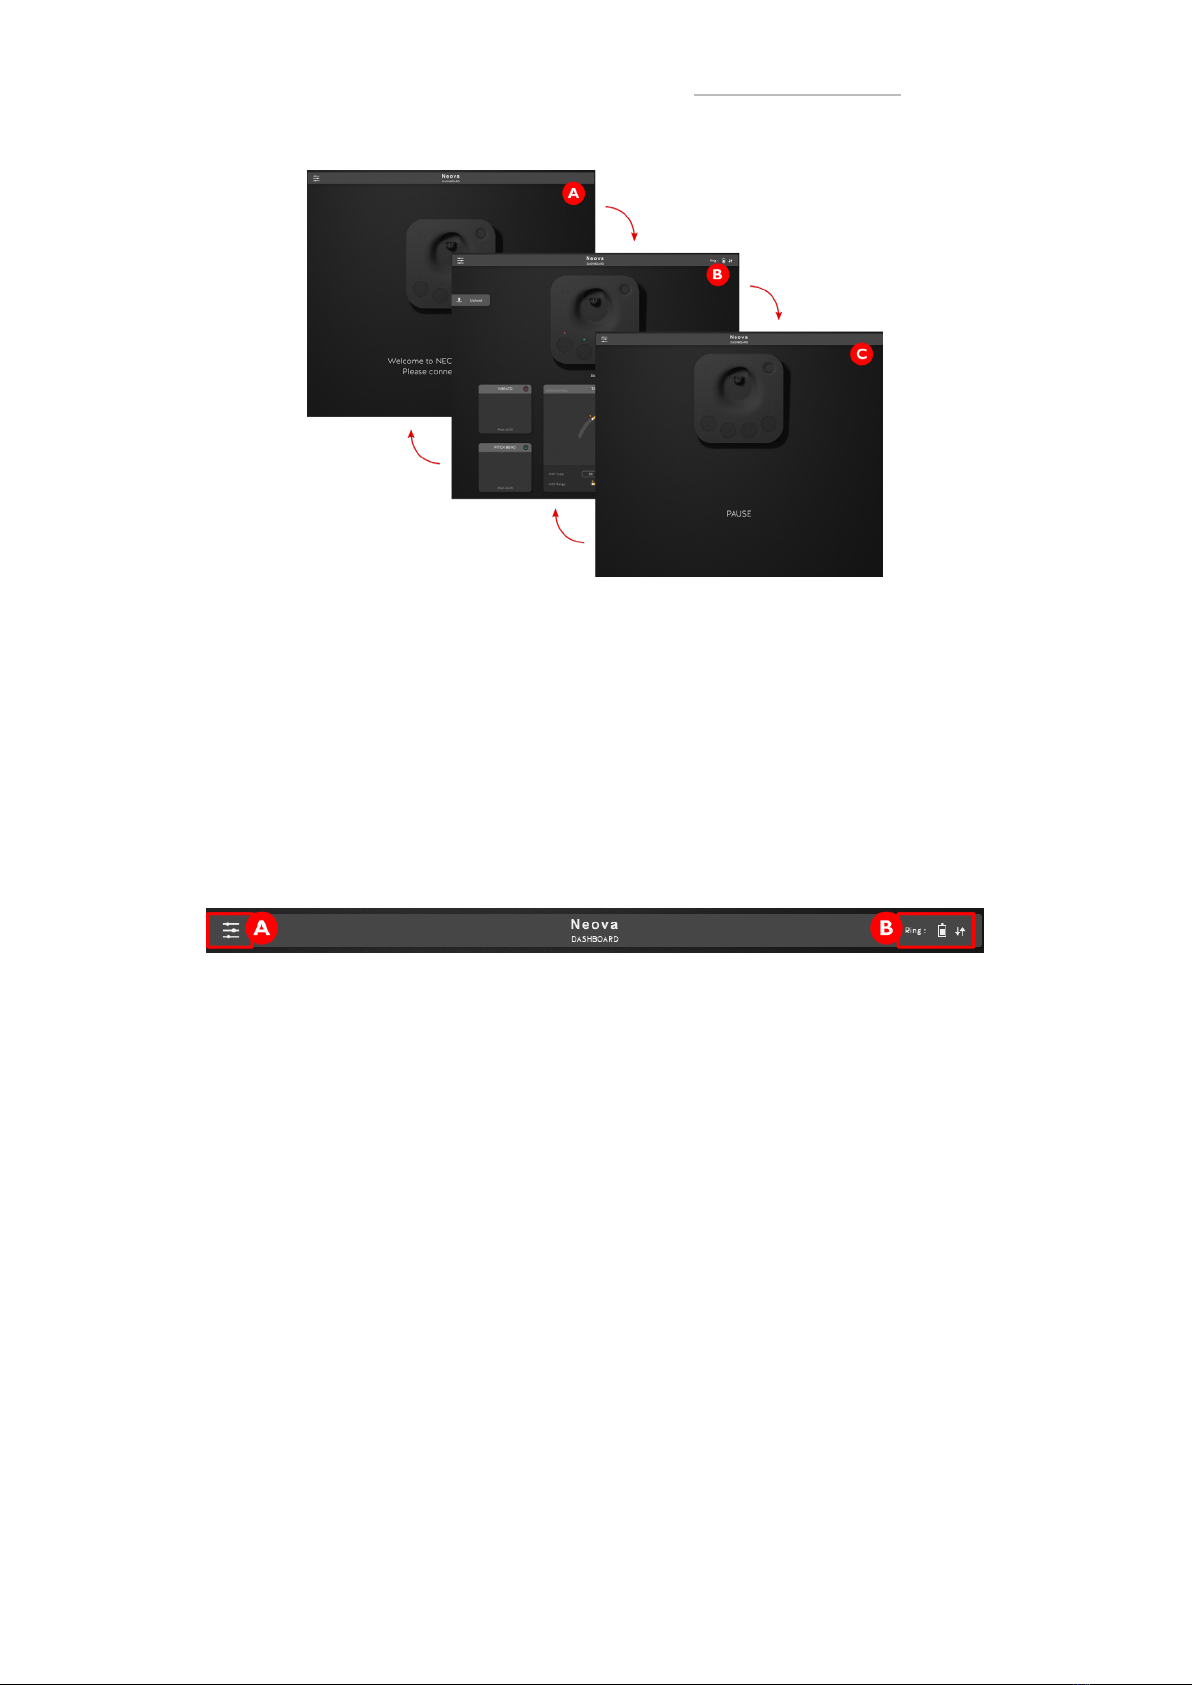
3.1.2. Interface States
The Dashboard switches between different states depending on the current connection with
the HUB, as displayed by figure 17:
p. 17
ENHANCIA
01. Getting Started 02. Introducing Neova 03. The Dashboard 04. Support
figure 17: The interface goes back and forth between its 3 states
• A: Welcome screen (Disconnected HUB)
• B: Default screen (Connected HUB)
• C: Pause screen (Pause button pressed on the HUB)
3.1.3. Header
The Header possesses a button to display the options and a ring information display, as dis-
played in figure 18:
figure 18: The Dashboard Header
• A: Options button: Press to display software information and access several options. This
option menu lets you update your HUB and Ring Firmware and contact the enhancia team.
• B: Ring Information Display: Shows the current ring battery, and the connection info. Visible
white arrows mean that the ring is connected and in range of the HUB.
3.1.4. Hub Visualiser
The HUB visualiser is a mirror to your Neova HUB. It has the same buttons and LED display, as
well as a indicator telling you which gesture set -or slot- you are using, as shown in figure 19.
v
p. 18
ENHANCIA
01. Getting Started 02. Introducing Neova 03. The Dashboard 04. Support
figure 19: The HUB Visualiser
In the default behaviour, pressing buttons A, B, C or D will mute or unmute the corresponding
gesture.
Changing your slot can be performed in three ways:
• Click on the SHIFT button (E) then click on A, B, C or D.
• Click on the arrows on either side of the slot number display.
• While holding “Ctrl” (Windows) or “Cmd ⌘” (MacOS), click on A, B, C or D.
Note: You may notice that your Neova HUB and the HUB Visualiser display will stay in sync
while changing slots. Actually, you are allowed to use “mixed controls”: For instance, you can
hold the SHIFT button on your Neova HUB and change the slot using a HUB button from the
Dashboard application! Quite handy, isn’t it?
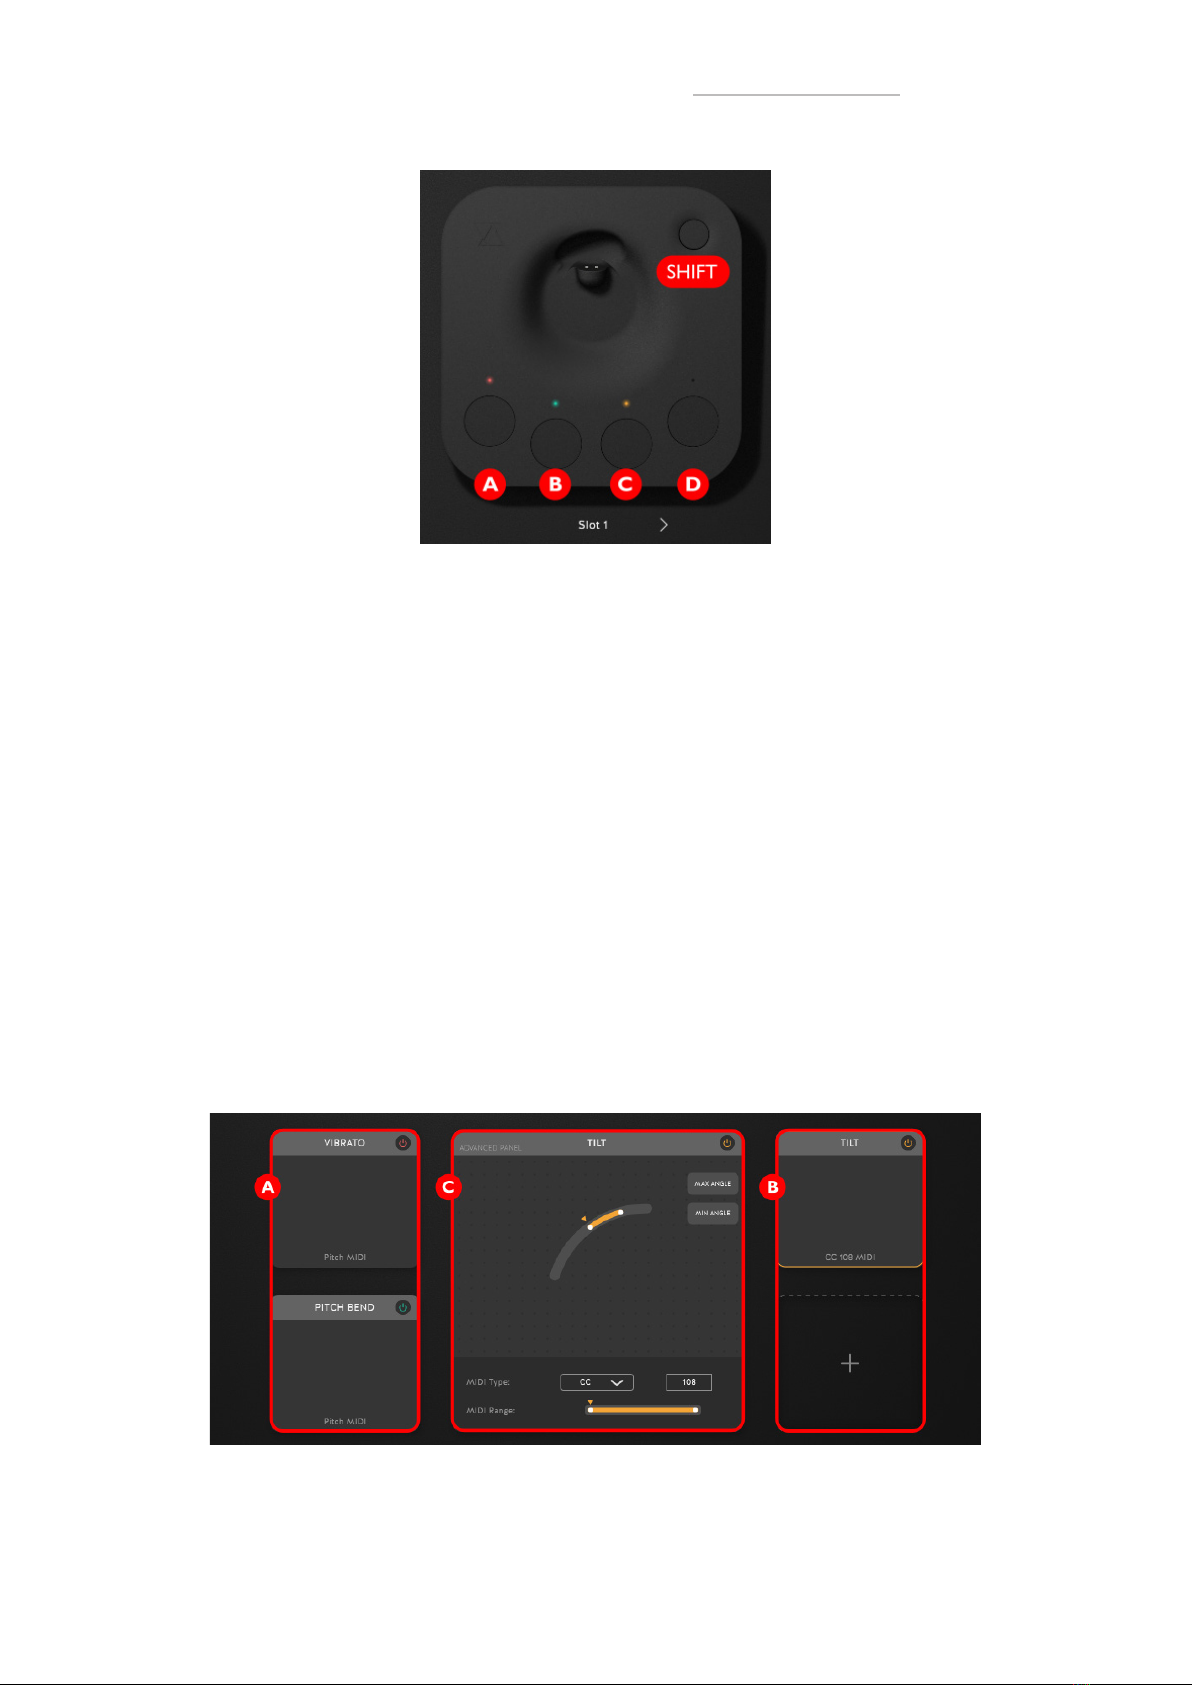
3.1.5. Gesture Panel
This panel displays the currently used gesture set. Figure 20 shows how the panel looks like:
figure 20: The Gesture Panel

p. 19
ENHANCIA
01. Getting Started 02. Introducing Neova 03. The Dashboard 04. Support
• Zones A and B: gestures display
• Zone C: advanced gesture panel for the selected gesture
Zones A and B display a simple representation of gestures 1 to 4. You may notice that two se-
parate representations exist, depending on if this specific gesture exists or not.
If the gesture exists, the area will show its type and info. The top-right-located button lets you
mute or unmute the gesture.
Clicking on an existing gesture selects it. A selected gesture has a colored outline: in the exa-
mple, the Vibrato (gesture 1 in Zone A) is selected.
Once a gesture is selected, its advanced settings will appear in the advanced panel (Zone C),
refer to 3.2 to learn how to change those settings.
You can organise your gesture set in multiple ways:
• Move a gesture by dragging it onto an empty gesture location.
• Swap 2 gestures by dragging one onto another.
• Duplicate a gesture using by using right click > duplicate.
• Delete a gesture by either using right click > delete, or by selecting it then pressing the “de-
lete” key (Cmd ⌘+ backspace on MacOS).
To create a new gesture, click on an empty gesture location to show the Gesture Creator Panel,
shown in figure 21.
figure 21: Gesture Creator Panel
• Zone A: gesture types.
• Zone B: gesture description.
Hover your move over a type (Zone A) to display a short description (Zone B) of what this ges-
ture type does. Create the gesture by clicking on the gesture type.
3.1.6. Upload Button
When you change your gesture configuration with the Dashboard, all changes are transferred
in real time to the dashboard. However, those changes are not actually saved: if you disconnect
and reconnect your Neova HUB, the configuration will be back to the one before the changes!
To save the changes to your Neova, press the upload button. The button will get brighter and
become clickable as soon as a change was performed, to let you know that you may save your
configuration before unplugging your Neova HUB.

p. 20
ENHANCIA
01. Getting Started 02. Introducing Neova 03. The Dashboard 04. Support
3.2. Configuring a Gesture
This section covers the use of the advanced panel (Zone C in figure 20) to customize an existing
gesture. The visuals representation of the control will vary depending on the gesture you selec-
ted, but the same principles apply to all. The figure 22 shows the Advanced Settings Panel with
its several areas, for a Tilt:
figure 22: Advanced Settings Panel
• Zone A: Range and Sensitivity display
• Zone B: MIDI settings
• C: Mute button
The range display shows a visual representation of the gesture’s full range, as well as the current
gesture sensitivity values in the form of a slider. A cursor will also display the current value for the
gesture, if your Neova Ring is currently connected.
You can change the sensitivity settings in several ways:
• Drag the sliders to change the sensitivities of the gesture to your liking. Note that the change
only takes place after the drag ends. For all gestures except Vibrato, you can click in the
middle of a range to move the entire range rather than a single value.
• Double click on a slider handle, then manually input the desired value.
• Use the range calibration buttons (for all gestures except Vibrato). They will either set the
start or the end the gesture range to the current gesture value.
The MIDI settings display lets you configure the MIDI messages that this gesture will create. It
only exists for the Tilt and Roll. It has two separate parts:
• MIDI type: lets you choose which kind of MIDI message this gesture creates.
• MIDI range:
• A cursor displays the current MIDI value the HUB sends for the gesture.
• Change the value range of the MIDI messages you send using the same controls as the
sensitivities: Drag and release a value or the full range, or double click then enter a value.
The mute button works just like the one from the simple representation of the gesture. Click on
it to mute or unmute the selected gesture.
Note: After setting a gesture, the next Gesture of the same type you create will keep the same
sensitivity values.
Table of contents


