ENKHO 160141.01 User manual

3
G
A
R
A
N
Z
I
A
E
S
T
E
S
A
A
N
N
I
Manuale d'uso
CODICE ART.: 160141.01
220-240V
50/60 Hz
1000W
art: 160141.01
SPINSERVICE S.r.l.
Via Campalto, 3/D - 37036
San Martino B.A. (VR) Italia / Italy / Italija
www.eurospin.it
MADE IN CHINA / ZEMLJA PORIJEKLA: Kina
Leggere e conservare /
Read and keep for future reference /
Preberite in shranite / Pročitati i sačuvati.
impastatrice planetaria 1000W
planetary mixer 1000W
planetarni mešalnik 1000W
planetarna miješalica 1000W
impastatrice planetaria 1000W
planetary mixer 1000W
planetarni mešalnik 1000W
planetarna miješalica 1000W

INFORMAZIONI PER LA SICUREZZA
INTRODUZIONE
USO PREVISTO
CONTENUTO DELLA CONFEZIONE
DESCRIZIONE APPARECCHIO
PREPARAZIONI
VELOCITÀ IMPOSTABILI
UTILIZZO DELLA FRUSTA PER IMPASTARE
SBATTITORE E FRUSTA PER MONTARE
OPERAZIONI DA SVOLGERE DOPO L'UTILIZZO
DELL'APPARECCHIO
PULIZIA E CURA
PULIZIA DEL CORPO ESTERNO
PULIZIA ACCESSORI
CONSERVAZIONE
IDENTIFICAZIONE E SOLUZIONE DEI PROBLEMI
DATI TECNICI
RICETTE
GARANZIA
SMALTIMENTO
1-5
5
5-6
6
7
8
8
8-9
9-10
10
10
10
10
10-11
11
11-12
13
13
INDICE
su www.eurospin.it trovi
la versione digitale del manuale d’uso
045.7862000
Dal lunedì al sabato:
9.00-13.30 e 15.30-19.00
La sicurezza di prodotti
testati e certificati
per te.
impastatrice
planetaria 1000W

INFORMAZIONI PER LA SICUREZZA
Leggere tutte le avvertenze, le istruzioni e le
specifiche per la sicurezza contenute nel pre-
sente manuale. Il mancato rispetto di tali
istruzioni potrebbe dare luogo a scosse
elettriche, incendi e/o lesioni gravi.
PERICOLO! RISCHIO DI SCOSSE ELETTRICHE!
●Pericolo di lesioni: non usare il prodotto per
scopi diversi da quelli per cui è stato costruito.
Non fare uso errato dell’apparecchio.
●Ogni utilizzo diverso da quello a cui l’appar-
ecchio è destinato è da considerarsi improprio
e, quindi, pericoloso.
●Scollegare sempre l’apparecchio dall’alimen-
tazione se lasciato incustodito e prima di mon-
tarlo, smontarlo o pulirlo.
●Non superare i tempi di funzionamento in-
dicati nella sezione RICETTE.
●L'apparecchio può essere collegato alla rete
elettrica solo se l'impianto è installato corret-
tamente ed è dotato di presa con messa a
terra. Accertarsi che il tipo di corrente erogata
dalla rete corrisponda a quello riportato sulla
targhetta dati nominali dell'apparecchio.
●Accertarsi che il cavo di alimentazione non
entri in contatto con acqua o umidità durante
l'utilizzo. Disporre il cavo in modo che non
possa essere schiacciato o danneggiato.
● Tenere il filo di alimentazione lontano da
superfici calde.
●Non riparare l'apparecchio da soli. Tutte le
riparazioni devono essere eseguite presso il
nostro Centro Assistenza Clienti, oppure da un
tecnico qualificato.
●In caso di guasti o quando si desidera pulire
l'apparecchio, scollegare la spina dalla presa di
corrente. Spegnere l'apparecchio dall'interrut-
tore non è sufficiente, poiché l'apparecchio
collegato alla presa continua a ricevere una
tensione di rete.
●Scollegare sempre la spina dalla presa
elettrica quando l'apparecchio non è in uso.
●Per evitare rischi, eventuali spine e/o cavi
difettosi devono essere riparati il prima possi-
bile da un tecnico qualificato oppure dal
nostro Servizio Assistenza Clienti.
● L'apparecchio e il suo filo di alimentazione
devono essere tenuti fuori dalla portata dei
bambini.
Non immergere l'apparecchio in acqua o in
altri liquidi.
●Per evitare rischi, se il cavo di alimentazione
è danneggiato, deve essere sostituito dal pro-
1 2
●Non riempire l'apparecchio con ingredienti
caldi!

3 4
duttore, dal suo agente addetto all'assistenza
o da una persona di simile qualifica.
AVVERTENZA! RISCHIO DI LESIONI!
●Scollegare sempre l'apparecchio dalla presa
elettrica quando si montano o smontano ac-
cessori. Questo per evitare l'accensione involo-
ntaria dell'apparecchio.
L'apparecchio si riavvia automaticamente
quando torna la corrente dopo un'interruzi-
one elettrica!
●Quando l'apparecchio viene lasciato incus-
todito e in caso di montaggio, smontaggio o
pulizia, disinserire sempre la spina dalla presa.
●Questo apparecchio non deve essere utiliz-
zato dai bambini. Tenere l’apparecchio ed il
suo cavo fuori dalla portata dei bambini.
●Usare solo accessori originali per l'apparec-
chio. Accessori di altri produttori possono non
essere adatti, con conseguenti rischi per
l'utente!
●L’apparecchio può essere utilizzato da per-
sone con ridotte capacità fisiche, sensoriali o
mentali o con mancanza di esperienza e di co-
noscenza se sono sorvegliati oppure se hanno
ricevuto istruzioni riguardo l’utilizzo in sicurez-
za dell’apparecchio e se ne hanno capito i peri-
coli implicati.
●I bambini non possono giocare con l’appare-
cchio.
●Non usare l'apparecchio per impieghi diversi
da quelli indicati in queste istruzioni. altrimen-
ti c'è il rischio di contraccolpi.
● Non sostituire gli accessori finché l'unità di
azionamento non si è completamente arresta-
ta e non è stata staccata la spina dalla presa di
corrente! L'apparecchio continua a funzionare
per qualche secondo anche dopo essere stato
spento!
●Non lasciare mai l'apparecchio incustodito!
●Spegnere l’apparecchio e scollegarlo dall’ali-
mentazione prima di cambiare gli accessori
oppure prima di avvicinarsi alle parti che sono
in movimento quando funzionano.
●Durante il funzionamento dell'apparecchio,
introdurre nella ciotola esclusivamente gli in-
gredienti da lavorare.
●Per evitare di ferirsi o danneggiare l'appare-
cchio, non introdurre le mani o corpi estranei
nell'accessorio di riempimento.
ATTENZIONE! RISCHIO DI DANNI A OGGETTI!
●Non azionare l'apparecchio senza ingredi-
enti all'interno. Rischio di surriscaldamento!
●Non riempire l'apparecchio con ingredienti
caldi!

INTRODUZIONE
Complimenti per l’acquisto del nuovo prodot-
to.
Hai scelto un prodotto di alta qualità. Le
istruzioni per l'assemblaggio e l'utilizzo fanno
parte integrante del prodotto. Contengono
informazioni importanti sulla sicurezza, l'uso e
lo smaltimento del prodotto. Prima di usare il
prodotto, familiarizzare con le istruzioni per
l'uso e per la sicurezza. Usare il prodotto esclu-
sivamente come descritto e per la gamma di
applicazioni per cui è designato.
L'utilizzo improprio del prodotto potrebbe
provocare scosse elettriche, incendi e/o lesioni
gravi.
Passare le presenti istruzioni a eventuali futuri
proprietari dell'apparecchio.
6
5
USO PREVISTO
L'apparecchio è destinato esclusivamente alla
lavorazione di alimenti in quantità per uso
domestico.
Ne è ammesso l'impiego solo per utilizzo priva-
CONTENUTO DELLA CONFEZIONE
Robot da cucina
Ciotola con coperchio e accessorio per riempi-
mento
Frusta per impastare
Frusta per montare
Sbattitore
Istruzioni per l'uso
NOTA
Controllare che la confezione sia completa di
tutti i componenti e che questi non siano dan-
neggiati. Contattare il Servizio Clienti se neces-
sario.
●Non riempire l'apparecchio con ingredienti
caldi!
to. Questo apparecchio non è destinato
all'impiego commerciale.
La planetaria è destinata esclusivamente ad
uso privato in ambienti asciutti. Non può
essere usata all'aperto.
Usare l'apparecchio solo con accessori originali.
Qualsiasi altro utilizzo o modifica al prodotto
comporterà un elevato rischio di incidenti.

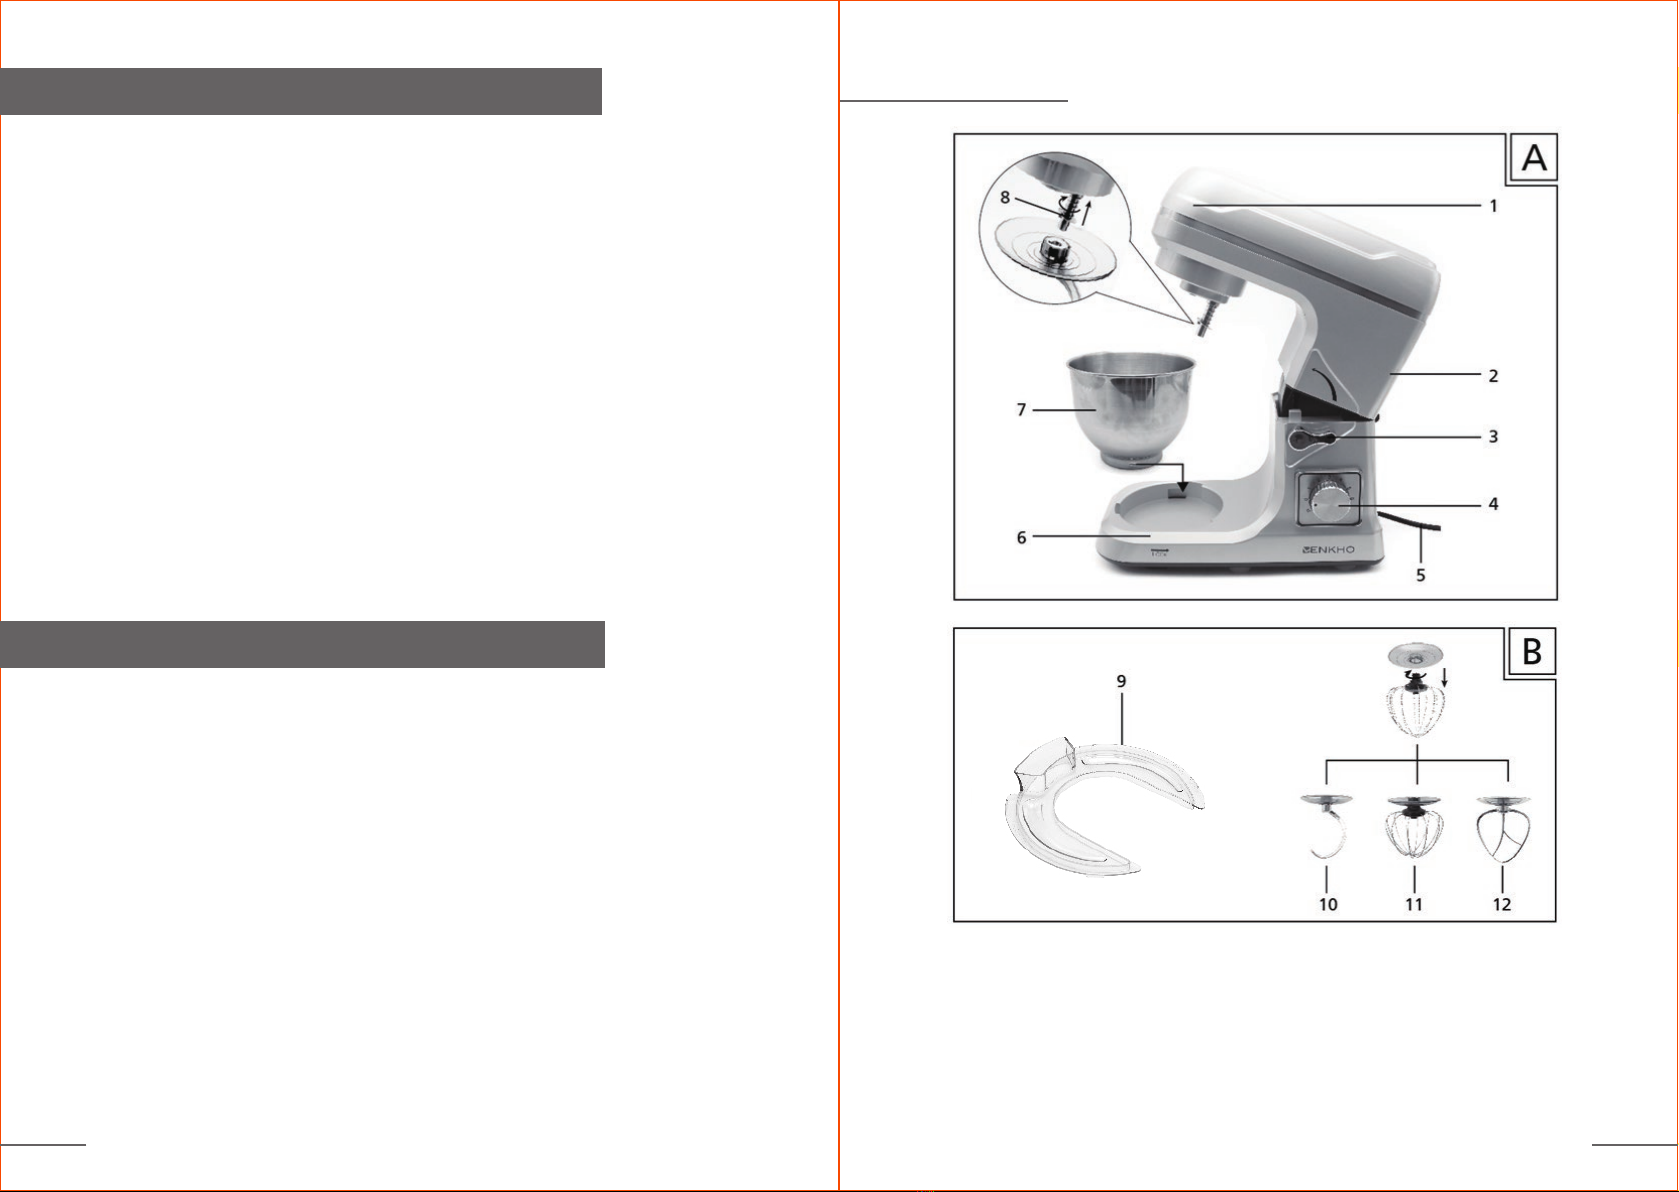
DESCRIZIONE APPARECCHIO
1 Coperchio superiore
2 Corpo superiore apparecchio
3 Manopola di sblocco
4 Rotella di regolazione
5 Filo di alimentazione
6 Base
7 Ciotola
8Alberino di trasmissione
9Coperchio ciotola
10 Frusta per impastare
11 Frusta per montare
12 Sbattitore
1. Togliere tutti i componenti dalla confezione e rimuovere i materiali d'imballo ed eventuali
pellicole/adesivi di protezione.
2. Pulire tutti i componenti come descritto nella sezione "Pulizia e manutenzione". Accertarsi che i
componenti siano completamente asciutti.
3. Posizionare l'apparecchio su una superficie pulita e piana e bloccare l'apparecchio in posizione
con le ventose.
4. Inserire la spina nella presa di corrente.
AVVERTENZA! RISCHIO DI LESIONI!
●Non mettere mai le mani o le dita nella ciotola 7durante il funzionamento dell'apparecchio!
Rischio di lesioni fisiche per via delle parti rotanti!
● Non sostituire gli accessori finché la trasmissione non si è completamente arrestata! Una volta
spento l'apparecchio, la trasmissione resta attiva per qualche secondo.
●In caso di guasti, spegnere l'apparecchio e scollegare la spina dalla presa elettrica per evitare
l'accensione involontaria dell'apparecchio.
ATTENZIONE! RISCHIO DI DANNI A OGGETTI!
●Quando si adopera la frusta per impastare 10, la frusta per montare 11 o lo sbattitore 12,
consigliamo di lasciare raffreddare l'apparecchio dopo 10 minuti di azionamento.
●Procedere con le operazioni preliminari indicate di seguito per utilizzare la frusta per impastare
10, la frusta per montare 11 o lo sbattitore 12:
PREPARAZIONI
VELOCITÀ IMPOSTABILI
Velocità Adatto per…
Uso
1 – 2
- impastare e miscelare
impasti abbastanza solidi o ingredienti
di maggiore consistenza
Frusta per
impastare10
Sbattitore 12
3 – 5
- miscelazione di preparati densi per dolci
- miscelazione di burro e farina
- miscelazione di pasta lievitata
- miscelazione di pastafrolla
Sbattitore 12
1 – 3 - lavorazione di pasta lievitata
- lavorazione di preparati densi per dolci
Frusta per
impastare 10
- lavorazione di preparati per dolci
- montare burro e zucchero
- lavorazione impasti per biscotti
Sbattitore 12
1 – 4
- panna montata
- Albume d'uovo
- maionese
- emulsioni a base di burro
Frusta per
montare 11
5 – 6
FUNZIONAMENTO FRUSTA PER IMPASTARE
SBATTITORE E FRUSTA PER MONTARE
8
7

10
9
1. Agire sulla manopola di sblocco 3. Il coperchio superiore 1sale verso l'alto.
2. Inserire la ciotola 7in modo che le linguette di fissaggio sulla ciotola si innestino sulle cavità della
base 6. Ruotare la ciotola 6in senso antiorario (vedi segno sulla base 6) in modo da bloccarla
saldamente in posizione.
3. Selezionare l'accessorio adatto 10/11/12, vedi figura B:
– frusta 11 per panna montata;
– sbattitore 12 per lavorare preparati per dolci;
– frusta per impastare 10 per lavorare impasti consistenti come la pasta lievitata.
4. A seconda della lavorazione da fare, scegliere la frusta per impastare 10, quella per montare 11,
oppure lo sbattitore 12 e montarli sull'alberino di trasmissione 8:
- Inserire l'accessorio 10/11/12 sull'alberino di trasmissione 8e spingerlo il più possibile verso l'alto.
- Ruotare l'accessorio 10/11/12 verso destra, fissandolo al pernetto dell'alberino di trasmissione 8.
5. Introdurre gli ingredienti nella ciotola 7, seguendo le indicazioni riportate sulla tabella delle
quantità consigliate:
Quantità di riempimento per ... Min Max
Pasta lievitata N/A 500 g di farina
Preparato per dolci N/A 400 g di farina
Panna 200 ml 1000 ml
Impasto consistente
(per es. pastafrolla)
N/A 400 g di farina
Albume d'uovo
(classe di peso M)
Dosare i rimanenti ingredienti della ricetta
senza eccedere le rispettive quantità massime.
2 12
PRECAUZIONE! RISCHIO DI DANNI A OGGETTI!
● Non superare le quantità di riempimento massime specificate! In caso contrario, l'apparecchio va
in sovraccarico.
● Se l'apparecchio è sotto sforzo, spegnerlo, togliere metà dell'impasto e lavorare le due metà una
alla volta.
NOTE:
● Notare che durante il processo di impasto o miscelazione, gli ingredienti mescolati nella ciotola 7
aumentano di volume, oppure si alzano leggermente di livello per effetto del movimento di
lavorazione. Non riempire quindi la ciotola 7 fino al livello massimo!
6. Agire sulla manopola di sblocco e abbassare il coperchio superiore 1con l'accessorio 10/11/12
montato portandolo in posizione di lavoro.
A questo punto è possibile introdurre gli ingredienti anche durante la lavorazione.
7. Premere il coperchio ciotola 9sulla ciotola 7.
8. Portare l'interruttore a rotella 4sulla velocità desiderata (vedi la sezione "Velocità impostabili").
9. Se gli ingredienti si inseriscono tra il filtro/lama e lo spingi-alimenti, portare l'interruttore in
posizione "P", quindi riavviare l'apparecchio, ripetendo - se necessario - la lavorazione.
OPERAZIONI DA SVOLGERE DOPO
L'UTILIZZO DELL'APPARECCHIO
1. Spegnere l'apparecchio portando l'interruttore a rotella 4in posizione "OFF".
2. Togliere il coperchio 1dalla ciotola 7.
3. Agire sulla manopola di blocco 3e sollevare il più possibile il corpo superiore dell'apparecchio 2.
4. Spingere il più possibile verso l'alto l'accessorio 10/11/12 e ruotarlo verso sinistra. Staccare
l'accessorio
10/11/12 dall'alberino di trasmissione 8.
5. Rimuovere la ciotola 7ruotandola in senso orario e spingendola verso l'alto.
6. Pulire l'apparecchio (vedi sezione "Pulizia e manutenzione").
● Strofinare il corpo apparecchio con un panno umido. Per lo sporco più ostinato, usare sul panno
un detersivo neutro. Togliere gli eventuali residui di detersivo passando un panno inumidito
con acqua. Quindi asciugare bene l'apparecchio.
● Pulire la ciotola 7, il suo coperchio 9, la frusta per impastare 10, la frusta per montare 11 e lo
sbattitore 12 in acqua calda con un po' di detersivo per piatti. Eventuali residui possono essere tolti
con una spazzola lavapiatti. Sciacquare tutti i componenti in acqua calda e accertarsi che siano bene
asciutti prima di riutilizzarli.
NOTE
La ciotola 7, il suo coperchio 9, la frusta per impastare 10, la frusta per montare 11 e lo
sbattitore 12 possono essere messi anche in lavastoviglie. Se possibile, mettere tutti i componenti
completamente (o parzialmente) fatti di plastica nel cestello superiore della lavastoviglie, senza
forzarli per posizionarli. In caso contrario potrebbero deformarsi oppure spaccarsi per le
sollecitazioni subite.
PERICOLO! RISCHIO DI ELETTROSHOCK!
● Prima di pulire l'apparecchio, scollegare la spina dalla presa di corrente!
Rischio di elettroshock! Non immergere l'apparecchio in acqua o in altri liquidi.
ATTENZIONE! RISCHIO DI DANNI A OGGETTI!
● Non usare spugnette abrasive o detersivi aggressivi. Potrebbero danneggiare le superfici.
NOTE
● Si consiglia di pulire l'apparecchio subito dopo l'uso. Ciò facilita l'asportazione dei residui di cibo.
Il mancato rispetto di tali istruzioni può dare luogo a scosse elettriche, incendi e/o lesioni gravi.
PULIZIA E CURA
PULIZIA DEL CORPO ESTERNO
PULIZIA ACCESSORI
CONSERVAZIONE
●Riporre l'apparecchio pulito in un luogo pulito, privo di polvere e asciutto.
Se l'apparecchio smette improvvisamente di funzionare:
● potrebbe essersi surriscaldato e potrebbe essere scattata la protezione automatica.
– Portare l'interruttore a rotella 4 in posizione "OFF”.
– Scollegare la spina dalla presa di corrente.
IDENTIFICAZIONE E SOLUZIONE DEI PROBLEMI

11 12
Tensione di ingresso:
Assorbimento:
Classe di protezione:
Capacità max Ciotola 7:
RICETTE
Ricetta base per la pasta lievitata
Ingredienti
500g di farina (tipo 00)
1 cubetto di lievito
60g di burro
1 pizzico di sale
200–250ml di latte tiepido
2 uova
Preparazione
●Mettere tutti gli ingredienti nella ciotola 7 . Impastare per 1 minuto alla velocità 1 usando la
frusta per impastare 10, e poi per altri 5 minuti alla velocità 4.
Lasciare lievitare nella ciotola 7 per 40 minuti. Formare una pallina con l'impasto.
●Spianare l'impasto su una teglia e aggiungere la farcitura desiderata.
●Cuocere a 200°C (nel ripiano centrale del forno) per 25-30 minuti.
Ricetta base per la pasta margherita
Ingredienti
250g di burro
250g di zucchero
1 bustina di zucchero vanigliato
250g di farina normale
4 uova
½ bustina di lievito in polvere
Preparazione
●Mettere il burro, lo zucchero e lo zucchero vanigliato nella ciotola 7 e mescolare con lo sbattitore
12 alla velocità 3–5 fino a ottenere un'emulsione della giusta consistenza.
– Fare raffreddare l'apparecchio per 15 minuti.
– Se l'apparecchio non si è del tutto raffreddato dopo 15 minuti, non si avvia.
– Attendere altri 15 minuti e provare a riaccenderlo. Se l'apparecchio non si accende:
– Controllare che la spina sia correttamente inserita nella presa di corrente.
– Controllare che il coperchio superiore 1 sia posizionato correttamente.
Tutti i componenti dell'apparecchio che sono a contatto con gli alimenti sono sicuri e approvati
per il contatto alimentare.
Si consiglia di eseguire cicli di utilizzo nel rispetto dei seguenti tempi: Quando si adopera la
frusta per impastare 10, la frusta per montare 11 o lo sbattitore 12, consigliamo di lasciare
raffreddare l'apparecchio dopo 10 minuti di azionamento.
Se si supera questo tempo di utilizzo, l'apparecchio può surriscaldarsi e danneggiarsi!
DATI TECNICI
220 – 240V~ (corrente alternata),
50 / 60 Hz
1000 W
II / (doppio isolamento)
circa 5 l
●Aggiungere le uova una alla volta e continuare a mescolare fino a ottenere il giusto amalgama.
●Aggiungere la farina e il lievito in polvere e mescolare fino a ottenere un impasto uniforme.
●Imburrare uno stampo rettangolare (di circa 30cm) e versarvi l'impasto.
●Cuocere a 180°C (nel ripiano centrale del forno) per circa 50-60 min.
Lavorazione di impasti per pane/pizza:
1. Si consiglia di dosare farina e acqua in un rapporto 5 : 3.
2. Iniziare la lavorazione alla velocità 1 per 10 secondi, poi passare alla 2 per altri 10 secondi e infine
alla velocità 3 per circa 3 minuti.
3. Quando si versano gli ingredienti nella ciotola, accertarsi di non superare la quantità massima.
4. La quantità massima per la farina è 1500g.
5. Usare la frusta per impastare o lo sbattitore.
Per montare albumi e panna:
1. Iniziare con la velocità 4 e passare alla 6, montando gli albumi senza interruzioni per circa 5
minuti, in base alla misura delle uova, finché non risultano montati a neve.
2. Quantità max.: 12 uova.
3. Per la panna montata, montare 250ml di panna fresca alla velocità 4-6 per circa 5 minuti.
4. Quando si versano latte fresco, panna o altri ingredienti liquidi nella ciotola, accertarsi di non
superare la quantità massima.
5. Usare lo sbattitore.
Preparazione di milk-shake, cocktail o altre bevande liquide:
1. Miscelare gli ingredienti seguendo la ricetta, adoperando l'apparecchio alle velocità 1-6 per circa
5 minuti.
2. Non superare la quantità massima indicata per la ciotola.
3. Usare lo sbattitore.

13
GARANZIA
SMALTIMENTO
L’apparecchio è garantito per un periodo di tre anni dalla data di acquisto.
Fa fede la data riportata sullo scontrino / fattura. In caso di difetto preesistente all’acquisto, viene
garantita la sostituzione. Non sono coperte da garanzie tutte le parti che dovessero risultare difettose
a causa della negligenza o della trascuratezza nell’uso.
La garanzia è inoltre esclusa in tutti i casi di uso improprio dell’apparecchio ed in caso di un utilizzo
di tipo professionale. Il venditore declina ogni responsabilità per eventuali danni che possano
direttamente o indirettamente derivare a persone, cose e animali domestici da conseguenza della
mancata osservazione di tutte le prescrizioni indicate nel manuale di istruzioni.
Il simbolo del cestino barrato riportato sull’apparecchio indica che il prodotto, alla fine della propria
vita utile, dovendo essere trattato separatamente dai rifiuti domestici, deve essere conferito in un
centro di raccolta differenziata per apparecchiature elettriche ed elettroniche oppure riconsegnato
al rivenditore al momento dell’acquisto di una nuova apparecchiatura equivalente. L’adeguata
raccolta differenziata per l’avvio successivo dell’apparecchio al riciclaggio, al trattamento e allo
smaltimento ambientale compatibile contribuisce ad evitare possibili effetti negativi sull’ambiente e
sulla salute e favorisce il recupero dei materiali di cui è composto. L’utente è responsabile del
conferimento dell’apparecchio a fine vita alle appropriate strutture di raccolta. Per informazioni più
dettagliate inerenti i sistemi di raccolta disponibili, rivolgersi al servizio locale di smaltimento rifiuti,
o al negozio dove è stato effettuato l’acquisto. Chiunque abbandona o cestina questo apparecchio e
non lo riporta in un centro di raccolta differenziata per rifiuti elettrici-elettronici è punito con la
sanzione amministrativa pecuniaria prevista dalla normativa vigente in materia di smaltimento
abusivo di rifiuti.

SAFETY INFORMATION
INTRODUCTION
INTENDED USE
PACKAGE CONTENTS
APPLIANCE DESCRIPTION
SET-UP
SELECTABLE SPEEDS
USING THE KNEADING HOOK
WHISK AND FLAT BEATER
STEPS FOLLOWING THE USE OF
THE APPLIANCE
CLEANING AND CARE
CLEANING THE OUTER BODY
CLEANING THE ACCESSORIES
STORAGE
TROUBLESHOOTING
TECHNICAL DATA
RECIPES
WARRANTY
DISPOSAL
1-4
4-5
5
6
7
8
8
8-9
9-10
10
10
10
10
10
11
11-12
12
12
CONTENTS
The safety of products
tested and certified
for you.
planetary mixer
1000W

SAFETY INFORMATION
Read all safety warnings, instructions, specifi-
cations in this user manual. Failure to follow
these instructions could result in electric shock,
fire and/ or serious injury.
DANGER! RISK OF ELECTRIC SHOCK!
●Risk of injury: do not use the product for
anything other than its intended purpose. Do
not use the appliance incorrectly.
●Using the appliance for anything other than
its intended purpose is to be considered incor-
rect and therefore dangerous.
●Always disconnect the appliance from the
powersupply when leaving it unattended and
before assembly, disassembly or cleaning.
●Do not exceed the running times indicated
in the RECIPES section.
●The appliance may be plugged into the
electrical mains only if the system is correctly
installed and features a grounded socket.
Make sure that the type of current provided by
the network matches that indicated on the
appliance’s nominal data plate.
●Make sure that the power cord does not
come into contact with water or moisture
during use. Position the cord in such a way
that it cannot be crushed or damaged.
●Keep the power cord far from hot surfaces.
●Do not repair the appliance by yourself. All
repairs must be carried out by our Customer
Assistance Centre, or by a qualified technician.
●In the event of malfunctions or when you
wish to clean
the appliance, remove the plug from the elec-
trical socket. Turning the appliance off with
the switch is not sufficient, as the appliance
continues to receive mains voltage for as long
as it is plugged in.
●Always remove the plug from the electrical
socket while the appliance is not in use.
●To avoid risks, any defects in plugs and/or
cords must be repaired as soon as possible by a
qualified technician or by our Customer Assis-
tance Service.
●The appliance and its power cord must be
kept out of the reach of children.
Do not immerse the appliance in water or
other liquids.
●If the power cord is damaged, it must be
replaced by the manufacturer, the manufac-
turer's service centre, or by a similarly qualified
person in order to avoid any risk.
1 2

3 4
INTRODUCTION
Congratulations on the purchase of your new
appliance.
You have chosen a top-quality product. The
instructions for assembly and use are an inte-
gral part of the product. They contain import-
WARNING! RISK OF INJURY!
●Always plug the appliance out of the
electrical socket when attaching or detaching
accessories. This is in order to prevent the ap-
pliance from being switched on accidentally.
The appliance restarts automatically when the
electricity returns after a power-out!
●When the appliance is left unsupervised or
during assembly, disassembly or cleaning,
always plug it out of the socket.
●This appliance must not be used by children.
Keep the appliance and its power cable out of
the reach of children.
●Use only original accessories for the appli-
ance. Accessories from other manufacturers
may not be suitable, leading to risks for the
user!
●This appliance may be used by people with
reduced physical, sensory or mental abilities or
with lack of experience and knowledge if they
are supervised or if they have been instructed
in the safe use of the appliance and have un-
derstood the dangers involved.
●Children must not play with the appliance.
●Do not use the appliance for purposes other
than those indicated in these instructions. Oth-
erwise, there is a risk of kickback.
●Do not swap accessories until the operating
unit has stopped completely, and the plug has
been removed from the electrical socket! The
appliance continues to operate for a few sec-
onds even after being switched off!
●Never leave the appliance unsupervised!
●Switch off the appliance and disconnect it
from the power source before changing acces-
sories or before approaching parts that move
while they are in use.
●While the appliance is operating, only place
the ingredients to be processed into the bowl.
●To avoid injuries or damage to the appli-
ance, keep hands and foreign bodies away
from the filling tool .
ATTENTION! RISK OF DAMAGE TO PROPERTY!
●Do not operate the appliance with no ingre-
dients inside. Risk of overheating!
● Do not fill the appliance with hot ingredi-
ents!
ant information on safety, use, and disposing
of the product. Before using the product, fa-
miliarise yourself with the instructions for use
and safety. Use the product only as described,
and for the applications it is intended for.
Misuse of product could result in electric
shock, fire and/ or serious injury.
Pass these instructions on to any future owners
of the appliance.

6
5
INTENDED USE
The appliance is intended exclusively for pro-
cessing food in quantities suitable for domestic
use.
Its use is only permitted for private purposes.
This appliance is not intended for commercial
use.
The planetary mixer is intended exclusively for
private use in dry environments. It cannot be
used outdoors.
Use the appliance only with original accesso-
ries.
Any other usage of or modification to the
product will lead to a significant risk of acci-
dents.
PACKAGE CONTENTS
Food processor
Bowl with lid and filling tool
Kneading hook Whisk Flat beater
Instructions for use
NOTE
Check that the package includes all its compo-
nents and that there are not damaged. Con-
tact Customer Service if necessary.
ant information on safety, use, and disposing
of the product. Before using the product, fa-
miliarise yourself with the instructions for use
and safety. Use the product only as described,
and for the applications it is intended for.
Misuse of product could result in electric
shock, fire and/ or serious injury.
Pass these instructions on to any future owners
of the appliance.

APPLIANCE DESCRIPTION
1 Top cover
2 Upper body of the appliance
3 Securing mechanism
4 Adjustment dial
5 Power cord
6 Base
7 Bowl
8 Transmission shaft
9 Bowl lid
10 Kneading hook
11 Whisk
12 Flat beater
1. Take all components out of the package and remove the packaging material and any protective
films/stickers.
2. Clean all parts as described in the "Cleaning and Maintenance" section. Make sure that the
components are completely dry.
3. Position the appliance on a clean, flat surface and make sure that it is held firmly in place by
the suction cups.
4. Plug the appliance into the electrical socket.
WARNING! RISK OF INJURY!
●Never insert hands or fingers in the bowl 7while the appliance is operating!
There is a risk of physical injury due to the moving parts!
●Do not swap accessories until the transmission shaft has fully stopped! Once the appliance has
been switched off, the transmission remains active for a few seconds.
●In the event of a malfunction, switch the appliance off and plug it out of the electric socket to
prevent it from switching on accidentally.
ATTENTION! RISK OF DAMAGE TO PROPERTY!
●When using the kneading hook 10, whisk 11 or flat beater 12, we recommend allowing the
appliance to cool down after 10 minutes of operation.
●Proceed with the preliminary operations indicated below to use the kneading hook 10, whisk 11
or flat beater 12:
SET-UP
SELECTABLE SPEEDS
Speed Suitable for…
Use
1 – 2
- kneading and mixing fairly
dense mixtures or ingredients
with a thick consistency
Kneading
hook 10 Flat
beater 12
3 – 5
- mixing thick cake mixtures
- mixing butter and flour
- mixing leavened dough
- mixing short pastry
Flat beater 12
1 – 3 - kneading leavened dough
- mixing cake mixtures
Kneading
hook 10
- mixing cake mixtures
- beating butter and sugar
- kneading dough for biscuits
Flat beater 12
1 – 4
- whipped cream
- egg whites
- mayonnaise
- butter-based emulsions
Whisk 11
5 – 6
USING THE KNEADING HOOK WHISK AND
FLAT BEATER
8
7

10
1. Release the securing mechanism 3. The top cover 1lifts upwards.
2. Insert the bowl 7so that the tabs on the bowl lock into the openings on the base 6. Turn the
bowl 6 anti-clockwise (see the symbol on the base, 6) in order to lock it firmly in position.
3. Select the appropriate accessory 10/11/12, see figure B:
– whisk 11 for whipped cream;
– flat beater 12 to work cake mixtures;
– kneading hook 10 to work dense mixtures, such as leavened dough.
4. Depending on the processing needed, choose the kneading hook 10, whisk 11 or flat beater 12
and attach it to the transmission shaft 8:
- Insert the accessory 10/11/12 onto the transmission shaft 8 and push it as far upwards as possible.
- Turn the accessory 10/11/12 to the right, attaching it to the pin of the transmission shaft 8.
5. Add the ingredients to the bowl 7, following the directions given in the table on the
recommended quantities:
Quantities for ... Min Max
Leavened dough N/A 500 g flour
Cake mixture N/A 400 g flour
Cream 200 ml 1000 ml
Dense mixtures
(e.g. short pastry) N/A 400 g flour
Egg whites
(weight class M)
Add the other recipe ingredients in proportion,
without exceeding the respective maximum quantities.
2 12
BE CAREFUL! RISK OF DAMAGE TO PROPERTY!
● Do not exceed the maximum quantities indicated! If you do, the appliance will be overloaded.
● If the appliance is struggling, switch it off, remove half of the mixture, and process the two halves
one at a time.
NOTE:
● Bear in mind that during the kneading or mixing process, the ingredients processed in the bowl 7
will increase in volume, or will reach a higher level as they move around during processing.
Therefore, do not fill the bowl 7to its maximum level!
6. Using the securing mechanism , lower the top cover 1with the accessory 10/11/12 which has been
attached, bringing it into the working position.
At this point, it is also possible to add ingredients during processing.
7. Press the bowl lid 9onto the bowl 7.
8. Turn the dial 4to the desired speed (see the section on "Selectable speeds").
9. If the ingredients get into the space between the filter/blade and the food-pusher, turn the dial
to the "P” position, then restart the appliance, repeating the processing if necessary.
STEPS FOLLOWING THE USE OF
THE APPLIANCE
1. Switch the appliance off by turning the dial 4to the “OFF” position.
2. Remove the lid 1from the bowl 7.
3. Using the securing mechanism 3 , lift the upper body of the appliance 2up as far as possible.
4. Push the accessory 10/11/12 as far upwards as possible and turn it to the left. Remove the
accessory 10/11/12 from the transmission shaft 8.
9
5. Remove the bowl 7by turning it clockwise and lifting it upwards.
6. Clean the appliance (see the "Cleaning and Maintenance" section).
DANGER! RISK OF ELECTIC SHOCK!
CLEANING AND CARE
● Wipe the appliance body with a damp cloth. For stubborn dirt, use a neutral cleaning agent on
the cloth. Remove any residues of the cleaning agent by wiping with a cloth dipped in water. Then,
dry the appliance thoroughly.
● Clean the bowl 7, its lid 9, the kneading hook 10, the whisk 11 and the flat beater 12 in hot water
with a little washing-up liquid. Any residues can be removed with a scrubbing brush. Rinse all
components in hot water and make sure that they are completely dry before using them again.
NOTE
The bowl 7, its lid 9, the kneading hook 10, the whisk 11 and the flat beater 12 can also go
in the dishwasher. If possible, put all the components which are completely (or partially) made of
plastic in the upper rack of the dishwasher, without forcing them to fit. Otherwise, they might
become misshapen or cracked due to the movement they experience.
● Before cleaning the appliance, disconnect the plug from the electrical socket.
Risk of electric shock! Do not immerse the appliance in water or other liquids.
ATTENTION! RISK OF DAMAGE TO PROPERTY!
● Do not use abrasive sponges or aggressive detergents. These may damage the surfaces.
NOTE
● We recommend cleaning the appliance immediately after use. This makes it easier to remove food
residues.
Failure to follow these instructions can result in electric shock, fire and/or serious injury.
CLEANING THE OUTER BODY
CLEANING THE ACCESSORIES
STORAGE
●Store the clean appliance in a clean and dry place, free from dust.
If the appliance suddenly stops working:
●it may have overheated, triggering the automatic protection.
– Turn the dial 4 to the "OFF” position.
– Remove the plug from the electric socket.
– Allow the appliance to cool down for 15 minutes.
– If the appliance has not completely cooled down after 15 minutes, it will not restart.
– Wait another 15 minutes and try to switch it back on. If the appliance does not switch on:
TROUBLESHOOTING
– Check that the plug is properly inserted into the electrical socket.
– Check that the top cover 1 is positioned correctly.
11
Input voltage:
Absorption:
Protection class:
Max. capacity of the bowl 7
RECIPES
Basic recipe for leavened dough
Ingredients
500g plain flour (type “00”) 1 small cube of yeast 60g butter
1 pinch of salt 200–250ml milk at room temperature 2 eggs
Preparation
● Place all the ingredients in the bowl 7. Knead for 1 minute at speed level 1 using the kneading
hook 10, then for another 5 minutes at speed level 4.
Leave it to rise in the bowl 7 for 40 minutes. Form the dough into a ball.
● Roll the dough out onto a tray and add the desired topping.
● Bake at 200°C (on the middle shelf of the oven) for 25-30 minutes.
Basic recipe for margherita cake
Ingredients 250g butter
250g sugar
1 sachet of vanilla sugar
250g normal flour 4 eggs
½ sachet baking powder
Preparation
● Place the butter, sugar and vanilla sugar in the bowl 7 and mix with the flat beater 12 at speed
level 3–5 until the mixture achieves the right consistency.
● Add the eggs one at a time and continue mixing until the correct consistency is achieved.
● Add the flour and baking powder and mix until you have an even batter.
● Grease a rectangular cake tin (approx. 30cm) and pour the batter in.
● Bake at 180°C (on the middle shelf of the oven) for around 50-60 min.
Kneading dough for bread/pizza:
1. We recommend using flour and water in a ratio of 5: 3.
2. Begin kneading at speed level 1 for 10 seconds, then move up to level 2 for another 10 seconds,
and finally level 3 for approx. 3 minutes.
All the appliance components which come into contact with foodstuffs are safe and approved
for food contact.
The appliance should be used in accordance with the following cycles: When using the
kneading hook 10, whisk 11 or flat beater 12, we recommend allowing the appliance to cool
down after 10 minutes of operation.
If this usage time is exceeded, the appliance may overheat and become damaged!
TECHNICAL DATA
220 – 240V~ (alternating current),
50 / 60 Hz
1000 W
II / (double insulation)
approx. 5 l
3. When pouring the ingredients into the bowl, take care not to exceed the maximum quantities.
4. The maximum quantity for flour is 1500g.
5. Use the kneading hook or flat beater.
To beat egg whites and cream:
1. Begin at speed level 4 before going up to 6, beating the egg whites constantly for around 5
minutes, depending on the size of the eggs, until beaten to stiff peaks.
2. Max. quantity: 12 eggs.
3. For whipped cream, beat 250ml fresh cream at speed setting 4-6 for approx. 5 minutes.
4. When pouring fresh milk, cream or other liquid ingredients into the bowl, take care not to
exceed the maximum quantities.
5. Use the flat beater.
Making milkshakes, cocktails or other liquid recipes:
1. Mix the ingredients in accordance with the recipe, using the appliance at speed level 1-6 for
approx. 5 minutes.
2. Do not exceed the maximum quantity indicated for the bowl.
3. Use the flat beater.
WARRANTY
DISPOSAL
The appliance is guaranteed for a period of three years from the date of purchase.
The date on the receipt / invoice is the warranty start date. In cases of pre-existing defects, the
appliance will be replaced. The warranty does not cover parts rendered defective by negligence or
carelessness.
Moreover, the warranty does not cover improper or professional use of the appliance. The seller shall
not be liable for any damage that may result directly or indirectly to persons, property and pets as a
result of non-compliance with any of the indications given in the owner’s manual.
The crossed-out dustbin symbol appearing on the appliance indicates that, at the end of its life, the
product must be treated separately from household waste, and delivered to a separate waste
collection facility for electric and electronic equipment or returned to the retailer when purchasing a
new, equivalent appliance. The correct separation of waste and the subsequent delivery of the
appliance for recycling, treatment and environmentally compatible disposal help to safeguard health
and the environment; and promote the reuse and/or recycling of materials contained in the
appliance. The user is responsible for delivering the appliance to the appropriate collection facilities
at the end of its life. For more detailed information on available collection systems, contact your local
waste disposal service or the shop where you purchased the product. Dumping or inadequately
disposing of this appliance, or failure to return it to a separate collection centre for electrical and
electronic waste, is punishable with the administrative sanctions and fines imposed by current law
regarding waste disposal.
– Check that the plug is properly inserted into the electrical socket.
– Check that the top cover 1 is positioned correctly.
12

INFORMACIJE O VARNOSTI
UVOD
PREDVIDENA UPORABA
VSEBINA EMBALAŽE
OPIS NAPRAVE
PRIPRAVA
NASTAVLJIVA HITROST
UPORABA KAVLJA ZA GNETENJE
STEPALA IN NASTAVKA ZA MEŠANJE
POSEGI PO UPORABI NAPRAVE
ČIŠČENJE IN VZDRŽEVANJE
ČIŠČENJE OHIŠJA
ČIŠČENJE NASTAVKOV
SHRANJEVANJE
ODKRIVANJE IN REŠEVANJE TEŽAV
TEHNIČNI PODATKI
RECEPTI
GARANCIJA
ODLAGANJE
1-4
4
5
5
6
7
7
7-8
8
9
9
9
9
9
10
10-11
11
11
VSEBINA
Varnost izdelkov je bila
preizkušena in potrjena
za vas.
na www.eurospin.si je
na voljo digitalna različica uporabniškega
priročnika
Na voljo smo vam: PONEDELJEK - PETEK: 7.00 - 20.00
(klici so možni samo znotraj Slovenije)
Brezplačna modra številka!
planetarni mešalnik
1000W

INFORMACIJE O VARNOSTI
Preberite vsa opozorila, navodila in specifikaci-
je v pričujočem priročniku. Neupoštevanje
navodil lahko privede do električnega udara,
požara in/ali resnih poškodb.
NEVARNOST! TVEGANJE ELEKTRIČNEGA
UDARA!
●Nevarnost osebnih poškodb: izdelka ne upo-
rabljajte za namene, za katere ni predviden.
Naprave ne uporabljajte nepravilno.
● Vsakršna uporaba, ki je drugačna od upora-
be, kateri je naprava namenjena, se smatra za
neustrezno in je zato nevarna.
● Napravo vedno izključite iz omrežja, preden
jo pustite brez nadzora ter pred sestavo, razs-
tavo in čiščenjem.
● Ne presezite delovnega časa, ki je naveden v
razdelku RECEPTI.
● Napravo lahko priključite v električno om-
režje samo, če je napeljava pravilno nameščena
in vključuje ozemljitev. Preverite, da nape-
tostne značilnosti električnega omrežja us-
trezajo podatkom na tehnični tablici naprave.
● Poskrbite, da med uporabo električni kabel
ne pride v stik z vodo ali vlago. Kabel speljite
tako, da ga ni mogoče tlačiti ali poškodovati.
● Električni kabel hranite daleč od vročih
površin.
●Naprave ne poskušajte sami popravljati. Vsa
popravila mora izvesti naša služba za stike s
strankami ali ustrezno usposobljen tehnik.
● V primeru okvar ali če želite napravo očisti-
ti, izključite vtič iz električne vtičnice. Izklop
naprave preko vklopnega stikala ni dovolj, saj
naprava, ki je priključena v vtičnico, še naprej
prejema omrežno napetost.
● Ko naprave ne uporabljate, vedno izključite
vtič iz električne vtičnice.
●Da bi se izognili tveganju, je potrebno
poškodovane vtiče in/ali kable čim prej odnesti
v popravilo strokovnemu tehniku ali naši službi
za stike s strankami.
● Napravo in njen električni kabel
je potrebno hraniti izven dosega otrok.
Naprave ne vstavljajte v vodo ali druge te-
kočine.
● Če je napajalni kabel poškodovan, ga mora
zamenjati proizvajalec, pooblaščena servisna
služba ali podobno strokovno usposobljena
oseba, da bi se izognili tveganju.
OPOZORILO! TVEGANJE OSEBNIH POŠKODB!
● Vedno izključite napravo iz električne
vtičnice pred nameščanjem ali odstranjevanjem
1 2

UVOD
3
Čestitamo ob nakupu novega izdelka.
Izbrali ste visokokakovostni izdelek. Navodila
za sestavo in uporabo so sestavni del izdelka.
Vsebujejo pomembne informacije o varnosti,
uporabi in odlaganju izdelka. Pred uporabo
izdelka se seznanite z navodili za uporabo in
varnost. Izdelek uporabljajte izključno, kot je
opisano in za opravila, katerim je namenjen.
Zloraba izdelka lahko privede do električnega
udara, požara in/ali resnih poškodb.
Navodila predajte morebitnim prihodnjim last-
nikom izdelka.
nastavkov. Na ta način se izognete nenačrto-
vanemu vklopu naprave.
Naprava se samodejno vklopi, ko se po izpadu
električnega toka tok vrne.
●Ko napravo pustite brez nadzora in pred
sestavo, razstavo in čiščenjem vedno izključite
vtič iz električne vtičnice.
●Naprave ne smejo uporabljati otroci.
Napravo in kabel hranite izven dosega otrok.
● Z napravo uporabljajte izključno originalne
nastavke. Nastavki drugih proizvajalcev niso
primerni in so za uporabnika lahko nevarni!
●Napravo lahko uporabljajo osebe z omejen-
imi telesnimi, čutnimi ali umskimi sposobnost-
mi oziroma brez ustreznih izkušenj in znanja,
če so nadzorovane oziroma so prejele navodila
o varni uporabi naprave in razumejo tveganja,
vezana na uporabo.
●Otroci se z napravo ne smejo igrati.
●Naprave ne uporabljajte za namene, za
katere ni predvidena, obstaja tveganje povrat-
nega sunka.
●Nastavkov ne menjajte, dokler se delovna
enota popolnoma ne zaustavi in izključite vtič
iz električne vtičnice! Naprava nadaljuje z de-
lovanjem še nekaj sekund po izklopu!
●Naprave nikoli ne pustite brez nadzora!
● Napravo izklopite in izključite iz omrežja
pred zamenjavo nastavkov ali preden se prib-
ližate delom, ki se gibajo, ko je naprava vk-
lopljena.
●Med delovanjem naprave v skledo vnesite
samo živila, ki jih želite obdelati.
●Da bi se izognili osebnim poškodbam in ma-
terialni škodi na napravi, v skledo nikoli ne
vstavite rok ali tujkov.
POZOR! TVEGANJE MATERIALNE ŠKODE!
● Naprave ne vklopite, če v njej ni sestavin.
Tveganje pregretja!
● V napravo ne vnašajte vročih sestavin!
4
OPIS NAPRAVE
1 Vrhnji pokrov
2Zgornje ohišje naprave
3 Sprostitvena ročica
4Nastavitveno kolesce
5 Električni kabel
6Osnova
7 Skleda
8Transmisijska gred
9Pokrov sklede
10 Kavelj za gnetenje
11 Stepalo
12 Nastavek za mešanje
5
PREDVIDENA UPORABA
Naprava je namenjena izključno obdelavi živil
v količinah za zasebno rabo.
Naprava je namenjena izključno zasebni upo-
rabi. Naprava ni primerna za komercialno up-
orabo.
Planetarni mešalnik je namenjen izključno za-
sebni rabi v suhih okoljih. Ni ga dovoljeno up-
orabljati na odprtem.
Napravo uporabljajte samo z originalnimi nas-
tavki.
Vsakršna drugačna uporaba ali spreminjanje
izdelka predstavljata resno tveganje nesreč.
VSEBINA EMBALAŽE
Skleda s pokrovom in polnilnim nastavkom
Kavelj za gnetenje
Stepalo
Nastavek za mešanje
Navodila za uporabo
OPOMBA
Preverite, da embalaža vključuje vse kompo-
nente in da le-te niso poškodovane. Po potrebi
stopite v stik s službo za pomoč strankam.
6
Table of contents
Languages:
Other ENKHO Mixer manuals


