ENSONIQ DP/4+ User manual

p a r a l l e l e f f e c t s p r o c e s s o r DP/4+
R e f e r e n c e Ma n u a l
V e r s i o n 2. 0

Part # 9310 0177 01 - D Model # MM-86
D P / 4 + R e f e r e n c e M a n u a l :
Written, designed, and illustrated by: Tom Tracy, Bill Whipple, Jon Dattorro, John Senior
Copyright © 1995, 1996
ENSONIQ® Corp
155 Great Valley Parkway
Box 3035
Malvern, PA 19355-0735
USA
Printed in U.S.A.
All Rights Reserved
Please record the following information:
Your Authorized ENSONIQ Dealer:___________________________ Phone:_______________
Your Dealer Sales Representative:_________________________________________________
Serial Number of Unit:___________________________ Date of Purchase:_________________
Your Authorized ENSONIQ Dealer is your primary source for service and support. The above information will be helpful in
communicating with your Authorized ENSONIQ Dealer, and provide necessary information should you need to contact
ENSONIQ Customer Service. If you have any questions concerning the use of this unit, please contact your Authorized
ENSONIQ Dealer first. For additional technical support, or to find the name of the nearest Authorized ENSONIQ Repair
Station, call ENSONIQ Customer Service at (610) 647-3930 Monday through Friday 9:30 AM to 12:15 PM and 1:15 PM to
6:30 PM Eastern Time. Between 1:15 PM and 5:00 PM we experience our heaviest call load. During these times, there may be
delays in answering your call.
This manual is copyrighted and all rights are reserved by ENSONIQ Corp. This document may not, in whole or in part, be copied,
photocopied, reproduced, translated, or reduced to any electronic medium or machine readable form without prior written consent
from ENSONIQ Corp. The DP/4+ software/firmware is copyrighted and all rights are reserved by ENSONIQ Corp.
Although every effort has been made to ensure the accuracy of the text and illustrations in this manual, no guarantee is made or
implied in this regard.
IMPORTANT:
“This equipment generates and uses radio frequency energy and if not installed and used properly, that is, in strict accordance
with the manufacturer's instructions, may cause interference to radio and television reception. It has been designed to comply
with the limits for a Class B computing device in accordance with the specifications in Subpart J of Part 15 of FCC rules, which
are designed to provide reasonable protection against such interference in a residential installation. However, there is no
guarantee that interference will not occur in a particular installation. If this equipment does cause interference to radio or
television reception, which can be determined by turning the equipment off and on, the user is encouraged to try to correct the
interference by one or more of the following measures.”
* reorient the receiving antenna
* relocate the instrument with respect to the receiver
* move the instrument away from the receiver
* plug the instrument into a different outlet so that the instrument and receiver are on different branch circuits
“If necessary, the user should consult the dealer or an experienced radio/television technician for additional suggestions. The
user may find the following booklet prepared by the Federal Communications Commission helpful: 'How to Identify and
Resolve Radio-TV Interference Problems.' This booklet is available from the U.S. Government Printing Office, Washington,
D.C. 20402. Stock No. 004-000-00345-4.”
CAUTION! Danger of explosion if battery is incorrectly replaced. Replace only with the same or equivalent
type recommended by the manufacturer. Discard used batteries according to manufacturer's instructions.
In order to fulfill warranty requirements, the DP/4+ should be serviced only by an Authorized ENSONIQ Repair Station. The
ENSONIQ serial number label must appear on the outside of the unit, or the ENSONIQ warranty is void.
• ENSONIQ, DP/4+, TS-10, TS-12, and ASR-10 are trademarks of ENSONIQ Corp.

Table of Contents
ENSONIQ DP/4+ Reference Manual 1
Table of Contents
DP/4+ List of Tips
Preface
Welcome!.................................................................................................................i
The Effects..........................................................................................................i
Parallel Processing..............................................................................................i
Clean Up and Maintenance..................................................................................i
Power.......................................................................................................................ii
Polarization and Grounding.................................................................................ii
AC Line Conditioning................................................................................................iii
Guidelines for using the DP/4+..................................................................................iii
Temperature Guidelines......................................................................................iii
Rack Mounting Guidelines...................................................................................iii
Amplifying Your DP/4+ Through a Home Stereo System............................................iv
Powering Up Your DP/4+ In a MIDI Configuration......................................................iv
Reinitializing the DP/4+....................................................................................v
To reinitialize the DP/4+..............................................................................v
Battery Replacement Guidelines...............................................................................vi
Available Options for Your DP/4+.............................................................................vi
Need More Help?......................................................................................................vii
Section 1 — Controls & Basic Functions
Front Panel Controls..................................................................................................2
Rear Panel Connections..............................................................................................4
DP/4+ RULES...........................................................................................................5
Setting Levels.....................................................................................................5
Setting the Level Switch.....................................................................................5
To set the input level(s).......................................................................................5
To set the output level(s).....................................................................................5
Using Headphones with the DP/4+...........................................................................6
The Input 1 Jack — Front Panel vs. Back Panel............................................................7
A Note About the Input and Output Jacks...................................................................8
Ground Loops.............................................................................................................9
Using XLR Ins and Outs with the DP/4+...............................................................10
A Note about the Foot Switches.................................................................................11
About Mono Foot Switches...................................................................................11
Four-On-The-Floor....................................................................................................12
An Application For Using Two Stereo Foot Switches to Bypass Effects..................12
HOT MODS!.............................................................................................................13
Replace the Mono Foot Switch Plug with a Stereo Plug.........................................13
Build a Splitter Box to Merge Two Mono Foot Switches into One Stereo Jack..........14
DP/4+ Modes......................................................................................................15
Select Mode..................................................................................................15
Edit Mode.....................................................................................................15
System•MIDI Mode......................................................................................15
Button Names...........................................................................................................15
About Select Mode.........................................................................................16
About Edit Mode...........................................................................................17
Edit Buffer..........................................................................................................17
About System•MIDI Mode.............................................................................18
About Presets............................................................................................................19

Table of Contents
2 ENSONIQ DP/4+ Reference Manual
Input Configurations..................................................................................................19
One Source Input Configuration............................................................................19
Two Source Input Configuration............................................................................19
Three Source Input Configuration.........................................................................19
Four Source Input Configuration...........................................................................19
Selecting Config Presets.......................................................................................20
Selecting a Config preset will........................................................................20
To select a Config preset................................................................................20
How the Config Type Affects Selecting Presets.....................................................21
Replacing the Algorithm in a Single Unit............................................................22
Loading a 2 Unit Preset While in a 1 Source Config.....................................................22
About Signal Routing.................................................................................................23
Signal Routing Between Units..............................................................................23
Understanding Serial, Parallel and Feedback Signal Routing...............................24
Serial Routing...............................................................................................24
Parallel Routing...........................................................................................24
Feedback Routing..........................................................................................24
Bypassing Units........................................................................................................25
Quick Tips and Shortcuts.....................................................................................25
Section 2 — Algorithms
List of Algorithms.....................................................................................................28
Understanding DP/4+ Algorithms.............................................................................29
About the Algorithm Parameters...............................................................................29
To Display the Algorithm Parameters.................................................................29
Programming Algorithms..........................................................................................29
When are New Algorithms Loaded into the ESP Chips?............................................30
Algorithm Abbreviations..........................................................................................30
Algorithm Parameters..............................................................................................30
Editing Algorithm Parameters............................................................................31
To modify the parameters of the algorithm in a unit......................................31
Mix and Volume Parameters......................................................................................32
Algorithm Modulators..............................................................................................32
Modulating Effects Parameters with the CV Pedal....................................................33
Crossfading Effects....................................................................................................34
3.3 SEC DDL 2U..................................................................................................35
Using the Instant Replay Feature..................................................................36
8 VOICE CHORUS..............................................................................................37
DE-ESSER..........................................................................................................39
DIGITAL TUBE AMP..........................................................................................41
DUAL DELAY....................................................................................................43
DUCKER / GATE................................................................................................45
DYNAMIC TUBE AMP.......................................................................................47
EQ - CHORUS - DDL..........................................................................................49
EQ - COMPRESSOR............................................................................................51
EQ - DDL - WITH LFO........................................................................................53
EQ - FLANGER - DDL.........................................................................................55
EQ - PANNER - DDL..........................................................................................57
EQ-TREMOLO-DDL...........................................................................................59
EQ - VIBRATO - DDL.........................................................................................61
EXPANDER........................................................................................................63
FAST PITCH SHIFT............................................................................................65
FLANGER..........................................................................................................66
GATED REVERB.................................................................................................67

Table of Contents
ENSONIQ DP/4+ Reference Manual 3
GUITAR AMP 1, GUITAR AMP 2.........................................................................70
GUITAR AMP 3...................................................................................................72
GUITAR AMP 4...................................................................................................74
GUITAR TUNER 2U............................................................................................76
HALL REVERB...................................................................................................77
INVERSE EXPANDER........................................................................................80
KEYED EXPANDER...........................................................................................82
LARGE PLATE....................................................................................................84
LARGE ROOM REV............................................................................................86
MULTI TAP DELAY............................................................................................89
NO EFFECT (BYPASS EFFECT)..........................................................................90
NON LIN REVERB 1, 2, 3....................................................................................91
PARAMETRIC EQ...............................................................................................94
PHASER-DDL....................................................................................................95
PITCH SHIFT 2U................................................................................................97
PITCHSHIFT - DDL............................................................................................99
PITCH SHIFTER.................................................................................................101
REVERSE REVERB 1...........................................................................................103
REVERSE REVERB 2...........................................................................................105
ROTATING SPEAKER........................................................................................107
RUMBLE FILTER................................................................................................109
SINE/NOISE GEN..............................................................................................110
SMALL PLATE....................................................................................................111
SMALL ROOM REV............................................................................................113
SPEAKER CABINET...........................................................................................116
TEMPO DELAY...................................................................................................117
TUNABLE SPEAKER..........................................................................................118
TUNABLE SPEAKER 2.......................................................................................119
VAN DER POL FILTER.......................................................................................121
VCF - DISTORT 1................................................................................................122
VCF - DISTORT 2................................................................................................124
VOCAL REMOVER.............................................................................................126
How to use the Vocal Remover.......................................................................126
VOCODER.........................................................................................................128
How the Vocoder Works................................................................................128
Setting Up the Vocoder.................................................................................129
Making the Right Connections.................................................................129
Selecting the Vocoder Preset..........................................................................129
Using the Vocoder.........................................................................................129
Section 3 — Config Parameters
What is a Config?.....................................................................................................132
Config Presets...........................................................................................................132
About Signal Routing.................................................................................................132
Input Configurations..................................................................................................133
One Source Input Configuration............................................................................133
Two Source Input Configuration............................................................................133
Three Source Input Configuration.........................................................................133
Four Source Input Configuration...........................................................................133
Selecting a Config Preset...........................................................................................134
To select a Config preset......................................................................................134
Editing a Config Preset..............................................................................................134
To edit a Config Preset.........................................................................................134
1 Source Config..........................................................................................................135

Table of Contents
4 ENSONIQ DP/4+ Reference Manual
Available ABCD Routings..................................................................................137
2 Source Config..........................................................................................................140
3 Source Config..........................................................................................................142
4 Source Config..........................................................................................................144
Section 4 — System•MIDI
About System•MIDI..................................................................................................146
To set the System parameters..............................................................................146
Shortcuts for Selecting System•MIDI Parameters.................................................147
Unit Specific Parameters...........................................................................................148
How the DP/4+ Uses MIDI Channels...................................................................149
If it does not seem to be working.................................................................................150
Program Change-to-Preset Map Editor.................................................................151
List of MIDI Controller Names..................................................................................153
System Global Parameters.........................................................................................154
Source List....................................................................................................155
Song Editor.........................................................................................................156
Using the Song Editor Feature........................................................................157
Using a Foot Switch to Alternate Between Two Presets...................................158
System Exclusive Dump.............................................................................................165
System Utility Functions...........................................................................................166
Soft Reset...........................................................................................................166
Initializing the RAM Presets...............................................................................166
To initialize the RAM presets.......................................................................166
Reinitializing the DP/4+....................................................................................167
To reinitialize the DP/4+..............................................................................167
System Diagnostic Parameters...................................................................................167
Section 5 — Storage
Internal Storage........................................................................................................170
The Preset Memory Protect Switch.......................................................................170
Saving Presets...........................................................................................................171
To Name and Save a Preset..................................................................................171
List of Alpha-Numeric Characters......................................................................172
Bailing Out.........................................................................................................172
Advanced Features....................................................................................................173
Switching Preset Types when Saving...................................................................173
Saving a 2 Unit Preset While in a 1 Source Config.................................................173
Swapping 1 Unit Presets......................................................................................173
Copying a 1 Unit Preset to Another Unit...............................................................174
Loading a 2 Unit Preset While in a 1 Source Config...............................................174
Copying Presets...................................................................................................175
To Copy a Preset............................................................................................175
MIDI System Exclusive Storage.................................................................................176
Sending MIDI Sys-Ex Messages to another DP/4+ or to a Storage Device...............176
To Send DP/4+ Data Out via MIDI System Exclusive Dump..................................176
Receiving MIDI System Exclusive Dumps with the DP/4+....................................178
Problems?.....................................................................................................178
Using the Preset Parameter Worksheet......................................................................179

Table of Contents
ENSONIQ DP/4+ Reference Manual 5
Section 6 — Presets
Quick Steps to Hear Presets.......................................................................................183
To Select 1 Unit Presets........................................................................................183
To Select 2 Unit Presets........................................................................................183
To Select 4 Unit Presets........................................................................................183
To Select Config Presets.......................................................................................183
1-Unit RAM Presets...................................................................................................184
1-Unit ROM Presets...................................................................................................186
2-Unit RAM Presets...................................................................................................188
2-Unit ROM Presets...................................................................................................190
4-Unit RAM Presets...................................................................................................192
4-Unit ROM Presets...................................................................................................194
Config RAM Presets...................................................................................................196
Config ROM Presets...................................................................................................198
Appendix
DP/4+ MIDI Implementation.....................................................................................I
Glossary...................................................................................................................III
DP/4+ Algorithm Parameters....................................................................................XI
Specs........................................................................................................................XXIII
Physical.............................................................................................................XXIII
Dimensions.........................................................................................................XXIII
Index
Charts
Song Step Worksheet
MIDI Program Change Map Worksheet
DP/4+ Preset Parameter Worksheet

List of Tips
6 ENSONIQ DP/4+ Reference Manual
DP/4+ List of Tips
Using Four Mono Foot Switches with the DP/4+.........................................................14
Shortcuts for locating System•MIDI parameters........................................................18
To Get to the First Parameter.....................................................................................25
To Advance by Screens...............................................................................................25
To Quickly Advance Through the Parameters............................................................25
To Undo Your Last Parameter Edit.............................................................................25
To Restore Parameter Settings...................................................................................25
To Quickly Center a Signed Parameter.......................................................................25
A Quick Way to Edit the Program Change Map..........................................................151
Changing Modulation Sources Quickly.......................................................................155
Using Different Combinations of Bypassed/Un-bypassed in a Song.............................156
A Quick Way to get to the Preset Memory Protect display..........................................170
Using the Unit buttons to Select the Alphanumeric Characters for Naming Presets......172
Setting the Preset Memory Protect Switch to Prevent Accidently Erasing Presets.........172

Preface
ENSONIQ DP/4+ Reference Manual i
Welcome!
Congratulations, and thank you for purchasing the ENSONIQ DP/4+ Parallel Effects Processor.
The DP/4+ creates 24-bit digital effects using four independent processors, and features four
independent inputs and outputs with full internal mixing capabilities. The DP/4+ is equally at
home in a professional recording studio, home studio, guitar rig, MIDI setup, or PA system.
The Effects
The ENSONIQ DP/4+ Parallel Effects Processor has over 50 high fidelity fully programmable
digital effect algorithms. Reverb, chorusing, flanging, delay, distortion, pitch shifting and an
assortment of other programs are provided with dynamic control over most of the settings.
There are 400 effect presets; 200 ROM (Read Only Memory) and 200 additional RAM (Random
Access Memory) presets for you to edit or store your own creations.
Parallel Processing
While other multi-effects processors only allow one input signal to be “effected,” the DP/4+’s
four-in, four-out design permits stereo processing of four parallel channels (multi-processing).
There is only one user interface, but up to four different input signals can each go to a separate
internal signal processor. Multiple inputs and outputs also allow for special types of effects, like
vocoding and ducking.
The DP/4+ can be used as one huge effects box, two stereo-in effects boxes, three effects boxes, or
four separate effects boxes. The routing between the four processing units is completely
programmable, allowing for any combination of serial and parallel effects. The DP/4+ also offers
paths to feedback the signal, and side-chain capability. The variable architecture and rich
assortment of algorithms provide for unusual effect structures not found in fixed routing
systems. The unique output mixing capability can also save you mixer effect return channels by
mixing the stereo outputs of the four effects units down to a single stereo pair (outputs 1 and 2).
The DP/4+ is equipped with an advanced digital signal processing system based on the
ENSONIQ Signal Processor (ESP) chip. The ESP chip is designed specifically for digital audio
signal processing, and in the DP/4+, four ESP chips work in conjunction with 16-bit analog-to-
digital and digital-to-analog converters to provide a studio-quality output signal.
The digital effects processing capability has been designed to complement any input source
(balanced/unbalanced; +4dBu to-10dBV), and all of the algorithms (except the Guitar Tuner) can
have specific parameters modulated by various MIDI and non-MIDI controllers such as a
keyboard’s pitch wheel, a CV Pedal, etc.
Clean Up and Maintenance
Clean the exterior of your DP/4+ with a soft, lint-free, dry (or slightly damp) cloth. You can use
a slightly dampened cloth (with a mild neutral detergent) to remove stubborn dirt, but make sure
that the DP/4+ is thoroughly dry before turning on the power. Never use alcohol, benzene,
volatile cleaners, solvents, abrasives, polish or rubbing compounds.
Thank you again for choosing ENSONIQ. Enjoy the music!

Preface
ii ENSONIQ DP/4+ Reference Manual
Power
Insert the line cord into the line
receptacle on the rear panel of the
DP/4+. Plug the other end of the
cable into a grounded AC outlet
(the proper voltage for your DP/4+
is listed on the Serial Number label
on the rear panel). Turn the DP/4+
power on and make sure the
display lights up. If not, check your
connections and power source.
When you turn the power on, the
display will show “ENSONIQ *
DP/4+,” and then go to Select mode
(Select LED on). If you travel,
remember the DP/4+ will only operate on the listed voltage.
Polarization and Grounding
Like many modern electrical devices, your ENSONIQ product has a three-prong power cord with
earth ground to ensure safe operation. Some products have power cords with only two prongs
and no earth ground. To ensure safe operation, modern products with two-prong power cords
have polarized plugs which can only be inserted into an outlet the proper way.
PolarizedNon-polarized Three-prong
with earth ground
Some products, such as older guitar amplifiers, do not have polarized plugs and can be
connected to an outlet incorrectly. This may result in dangerous high voltages on the audio
connections, which could cause you physical harm or damage any properly grounded
equipment to which they are connected, such as your ENSONIQ product.
To avoid shock hazards or equipment damage, we recommend the following precautions:
• If you own equipment with two-pronged power cords, check to see if they are polarized or
non-polarized. You might consider having an authorized repair station change any non-
polarized plugs on your equipment to polarized plugs to avoid future problems.
• Exercise caution when using extension cords or plug adapters. Proper polarization should
always be maintained from the outlet to the plug. The use of polarized extension cords and
adapters is the easiest way to maintain proper polarity.
• Whenever possible, connect all products with grounded power cords to the same outlet
ground. This will ensure a common ground level to prevent equipment damage and
minimize hum in the audio output.
AC outlet testers are available from many electronic supply and hardware stores. These can be
used to check for proper polarity of outlets and cords.
Line
Thru
WARNING!
To reduce the risk of fire or
electric shock do not expose
this product to rain or moisture.

Preface
ENSONIQ DP/4+ Reference Manual iii
AC Line Conditioning
As with any computer device, the DP/4+ is sensitive to sharp peaks and drops in the AC line
voltage. Lightning strikes, power drops, or sudden and erratic surges in the AC line voltage can
scramble the internal memory, and in some cases, damage the unit’s hardware. Here are a few
suggestions to help guard against such occurrences:
• A Surge/Spike Suppressor. The cheaper of the options, a surge/spike suppressor absorbs
surges and protects your gear from all but the most severe over-voltage conditions. You can
get multi-outlet power strips with built-in surge/spike suppressors for little more than the
cost of unprotected power strips, so using one is a good investment for all your electronic
equipment.
• A Line Conditioner. This is the best, but by far the more expensive way to protect your gear.
In addition to protecting against surges and spikes, a line conditioner guards the equipment
against excessively high or low line voltages. If you use the DP/4+ in lots of different
locations with varying or unknown AC line conditions, you might consider investing in a line
conditioner.
Guidelines for using the DP/4+
Temperature Guidelines
The DP/4+ contains a substantial amount of computerized and electronic circuitry that can be
susceptible to damage when exposed to extreme temperature changes. When the DP/4+ is
brought inside after sitting in a cold climate (i.e. the back seat of your car), condensation builds
up on the internal circuitry in much the same way a pair of glasses fogs up when you come inside
on a cold day. If the unit is powered up as this condensation occurs, components can short out or
be damaged. Excessively high temperatures also pose a threat to the unit, stressing both the
internal circuits as well as the case. With this in mind, it is highly advisable to follow these
precautions when storing, mounting and setting up your DP/4+:
• Avoid leaving the DP/4+ in temperatures of less than 50 degrees Fahrenheit or more than 100
degrees Fahrenheit.
• When bringing the DP/4+ indoors after travel, allow the unit at least 20 minutes to reach room
temperature before powering up. In the case of excessive outdoor temperatures (below 50
degrees Fahrenheit or above 100 degrees Fahrenheit), allow an hour or more before power up.
• Avoid leaving the DP/4+ inside a vehicle exposed to direct sunlight.
Rack Mounting Guidelines
Because the DP/4+ operates with an internal transformer, there is a certain amount of heat
generated by this unit. For better reliability, we recommend that you do not install this unit
beneath devices that are sensitive to heat, or above power amps, tube equipment, or other rack-
mount units that emit a lot of heat. We recommend leaving a space above the DP/4+, as well.

Preface
iv ENSONIQ DP/4+ Reference Manual
Amplifying Your DP/4+ Through a Home Stereo System
If you are thinking about amplifying your DP/4+ through your home stereo, please be careful. A
home stereo is great for playing CDs, albums or tapes — the dynamic range of these media is
limited, and your speakers aren’t usually subjected to extreme volume changes and frequency
transients. While the dynamic range of CDs is significantly greater than LPs or tapes, the output
of a CD player is still conservative compared to output of a pro-level effects processor. Running
your DP/4+ (or any pro-level product) through a home stereo at high volume levels can damage
your stereo system and/or speakers. If your only means of amplification is your home stereo, set
the Level (dBu) switch to the -10 dBV position, set the Output Knobs to around the 12 o’clock
position, and try to keep your levels on the conservative side.
Powering Up Your DP/4+ In a MIDI Configuration
Just as you would power up the individual components before turning on the amplifier in your
home stereo system, you should first turn on the MIDI data transmitting source (processors,
keyboards, modules, etc.) before you power up the receiving MIDI source. For instance, if you’re
using the DP/4+ to receive MIDI information from a keyboard/sequencer, you would turn the
keyboard on before the DP/4+. This will prevent any unwanted MIDI information from being
“spit” out of the transmitting source (keyboard/sequencer) during power up, which could
confuse the MIDI receivers, thereby disabling them. If this should occur, turn off the receiving
module, and then turn it back on.

Preface
ENSONIQ DP/4+ Reference Manual v
Reinitializing the DP/4+
If your DP/4+ is behaving in peculiar ways (the display is showing alphanumeric characters that
shouldn’t be there or unexplainable Unexpected Event messages) and a soft reset (or turning the
DP/4+ power off and then on again) won’t cure the problem, try reinitializing the DP/4+.
WARNING! THIS PROCESS WILL ERASE ALL RAM PRESETS!
The 200 User Presets in the internal memory (RAM) are automatically
loaded with the factory defaults after reinitialization. Good backup
habits should be an important part of your routine. Save any important
information by using the MIDI System Exclusive Dump feature of the
DP/4+, or manually write down the relevant parameters using the
provided Preset Parameter Worksheet (or a photo-copy). If you fail to
do so, you may accidentally lose the presets you’ve created.
To reinitialize the DP/4+
1. While holding down the {SYSTEM"MIDI} button,
2. Press the {B} button.
3. Press the {>} button. The display shows:
01
Hit <WRITE> To
Reinitialize!!!!
Press the {CANCEL} button to quit without reinitializing the system, or
4. Press the {WRITE} button to reinitialize the DP/4+. Remember that by doing this you will
replace all of the RAM Preset data in the DP/4+, and all System•MIDI parameters will be
reset to their default range!
If reinitializing the DP/4+ does not correct the problem, then contact an Authorized ENSONIQ
Repair Station.
Note: If the DP/4+ is sitting in an infinite loop of system errors (the display is
continually cycling through errors), press the {SYSTEM"MIDI} button to escape this
state.
Note: In the unlikely event of a system malfunction, you can save your entire set-up
(all Preset Banks and System parameters) with a System Exclusive dump by pressing
the {WRITE} button. This will help you restore all of the user-defined parameters. For
more information about System Exclusive dumps, see Section 5 — Storage.

Preface
vi ENSONIQ DP/4+ Reference Manual
Battery Replacement Guidelines
The reason that the DP/4+ “remembers” configs, presets and system parameters, even when the
power is off, is that all of its internal RAM is “battery-backed-up.” The battery that keeps the
DP/4+ memory intact is located inside the DP/4+, and when it becomes discharged, the battery
must be replaced by an Authorized ENSONIQ Repair Station.
The battery that came in your DP/4+ is good for up to five years. You will know when it needs
replacing, because the DP/4+ will tell you so. One day you will switch the power on, and
instead of its usual wake-up message, the display will read:
00
-- WARNING --
Battery is Low
This will only appear for a short time, and then you can commence with normal operation. Then,
make sure that all custom RAM configs, presets and system parameters are saved, and take the
DP/4+ to an Authorized ENSONIQ Repair Station as soon as possible to have the battery
replaced.
For more information about saving DP/4+ data, see Section 5 — Storage.
Available Options for Your DP/4+
These optional accessories are available from your Authorized ENSONIQ Dealer:
•CVP-1 Pedal — AControl Voltage Foot Pedal which can be assigned as a modulator to
parameters within the DP/4+. The CVP-1 Pedal makes a great “wah wah” pedal.
•SW-10 Dual Damper Foot Switch — Because the DP/4+ has two stereo Foot Switch jacks,
you can use two of these two pedal, piano-type foot switches, for ultimate control! The
pedals can be programmed independently to act as a bypass effect switch, offering two
separately programmable modulation sources or increase/decrease presets.
For a full discussion of these foot switches and how to use them, see Section 1 — Controls &
Basic Functions.
Warning!
The use of single (mono) foot switches is not recommended, and can
affect the operation and performance of the DP/4+.
If you are considering a foot switch for the DP/4+, we strongly recommend purchasing the
SW-10 Dual Foot Switch.

Preface
ENSONIQ DP/4+ Reference Manual vii
Need More Help?
Whether you’re an aspiring programmer looking for additional information about basic effect
processing techniques and MIDI theory, or a professional sound engineer working with
advanced applications, you may want more detailed information that is beyond the scope of this
manual. The following books can help enhance your understanding of effect processing, MIDI,
and related topics. These, in addition to the numerous monthly magazines, provide a wealth of
information. While we don’t endorse any one of these publications, we offer this partial list as a
resource for you to draw on.
The Mix Bookshelf
For prices and more information call: 1-800-233-9604
MIDI
HOW MIDI WORKS, Dan Walker
MIDI FOR MUSICIANS, Craig Anderton
MIDI SYSTEMS & CONTROL, Francis Rumsey
MIDI, THE INS, OUTS AND THRUS, Jeff Rona
THE MIDI BOOK, Steve De Furia, Joe Scacciaferro
THE MIDI HOME STUDIO, Howard Massey
THE MIDI MANUAL, David Huber
THE MIDI RESOURCE BOOK, Steve De Furia, Joe Scacciaferro
THE NEXT MIDI BOOK, Rychner & Walker
USING MIDI, Helen Casabona, David Frederick
RECORDING
BUILDING A RECORDING STUDIO, Jeff Cooper
DIGITAL DELAYS (And How to Use Them), Douglas Fraser
IMPROVING YOUR SIGNAL PROCESSING SKILLS, (cassette & manual) Bill Gibson
MASTER HANDBOOK OF ACOUSTICS, F. Alton Everest
SOUND RECORDING HANDBOOK, John Woram
SOUND REINFORCEMENT HANDBOOK, Davis & Jones
SYNTHESIS
A SYNTHESIST'S GUIDE TO ACOUSTIC INSTRUMENTS, Howard Massey
MUSIC & TECHNOLOGY, H.P. Newquist
SECRETS OF ANALOG AND DIGITAL SYNTHESIS, Steve De Furia
VIDEOS
SHAPING YOUR SOUND, (video series) Tom Lubin
Alfred Publishing Company
For prices and more information call 1-818-891-5999
MIDI
ADVANCED MIDI APPLICATIONS, GPI
BASIC MIDI APPLICATIONS, GPI
WHAT IS MIDI?, GPI
Hal Leonard Publishing
For prices and more information call 1-414-774-3630
MIND OVER MIDI, GPI

Preface
viii ENSONIQ DP/4+ Reference Manual
Monthly Magazines
The following magazines offer many specific articles and columns that can provide a plethora of
useful information.
THE TRANSONIQ HACKER
For prices and more information about this independent news magazine for ENSONIQ
Users, call 1-503-227-6848
KEYBOARD
For subscription rates and more information call 1-800-289-9919
ELECTRONIC MUSICIAN
For subscription rates and more information call 1-800-888-5139
HOME & STUDIO RECORDING
For subscription rates and more information call 1-818-407-0744
MIX
For subscription rates and more information call 1-800-888-5139
EQ For subscription rates and more information call 1-212-213-3444
ENSONIQ DP/4+ Reference Manual 1
Section 1 — Controls & Basic Functions
There must be
something better…
This section provides an introduction to the DP/4+’s many controls and rear panel connections; a
conceptual overview of the system; a guide to selecting DP/4+ presets; and a discussion of editing
various types of parameters. We suggest you read this section carefully — it will help you get the
most out of your DP/4+.

Section 1 — Controls & Basic Functions
2 ENSONIQ DP/4+ Reference Manual
3 42
Mute Outputs
1 2 3 4
outputs
inputs
Mic Gain
Copy Undo
phones
input 1
inst/mic
Write Cancel
peak
signal
MIDI
rear input 1 off
push .00
51 6 7 98
paralle
DP/
Front Panel Controls
1. Phones
Plug headphones into this 1/4” stereo jack to listen to the
DP/4+ in stereo. The signal going to this jack is from the
sum of all four rear outputs, even if they are not
connected. The 4 rear outputs are mapped to the stereo
headphone as follows: 1 and 3 are mostly to the left; 2
and 4 are mostly to the right. Headphone volume is
controlled by the Output Knobs. Plugging headphones
into this jack does not turn off the audio in the outputs.
☞Warning: The headphone output circuit is designed
to minimize the volume differences between low and
high impedance headphones. Because some
headphones are more efficient than others, set the
Output Knobs accordingly — high output volume levels
could damage your hearing.
2. Input 1 — (inst/mic)
This combination balanced XLR mic/unbalanced 1/4”
mono input jack is for connecting a guitar, microphone,
or any high or low impedance instrument. This jack is
routed to the same input circuitry as the Input 1 jack
located on the rear panel, and is electrically equivalent.
3. Mic Gain — (rear input 1 off)
This activates the XLR Mic (microphone) input and
supplies mic gain to both the Mic and Instrument inputs.
When set to Instrument (LED off):
The XLR Mic Input is disabled.
The 1/4” front panel Instrument input is enabled.
Rear panel Input 1 is overridden and disabled when
the 1/4” front panel Instrument input is connected.
When set to Mic (LED on):
The XLR Mic Input is enabled.
Mic Gain will be supplied to the XLR Mic input.
The 1/4” front panel Instrument input is enabled.
Mic Gain is not supplied to the 1/4” front panel
Instrument input.
Rear panel Input 1 is overridden and disabled.
4. Mute Outputs — (inst/mic)
This button is used to mute the rear panel output jacks.
When the LED is on, the output jacks are muted, but the
headphone output remains active.
5. Output Knobs
The four Output Knobs control the output level of each
channel. If separate signals are being processed in the
ENSONIQ DP/4+, these knobs will control the “mix-
down” volumes. The maximum output level is +19 dBu.
6. Input Knobs
These four input knobs control the gain applied to the
input signals. The input circuitry is designed to work with
signals ranging from -34.6 dBV to +22 dBu. Use these
knobs to set each input to the optimal level for the signal
you are feeding into it.
7. Signal/Peak LEDs
The three LEDs above each knob indicate the level of
the input signal being fed into the Analog-to-Digital
Converters (ADCs).
• The Signal LED (green) will light when a low level
signal (-30dB) is present at the input. Extremely low
level input signals may not trigger this LED.
• The middle LED (yellow) will light at -12dB.
• The Peak LED (red) will light when the incoming
signal reaches -6dB below the ADC clipping point.
For optimal level, adjust the Input Knob so that the
Peak LED flashes only occasionally. Note that the Peak
LEDs indicate the levels of the input signals only and will
not reflect clipping in the digital processing stages.
8. Write•Copy Button
The {WRITE"COPY} button is used to save or copy
presets to the DP/4+’s internal RAM memory.

Section 1 — Controls & Basic Functions
ENSONIQ DP/4+ Reference Manual 3
/4+input configurations
A B C D Config
Select
on
bypass
all
MIDICompare
active
bypassed
1 source 2 source A
B
C
D
1
2
3
4
1
2
3
3 source
B
A
C
D
1
2
3
1
2
3
4 4
4 source
Edit System
A
B
C
D
11
2
A
B
C
D
1
3
1
2
3
4
MIDI
A:Hall Reverb
Mix=25 Volume=99
.
l effects processor
19181716151413121110
9 Cancel•Undo Button
The Cancel•Undo button is used to cancel command
functions, return to the selected preset, or to undo your
last unit or system parameter edit.
10. Left and Right Arrow Buttons
The Left and Right Arrow buttons are used to change
parameters except in the Select mode, where they scroll
to the next preset. Also when naming presets, they are
used to change the cursor position within the name.
11. LED Numeric and LCD Display
In Select mode, the red, two-digit LED display shows
the preset number. In Edit and System•MIDI modes,
this display shows the currently active parameter
number. This will also show a “--” when the preset
number is invalid (i.e. when current settings are not
saved).
The yellow, 32-character alphanumeric LCD display
shows you information about parameters, presets and
may also ask you for additional input.
The MIDI Message Indicator (a little red dot in the LED
Display) lights when any MIDI events are received;
useful for troubleshooting MIDI connections.
12. Select Button
This is used to select presets which can load effects into
the units and set up signal routing parameters,
depending on the type of preset selected.
13. Edit Button
This is used to edit preset parameters, edit preset titles
and save presets.
14. System•MIDI Button
This is used to view and modify system (or global) and
MIDI parameters.
15. Data Entry Knob
In Select mode, turning the Data Entry Knob will select
presets. In all other modes, the knob will change value
of the currently active parameter. Turning clockwise will
increase and counterclockwise will decrease the values.
16. Unit Buttons
The four Unit buttons (A, B, C, and D) correspond to the
four separate signal processors in the DP/4+. Use
these buttons to activate a particular Unit for selecting
presets or editing parameters. The yellow LED above
each button will light when that Unit is active. When a
Unit button is pressed a second time, it will be bypassed
(the red LED will be lit). Pressing again will reactivate
that Unit.
17. Config Button
This button allows you to select config presets and edit
config parameters. When Config is active, the yellow
LED above the button will be lit. By pressing this button
a second time, you can bypass all four Units (all red Unit
LEDs lit). Pressing this button a third time will reactivate
the Units (no red Unit LEDs lit).
18. Power
The power switch turns the DP/4+ on and off.
19. Input Configuration LEDs
One of LEDs above the diagram will be lit, to show the
currently selected input configuration.
Section 1 — Controls & Basic Functions
4 ENSONIQ DP/4+ Reference Manual
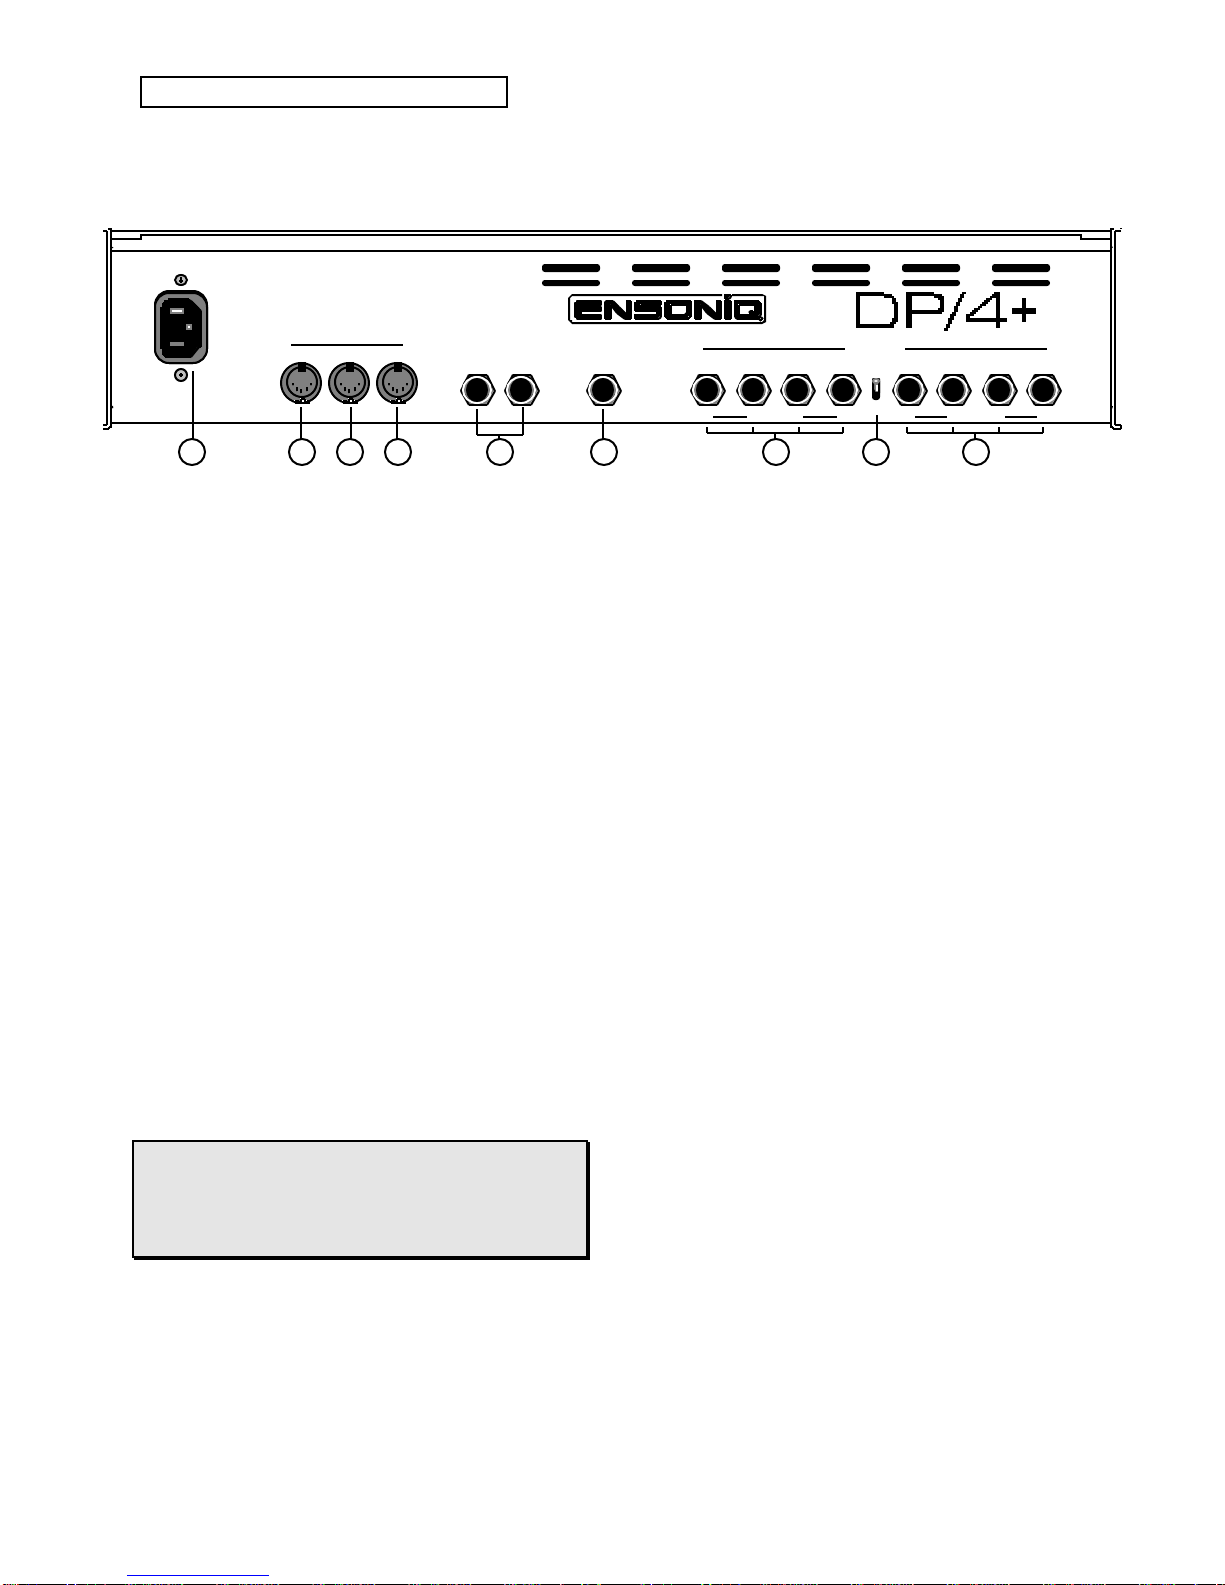
Rear Panel Connections
1
Line
MIDI
CV•Pedal 4
R
3
mono 2 1
mono
Outputs
R
4 3
mono 2 1
mono
Inputs
R R
Thru InOut Foot
Switch 1 +4
-10
WARNING!
To reduce the risk of fire or
electric shock do not expose
this product to rain or
moisture. main
Foot
Switch 2
Level (dBu)
L LL L
Front panel
Mic Gain
button
disables
rear Input 1
TRS Bal/Unbal
Inputs & Outputs
3 4 6 7 982 5
1. Line
The supplied line cord is connected here.
2. MIDI Thru
“Passes on” all MIDI (Musical Instrument Digital
Interface) information received by the DP/4+ to other
devices. Information generated by the DP/4+ itself
does not go to this jack — the Thru jack merely
echoes what comes in at the MIDI In jack.
3. MIDI Out
Sends out MIDI information to other instruments and
computers when the System•MIDI parameter “63
Send MIDI PrgChg + Controllers” is set to “ON.”
4. MIDI In
This jack receives MIDI information from other MIDI
instruments or computers.
5. Foot Switch 1 and 2 Jacks
These two independent foot switch jacks are
designed for dual (stereo) foot switches, and can be
assigned to a number of different functions, allowing a
total of four independent foot switch controllers (when
two optional SW-10 Dual Foot Switches are
connected).
Warning!
The use of single (mono) foot switches is not
recommended, and can affect the operation and
performance of the DP/4+.
See “A note About the Foot Switches” later in this
section.
6. CV•Pedal
This jack is for connecting an ENSONIQ Model CVP-
1 Control Voltage Foot Pedal, which is assignable as
a modulator to parameters within the DP/4+.
Pedal/CV Specs: 3-conductor (tip = control voltage
input, ring = 424. Ohm resistor to +4.25 volts, sleeve
= ground). 110. KOhm input impedance, DC coupled.
Input voltage range = 0 to 4. volts DC. For use with
an external control voltage, use a 2-conductor cable
with the voltage on the tip and the sleeve grounded.
7. Output Jacks
The four ground compensated output jacks can be
configured in numerous ways. Because the DP/4+
offers fully programmable output control, you can
have almost any combination ranging from a single
mono output to four mixed stereo signals.
See “A note About the Input and Output Jacks” later
in this section.
8. Level Switch
This switch toggles between +4 dBu and -10 dBV (this
affects the rear panel input and output jacks only).
Because this switch can accommodate a broader
range, it allows an improved signal-to-noise ratio.
9. Input Jacks
These four balanced input jacks are truly independent
inputs and can be used in a 1 source, 2 source, 3
source, or 4 source configuration.
See “A note About the Input and Output Jacks” later
in this section.
Other manuals for DP/4+
4
Table of contents
Other ENSONIQ Recording Equipment manuals


Popular Recording Equipment manuals by other brands

Philips
Philips TDA8001 datasheet

Cochlear
Cochlear Baha 5 SuperPower user manual

Roland
Roland TR-808 Service notes

Custom Audio Electronics
Custom Audio Electronics 2x4 operating guide

Lowrance
Lowrance X-4 Operation Operation manual

Focusrite Audio Engineering
Focusrite Audio Engineering BASS STATION II user guide


