Entel HT644 Series Setup guide

PREPARING YOUR RADIO FOR USE
Attaching / removing the aerial
Attaching / removing the battery pack
1. To attach, carefully align the aerial with
the socket. Screw in the aerial clockwise
(taking care not to cross the thread) until it
is seated rmly with the accessory cover’s
rubber ring between the aerial and the top
of the radio. (A)
2.To remove, unscrew the aerial anti-clockwise.
(B)
1. To attach, locate the pegs on the bottom of the
battery into the slots on the radio and press
the top of the battery against the radio. Secure
battery by tightening the screw clockwise
by hand. (Do not use any implement or
overtighten). (C)
2.To remove, unscrew the locking screw anti-
clockwise and pull the battery away from the
top of the radio. (D)
A
B
C
D
SWITCHING ON, RECEPTION
AND SWITCHING OFF
1. To switch on, rotate the on/off/volume control
(1) on the top of the radio clockwise.
2.When the radio has passed its diagnostic tests,
it will emit a fanfare tone.
3.The radio will enter standby mode. This is
indicated by the LED Amber ashing once
every 5 seconds, signalling that the radio is
ready for use.
4.Adjust the volume control (1) to select the
desired volume level.
5. Using the channel buttons (3) ensure you have
the correct channel selected.
6.When receiving a valid signal, the LED will
illuminate steady green and audio will be
emitted from the radio’s speaker or audio
accessory (if attached)
7. When nished using the radio, switch off by
turning the on/off/volume control (1) until it
clicks and the radio will be switched off.
TRANSMITTING
1. Perform steps 1 through to 5 of ‘Switching On,
Reception and Switching Off.’
2.Before transmitting, monitor the channel and
make sure it is clear.
3.When receiving a signal, wait until the signal
stops before transmitting. The transceiver
cannot transmit and receive simultaneously.
4.Press the PTT (Push To Talk) button (4) to begin
your transmission. To conrm transmission the
LED illuminates red.
5. For best transmitted speech quality you must
talk directly into the radio’s microphone (10) at
around 4cm between your mouth and the radio.
6.Please note: if you talk into the top of the
radio or with your mouth further away, you will
transmit poor quality speech.
7. When the transmission is nished, release the
PTT button.
EU DECLARATION OF CONFORMITY
We, Entel UK Limited of:
320 Centennial Ave,
Centennial Park,
Elstree.
WD6 3TJ United Kingdom
Tel +44 208 236 0032
info@entel.co.uk
Declare on our sole responsibility that this
equipment complies with the essential
requirements EU Directive 1999/5/EC, and
conforms to the following standards or other
nominative documents;
HT644
EN 301 178-2 V1.2.2:2007-02,
EN60945:2002,
EN60950-1:2006 A1:2010
Name: Mike Jamieson
Position: Quality Manager
Date: 18 December 2015
Signed:
www.entel.co.uk
HT644 Series
Quick Start User Guide
Designed in the United Kingdom
Quick Start User Guide V2.1
HT644 Series
INTRODUCTION
The Entel HT644 is a professional IP68 submersible marine handheld
transceiver that operates on the VHF marine band. The HT644 has 56
marine international channels, 10 weather and 36 dealer programmable
private channels.
This quick guide provides basic guidance for operating your radio.
A full version of this user guide is available to download from our website,
www.entel.co.uk
To meet your exact requirements the radio may have been customised by
your Entel dealer. These features will be explained in a separate guide
issued by the dealer.
PACKING LIST
HT644 Marine VHF transceiver
CNB750E Rechargeable Li-Ion battery
CBH750 Spring loaded belt clip
CCAHT Trickle charger pod
CAT40 High efciency antenna
CWCHT Mains adaptor
CWCHT-12 12v charger lead
LY600 Lanyard
OPTIONAL ACCESSORIES
Attaching and removing accessories
To attach an accessory, remove the accessory cover by unscrewing the
locking screw anti-clockwise (leave the cover attached or store in a safe
place).
Plug the accessory into the socket, then
carefully tighten the locking screw clockwise
until nger tight (do not overtighten or use any
implement)
To remove an accessory, unscrew the locking
screw of the accessory by hand in an anti-
clockwise direction. Ensure you re-t the
accessory socket cover (the radio is not
submersible without the socket covered).
BATTERY INFORMATION
Battery charging
1. Connect the AC adapter to the charger pod and plug in.
2.Turn the transceiver off.
3.Insert the battery pack into the charger pod, either with or without the
transceiver attached. The charger LED status light changes to red and
charging begins.
4.When charging is complete the charger status LED changes from red
to green (a fully discharged battery pack will take approximately 6 hours
to recharge).
A ashing red LED on the charger indicates there is a problem with the
battery. Remove the battery from the charger and consult your Entel Dealer.
CAUTION
BATTERY PACK PRECAUTIONS
• Do not recharge the battery pack if it is already fully charged. Doing so
may cause the life of the battery pack to shorten or the battery pack may
be damaged.
• After charging is complete, remove the battery from the charger. If the
power to the charger is turned off and on again, charging will restart and
the battery will become overcharged.
• Please ensure that the radio is turned off before placing it in the charger
and never switch a radio on whilst in the charger.
• Only use Entel branded battery pack and chargers.
• Do not short the battery terminals or dispose of the battery in a re.
• Do not charge the transceiver and/or battery pack if they are wet.
DANGER
DO NOT DISASSEMBLE OR MODIFY THE BATTERY IN ANY WAY!
Your Entel battery pack incorporates safety circuitry to avoid danger. If the
safety circuitry is damaged or bypassed, or the battery cells are damaged
directly, they may generate extreme heat, smoke, rupture and emit ames.
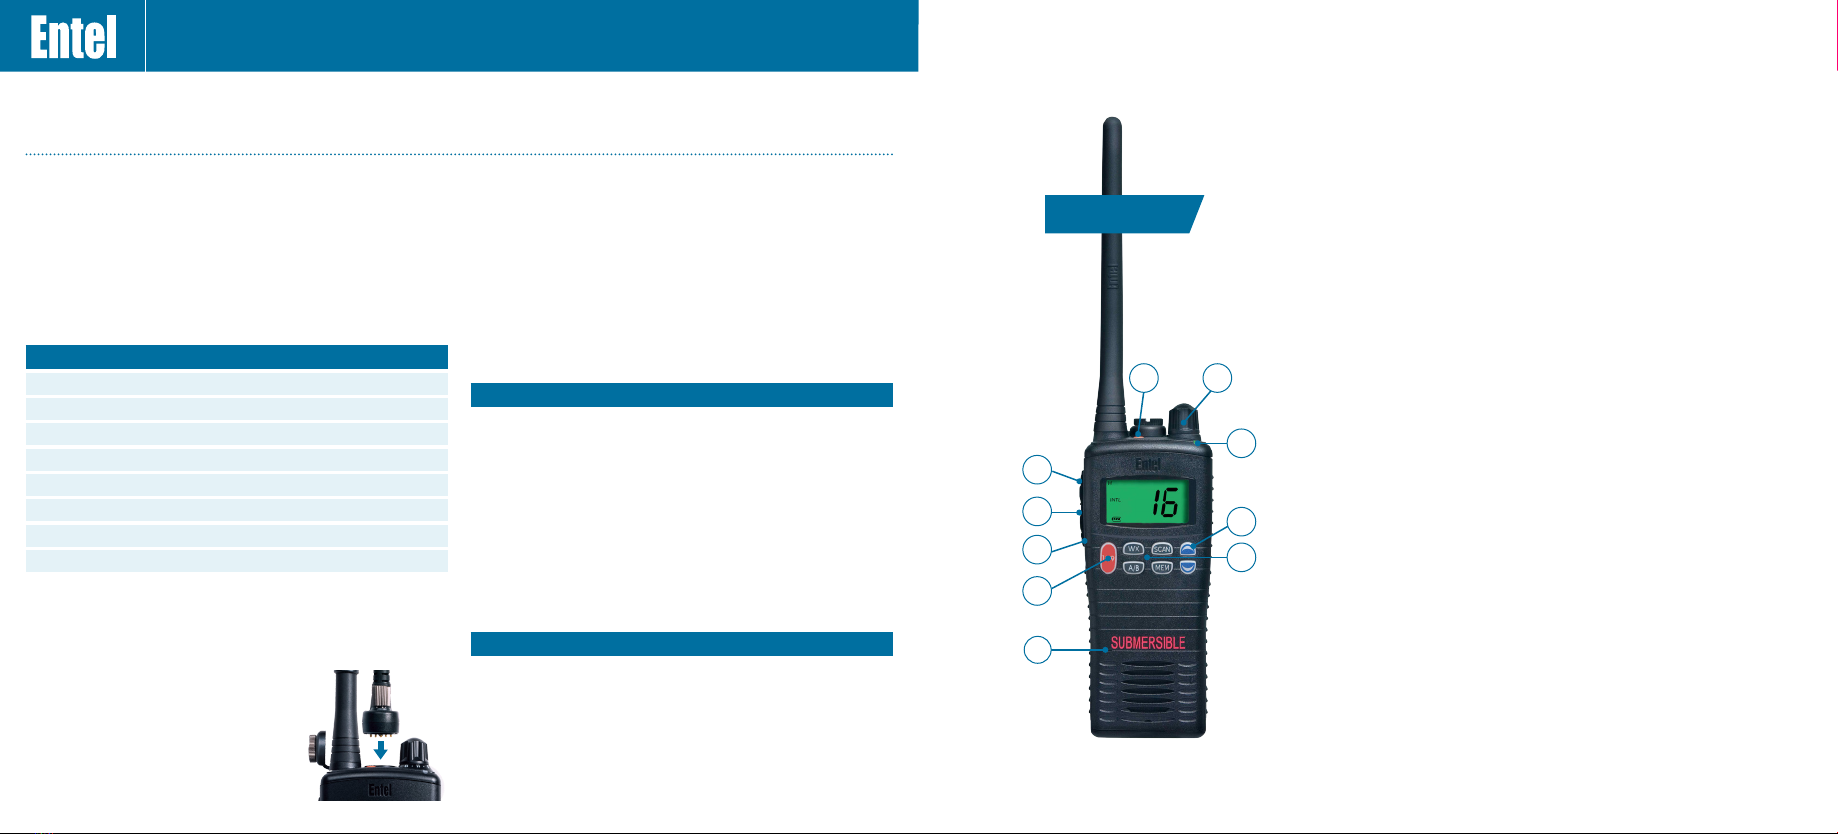
CONTROLS & INDICATORS
1
3
8
9
2
5
6
4
7
7 KEY LCD
1. On/off knob. Rotate to turn the radio on or off, rotate clockwise to
increase volume
2.MEM Button: Memorises a desired channel for scanning
SCAN Button: Starts/stops scanning the memorized channels
WX Button: Immediately recalls the weather channels
A/B Button: Provides instant access to preassigned channels (if
programmed)
3.Channel control
4.Push To Talk (PTT) button. Press to speak and release to listen
5. 16/9 Button: Short press selects channel 16 and a longer press
selects channel 9
6.Toggle high/low transmitter power
7. Short press toggles LCD and keypad backlight on/off. Long press
toggles keypad lock on/off
8. Monitor momentarily (squelch defeat)
9. LED Indicator
Red steady - Transmitting
Red ashing slowly - Battery needs recharging
Green steady - Receiving
10. Microphone
10
T
a
l
k
H
e
r
e
Other Entel Transceiver manuals

Entel
Entel HT640 User manual

Entel
Entel HT502 User manual

Entel
Entel HX446E User manual

Entel
Entel HT446 User manual

Entel
Entel HT642 User manual

Entel
Entel HT844 User manual

Entel
Entel HT700 2.0 Series User manual

Entel
Entel DX Land Series Setup guide

Entel
Entel HT981 User manual

Entel
Entel HT900T Series User manual

Entel
Entel HT920 User manual

Entel
Entel HX400 series User manual

Entel
Entel HT642 User manual

Entel
Entel HT900 Series User manual

Entel
Entel HT910 User manual

Entel
Entel HT644 GMDSS User manual

Entel
Entel HT640 User manual

Entel
Entel HT712T User manual

Entel
Entel HT644 GMDSS User manual

Entel
Entel HT702 User manual


