Entel HT642 User manual

HT642
Entry
User Guide – HT600 Series v10/10
Common Information
(all models)
HT644
LCD
HT648
Entry GMDSS
HT649
LCD GMDSS
Professional submersible marine handheld transceivers

Common
Introduction
This guide covers the ‘basics’ of your radio’s operation.To meet your exact
requirements the radio may have been customised by your Entel authorised dealer.
These features will be explained in a separate guide issued by the dealer.
1
Table of Contents
Common Information (all models) Page
Certification 2
Radio Care 3
Battery Care 4
Packing List 5
Optional Accessories 5 & 6
Preparing Your Radio For Use 6 & 7
Using Your Radio HT642/HT648 8
Using Your Radio HT644/HT649 9
HT642
Feature List 10
Controls & Indicators 11
HT644
Feature List 12
Controls & Indicators 13
LCD Icons 14
HT648 (GMDSS)
Feature List 16
Controls & Indicators 17
HT649 (GMDSS)
Feature List 18
Controls & Indicators 19
LCD Icons 20

2
Common
Certification
Declaration of Conformity
We Entel UK Limited of:
320 Centennial Avenue
Centennial Park
Elstree
Borehamwood
Hertfordshire
WD6 3TJ
United Kingdom
Declares under our sole responsibility that the product range:
HT600 Series Handheld Radio Transceiver
Conforms to the following standards or other nominative documents:
•EN 301 178-2 V1.2.2: 2007-02, EN 60945:2002, EN60950-1: 2006, in accordance with
Directive 1999/5/EC.
•EN 300 225 V1.4.1: 2004-12
Serial Number________________________________
M Austin
Quality Manager
1 October 2010
Date:

3
Common
Warranty
The HT6XX comes with a 24 month warranty, for
details see our full terms & conditions.
Advice
• Do not use options or accessories not
specified by Entel
• Ensure that the radio is used within the
parameters for which it was designed
• Please switch the transceiver off before
connecting optional accessories
Warning
Turn the transceiver off in the following locations:
•In explosive atmospheres (flammable gas, dust
including metallic & grain powders etc)
•Whilst taking on fuel or while parked near a fuel
station
•Near explosives or blasting sites
•In aircraft, medical institutions or near
persons known to be wearing a pacemaker
Caution
•Do not disassemble or modify the transceiver
for any reason
•Do not transmit while touching the antenna
terminal or any exposed metallic parts of the
aerial as this may result in a burn
•Please check and observe regulations in your
country with regard to use whilst driving
Cleaning your Radio
After exposure to any potentially corrosive
substance including salt water it is recommended to
thoroughly wash the transceiver in fresh water.
If washing with the battery removed from the radio,
ensure that the battery is not immersed in water and
clean only with a damp cloth.
Note: Do not wash the transceiver if you suspect
the waterproofing seal may be damaged. Please
return to your supplier for inspection/repair.
End of Life Disposal
When your Entel transceiver reaches the end of its
useful life, please ensure that the unit is disposed of
in an environmentally friendly way.
For country specific information please see
www.entel.co.uk/recycling.
Radio care

4
Common
Battery care / information
Introduction
Your Entel radio is supplied with a high performance
Lithium-Ion (Li-Ion), or primary type Lithium battery.
These batteries:
•Extend talk time
•Reduce the battery’s size and weight
•Do not suffer from ‘memory effect’ that reduces the
life of Ni-Cad and NiMH batteries
•Have a low toxicity, therefore reducing the impact
on the environment
Battery Pack Precautions
•Switch the transceiver OFF before charging
•Charge the battery pack before use
•Do not recharge the battery pack if it is already fully
charged
•Charge the battery in accordance with the
instructions enclosed with your charger
•Do not charge the transceiver and/or battery pack
if they are wet
The battery pack includes potentially
hazardous components. Please:
•Do not disassemble or reconstruct battery
•Do not short-circuit the battery
•Do not incinerate or apply heat to the battery
•Do not immerse the battery in water unless
attached securly to the radio or get it wet by other
means
•Use only the specified charger and observe charging
requirements
•Do not pierce the battery with any object or strike
it with an instrument
•Do not use the battery pack if it is damaged in any
way
•Do not reverse-charge or reverse-connect the
battery
•Do not touch a ruptured or leaking battery
If liquids from the battery get into your eyes,
immediately:
•Wash your eyes out with fresh water and
avoid rubbing them
•Seek medical treatment
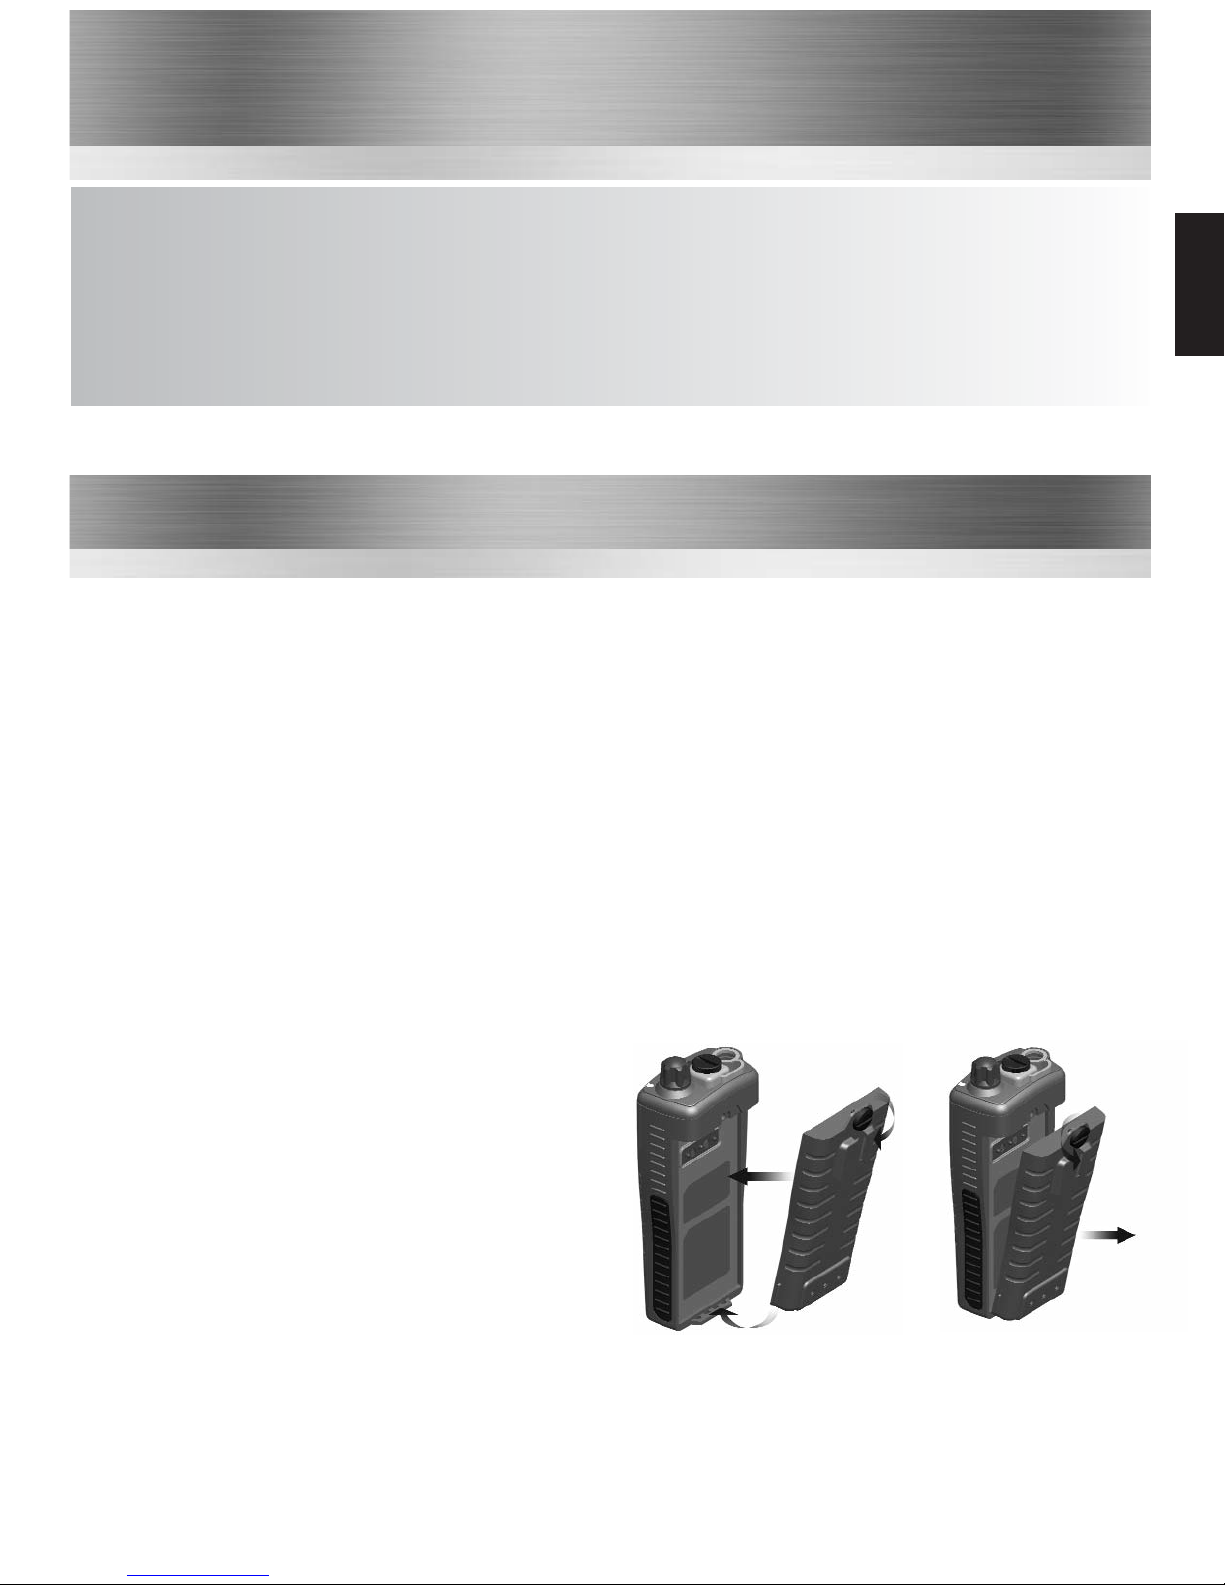
Battery Pack
•If a battery is not to be used for an extended
period of time (e.g. several months) remove the
battery pack from the equipment and store in a
cool and dry location (around 0°C) part charged.
Do not fully discharge the battery before storage
•Each charge cycle reduces the battery’s life.
Minimise the number of times you charge your
battery especially in hotter environments which
further shortens a battery’s life.
GMDSS Battery (CLB750x)
The GMDSS batteries (CLB750L \ G \ M depending
on which cells have been used in the battery pack)
are non-rechargeable Lithium batteries. The battery
is supplied with a security seal that must be removed
before fitting to the radio. An expiry date is printed
on the battery. Do not use this battery if past the
expiry date. Replacement batteries are available from
your local authorised dealer. If you require assistance
where to purchase please contact Entel for details.
Under no circumstances must you
attempt to recharge these batteries
Note: only genuine Entel batteries should be used.
Customer satisfaction is assured as you can not be
supplied with sub standard, potentially dangerous
battery packs from 3rd party manufacturers, ensuring
it delivers the expected capacity and endurance.
On HT series batteries a breathable membrane is
used.This is clearly marked on the battery label.
Piercing the membrane will allow water ingress to
the battery, and will invalidate the warranty.

Common
Packing List
Carry Options
CFC750 HT64X soft leatherette case finished in black with carry strap
CLC752 HT642, HT648 heavy duty black leather case with strap & belt loop
CLC753 HT644 & HT649 heavy duty black leather case with strap & belt loop
CBH750 Spare spring loaded belt clip
Audio Accessory Options
CMP1/750 Compact medium duty speaker microphone with earpiece jack
CMP750 Heavy duty submersible speaker microphone
EHP9 D-shaped earpiece (plugs into CMP1/750 or CMP750 above)
EA12/750 D-shaped earpiece with in-line PTT/microphone & VOX*
EA15/750 Earpiece microphone with transparent acoustic tube &VOX*
EA19/750 D-shaped earpiece with boom microphone and in-line PTT & VOX*
EHP750 D-Shaped earpiece (connects directly to radio)
EPT40/750 Bone conductive earpiece microphone with PTT
CXR5/750 Bone conductive skull microphone with in-line PTT
CXR16/750 D-shaped earpiece and throat microphone with in-line PTT
5
•HT64x Transceiver
•CNB750E Rechargeable 1800mAh Li-Ion battery (May not be included with GMDSS)
•CLB750x Non rechargeable Lithium battery (GMDSS only)
(CLB750L, CLB750G or CLB750M depending on which cells have been used in the battery pack)
•CBH750 Spring loaded belt clip
•CATxx Antenna CCA trickle charger included with certain models
Battery & Charger Options
CNB750E Spare 1800mAh Lithium-Ion battery pack with rear clip
CLB750x Spare 2000mAh Lithium non-rechargeable battery with rear clip (GMDSS models only)
CSAHT 1-way intelligent rapid charger, 110-230v
CSBHT 6-way intelligent, rapid charger, 110-230v
CCAHT-230 1-way trickle charger with 230V mains adapter
CCAHT-110 1-way trickle charger with 110V mains adapter
CCAHT-12 1-way trickle charger with cigar lighter lead, 12V DC operation
Optional Accessories

Common
---
Attaching / Removing the Battery Pack
1To attach, locate the pegs on the bottom of the
battery into the slots on the radio and press the
top of the battery against the radio. Secure battery
by tightening the screw clockwise by hand.
(Do not over tighten)
2To remove, unscrew the locking screw
anticlockwise and pull the battery away from the
top of the radio.
Optional Accessories cont...
For complete up to date list of optional accessories visit www.entel.co.uk
12
6
Preparing Your Radio For Use
CHP1/750 Light weight single earpiece headset with in-line PTT &VOX*
CHP750HS Single earpiece ear defender headset with boom mic and in line PTT for hard hat & VOX*
CHP750HD Double earpiece defender headset with boom mic and in line PTT for hard hat & VOX*
CHP750D Double earpiece headband defender headset with boom mic and in line PTT &VOX*
CHP750BT Bluetooth double earpiece headband defender headset with boom mic and ear cup PTT
CBH750 Spare spring loaded belt clip
* VOX =Voice Operated Transmit (hands free operation)
Simplex/ Duplex Channel Use
Your transceiver has been factory programmed in accordance with International regulations.
The mode of operation cannot be altered from simplex to duplex or vice versa. Simplex or duplex mode is
automatically activated, depending on the channel selected. If you have a licence to use a specific simplex or
semi-duplex channel, contact your dealer who may be able to programme your channel using the
transceiver’s private channel memory.
Bluetooth option board in radio is required to use Bluetooth audio accessories. (Not available for HT644/HT648/HT649)
INT, USA, & Canadian modes
In compliance with worldwide license regulations the following version of HT644 are available:
Version A : INT, USA, & Canadian modes
Version B, C and D : INT mode only
1. In the case of version A only ; to change the channel set of the transceiver, hold down the [WX] key.The
mode changes from USA to Canadian to International.

Common
Preparing Your Radio For Use cont...
Attaching / Removing the Aerial
1To attach, carefully align the aerial with the
socket. Screw in the aerial clockwise (taking
care not to cross the thread) until it is seated
firmly against the top of the radio.
2To remove, unscrew the aerial
anti-clockwise.
12
Attaching / Removing Audio Accessories
1To attach, remove the accessory cover by unscrewing
the locking screw anti-clockwise (leave cover attached
or store in a safe place).Attach accessory plug by
locating over the socket. Carefully tighten the locking
screw clockwise until finger tight (do not tighten with a
screwdriver etc).
2To remove, unscrew the locking screw by hand in an
anti-clockwise direction (carefully use a coin or
screwdriver if too tight). Ensure you re-fit the
accessory cover so as to protect the socket.
Attaching / Removing the Belt Clip
1To attach, locate the clip into the slot on
the back of the battery and slide up until
you hear a “click”.
2To remove, pull the tab (a) towards the
belt clip.Then slide the belt clip
downwards (b).
12
a
b
Charging Your Radio
Several charger options are available. Please refer to your charger user guide.
7

8
Using Your HT642/HT648
On / Off button
Press the on / off button to turn your radio on. A short turn on beep will be heard. To turn off,
press and hold the on / off button until the display extinguishes.
Using your radio
Before using your radio you may need to adjust the volume on the radio to take in to account
background noise. Adjust the volume using the rotary control on the top of the radio.
Transmitting on your radio
Before transmitting, ensure that the channel is not in use.To transmit press and hold the PTT
button and speak approximately 35 - 50mm from the microphone on the radio.To receive,
release the PTT button.
Channel Scan (dealer programmable feature)
Press the dealer assigned button on the radio to start scan. Press again to return to stop.
Monitor Button
Press the orange monitor button on the top of the radio to defeat the squelch mute. Press again
to return to squelch mute.
SecuringYour Radio
You may secure your radio to you using either the supplied CBH750 belt clip or using an
optional leather case.
Common

9
Common
Emergency Channel
Channel 16 is used for emergency contact with other vessels. Hold down the [16] key for 1 second
to select channel 16.
Using Your HT644/HT649
Monitor Button
Press the blue monitor button on the top of the radio to defeat the squelch mute and release
button to mute radio.A long press (radio will beep) will hold the squelch mute open until pressed
again to cancel again to return to squelch mute.
On / Off button
Press the on / off button to turn your radio on. A short turn on beep will be heard. To turn off,
press and hold the on / off button until the display extinguishes.
Transmitting on your radio
Before transmitting, ensure that the channel is not in use.To transmit press and hold the PTT -
button and speak approximately 35 - 50mm from the microphone on the radio.To receive, release
the PTT button.
Using your radio
Before using your radio you may need to adjust the volume on the radio to take in to account
background noise. Adjust the volume using the rotary control on the top of the radio.
SecuringYour Radio
You may secure your radio to you using either the supplied CBH750 belt clip or using an optional
leather case.
Scan (HT644/HT649)
1. Select the desired channel to be scanned using the & buttons.
2. Press the [MEM] button to store the channel into the transceiver’s memory. [MEM] is displayed
on the LCD.This channel is now memorised to be scanned.
3.To add further channels, repeat steps 1 & 2.
4.To delete a channel from the transceiver’s scan memory, simply press [MEM] button again whilst
the memorised channel is displayed. [MEM] disappears.
5.All channels programmed remain in the scan memory even if the power is switched off.
6.To start scanning, press the [SCAN] key.The scan proceeds from the lowest to the highest
programmed channel number and stops on channels when a transmission is received.
7.To stop the scan at any time, press the [SCAN] key.
Adjusting squelch threshold
Press the blue monitor button on the top of the radio and switch radio on. Use and
buttons to adjust threshold (between 01 - 16). Press MEM to store the setting.
A / B Button
Hold down A/B button and turn on radio.The letter A will appear and dashes _ _ indicate no
channel is assigned. Press up/down button to desired channel. Press MEM to select channel. Channel
is stored when display stops flashing.To allocate channel to B, press A/B again and repeat process.
Switch radio off/on to return to user mode.To clear a channel turn radio on holding A/B button.
Press MEM then turn radio off/on.

HT642
Standard Features:
•Environmentally protected to IP68 i.e. submersible to 5 metres for up to 60 minutes
•Robust design, exceeds MIL-STD-810C/D/E/F
•1800mAH Lithium-Ion battery for superior operational time
•16 programmable channels
•Full transmit power output 5 Watts
•Exceptionally loud and clear audio
•Top mounted monitor button
•Automatic power save to further increase operational time
•Low battery alert indicates when the battery needs replacing
Dealer Programmable Features:
•Channel Scan
•Key lock button
•Prefixed minimum volume level and fixed bleep level
10
HT642

11
Controls & Indicators
HT642
On / Off button. Press to turn radio on, press and hold to turn off.
Press up / down buttons to increase / reduce volume.
Channel / Scan Control. Rotate to select the desired channel or scan setting.
Push To Talk (PTT) button. Press to speak and release to listen.
Dealer programmable button 1 (ask your dealer for more information).
Dealer programmable button 2 (ask your dealer for more information).
Monitor button. Press button to turn on / off.
LED indicator.
•RED Steady = Transmitting
•RED flashing slowly = Battery needs re-charging
•GREEN Steady = Receiving
1
8
7
6
5
4
3
2
Antenna
Dealer
programmable
button 1
5
Push To Talk
(PTT) button
4
Dealer
programmable
button 2
6
On / Off
1
Volume control
2
Speaker
Microphone
Monitor
button
7
LED indicator
8
Channel / Scan /
control
3

HT644
Standard Features:
•Environmentally protected to IP68 i.e. submersible to 5 metres for up to 60 minutes
•Robust design, exceeds MIL-STD-810C/D/E/F
•LCD screen to display channel number
•1800mAH Lithium-Ion battery for superior operational time
•INT, USA, CAN channels
•Full transmit power output 5 Watts
•Exceptionally loud and clear audio
•Ch 16 shortcut button
•Scan button
•Monitor button
•MEM button
•Automatic power save to further increase operational time
•Low battery alert indicates when the battery needs replacing
Dealer programmable features:
•Key lock button
•Prefixed minimum volume level and fixed bleep level
12
HT644

13
HT644
Controls & Indicators
Antenna
H/L button
10
Push To Talk
(PTT) button
9
Lamp / key
lock button
8
16/9 button
7
Monitor button
1
On / off
Volume control
2
Speaker
Microphone
Scan button
3
Up / down buttons
4
MEM button
5
A/B button
6
Monitor button. Press to monitor channel.
On / off Volume control
Channel scan button. Press to start / stop channel scanning.
Up / down buttons. Press up / down buttons to change channel.
MEM button. Memorise a desired channel for scanning.
A/B button. Instant access to preassigned channels (if programmed)
16/9 quick access button.
Lamp/key lock button. Momentarily pressing this button illuminates the LCD display. Holding this button
for over 1 second activates the key lock.To deactivate press button again.
PTT button. Press & hold to speak. Release to listen.
H/L button. Press and hold this button for one second to toggle between high and low power (1 & 5
Watts).
WX button. Immediately recalls the weather channels.
LED indicator.
•RED Steady = Transmitting
•RED flashing slowly = Battery needs re-charging
•GREEN Steady = Receiving
12
11
10
9
8
7
6
5
4
3
2
1
WX button
11 LED indicator
12

14
LCD Indicators
•High power selected (5 Watts)
•Low power (1 Watt)
•Transmit in progress
•Receive in progress
•Indicated channel is memorised for scanning
•Scrambler mode enabled (version A & B only)
•Voice operated mode enabled
•Indicates the channel set for USA
• Indicates the channel set for Canadian
• Indicates the channel set for International
• NOAA weather channels (USA and Canadian waters only)
• A ship-to-ship channel (in USA or Canadian mode)
• Battery life indicator
• Indicates keypad is locked, excluding the PTT, H/L and LAMP buttons
• Private channel number selected
• Duplex channel selected (not simplex)
HT644

15
PAGE
INTENTIONALLY
LEFT BLANK

16
HT648
HT648
Standard Features:
•Environmentally protected to IP68 i.e. submersible to 5 metres for up to 60 minutes
•Robust design, exceeds MIL-STD-810C/D/E/F
•GMDSS (Conforms to Pan European Specification ETS300-225
for the use of radios for Safety at sea
•Non rechargeable Lithium battery for superior operational time
•16 programmable channels
•Transmit power output 1 Watt
•Exceptionally loud and clear audio
•Top mounted monitor button
•Automatic power save to further increase operational time
•Low battery alert indicates when the battery needs replacing
Dealer programmable features:
•Channel Scan

17
Controls & Indicators
On / Off button. Press to turn radio on, press and hold to turn off.
Press up / down buttons to increase / reduce volume.
Channel change control, rotate to select the desired channel or scan setting.
Push to talk button, press to speak and release to listen.
Dealer programmable button 1 (ask your dealer for more information).
Dealer programmable button 2 (ask your dealer for more information).
Monitor button. Press to turn monitor on / off.
LED indicator.
•RED Steady = Transmitting
•RED flashing slowly = Battery needs re-charging
•GREEN Steady = Receiving
8
7
6
5
4
3
2
1
HT648
Monitor
button
7
Channel Change
3
Volume control
2
Speaker
Microphone
LED indicator
8
Dealer
programmable
button 1
5
Push To Talk
(PTT) switch
4
Dealer
programmable
button 2
6
On / Off
1
Antenna

HT649
HT649
18
Standard Features:
•Environmentally protected to IP68 i.e. submersible to 5 metres for up to 60 minutes
•Robust design, exceeds MIL-STD-810C/D/E/F
•GMDSS (Conforms to Pan European Specification ETS300-225 for the use of radios for Safety
at sea
•LCD screen to display channel number
•Non rechargeable Lithium battery for superior operational time
•19 International Simplex channels
•Transmit power output 1 Watt
•Exceptionally loud and clear audio
•Ch 16 shortcut button
•Scan button
•Monitor button
•MEM button
•Automatic power save to further increase operational time
•Low battery alert indicates when the battery needs replacing

19
Controls & Indicators
HT649
Antenna
Push To Talk
(PTT) switch
8
Function button
7
On / Off
1
Volume control
LED indicator
9
Speaker
Microphone
Scan button
3
Channel change
4
MEM button
5
Ch16 button
6
On / Off button. Press to turn radio on, press and hold to turn off.
Monitor button. Press to monitor channel
Channel scan button. Press to start/stop channel scanning.
Channel change buttons. Press up/down buttons to change channel.
Mem button. Press to memorise channel to scan.
Ch 16 button. Shortcut button to access channel 16.
Function button:
• Short press will illuminate display backlight for 3 short period.
• Long press will activate/deactivate keylock
PTT button. Press & hold to speak. Release to listen.
LED indicator.
•RED Steady = Transmitting
•RED flashing slowly = Battery needs re-charging
•GREEN Steady = Receiving
8
7
6
5
4
3
2
1
Monitor button
2
9
Other manuals for HT642
2
This manual suits for next models
4
Table of contents
Other Entel Transceiver manuals

Entel
Entel HT502 User manual

Entel
Entel HT642 User manual

Entel
Entel HT952 User manual

Entel
Entel HT644 GMDSS User manual

Entel
Entel DX Land Series Setup guide

Entel
Entel HT20 User manual

Entel
Entel HT640 User manual

Entel
Entel HT446E User manual

Entel
Entel HX446E User manual

Entel
Entel HT644 GMDSS User manual

Entel
Entel HT700 Series User manual

Entel
Entel HT642 User manual

Entel
Entel HT712T User manual

Entel
Entel HT910 User manual

Entel
Entel HT640 User manual

Entel
Entel HT644 GMDSS User manual

Entel
Entel HT644 Series Setup guide

Entel
Entel EURO-WAVE User manual

Entel
Entel HX402 User manual

Entel
Entel HT920 User manual