manuals.online logo
Brands
  1. Home
  2. •
  3. Brands
  4. •
  5. Entrematic
  6. •
  7. Transmitter
  8. •
  9. Entrematic ZEN Series User manual

Entrematic ZEN Series User manual

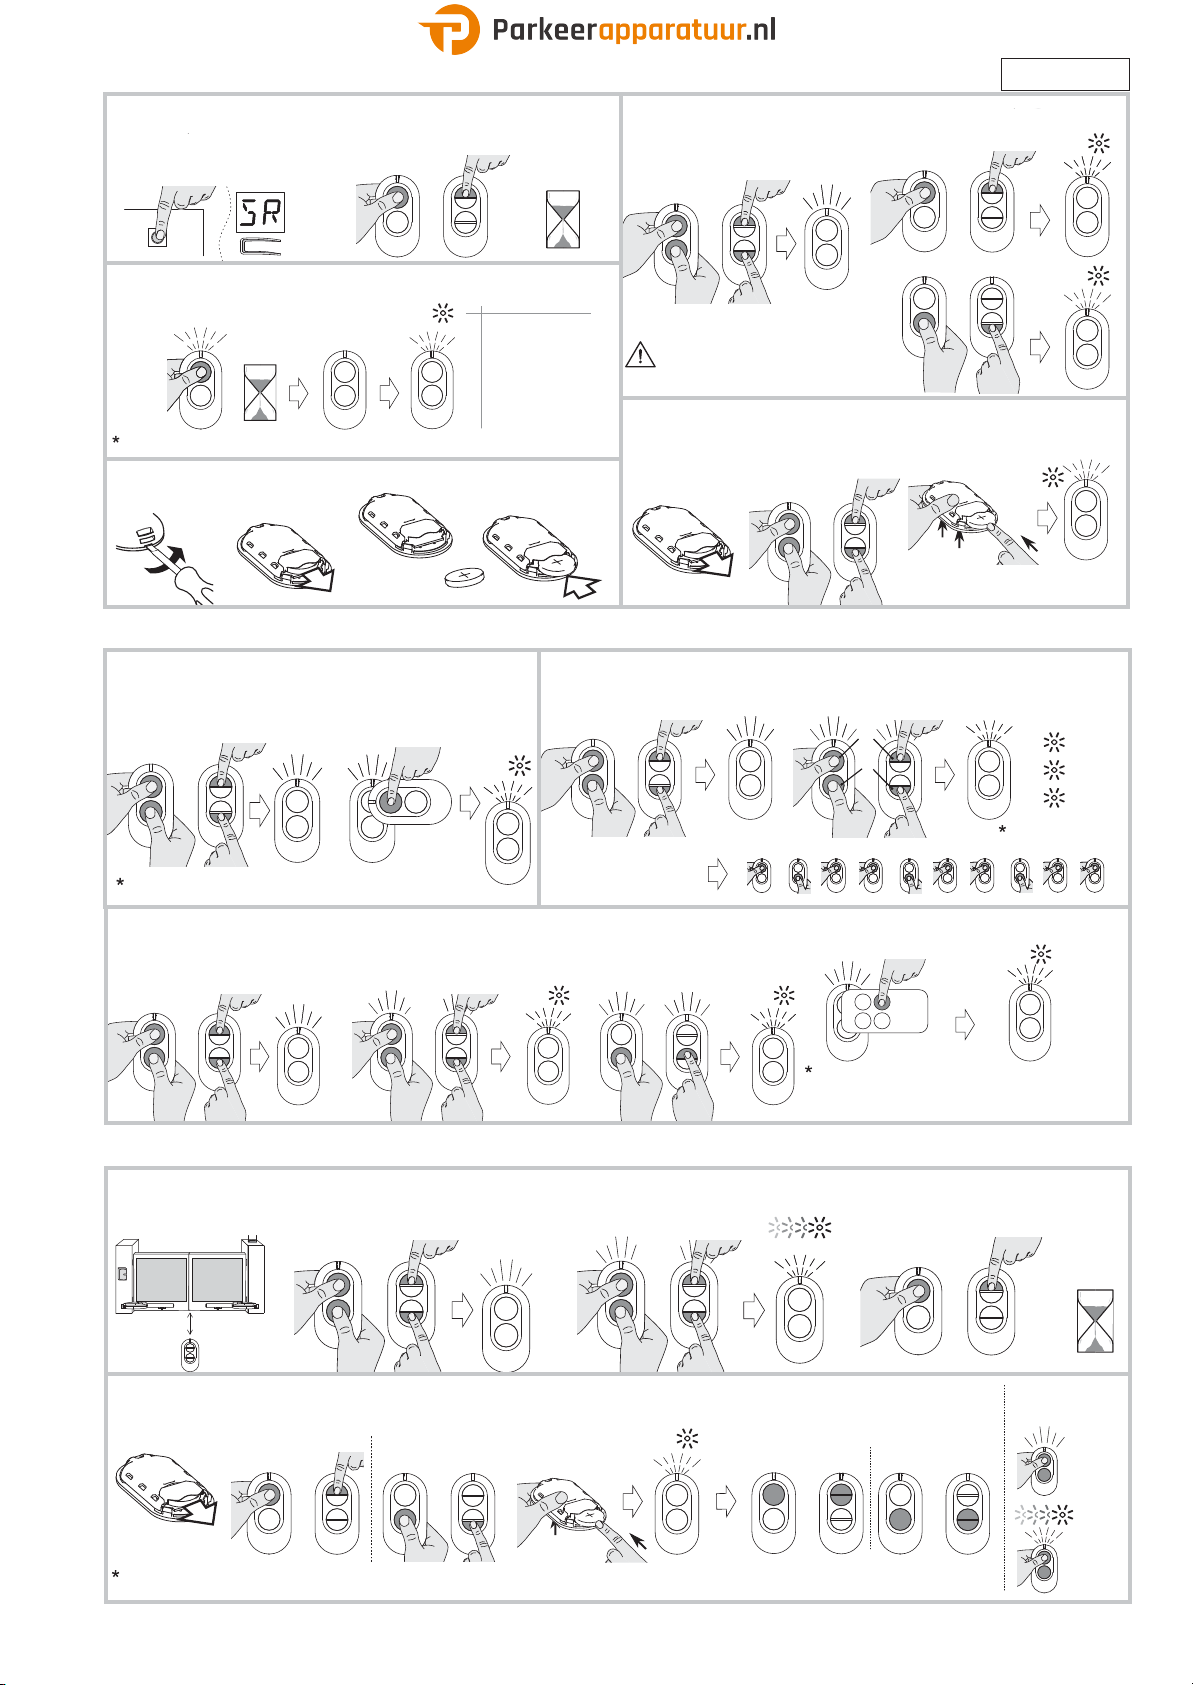
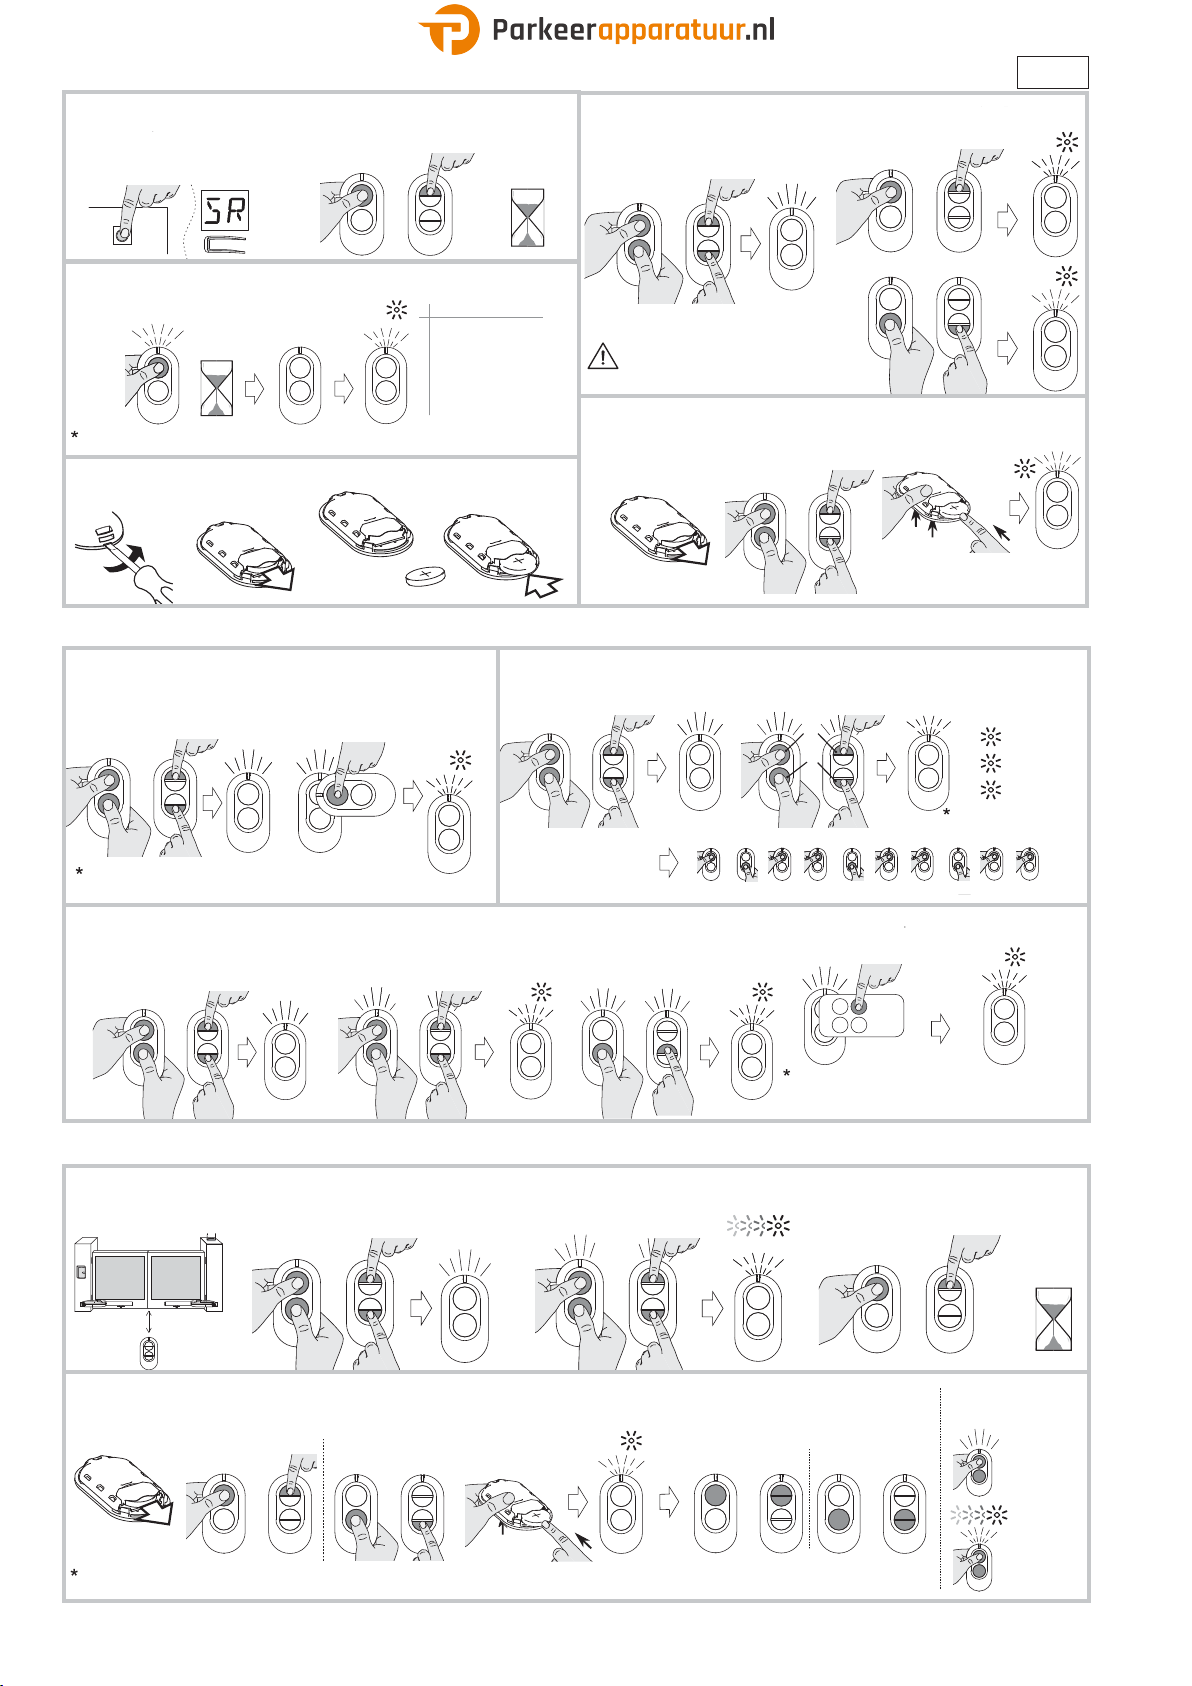
Manuale dʼusoper trasmettitori serie ZEN.
User manual for ZEN series transmitters.
www.entrematic.com
Entrematic ZEN
IP2269 • 2018-05-08
CH1 CH1
CH2
CH2
CH3
CH4
[**] Modelli /Models ZEN2, ZEN2B, ZEN2G, ZEN2R, ZEN2W, ZEN2Y
Congurazionecanali di fabbrica
Factory default channel conguration Congurazione manuale
Manual conguration Vedipagine successive
See nextpages
[***] Modelli /Models ZEN4, ZEN4W
Trasmettitori
Transmitters
Frequenza
Frequency
Potenzairradiata
Radiated power
Tipo
Type
Alimentazione
Power supply
Canali
Channels
Portata
Range
ZEN2**
433,92 MHz <1 mW
Rolling code Batteria tipo
Battery type
CR2032
Usare batterie
del tipo indicato.
Use batteries of
indicated type.
2
50-150 m
ZEN4*** 4
ZEN2C Fixed code 2
ZEN4C 4
ZENP2 868,35 MHz <1 mW AES-128
rolling code
2
ZENP4 4
Informazioni aggiuntive e video:
Additional information & videos:
Visitare la pagina web /Check
web page
www.ditecentrematic.com/download
IT -Dichiarazione CE di conformità
Il fabbricante Entrematic GroupAB con sede in Lodjursgatan 10, SE-26144Landskrona, Sweden, dichiara che i trasmettitori ZEN2, ZEN2B, ZEN2G, ZEN2R, ZEN2W,
ZEN2Y, ZEN4, ZEN4W, ZEN2C, ZEN4C, ZENP2, ZENP4 sonoconformiai requisiti essenziali e adaltre disposizionipertinenti della Direttiva 2014/53/UERED.
EN -EC Declaration of Conformity
Themanufacturer Entrematic GroupAB withheadquarters inLodjursgatan 10,SE-26144Landskrona, Sweden, declares that the ZEN2, ZEN2B, ZEN2G, ZEN2R, ZEN2W,
ZEN2Y, ZEN4, ZEN4W, ZEN2C, ZEN4C, ZENP2, ZENP4 transmitters complywith thebasic requirements and other relevant regulations ofDirective 2014/53/EU(RED).
FR -Déclaration CE de conformité
Le fabricant Entrematic GroupAB sis à Lodjursgatan10,SE-26144Landskrona, Sweden,déclare queles émetteursZEN2, ZEN2B, ZEN2G, ZEN2R, ZEN2W, ZEN2Y,ZEN4,
ZEN4W, ZEN2C, ZEN4C, ZENP2, ZENP4 sont conformes auxexigencesessentielles et auxautres dispositionspertinentes de la Directive 2014/53/UERED.
DE -EG-Konformitätserklärung
Der Hersteller Entrematic GroupAB mit Sitz in Lodjursgatan 10,SE-26144Landskrona, Schweden, erklärt, dass die Sender ZEN2, ZEN2B, ZEN2G, ZEN2R, ZEN2W,
ZEN2Y, ZEN4, ZEN4W, ZEN2C, ZEN4C, ZENP2, ZENP4 den wesentlichen Anforderungenundsonstigen Bestimmungen der RED-Richtlinie 2014/53/EUentsprechen.
ES -Declaración CE de conformidad
El fabricante Entrematic GroupAB, con sede enLodjursgatan 10,SE-26144Landskrona, Sweden, declara que los transmisores ZEN2, ZEN2B, ZEN2G, ZEN2R, ZEN2W,
ZEN2Y, ZEN4, ZEN4W, ZEN2C, ZEN4C, ZENP2, ZENP4 son conformescon los requisitosesenciales y otras disposicionespertinentes dela Directiva
2014/53/UERED.
PT -Declaração CE de conformidade
Ofabricante, Entrematic GroupAB, comsede emLodjursgatan10,SE-26144Landskrona, Sweden, declara que ostransmissores ZEN2, ZEN2B, ZEN2G, ZEN2R, ZEN2W,
ZEN2Y, ZEN4, ZEN4W, ZEN2C, ZEN4C, ZENP2, ZENP4 são conformesaos requisitosessenciais e às outras disposiçõespertinentes daDiretiva
2014/53/UERED.
Landskrona 01-03-2017 Matteo Fino
(President & CEO)
IT - Il simbolo del cassonetto barrato indica che il prodottonon puòessere eliminato con i comuni riuti domestici. Il prodottodeve essere riciclato nel rispetto
delle norme ambientali locali per lo smaltimento dei riuti. Separando un prodottocontrassegnato da questo simbolodai riuti domestici, si aiuterà a ridurre il
volume dei riutidestinati agli inceneritori o alle discariche, minimizzandocosì qualsiasi possibile impatto negativosulla salute umana e sullʼambiente.
EN -The crossed-outwheeled binsymbolindicates that the productshould bedisposedofseparately from householdwaste. Theproductshould behandedin forrecycling
in accordancewith local environmentalregulations for waste disposal. By separating a marked item fromhouseholdwaste, youwill help reduce thevolumeofwaste sent
to incinerators or landll and minimize any potential negative impact onhuman health and the environment.
FR - Le symbole de la poubelle barrée indique quele produit ne peut pas être éliminé avec les ordures ménagères ordinaires. Il doit être recyclé conformément à la
réglementation environnementalelocale en matière dedéchets. En triant les produitsportant ce pictogramme,vouscontribuezà réduire le volumedes déchets incinérés
ou enfouis,et à diminuer tout impact négatifsur la santé humaine et lʼenvironnement.
DE -Das Symbol mitder durchgestrichenen Abfalltonnebedeutet,dass das Produkt getrenntvomHaushaltsabfall entsorgtwerden muss. Das Produkt muss gemäß. der
örtlichen Entsorgungsvorschriften der Wiederverwertung zugeführt werden. Durch separate Entsorgung des Produkts trägst du zur Minderung des Verbrennungoder
Deponieabfalls bei undreduzierst eventuelle negative Einwirkungen auf die menschliche Gesundheit unddie Umwelt.
ES -La imagendel cubodebasura tachadoindica queel productonodebeformar partedelos residuoshabituales delhogar.Se debereciclar segúnla normativaambiental
local de eliminación de residuos. Cuandose separan los productosque llevan esta imagen, se contribuyea reducir el volumen de residuos quese incineran o se envían
a vertederos y se minimiza el impacto negativosobre la salud y el medio ambiente.
PT - Osímbolo do caixote dolixo com o sinal de proibição indica que esse artigo deve ser separado dos resíduos domésticos convencionais. Deve ser entregue para
reciclagem de acordocomas regulamentações ambientais locais para tratamento deresíduos. Aoseparar um artigo assinalado dosresíduos domésticos,ajudaa reduzir
o volumede resíduos enviados para os incineradores ou aterros, minimizandoo potencial impacto negativona saúde pública e no ambiente.
Congurazionetramite PC
Congurationwith PC
ConsultaredocumentazionesistemaEntrematic ZEN Manager.
Refer toEntrematic ZEN Managersystemdocumentation.
ZEN
Manager
2
IP2269 -2017-03-30
Solo modelli /Onlymodels ZEN2 (ZEN2B/G/R/W/Y)-ZEN4 (ZEN4W)-ZENP2-ZENP4
Solo modelli /Onlymodels ZEN2C-ZEN4C
o
or
[F] DuplicazionecompletaTX esistente*
Existing TXfull duplication*
x 3 s
1. ConTX NUOVO
WithNEW TX
ESISTENTE
EXISTING
NUOVO
NEW
2. ConTXESISTENTE, entro 10s
With EXISTING TX, within10s
Compatibile anchecon: GOL4C,
Also compatiblewith:
BIXLS2
3x
LED ON o
or
0
1
[G] Inserimento manuale codice*/
manual codesetting*
2. Inserire sequenzadidieci“0” o “1”Lampeggidi conferma:
Insert sequenceoften “0” or “1”
x 3 s
1. Con TX NUOVO
WithNEW TX Conrmationblinks:
Esempio / :
Example
0100100100
Code
0100100100
1x = "0"
2x = "1"
3x = OK
"Dip-switch" code
LED ON
o
or
o
or
o
or
[H] Duplicazionedi un pulsante daTX generico*
3. Premere e rilasciare pulsantesu
Generic TX single-buttonduplication*
x 3 s
1. ConTX NUOVO
WithNEW TX
x 3 s
2. Ancora con TX NUOVO,entro 10s
Againwith NEW TX, within10s
TX NUOVOdoveduplicare TX generico
Press andrelease buttononNEW TX
onwhich duplicategeneric TX
(esempio /
example
)
4. Entro 10s premere pulsantedesideratosu TXgenerico
Within 10s press desired buttonongeneric TX
Compatibile con prodottia 433MHzcon codica
tipo"MM53200"o similare /
Compatiblewith 433
MHzproducts with "MM53200"encodingor similar
1x 2x
3x
LED ON
o
or
o
or
o
or
x 2 s
x 3 s
[I] Aggiunta NUOVOTX da TX esistente /
AddNEW TX by existing TX
5-10 m
x 3 s 10s
1. Avvicinarsial cancello
Gonear the gate
2. ConTXESISTENTE (programmato)
With EXISTING (programmed)TX
3. AncoraconTXESISTENTE
AgainwithEXISTING TX
4. Con NUOVOTX, entro 10s
With NEW TX,within 10s
5. Attendere
Wait
LED ON
o
or
o
or
o
or
o
or
LED ON
[J] Abilitare-disabilitarecriptazioneAES* /
Enable-disableAES encryption*
3. Conpulsante premuto
reinserire batteria
With buttonpressed
re-insertbattery
1. Estrarre batteria 2. Tenerepremutopulsanteindicato
Takeoutbattery
AES abilitato-disabilitatoneipulsanti indicati
AES enabled-disabledonthe indicatedbuttons
Keep pressed buttonas shown
La procedura commutamodalità AES (ON-OFF-ON-OFF...).DecodicaAESdisponibilesolo suricevitori e Q.E. dinuovagenerazione-consultare manuale prodottospecico
The proceduretogglesAES mode(ON-OFF-ON-OFF...).AESdecoderavailable only onnew generationreceivers or controlunits -refer to specic productmanual
Caso a) pulsanti 1/1-2
Case a) buttons 1/1-2
Case b) pulsanti 2/3-4
Case b) buttons 2 /3-4
PRESS
Verica modalità
Modeverication
Caso /
Case a)
Case /
Case b)
1
23
4
1
2
5x AES
OFF
AES
ON
PRG
ENTER
o
or
[A] Programmazione diretta /
Direct programming
10s
1. Attivare ApprendimentoRicevitore
(consultare manuale prodottospecico)
ActivateReceiver Learning mode
(refer to specicproductmanual)
2. Premere pulsante sul NUOVOTX
Press buttononNEW TX
3. Attendere
Wait
[C] Verica tipo codica* /
Encoding type check*
1. Tenerepremutopulsante davericare
Keep pressed buttontobe checked
esempio
example
Funzionesalva-batteriadeveessere abilitata /
Battery save functionmustbeenabled
LED OFF
3-5s
N x
N Codica/
Encoding
0 Fisso /
Fixed code
1 "Dip-switch"
2 Rolling code
3 "MM53200"clone
4 AES
5 Protetto/Protected
o
or
[E] Ripristino condizionifabbrica/
Factory RESET
1.
Estrarre la batteria
2. Tenerepremutipulsantiindicati
Keep pressed buttonsas shown
Takeoutbattery
3. Conpulsantipremutireinserire batteria
Keepingbuttonspressedre-insert battery
PRESS
10x
o
or
o
or
o
or
x 3 s
LED ON
2a.Abilitare /
Enable
2b.Disabilitare /
Disable
x 3 s
x 3 s
[B] Abilitare-disabilitare funzionesalva-batteria*
Battery save functionenable-disable*
1. Premere simultaneamente
Press simultaneously
Si sconsiglia l'uso diradiocomandiper
eettuare operazionia uomopresente
Donotuse remote controlstoperform
hold-to-runoperations
1x
2x
*
Abilitata difabbricasu tutti i modelli
Factory enabledin all models
Tuttii modelli /All models
[D] Sostituzionebatteria /
Battery replacement
Nuova/
New
CR2032
2. Estrarre batteria
Takeoutbattery
1. Aprire contenitore
Openhousing
3. Inserire nuovabatteria
Insert newbattery
Fig.3
ITALIANO
ENGLISH
3
IP2269 -2017-03-30
DEUTSCH FRANÇAIS
Seulement modèles/Nur ModelleZEN2 (ZEN2B/G/R/W/Y)-ZEN4(ZEN4W)-ZENP2-ZENP4
Seulement modèles /Nur Modelle ZEN2C-ZEN4C
ou
oder
[F] Duplication complète TX existant*
Komplette Duplizierungdes bestehendenTX*
x 3 s
1.Avec NOUVEAUTX
MitNEUEM TX
EXISTANT
BESTEHENDES
NOUVEAU
NEUES
2. AvecTXEXISTANT, dans les 10s
VOYANTALLUMÉ
MitBESTEHENDEM TX,innerhalbvon 10s
Également compatibleavec : GOL4C,
Auchkompatibel mit:
BIXLS2
3x
LEDEIN
ou
oder
0
1
[G] Saisie manuelle ducode*/
2. Saisir une séquencededix« 0» ou« 1»
Zehn“0” oder“1” hintereinandereingeben
x 3 s
1. Avec NOUVEAU TX
MitNEUEM TX
Clignotementsde conrmation:
Blinkzeichenzur Bestätigung:
Exemple /Beispiel: 0100100100
Code
0100100100
1x = "0"
2x = "1"
3x = OK
Code« Commutateur»
"Dip-Schalter"-Code
VOYANTALLUMÉ
LEDEIN
Manuelle Code-Eingabe*
ou
oder
ou
oder
ou
oder
[H] Duplication d'un boutonTX générique*
Duplizierungeiner Taste vongenerischem TX*
x 3 s
1.Avec NOUVEAU TX
MitNEUEM TX
x 3 s
2. Encore avec NOUVEAUTX,dans les 10s
Wieder mit NEUEM TX, innerhalbvon 10s
3. Appuyeret relâcher le boutonsur
NOUVEAUTXoùdupliquerle TXgénérique
TasteaufNEUEM TXwogenerisches TX
dupliziertwerdensoll drückenundloslassen
(exemple/Beispiel)
4. Dansles 10s appuyer sur le boutonsouhaitésur le TXgénérique
Innerhalb 10s gewünschte Tasteauf generischemTXdrücken
Compatibleavec des produitsà 433MHzavec
un codagede type« MM53200» ousimilaire
Kompatibel mit Produkten mit433MHzmit
Codierungstyp"MM53200"oder ähnlichem
1x 2x
3x
VOYANTALLUMÉ
LEDEIN
ou
oder
ou
oder
ou
oder
x 2 s
x 3 s
[I] Ajout du NOUVEAU TX depuis TX existant /
5-10 m
x 3 s 10s
1. S'approcher duportail
Zum Torgehen
2. AVECTXEXISTANT (programmé)
Bei BESTEHENDEM TX(programmiert)
3. Encore avecTXEXISTANT
WiederbeiBESTEHENDEM TX
4. Avec NOUVEAUTX,dans les 10s
Bei NEUEM TX,innerhalb von10s
5. Attendre
Warten
VOYANTALLUMÉ
LEDEIN
NEUES TX von bestehendem TX hinzufügen
ou
oder
ou
oder
ou
oder
ou
oder
VOYANTALLUMÉ
LEDEIN
[J] Activer-désactiverle cryptageAES* /
AES-Kryptierung aktivieren-deaktivieren*
3. Touten gardant le boutonenfoncé,
réinsérer labatterie
Mit gedrückterTastedie
Batterie wieder einsetzen
1. Extrairela batterie
Batterie entnehmen
Activer-désactiverle cryptageAES*
AES-Kryptierung aktivieren-deaktivieren*
2. Garder enfoncé le boutonindiqué
AngegebeneTastegedrückt halten
La procédurepasseaumode AES (ON-OFF-ON-OFF...).LedécodageAESn'estdisponiblequesur les récepteursetles tableauxélectroniquesdenouvellegénération-consulter le manuelduproduitspécique
DasVerfahrenschaltet AES-Modusum(EIN-AUS-EIN-AUS...). AES-Decodierungnurauf EmpfängernundSteuerungender neuenGenerationverfügbar -siehe Handbuchdes spezischenProdukts
Cas a) boutons 1/1-2
Fall a) Tasten 1/1-2
Cas b) boutons 2 /3-4
Fall b) Tasten 2/3-4
APPUYER
DRÜCKEN
Vérication dumode
Modus-Überprüfung
Cas/
Fall a)
Cas/
Fall b)
1
23
4
1
2
5x
AES ÉTEINT
AES AUS
AES ALLUMÉ
AES EIN
PRG
ENTER
ou
oder
[A] Programmation directe /
Direkte Programmierung
10s
1. Activer apprentissagerécepteur
(consulter le manuelduproduitspécique)
EinfahrenEmpfängeraktivieren
(siehe Handbuchfür dasspezischeProdukt)
2. Appuyersur le boutonsur le NOUVEAUTX
DieTasteamNEUEN TXdrücken
3. Attendre
Warten
[C]
Vérication du type de codage*/
Überprüfung des Codierungstyps
1. Garder enfoncéle boutonà vérier
Zu prüfendeTastegedrückt halten
exemple
Beispiel
La fonctionéconomiseurde batterie doitêtre activée/Batteriespeicherfunktionmuss aktiviertsein
VOYANTÉTEINT
LEDAUS
3-5s
N x
N Codage/Codierung
0 Fixe /Festcode
1 « Commutateur »/
"Dip-Schalter"
2 Rolling code
3 Clone "MM53200"/
"MM53200"duplizieren
4 AES
5 Protégé/Geschützt
ou
oder
[E] Restauration des conditionsd'usine /
1. Extraire la batterie 2. Garder enfoncésles boutonsindiqués
AngegebeneTastengedrückt halten
Batterie entnehmen
3. Toutengardantlesboutonsenfoncés,réinsérerlabatterie
MitgedrücktenTastendie Batterie wieder einsetzen
APPUYER
DRÜCKEN
10x
Werkseitige Einstellungen wiederherstellen
ou
oder
ou
oder
ou
oder
x 3 s
VOYANTALLUMÉ
LEDEIN
2a. Activer /Aktivieren
2b.Désactiver /Deaktivieren
x 3 s
x 3 s
[B] Activer-désactiverl'économiseur de batterie*
Batteriespeicherfunktion aktivieren-deaktivieren*
1x
1. Appuyeren mêmetemps sur
Gleichzeitigdrücken
Il est déconseilléd'utiliser desradiocommandes
poureectuer desopérationshommeprésent
Für Arbeiten mit Totmann-Funktionwirdvom
GebrauchvonFunksteuerungenabgeraten
2x
*
Activée en usine sur tousles modèles
Werkseitig aufallen Modellenaktiviert
Tousles modèles /Alle Modelle
[D] Remplacementde la batterie /Batteriewechsel
Nouvelle /Neue
CR2032
2. Extrairela batterie
Batterie entnehmen
1. Ouvrirle compartiment
Behälter önen
3. Insérer une nouvellebatterie
Neue Batterie einsetzen
Fig. /Abb .3
4
IP2269 -2017-03-30
ESPAÑOLPORTUGUÊS
Solo modelos/ApenasmodelosZEN2 (ZEN2B/G/R/W/Y)-ZEN4 (ZEN4W)-ZENP2-ZENP4
Solo modelos /Apenas modelos ZEN2C-ZEN4C
o
or
[F] Duplicacióncompleta TX existente*
Duplicação completa TX existente*
x 3 s
1.ConTX NUEVO
Com TX NOVO
EXISTENTE
NUEVO
NOVO
2. ConTXEXISTENTE, antes de10s
ComTXEXISTENTE, dentrode 10s
Compatible tambiéncon: GOL4C,
Compatíveltambémcom:
BIXLS2
3x
LEDENCENDIDO
LEDACESO
o
ou
0
1
[G]
Introducciónmanual del código*/
2. Introduzcasecuencia dedieces “0” o“1” Parpadeode conrmación:
Introduzaa sequência dedez“0” ou“1”
x 3 s
1. ConTX NUEVO
Com TX NOVO Lampejo deconrmação:
Ejemplo /Exemplo: 0100100100
Código
0100100100
1x = "0"
2x = "1"
3x = OK
Código"interruptor DIP"
Código"Dip-switch"
LEDENCENDIDO
LEDACESO
Introdução manual código*
o
ou
o
ou
o
ou
[H] Duplicación de un botóndesde TX genérico*
3. Presione y suelte el botónen el
Duplicação de um botãoa partir de TXgenérico*
x 3 s
1.ConTX NUEVO
Com TX NOVO
x 3 s
2. Todavíacon TXNUEVO, antes de 10s
De novo comTX NOVO,dentro de 10 s
TXNUEVOdonde se duplica TXgenérico
Prima e solte o botãodoTXNOVO
para duplicaroTX genérico
(ejemplo /exemplo)
4. Antes de10s, presione el botóndeseadoen el TX genérico
Prima dentro de10s o botãodesejadonoTXgenérico
Compatible conproductos a 433MHzcon codicación
tipo"MM53200"o similar
Compatível com produtosa 433MHzcom codicação
de tipo"MM53200"ousemelhante
1x 2x
3x
LEDENCENDIDO
LEDACESO
o
ou
o
ou
o
ou
x 2 s
x 3 s
[I] Adición de NUEVO TXdesde TX existente /
5-10 m
x 3 s 10s
1. Acérquesea la cancela
Aproxime-sedoportão
2. ConTXEXISTENTE (programado)
ComTXEXISTENTE (programado)
3. TodavíaconTXEXISTENTE
DenovocomTXEXISTENTE
4. ConNUEVOTX, antes de 10s
Com NOVOTX, dentro de 10s
5. Espere
Aguarde
LEDENCENDIDO
LEDACESO
Adição NOVOTX a partir de TXexistente
o
ou
o
ou
o
ou
o
ou
LEDENCENDIDO/LEDACESO
[J] Habilitar-deshabilitarcifradoAES* /
3. Conel botónpresionado,vuelva a
introducirla batería
Com obotão
pressionado, reponha
a bateria
1. Extraiga la batería 2. Mantengapresionadoel botónindicado
Remova a bateria
AES habilitado-deshabilitadoen los botonesindicados
AES habilitado-desabilitadonos botõesindicados
Mantenha obotãoindicadopressionado
El procedimientoconmutael modoAES (ON-OFF-ON-OFF...).DecodicaciónAESdisponiblesoloenreceptores yC.E. denuevageneración;consulteel manual delproductoespecíco
Oprocedimentocomuta as modalidadesAES (ON-OFF-ON-OFF...).DecodicaçãoAESdisponívelapenas nosrecetores e Q.E. denovageração-consulte omanual doprodutoespecíco
Caso a) botones 1 /1-2
Caso a) botões 1 /1-2
Caso b) botones 2 /3-4
Caso b) botões 2 /3-4
PRESIONE
PREMIR
Comprobacióndemodalidad
Vericaçãoda modalidade
Caso a) Caso b)
1
23
4
1
2
5x AES APAGADO
AES ENCENDIDO
AES ACESO
Habilitar-desabilitar codicaçãoAES*
PRG
ENTER
o
ou
[A] Programación directa /
10s
1. Active AprendizajeReceptor
(consulte el manual de productoespecíco)
Ativar AprendizagemdoRecetor
(consulte o manualdoprodutoespecíco)
2. Presione el botónenel NUEVOTX. 3. Espere
Prima o botãono NOVOTX Aguarde
Programação direta
[C]
Comprobacióndetipodecodicación*/Vericaçãotipocodicação*
1. Mantenga presionadoel botónque debecomprobarse
Mantenha premidoo botãoa vericar
ejemplo
exemplo
La funcióndeproteccióndebatería debeestar habilitada/Afunçãopreserva-bateria deveestar habilitada
LED APAGADO
3-5s
N x
N Codicación/Codicação
0 Fijo/Fixo
1 "Interruptor DIP" /"Dip-switch"
2 Rollingcode
3 "MM53200"clon/clone
4 AES
5 Protegido
o
ou
[E] Restablecimiento de condicionesde fábrica /
1. Extraiga la batería 2. Mantengapresionadoslos botonesindicados
Mantenha premidosos botõesindicados
Removaa bateria
3. Conlos botonespresionados, vuelva
a introducir la batería /Com os botões
premidos,reponhaa bateria
PRESIONE
PREMIR
10x
Restabelecimento das condiçõesoriginais
o
ou
o
ou
x 3 s
LEDENCENDIDO
LEDACESO
2a. Habilite /Habilitar
2b.Deshabilite /Desabilitar
x 3 s
x 3 s
[B]
Habilitar-deshabilitarfunciónde protecciónde batería*
Habilitar-desabilitar a funçãopreserva-bateria*
1. Presione simultáneamente
Prima simultaneamente
Sedesaconsejaelusoderadiocontrolesadistanciapara
efectuaroperacionesdiseñadasparaqueeloperadorestépresente
Recomenda-seousoderadiocontrolosparaefetuaroperações
comoperadorpresente
1x
2x
*
Habilitada defábrica en todoslos modelos
Habilitada porpredeniçãoem todosos modelos
Todoslos modelos /Todosos modelos
[D] Sustitución de batería /
Nueva /Nova
CR2032
2. Extraiga la batería
Removaa bateria
1. Abra el contenedor
Abra oalojamento
3. Introduzcauna batería nueva
Coloquea novabateria
Substituição da bateria
Fig.3

This manual suits for next models

12

Other Entrematic Transmitter manuals

Entrematic BIXLR42 Guide

Entrematic

Entrematic BIXLR42 Guide

Entrematic ZEN2 Series User manual

Entrematic

Entrematic ZEN2 Series User manual

Entrematic DITEC ZENKW2 User manual

Entrematic

Entrematic DITEC ZENKW2 User manual

Entrematic BIXLR12 Guide

Entrematic

Entrematic BIXLR12 Guide

Popular Transmitter manuals by other brands

Mitutoyo U-WAVE-T user manual

Mitutoyo

Mitutoyo U-WAVE-T user manual

Siemens SITRANS F C MASSFLO MASS 6000 quick start

Siemens

Siemens SITRANS F C MASSFLO MASS 6000 quick start

ACS Hydrocont HP4SC operating manual

ACS

ACS Hydrocont HP4SC operating manual

AFi MT-1 instruction manual

AFi

AFi MT-1 instruction manual

Shure P4T user guide

Shure

Shure P4T user guide

PR electronics 7501 series product manual

PR electronics

PR electronics 7501 series product manual

JVC PK-EXT40TG instructions

JVC

JVC PK-EXT40TG instructions

ABB STT04 instruction manual

ABB

ABB STT04 instruction manual

BAPI BA/T100 Installation & operating instructions

BAPI

BAPI BA/T100 Installation & operating instructions

Emerson Micro Motion 1600 installation manual

Emerson

Emerson Micro Motion 1600 installation manual

Vislink InCam-HG user manual

Vislink

Vislink InCam-HG user manual

Hampshire Controls TT Series operating instructions

Hampshire Controls

Hampshire Controls TT Series operating instructions

Nautel NV Series Software update procedure

Nautel

Nautel NV Series Software update procedure

Comnet FVT80D4SFP Installation and operation manual

Comnet

Comnet FVT80D4SFP Installation and operation manual

AMG AMG4683ER instruction manual

AMG

AMG AMG4683ER instruction manual

WT sensor PCT220 quick start guide

WT sensor

WT sensor PCT220 quick start guide

PR PRetop 5331 manual

PR

PR PRetop 5331 manual

Distech Controls HS-D 2X Sensor Series Hardware installation guide

Distech Controls

Distech Controls HS-D 2X Sensor Series Hardware installation guide

manuals.online logo
manuals.online logoBrands
  • About & Mission
  • Contact us
  • Privacy Policy
  • Terms and Conditions

Copyright 2025 Manuals.Online. All Rights Reserved.