EOS SteamTec Classic Planning guide

1
D
IP x4
Made in Germany
SteamTec Classic
Druck Nr. 29343783en 40.12
HD 7
GB Assembly and operating instruction

2GB
English
Table of Contents
Plan.........................................................................................................................3
Technical specifications.....................................................................................5
1. Erecting the frame ..............................................................................................5
1.1.Fresh water and dirty water.........................................................................5
1.2. Connection cables......................................................................................6
1.3. The steam pipe ..........................................................................................6
1.4. Aeration and ventilation .............................................................................6
2. Final assembly ..................................................................................................7
2.1.Dismantling the steam generator hood .......................................................7
2.2. Connecting to the water supply and drain..................................................7
2.3. Steam connections....................................................................................7
2.4. Connecting to the mains ............................................................................7
Terminal diagram...............................................................................................8
2.5. Fitting the hood for the steam generator ....................................................9
3. Service................................................................................................................9
4. Operation ............................................................................................................9
3. Flushing and decalcification..............................................................................10
Service Address:...................................................................................................11
Guarantee.............................................................................................................11
Handling procedures for return shipments (RMA) - Details for all returns ! ..........12

3
GB
1000
300
Floor drain
control room
Connection
for Steamfix
Door
Fresh air
Cabin drain
Plan
Container for
descaling li-
quid

4GB
Fresh water supply
Supply pump for
descaling liquid
Steam output connec-
tor
Pressure release exit
pipe
Drain for descaling
Wiring cable feeds
Terminal block
X3
Steam pipe
Fresh water
supply pipe
Pressure re-
lease valve
Safety tempera-
ture limitation
Control
PCB
Steam generator
Magnet val-
ve, flush
Drain for descaling
Pressure re-
lease exit pipe
Supply tubes for es-
sences and descaling
liquid
Pressure re-
lease exit pipe

5
GB
Equipment
Output
Voltage
in kW
Nominal
Voltage Fuse in A Cross-section
in mm²
SteamTec
Basic
4,5 400 V 3 N
AC 50 Hz 3 x 16 5 x 2,56,0
9,0
Technical specifications
• Before you put the sauna up please read these instructions carefully and keep
them for reference in a safe place.. You will find a great deal of useful advice on
how to set up your sauna safely and expertly.
• After you have unpacked everything, please check carefully that no part of the
steam generator is missing or damaged during transport. EOS does not accept
any liability for any damage that has occurred in transit during storage.
Delivery includes:
• Steam generator
• wall mounting template
• 4 screws 45 x 40
• 4 dowels M8
• Union 1“ - 35 mm
• 0.5 m steel-coated pressure tube 3/8 - 500
- 3/4
• 0.4 m flex tube 28 - 22
• 5 L container for descaling liquid with level
probe
• Owner‘s manual
1. Erecting the frame
Complete the building according to the
plans.
1.1.Fresh water and dirty water
The way in which the pipes for the fresh
water and the dirty water are posiitoned
should be done with the help of the dril-
ling template which is included with the
materials
1.2.Electrical wiring
The electrical wiring must take into full
consideration the requisite conductor
cross-section. The mains electricity must
be connected in accordance with DIN
VDE 0100. There must be a separate cir-
cuit for the system. The steam generator
must have a separate FI switch (IΔ = 30
mA) forsafety reasons so that the equip-
ment has a circuit breaker with a contact
opening of at least 3 mm from the mains
supply. The electricity should be connec-
ted to the mains only by a qualified elec-
trician.
X = This area is for the cable duct piping
to be used for the electricity supply lines
(control panel, temperature sensor, etc.)

6GB
4,5-9 kW 340 mm
290
510
4,5 - 9 kW 620 mm
1000
300
420
12 - 18 kW 410 mm
12 - 18 kW 670 mm
150
150
1.2. Connection cables
It is advisable to use the drilling template so
that all the connections that are connected to
the steam generator can be drawn through
correctly. For the connection to the genera-
tor you will require a cable that is about 0,5
m long.
The steam generator is controlled by the
sauna control unit of your sauna system.
Use one of the following control units for this
purpose:
• EMOTEC HCS 9003
• EMOTEC HCS 9003 DB/DL
• or EMOTOUCH
always only in connection with the optional
humidity sensor.
A cable 5 x 1.5 mm² is required to connect
the control unit to the steam generator.
1.3. The steam pipe
For all types of steam generator the steam pipe must always be either of copper or high-
quality stainless steel (min. Ø 22 mm, we recommend Ø 35 mm in order to reduce the
noise level) and when it is being installed sharp bends must be at 90° in 2 x 45°bends.
The steam pipe insulation is best completed with either Isover, Armafl ex HT or similar
materials that are 25 - 30 mm thick.
When the steam pipe is being fitted care must be taken to ensure that it inclines towards
the steam outlet so as to prevent any blockage through condensation (water bag). The
steam pipe must be no longer than 5 metres. Pressure must not be allowed to build up
inside the steam pipe.
1.4. Aeration and ventilation
Care must be taken that the room where the steam cabin is set up is sufficiently aerated
and ventilated.
Connection to a central ventilation system is not recommended due to possible conden-
sation formation.

7
GB
2. Final assembly
2.1.Dismantling the steam generator hood
• Below the steam generator there are two 32 x
16mm screws that must be unscrewed from the
hood.
Make sure that the hood is connected to the
steam generator through the cables to the display
panel. To remove the hood, loosen the plugs on
the connection cable.
• The assembly drill holes must be drilled in the
wall with the help of the template.
• Place the top screws in their dowels and tighten
them to 5mm from the wall.
• Hang up the steam generator and then tighten
the lower screws.
30 mm
• Screw on the flex-hose with the stainless steel woven casing already on the steam gene-
rator onto the mains water supply (3/8“).
• The water tank will be drained automatically during the flush programme
2.3. Steam connections
• Connect the steam pipe with the RG screw (1“ x 35) to the steam generator.
• You can fix the steam exit either on the right-hand side or below the steam generator.
• Connect the Steamfix of the sauna heater to the pre-installed 5/4“ x 35 sleeve.
Important Notes:
The regulations of EN 1717 and/or DIN 1988 Part 4 must be attended. Appropriate
measures must be taken that prevent the water from running back into the drinking water
pipeline. For this, especially pipe isolators or system isolators are appropriate. If necessary,
ask your drinking water supply company or your local sanitary expert.
2.2. Connecting to the water supply and drain
• Route all the electric cables from below through the PG screw connections or through the
rear wall.
Now connect the steam generator according to the following terminal diagram.
2.4. Connecting to the mains
When the mains are connected it is essential to comply with the local VDE EVU require-
ments as these currently apply. The mains must be connected and checked by a fully
qualified electrician to ensure that the applicable norms are adhered to in full.

8GB
L1
L2L3 N PE 27 28 S1
LWB PEN PE L1 L2 L3 N S1 LNL N WM PE N N U V W WB
Steamtec Classic Steuergerät / control unit EMOTEC HCS 9003 EMOTEC HCS 9003 DB/DL
EMOTOUCH
X3
400 V 3N
AC 50 Hz
400 V 3N
AC 50 Hz
Saunaheater
Powerunit
Ventilator
Cabin light
Main
Main
Terminal diagram
Descaling liquid level probe

9
GB
2.5. Fitting the hood for the steam generator
Insert the connection cable to the display panel again and fit the hood in place.
Use the two screws to fix the steam generator hood under the the casing.
3. Service
• Please note that all the work must be undertaken only by fully qualified persons.
• Before any servicing is started the steam generator must be disconnected from the
mains.
• By further questions and technical queries please contact your local EOS dealer.
4. Operation
The Steamtec Classic is controlled by the sauna control unit belonging to the sauna heater.
More information can be found in the operating instructions for your sauna control unit.
You will find the following display panel on the steam generator
Operation
Decalcification / Flushing
STB problem
Problem with softening
agent supply
green
green
red
red

10 GB
3. Flushing and decalcification
The development of lime scale deposits due to hard water in the tank and on the radia-
tors reduces quite considerably the life of the heating rods.
We recommend that you use a chemical water softener with the steam generator (as an
extra) so as to prevent lime scale from developing.
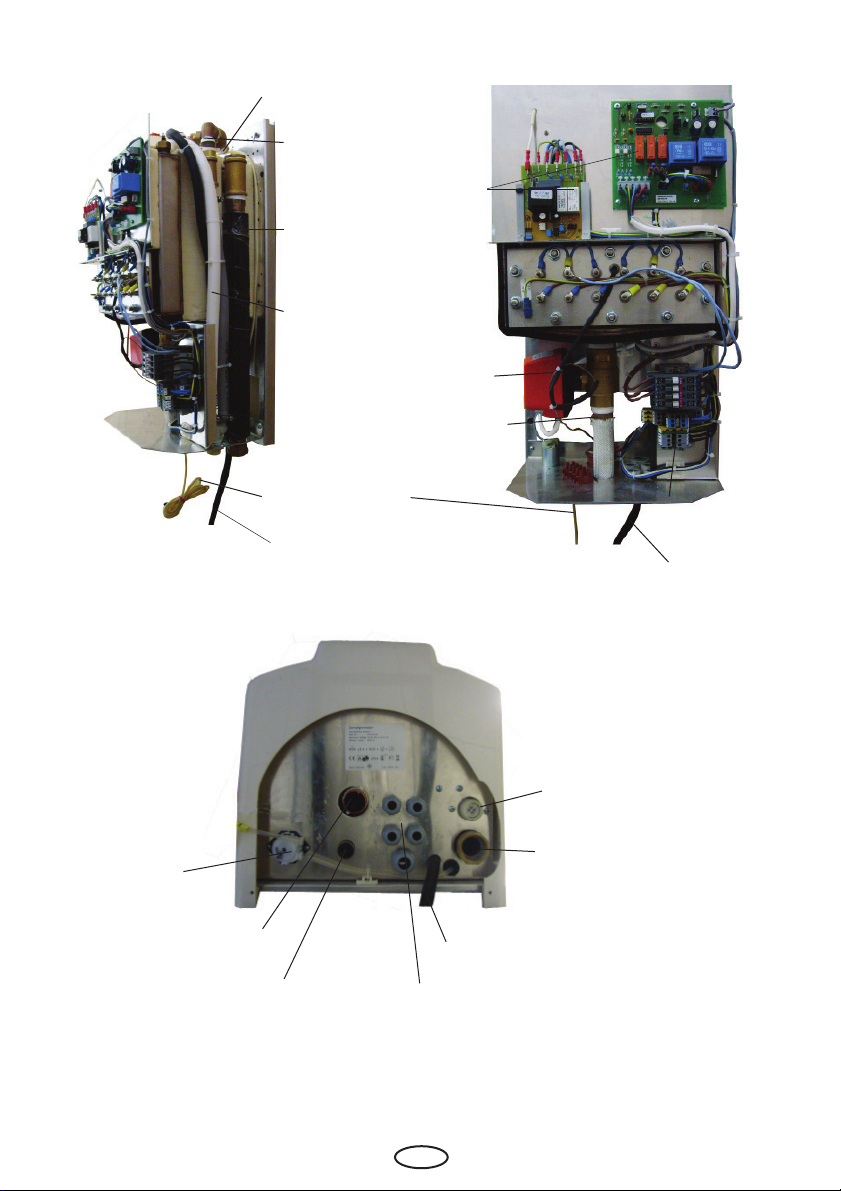
The steam generator is equipped with a fully automatic self-cleaning system (flushing
and descaling), which may be programmed at site to match the local water quality.
The flushing or decalcification process starts automatically after a delay of 30 minutes af-
ter the steam generator has been switched off. The green LED „Decalcification / flushing“
lights up on the display panel.
Whenever the decalcification programme is run, the tube pump will fill up the steam tank
with approximately 100 ml of softening agent.
This will be allowed to work for about 30 minutes and then the water with the lime scale
in it will be drained out through the electr. ball valve.
The flushing valve flushes the container a second time, the ball valve will close and the
flushing programme will come to an end.
The running time for the flushing programme is about 35 minutes.
The steam generator cannot be switched on during this time.
Check regularly if there is still enough of the cleaner / descaling liquid in the container.
When the level in the container remains unchanged over a longer time this may indicate
a failure in the cleaning system. Check the steam generator immediately to prevent da-
mages from the scale building inside water tank.
If the softening agent supply has been almost used up, the red LED „Problem with softe-
ning agent supply“ lights up on the display panel.
The LED „operation“ lights up when the sauna equipment is in operation, independently of
whether the steam generator is working or not.
The steam generator is equipped with an overheating protection feature (Safety Temperatu-
re Limiter (STB in German)). If this STB reacts, the steam generator switches off and the red
LED „STB problem“ lights up on the display panel.
In this case, wait briefly until the steam generator has cooled down. Disconnect the sauna
control unit from the mains for about 5 seconds (switch off fuses or FI switch). The device
now works normally again. If the fault occurs again, have the device checked by your autho-
rised EOS partner.

11
GB
Service Address:
EOS Saunatechnik GmbH
Adolf-Weiß-Straße 43
35759 Driedorf-Mademühlen, Germany
Tel: +49 (0)2775 82-514
Fax: +49 (0)2775 82-431
www.eos-sauna.de
WARRANTY
The warranty is provided according to the
legal regulations at present.
Manufacturer’s guarantee:
- The period of guarantee starts from the
date of purchase and lasts up to 2 years
by commercial use and 3 years by private
use.
- Always include the completed guarantee
certificate when returning equipment.
- The guarantee is void for appliances
which have been modified without
manufacturer’s explicit agreement.
- Damages caused by incorrect operation
or handling through non-authorized per-
sons are not covered under the terms of
guarantee.
- In the event of a claim please indicate the
serial number as well as the item number
and model name with detailed description
of the fault.
- This guarantee covers defective parts
and labour but not the defects caused by
wear and tear.
In case of complaint please return the
equipment in its original packaging or other
suitable packaging (caution: danger of
transport damage) to our service depart-
ment.
Always include the completed warranty
certificate when returning equipment.
Possible shipping costs arising from the
transport to and from point of repair cannot
be overtaken by us.
Outside of Germany please contact your
specialist dealer in case of warranty claims.
Direct warranty processing with our service
department is in this case not possible.
Equipment commissioning date:
Stamp and signature of the authorized
electrician:
Please keep this address in a safe place to-
gether with the installation guide.
To help us answer your questions quickly
and competently please provide the infor-
mation printed on the type shield including
the model, item no. and serial no., in all in-
quiries.

12 GB
Handling procedures for return shipments (RMA) - Details for all returns !
Dear customer
we hope that you will rejoice in the ordered articles. Just in case that you are not entirely contented as an
exeption, please follow the procedures specified below.This enabling us to ensure a quick and smooth
handling of the return shipment.
Form of complaint:
Please absolutely respect for all returns!
• Please add the available RMA-voucher always completely filled out together with an
invoice copy to the return shipment! Do not stick it on the goods or on the packaging.
We do not accept the return shipment without these papers.
• Not prepaid parcels will be refused and returned to Sender! Please always ask for the
RMA-No. for the cheapest return.
• Please pay attention that the goods have to be sent back without visible marks of
use in the original scope of delivery and in original packing.
• We recommend to use an additional solid and break-proof covering box which
should be padded out with styrofoam, paper or similar. Transport damages as a result of
faulty packing are for the sender‘s account.
2) Faulty goods
• The implied warrenty pe-
riod is 2 years.Please
contact your dealer in
case of faulty or wrong
articles or missing ac-
cessories. He will discuss
with you the individual
case and try for immediate
and customer-friendly so-
lution.
• For economic returns
within Germany you will
get an RMA-number
from the manufacturer.
• All returns have to be in
the original packing of
the goods with corre-
sponding accessories.
Please repack the goods
to avoid damages. In case
of wrong delivery, please
do not use this article !
3) Problems of installation
and functioning
• Please read the manual
carefully first of all and
pay attention to the indica-
ted assembly or installing
instructions.
• Your dealer should be
the first contact person
because he knows his
products best and also
knows possible problems.
• In case of function
problems with an arti-
cle, please check at first
whether there is an obvi-
ous material defect. The
quality system in our fac-
tory reduces malfunctions
of new appliances to al-
most zero.
.
1) Transport damage
• Please check the content
of your parcel immediately
and advise the forwarding
company of a claim (par-
cel service/ freight forwar-
der)
• Do not use damaged
goods!
• Ask the forwarder for a
written acknowledge-
ment of the damages.
• Report the claim promp-
tly by phone to your
dealer. He will discuss
with you how to act in this
case.
• If the transport box has
been damaged, please
use an additional covering
box. Do not forget to add
the acknowledgement of
the damage of the for-
warding company !
Table of contents
Other EOS Iron manuals

EOS
EOS SteamTec II Basic User manual

EOS
EOS SteamRock II Premium User manual

EOS
EOS SteamRock II Basic User manual

EOS
EOS SteamRock Basic User manual

EOS
EOS SteamTec Premium Troubleshooting guide

EOS
EOS SteamRock II Premium User manual

EOS
EOS SteamRock Premium User manual

EOS
EOS SteamAttrac User manual

EOS
EOS SteamRock II Premium User manual