Epic Chair-size Grid Mainframe User manual

Please Do Not Return
Your Item to the
Retailer
Thank you for your purchase of an Epic Furnishings item
You should enjoy many years of trouble free, dependable use
access to the item
888.608.6086 or email us at
Please have your order # as well as
If for any reason you are missing parts,
have damaged parts, or need help with
assembly or trouble shooting, please call:

Page 1 of 6
Getting Started
THANK YOU for selecting an Epic Furnishings futon. We've taken great care in the design and hand crafting of each
piece so that assembling your futon is enjoyable and rewarding. By carefully following the simple assembly instructions, you
will have created a piece of furniture that will provide years of enjoyment.
BEFORE YOU BEGIN ASSEMBLY be sure you have both boxes for the frame. This box and the box
containing the two arms. Select a suitable area for assembly of the unit, preferably an open space on soft carpet.
If assembling on a hard floor, we recommend laying down a blanket so that you will not scratch or mark either furniture or floor.
We take great care to make sure each piece comes with everything you'll need. If you find a part missing, or have questions,
just call us toll-free in the U.S.A. at 888.608.6086 during business hours.
Part # Description Qty
ALeft Hinge 1
BRight Hinge 1
CSeat Section 1
DBack Section 1
EStretcher Rail 2
FMedium Bolt 1" 4
GLonger Bolt 1¾" 12
HLarge Silver Washer 20
ILarge Nut 12
JAllen Wrench 1
KOpen Wrench 1
MRubber Pad 4
NLarge Lock Washer
12
RLongest Bolt 3 ½" 8
***Because this item is used with
several items, you may have extra
hardware/parts that you may
not need; simply ignore any extras***
DO NOT RETURN PRODUCT TO YOUR RETAILER
Contact Technical Support
Live Assembly Assistance (you must provide a valid order #)
888.608.6086 (Business Days 10am-5pm Central Time)
24/7 email: service@epicfurnishings.com (reply within one business day)
Video Assembly Instructions … www.youtube.com/epicfurnishings
Chair-size Grid Mainframe
Assembly
Instructions

Page 2 of 6
Step 1 Attaching Hinges to Wooden Arms
2. Starting with Left Arm and "L" Hinge, make sure hinge is position as shown in the diagram; keep in mind
that your particular arm will look different, this diagram is a generic arm presentation
3. Using the Medium Bolt (F), then a Large Lock Washer (N), then a Large Silver Washer (H), then the hinge,
then the Arm. Tighten the bolt loosely. Repeat for second bolt to attach hinge
4. Tighten both bolts using the Allen Wrench (J)
DO NOT RETURN PRODUCT TO YOUR RETAILER
Contact Technical Support
Live Assembly Assistance (you must provide a valid order #)
888.608.6086 (Business Days 10am-5pm Central Time)
24/7 email: service@epicfurnishings.com (reply within one business day)
Video Assembly Instructions … www.youtube.com/epicfurnishings
1. Remove the 2 hinges inside your hardware kit. You will find an "L" and "R" sticker on the hinges. Match the
5. Repeat steps 2 through 4 for Right Arm
"L" Hinge to the "L" Arm and the "R" Hinge to the "R" Arm
Chair-size Grid Mainframe
Assembly
Instructions

Page 3 of 6
Step 3 Attach Arms to Stretcher Rails
Note: It does not matter which Stretcher
Rail is used for the Front or Back
asdf
up with the screw holes. Then tighten all 8 Longest Bolts ®
evenly using Allen Wrench (J).
Live Assembly Assistance (you must provide a valid order #)
888.608.6086 (Business Days 10am-5pm Central Time)
24/7 email: service@epicfurnishings.com (reply within one business day)
Video Assembly Instructions … www.youtube.com/epicfurnishings
Chair-size Grid Mainframe
Stretcher Rails (E) to the front and back of the Left Arm as shown
in diagram. Tighten VERY LOOSELY the 4 Longest Bolts (R).
1. Using 4 of the Longest Bolts (R) attach the assembled
2. Repeat Step 1 for other arm. Note: Tighten slightly the bolts
on opposite corners to ensure that Stretcher Arms (E) are lined
DO NOT RETURN PRODUCT TO YOUR RETAILER
Contact Technical Support
Assembly
Instructions

Page 4 of 6
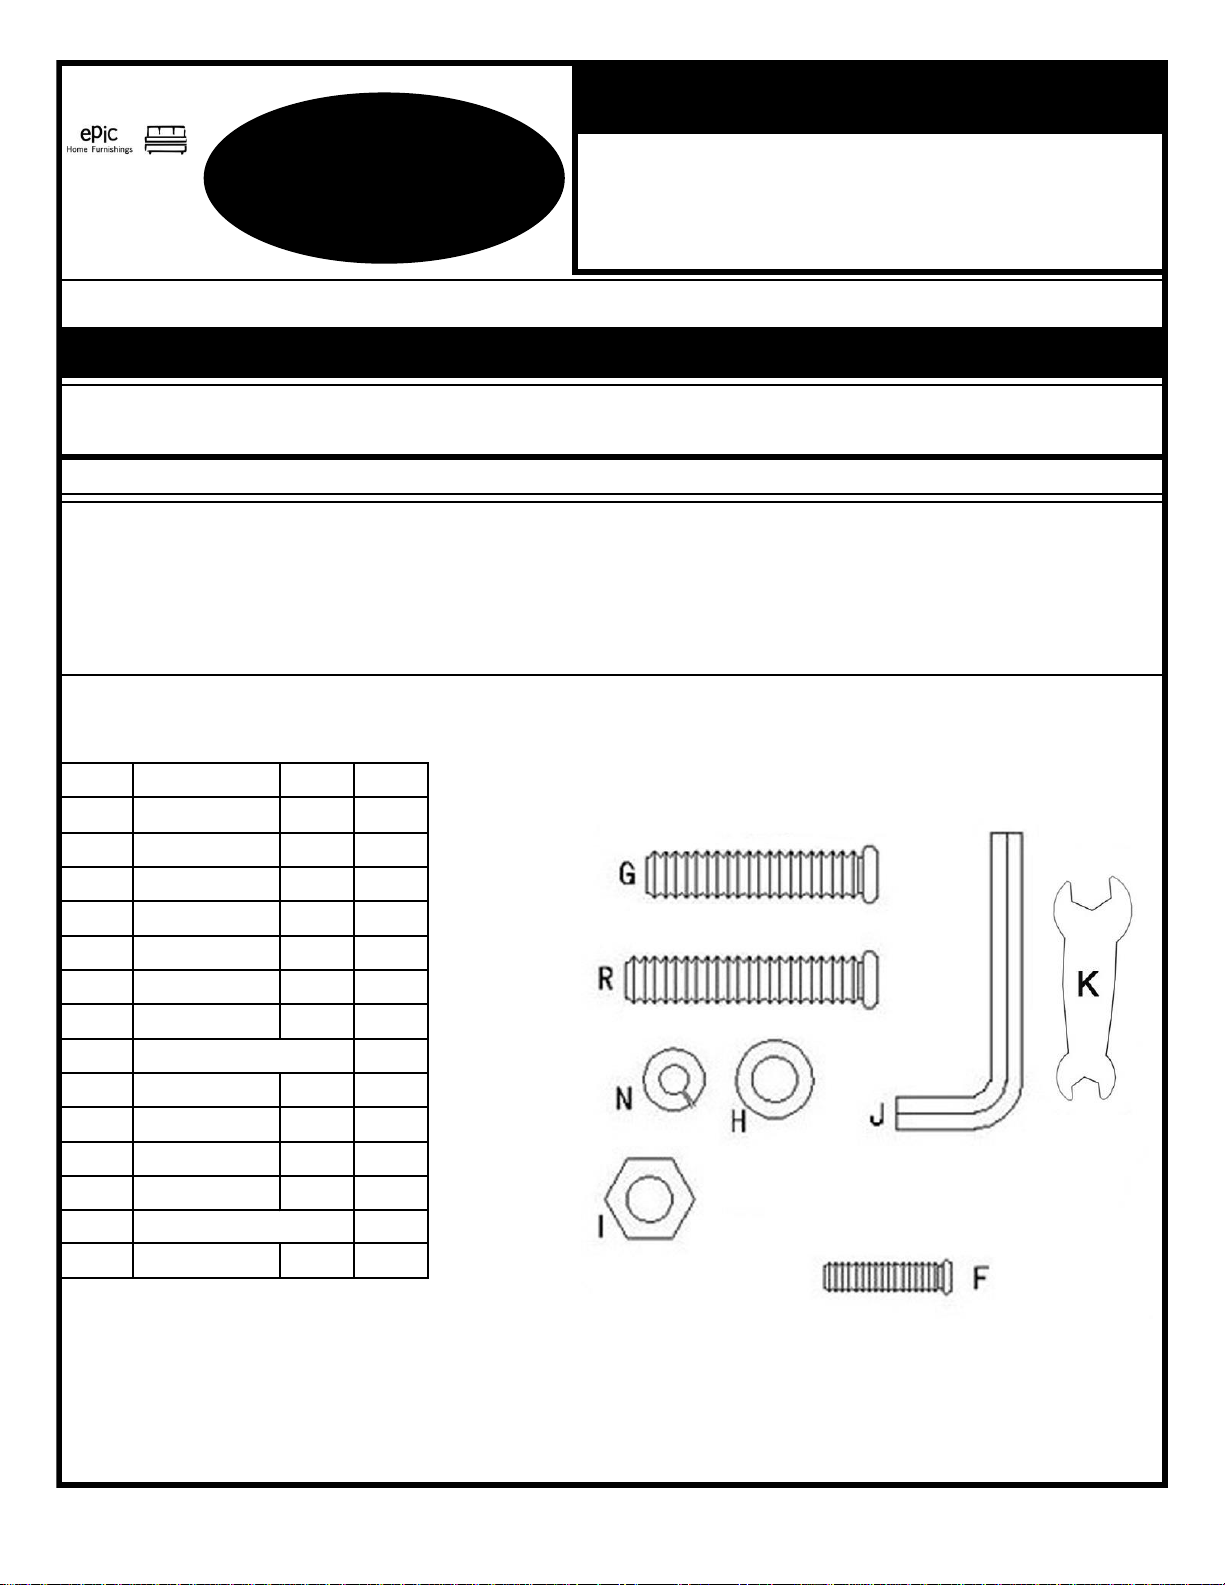
Step 5 Attach Seat and Back Sections to Hinges
Note: To identify Seat Section (C) from Back Section (D),
Seat Section (C) has 4 holes (2 if chair) along the front edge.
1. Attach Seat Section (C) WIRE RODS UP, to the front portion of the Hinge
using a Longer Bolt (G), then Seat Section (C), then Hinge,
then a Large Silver Washer (H), then a Large Lock Washer (N)
and then screw the Large Nut (I) from the bottom of the
Hinge. TIGHTEN LOOSELY. Repeat for the second hole.
2. Repeat step 1 for the Right side of the Seat Section (C).
During shipment hinges may get compressed. If Seat
Note: Wire Rods Up. Section does not easily reach the Right Hinge (B), simply
pull hinge and Seat Section (C) together to decompress hinge.
3. Repeat steps 1 and 2 for the Back Section (D) except
attaching to the back portion of the Hinge.
4. DO NOT TIGHTEN the 8 Longer Bolts (G) yet.
DO NOT RETURN PRODUCT TO YOUR RETAILER
Contact Technical Support
Live Assembly Assistance (you must provide a valid order #)
888.608.6086 (Business Days 10am-5pm Central Time)
24/7 email: service@epicfurnishings.com (reply within one business day)
Video Assembly Instructions … www.youtube.com/epicfurnishings
Chair-size Grid Mainframe
Assembly
Instructions

Page 5 of 6
Step 8 Attach Rubber Pads
Note: The purpose of the Rubber Pads (M) is to prevent
metal on metal wear and tear and minimize noise.
1. Convert the frame to the Bed Position (see page 6 for
instructions on how to convert your frame to the Bed Position).
2. Attach the four Rubber Pads (M) to the top of the
Stretcher Rail (E) at the four points where the Seat and
Back Sectionis (C & D) touch the Stretcher Rails (E).
Diagram shows placement for the Right side Seat Section.
Repeat for the other three points including the Left side Seat
Section, Left side Back Section, and Right side Back Section.
DO NOT RETURN PRODUCT TO YOUR RETAILER
Contact Technical Support
Live Assembly Assistance (you must provide a valid order #)
888.608.6086 (Business Days 10am-5pm Central Time)
24/7 email: service@epicfurnishings.com (reply within one business day)
Video Assembly Instructions … www.youtube.com/epicfurnishings
Chair-size Grid Mainframe
Assembly
Instructions

Page 6 of 6
Opening and Closing Your Futon
Sofa Position Bed Position
To position your futon frame in the bed position:
1. Place both hands on the seat of the frame.
2. Pull upward until the hinge tightens. In the same motion, gently pull back
and push down until frame is fully flat.
To bring you futon back up to the sofa position:
1. Lift up on seat frame until hinge releases and begins to fold.
2. Push forward and then down until back to the sofa postion.
Note: You can also lift from either side of the back, if you prefer, to bring it back up
to the sofa position
Care and Maintenance
The care required for your new futon frame is no different from any other piece of fine furniture in your home. A soft
damp cloth will easily clean your furniture. Avoid excessive moisture (especially from condensation forming on cold drinks)
and open flame or hot candle wax. As with all fine furniture, exposure to direct sunlight, over time, will lighten the finish.
Live Assembly Assistance (you must provide a valid order #)
888.608.6086 (Business Days 10am-5pm Central Time)
Start by standing directly in front of your futon frame
Video Assembly Instructions … www.youtube.com/epicfurnishings
DO NOT RETURN PRODUCT TO YOUR RETAILER
Contact Technical Support
Chair-size Grid Mainframe
24/7 email: service@epicfurnishings.com (reply within one business day)
Assembly
Instructions
Table of contents
Other Epic Indoor Furnishing manuals
Popular Indoor Furnishing manuals by other brands

BDI
BDI format Assembly instructions

CB2
CB2 CADET Assembly instructions

Home Decorators Collection
Home Decorators Collection Halford BT0283D Assembly instruction

Wallbeds Australia
Wallbeds Australia AB1a Assembly instructions

CAFOM SOURCING
CAFOM SOURCING MLM-611246NOIR Note of assembly

Twin-Star International
Twin-Star International TC56-6066 manual