manuals.online logo
Brands
  1. Home
  2. •
  3. Brands
  4. •
  5. Epic
  6. •
  7. Melting Machine
  8. •
  9. Epic ADVANCED STRIPPING EQUIPMENT FASTMELT 650 User manual

Epic ADVANCED STRIPPING EQUIPMENT FASTMELT 650 User manual

FASTMELT 650
QUICKSTART GUIDE
Follow the appropriate steps below to properly maintain the system.
1Remove and replace hydraulic filter 1Replace hydraulic fluid with #46 or equivalent.
Wear protective gloves, clothing, and face shield at all times
Check all connections and ensure there are no gas leaks Do
not leave kettle unattended when lit
Avoid breathing propane gas flames
Never heat thermoplastic material above 445°F
Do not over-fill kettle
In case of molten thermoplastic burns, submerge in cold water and seek immediate medical aid. Do not attempt to remove thermoplastic from skin.
inside kettle top.
1Grease shaft bearing with lubriplate AC-2A, Enco Andock B or equivalent.
2Change engine oil at least every 24 hours of operation, and maintain
oil change records.
3Check material and oil temperature gauges with a long stem,
high-temperature thermometer. Calibrate gauges when necessary.
4Check interior of kettle and remove excessive resin buildup, particularly
1Check hydraulic oil level.
2Check that hydraulic shut-off valve is open.
3Check propane lines.
4Check hydraulic lines for leaks and hose deterioration.
5Check engine oil level.
6Check propane tank condition.
Tanks should be leak-free and rust-free.
SAFETY
MAINTENANCE
DAILY MAINTENANCE WEEKLY MAINTENANCE
BI-ANNUAL MAINTENANCE (Every 6 Months) ANNUAL MAINTENANCE (Every Year)
2811 Fiechtner Drive
Fargo, ND 58103
701-367-9233 Phone
701-277-7073 Fax
epicsolutions.us
The FastMelt 650 is a completely self-contained thermo-
plastic melting system that holds 650 lbs. of material.
It’s one of the most versatile/efficient supply systems with
the ability to be placed in the back of a pickup, flat-bed
truck, or a work trailer for easy transport.
Compatible with any Thermomark applicator and most
competitive models.
PURPOSE
Ensure material slide gate is closed and open
burner access door
Set Thermostat to OFF
Add 3 - 4 Bags of material to kettle if needed
Fully Open LP tank valve
Open main system propane valve
Check hydraulic bypass valves:
Left Valve (A) Open
Right Valve (B) Closed
Place agitation direction lever in the neutral
(middle) position
Start engine
Ignite Pilot:
1) Press and hold RED pilot button and BLACK
igniter button at the same time
2) Release BLACK igniter button upon
successful pilot light
3) Continue to press RED pilot button until
pilot flame is achieved
4) If flame goes out or unsuccessfully lights,
wait 30 - 60 seconds and try againt
Adjust oxygen relay disc if needed, otherwise
close burner access door
Set thermostat to 300ºF
Set desired agitation speed by adjusting the
Cycle Speed control dial.
Wait for material to reach 250ºF - 300ºF
Set thermostat to desired temperature of
380ºF - 400ºF
Add additional material if needed
Install material extrusion chute, then check
material consistency
Move applicator (handliner) into position
Toggle agitation direction lever to begin agita-
tion (either up or down).
Note: If material is too thick, wait before
enabling agitation.
Set thermostat to OFF and make sure the
flame goes out
Drain material in the kettle into draw-off pans
until either 25% full or completely empty.
If leaving material for next day, adjust the
Speed Cycle dial to a “slow” setting until
temperature reaches 150º F
Set agitation direction lever to the neutral
(middle) position
Turn engine key to OFF position
Close main system propane valve and close
100lb LPG tank valve
Make sure the material feed hopper door is
closed
QUICK START CHECKLIST
PRE START SHUTDOWN
SYSTEM STARTUP
2811 Fiechtner Drive
Fargo, ND 58103
701-367-9233 Phone
701-277-7073 Fax
epicsolutions.us
Set thermostat to 300ºF which will activate the
large burner flame.
STEP 3
Check the material level of the kettle and add more
as needed up to 25% of the kettle. If empty, add
3-4 (50lb) bags of thermoplastic material. Note:
Do not fill kettle full of material yet.
Open the 100lb LPG tank valve.
Ensure the agitation direction lever is in the
neutral position.
AB
A
B
Start the gas engine using the engine key.
Open thermostat door and make sure thermostat
knob is at lowest position possible.
A
B
Engine must be running to activate the burner flame.
Open the main system propane valve.
UP = Open DOWN = Closed
Press and hold down RED pilot button (A), while
at the same time pressing the BLACK ignitor
button (B) to generate spark to light the pilot.
TIP: If the pilot light stops, repeat step 5, but
depress the red pilot button for an additional 15-20
seconds after the spark/pilot is activated.
Once the pilot is lit, allow the flame to stabilize for
a few minutes.
A) Ensure the material discharge valve (slide
gate) is closed.
B) Open the burner access door and latch chain
to hold access door open.
A) Check hydraulic bypass valve left of the black
tank to make sure it is Open (counter-clockwise)
B) Check the hydraulic bypass valve under the
black tank to make sure it is Closed (clockwise).
QUICK START INSTRUCTIONS
PRE START SYSTEM STARTUP
2811 Fiechtner Drive
Fargo, ND 58103
701-367-9233 Phone
701-277-7073 Fax
epicsolutions.us
If material is left in kettle after draining, adjust
needle valve agitation speed to a “slow” setting
until temperature reaches 150º F.
Close main system propane valve and close 100lb
LPG tank valve.
Turn engine ignition key to OFF position.
Keep material feed door closed to avoid water or
foreign matter from entering kettle.
Drain the material from the reservoir into draw-off
boxes, pan, etc., until kettle reservoir is either
empty or a maximum of 25% full if planing to use
machine the following day.
Set agitation lever to neutral position.
Open the material slide gate and fill the
applicator. Tip: Add more material to the kettle
immediately after filling the applicator.
Install material extrusion chute just beneath the
slide gate, using the two chains provided. Move
your applicator into position under the chute so it
is ready to fill with material.
Do a final material consistency check before giving
the green light. Continue agitating material until it
has fully melted before extruding into to your
thermoplastic machine.
Move the agitation direction lever up or down to
begin agitating material. If agitation struggles,
allow more time to heat material and try again.
Check kettle temperatures and continue to heat
until it reaches 250º F - 300º F.
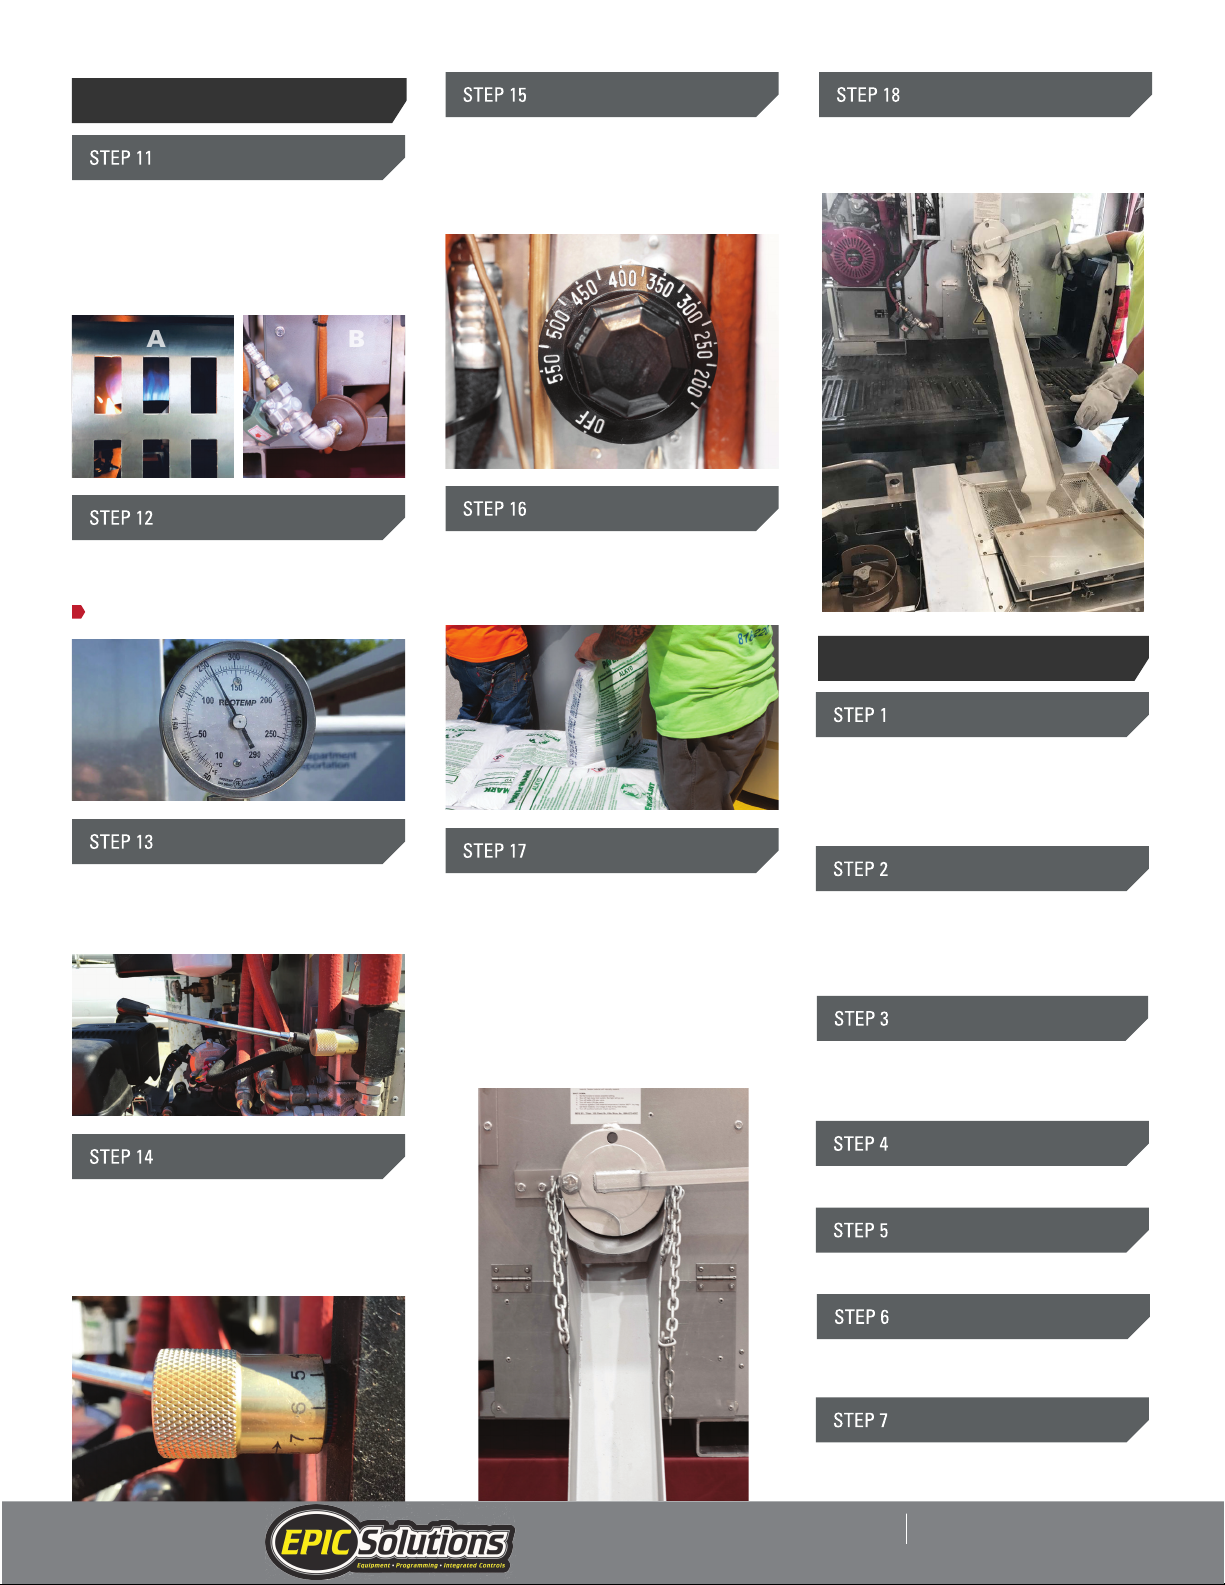
A) If the majority of the burner flame is blue,
close the burner access door and continue on.
B) If the majority of the burner flame is yellow,
adjust the oxygen relay disc (pictured below) to
establish a blue flame, then close the burner
A
B
Do NOT set to desired temp
Adjust the hydraulic needle valve to achieve the
proper cycle rate.
Note: Allow material to completely liquefy before
extruding into handliner.
Once agitation is working properly, adjust desired
temperature, usually between 380º F – 400º F
(depending on weather and material used).
Caution: Never exceed 445º F!
Add additional thermoplastic material as needed.
Tip: Let the machine melt/agitate new material
while you are using your handliner.
Turn thermostat knob to lowest possible
position. (counter-clockwise)
Look inside the burner access door to verify that
the flame is out.
SYSTEM STARTUP conti.
SYSTEM SHUTDOWN
2811 Fiechtner Drive
Fargo, ND 58103
701-367-9233 Phone
701-277-7073 Fax
epicsolutions.us

Popular Melting Machine manuals by other brands

Graco THERM-O-FLOW T7 Series instructions

Graco

Graco THERM-O-FLOW T7 Series instructions

Nordson 3500 Series Operator card

Nordson

Nordson 3500 Series Operator card

Rapid Hobby7 operating instructions

Rapid

Rapid Hobby7 operating instructions

RYNO WORX RA-MLT-0016 Operator's manual

RYNO WORX

RYNO WORX RA-MLT-0016 Operator's manual

Summit Radiant Edge HotSlot Installation and operation guide

Summit

Summit Radiant Edge HotSlot Installation and operation guide

manuals.online logo
manuals.online logoBrands
  • About & Mission
  • Contact us
  • Privacy Policy
  • Terms and Conditions

Copyright 2025 Manuals.Online. All Rights Reserved.