epiphan VGA2Ethernet User manual

Epiphan Technical
Documentation
©2009-2011
Epiphan Systems Inc.
All Rights Reserved
February 2011
VGA2Ethernet™
User Guide
www.epiphan.com

Thank you for choosing Epiphan!
At Epiphan Systems Inc. (“Epiphan”), product function and quality are our top
priority. We make every effort to make sure that our products exceed our
customers’ expectations.
Product Feedback
We regularly contact our customers to ensure product performance and
reliability. We strive to continually enhance our products to accommodate your
needs. We welcome your feedback and suggestions for product improvements.
Specifications
You can go to the Frame Grabbers page of the Epiphan website to get
information about the VGA2Ethernet.
Warranty
All Epiphan Systems products are provided with a 100% return to depot warranty
for one year from the date of purchase.
Technical Support
Epiphan is staffed by a professional support team. If, after checking the FAQs
for your product on the Epiphan website and re-installing the Epiphan driver
software (where applicable), you continue to have outstanding issues, email a
efficiently, include the following info:
•Your VGA2Ethernet serial number.
•The behavior of your VGA2Ethernet LED indicators.
•Technical description of the signal source including resolution, refresh
rate, synchronization, type of hardware.
•Complete description of the problem you are experiencing.
Copyright ©2011 Epiphan Systems Inc. All Rights Reserved.

Introduction
ii
VGA2Ethernet User Guide
Terms and Conditions
This document, the Epiphan web site, and the information contained therein,
including but not limited to the text and images as well as Epiphan Systems Inc's
trademarks, trade names and logos are the property of Epiphan and its affiliates
and licensors, and are protected from unauthorized copying and dissemination
by Canadian copyright law, United States copyright law, trademark law,
international conventions and other intellectual property laws.
Epiphan, Epiphan Systems, Epiphan Systems Inc., and Epiphan logos are
trademarks or registered trademarks of Epiphan Systems Inc., in certain
countries. All Epiphan product names and logos are trademarks or registered
trademarks of Epiphan. All other company and product names and logos may be
trademarks or registered trademarks of their respective owners in certain
countries.
Copyright ©2011 Epiphan Systems Inc. All Rights Reserved.
THE SOFTWARE LICENSE AND LIMITED WARRANTY FOR THE
ACCOMPANYING PRODUCT ARE SET FORTH IN THE INFORMATION
PACKET OR PRODUCT INSTALLATION SOFTWARE PACKAGE THAT
SHIPPED WITH THE PRODUCT AND ARE INCORPORATED HEREIN BY
REFERENCE. IF YOU ARE UNABLE TO LOCATE THE SOFTWARE LICENSE
OR LIMITED WARRANTY, CONTACT YOUR EPIPHAN REPRESENTATIVE
FOR A COPY.
PRODUCT DESCRIPTIONS AND SPECIFICATIONS REGARDING THE
PRODUCTS IN THIS MANUAL ARE SUBJECT TO CHANGE WITHOUT
NOTICE. EPIPHAN PERIODICALLY ADDS OR UPDATES THE INFORMATION
AND DOCUMENTS ON ITS WEB SITE WITHOUT NOTICE. ALL
STATEMENTS, INFORMATION AND RECOMMENDATIONS ARE BELIEVED
TO BE ACCURATE AT TIME OF WRITING BUT ARE PRESENTED WITHOUT
WARRANTY OF ANY KIND, EXPRESS OR IMPLIED. USERS MUST TAKE
FULL RESPONSIBILITY FOR THEIR APPLICATION OF ANY PRODUCTS.
LIMITATION OF LIABILITY
UNDER NO CIRCUMSTANCES SHALL EPIPHAN BE LIABLE FOR ANY
INCIDENTAL, SPECIAL, CONSEQUENTIAL, EXEMPLARY OR OTHER
INDIRECT DAMAGES THAT RESULT FROM THE USE OF, OR THE INABILITY
TO USE, THIS PRODUCT OR THE INFORMATION CONTAINED ON THIS
DOCUMENT OR PROVIDED ON EPIPHAN’S WEB SITE, EVEN IF EPIPHAN
HAS BEEN ADVISED OF THE POSSIBILITY OF SUCH DAMAGES. IN NO

Introduction
iii
VGA2Ethernet User Guide
EVENT SHALL EPIPHAN'S TOTAL LIABILITY TO YOU FOR ALL DAMAGES,
LOSSES, AND CAUSES OF ACTION RESULTING FROM YOUR USE OF THIS
PRODUCT, WHETHER IN CONTRACT, TORT (INCLUDING, BUT NOT
LIMITED TO, NEGLIGENCE) OR OTHERWISE, EXCEED THE AMOUNTS YOU
PAID TO EPIPHAN DURING THE MOST RECENT THREE-MONTH PERIOD IN
CONNECTION WITH AMOUNTS WHICH YOU PAID FOR USING THIS
PRODUCT.
INFORMATION AND DOCUMENTS, INCLUDING PRODUCT
SPECIFICATIONS, PROVIDED IN THIS DOCUMENT OR THE EPIPHAN WEB
SITE ARE PROVIDED "AS IS." SPECIFICALLY, BUT WITHOUT LIMITATION,
EPIPHAN DOES NOT WARRANT THAT: (i) THE INFORMATION IS CORRECT,
ACCURATE, RELIABLE OR COMPLETE; (ii) THE FUNCTIONS CONTAINED
ON THIS WEB SITE WILL BE UNINTERRUPTED OR ERROR-FREE; (iii)
DEFECTS WILL BE CORRECTED, OR (iv) THE EPIPHAN WEB SITE OR THE
SERVER(S) THAT MAKES IT AVAILABLE ARE FREE OF VIRUSES OR
OTHER HARMFUL COMPONENTS. EPIPHAN SPECIFICALLY DISCLAIMS
ALL REPRESENTATIONS, WARRANTIES AND CONDITIONS, EITHER
EXPRESS, IMPLIED, STATUTORY, BY USAGE OF TRADE OR OTHERWISE
INCLUDING BUT NOT LIMITED TO ANY IMPLIED WARRANTIES OF
MERCHANTABILITY, NON-INFRINGEMENT, TITLE, SATISFACTORY
QUALITY OR FITNESS FOR A PARTICULAR PURPOSE.
For additional terms and conditions, please refer to additional sections in this
document.

1. Table of Contents
1. Introduction ............................................................................... 4
2. Installation.................................................................................. 6
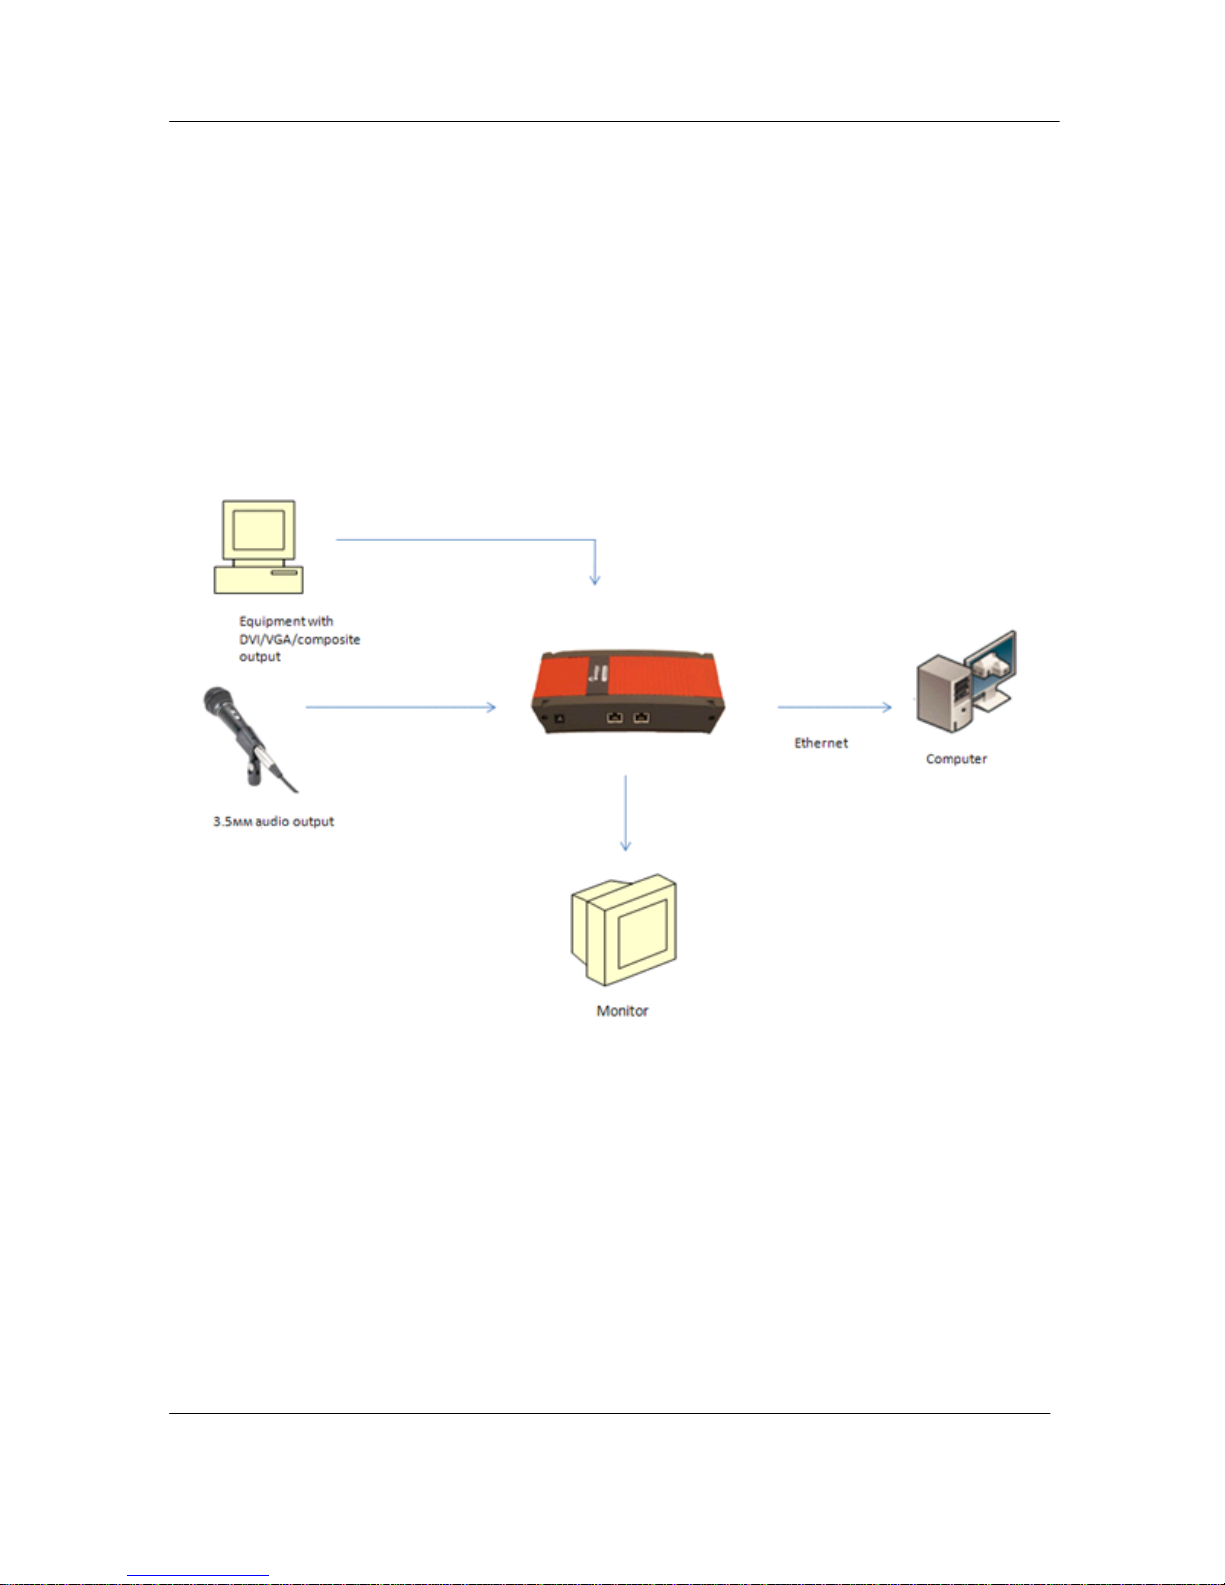
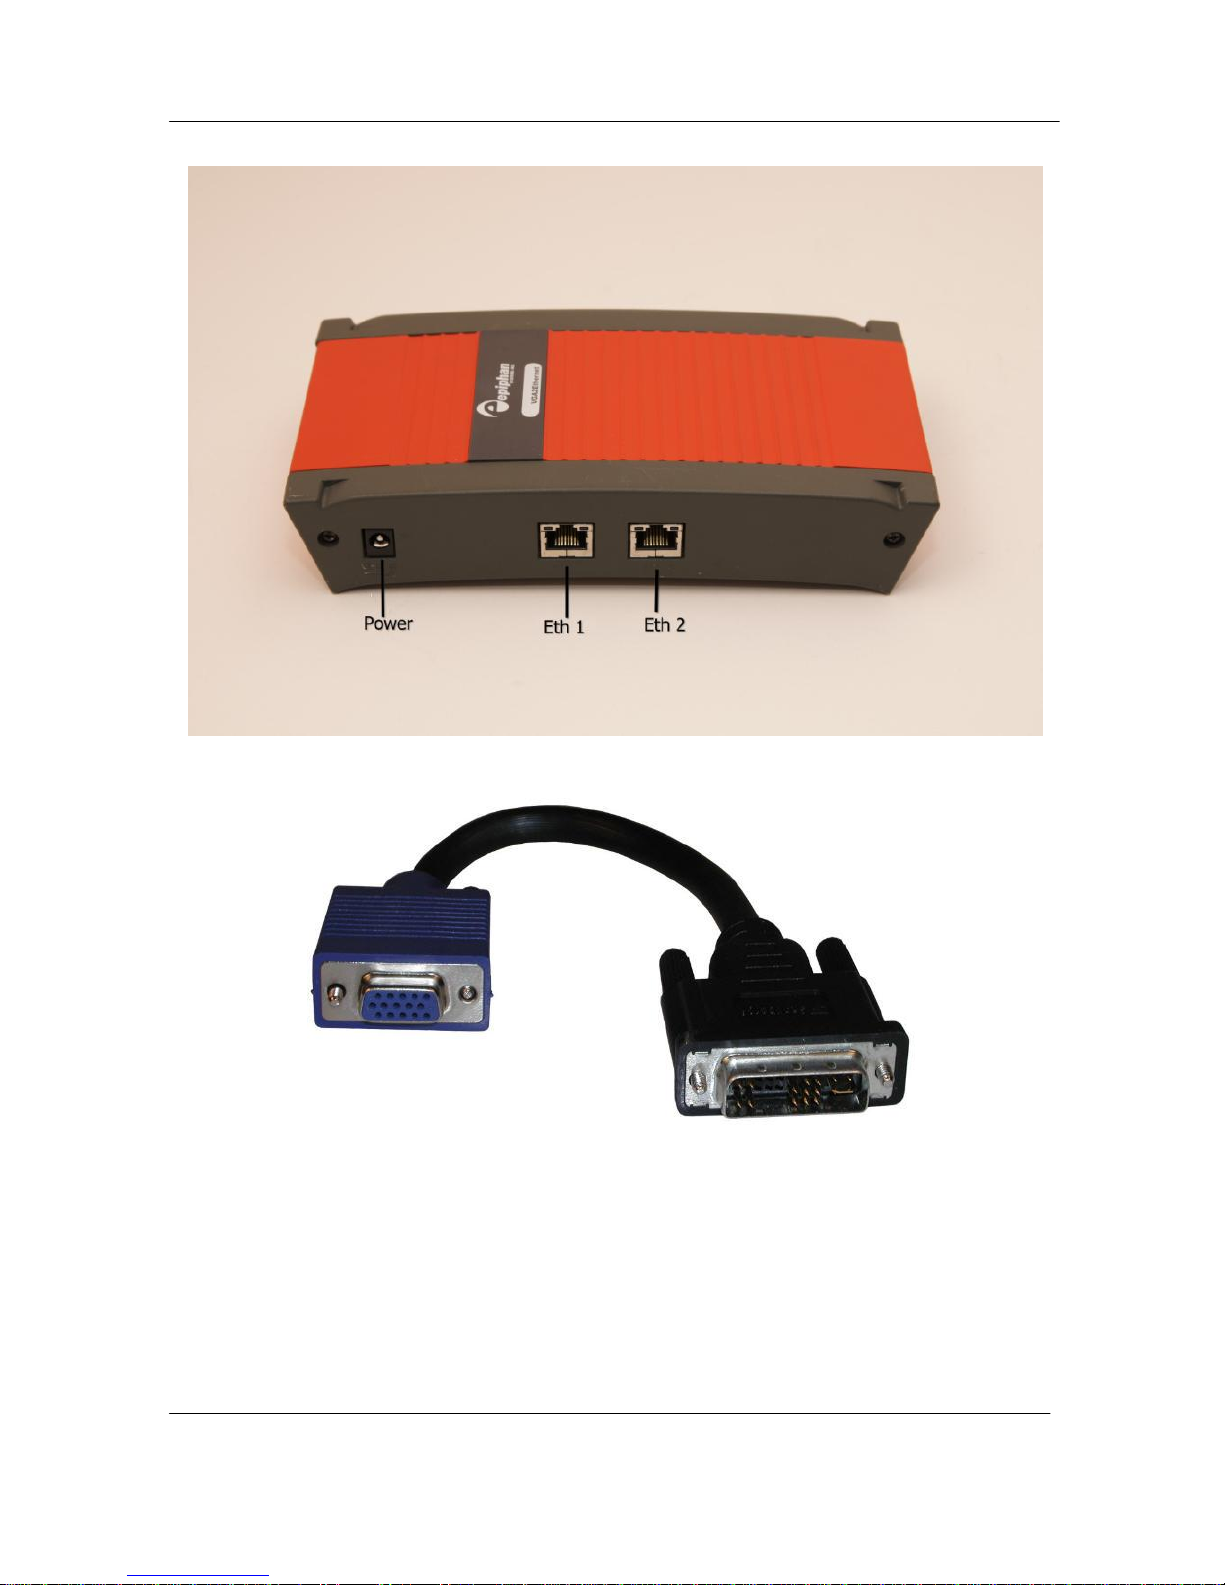
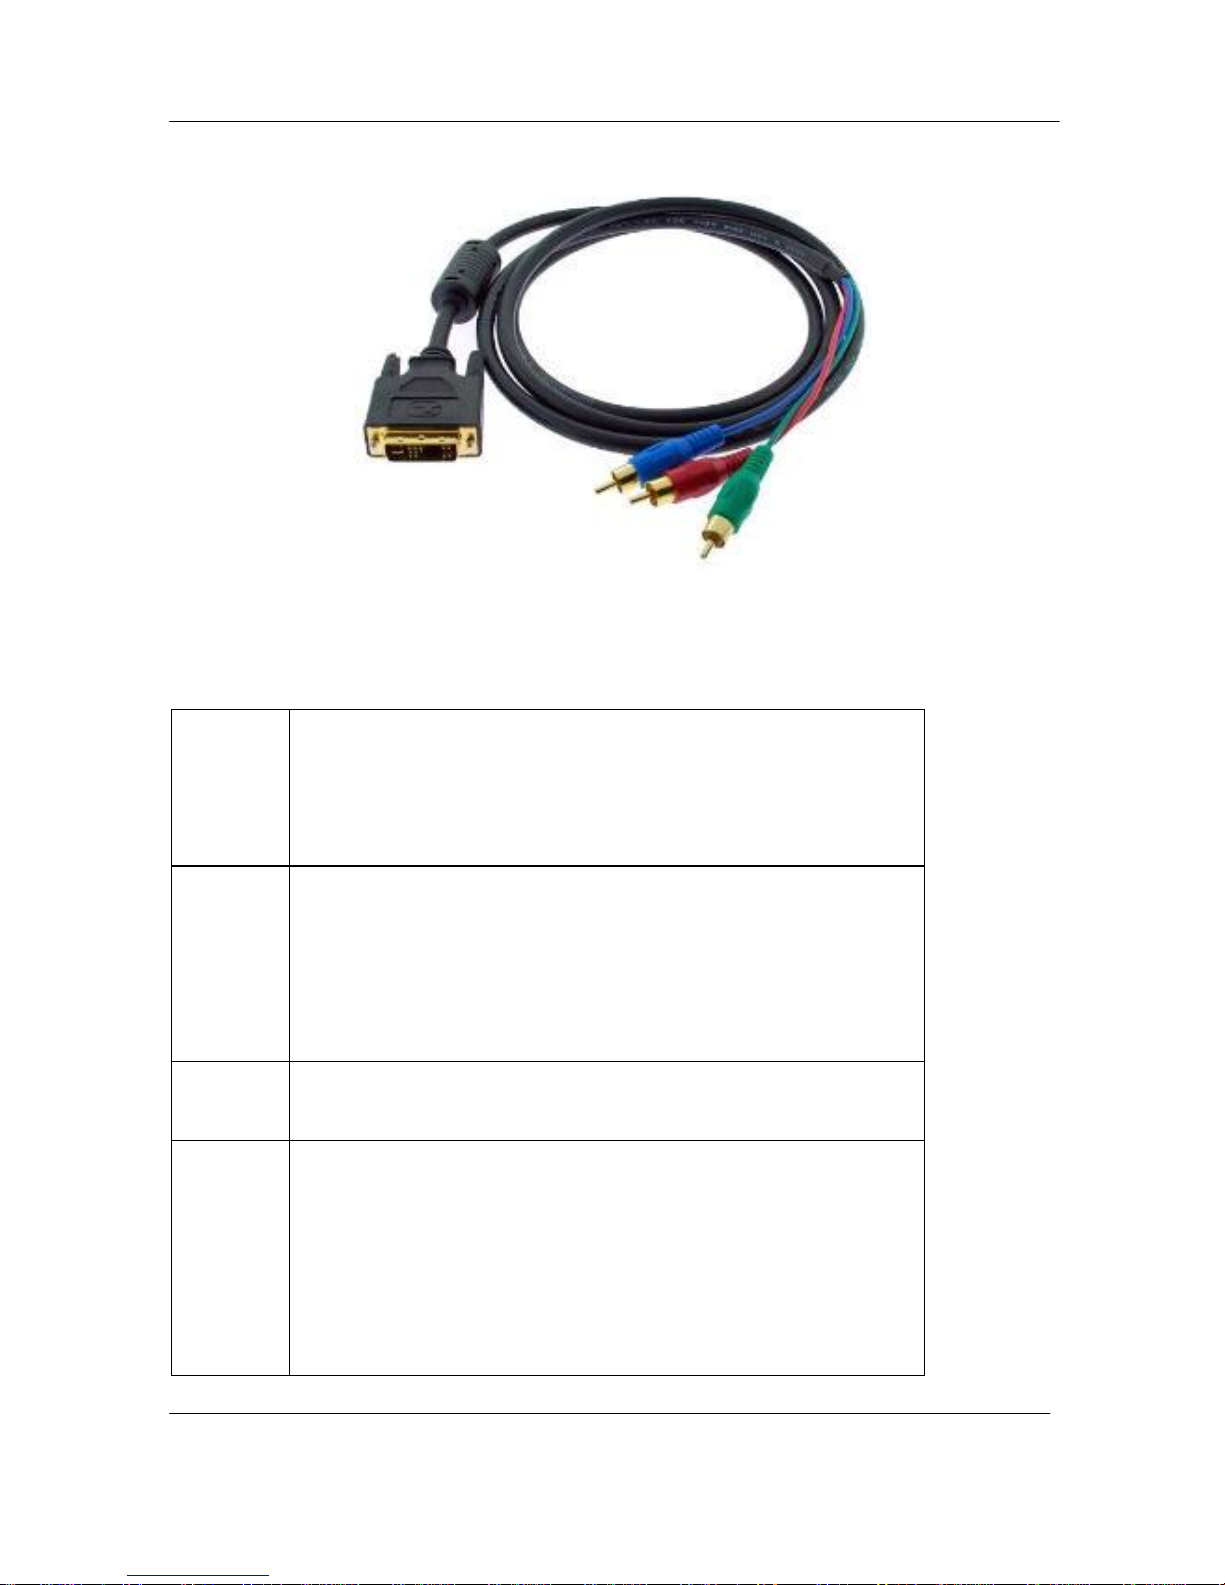
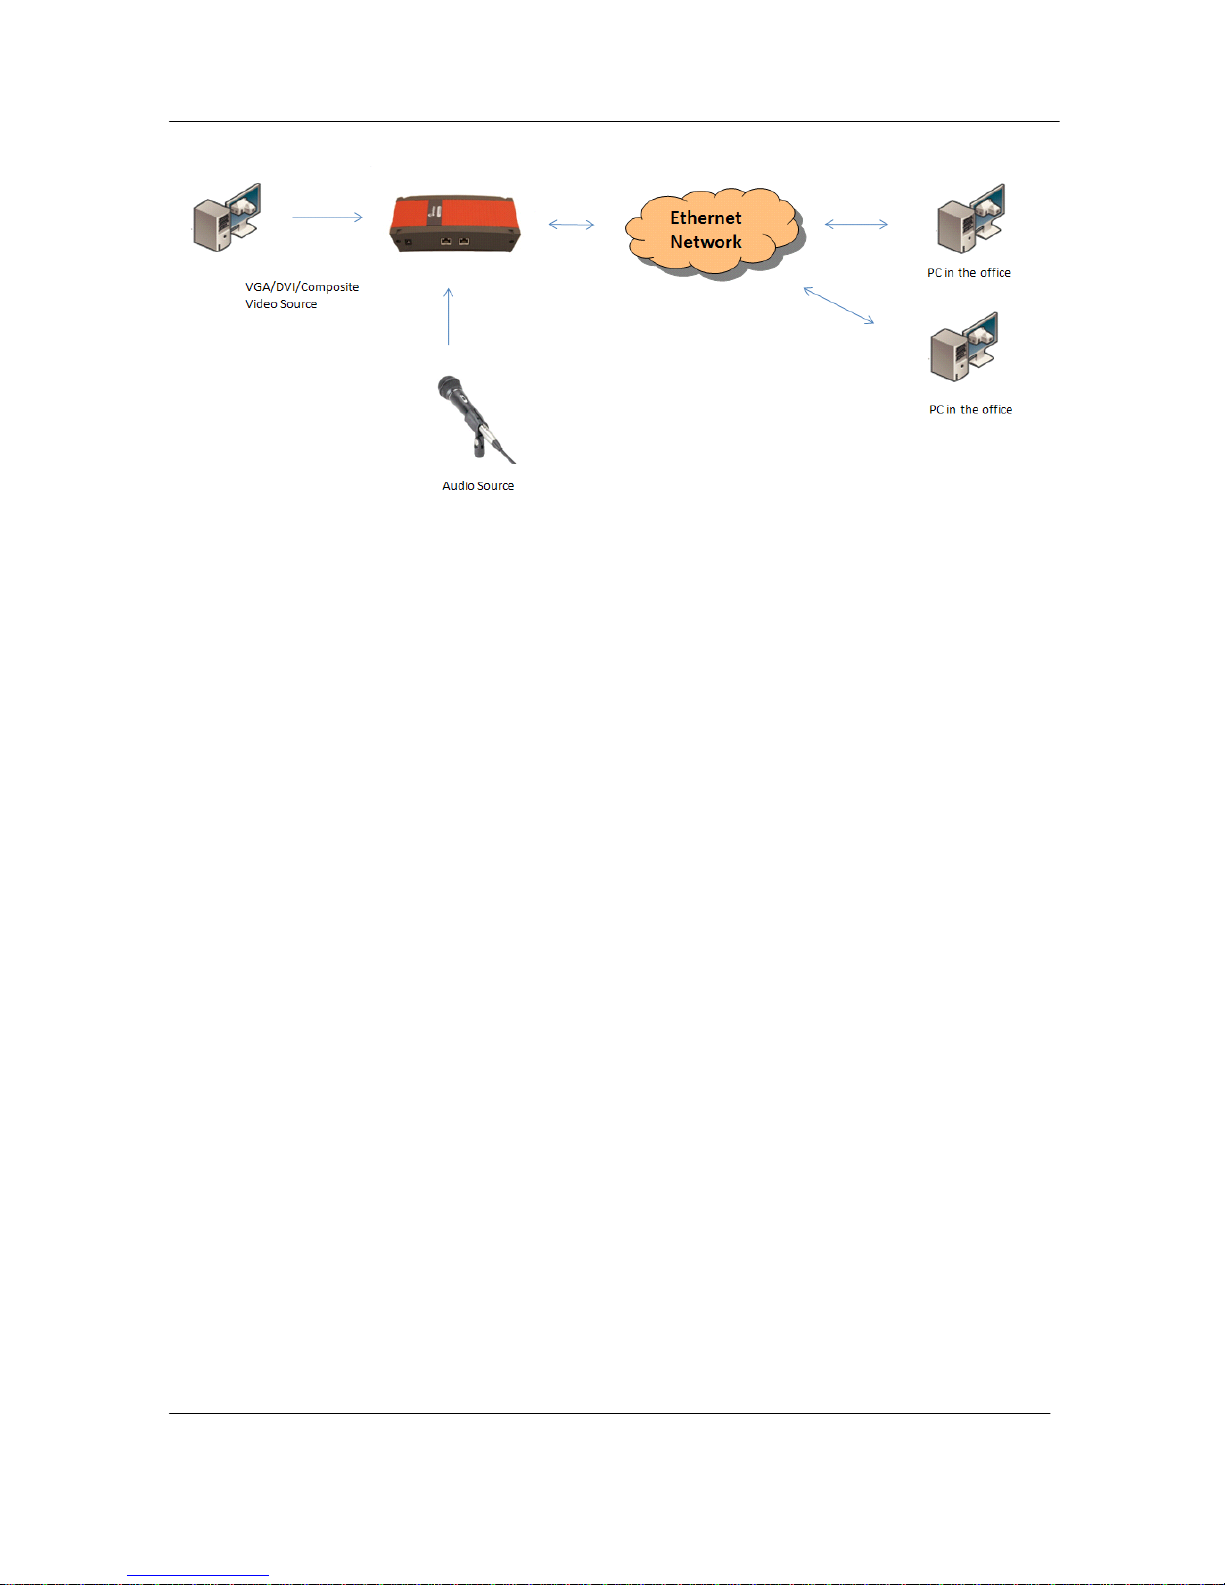
VGA2Ethernet Hardware Features................................................. 6
VGA2Ethernet Software Features ................................................ 10
Optimizing VGA2Ethernet Performance...................................... 11
Connect and Power on a VGA2Ethernet Device.......................... 11
Installing the Drivers and Application for Windows.................... 13
If the VGA2Ethernet User Interface Cannot Find the Device......16
Finding the VGA2Ethernet Device Manually .............................. 16
Using the Network Discovery Utility to Find the VGA2Ethernet 17
Installing the Drivers and Applications for Mac OS X ................ 18
If the VGA2Ethernet User Interface Cannot Find the Device......20
Direct Connection of VGA2Ethernet to Workstation................... 20
3. Windows VGA2Ethernet User Interface............................... 22
Finding VGA2Ethernet Drivers and Application Updates........... 22
Starting the VGA2Ethernet User Interface................................... 23
Pausing, Copying, Saving, and Printing Images...........................24
Recording Captured Images.......................................................... 26
Menus............................................................................................ 28
Toolbar.......................................................................................... 33
Status Bar...................................................................................... 34
Capture, Recording, and Display Options ................................... 35
4. Mac OS X VGA2Ethernet user interface..............................48
Upgrading to the Latest Mac OS X Software Version ................. 48
Starting the Mac OS X VGA2Ethernet user interface.................. 49
Menus............................................................................................ 51
Toolbar.......................................................................................... 54
Changing System Preferences ...................................................... 58
5. Web admin interface............................................................... 59
Logging into the Web admin interface ......................................... 59
Configuring the Ethernet Bridge For Use if You Have Only One
Ethernet Connection ..................................................................... 62
If the Network Does Not Have a DHCP Server ........................... 63
Adding or Changing the Web admin Interface Password............. 65
Adding or Changing the Viewer Password................................... 66
Configuring Frame Grabber Adjustments .................................... 67
Changing the Network Configuration........................................... 71
Configuring Remote Support........................................................ 75
Setting the Date and Time............................................................. 77

Introduction
2
VGA2Ethernet User Guide
Upgrading the VGA2Ethernet Firmware......................................79
Using Maintenance Controls ........................................................ 81
Restoring the VGA2Ethernet Default Factory Configuration...... 81
Rebooting or Restarting VGA2Ethernet....................................... 82
Shutting Down the VGA2Ethernet Device...................................82
Displaying VGA2Ethernet Information........................................ 82
6. Web Broadcasting ................................................................... 85
Setting the Display Format for Web Broadcasting....................... 85
Starting a Web Broadcasting Session...........................................86
Viewing a Web Broadcasting Session.......................................... 87
Troubleshooting Web Broadcasting Performance........................ 87
7. Windows Network Discovery Utility .....................................88
Finding and Installing Drivers and Application Updates .............89
Starting the Network Discovery Utility........................................ 89
Menus............................................................................................ 90
List of Devices.............................................................................. 91
Captured Image Display ............................................................... 92
Configuring Image Adjustments................................................... 94
Configuring DirectShow Options................................................. 95
8. Recording Image Files............................................................. 97
Configuring Image File Recording Options ................................. 97
Recording Image Files.................................................................. 97
9. Recording Videos.....................................................................98
Recording Videos Using the Epiphan VGA2Ethernet user interface
...................................................................................................... 99
Selecting a Windows Video Codec .............................................. 99
Installing the ffvfw Video Codec Pack....................................... 100
Recording a Video ...................................................................... 101
Playing Back a Video File .......................................................... 102
Recording Videos for Mac OS X................................................ 102
10. Cables, Connectors and Adapters........................................105
3.5 mm Mini-jack ....................................................................... 105
DVI ............................................................................................. 105
VGA............................................................................................ 106
DVI to VGA cable...................................................................... 106
RJ-45 Male.................................................................................. 108

Introduction
3
VGA2Ethernet User Guide
Composite Video to DVI Converter........................................... 108
8. Sample Applications.............................................................. 109
Sharing Data without Using Guest-access Networks ................. 109
Performing Presentations over Ethernet ..................................... 109
Recording Training Sessions and Lecture Capture..................... 110
9. List of Figures........................................................................112

Introduction
4
VGA2Ethernet User Guide
1. Introduction
The Epiphan VGA2Ethernet™ is a compact external DVI/VGA/composite frame
grabber that is capable of capturing single link DVI and VGA signals at rates of up to
60 frames per second. VGA2Ethernet also supports a stereo 3.5mm audio input.
Designed for high speed and high precision military, medical and industrial
applications, Epiphan Systems VGA2Ethernet uses the common RJ45 Ethernet port
to interface itself with the target computer, allowing for up to 1 Gigabit transfer rates.
This is the only frame grabber capable of capturing both DVI and VGA signals and
sending the data over Ethernet. Using the latest state-of-the-art pre-compression
technologies developed by Epiphan Systems specifically for the VGA2Ethernet, you
are able to acquire diagnostic-quality 100% lossless images from any DVI/VGA/RGB
source.
This solution is also able to capture a composite video signal using a composite to
VGA converter cable, purchased separately.
The VGA2Ethernet is part of Epiphan’s complete line of video signal capture,

Introduction
5
VGA2Ethernet User Guide
broadcasting and recording products. For more information about all of Epiphan’s
broadcasting products, please see the Broadcaster Products Overview on the
Epiphan website.

Installation
6
VGA2Ethernet User Guide
2. Installation
This chapter describes the basics of how to connect a VGA2Ethernet device to a
VGA, DVI source and to an Ethernet network.
The VGA2Ethernet device uses an Ethernet network connection to send captured
image data to a video capture workstation. A video capture workstation is any PC or
Mac on which you have installed the VGA2Ethernet drivers and application and that is
connected to the same Ethernet network as the VGA2Ethernet device.
VGA2Ethernet Hardware Features
The VGA2Ethernet device is a 202mm x105mm x35mm (7.95”x4.13”x.1.38”) unit.
The front panel includes power and capture activity LEDs, DVI In and Out, audio In
and Out ports. The back panel includes 2 10/100/1000 Ethernet ports, and a power
connector.
Figure 1.
VGA2Ethernet (front view)

Installation
7
VGA2Ethernet User Guide
Figure 2.
VGA2Ethernet (rear view)
Figure 3.
VGA to DVI Cable

Installation
8
VGA2Ethernet User Guide
Figure 4.
Composite video to DVI converter (not included)
Table 1: Connector, Interface and LED Descriptions
ETH1
Primary 10/100/1000 Base-T RJ-45 auto-sensing Ethernet
network port to connect the VGA2Ethernet device to an
Ethernet network. The VGA2Ethernet device Ethernet port is
auto-sensing.
ETH2
Secondary 10/100/1000 Base-T RJ-45 auto-sensing Ethernet
network port. This port is useful in case you need to configure
the Ethernet Bridge when there is only one Ethernet
connection. See Configuring the Ethernet Bridge For Use if
You Have Only One Ethernet Connection.
Power
Connect the AC adapter to the VGA2Ethernet power
connector and to a power outlet
LEDs
Red LED: during operation the red LED blinks each time the
VGA2Ethernet captures an image. You can use the red LED
as an indicator that the VGA2Ethernet is capturing images.
Green and blue LEDs: when the VGA2Ethernet device first
starts up, the blue LED lights up. A few seconds later the
green LED lights up. After about another 20 seconds the blue

Installation
9
VGA2Ethernet User Guide
LED turns off, leaving the green LED on indicating that the
VGA2Ethernet has started up and can start capturing
images. During operation the blue LED blinks during video
signal test operation and when the system tunes video
parameters (e.g. VGA parameters)
DVI In
Connect a DVI source to the VGA2Ethernet device using a
DVI cable. You can also connect a VGA source using a VGA
to DVI adapter (included). To identify this cable please see
Figure 3. If you want to connect a composite video source,
use a composite video to DVI converter (not included). To
identify this converter please see Composite video to DVI
converter (not included).
DVI Out
This port allows you to check the presence of the signal.
Connect a DVI monitor or projector using a DVI cable or a
VGA monitor using DVI to VGA cable.
Audio In
Connect a microphone if you need to acquire audio.
Audio
Out
Connect audio equipment (e.g. headphones or speakers) to
control how audio stream is currently being captured by
VGA2Ethernet.
The VGA2Ethernet device will not capture images until a video capture workstation
has found the device on the network and an application is requesting captured
images. Even if the device is properly connected to a VGA source the red LED will not
flash unless a video capture workstation is receiving captured images.

Installation
10
VGA2Ethernet User Guide
VGA2Ethernet Software Features
Use the following software features to install and configure the
VGA2Ethernet device.
Factory default
IP
address and
network mask
IP: 192.168.255.250
Netmask: 255.255.255.252
Refer to the Restoring the VGA2Ethernet Default
Factory Configuration section to know more about
restoring factory default configuration.
IP
address
from a
DHCP
server
The VGA2Ethernet device can get an IP address on the
network from a DHCP server if the network has one. If the
network does not have a DHCP server, see the “If the Network
Does Not Have a DHCP Server“section.
Web
admin
interface
Use the VGA2Ethernet Web admin interface for changing the
VGA2Ethernet IP address, making device adjustments, and
installing new firmware. You can log into the Web admin
interface by selecting Web config from the Network Discovery
Utility or by opening a web browser and browsing to:
http://< VGA2Ethernet_IP_Address>/admin/
User Name: admin (no password)
The Web admin interface is described in Chapter 3 of this User
Guide.

Installation
11
VGA2Ethernet User Guide
Optimizing VGA2Ethernet Performance
For best performance, the capacity of the Ethernet connection between the
VGA2Ethernet device and the video capture workstation should be as high as
possible. The video capture workstation should have a 1-gigabit Ethernet port and the
network should be a 1-gigabit network that includes high-bandwidth 1-gigabit
switches.
You can improve performance by using Ethernet cables with 4 pairs of wires. Cat5e or
Cat6 cables are preferred to Cat5.
You can also improve performance by connecting the VGA2Ethernet device directly to
your video capture workstation. This connection makes all of the 1-gigabit bandwidth
available for transmitting captured image data. See Direct Connection of
VGA2Ethernet to Workstation.
Connect and Power on a VGA2Ethernet Device
To connect a VGA2Ethernet device you need:
A DVI or VGA video source. If connecting a VGA source, you will need to
connect a VGA to DVI cable (provided).
A video capture station.
An Ethernet connection between the VGA2Ethernet device and the video
capture workstation (in case the workstation is not located near
VGA2Ethernet). The video capture workstation and the VGA2Ethernet device
must be on the same Ethernet subnet.

Installation
12
VGA2Ethernet User Guide
Figure 5.
Connecting the VGA2Ethernet device to a network
To connect and turn on the VGA2Ethernet device
1. Use a DVI cable to connect the DVI source to the VGA2Ethernet DVI IN port
on the front panel of the device. If connecting a VGA source, you will also
need a VGA to DVI cable to connect the VGA source and the DVI IN port.
You can use an active VGA splitter to split the video signal between a
monitor and the VGA2Ethernet. The monitor should be connected to
VGA2Ethernet through the DVI OUT port. Splitting the signal may reduce the
image quality.
2. Use a 3.5 mm mini-jack connector to connect the source’s audio output (if
any) to an audio input of VGA2Ethernet.
3. Use an RJ-45 Ethernet cable to connect the VGA2Ethernet Eth1 port to the
10/100/1000 Base-T Ethernet network. For best performance, connect the
VGA2Ethernet device to a 1000 Base-T Ethernet link to your network. The
network must be running the TCP/IP protocol. You can optionally connect the
VGA2Ethernet device directly to a video capture workstation 1-gigabit
Ethernet port.
4. Connect the power cable to the VGA2Ethernet device. The VGA2Ethernet
device powers on and the power and image capture activity LEDs light up as
the device starts up.
5. Start up the video source.

Installation
13
VGA2Ethernet User Guide
6. Install the VGA2Ethernet drivers and the application (see Installing the
Drivers and Application for Windows) and confirm that a
captured image appears in the VGA2Ethernet user interface or Network
Discovery utility.
If a captured image does not appear, check the video source to make sure it is
transmitting a video image. Also check the cable between the VGA2Ethernet and the
video source to make sure it is connected correctly.
Installing the Drivers and Application for Windows
To view and record images captured by the VGA2Ethernet device, you must install the
VGA2Ethernet drivers and application on a video capture workstation. The drivers and
application include the following components:
The Epiphan device drivers that receive captured images from the
VGA2Ethernet device over the network.
The VGA2Ethernet user interface that you can use to view, print, save,
record and broadcast captured images.
The Network Discovery Utility that you can use to find Epiphan devices
connected to the network.
To install the drivers and application
1. Find the latest drivers and application on the VGA2Ethernet download page:
http://www.epiphan.com/products/frame-grabbers/vga2ethernet/download/
2. Select Download VGA2Ethernet drivers and application to download the
Installer package file.
3. Double-click the installer package file to start the setup wizard and install the
application.
4. Follow the prompts.

Installation
14
VGA2Ethernet User Guide
Figure 6.
VGA2Ethernet download page
5. On the video capture workstation, run the VGA2Ethernet user interface. From
the Windows Start menu select Start > Epiphan VGA2Ethernet >
VGA2Ethernet GUI. The VGA2Ethernet user interface starts up and looks for
VGA2Ethernet device on your network.
Once the drivers and application are installed, you can start the VGA2Ethernet user
interface by selecting Start > Epiphan VGA2Ethernet > VGA2Ethernet GUI. The user
interface starts up and finds the VGA2Ethernet device if the device is connected to
your network and operating.
If the VGA2Ethernet user interface cannot find the device, you use the following utility:
Start > Epiphan VGA2Ethernet > VGA2Ethernet DirectShow Configuration Utility.

Installation
15
VGA2Ethernet User Guide
This section assumes your network has a DHCP server and that the DHCP server
gives the Epiphan device an IP address on your network. If your network does not
have a DHCP server, see the “If the Network Does Not Have a DHCP Server“ section.
If the device is operating, has received an IP address from a DHCP server, and is
connected to the network, the VGA2Ethernet user interface should find it and the
image being captured by the device should appear on the user interface display.
If the device is not capturing images, the device name and serial number still appear
in the title bar and the IP address of the device still appears in the status bar, but
instead of a captured image, the user interface displays No signal detected.
Figure 7.
VGA2Ethernet GUI interface
Title Bar
Displays the product name and serial number of the VGA2Ethernet
device as well as the VGA mode and refresh rate of the video
source. The title bar also displays the screen resolution and refresh
rate of the video source.
Menu
Select commands from the menus. You can save and print
captured images, start and stop recording, configure recording
settings, and configure capture settings.

Installation
16
VGA2Ethernet User Guide
Toolbar
Save, print, and copy a snapshot of the current captured image.
Start, stop, pause and resume recording images.
Captured Image
The image currently being captured by the device.
If the VGA2Ethernet User Interface Cannot Find the
Device
If the user interface cannot find the VGA2Ethernet device, make sure the device is
turned on and check the network connections. If you find and correct the problem the
device should automatically be detected by the user interface.
If you still cannot see the VGA2Ethernet device, it may not have obtained an IP
address from your DHCP server. See the “If the Network Does Not Have a DHCP
Server“section to change the device’s IP address.
Finding the VGA2Ethernet Device Manually
You can find the VGA2Ethernet device from the VGA2Ethernet user interface by
selecting Select Device from the Capture menu in the VGA2Ethernet GUI application.
The user interface lists all Epiphan devices that can be found on the network. Select
the VGA2Ethernet device from the list and select OK. The VGA2Ethernet user
interface connects to the selected device.
Other manuals for VGA2Ethernet
2
Table of contents
Other epiphan Media Converter manuals

epiphan
epiphan Networked VGA Grid User manual

epiphan
epiphan VGA2Ethernet User manual

epiphan
epiphan SDI2USB 3.0 User manual

epiphan
epiphan DVI2USB 3.0 User manual

epiphan
epiphan Pearl-2 Rackmount User manual

epiphan
epiphan VGA Grid User manual

epiphan
epiphan VGA2USB LR User manual

epiphan
epiphan DVI2USB 3.0 User manual

epiphan
epiphan SDI2USB 3.0 User manual