epiphan VGA Grid User manual
Epiphan Technical
Documentation
©2012
Epiphan Systems Inc.
All Rights Reserved
August 2012
VGA Grid™
User Guide
www.epiphan.com

Thank you for choosing Epiphan!
At Epiphan Systems Inc. (“Epiphan”), product function and quality are our top
priority. We make every effort to make sure that our products exceed our
customers’ expectations.
Product Feedback
We regularly contact our customers to ensure product performance and
reliability. We strive to continually enhance our products to accommodate your
needs. We welcome your feedback and suggestions for product improvements.
Specifications
You can go to the VGA Grid page of the Epiphan website to get information
about the VGA Grid.
Warranty
All Epiphan Systems products are provided with a 100% return to depot
warranty for one year from the date of purchase.
Technical Support
Epiphan is staffed by a professional support team. If, after checking the FAQs
for your product on the Epiphan website you continue to have outstanding
issues, email a problem report to support@epiphan.com. To help us solve the
problem efficiently, include the following info:
Your VGA Grid serial number.
The behavior of your VGA Grid LED indicators.
Technical description of the signal source including resolution, refresh rate,
synchronization, type of hardware.
Complete description of the problem you are experiencing.
Copyright © 2012 Epiphan Systems Inc. All Rights Reserved.

<Table of Contents
ii
VGA Grid User Guide
Terms and Conditions
This document, the Epiphan web site, and the information contained therein,
including but not limited to the text, videos and images as well as Epiphan
Systems Inc's trademarks, trade names and logos are the property of Epiphan
Systems Inc and its affiliates and licensors, and are protected from
unauthorized copying and dissemination by Canadian copyright law, United
States copyright law, trademark law, international conventions and other
intellectual property laws.
Epiphan, Epiphan Systems, Epiphan Systems Inc., and Epiphan logos are
trademarks or registered trademarks of Epiphan Systems Inc., in certain
countries. All Epiphan product names and logos are trademarks or registered
trademarks of Epiphan. All other company and product names and logos may
be trademarks or registered trademarks of their respective owners in certain
countries.
Copyright ©2012 Epiphan Systems Inc. All Rights Reserved.
THE SOFTWARE LICENSE AND LIMITED WARRANTY FOR THE ACCOMPANYING
PRODUCT ARE SET FORTH IN THE INFORMATION PACKET OR PRODUCT
INSTALLATION SOFTWARE PACKAGE THAT SHIPPED WITH THE PRODUCT AND
ARE INCORPORATED HEREIN BY REFERENCE. IF YOU ARE UNABLE TO LOCATE
THE SOFTWARE LICENSE OR LIMITED WARRANTY, CONTACT YOUR EPIPHAN
REPRESENTATIVE FOR A COPY.
PRODUCT DESCRIPTIONS AND SPECIFICATIONS REGARDING THE PRODUCTS IN
THIS MANUAL ARE SUBJECT TO CHANGE WITHOUT NOTICE. EPIPHAN
PERIODICALLY ADDS OR UPDATES THE INFORMATION AND DOCUMENTS ON
ITS WEB SITE WITHOUT NOTICE. ALL STATEMENTS, INFORMATION AND
RECOMMENDATIONS ARE BELIEVED TO BE ACCURATE AT TIME OF WRITING
BUT ARE PRESENTED WITHOUT WARRANTY OF ANY KIND, EXPRESS OR
IMPLIED. USERS MUST TAKE FULL RESPONSIBILITY FOR THEIR APPLICATION OF
ANY PRODUCTS.
LIMITATION OF LIABILITY
UNDER NO CIRCUMSTANCES SHALL EPIPHAN BE LIABLE FOR ANY INCIDENTAL,
SPECIAL, CONSEQUENTIAL, EXEMPLARY OR OTHER INDIRECT DAMAGES THAT
RESULT FROM THE USE OF, OR THE INABILITY TO USE, THIS PRODUCT OR THE
INFORMATION CONTAINED ON THIS DOCUMENT OR PROVIDED ON EPIPHAN’S
WEB SITE, EVEN IF EPIPHAN HAS BEEN ADVISED OF THE POSSIBILITY OF SUCH
DAMAGES. IN NO EVENT SHALL EPIPHAN'S TOTAL LIABILITY TO YOU FOR ALL

<Table of Contents
iii
VGA Grid User Guide
DAMAGES, LOSSES, AND CAUSES OF ACTION RESULTING FROM YOUR USE OF
THIS PRODUCT, WHETHER IN CONTRACT, TORT (INCLUDING, BUT NOT LIMITED
TO, NEGLIGENCE) OR OTHERWISE, EXCEED THE AMOUNTS YOU PAID TO
EPIPHAN DURING THE MOST RECENT THREE-MONTH PERIOD IN CONNECTION
WITH AMOUNTS WHICH YOU PAID FOR USING THIS PRODUCT.
INFORMATION AND DOCUMENTS, INCLUDING PRODUCT SPECIFICATIONS,
PROVIDED IN THIS DOCUMENT OR THE EPIPHAN WEB SITE ARE PROVIDED "AS
IS." SPECIFICALLY, BUT WITHOUT LIMITATION, EPIPHAN DOES NOT WARRANT
THAT: (i) THE INFORMATION IS CORRECT, ACCURATE, RELIABLE OR COMPLETE;
(ii) THE FUNCTIONS CONTAINED ON THE EPIPHAN WEB SITE WILL BE
UNINTERRUPTED OR ERROR-FREE; (iii) DEFECTS WILL BE CORRECTED, OR (iv)
THIS WEB SITE OR THE SERVER(S) THAT MAKES IT AVAILABLE ARE FREE OF
VIRUSES OR OTHER HARMFUL COMPNENTS. EPIPHAN SPECIFICALLY DISCLAIMS
ALL REPRESENTATIONS, WARRANTIES AND CONDITIONS, EITHER EXPRESS,
IMPLIED, STATUTORY, BY USAGE OF TRADE OR OTHERWISE INCLUDING BUT
NOT LIMITED TO ANY IMPLIED WARRANTIES OF MERCHANTABILITY, NON-
INFRINGEMENT, TITLE, SATISFACTORY QUALITY OR FITNESS FOR A PARTICULAR
PURPOSE.
For additional terms and conditions, please refer to additional sections in this
document.

1Table of Contents
1Table of Contents ........................................................................................1
2Overview .....................................................................................................5
2.1 Introduction............................................................................................ 5
2.2 Available Product Configurations........................................................... 7
3Physical Attributes ......................................................................................8
3.1 System Hardware Features .................................................................... 8
3.1.1 VGA Grid Concentrator Hardware Features .......................................... 8
3.1.2 VGA Grid Remote Acquisition Device Hardware Features..................... 9
3.2 Cables, Connectors and Adapters ........................................................ 11
3.2.1 3.5 mm Mini-jack ................................................................................. 11
3.2.2 VGA to DVI Cable ................................................................................. 12
3.2.3 DVI to DVI Cable ................................................................................... 13
3.2.4 HDMI to DVI Adapter ........................................................................... 14
3.2.5 RJ-45 Male............................................................................................ 14
4Getting Started ..........................................................................................15
4.1 Powering on the system....................................................................... 15
4.2 Network Connections........................................................................... 15
4.3 Logging into the Web Admin Interface ................................................ 15
4.3.1 Epiphan’s Network Discovery Utility.................................................... 16
4.3.2 Logging into the Web Admin Interface Using a Web Browser and the IP
Address of the System ....................................................................................... 16
4.4 Users Logging ....................................................................................... 17
4.4.1 The Administrator User........................................................................ 17
4.4.2 The Viewer User................................................................................... 17
4.5 Web Admin Interface ........................................................................... 18
5Signal Flow Diagrams.................................................................................21
6Signal Capture ...........................................................................................23
6.1 Connecting Sources .............................................................................. 23
6.1.1 Connecting DVI, VGA or HDMI Input Sources ...................................... 23
6.1.2 Connecting Audio Input Sources.......................................................... 24
6.2 Sources Setup ....................................................................................... 24
6.2.1 Digital source setup ............................................................................. 24
6.2.2 Composite and S-Video Source Setup.................................................. 27
6.2.3 Remote source setup ........................................................................... 28
6.2.4 Adding a network grabber ................................................................... 29
6.3 Audio Configuration ............................................................................. 29
7Channel Setup ...........................................................................................30
7.1 Creating and Deleting a Channel .......................................................... 30
7.2 Multiple Sources Channel Setup .......................................................... 33
7.3 Select Video Codec ............................................................................... 35
7.4 Set Video Encoding Constraints/Parameters ....................................... 35
7.5 Select Audio Format ............................................................................. 38
8Streaming ..................................................................................................39
8.1 HTTP or RTSP Streaming....................................................................... 41
8.2 Using an IP Multicast Network ............................................................. 41

<Table of Contents
2
VGA Grid User Guide
8.2.1 Setting up an RTP Multicast from Stream Setup.................................. 43
8.2.2 Setting up an RTP Multicast from Publish Stream ............................... 44
8.3 Using a Content Distribution Network ................................................. 45
8.3.1 Using Epiphan Portal for Streaming ..................................................... 46
8.3.2 Using Epiphan’s Partners as CDN Providers For Streaming ................. 50
8.4 Setting Up VGA Grid and StreamZilla for CDN Broadcasting................ 51
8.5 Viewing Streaming Video ..................................................................... 58
8.5.1 Retrieving the Stream’s URL for Publishing ......................................... 58
8.5.2 Using the Channel Status Option ......................................................... 59
8.5.3 Testing How Participants Log In With a Viewer Password................... 60
8.6 Viewing a Broadcast with a Browser .................................................... 60
8.6.1 Viewing a Broadcast with a Media Player............................................ 60
8.7 Viewing a Broadcast on iPhone, iTouch, or iPad .................................. 61
8.8 Compatibility Information .................................................................... 61
8.8.1 Streaming format/Player Compatibility ............................................... 62
8.8.2 Browser Compatibility.......................................................................... 62
8.8.3 Media Player Compatibility.................................................................. 63
9Recording ..................................................................................................64
9.1 Selecting Recording File Format ........................................................... 64
9.2 Changing File Limits (Time and Size) .................................................... 65
9.3 Starting and Stopping Recording.......................................................... 66
9.4 Viewing the Current Recording ............................................................ 67
9.5 Recording a Stream on iPad, iPhone and iTouch ................................. 67
9.6 Recording Data in Motion JPEG Format ............................................... 67
9.7 Files Archive ......................................................................................... 67
9.7.1 Downloading Recordings ..................................................................... 68
9.7.2 Deleting Files........................................................................................ 69
9.7.3 Renaming Files ..................................................................................... 69
9.7.4 Viewing Closed Recording Files............................................................ 69
9.8 Recording Video from Multiple Sources on Separate Tracks in a File.. 70
9.9 Recording Video from Multiple Sources on One Track in a File ........... 71
9.10 File Transfer of Recorded Files ............................................................. 71
9.10.1 Copying Recorded Files to a USB Flash Drive or to an external HDD
71
9.11 Automatic File Upload.......................................................................... 73
9.11.1 Configuring Automatic File uploads................................................. 74
9.11.2 Configuring the CIFS Client .............................................................. 75
9.11.3 Configuring the RSync Client ........................................................... 76
9.11.4 Configuring the FTP Client ............................................................... 77
9.11.5 Testing the Automatic File Upload .................................................. 78
10 Networking................................................................................................79
10.1 Connecting Directly to the VGA Grid Concentrator ............................. 79

<Table of Contents
3
VGA Grid User Guide
10.1.1 Default Network Settings ................................................................ 80
10.1.2 Establishing Direct Connecting ........................................................ 80
10.2 Network Discovery of the System ........................................................ 81
10.2.1 Epiphan’s Network Discovery Utility ............................................... 81
10.2.2 Epiphan’s EpiphanTouch App for iPad, iPhone, iTouch ................... 82
10.3 Setting IP Address................................................................................. 83
10.3.1 Set the System to use a static IP address ........................................ 84
10.3.2 Set the VGA Grid to use a DHCP server ........................................... 84
11 System Administration ..............................................................................86
11.1 Setting the Date and Time.................................................................... 86
11.2 Users and Passwords............................................................................ 88
11.2.1 Configuring the Administrator User Password ................................ 88
11.2.2 Deleting the Administrator password ............................................. 89
11.3 Configuring Viewer Access ................................................................... 90
11.3.1 To add or change the viewer password........................................... 90
11.3.2 Configuring IP-based Authentication for Viewers ........................... 91
11.3.3 Delete the Viewer Password ........................................................... 92
11.4 Upgrading the System Firmware .......................................................... 92
11.4.1 Installing new firmware ................................................................... 92
11.5 Maintenance Controls .......................................................................... 93
11.5.1 Restoring the System Default Factory Configuration ...................... 94
11.5.2 Rebooting or Restarting System ...................................................... 94
11.5.3 Shutting down the System............................................................... 94
12 Serial Port Configuring...............................................................................95
13 Customizing Presentation and Web Content .............................................96
14 Configuring Remote Support .....................................................................98
15 VGA Grid Information..............................................................................101
16 Disk Check ...............................................................................................101
17 Disk Status Information ...........................................................................102
18 Configuring using a Third-Party Application.............................................103
18.1 Serial Port Configuration .................................................................... 103
18.2 RS-232 Commands ............................................................................. 103
18.3 Syntax for HTTP API Commands ......................................................... 105
18.4 Keys for HTTP API Commands ............................................................ 106
18.5 Device Info Keys ................................................................................. 106
18.6 Broadcasting Setup Keys .................................................................... 107
18.7 ASF Encoder Keys ............................................................................... 108
18.8 RTP Unicast (Peer-to-peer connection) Keys...................................... 108
18.9 Recorder Keys..................................................................................... 109
19 Examples .................................................................................................109
20 Sample Configurations ............................................................................110
21 Troubleshooting ......................................................................................113


Overview
5
VGA Grid User Guide
2Overview
2.1 Introduction
Epiphan’s VGA Grid™ is a streaming, recording, and multiviewer product that allows
you to capture and stream video and audio from up to 256 VGA, DVI, HDMI sources,
either local or remote. This appliance combines both Ethernet-based audio-video
broadcast streaming and recording functionalities and is ideal for multi audio-video
source event recording, control rooms, digital signage, security recording, training
and simulation systems.
VGAGrid’s multiviewer capability enables administrators to create multiple output
channels which are combinations of multiple input channels. Layout of multiview
channels supports flexible scaling/sizing and placement of any input signals to create
custom views. Multiview channels may also be recorded and streamed.
Supporting resolutions between 640x480 and 2048x2048, this solution is suitable for
a broad range of applications including medicine, black box recording, traffic
monitoring and simulators.
Depending on the model configuration the VGA Grid can capture video and audio
from 4 or 6 input sources such as:
a DVI/VGA/HDMI display or camera source,
an analog audio source.
Upon customer request Epiphan Systems can provide customized configurations of
VGA Grid.
This system supports both local and remote capture of video sources. Remote units
capture video sources and transmit the data to VGAGrid via Ethernet for recording,
streaming, and multiviewing.
VGAGrid supports multiple industry standard video codecs including Motion JPEG,
MPEG4 and H.264.
VGA Grid features the Publish Stream functionality that enables a user to direct
captured video and audio to servers or clients using available stream modes. VGA
Grid can be configured as a client to a Content Distribution Network and stream the
broadcast to an unlimited number of concurrent viewers. This functionality enables
you to stream video to the Epiphan’s portal (epiphan.net) where it can be viewed
directly from.

Overview
6
VGA Grid User Guide
VGA Grid consists of the VGA Grid Concentrator with installed internal capture cards
and external frame grabber hardware devices:
-VGA Grid Central Unit (Concentrator) is a 4U rackmount server with hardware
for video/audio capture, Gigabit Ethernet and proprietary firmware. It connects
to local sources and remote sources (via network) capturing video and audio
and can be managed through the Web admin interface. The number of internal
VGA/DVI capture cards installed in the rackmount server chassis determines
how many local sources can be connected to the VGA Grid.
-External network frame grabbers used in conjunction with VGA Grid
Concentrator allow you to capture, broadcast and record video and audio from
the remote sources through the Ethernet connection.
The VGA Grid Concentrator is connected to a network with an Ethernet connection.
The VGA Grid Concentrator and external frame grabber hardware devices support
both DHCP and static IP address assignment. Once connected to the network, they
can be configured and operated through an easy to use web interface.
When recording content administrators have a choice between AVI and MOV file
formats. Channels may be recorded to separate single-track files or combined into a
single multi-track file. Recorded files may be downloaded from the VGAGrid via the
Ethernet port to enable playback from an external computer.
To view streamed content, viewers are simply provided with the corresponding
unique URL which is automatically assigned to each output stream
The VGAGrid supports a range of storage options including standard hard disks, solid
state devices, removable drive options, and RAID configurations for storing recorded
content.
The VGA Grid supports streaming over HTTP, RSTP, peer-to-peer and multicast RTP.
Except for peer-to-peer and multicast RTP, all streaming types can be sent to a
Content Distribution Network (CDN) to maximize the number of concurrent viewers.
The decision on how to stream a broadcast will depend on many factors including
the number of expected viewers, destination devices used for viewing (e.g. iPAD,
laptop), and network capabilities between source and destination. For further
details on broadcasting strategies, please refer to Streaming.
The figure below illustrates how the VGA Grid fits into a network to allow a
broadcast consisting of video and optionally audio to be streamed to local and
remote viewers. While the broadcast is running, the VGA Grid can be recording the
broadcast to be retrieved at a later time.

Overview
7
VGA Grid User Guide
Figure 1 Epiphan's VGA Grid Delivering High Quality Video and Audio to Local and Remote
Clients
2.2 Available Product Configurations
The VGA Grid can be ordered in the following configurations to accommodate your
needs.
4-source VGA Grid
This VGA Grid version integrates four DVI2PCIe internal frame grabbers. It offers
maximum connection of four DVI/VGA sources collocated with VGA Grid.
6-source VGA Grid
This VGA Grid version integrates six DVI2PCIe internal frame grabbers. It offers
maximum connection of six DVI/VGA sources collocated with VGA Grid.
Physical Attributes
8
VGA Grid User Guide
If you need to broadcast or record data from remote inputs you can add a required
number of external network frame grabbers to your VGA Grid configuration.
It is possible to order any other configuration of VGA Grid on the Customize product
page upon customer request.
3Physical Attributes
3.1 System Hardware Features
3.1.1 VGA Grid Concentrator Hardware Features
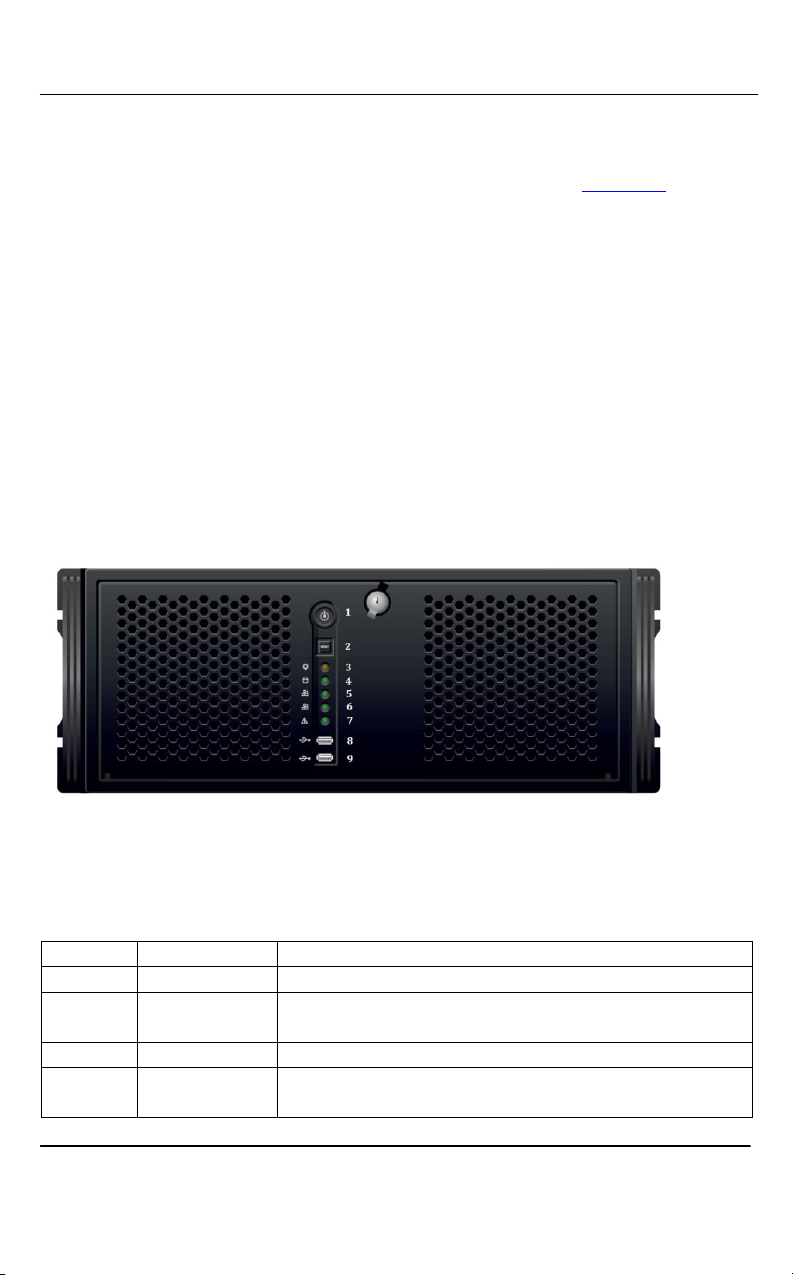
The VGA Grid Concentrator device is a standalone 4U rackmount chassis.
Dimensions are 235mm x 117.5mm x 73mm (9.25”x4.625”x2.875”).
Figure 2 Front View of the VGA Grid
Below is a table summarizing the connectors and indicators found on the front panel
of the VGA Grid.
Table 1 Summary of the Front Panel's connectors and Indicators
Number
Name
Description
1
Power
Power button
2
Factory Reset
Button
Resets the VGA Grid device to factory default settings.
3
Power LED
Indicates that the VGA Grid is turned on
4
Hard disk
activity LED
Blinks when the VGA Grid is making recordings.

Physical Attributes
9
VGA Grid User Guide
5, 6, 7
Not used
8, 9
USB port
This expansion port allows the connecting of any of the
following to the VGA Grid: an external HDD, a USB flash
drive, a remote mouse control for the starting/stopping
of a recording, or an RS-232 serial port for remote
controls, WiFi network connection.
Since VGA Grid can be delivered in multiple configurations, its back panel includes
RJ45 Gigabit Ethernet and power connectors, various number of DVI-I and audio in
ports.
3.1.2 VGA Grid Remote Acquisition Device Hardware Features
In order to capture, record and stream vide from remote sources VGA Grid uses the
VGA2Ethernet network frame grabbers. For the complete information about this
solution please refer to VGA2Ethernet User Guide. Below you can find the
description of its hardware features.
Figure 3 VGA2Ethernet (front view)

Physical Attributes
10
VGA Grid User Guide
Table 2 Summary of the Front Panel's connectors and Indicators
Number
Name
Description
1, 2
Not Used
3
Power and
Capture LEDS
Red LED: during operation the red LED blinks each time
the VGA2Ethernet captures an image. You can use the
red LED as an indicator that the VGA2Ethernet is
capturing images.
Green and blue LEDs: when the VGA2Ethernet device
first starts up, the blue LED lights up. A few seconds
later the green LED lights up. After about another 20
seconds the blue LED turns off, leaving the green LED
on indicating that the VGA2Ethernet has started up and
can start capturing images. During operation the blue
LED blinks during video signal test operation and when
the system tunes video parameters (e.g. VGA
parameters)
4
Audio Out
Connects audio equipment, such as headphones or
speakers, to confirm whether the audio stream is
currently being captured by the VGA2Ethernet.
5
DVI Out
Used to verify and confirm that the connected video
source from DVI In port is being received. A DVI
monitor or projector can be used with this port using
the DVI to DVI cable. Alternatively, if the device to be
used to confirm the receiving DVI input signal is a VGA
monitor, use the DVI to VGA cable.
6
Audio In
Connects a microphone or audio source. The input can
be mic or line.
7
DVI In
Connects a DVI source to the VGA2Ethernet using the
included DVI cable. To connect a VGA source, use the
included VGA to DVI adapter. To connect an HDMI
source (non-copy protected content) use the included
HDMI to DVI adapter.

Physical Attributes
11
VGA Grid User Guide
Figure 4 VGA2Ethernet (rear view)
Table 3 Connector, Interface and LED Descriptions
8
Power
Connect the AC adapter to the VGA2Ethernet power
connector and to a power outlet
9
ETH1
Primary 10/100/1000 Base-T RJ-45 auto-sensing Ethernet
network port to connect the VGA2Ethernet device to an
Ethernet network. The VGA2Ethernet device Ethernet port
is auto-sensing.
10
ETH2
Secondary 10/100/1000 Base-T RJ-45 auto-sensing Ethernet
network port. This port is useful in case you need to
configure the Ethernet Bridge when there is only one
Ethernet connection.
3.2 Cables, Connectors and Adapters
The VGA Grid can be connected to a number of different types of equipment using a
variety of cables, and adapters. This section describes a subset of connectors, cables
and adapters that are known to be compatible with the VGA Grid.
3.2.1 3.5 mm Mini-jack
A 3.5mm mini jack connector is used to carry audio signals. It can be connected to
VGA Grid to its Audio In port.

Physical Attributes
12
VGA Grid User Guide
Figure 5 3.5mm Mini-jack
3.2.2 VGA to DVI Cable
Connects a VGA source to either of the VGA Grid’s DVI-I Single-Link ports or DVI-I
dual link ports. This cable is included with the VGA Grid (one per DVI-I port)

Physical Attributes
13
VGA Grid User Guide
Figure 6 VGA to DVI cable
3.2.3 DVI to DVI Cable
Connects a DVI source to the VGA Grid’s DVI ports. This cable is included with the
VGA Grid (one per DVI port).
Figure 7 DVI to DVI Cable

Physical Attributes
14
VGA Grid User Guide
3.2.4 HDMI to DVI Adapter
Connects an HDMI source to either of the VGA Grid’s DVI ports. This cable is
included with the VGA Grid.
Figure 8 HDMI to DVI Adapter
3.2.5 RJ-45 Male
Connects the VGA Grid to an Ethernet network.
Figure 9 RJ-45 Male Cable

Getting Started
15
VGA Grid User Guide
4Getting Started
4.1 Powering on the VGA Grid
The main operation sequence for connecting and powering on the VGA Grid is as
follows:
1. Connect local video and audio sources to the Concentrator.
2. Connect all remote video and audio sources to the corresponding
VGA2Ethernet devices:
a. Connect a remote video source to the VGA2Ethernet device.
b. Use an RJ-45 Ethernet cable to connect the VGA2Ethernet Eth1 port to
the Ethernet network.
c. Connect the power cable to the VGA2Ethernet device. The
VGA2Ethernet device powers on and the power and image capture
activity LEDs light up as the device starts up.
d. Start up the remote video source.
3. Use an RJ-45 Ethernet cable to connect the VGA Grid’s Ethernet port to an
Ethernet network.
4. Connect the power cable to the VGA Grid Concentrator.
5. Press the Power button on the VGA Grid Concentrator front panel to turn on
the device.
6. The VGA Grid Concentrator powers on. The power and hard disk activity LEDs
light up as the device starts up following their start up sequence.
7. Log into the Concentrator configuration interface to confirm that the device is
connected to the network.
8. Start up the local video and audio sources.
4.2 Network Connections
Please to refer to the Networking chapter for the instructions on direct VGA Grid’s
connection to the Ethernet, discovering the VGA Grid on the network, IP address
settings and other details.
4.3 Logging into the Web Admin Interface
The VGA Grid comes with a Web admin interface that can be used to configure the
VGA Grid settings, view the files that have been recorded, and download recorded

Getting Started
16
VGA Grid User Guide
files. Additionally this control interface acts as a system monitor with options to
view the VGA Grid’s system status and its internal storage status.
The Web admin Interface is accessible by logging into it using one of the following
methods.
4.3.1 Epiphan’s Network Discovery Utility.
Epiphan Network Discovery Utility runs on a Windows based PC. It is used to
connect to the VGA Grid Web admin interface tool. Network Discovery Utility finds
the VGA Grid device on the network and displays its assigned IP address.
The Epiphan Network Discovery Utility can be installed and executed from a
workstation running Windows XP, Vista or Windows 7. Please refer to Networking
for the instructions on how to install the utility.
Follow the following steps to access the Web admin Interface through this utility:
1. Start the Epiphan Network Discovery Utility tool.
2. Click Search to find all of the available Epiphan devices on the network and
select the VGA Grid.
3. Click Web config.
4. A web browser starts and you are prompted for the VGA Grid’s administrator
user name and password.
5. Enter the following information:
-User Name: admin
-Password: configured password<return>, there is no default password so unless
a password has been configured, just hit <return>
The Web admin interface opens.
4.3.2 Logging into the Web Admin Interface Using a Web Browser and the
IP Address of the VGA Grid
The web browser can be running on Windows, Mac OS X, Linux or any other
operating system.
1. Start a web browser on any workstation connected to the same network as the
VGA Grid.
2. Browse to the VGA Grid.
http://<ip address of the VGA Grid>/admin
The IP address of the VGA Grid can be obtained using any of the following
methods:
Table of contents
Other epiphan Media Converter manuals

epiphan
epiphan SDI2USB 3.0 User manual

epiphan
epiphan VGA2Ethernet User manual

epiphan
epiphan DVI2USB 3.0 User manual

epiphan
epiphan VGA2USB LR User manual

epiphan
epiphan VGA2Ethernet User manual

epiphan
epiphan Networked VGA Grid User manual

epiphan
epiphan Pearl-2 Rackmount User manual

epiphan
epiphan DVI2USB 3.0 User manual

epiphan
epiphan SDI2USB 3.0 User manual
Popular Media Converter manuals by other brands


Whelen Engineering Company
Whelen Engineering Company E-747 Operation & installation manual

EtherWAN
EtherWAN EM1100 user manual

Diga
Diga CRUSB Spartan manual

Rampino Elektronik
Rampino Elektronik Loco-1 instruction manual

GAMESWITCH
GAMESWITCH PS3-S201 user manual

StarTech.com
StarTech.com ST124HD202 quick start guide