manuals.online logo
Brands
  1. Home
  2. •
  3. Brands
  4. •
  5. Epson
  6. •
  7. Printer
  8. •
  9. Epson DS-C480W Instruction Manual

Epson DS-C480W Instruction Manual

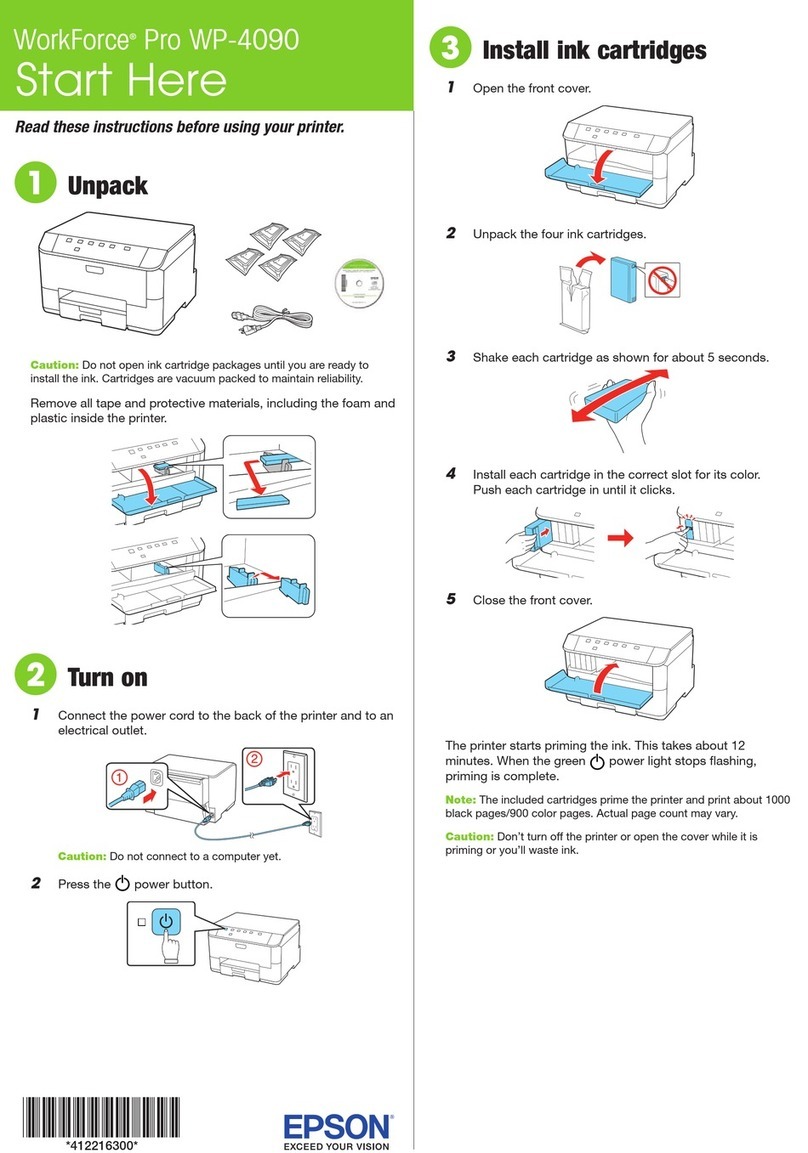
Note: An internet connection is required to obtain the
product software.
Remarque : Une connexion Internet est requise pour
obtenir le logiciel du produit.
Visit Epson’s support site listed below to download
the Drivers and Utilities Combo Package.
Visitez le site de soutien d’Epson indiqué ci-dessous
pour télécharger l’Ensemble des pilotes et logiciels.
http://epson.com/support/dsc480w (U.S./É.-U.)
http://epson.ca/support/dsc480w (Canada)
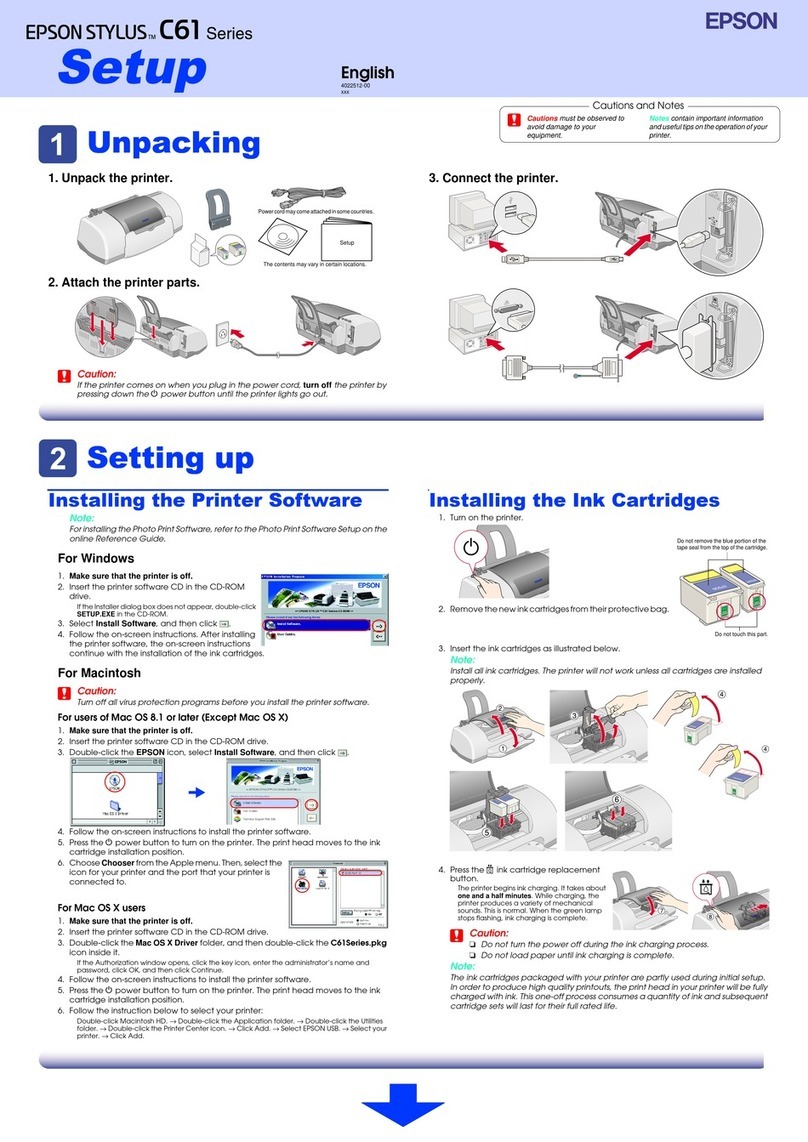
Double-click the le you downloaded to install the
software. Follow the on-screen instructions to set up
the connection.
Double-cliquez sur le chier que vous avez
téléchargé pour installer le logiciel. Suivez les
instructions à l’écran pour congurer la connexion.
Press the power button.
Appuyez sur le bouton d’alimentation.
Select your language, date, and time settings.
Sélectionnez les paramètres de langue, de date et
d’heure.
1 1
1 3
2
DS-C480W
IMPORTANT: Before using this product, make sure you read
these instructions and the safety instructions in the online
User’s Guide.
IMPORTANT : Avant d’utiliser ce produit, assurez-vous de lire
ces instructions et les instructions de sécurité dans le Guide de
l’utilisateur en ligne.
Start Here
Point de départ
Install software •
Installez le logiciel
Turn on the scanner •
Allumez le scanner
Vériez l’icône achée sur l’écran ACL et eectuez
l’une des actions suivantes :
• Si l’icône est achée, passez à l’étape 2.
• Si l’icône est achée, déplacez le sélecteur
de position à l’arrière du scanner vers la droite et
faites basculer le scanner vers l’avant.
Open the input tray and raise the input tray
extension.
Ouvrez le bac d’entrée et levez la rallonge du bac
d’entrée.
Load the original faceup
and top edge rst, then
slide the edge guides
against the original.
Chargez l’original face
vers le haut et bord
supérieur en premier,
puis faites glisser les
guide-papier contre l’original.
Select Computer on the LCD screen, select a job,
then press the Start icon to initiate the scan.
Sélectionnez Ordinateur sur l’écran ACL,
sélectionnez un travail, puis appuyez sur l’icône
Démarrer pour lancer la numérisation.
Straight path position •
Position de chemin droit
Use the straight path position to scan large, folded originals,
such as tabloid or A3, long paper, booklets, I.D. cards,
passports, and envelopes.
Utilisez la position de chemin droit pour numériser les
originaux pliés et larges, comme le papier de format
tabloïde ou A3, le papier long, les livrets, les cartes
d’identité, les passeports et les enveloppes.
Check the icon on the LCD screen and do one of the
following:
• If is displayed, continue to step 2.
• If is displayed, pull the position selector on
the back of the scanner to the right, and tilt the
scanner backward.
Note: For detailed information on loading and scanning
originals, see the online User’s Guide.
Remarque : Pour obtenir des informations détaillées sur
lechargement et la numérisation des originaux, consultez
leGuide de l’utilisateur en ligne.
Note: To scan using the Start icon, you must connect
the scanner to a computer with Document Capture Pro
(Windows®) or Document Capture (Mac) installed.
Remarque : Pour numériser en utilisant l’icône Démarrer,
vous devez connecter le scanner à un ordinateur avec le
logiciel Document Capture Pro (Windows®) ou Document
Capture (Mac) installé.
Vertical path position •
Position de chemin vertical
Use the vertical path position to scan Letter- or A4-size
originals, receipts, and business cards.
Utilisez la position de chemin vertical pour numériser les
originaux de format Lettre ou A4, les reçus et les cartes
professionnelles.
Check the icon on the LCD screen and do one of the
following:
• If is displayed, continue to step 2.
• If is displayed, pull the position selector on
the back of the scanner to the right, and tilt the
scanner forward.
Scan a document •
Numérisez un document
Note: Do not connect the USB cable until instructed to
doso.
Remarque : Ne branchez pas le câble USB avant d’y être
invité.
Remove the packing
materials •Retirez tout le
matériel d’emballage
To scan from an iOS®or Android™ device,
download and install the free Epson Smart
Panel®app from the App Store or Google Play™.
Note: For information on setting up presets and
Epson Connect™, see the online User’s Guide.
Pour numériser depuis un appareil iOS®ou
AndroidMC, téléchargez et installez l’application
gratuite Epson Smart Panel®depuis l’App Store
ou Google PlayMC.
Remarque : Pour obtenir plus d’informations
concernant la conguration des présélections
et d’Epson ConnectMC, consultez le Guide de
l’utilisateur en ligne.
You can also scan from your computer with Document
Capture Pro (Windows) or Document Capture (Mac).
Windows 11/Windows 10: Click or , then search for
Document Capture Pro and select it.
Windows 8.x: Navigate to the Apps screen and select
Document Capture Pro.
Windows 7: Click > All Programs > Epson Software >
Document Capture Pro.
Mac: Select Applications > Epson Software > Document
Capture.
For more information about scanning from a computer
and creating custom scan jobs with Document Capture Pro
(Windows) or Document Capture (Mac), click the Help or ?
button in the scanner software or see online User’s Guide.
Vous pouvez aussi numériser depuis votre ordinateur avec
Document Capture Pro (Windows) ou Document Capture
(Mac).
Windows 11/Windows 10 : Cliquez sur ou , puis
eectuez une recherche de Document Capture Pro et
sélectionnez-le.
Windows 8.x : Naviguez vers l’écran Applications et
sélectionnez Document Capture Pro.
Windows 7 : Cliquez sur > Tous les programmes >
Epson Software > Document Capture Pro.
Mac : Sélectionnez Applications > Epson Software >
Document Capture.
Pour obtenir plus d’informations concernant la
numérisation depuis un ordinateur et la création de travaux
de numérisation personnalisés avec Document Capture
Pro (Windows) ou Document Capture (Mac), cliquez sur
le bouton Aide ou ?dans le logiciel de numérisation ou
consultez le Guide de l’utilisateur en ligne.
Scan from a mobile
device•Numérisez depuis
un appareil mobile
Scan from a computer•
Numérisez depuis un
ordinateur
EPSON and Epson Smart Panel are registered trademarks, EPSON Exceed Your Vision is
a registered logomark, and Epson Connect is a trademark of Seiko Epson Corporation.
Mac is a trademark of Apple Inc., registered in the U.S. and other countries. App Store
is a service mark of Apple Inc., registered in the U.S. and other countries.
Android and Google Play are trademarks of Google LLC.
Windows is a registered trademark of Microsoft Corporation in the United States
and/or other countries.
General Notice: Other product names used herein are for identication purposes only
and may be trademarks of their respective owners. Epson disclaims any and all rights
in those marks.
This information is subject to change without notice.
EPSON et Epson Smart Panel sont des marques déposées, EPSON Exceed Your Vision
est un logotype déposé et Epson Connect est une marque de commerce de Seiko
Epson Corporation.
Mac est une marque de commerce d’Apple Inc., enregistrée aux États-Unis et dans
d’autres pays. App Store est une marque de service d’Apple Inc., enregistrée aux
États-Unis et dans d’autres pays.
Android et Google Play sont des marques de commerce de Google LLC.
Windows est une marque déposée de Microsoft Corporation aux États-Unis et/ou dans
d’autres pays.
Avis général : Les autres noms de produit gurant dans le présent document ne sont
cités qu’à des ns d’identication et peuvent être des marques de commerce de leurs
propriétaires respectifs. Epson renonce à tous les droits associés à ces marques.
L’information contenue dans le présent document peut être modiée sans préavis.
CPD-63186
© 2022 Epson America, Inc., 12/22
Printed in XXXXXX
Pays d’impression : XXXXXX
• Your network name (SSID) and password are case
sensitive. Make sure you enter uppercase and lowercase
letters correctly.
Le nom du réseau (SSID) et le mot de passe sont
sensibles à la casse. Assurez-vous de bien saisir les
lettres minuscules et majuscules.
• If the scanner did not connect automatically and you
areconnecting it to the network manually, make sure
you select the same network name (SSID) that the
computer is connected to.
Si le scanner ne s’est pas connecté automatiquement
et que vous tentez de le connecter au réseau
manuellement, assurez-vous de sélectionner le même
nom de réseau (SSID) auquel l’ordinateur est connecté.
• Turn your router o and on again, then repeat the
software installation process.
Éteignez votre routeur et rallumez-le, puis répétez le
processus d’installation du logiciel.
Troubleshooting Wi-Fi
Setup •Dépannage pour
configuration Wi-Fi
Aide pour le logiciel du scanner
Cliquez sur le bouton Aide ou ?sur l’écran du logiciel.
Guide de l’utilisateur
Double-cliquez sur l’icône sur le bureau (ou dans le
dossier Applications/Epson Software/Guide sur un Mac).
Soutien technique Epson
Soutien Internet
Visitez http://epson.com/support/dsc480w (É.-U.) ou
http://epson.ca/support/dsc480w (Canada) an de
télécharger des logiciels et des utilitaires, de consulter
les manuels, la FAQ et des conseils de dépannage et de
communiquer avec Epson.
Parler à un représentant du soutien
Composez le 562 276-4300 (É.-U.) ou le 905 709-3839
(Canada), de 7 h à 16 h, heure du Pacique, du lundi
au vendredi. Les heures et les jours de soutien sont
modiables sans préavis. Des frais d’interurbain peuvent
s’appliquer.
Help •Aide
Scanner software help
Click the Help or ? button on your software screen.
User’s Guide
Double-click the icon on your desktop (or in the
Applications/Epson Software/Guide folder on a Mac).
Epson technical support
Internet support
Visit http://epson.com/support/dsc480w (U.S.) or
http://epson.ca/support/dsc480w (Canada) to download
software and utilities, view manuals, get FAQs and
troubleshooting advice, or contact Epson.
Speak to a support representative
Call (562) 276-4300 (U.S.) or (905) 709-3839 (Canada),
7a.m. to 4 p.m., Pacic Time, Monday through Friday.
Days and hours of support are subject to change without
prior notice. Toll or long distance charges may apply.
Vériez l’icône achée sur l’écran ACL et eectuez
l’une des actions suivantes :
• Si l’icône est achée, passez à l’étape 2.
• Si l’icône est achée, déplacez le sélecteur
de position à l’arrière du scanner vers la droite et
faites basculer le scanner vers l’arrière.
Open the input tray and raise the input tray
extension.
Ouvrez le bac d’entrée et levez la rallonge du bac
d’entrée.
Load the original faceup and top edge rst, then
slide the edge guides against the original.
Chargez l’original face vers le haut et bord supérieur
en premier, puis faites glisser les guide-papier contre
l’original.
Select Computer on the LCD screen, select a job,
then press the Start icon to initiate the scan.
Sélectionnez Ordinateur sur l’écran ACL,
sélectionnez un travail, puis appuyez sur l’icône
Démarrer pour lancer la numérisation.

Other manuals for DS-C480W

1

Other Epson Printer manuals

Epson Stylus CX4900 Series User manual

Epson

Epson Stylus CX4900 Series User manual

Epson T20IIIL-T User manual

Epson

Epson T20IIIL-T User manual

Epson STYLUS PRO WT7900 User manual

Epson

Epson STYLUS PRO WT7900 User manual

Epson EPL N2700 User manual

Epson

Epson EPL N2700 User manual

Epson Expression Home XP-200 User manual

Epson

Epson Expression Home XP-200 User manual

Epson AcuLaser C900 User manual

Epson

Epson AcuLaser C900 User manual

Epson Stylus Photo 1500W User manual

Epson

Epson Stylus Photo 1500W User manual

Epson Stylus Pro 7600 User manual

Epson

Epson Stylus Pro 7600 User manual

Epson LQ-690II Instruction Manual

Epson

Epson LQ-690II Instruction Manual

Epson Stylus Photo PX830FWD Assembly instructions

Epson

Epson Stylus Photo PX830FWD Assembly instructions

Epson Grafiprint MP20 Instruction Manual

Epson

Epson Grafiprint MP20 Instruction Manual

Epson Stylus Pro 4800 Portrait Edition User manual

Epson

Epson Stylus Pro 4800 Portrait Edition User manual

Epson R2400 - Stylus Photo Color Inkjet Printer Instruction Manual

Epson

Epson R2400 - Stylus Photo Color Inkjet Printer Instruction Manual

Epson Stylus C45 User manual

Epson

Epson Stylus C45 User manual

Epson Stylus Pro GS6000 User manual

Epson

Epson Stylus Pro GS6000 User manual

Epson Stylus Pro 9000 - Print Engine User manual

Epson

Epson Stylus Pro 9000 - Print Engine User manual

Epson Stylus PX810FW SERIES Assembly instructions

Epson

Epson Stylus PX810FW SERIES Assembly instructions

Epson SureColor P400 User manual

Epson

Epson SureColor P400 User manual

Epson EPL-7500 User manual

Epson

Epson EPL-7500 User manual

Epson ET-L6550 Series User manual

Epson

Epson ET-L6550 Series User manual

Epson PictureMate Guide

Epson

Epson PictureMate Guide

Epson FX-980 - Impact Printer User manual

Epson

Epson FX-980 - Impact Printer User manual

Epson TM-H5000/H5000P User manual

Epson

Epson TM-H5000/H5000P User manual

Epson Stylus Pro 7600 Photographic Dye Ink Technical manual

Epson

Epson Stylus Pro 7600 Photographic Dye Ink Technical manual

Popular Printer manuals by other brands

SPRT SP-RMT11/L21 user manual

SPRT

SPRT SP-RMT11/L21 user manual

Canon LBP-810 user guide

Canon

Canon LBP-810 user guide

Telpar MTP-1500 user manual

Telpar

Telpar MTP-1500 user manual

MGI JETVARNISH 3DS user manual

MGI

MGI JETVARNISH 3DS user manual

Axiohm A721 Setup guide

Axiohm

Axiohm A721 Setup guide

Sony UP-890CE Service manual

Sony

Sony UP-890CE Service manual

Canon PIXMA MX432 Setting up

Canon

Canon PIXMA MX432 Setting up

Trotec Speedy 400 operating manual

Trotec

Trotec Speedy 400 operating manual

Canon PIXMA MP620 series Getting started

Canon

Canon PIXMA MP620 series Getting started

Brother MFC MFC-5440CN user guide

Brother

Brother MFC MFC-5440CN user guide

Xerox Phaser 7750 Quick reference guide

Xerox

Xerox Phaser 7750 Quick reference guide

Fujitsu DL4400 user manual

Fujitsu

Fujitsu DL4400 user manual

Star Micronics TSP200 Series Programmer's manual

Star Micronics

Star Micronics TSP200 Series Programmer's manual

Mitsubishi CP-3800DW user manual

Mitsubishi

Mitsubishi CP-3800DW user manual

Boca Systems Micro Plus user manual

Boca Systems

Boca Systems Micro Plus user manual

Lexmark MS610 Series Specfications

Lexmark

Lexmark MS610 Series Specfications

Craind Impianti FT190S user manual

Craind Impianti

Craind Impianti FT190S user manual

Brother HL-L6300DW reference guide

Brother

Brother HL-L6300DW reference guide

manuals.online logo
manuals.online logoBrands
  • About & Mission
  • Contact us
  • Privacy Policy
  • Terms and Conditions

Copyright 2025 Manuals.Online. All Rights Reserved.