manuals.online logo
Brands
  1. Home
  2. •
  3. Brands
  4. •
  5. Epson
  6. •
  7. Projector
  8. •
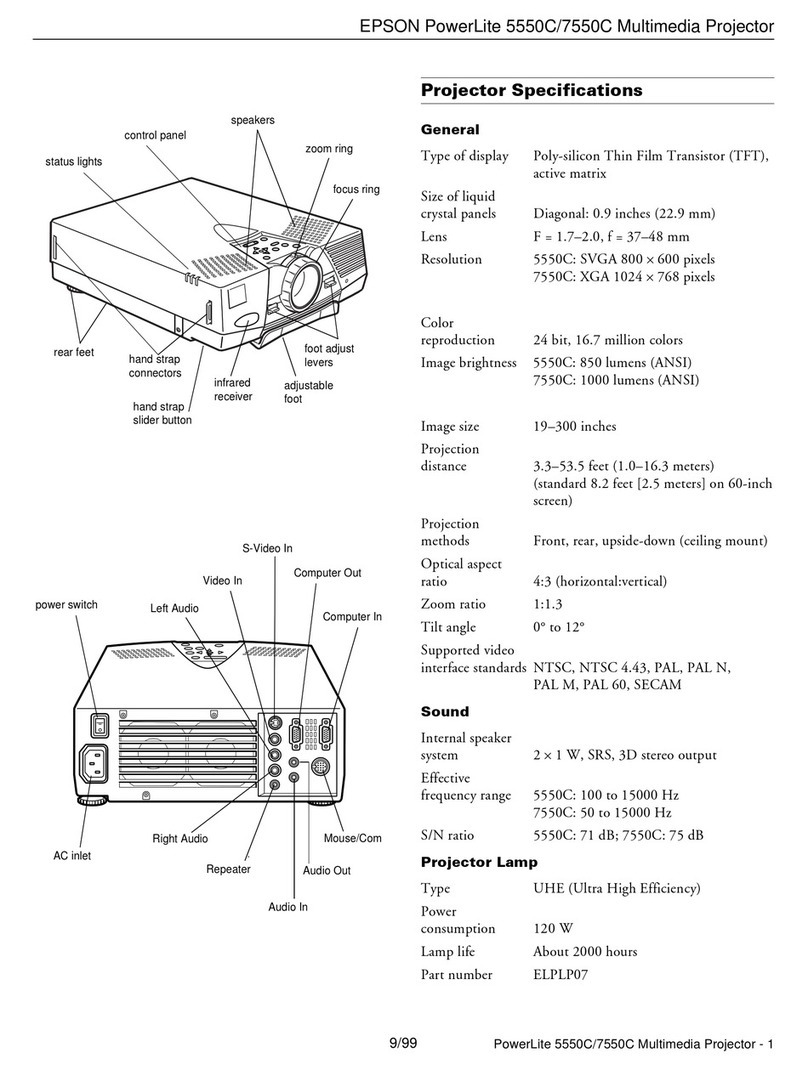
  9. Epson PowerLite S18+ Specification sheet

Epson PowerLite S18+ Specification sheet

4125878 Rev.0
1-F C
4125878 Rev.0
1-F M
4125878 Rev.0
1-F Y
4125878 Rev.0
1-F K
Quick Setup
Before using the projector, make sure you read the safety instructions in the
online User’s Guide.
Note: The PowerLite W15+ has USB-A, USB-B, and Computer ports only. Refer
to the applicable sections below when connecting the projector.
Connect the projector
Choose from the following connections. See the sections below or the online
User’s Guide for details.
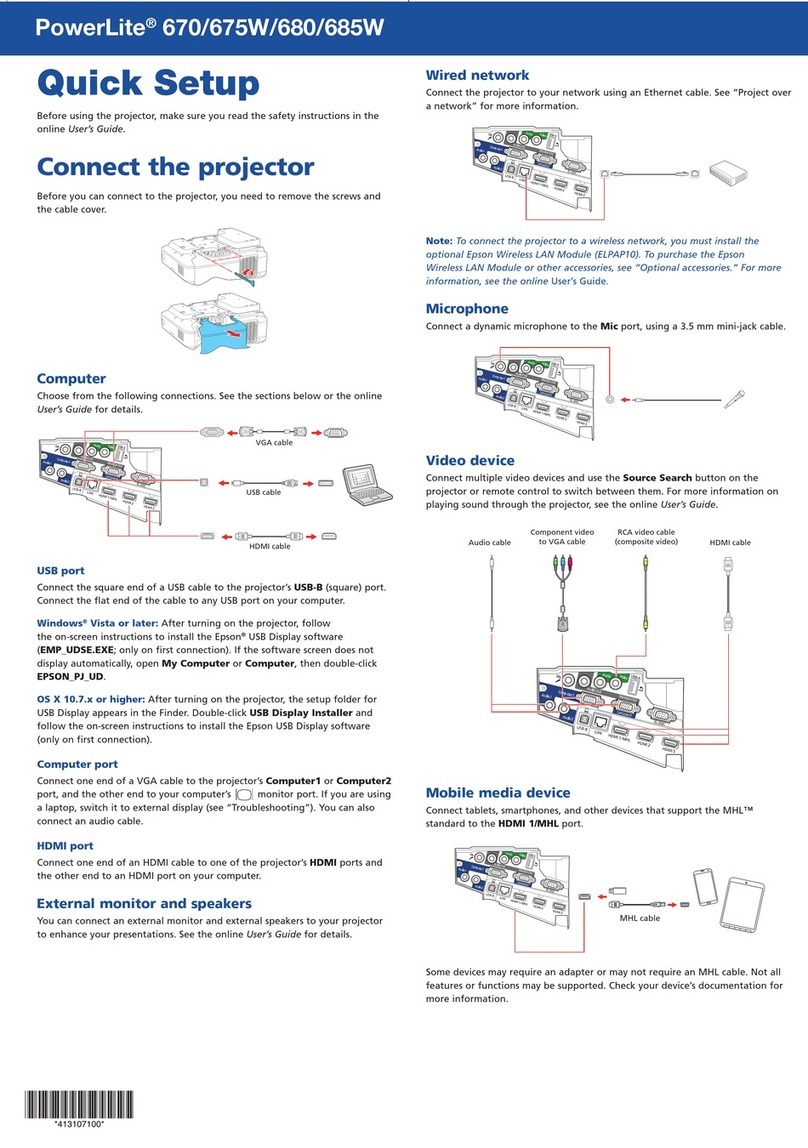
Computer
USB cable
HDMI cable
VGA cable
Audio cable
USB port
Connect the square end of a USB cable to the projector’s USB-B (square) port.
Connect the flat end of the cable to any USB port on your computer.
Windows®XP or later: After turning on the projector, follow the on-screen
instructions to install the Epson®USB Display software (EMP_UDSE.EXE; only
on first connection). If the software screen does not display automatically,
open My Computer or Computer, then double-click EPSON_PJ_UD.
Mac OS X 10.5.8 or higher: After turning on the projector, the setup folder
for USB Display appears in the Finder. Double-click USB Display Installer and
follow the on-screen instructions to install the Epson USB Display software
(only on first connection).
Note: If you have problems installing the USB Display software, make sure the
USB Type B setting in the projector’s Extended menu is set to USB Display.
See the online User’s Guide for instructions.
Computer port
Connect one end of a VGA cable to the projector’s Computer port, and the
other end to your computer’s monitor port. If you are using a laptop,
switch it to external display (see “Troubleshooting”). You can also connect an
audio cable.
HDMI port
Connect one end of an HDMI cable to the projector’s HDMI port and the other
end to an HDMI port on your computer.
Video device
Connect up to 4 video devices and use the remote control to switch between
them.
RCA video cable (composite video)
Component video to VGA cable
S-Video cable
HDMI cable
Audio cable
Camera, USB device, or Epson DC-06 document camera
Connect a digital camera, USB flash drive, USB storage device, or Epson DC-06
document camera to the projector’s USB-A (flat) port.
If you connect a digital camera, USB flash drive, or USB storage device, you can
use the projector’s PC Free feature. See the online User’s Guide for details.
Turn on your equipment
1Turn on your computer or video source.
2Plug in the projector. The power
light on the projector turns blue.
3Open the A/V Mute slide all the way.
4Press the power button.
The projector beeps, the Status
light flashes blue, and then
stays on.
Note: To shut down the projector, press the power button twice, then
unplug it. You don’t have to wait for the projector to cool down.
5The default language of the menu system is English. To select another
language, press the Menu button on the projector. Select Extended and
press Enter. Select Language and press Enter. Select your language and
press Enter.Press the Menu button to exit the menu system.
Adjust the image
1If you don’t see an image, press the Source Search button on the
projector or remote control to select the image source.
Note: If you still see a blank screen or have other display problems, see
the troubleshooting tips on the back of this sheet.
2To raise the image, press the
foot release button and lift
the front of the projector.
Release the button to lock
the foot in position.
3PowerLite W15+/W18+/X24+: To reduce or enlarge the image, turn
the zoom ring.
PowerLite S18+: To reduce or enlarge the image, press the Tele
(reduce) or Wide (enlarge) buttons on the projector.
PowerLite
W15+/W18+/X24+
PowerLite S18+
4Turn the focus ring to sharpen the image.
PowerLite
W15+/W18+/X24+
PowerLite S18+
5If your image looks like or , you may have placed the projector
off to one side of the screen at an angle. Place the projector directly in
front of the center of the screen, facing the screen squarely. If you can't
move the projector, use the horizontal slider on the projector to correct
the image.
PowerLite
W15+/W18+/X24+
PowerLite S18+
6Your projector automatically adjusts images that look like or ,
but if necessary you can press the or button on the projector to
correct it.
Using the remote control
Make sure the batteries are installed as shown (two AA batteries).
Choose which
source to display
Turn projector
on and off
Access projector
menus
Turn off projector
display Get solutions to
common problems
Navigate projector
menus
For more information on using the remote control, see the online
User’s Guide.
Project wirelessly
Follow the steps here to connect the projector wirelessly over an 802.11n,
802.11g, or 802.11b wireless network. With the PowerLite S18+, you will need
the optional wireless LAN module (part number V12H418P12).
If you’re projecting from a computer, it must have a wireless card or built-in
wireless interface, and be running Windows 8, Windows 7, Windows Vista®,
Windows XP Professional x64, or Windows XP, or Mac OS X 10.4.11 to 10.8.x.
1
Remove the wireless LAN module cover screw.
2Connect the wireless LAN module to the projector's USB-A (flat) port.
3
To configure your projector for your wireless network, do one of the
following:
•If you’re using the optional Quick Wireless Connection USB
key (Windows only, part number V12H005M09), press the LAN
button on the remote control. When you see SSID and IP address
information on the screen, remove the wireless LAN module
and connect the key to the projector’s USB-A port. Look for the
displayed message, remove the key, and connect it to a USB port
on your computer. Follow the on-screen instructions to install
the driver, then run your presentation. For details, see the online
User’s Guide.
•If you’re not using the key, continue with the steps below.
4Attach the wireless LAN module cover and secure it using the screw
you removed.
5Press the Menu button on the remote control, select the Network
menu and press .
6Choose Network Configuration and press .
PowerLite®S18+/W15+/W18+/X24+
*412587800*
*412587800*
4125878 Rev.0
1-B C
4125878 Rev.0
1-B M
4125878 Rev.0
1-B Y
4125878 Rev.0
1-B K
7Select the Wireless LAN menu and press .
8Choose Connection Mode,press , select Quick (for a direct
connection to a computer, tablet, or smartphone) or Advanced
(for a connection to a router or access point), then press again.
When you’re finished, press Esc to return to the Wireless LAN menu.
9If you chose the Advanced connection mode, select SSID, press ,
and enter your network name (SSID) in the screen that appears.
•
To select a character, use the arrow buttons on the remote control
to highlight it, then press .
•
To enter a number, hold down the Num button on the remote
control and press the numeric button.
•
To switch between uppercase and lowercase letters, select CAPS
and press .
•
To change the displayed symbols, select SYM1 or SYM2 and
press .
When you’re finished entering the SSID, select Finish and press .
10 If you chose the Advanced connection mode, select IP settings and
press .
If your network assigns addresses automatically, turn on DHCP. If not,
turn off DHCP and enter the projector’s IP Address, Subnet Mask, and
Gateway Address, as needed.
To enter numbers, hold down the Num button on the remote control
and press the numeric buttons. When you’re finished, press Esc to return
to the Wireless LAN menu.
11 To prevent the SSID and IP address from appearing on the network
standby screen, set the SSID Display and/or IP Address Display
settings to Off.
12 When you’re finished selecting settings in the Wireless LAN menu,
press Esc.
13 If you are connecting the projector to a secure network, select the
Security menu and press . Then select settings as necessary and
press Esc when you’re finished.
14 Select Complete and press . Then select Yes and press again.
15 See “Install network software” for additional instructions.
Install network software
Computer
To project over the network, download and install the EasyMP®Network
Projection software on each computer that you will project from. To monitor
and control your projector over the network, download and install the EasyMP
Monitor software (Windows only). Click the icons on your desktop to access
the software download pages.
For instructions on installing and using your network software, click the icons
on your desktop to access the online EasyMP Network Projection Operation
Guide or EasyMP Monitor Operation Guide (requires an Internet connection).
If you don’t see the software download or guide icons on your desktop, you can
install them from the projector CD or go to the Epson website, as described in
“Where to get help.”
Mobile device
To project from an iOS®or Android™tablet or smartphone,
download and install the Epson iProjection™app. Visit
www.epson.com/projectorapp for more information.
Troubleshooting
If you see a blank screen or the No signal message after turning on your
computer or video device, check the following:
•
Make sure the Status light on the projector is blue and not flashing, and
the A/V Mute slide is open.
•
Press the Source Search button on the projector or the remote control
to switch to the correct image source, if necessary.
•
If you’re using a Windows laptop, press the function key on your
keyboard that lets you display on an external monitor. It may be labeled
CRT/LCD or have an icon such as . You may have to hold down the
Fn key while pressing it (such as Fn + F7). Wait a moment for the display
to appear.
•
If you’re using a Mac laptop, open System Preferences and
select Displays. Select the Display or Color LCD option if necessary,
then click the Arrange or Arrangement tab, and select the Mirror
Displays check box.
Where to get help
Manuals
For more information about using the projector, click the icons on your desktop
to access the online manuals (requires an Internet connection). If you don’t
have icons for the manuals, you can install them from the projector CD or go to
the Epson website, as described below.
Telephone support services
You may also speak with a support specialist by calling:
Argentina (54 11) 5167-0300 Mexico
Bolivia* 800-100-116 Mexico City (52 55) 1323-2052
Chile (56 2) 2484-3400 Other cities 01-800-087-1080
Colombia 01 8000 915235 Nicaragua* 00-1-800-226-0368
Costa Rica 800-377-6627 Panama* 00-800-052-1376
Dominican Peru
Republic* 1-888-760-0068 Lima (51 1) 418-0210
Ecuador* 1-800-000-044 Other cities 0800-10126
El Salvador* 800-6570 Uruguay 00040-5210067
Guatemala* 1-800-835-0358 Venezuela (58 212) 240-1111
Honduras** 800-0122
Code: 8320
*Contact your local phone company to call this toll free number from a mobile phone.
**Dial the first 7 digits, wait for a message, then enter the code.
If your country does not appear on the preceding list, please contact the dealer where
you purchased the product. Toll or long distance charges may apply.
Internet support
Visit global.latin.epson.com/Soporte for solutions to common problems
(website available in Spanish and Portuguese). You can download utilities and
documentation, get FAQs and troubleshooting advice, or e-mail Epson.
Optional accessories
For a list of optional accessories, see the online User’s Guide.
You can purchase screens or other accessories from an Epson authorized reseller.
To find the nearest reseller, contact Epson as described in “Where to get help.”
Notices
Declaration of Conformity
According to 47CFR, Part 2 and 15, Class B Personal Computers and
Peripherals; and/or CPU Boards and Power Supplies used with Class B Personal
Computers
We: Epson America, Inc.
Located at: 3840 Kilroy Airport Way
MS: 3-13
Long Beach, CA 90806
Tel: (562) 981-3840
Declare under sole responsibility that the product identified herein, complies
with 47CFR Part 2 and 15 of the FCC rules as a Class B digital device. Each
product marketed, is identical to the representative unit tested and found
to be compliant with the standards. Records maintained continue to
reflect the equipment being produced can be expected to be within the
variation accepted, due to quantity production and testing on a statistical
basis as required by 47CFR 2.909. Operation is subject to the following two
conditions: (1) this device may not cause harmful interference, and (2) this
device must accept any interference received, including interference that may
cause undesired operation.
Trade Name: Epson
Type of Product: LCD Projector
Model: H552A/H557A/H550A/H553A
Marketing Name: PowerLite S18+/W15+/W18+/X24+
Epson America, Inc. Limited Warranty
1. Limited Warranty for Epson Products
Epson products are covered by warranty against defects in workmanship and materials
when operated under normal use and handling conditions, as indicated in the product
documentation, for the period specified in section “Limited Warranty Coverage”.
Coverage begins as of the date of delivery to the purchaser by Epson or by an
authorized Epson dealer, in the country of purchase.
Epson also guarantees that the consumables (ink cartridges, toner, batteries) included
with the product, will perform according to the usage specifications as long as they
are used prior to the expiration of their warranty period.
2. Scope of Warranty
Should Epson receive notice of a defect during the warranty period, it may, at its
discretion, repair or replace the defective product at no cost to the purchaser. In the
event of a replacement, the replaced equipment will become property of Epson. The
replaced item may be new or previously repaired to the Epson standard of quality,
and will assume the remaining warranty period of the product that was originally
purchased.
This warranty does not include any compensation or damages whatsoever, resulting
from the operating failures of the Epson product. In any event, Epson’s maximum
liability toward the purchaser will be limited to the purchase price paid to Epson or to
the authorized dealer.
Epson’s warranty does not cover any software not manufactured by Epson, even when
delivered with an Epson product. The software may have a warranty provided by the
manufacturer, as indicated in the documentation attached thereto.
3. Limitations and Exclusions
The warranty will be invalid in the following cases:
3.1 When the product’s serial number has been removed or altered.
3.2 When the product has been misused, has undergone unauthorized
modifications, has been used or stored in ways that are not in compliance
with the environmental specifications of the product.
3.3 When the damage resulted from the use of refilled supplies or consumables,
or when damages are the result of use of media that does not meet the
product’s specifications.
3.4 When damages resulted from the inappropriate transport of the equipment
(packaging, installation, maintenance, transportation).
3.5 When damages were caused by natural or intentional disasters (fire, floods,
lightning, earthquakes, etc.), power surges, or interaction with other brand
products.
3.6 When the product has been totally or partially disassembled, or has been
repaired other than by an Epson Authorized Service Center.
3.7 When substances have been spilled on the product.
3.8 When the external plastic case has been scratched or abused.
3.9 When damages resulted from inappropriate tests, installation, maintenance or
adjustments.
The warranty does not extend to accessories (lids, covers, trays) or replenishing
supplies and consumables (ink cartridges, toner, ink ribbons, batteries, photosensitive
units, knobs, print heads, lamps), which, due to their nature, must be regularly
purchased through authorized dealers.
4. How to Obtain Warranty Service
Please refer to the user documentation to ensure that the product settings have
been properly set and to perform the diagnostic tests indicated therein. Furthermore,
in order for the unit to operate optimally, always use original Epson supplies and
consumables.
To obtain warranty service, the purchaser may take the product to any Authorized
Epson Service Center, along with proof of purchase, or call any of the Epson Technical
Assistance Centers (see country list below).
Upon calling an Authorized Epson Service Center, the purchaser will be asked
to provide the product model and serial numbers, and may be asked to provide
information on the location and the date of purchase (the warranty is only valid in the
country of purchase).
If there are no Authorized Epson Service Centers in your area, call the Technical
Assistance Center for service referral.
5. Responsibilities of Purchaser
The purchaser is responsible for the safety of all confidential and proprietary
information stored on the product, as well as for recovery backup files in case of
damage. Any activity related with the re-installation or resetting of the software that
was delivered with the equipment, will be billed to the purchaser at the rates in effect
at the Epson Service Center. This also applies if the failure was the result of a defect in
the purchaser’s proprietary software or of a computer “virus”.
In order to obtain on-site service, the purchaser will be required to provide: access to
the product; an appropriate working area; access to electrical facilities; access to the
resources that may be necessary for the installation, repair or maintenance of the unit;
a safety environment for Epson staff and their work tools.
6. Limited Warranty Coverage
Product Projector
Model PowerLite
Coverage Period Two years
Condiciones Service Center
Notes The lamp has a 90 day warranty.
Epson offers technical assistance through electronic and telephone services. Before
calling Epson, refer to the documentation included with your product. If you do not
find the solution to your problem, visit Epson’s website at: global.latin.epson.com or
call the local Epson office or an authorized dealer.
Service Centers
Argentina (54 11) 5167-0300 Mexico
Bolivia* 800-100-116 Mexico City (52 55) 1323-2052
Chile (56 2) 2484-3400 Other cities 01-800-087-1080
Colombia 01 8000 915235 Nicaragua* 00-1-800-226-0368
Costa Rica 800-377-6627 Panama* 00-800-052-1376
Dominican Peru
Republic* 1-888-760-0068 Lima (51 1) 418-0210
Ecuador* 1-800-000-044 Other cities 0800-10126
El Salvador* 800-6570 Uruguay 00040-5210067
Guatemala* 1-800-835-0358 Venezuela (58 212) 240-1111
Honduras** 800-0122
Code: 8320
*Contact your local phone company to call this toll free number from a
mobile phone.
**Dial first 7 digits, wait for a message, then enter code.
If your country does not appear on the preceding list, please contact the dealer where
you purchased the product.
You may receive help or consult information online for all Epson products. Register
your Epson equipment on our website, at global.latin.epson.com.
Extended Warranty Support and Service
In some countries, Epson offers warranty extension services. You may purchase this
service by calling the Technical Service Centers.
EPSON, EasyMP, and PowerLite are registered trademarks, Epson iProjection is a trademark, and EPSON Exceed
Your Vision is a registered logomark of Seiko Epson Corporation.
Mac and Mac OS are trademarks of Apple Inc., registered in the U.S. and other countries.
General Notice: Other product names used herein are for identification purposes only and may be trademarks of
their respective owners. Epson disclaims any and all rights in those marks.
This information is subject to change without notice.
© 2013 Epson America, Inc. 7/13
Printed in XXXXXX CPD-39527R1
4125878 Rev.0
1-B C
4125878 Rev.0
1-B M
4125878 Rev.0
1-B Y
4125878 Rev.0
1-B K
7Select the Wireless LAN menu and press .
8Choose Connection Mode,press , select Quick (for a direct
connection to a computer, tablet, or smartphone) or Advanced
(for a connection to a router or access point), then press again.
When you’re finished, press Esc to return to the Wireless LAN menu.
9If you chose the Advanced connection mode, select SSID, press ,
and enter your network name (SSID) in the screen that appears.
•
To select a character, use the arrow buttons on the remote control
to highlight it, then press .
•
To enter a number, hold down the Num button on the remote
control and press the numeric button.
•
To switch between uppercase and lowercase letters, select CAPS
and press .
•
To change the displayed symbols, select SYM1 or SYM2 and
press .
When you’re finished entering the SSID, select Finish and press .
10 If you chose the Advanced connection mode, select IP settings and
press .
If your network assigns addresses automatically, turn on DHCP. If not,
turn off DHCP and enter the projector’s IP Address, Subnet Mask, and
Gateway Address, as needed.
To enter numbers, hold down the Num button on the remote control
and press the numeric buttons. When you’re finished, press Esc to return
to the Wireless LAN menu.
11 To prevent the SSID and IP address from appearing on the network
standby screen, set the SSID Display and/or IP Address Display
settings to Off.
12 When you’re finished selecting settings in the Wireless LAN menu,
press Esc.
13 If you are connecting the projector to a secure network, select the
Security menu and press . Then select settings as necessary and
press Esc when you’re finished.
14 Select Complete and press . Then select Yes and press again.
15 See “Install network software” for additional instructions.
Install network software
Computer
To project over the network, download and install the EasyMP®Network
Projection software on each computer that you will project from. To monitor
and control your projector over the network, download and install the EasyMP
Monitor software (Windows only). Click the icons on your desktop to access
the software download pages.
For instructions on installing and using your network software, click the icons
on your desktop to access the online EasyMP Network Projection Operation
Guide or EasyMP Monitor Operation Guide (requires an Internet connection).
If you don’t see the software download or guide icons on your desktop, you can
install them from the projector CD or go to the Epson website, as described in
“Where to get help.”
Mobile device
To project from an iOS®or Android™tablet or smartphone,
download and install the Epson iProjection™app. Visit
www.epson.com/projectorapp for more information.
Troubleshooting
If you see a blank screen or the No signal message after turning on your
computer or video device, check the following:
•
Make sure the Status light on the projector is blue and not flashing, and
the A/V Mute slide is open.
•
Press the Source Search button on the projector or the remote control
to switch to the correct image source, if necessary.
•
If you’re using a Windows laptop, press the function key on your
keyboard that lets you display on an external monitor. It may be labeled
CRT/LCD or have an icon such as . You may have to hold down the
Fn key while pressing it (such as Fn + F7). Wait a moment for the display
to appear.
•
If you’re using a Mac laptop, open System Preferences and
select Displays. Select the Display or Color LCD option if necessary,
then click the Arrange or Arrangement tab, and select the Mirror
Displays check box.
Where to get help
Manuals
For more information about using the projector, click the icons on your desktop
to access the online manuals (requires an Internet connection). If you don’t
have icons for the manuals, you can install them from the projector CD or go to
the Epson website, as described below.
Telephone support services
You may also speak with a support specialist by calling:
Argentina (54 11) 5167-0300 Mexico
Bolivia* 800-100-116 Mexico City (52 55) 1323-2052
Chile (56 2) 2484-3400 Other cities 01-800-087-1080
Colombia 01 8000 915235 Nicaragua* 00-1-800-226-0368
Costa Rica 800-377-6627 Panama* 00-800-052-1376
Dominican Peru
Republic* 1-888-760-0068 Lima (51 1) 418-0210
Ecuador* 1-800-000-044 Other cities 0800-10126
El Salvador* 800-6570 Uruguay 00040-5210067
Guatemala* 1-800-835-0358 Venezuela (58 212) 240-1111
Honduras** 800-0122
Code: 8320
*Contact your local phone company to call this toll free number from a mobile phone.
**Dial the first 7 digits, wait for a message, then enter the code.
If your country does not appear on the preceding list, please contact the dealer where
you purchased the product. Toll or long distance charges may apply.
Internet support
Visit global.latin.epson.com/Soporte for solutions to common problems
(website available in Spanish and Portuguese). You can download utilities and
documentation, get FAQs and troubleshooting advice, or e-mail Epson.
Optional accessories
For a list of optional accessories, see the online User’s Guide.
You can purchase screens or other accessories from an Epson authorized reseller.
To find the nearest reseller, contact Epson as described in “Where to get help.”
Notices
Declaration of Conformity
According to 47CFR, Part 2 and 15, Class B Personal Computers and
Peripherals; and/or CPU Boards and Power Supplies used with Class B Personal
Computers
We: Epson America, Inc.
Located at: 3840 Kilroy Airport Way
MS: 3-13
Long Beach, CA 90806
Tel: (562) 981-3840
Declare under sole responsibility that the product identified herein, complies
with 47CFR Part 2 and 15 of the FCC rules as a Class B digital device. Each
product marketed, is identical to the representative unit tested and found
to be compliant with the standards. Records maintained continue to
reflect the equipment being produced can be expected to be within the
variation accepted, due to quantity production and testing on a statistical
basis as required by 47CFR 2.909. Operation is subject to the following two
conditions: (1) this device may not cause harmful interference, and (2) this
device must accept any interference received, including interference that may
cause undesired operation.
Trade Name: Epson
Type of Product: LCD Projector
Model: H552A/H557A/H550A/H553A
Marketing Name: PowerLite S18+/W15+/W18+/X24+
Epson America, Inc. Limited Warranty
1. Limited Warranty for Epson Products
Epson products are covered by warranty against defects in workmanship and materials
when operated under normal use and handling conditions, as indicated in the product
documentation, for the period specified in section “Limited Warranty Coverage”.
Coverage begins as of the date of delivery to the purchaser by Epson or by an
authorized Epson dealer, in the country of purchase.
Epson also guarantees that the consumables (ink cartridges, toner, batteries) included
with the product, will perform according to the usage specifications as long as they
are used prior to the expiration of their warranty period.
2. Scope of Warranty
Should Epson receive notice of a defect during the warranty period, it may, at its
discretion, repair or replace the defective product at no cost to the purchaser. In the
event of a replacement, the replaced equipment will become property of Epson. The
replaced item may be new or previously repaired to the Epson standard of quality,
and will assume the remaining warranty period of the product that was originally
purchased.
This warranty does not include any compensation or damages whatsoever, resulting
from the operating failures of the Epson product. In any event, Epson’s maximum
liability toward the purchaser will be limited to the purchase price paid to Epson or to
the authorized dealer.
Epson’s warranty does not cover any software not manufactured by Epson, even when
delivered with an Epson product. The software may have a warranty provided by the
manufacturer, as indicated in the documentation attached thereto.
3. Limitations and Exclusions
The warranty will be invalid in the following cases:
3.1 When the product’s serial number has been removed or altered.
3.2 When the product has been misused, has undergone unauthorized
modifications, has been used or stored in ways that are not in compliance
with the environmental specifications of the product.
3.3 When the damage resulted from the use of refilled supplies or consumables,
or when damages are the result of use of media that does not meet the
product’s specifications.
3.4 When damages resulted from the inappropriate transport of the equipment
(packaging, installation, maintenance, transportation).
3.5 When damages were caused by natural or intentional disasters (fire, floods,
lightning, earthquakes, etc.), power surges, or interaction with other brand
products.
3.6 When the product has been totally or partially disassembled, or has been
repaired other than by an Epson Authorized Service Center.
3.7 When substances have been spilled on the product.
3.8 When the external plastic case has been scratched or abused.
3.9 When damages resulted from inappropriate tests, installation, maintenance or
adjustments.
The warranty does not extend to accessories (lids, covers, trays) or replenishing
supplies and consumables (ink cartridges, toner, ink ribbons, batteries, photosensitive
units, knobs, print heads, lamps), which, due to their nature, must be regularly
purchased through authorized dealers.
4. How to Obtain Warranty Service
Please refer to the user documentation to ensure that the product settings have
been properly set and to perform the diagnostic tests indicated therein. Furthermore,
in order for the unit to operate optimally, always use original Epson supplies and
consumables.
To obtain warranty service, the purchaser may take the product to any Authorized
Epson Service Center, along with proof of purchase, or call any of the Epson Technical
Assistance Centers (see country list below).
Upon calling an Authorized Epson Service Center, the purchaser will be asked
to provide the product model and serial numbers, and may be asked to provide
information on the location and the date of purchase (the warranty is only valid in the
country of purchase).
If there are no Authorized Epson Service Centers in your area, call the Technical
Assistance Center for service referral.
5. Responsibilities of Purchaser
The purchaser is responsible for the safety of all confidential and proprietary
information stored on the product, as well as for recovery backup files in case of
damage. Any activity related with the re-installation or resetting of the software that
was delivered with the equipment, will be billed to the purchaser at the rates in effect
at the Epson Service Center. This also applies if the failure was the result of a defect in
the purchaser’s proprietary software or of a computer “virus”.
In order to obtain on-site service, the purchaser will be required to provide: access to
the product; an appropriate working area; access to electrical facilities; access to the
resources that may be necessary for the installation, repair or maintenance of the unit;
a safety environment for Epson staff and their work tools.
6. Limited Warranty Coverage
Product Projector
Model PowerLite
Coverage Period Two years
Condiciones Service Center
Notes The lamp has a 90 day warranty.
Epson offers technical assistance through electronic and telephone services. Before
calling Epson, refer to the documentation included with your product. If you do not
find the solution to your problem, visit Epson’s website at: global.latin.epson.com or
call the local Epson office or an authorized dealer.
Service Centers
Argentina (54 11) 5167-0300 Mexico
Bolivia* 800-100-116 Mexico City (52 55) 1323-2052
Chile (56 2) 2484-3400 Other cities 01-800-087-1080
Colombia 01 8000 915235 Nicaragua* 00-1-800-226-0368
Costa Rica 800-377-6627 Panama* 00-800-052-1376
Dominican Peru
Republic* 1-888-760-0068 Lima (51 1) 418-0210
Ecuador* 1-800-000-044 Other cities 0800-10126
El Salvador* 800-6570 Uruguay 00040-5210067
Guatemala* 1-800-835-0358 Venezuela (58 212) 240-1111
Honduras** 800-0122
Code: 8320
*Contact your local phone company to call this toll free number from a
mobile phone.
**Dial first 7 digits, wait for a message, then enter code.
If your country does not appear on the preceding list, please contact the dealer where
you purchased the product.
You may receive help or consult information online for all Epson products. Register
your Epson equipment on our website, at global.latin.epson.com.
Extended Warranty Support and Service
In some countries, Epson offers warranty extension services. You may purchase this
service by calling the Technical Service Centers.
EPSON, EasyMP, and PowerLite are registered trademarks, Epson iProjection is a trademark, and EPSON Exceed
Your Vision is a registered logomark of Seiko Epson Corporation.
Mac and Mac OS are trademarks of Apple Inc., registered in the U.S. and other countries.
General Notice: Other product names used herein are for identification purposes only and may be trademarks of
their respective owners. Epson disclaims any and all rights in those marks.
This information is subject to change without notice.
© 2013 Epson America, Inc. 7/13
Printed in XXXXXX CPD-39527R1

Other manuals for PowerLite S18+

1

This manual suits for next models

3

Other Epson Projector manuals

Epson PowerLite EB-L210SF User manual

Epson

Epson PowerLite EB-L210SF User manual

Epson EMP-7850 User manual

Epson

Epson EMP-7850 User manual

Epson PowerLite Pro Cinema 6010 User manual

Epson

Epson PowerLite Pro Cinema 6010 User manual

Epson PowerLite 4750W User manual

Epson

Epson PowerLite 4750W User manual

Epson BrightLink 710Ui User manual

Epson

Epson BrightLink 710Ui User manual

Epson PowerLite Home Cinema 705HD User manual

Epson

Epson PowerLite Home Cinema 705HD User manual

Epson PowerLite 95 User manual

Epson

Epson PowerLite 95 User manual

Epson BrightLink 450Wi - Interactive Projector User manual

Epson

Epson BrightLink 450Wi - Interactive Projector User manual

Epson PowerLite 703C User manual

Epson

Epson PowerLite 703C User manual

Epson EMP 51/L User manual

Epson

Epson EMP 51/L User manual

Epson PowerLite Home Cinema 3020e Specification sheet

Epson

Epson PowerLite Home Cinema 3020e Specification sheet

Epson PowerLite Home 10 Manual

Epson

Epson PowerLite Home 10 Manual

Epson PowerLite Home Cinema 705HD User manual

Epson

Epson PowerLite Home Cinema 705HD User manual

Epson CO-FH02 User manual

Epson

Epson CO-FH02 User manual

Epson EB-PU1008 User manual

Epson

Epson EB-PU1008 User manual

Epson CO-FH02 Specification sheet

Epson

Epson CO-FH02 Specification sheet

Epson V11H348020 User manual

Epson

Epson V11H348020 User manual

Epson EB-G5600 User manual

Epson

Epson EB-G5600 User manual

Epson PL 735c User manual

Epson

Epson PL 735c User manual

Epson EMP 730 User manual

Epson

Epson EMP 730 User manual

Epson PowerLite W16 User manual

Epson

Epson PowerLite W16 User manual

Epson MOVIEMATE 72 User manual

Epson

Epson MOVIEMATE 72 User manual

Epson H928A User manual

Epson

Epson H928A User manual

Epson MovieMate 85HD User manual

Epson

Epson MovieMate 85HD User manual

Popular Projector manuals by other brands

NEC NP-PA703UL user manual

NEC

NEC NP-PA703UL user manual

Vankyo Performance V630W user manual

Vankyo

Vankyo Performance V630W user manual

WolfVision VZ-C10 installation manual

WolfVision

WolfVision VZ-C10 installation manual

Barco DP4K--32B Service bulletin

Barco

Barco DP4K--32B Service bulletin

Ghost Acuspot manual

Ghost

Ghost Acuspot manual

Laseno SMP-120 user manual

Laseno

Laseno SMP-120 user manual

Acer S5301WM Series user guide

Acer

Acer S5301WM Series user guide

YOWHICK GDP1W user manual

YOWHICK

YOWHICK GDP1W user manual

Toshiba TLP-380 owner's manual

Toshiba

Toshiba TLP-380 owner's manual

JVC G1000S instructions

JVC

JVC G1000S instructions

Sanyo PLC-XU30 Comparison chart

Sanyo

Sanyo PLC-XU30 Comparison chart

Vivitek DK10000Z user manual

Vivitek

Vivitek DK10000Z user manual

Barco Galaxy 4 Long Life+ R9040355 owner's manual

Barco

Barco Galaxy 4 Long Life+ R9040355 owner's manual

Christie DWU1075-GS Schematics

Christie

Christie DWU1075-GS Schematics

Philips LC5141 user guide

Philips

Philips LC5141 user guide

InFocus LP 600 Setup instructions

InFocus

InFocus LP 600 Setup instructions

Bell&Howell AUTOLOAD FILMOSOUND 2585 Service manual

Bell&Howell

Bell&Howell AUTOLOAD FILMOSOUND 2585 Service manual

Dukane CP-RX80 user manual

Dukane

Dukane CP-RX80 user manual

manuals.online logo
manuals.online logoBrands
  • About & Mission
  • Contact us
  • Privacy Policy
  • Terms and Conditions

Copyright 2025 Manuals.Online. All Rights Reserved.