EPV Twilight Manual User manual

Rev.03292022JA www.epvscreens.com 1
Twilight Manual Series
Outdoor Manual Pull-Down Projection Screen
User’s Guide
Thank you for choosing the Twilight Manual projection screen! Please read through this user guide
before utilizing the screen. Correct usage and maintenance will ensure a long product life
Product Description:
The Twilight Manual is a non-electric outdoor projector screen for wall and patio installations that
brings media room quality to your outdoor spaces. Its sleek aluminum casing beautifully accessorizes
your backyard, patio, pool deck or anywhere a gathering for evening movie time is appropriate.
Outdoor Projection Screen Disclaimer
Never leave your projection screen out and exposed to direct sunlight. Regardless of screen brand,
prolonged exposure to the sun’s ultraviolet radiation degrades the chemical bonds causing the material
to ultimately decompose. Photodegradation first causes the material to lose its theater-grade reflective
qualities. Eventually nature will completely destroy even synthetic materials. For this reason, the
Twilight Manual has a retractable design that allows the material to be drawn up into its protective
casing to be shielded from solar radiation.
Care & Use Instructions
◆Dust, dirt and scratches on the projection surface will affect the picture quality, please take note of
the points below to prevent that from occurring:
1. Do not touch the projection surface with your hands
2. Do not write or draw on the projection surface
3. Do not use fingers or sharp objects to point on the projection surface; this will damage the screen
material.
4. Use a soft-damp cloth to clean the projection surface; do not use chemical cleaning agents or
alcohol.
5. Use clean water when dampening the cleaning cloth and do not rub against the material to clean it.
◆To avoid damage and injury, the screen should only be operated by adults.
Pre-Installation
1. Carefully unpack the screen.
2. Always handle the screen in a leveled position on a clean surface.
3. To protect the screen from exposure to stains, keep the screen out of contact with foreign particles such
as dust, sawdust, and/or liquids.

Rev.03292022JA www.epvscreens.com 2
NOTE
Wall screws included with this product are complimentary and may not be adequate for all mounting surfaces.
Consult with a professional installer or hardware store for proper mounting screws and anchors.
Regardless of the mounting method, the screen should be securely supported so that the vibration or pulling on
the viewing surface will not cause the casing to become loose or fall. The installer must ensure that the fasteners
used are of adequate strength and suitable for the installation location.
Hardware Parts List for Twilight Manual Series
A. Mounting Bracket
x2pcs
B. M10 Anchor and
M4x50 Screwx4pcs
C. M10 Anchor and
M5x50 Screwx1pcs
D. Suspended Ceiling
Bracket Connectorx2pcs
E. M5x15 Screw& Bolt
x4pcs
F. Ground Stake x2pcs
G. Carabiner x2pcs
H. Elastic Stringx2pcs

Rev.03292022JA www.epvscreens.com 3
Installation Instructions
Please consult a professional installer, EPV Screens is not liable for faulty installations.
Flush Mount to the Wall
1. Mark the location of where the screen is to be installed, drill your holes and insert the M10Anchors (B).
2. Install the Mounting Brackets (A) to the wall and secure with the M4x50 Screws (B).
Mounting Bracket
Anchor
3. Attach the screen to the Mounting Brackets (A) by inserting the top of the case to Fix Plate 1 and
securing the back of the case to Fix Plate 2. Make sure the case slots are securely attached to the
mounting brackets.
Mounting Bracket Mounting Bracket
Fix Plate 1 Fix Plate 2
Mounting Bracket Case Slot 1
Case Slot 2 Screen Case
Mounting bracket
Fix Plate 1
M4x50 Screw
Mounting Bracket
Fix Plate 2
Wall

Rev.03292022JA www.epvscreens.com 4
Flush Mount to the Ceiling
1. Mark the location of where the screen is to be installed, drill your holes, and insert the M10 Anchors (B).
2. Install the Mounting Brackets (A) to the ceiling and secure with the M4x50 Screws (B).
Ceiling M10 Anchor
Mounting Bracket Fix Plate 1
Mounting Bracket
M4x50 Screw
Mounting BracketFix Plate 2
3. Attach the screen to the Mounting Bracket (A) by inserting the top of the case to FixPlate 1 and
securing the back of the case to Fix Plate 2. Make sure the case slots are securely attached to the
Mounting Bracket (A).
Suspended Ceiling using Chains (additional hardware required)
1. You can also hang the screen on a ceiling by using chains (not included).
2. Connect the Suspended Ceiling Bracket Connector (D) to the Mounting Bracket (A) and secure with
the M5x15 Screws & Bolts (E).
M5x15 Bolt Suspended Ceiling Bracket Connector
(E) (D)
Mounting Bracket
(A) M5 M5x15 Screw (E)
Fix Plate1
Fix Plate 2

Rev.03292022JA www.epvscreens.com 5
3.Insert chains (not included) through the holes of the Suspended Ceiling Bracket Connector(D).
Suspended Ceiling Bracket Connector
(D)
Screen removal from the Mounting Brackets
1. Pull down on the Mounting Bracket Release Tab and remove the bottom case away from the wall/ceiling
followed by the top of the case.
Release Ring Pull bottom of case first away from wall/ceiling
Screen Operation
1. Pull the screen down from the lanyard or from the handle
only in a 90-degree angle. The screen is designed to stop at any
location. To achieve this, make sure to pull straight down and
allowing the screen to come up to lock into place. Do not
attempt to pull the screen down by the surface or touch the
screen, as it will damage the screen and void the warranty.
2. To retract the screen, simply pull the screen down more than
2 inches and retract the screen back releasing it up gently. The
screen is equipped with a SLOW RETRACT MECHANISM
which allows the screen to slowly retract without the need to
hold on to the handle or lanyard. Simply release the handle and
the screen will retract by itself into the housing.
Attention:If the screen does not unlock, carefullypull the screen straight down with a little force. Always pull
the screen down at a 90-degree angle.

Rev.03292022JA www.epvscreens.com 6
Slow Retract Mechanism Temperate Limitation
Please be aware that temperature changes will affect the Slow Retract Mechanism (SRM) operation/speed.
Below are the expectations of the SRM based on the temperature in your outdoor environment.
Note: If the screen does not fully retract entirely on its own, it is not a defect but just a limitation on the SRM
operation. Please use the handle to manually retract it by pulling it down and gently guiding it back inside
the housing.
Securing the weight bar location
1. Pull the screen down until you have reached the desired
location.
2. Mark the drill-hole area of where the screw is to be
installed, then retract the screen.
3. Drill the hole and insert a M10Anchor (C), secure it with
an M5x50 Screw (C). Allow a 1-inch gap between the
wall and screw head to allow room for the weight bar and
pull handle to release freely.
4. Pull the screen down and secure it to the screw location.
Make any adjustments if there are any deviations.
Note: Remove the screw when not in use any longer to avoid an accident.
Temperature
SRM operation
Speed
Subzero 0° C (below 32° F)
No
Does not work
0° C (32° F)
Yes
30-180 seconds
Above 15° C (59° F)
Yes
Within 30 seconds
Minimum 1-inch clearance required
Rev.03292022JA www.epvscreens.com 7
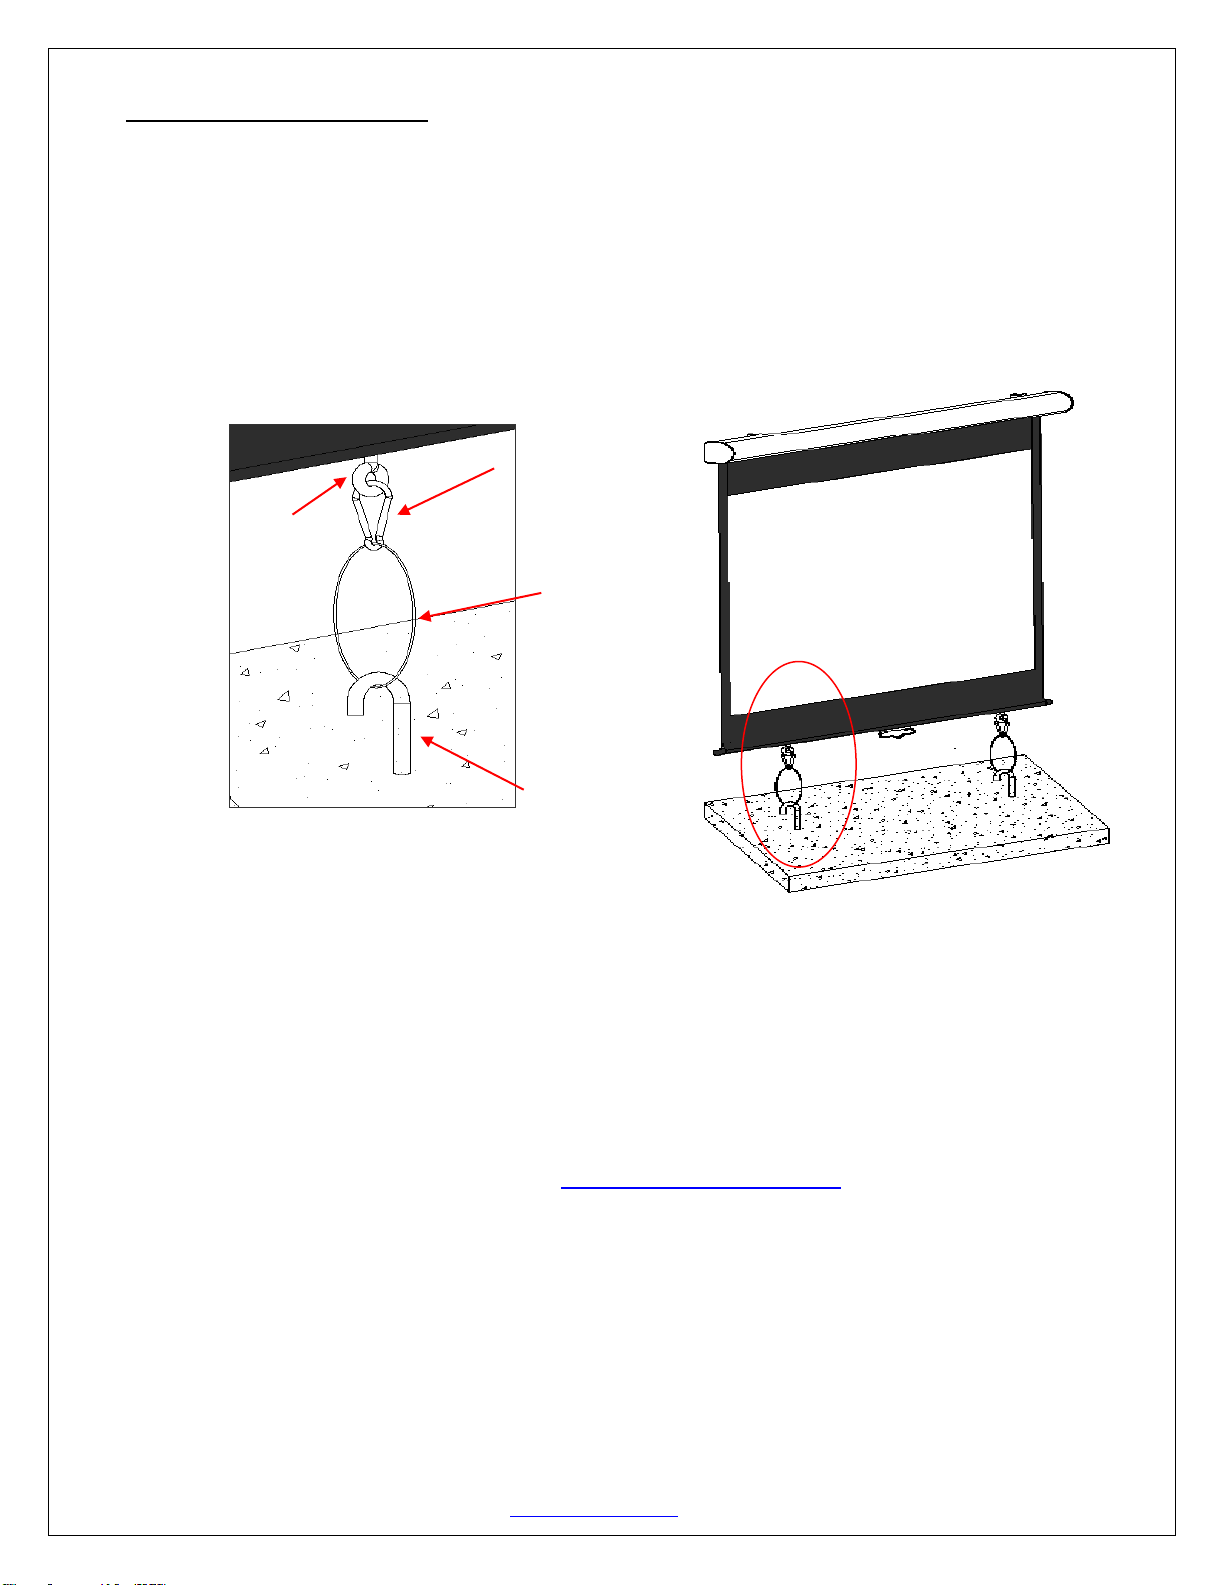
How to ground the screen
1. Attach the Carabiner (G) into the Iron Ring, and join the Carabiner (G) and Ground Stake (F) using the
Elastic String (H).
2. Drive the Ground Stake (F) into the ground and stretch the Elastic String (H) in the direction of the Ground
Stake (F) to secure screen to the ground and supply adequate tension to the screen.
For more information, technical support or your local EPV Screens contact,
please visit www.epvscreens.com
Elastic String
Ground Stake
Ground
Iron Ring
Carabiner
Table of contents
Other EPV Projector Accessories manuals

EPV
EPV EDGE FREE Sonic AT8 ISF eFinity Series User manual

EPV
EPV EDGE FREE AcousticPro 4K eFinity Series User manual

EPV
EPV Twilight Portable Series User manual

EPV
EPV Peregrine HD 2 series User manual

EPV
EPV DarkStar Max UST Series User manual

EPV
EPV Polar Max Recessed Series User manual

EPV
EPV Polar Star Series User manual
Popular Projector Accessories manuals by other brands


")

VADDIO
VADDIO AutoPresenter 999-5675-000 Installation and user guide

Sharp
Sharp AN-PH2EZ Operation manual

vivtek
vivtek novopro Deployment guide

OBERON
OBERON 1074-PROJ installation instructions
")
A&D
A&D bestView ADF-3200A Operating instructions (functional manual)

Hitachi
Hitachi CPX885 - XGA LCD Projector Specifications


