Eriez 1250 ANALOG Manual

1
MM-1250-ANALOG-C
Installation, Operation
and Maintenance
Instructions
ERIEZ MAGNETICS HEADQUARTERS: 2200 ASBURY ROAD, ERIE, PA 16506–1402 U.S.A.
WORLD AUTHORITY IN SEPARATION TECHNOLOGIES
TRAMP METAL
DETECTOR
MODEL 1250 ANALOG

2
Introduction
This manual details the proper steps for installing,
operating and maintaining the Eriez Model 1250
Metal Detector.
Careful attention to these requirements will assure
the most efficient and dependable performance of
this equipment.
If there are any questions or comments about the
manual, please call Eriez at 814/835-6000 for Metal
Detector assistance.
©2004 ERIEZ MAGNETICS ALL RIGHTS RESERVED
CAUTION: Safety labels must be affixed to
this product. Should the safety label(s) be damaged,
dislodged or removed, contact Eriez for replacement.

3
Table of Contents
ERIEZ MODEL 1250 METAL DETECTOR
PART I - OPERATION & DESCRIPTION .............................................................. 4
PART II - INSTALLATION ...................................................................................... 8
PART III - START-UP & CALIBRATION............................................................... 14
PART IV - SYSTEM PROGRAMMING ................................................................ 16
PART V - TROUBLESHOOTING......................................................................... 22
PART VI - MAINTENANCE.................................................................................. 27

4
A. GENERAL
The Model 1250 provides protection to downstream
processing equipment by detecting the presence of
potentially damaging metal objects. It is specifically
designed for use on conveying systems in the food,
plastics, forest, agriculture, rubber, recycling and
mining industries.
The Detector makes use of the latest in solid state
technology, incorporating programmable logic
known as EPROM (Erasable Programmable Read
Only Memory). The design includes a number of
innovative features: self-test circuits that monitor
the performance of the detection circuitry; light
emitting diodes (L.E.D.’s) which indicate the status
of the test circuits; wide programming capability to
custom tailor the Detector to suit specific applica-
tion requirements; and solid state relays to provide
reliable arc-free switching.
B. METHOD OF OPERATION
During normal operation, the transmitter coil is
energized to produce a pulsed electromagnetic
signal. These signals produce a field that locally
permeates the conveyed material. A piece of metal
entering this field absorbs energy emitted from the
transmitter coil. The metal particle then releases the
energy and this change is detected by the receiver
coil. This technique provides optimum discrimination
between tramp metal and the conveyed material;
product effect is non-existent or minimal.
Having detected metal by a waveform change, the
signal generated is amplified and filtered. The sig-
nal is then compared to a threshold determined by
the size of metal that must be detected. When the
signal exceeds this threshold, the Detector, at the
appropriate time, triggers solid state relays. These
solid state relays in turn switch the line voltage
to the Detector’s output alarm terminals. Various
combinations of alarm horns, belt stop relays, alarm
beacons, etc., can then be activated by the switched
alarm outputs
The Detector is influenced only by change. There-
fore, stationary structural members, metal belt cores,
symmetrical idlers and other objects which do not
represent a moving mass to the field are not detect-
ed. Metal belt repair clips are passed by the unit with
an optional clip detector sensor and inhibitor circuit
which is properly adjusted to the clip signal.
C. PHYSICAL DESCRIPTION
MAIN CONTROL ENCLOSURE
This enclosure houses and protects the Electronic
and Interface Modules and also serves as a junc-
tion box for conduit and cables running to and from
the Detector. As standard, the control is housed in
a steel NEMA 4 enclosure. Other enclosures are
available as options.
Visible and accessible on the front panel are:
Power On/Off Switch, Green Power “ON” Indicator
Lamp, Red Trip Indicator Lamp that lights when
the unit has detected metal and a Reset Button.
See Figure 1.
Type: JIC NEMA 4
Size: 16" x 14" x 6" (406 x 356 x 152 mm)
Weight: 33 Lbs (15 kg) (Includes All Electronics)
ELECTRONIC/LNTERFACE MODULES
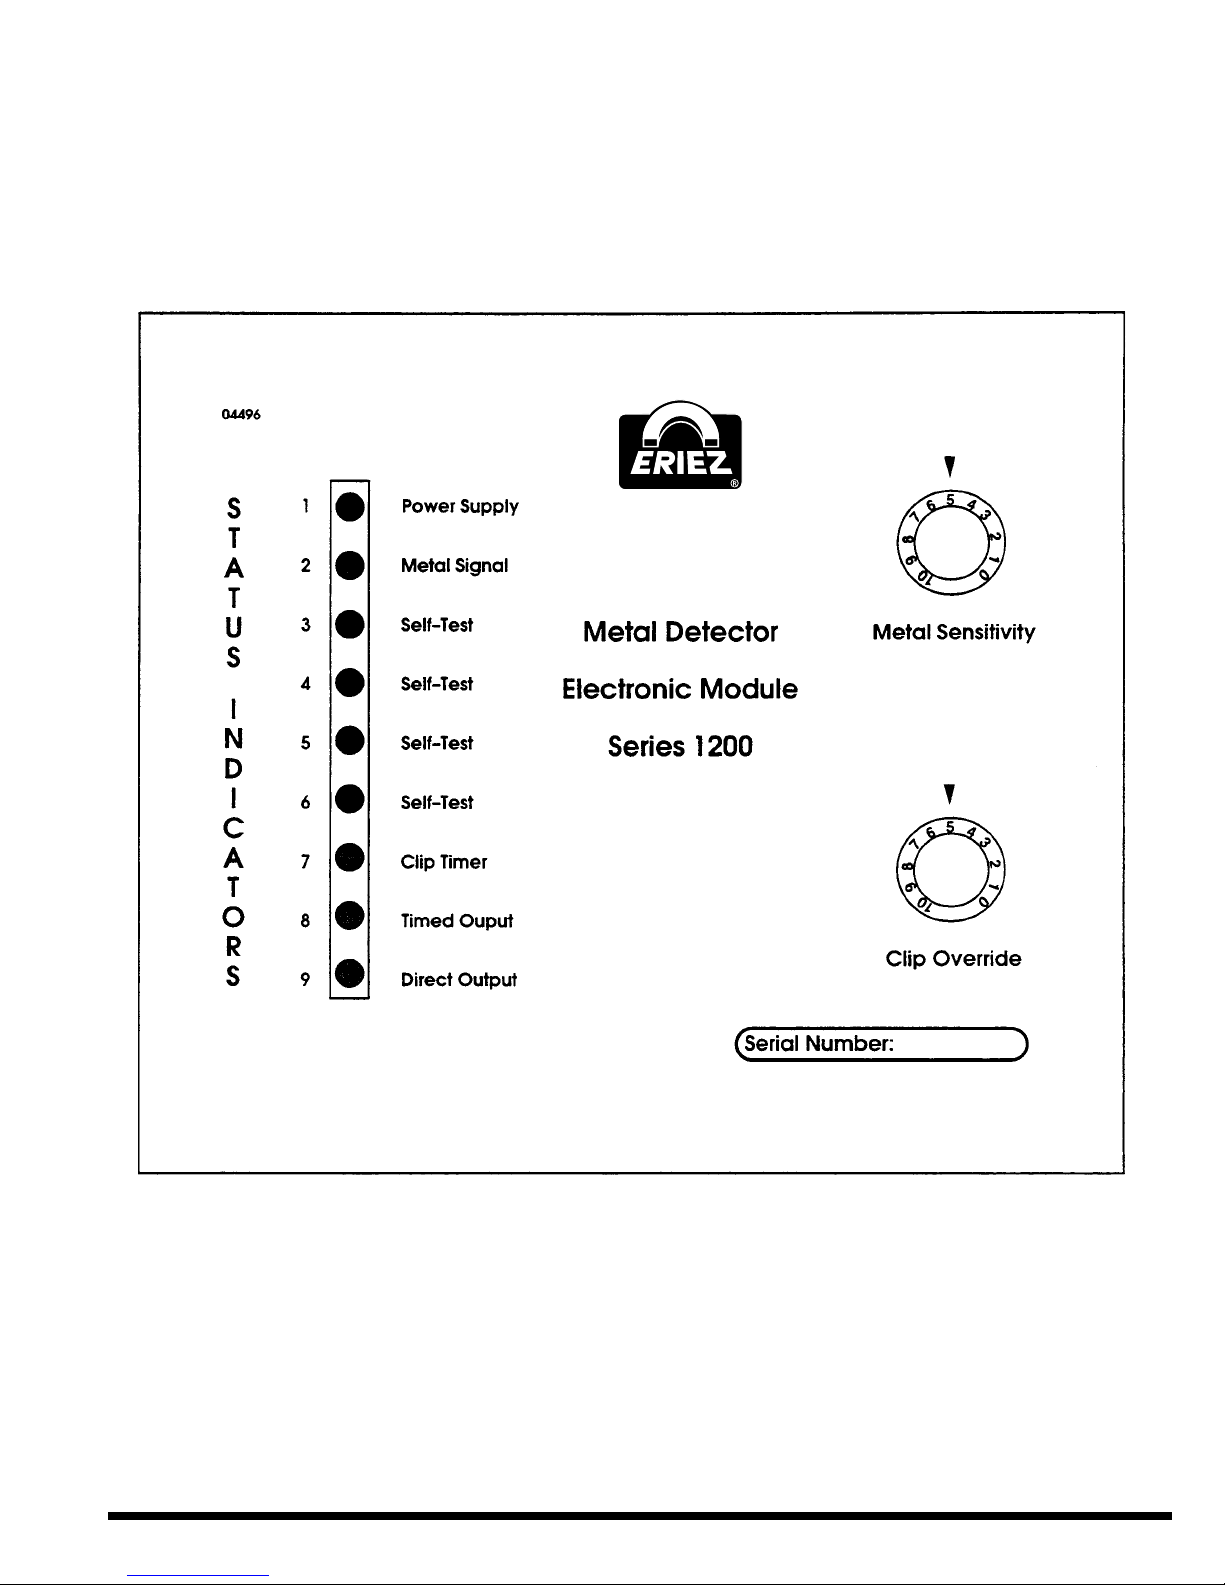
All the electronics and controls for the Detector
are contained in two modules, the Interface Module
and the Electronic Module shown in Figure 2. The
Electronic Module houses the electronic circuitry
and components associated with metal signal
processing and analysis. Visible on the front panel
of the Electronic Module are the metal sensitivity
control knob, clip override control knob and L.E.D.
status indicators used to monitor the status of the
Detector’s self-test circuits. By removing the front
panel of the module, all of the electronics are ex-
posed for calibration and troubleshooting. All con-
nections for the Electronic Module are made through
a 36-pin connector located along the bottom edge
of the module. When the modules are in place, this
connector mates with a connector on the Interface
Module.
Part I - Operation & Description

5
The Interface Module interconnectors all external
signals and power to the Electronic Module. This
module houses the power transformer, solid state
relays and interface circuit board. Visible on the face
of the Interface Module are system fuses and two
terminal blocks for external wiring; all are clearly
identified. The right terminal block, a 14-pin, 3/8"
center screw type, connects the Detector’s external
transducers and signals. The left terminal block, a
6-pin, 7/16" center screw type, is used for all con-
nections handling the A.C. Iine voltage.
ELECTRONIC INTERFACE
MODULE MODULE
Size: 10.5" x 8" x 1.5" Size: 11" x 4.5" x 4"
(267 x 203 x 38 mm) (279 x 114 x 102 mm)
Weight: 2.5 Lbs (1.1 kg) Weight: 4.75 Lbs (2.2 kg)
SEARCH COIL ASSEMBLY
The Search Coil Assembly includes receiver and
transmitter antennas, mounting frame and inter-
connecting cables. Each assembly is custom de-
signed to suit its particular application. Please refer
to the Frame Assembly Diagram.
RECEIVER COIL
The receiver coil is typically located under the con-
veyed material within 1" (25 mm) of the conveyor
belt. An aluminum enclosure shields the recover
coiI from electromagnetic interference. Mounting
tabs are located on the aluminum shield to attach
it to the material handling structure.
TRANSMITTER COIL
The transmitter coil is located opposite and parallel
to the receiver coil. The distance between the trans-
mitter and receiver (aperture) is typically 2" - 4" (51-
162 mm) greater than the maximum burden depth
of the processed material. Strong, yet lightweight,
molded fiberglass is used for applications that do
not have vibrating or moving metal objects nearby.
A shielded version may be recommended if addi-
tional protection from electromagnetic interference
is required.
MOUNTING FRAME
Two types of mounting frames support the anten-
nas on troughed and slider bed conveyors. Special
designs are available to accommodate other types
of material handling systems. The swing-away as-
sembly shown in Figure 3, is used with non-shielded
transmitter coils or when the transmitter must be
protected from oversized conveyed materials. The
fixed assembly, shown in Figure 4, is used for high
sensitivity applications or when a shielded trans-
mitter is required.
INTERCONNECTING CABLES
Shielded cables connect the receiver and transmit-
ter to the Main Control Enclosure. The cables are
cut to a specified length at the Factory. Any alter-
ation to the cables may degrade the Detector’s
performance. Consult the Factory if other cable
lengths are required.
CLIP DETECTOR (IF APPLICABLE)
The clip detector consists of a compact sensor head
and mounting bracket. The clip detector senses the
proximity of repair clips as they pass over the sen-
sor’s head. Once the clips are detected, the Metal
Detector is desensitized or disabled for a period
which has been preset at the factory.
Part I - Operation & Description (cont.)

6
Part I - Operation & Description (cont.)
FIGURE 1. MAIN CONTROL ENCLOSURE (NEMA 4, 4X, 7 OR 9)

7
Part I - Operation & Description (cont.)
FIGURE 2. ELECTRONIC MODULE

8
PLEASE READ THROUGH COMPLETELY
BEFORE BEGINNING WORK!
A. UNPACKING
Upon receipt of the crate(s) containing the Metal
Detector System, inspect the contents for physical
damage and missing parts. If anything is broken or
missing, please contact the carrier and notify the
supplier immediately.
B. SITE SELECTION &
PREPARATION
While each application is unique, the guidelines
listed below apply to most installations. Specific in-
formation concerning your installation can be found
in the Frame Assembly and Control Connection
Diagrams. Follow the steps listed below to choose
the best location for the detector.
• Choosealocationforthedetectorsothemater
ial handling system has ample time to react to
tramp metal. Locate the detector far enough in
advance of the head pulley so the belt can come
to a stop before the metal falls off the end of the
belt If a diverter is used, consider the reaction
time of the system and speed of the conveyor
belt.
• Selectasitewithminimumvibration.Highvibra
tion areas may degrade detector sensitivity and
shorten component life.
• Locate the Search CoilAssembly away from
sources of airborne electrical interference emit-
ted from variable-speed drives, large motors,
ballasts, FM radios, induction furnaces and oth-
er radio frequency (RF) sources. Although the
receiver coil is shielded on five sides to reduce
the effects of RF noise, the surface facing the
transmitter is unshielded and therefore suscep-
tible to RF noise. Because RF energy travels
along a straight line (line-of-sight), position the
receiver coil or relocate RF sources so they are
below or out of the direct line-of-sight with the top
of the receiver. Cables carrying high voltage or
varying loads must be enclosed in steel conduit,
grounded at both ends and located at least 4'
(1.2 m) from the detector antennas.
• Positiontheentiresearchcoilassemblysothat
the bottom coil (usually the receiver) is equally
spaced between the two adjacent idler rollers.
Center the receiver coil. Do not center the 2" x
2" uprights.
• The magnetic eld generated by the transmitter
coil induces eddy currents in nearby metal cross
bracing, stairways, handrails and pipes. These
eddy currents may cause false tripping if the current
path intermittently makes contact. Eddy current
loops can be broken by cutting the conductive
paths in these structures. Use non-metallic hard-
ware as required to restore structural support. If
conveyor idlers are used in your application, the
idlers adjacent to the Search Coil Assembly may
require modification or isolation to break eddy cur-
rent loops. Refer to the Conveyor Idler Modification
Diagram (if applicable) for details.
• If the Search CoilAssembly is located where
a metal skirt passes through the coils, it must
be replaced with a five-foot (1.5 m) section of
non-metallic material (i.e., wood or plastic).
• Relocate or tightly secure moving or vibrating
pieces of metal such as cables, conduit and
piping within 36" (914 mm) of the Search Coil As-
sembly. Remove metallic decking, skirt boards,
cross bracing and return idlers below and within
3' (914 mm) of the center line of the receiver coil
(upstream and downstream).
C. MOUNTING - SEARCH COIL
ASSEMBLY
Note the material flow direction arrows match marks
and other identification on the Detector components
before beginning work. Please refer to the Frame
Assembly Diagram for installation
• Fastenthereceivercoiltothematerialhandling
system. Shim the unit as necessary to provide a
uniform and sturdy mounting surface. Maintain
clearance between the coil and any moving ob-
jects. Do not torque, twist or use excessive force
when fastening the coil to the structure. Do not
drill or weld the coil
Part II - Installation

9
• Securetheframeassemblytothereceivercoil.
Make sure the assembly is aligned. Use the
hardware provided as called out in the Frame
Assembly Diagram. If aluminum side shields
are used to reduce RF noise, use the electrical
isolation bushings and spacers (provided). The
Detector will not operate properly if the aluminum
side shields make electrical contact with either
the receiver or transmitter shield, or contact with
metal conveyor components.
• Fastenthetransmittercoiltotheframeassembly.
If a swing-away assembly is used, make sure
the transmitter brackets rest squarely with the
uprights and move freely. Be careful to install the
bolts, washers and nuts in the proper sequence
to allow free but controlled movement of the
brackets.
• Inspectthecoilsandframeassemblyforalign
ment and fit. Tighten all connections. The entire
assembly should be rigid and sturdy.
D. MOUNTING - MAIN CONTROL
ENCLOSURE
After installing the Search Coil Assembly, select a
place to mount the Main Control Enclosure for ease
of operation. Avoid high vibration areas. Note the
length of interconnecting cables and the location of
the connectors on the receiver and transmitter coils.
• TheEnclosureshouldbepositionedsothefront
panel hinge is on the left side
• Fabricateandinstallasun/rainshadeforadded
protection over the Enclosure if it is mounted out
doors. Do not obstruct the natural airflow around
the Enclosure.
• Familiarizeyourselfwiththetypeofelectricalcon-
nections required for this installation and any safety
precautions before proceeding. Please refer to the
Control Connection Diagram for information about
connections and color code hook-up.
• Useanelectrician’sconduitpunchordrilltomake
either 1/2" or 3/4" conduit entries on the bottom of
the Enclosure. The Control Connection Diagram
shows where to position each entry
Remember to remove all metal shavings when you
are finished. Use caution to not damage the elec-
tronics and to ensure that no metal particles enter
the electronics. Do not run metal conduit along the
sides or near the Search Coil Assembly.
• Paycloseattentiontothetypeofelectricalwires
routed in each conduit and the location of each
connection on the Interface Module. The receiver
and transmitter cables must be routed in sep-
arate conduit 6" apart from the search coils to
the control box. Do not run power wiring near
the transmitter and receiver cables. Do not run
power wiring connected to TB2 with low voltage,
signal wiring from TB1 in the same conduit.
• All line voltage connections terminate at TB2.
Install line voltage cables between devices
con- trolled by the Detector including diverters,
auxiliary relays, marking devices, alarm horns
or motor control equipment and TB2 in the Main
Control Enclosure. The direct or timed outputs
should not be connected to a Programmable
Logic Controller (PLC) or other low voltage
computer interface equipment that may
require dry contact closures. The direct and
timed output contacts are typically programmed
as normally “OFF” at the Factory. They may be
set to normally “ON” if required. Refer to the
System Programming Section for details.
• Connecta115/220VAC(50/60Hz),singlephase
power line with at least 10 amp capacity to TB2.
Make sure to connect an electrical ground to
terminal #3. The power should be the “cleanest”
available and free of significant voltage variations
or spikes. Do not connect the Detector to a line
which is used for operation of motors or motor
controls. Proceed with the Start-Up & Calibration
Section before applying power.
CAUTION:The Interface Module is preset at the
Factory for 115 or 220 volt (+10%), 50/60 Hz,
single phase operation. If the source is different,
contact the Factory for instructions to select the
proper voltage source.
Part II - Installation (cont.)

10
E. SWING-AWAY SWITCH (IF
APPLICABLE)
The Swing-Away Cutout Switch (Optional) is a pre-
wired switch mounted on the swing-away, bracket.
Its purpose is to prevent the Metal Detector from
tripping when the transmitter coil is hit by an over-
burden of material. Route the free end of this cable
in the same conduit as the transmitter cable to the
Main Control Enclosure. Refer to the Control Con-
nection Diagram for hook-up.
F. CLIP DETECTOR (IF
APPLICABLE)
Install the Clip Detector Unit as follows:
• RefertoControlConnectionandFrameAssem
bly Diagrams.
Position the Clip Detector Sensor approximately
(but no closer than) 2' (610 mm) from the center
line of the receiver coil on the upstream side of the
Search Coil Assembly. If there are idlers adjacent
to the search coils, position the Clip Detector Sen-
sor approximately 1” to 3" (25-76 mm) upstream of
the nearest upstream idler before the Search Coil
Assembly. The flat face of the Clip Detector should
be facing toward the belt with approximately 1/2"
-1" (12-25 mm) of clearance. This clearance must
be maintained in order to assure proper operation.
The Clip Detector should be a few inches (about 50
mm) from the edge of the belt. Do not mount the
Sensor too far from the edge, as tramp metal Iying
close to the belt may trigger the sensor and pass
through the search coils as a repair splice.
• With the Clip Detector Sensor in the proper
position below the belt, weld the 3/4” support
pipe (provided) to the conveyor name. The pipe
may be cut to the proper size for an easier fit.
The multi-axis swivel joint will provide adequate
movement for proper adjustment.
• ItisrecommendedthattheClipDetectorcable,
running to the Main Control Enclosure be in-
stalled in conduit. The same conduit that houses
the transmitter coil cable may be used.
• Feed the Clip Detector cable into the conduit,
from the Clip Detector end to the Main Control
Enclosure.
• Cutoffexcesscable.Connectwirestoterminal
block (TB1) using the supplied spade lugs. Refer
to the Control Connection Diagram for color code
hook-up. Be certain all wires are attached secure-
ly and connected to their proper terminals.
• Wheremetalrepairclipsareusedtwoormore
clips close together must pass directly over the
Clip Detector Sensor in order to activate it. If a
small patch of clips is used on the belt which
would not pass directly over the Clip Detector,
reference clips are required. Reference clips
are made by installing two or more clips which
will pass directly over the Clip Detector to trip it
when a small patch passes by. Numerous repair
and reference clips on the belt will degrade the
Detector’s performance because it will frequently
be in a desensitized mode.
G. MARKING DEVICE (IF
APPLICABLE)
The Marking Device is a pressurized solenoid
activated liquid spray system which pinpoints the
location of tramp metal to eliminate costly search
and downtime.
SPECIFICATIONS
Tank Pressure Rating: 150 psig (maximum working
pressure) (10 bar)
Tank Capacity: 3 Gallons (11.1 l) (liquid)
Operational Voltage: 115/220 (50/60 Hz), 15 Watts
Air: Plant air or any source of 100 to 200 psig inert
gas (6.5-13 bar)
INSTALLATION INSTRUCTIONS
• RefertotheSensingCoilandFrameAssembly
Drawing, for layout of the Marking Device on
the belt.
• Positionthesolenoidsupportuprightandcrossarm
as shown. Distance from the coils should be 3’ to
6' (.9 m to 1.8 m). Clamp in place temporarily
Part II - Installation (cont.)

11
Part II - Installation (cont.)
FIGURE 3. SWING-AWAY FRAME ASSEMBLY
FIGURE 4. FIXED FRAME ASSEMBLY

12
NOTE:The 1" x 1" (25 x 25 mm) support structure
is a solid fiberglass bar.
• Positionthesupportbracketofthesolenoidspray
valve so that the nozzle is pointed directly on the
center of the conveyor belt. The nozzle may be
positioned as shown or on the opposite side of
the arm. Bolt the bottom of the support frame to
the conveyor frame.
• Thesolenoidcontrolcableisconnectedtothe
Interface Module Timed Output (Terminal TR2,
Pins 4 & 5). Route the cable accordingly.
• Connectthehosebetweenthetankoutletand
the solenoid valve.
• Connectthefacilityairsourcetothetankregu-
lator inlet. Be sure the facility air source is shut
off and no pressure is in the tank
• Removethetopofthespraytank.
• ThespraysolutionissuppliedbytheUser.The
recommended mixture is five (5) fluid ounces
(148 cc) of colorant. Chrome Yellow (or other
contrasting colors manufactured by Tenneco
Chemical (or equivalent) mixed with a two (2)
gallon (7.6 l) solution of water and antifreeze
appropriate for local climate conditions (minimum
of 25% antifreeze)
• Mixthesolutionandpouritintotheholdingtank.
Replace the cap.
• Verifythatthepressureregulatorvalveisclosed
prior to turning on the facility air.
• Apply the facility air and adjust the pressure
regulator between 60 and 100 psig (4-6.7 bar),
as noted on the pressure gauge on top of the
holding tank.
CALIBRATION OF MARKING DEVICE
• RefertoSectionIV.EandIV.Ftosetthedesired
timing for marking a predetermined location.
• UsingaSamplepieceoftrampmetal,withthe
belt operating at normal load, adjust the Marking
Device timing by trial and error.
Part II - Installation (cont.)

13
Part II - Installation (cont.)

14
A. START-UP
Before turning on the system, locate the switches
and lights on the door panel and the controls inside
the cabinet.
• Thepower switch islocatedon the lowerleft
hand corner of the door panel. Place it in the
“ON” position. The green “ON” indicator should
light at this time.
• If the green “ON” indicator does not come on
return the power switch to the “OFF” position
and inspect the light bulb and fuses; also check
the power and wiring for proper connections.
• Approximately5secondsafterpower“ON”,the
No. 1 Status indicator (power supply located
on the front panel of the Electronic Module will
light (reference Figure 2). This indicates that
the power supply is fully operational and all the
electronics are enabled.
If the power supply L.E.D. status indicator or the
“ON” indicator does not light, refer to Trouble-
shooting Flow Diagram #1 for instructions. Until
the power supply L.E.D. is lit, calibration of the unit
cannot begin.
B. MAIN DETECTOR UNIT METAL
SENSITIVITY CALIBRATION
Before proceeding with the calibration procedure
obtain a sample of tramp metal to be used during
calibration. The piece should be the minimum size
to be detected.
It is important that the clip time L.E.D. No. 7 is not
lit during the calibration. This results in erroneous
data. Calibration adjustments are to be performed
using controls on the Electronic Module in the fol-
lowing manner:
1. Set the “Metal Sensitivity” control knob, located
on the from panel of the Electronic Module, to the
middle of the dial (reading of 5).
2. The Detector discriminates between interference
and a signal given off by tramp metal. The tramp
metal must enter the sensing coil at the direction
and speed of normal belt flow, before the Detector
will arm. However, the “Metal Signal” L.E.D. No 2,
will light anytime moving metal is in the sensing
field. When calibrating the system, be careful not
to introduce extraneous metal into the field in the
form of rings, belt buckles, keys, steel-toed shoes,
etc. When calibrating the system, it is best to set
the metal to be detected on a cardboard box (with
no staples) at the appropriate height and pass at
the speed and direction of belt flow.
If the Detector does not trip on the sample, turn the
“Metal Sensitivity” control knob to a higher sensitivity
(in direction of ascending numbers), so the Detector
will trip just as the metal is passed between the coils.
In the event that the unit doesn’t trip with the “Met-
al Sensitivity” control knob on 10, check to see if
the metal signal L.E.D. No. 2 lights as the metal
is passed through the field. If the L.E.D. does not
light as the tramp metal is passed through the field,
additional sensitivity may be required. In this case,
please refer to Section 4.2.
If L.E.D. No. 2 flashes, but the Detector does not
alarm, pass the metal through in the opposite direc-
tion of normal belt flow. If the unit trips, then switch
the (+) and (-) receiver terminal wires at the Interface
Module. This will program the Detector to trigger on
tramp metal traveling in the correct direction
3. Repeat step (2) until the system trips on the
piece or metal. When the final setting is determined,
note the number on the control knob for future ref-
erence.
If this number is greater than 8 increase the gain
of the Detector as discussed in Section IV.B. If the
number is less than 3, decrease the gain of the
system as discussed in Section IV.B
C. CLIP DETECTOR CALIBRATION
(IF APPLICABLE)
Refer to this section if the clip detector is set for the
desensitization mode rather than the disable mode
• Turnthe“ClipOverride”controlknobfullyclock
wise to position 10 on the dial. This knob is locat-
ed on the front panel of the Electronic Module
as shown in Figure 2.
Part III - Start-up & Calibration

15
• Observe the reference clips to see if they are
passing within 1" (25 mm) of the Clip Sensor
Head when the belt is empty. Adjust the Clip
Detector if it is not within this distance making
sure that the clips or the belt do not hit the Clip
Detector Sensor Head when the belt is fully load-
ed. If the clip is located properly, the Clip Timer,
status indicator No 7, located on the Electronic
Module will light for approximately 1 second each
time the clips pass over the Clip Detector Head.
NOTE: It the Clip Detector is spaced more than
1” (25 mm) from the passing clips, erratic per-
formance may occur.
• IftheDetectoristrippingontheclipswitha“Clip
Override” setting of 10, refer to Section IV C, Clip
Gain.
• Gradually turn the clip control knob counter
clockwise to a lower setting until the unit trips
on the largest set of repair clips on the belt.
• Turntheclipcontrolknobclockwiseonenumber
higher as a safety factor.
NOTE: This setting should be periodically
checked to compensate for shading of the con-
veyor belt.Turn the control knob to a “0” setting
if the Clip Detector is not used.
D. OPERATION
The Detector may be programmed to operate in a
manual or an automatic reset mode; the standard
mode of operation manual reset
MANUAL RESET
In the manual reset mode, once the unit has tripped,
the Detector’s Direct Output provides a continuous
alarm indication to alert the operator of detected
metal and/or to stop the belt. To reset the unit, the
reset button located on the front panel must be
manually depressed.
AUTOMATIC RESET
The Detector may be converted to an “Automatic
Reset Model”. In this mode the Detector will momen-
tarily signal when tripped then self-reset according
to the placement of the programming switches.
For complete programming instructions, refer to
Section IV.H.
REMOTE RESET
Provisions have been made to externally reset the
Detector from a remote location. Wire a normally
open set of contacts across the remote reset ter-
minals TB1 pins 5 & 6 located on the Interface Mod-
ule. Upon closure of the contacts, the unit will reset.
Part III - Start-up & Calibration (cont.)

16
A. GENERAL
The Detector provides a wide range of programming
capability. The Detector can be individually tailored
to the customer’s specific requirements; taking into
account the type and size of metal to be detected,
the type of material being conveyed and the mode
and combination of alarm signals required.
REMOVING/REPLACING COVER
To program the Electronic Module, the cover must
be removed. Remove the control knobs with the
1/16" allen wrench (provided). Unscrew the six
screws securing the cover with the 5/64" allen
wrench (provided).
When replacing the cover, it is essential to re-index
the control knobs. Before tightening the set screw,
line it up with the flat of the shaft. The knob, when
properly indexed, will indicate 10 in a full clockwise
position and 0 in a full counterclockwise position.
B. METAL GAIN
When a piece of tramp metal passes through the
search coils, a change in the received signal oc-
curs. This change is extremely small and must be
amplified to produce a suitable signal to trigger the
relay driver circuitry.
The amount of gain required in the receiver circuitry
depends on the following factors:
• CoilLength
• CoilAperture
• BeltSpeed
• TypeofMetaltobeDetected
• SizeShapeandOrientationoftheMewtothe
Search Coils
The internal gain of the Detector is adjusted by a
rotary switch, S4, located inside the Electronic Mod-
ule (refer to Figure 5). Each step in gain represents
an increase over the last step. Ideally the gain is
adjusted to pick up the desired piece of tramp metal
with the “Metal Sensitivity” control knob located on
the outside of the Electronic Module set to 5.
If the gain must be changed, use a sample of tramp
metal the same size as the piece to be detected and
follow the procedures listed below:
• RemovethecontrolknobsandcoveroftheElec-
tronic Module as indicated in Section IV.A.
• Setthe“MetalSensitivity”controlknob(R61)toits
rotational midpoint (if the cover was not removed,
the “Metal Sensitivity” setting would be 5).
• Checkthatthecliptimer,statusindicatorNo.7,
is not lit during any portion of this test. If the clip
timer is lit the data will be incorrect.
• Passthesamplepieceoftrampmetalcomplete
ly through the coils at a height midway between
the transmitter and receiver coils and at a speed
near that of the conveyed material under normal
operating conditions.
Increase or decrease the gain of the system with
the rotary switch as needed until the Detector will
trip just as the sample metal is passed between
the coils. The larger numbers on the gain setting
switch correlate to a higher gain. The lowest gain
being 1 and the highest 0 (representing 10). If
the unit never trips, refer to Troubleshooting Flow
Diagram #1.
• Ifallotherfunctionsareproperlyprogrammed
replace the cover and knobs. Re-index the con-
trol knobs as indicated in Section IV A.
• Recalibratethe“MetalSensitivity”controlknob
as instructed in Section III.B.
C. CLIP GAIN (IF APPLICABLE)
Refer to this section if the clip detector is set for, the
desensitization mode rather than the disable mode.
When belt repair clips are used on a conveyor belt,
the repair clips represent a stronger metal signal
than the tramp metal. In this situation, it is neces-
sary to reduce the gain of the system to allow the
clips to pass. Rotary Switch S5, shown in Figure
5, establishes the gain whenever the clip detector
circuit is energized. In the event that Switch S5 is set
higher than S4, the system will choose the smaller
gain setting of the two.
Part IV - System Programming

17
For calibration of the clip gain follow the steps
below:
• Runthebeltatnormalrunningspeedandmaxi
mum belt load.
• Verifythatthecliptimer,statusindicatorNo.7
lights each time a clip passes the sensor head.
If it does not, adjust the clip sensor head as
described in Section II.F.
• AdjusttheClipOverridecontrolknob,shownin
Figure 2, to a setting of 5.
• RemovethecoverasdescribedinSectionIV.A
without changing the setting on the Clip Override
control.
• AdjusttheClipGain,SwitchS5showninFigure
5, to the highest gain that does not trip the De-
tector when the clips pass. If the unit continues
tripping even at the minimum clip gain of 1, the
desensitized length of the belt may be too short.
In other words the system is switched back to full
sensitivity before the clips are completely out of
the Detector’s field. To correct, increase the clip
detector time delay as described in Section IV.D.
• Ifallotherfunctionsareproperlyprogrammed,
replace the cover as described in Section IV.A.
Return the controls to recorded settings.
• CalibratetheClipOverrideasdescribedinSec-
tion III.C.
D. CLIP DETECTOR TIME DELAY
If the clip detector is used, the length of belt desen-
sitized or disabled to permit the clips to pass can be
adjusted by properly programming the clip detector
time delay switches S1-4, 5, 6 & 7. The locations of
these switches are shown in Figure 5. The range of
delay times is from .1 seconds to 4.8 seconds as
tabulated in Table 1. These switches are set at the
factory according to customer requirements and
should not be adjusted unless absolutely necessary.
As long as the Detector is desensitized or disabled,
the clip timer, status indicator No. 7, will remain lit.
Part IV - System Programming (cont.)
E. DELAY BEFORE ALARM
The timed output alarm can be accurately pro-
grammed with a time delay before turn on. This
allows the conveyed material to travel for a pro-
grammed period before the timed output alarm
signal is energized. Typically this feature is used in
conjunction with a marking device or diverter gate
to delay the system until the detected tramp metal
has reached the auxiliary equipment. Switches
S2-1 through S2-5 control this time delay from .01
to 17.0 seconds. Refer to Table 2 for tabulation of
the delay time versus switch settings and Figure 5
for the switch locations.
F. TIME ALARM ON
The timed output can be accurately programmed
to remain energized for a timed period once it is
switched on. This feature can activate a diverter
gate, sound an alarm for a given period, command
a marking device to spray a given length of the belt,
etc. Switches S3-1 through S3-5 control this time
delay from .01 to 17.0 seconds. Refer to Table 2 for
a tabulation of the delay time versus switch settings
and Figure 5 for the switch locations.
TABLE 1. CLIP TIME DELAY
(SWITCH S1)

18
G. STANDARD OR FAIL-SAFE
OUTPUT OPERATION
As standard, the alarm outputs of the Detector
will energize when tramp metal is detected. In this
mode, the solid state relay is programmed to oper-
ate in a Normally “OFF” condition. The outputs will
not energize until metal is detected.
Provisions have been made to program the Detec-
tor to operate in a fail-safe mode. In this mode, the
outputs of the Detector are always energized and
de-energize when tramp metal is detected or when
power to the Detector is turned off. In the fail-safe
mode, the solid state relay is programmed to oper-
ate in a Normally “ON” condition.
Both outputs can be independently programmed.
The direct output (status indicator No. 9) and timed
output (status indicator No. 8) will monitor the
alarm’s output condition. If the status indicator is
lit, its associated output is energized. Switch S2-6
controls the direct output and S3-6, the timed output
as shown in Table 3. To operate the solid state relay
in a Normally “OFF” condition, open the appropriate
switch. Conversely, to operate the relay in a Nor-
mally “ON” condition, close the switch.
Part IV - System Programming (cont.)
TABLE 2.
S2 - DELAY BEFORE ALARM
S3 - TIME ALARM ON
TABLE 3.
S2 - DIRECT OUTPUT NORMALLY ON/OFF SELECT
S3 - TIMED OUTPUT NORMALLY ON/OFF SELECT

19
H. MANUAL/AUTO RESET
MANUAL RESET
In the manual reset mode, once the unit has tripped,
the Detector’s Direct Output provides a continuous
alarm indication to alert the operator of detected
metal and/or to stop the belt. To reset the unit, the
reset button located on the front panel must be
manually depressed.
AUTOMATIC RESET
The Detector may be converted to an “Automatic
Reset Mode. In this mode, the Detector will momen-
tarily signal when tripped then self-reset.
The direct output can be programmed to automat-
ically reset by shorting the remote reset terminals
TB1 pins 5 & 6, located on the front of the Interface
Module. To “short”, install a jumper from pin 5 to pin
6. Open Switch S2-7. The operating mode of the
timed output is governed by the position of Switch
S3-7 as shown in Table 4. With the switch in the
open position, the timed output operates in the
Automatic Reset Mode. When the switch is closed,
the timed output will follow the mode programmed
on the direct output.
I. RESET OVERRIDE
If required, the Detector can be programmed so
the system is disabled during the rest period. This
means the Detector is prevented from tripping as
long as a reset signal is provided, either manually
on the front panel or remotely through a set of ex-
ternal contacts
With S2-7 in the open position, the reset signal does
not disable the Detector. Closing S2-7 will program
the Detector so it is disabled while a reset signal is
applied. Refer to Table 5.
J. SAMPLING & TPD MODES
The Detector Sampling and TPD Modes are set at
the factory to make the Detector sensitivity selec-
tive between various materials as required for
each particular application. Switches S1-1 through
S1-3 inclusive are preset and are to be adjusted
by the user.
K. TRIP REGISTER
The “Trip Register” is used with the Detector’s timed
output. The Trip Register accurately tracks, up to
128 metal particles concurrently. Each particle’s
signal is released to the timed output terminals
consistent with the pre-programmed “Delay Before
Alarm”. This standard feature is automatically ac-
tivated when the timed output is used for delayed
operation of any device.
Part IV - System Programming (cont.)
TABLE 4. TIMED OUTPUT RESET MODE (S3)
TABLE 5. BELT RESET OVERRIDE (S2)

20
TABLE 6. PROGRAMMING CONTROLS SUMMARY
Part IV - System Programming (cont.)
Table of contents
Other Eriez Metal Detector manuals
Popular Metal Detector manuals by other brands

Ceia
Ceia THS/21E Instruction manual for installation, use and maintenance

First Texas Products
First Texas Products Gamma 6000 owner's manual

EENOUR
EENOUR GC-1078 owner's manual

Garrett
Garrett AT Gold owner's manual

Steinberg Systems
Steinberg Systems SBS-MD-26 user manual

Renkforce
Renkforce MD50 operating instructions

Fisher Labs
Fisher Labs CZ-21 QuickSilver operating manual

Bounty Hunter
Bounty Hunter The Guardian operating manual

Garrett
Garrett Master Hunter CX Plus owner's manual

Velleman
Velleman CS200 user manual

Tesoro
Tesoro LOBO Operator's instruction manual

Minelab
Minelab X-Terra 70 Quick start & reference guide