ESI ESI-1000 User manual

ESI Phone
User’s Guide
FOR ESI Communications Servers
ESI-1000 • ESI-600 • ESI-200 • ESI-100 • ESI-50
Covering these current ESI phone models:
ESI 60 Business Phone • ESI 40 Business Phone
24-Key Feature Phone • ESI Cordless Handset II
. . . and these legacy ESI phone models:
48-Key Feature Phone • 12-Key Feature Phone
[Original] ESI Cordless Handset
0450-1047
Rev. L
For on-line help, visit www.esi-estech.com/users.
About ESI
ESI (Estech Systems, Inc.) is a privately held corporation based in Plano, Texas. Founded in 1987, ESIdesigns and
builds innovative telecommunications products for businesses like yours. Because of their powerful combination of
value and features, ESI products are consistently recognized by industry publications and leaders.
Copyright © 2011 ESI (Estech Systems, Inc.).
Esi-Dex, Quick Groups, Quick Moves, Virtual Mailbox Key, AutoPage, Quick Page and Verbal User Guide
are trademarks, of ESI. Act! is a registered trademark of Symantec Corporation. Goldmine is a trademark of
Goldmine Software Corporation. Ethernet is a registered trademark of Xerox Corporation. Microsoft, Windows, NT and
Outlook are registered trademarks of Microsoft Corporation. Intel is a registered trademark of Intel Corporation.
Panasonic and DBS are registered trademarks of Matsushita Electric Corporation of America. Bluetooth is a registered
trademark of the Bluetooth Special Interest Group (S.I.G.), Inc. Information contained herein is subject to change
without notice. ESI products are protected by various U.S. Patents, granted and pending. Visit ESI on the Web at
www.esi-estech.com.

Introduction.....................................................................................................................................................................................................................................A.1
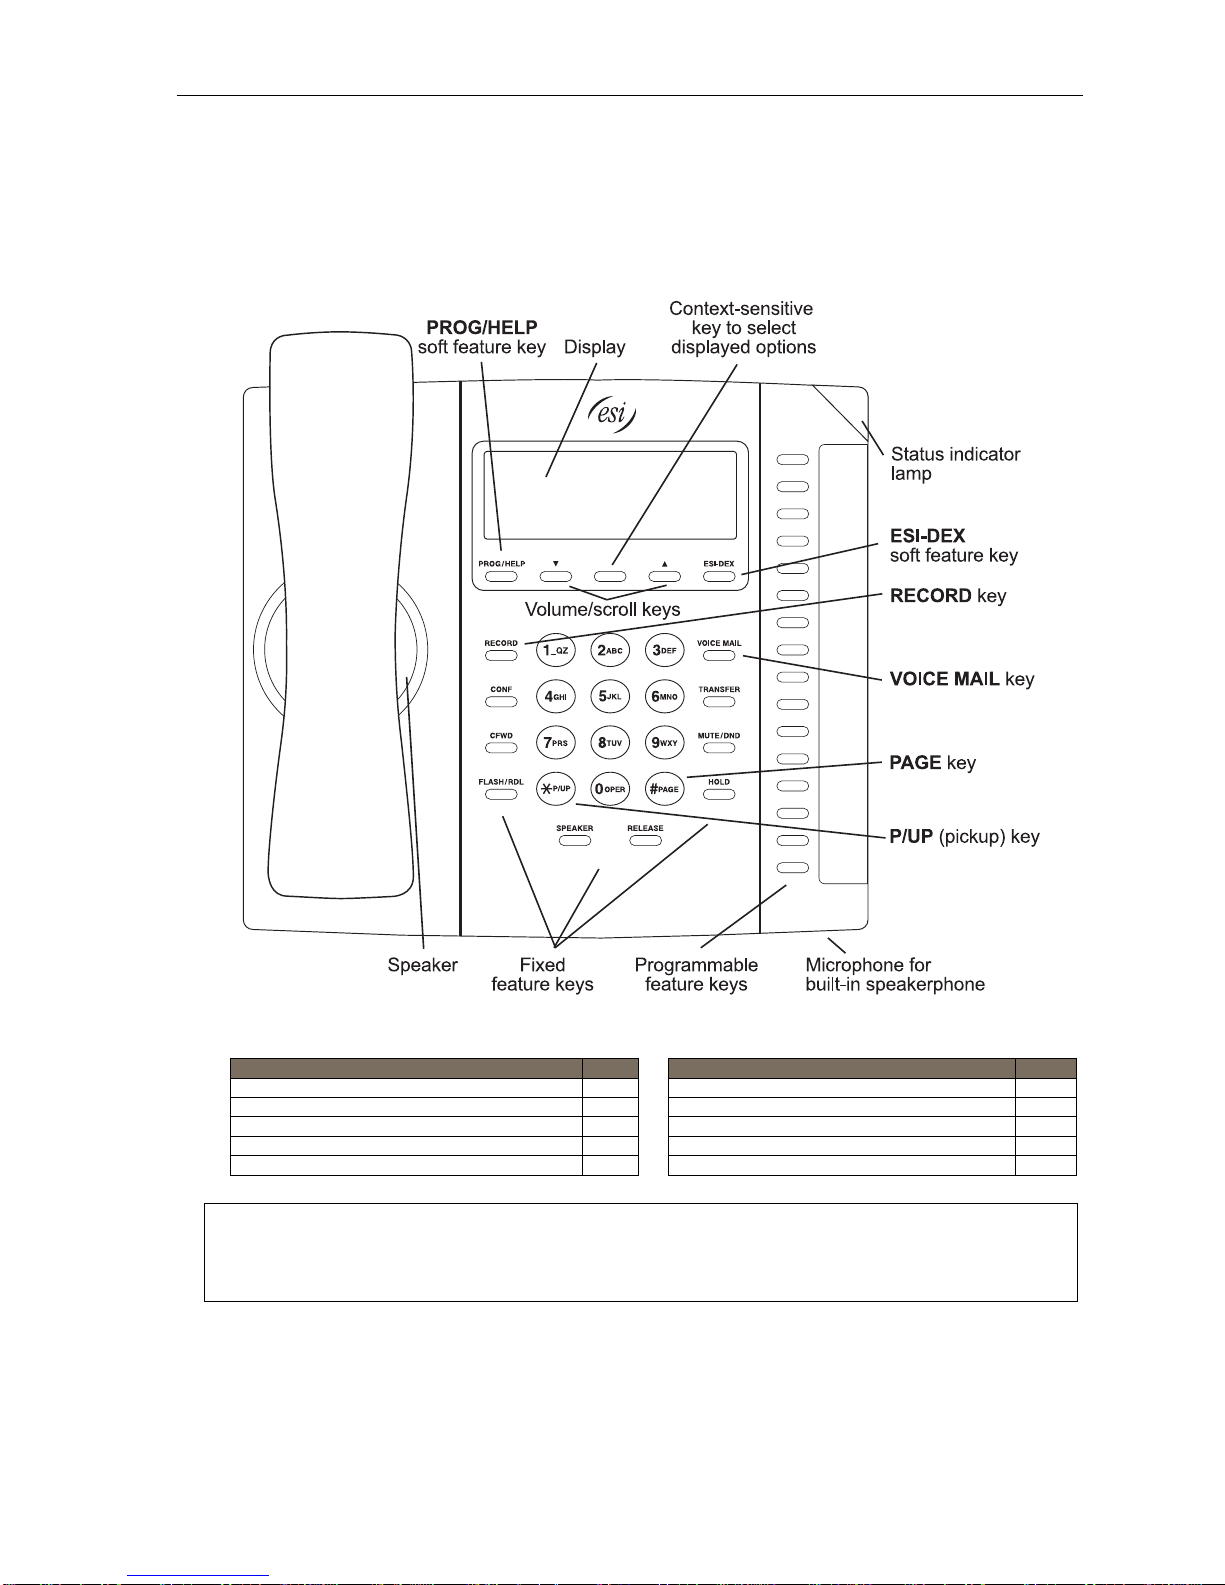
ESI 60Business Phone........................................................................................................................................................................................................... A.2
ESI 40Business Phone........................................................................................................................................................................................................... A.3
48-Key Feature Phone (legacy product)................................................................................................................................................................................... A.4
Optional Expansion Consoles.................................................................................................................................................................................................. A.5
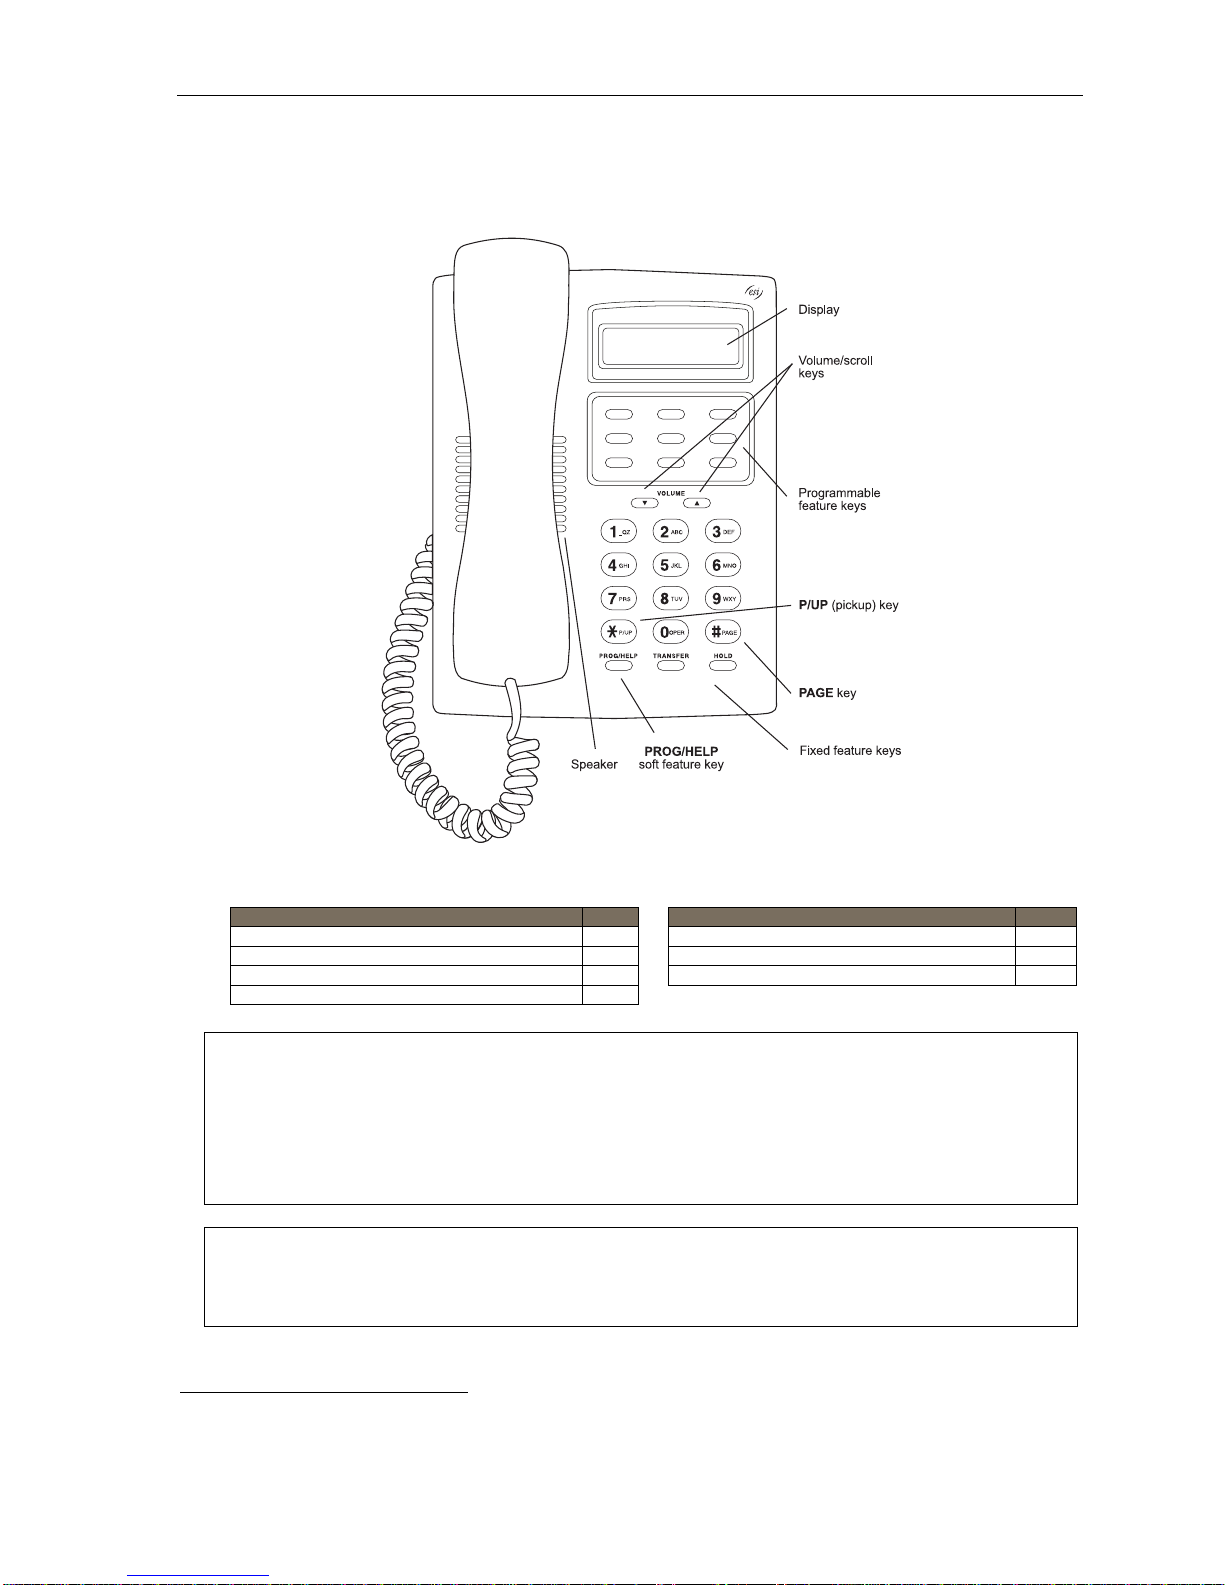
24-Key Feature Phone............................................................................................................................................................................................................. A.6
12-Key Feature Phone (legacy product)................................................................................................................................................................................... A.7
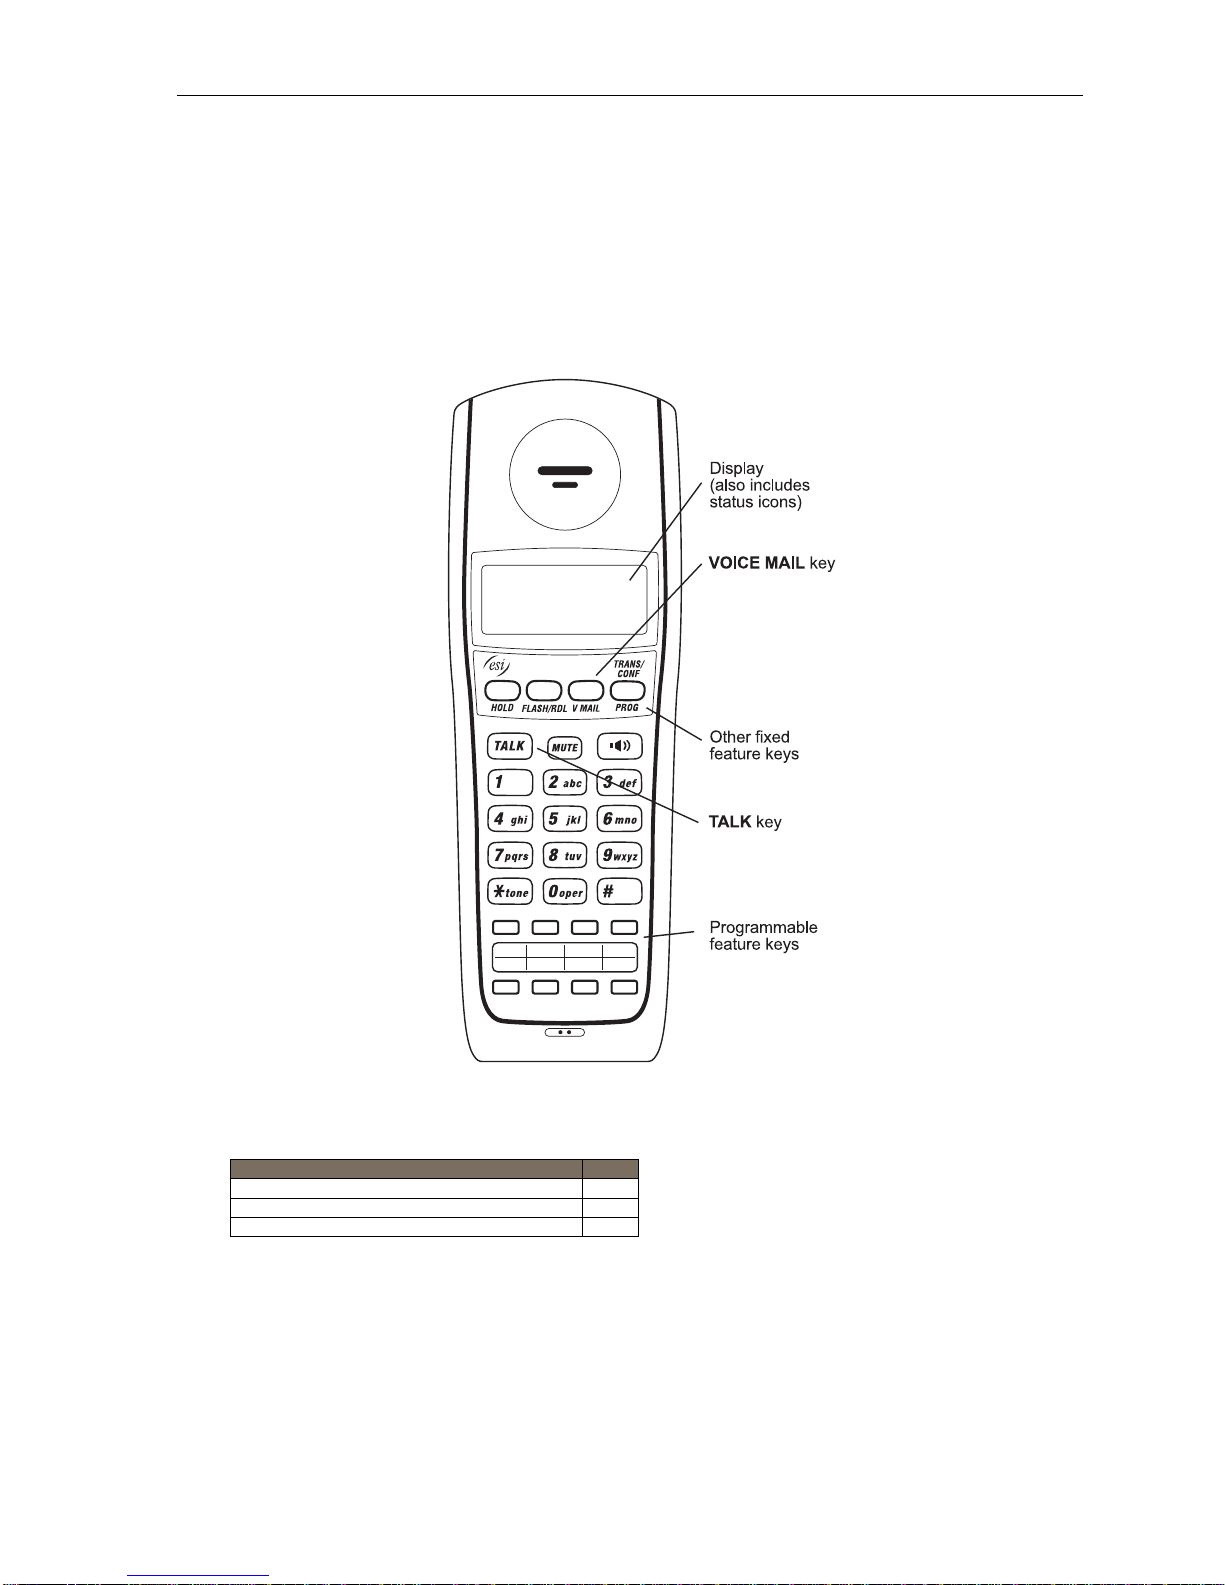
ESI Cordless Handset II........................................................................................................................................................................................................... A.8
Connecting your ESI phone..................................................................................................................................................................................................... A.9
Help mode (Verbal User Guide)......................................................................................................................................................................................................B.1
User programming: An introduction...............................................................................................................................................................................................C.1
Voice mail operation........................................................................................................................................................................................................................D.1
VOICE MAIL key .....................................................................................................................................................................................................................D.1
Personal greetings...................................................................................................................................................................................................................D.1
Leaving messages . . ..............................................................................................................................................................................................................D.2
AutoPage................................................................................................................................................................................................................................D.3
Moving and deleting a message...............................................................................................................................................................................................D.3
Off-premises “reach-me”..........................................................................................................................................................................................................D.3
Message retrieval ....................................................................................................................................................................................................................D.4
Live recording..........................................................................................................................................................................................................................D.8
Off-premises message delivery................................................................................................................................................................................................D.9
Message Recycle Bin (un-delete)...........................................................................................................................................................................................D.10
Status indicatorlamp.............................................................................................................................................................................................................D.10
Setting up ESI Mobile Messaging........................................................................................................................................................................................... D.11
Setting up twinning................................................................................................................................................................................................................. D.14
Optional voice mail feature: Guest mailboxes.........................................................................................................................................................................D.15
Optional voice mail feature: Group/broadcast mailboxes.........................................................................................................................................................D.17
Optional voice mail feature: Cascade notification mailboxes.................................................................................................................................................... D.18
Optional voice mail feature: Q & A mailboxes .........................................................................................................................................................................D.20
ESI phone operation........................................................................................................................................................................................................................ E.1
Display.................................................................................................................................................................................................................................... E.1
Caller ID.................................................................................................................................................................................................................................. E.1
Keys........................................................................................................................................................................................................................................ E.2
Dial tone.................................................................................................................................................................................................................................. E.4
Basic phone use...................................................................................................................................................................................................................... E.5
Direct station selection............................................................................................................................................................................................................. E.6
Transferring an outside call . . .................................................................................................................................................................................................. E.6
Transferring an internal call . . ................................................................................................................................................................................................. E.8
Conference calling................................................................................................................................................................................................................... E.9
Call forwarding....................................................................................................................................................................................................................... E.10
Call waiting............................................................................................................................................................................................................................ E.13
Hold/exclusive hold operation................................................................................................................................................................................................. E.14
Paging................................................................................................................................................................................................................................... E.16
Call pickup............................................................................................................................................................................................................................. E.16
Optional features................................................................................................................................................................................................................... E.17
Special keys......................................................................................................................................................................................................................................F.1
Esi-Dex ....................................................................................................................................................................................................................................F.2
Override ring.............................................................................................................................................................................................................................F.9
Messagemonitor mode (live call screening)............................................................................................................................................................................F.10
Personal greeting reminder.....................................................................................................................................................................................................F.10
Headset operation ..................................................................................................................................................................................................................F.10
Outside dial tone preference...................................................................................................................................................................................................F.13
Linekeys................................................................................................................................................................................................................................F.13
Optional features....................................................................................................................................................................................................................F.14
Using an ESI desktop IP phone remotely.......................................................................................................................................................................................G.1
Using Esi-Link .................................................................................................................................................................................................................................H.1
Network numbering..................................................................................................................................................................................................................H.1
Location Keys..........................................................................................................................................................................................................................H.1
Programmable feature keys andEsi-Link: an introduction.........................................................................................................................................................H.2
Dialing an Esi-Link location......................................................................................................................................................................................................H.3
Using featurekeys with Esi-Link...............................................................................................................................................................................................H.5
Other Esi-Link features ............................................................................................................................................................................................................H.8
ACD agent operation.........................................................................................................................................................................................................................I.1
Programming the agent log-on/off key........................................................................................................................................................................................I.1
Wrap mode................................................................................................................................................................................................................................I.2
LED indicator.............................................................................................................................................................................................................................I.2
Display indications.....................................................................................................................................................................................................................I.3
While logged on: no DND, monitormode, call forward, or programming.....................................................................................................................................I.4
Call waiting................................................................................................................................................................................................................................I.4
ACD administrator key...............................................................................................................................................................................................................I.5
Analog stations................................................................................................................................................................................................................................J.1
Caller ID...................................................................................................................................................................................................................................J.1
Placing calls .............................................................................................................................................................................................................................J.1
Transferringcalls......................................................................................................................................................................................................................J.2
Conference calling....................................................................................................................................................................................................................J.2
Call waiting...............................................................................................................................................................................................................................J.3
Call hold...................................................................................................................................................................................................................................J.3
Paging......................................................................................................................................................................................................................................J.3
Call pick-up...............................................................................................................................................................................................................................J.3
Voice mail operation from an analog station..............................................................................................................................................................................J.4
Analog station programming.....................................................................................................................................................................................................J.6
Index

User’s Guide Introduction
A.1
Introduction
Accessing the rich ESI feature set is simple and easy through the straightforward design of each of the various
ESI phones. Each feature has been designed for ease of use while providing capabilities needed in an advanced
business phone.
You will be able to learn many of the features by simply using your phone; and this ESI Phone User’s Guide will
introduce you to the wide variety of features offered by your ESI Communications Server1and how to use your
phone effectively to achieve maximum benefits.
What it covers
This User’s Guide covers the use of the following with your ESI Communications Server:
• ESI 60 Business Phone (digital and IP versions)
• ESI 40 Business Phone (digital and IP versions)
• 24-Key Digital Feature Phone
• 60-Key Expansion Console and Second Expansion Console
• ESI Cordless Handset II (digital, local IP, and remote IP versions)
• [Legacy] 48-Key Feature Phone (Digitaland local/remote IP Feature Phone II)
• [Legacy] 12-Key Digital Feature Phone
• Analog station
How it’s arranged
• Section A — Phone illustrations
• Section B — User help
• Section C — User programming
• Section D — Voice mail operation
• Section E — Phone operation
• Sections F through I — Special keys and features
• Section J — Analog stations
Important: If you’re using a legacy 48-Key Feature Phone, please note that this phone has separate PROGRAM
and HELP keys, rather than the combo PROG/HELP key found on the other models supported by your ESI
Communications Server. Therefore, you should press PROGRAM if programming your phone and the
instructions tell you to press PROG/HELP; or, similarly, you should press HELP if the instructions tell you to
press PROG/HELP to obtain assistance from the Verbal User Guide described herein (see page B.1).
1ESI-1000, ESI-600, ESI-200, ESI-100, or ESI-50.

User’s Guide Introduction
A.2
ESI 60 Business Phone
The ESI 60 Business Phone has a variety of programmable and built-in features. It comes in three models:
ESI 60D,a digital phone; and two versions (Gigabit Ethernet and 10/100 Ethernet) of ESI 60IP, an IP phone.
Additionally, it supports up to two optionalExpansion Consoles (see page A.5).All ESI 60 Business Phone
models offer the same basic features which are described throughout this User’s Guide. The ESI 60 Business
Phone’s built-in voice mail features and voice prompts make it easy to program and use.
Note: Depending on your angle of view, you will notice differences in the contrast levels of the upper and lower
displays. This is normal.
Items referenced elsewhere
Item Page
Item Page
PROG/HELP soft feature key C.2
Verbal User Guide and tutorial B.1
P/UP (pickup) key E.16
Status indicator lamp D.10
Fixed feature keys E.2
ESI-DEX soft feature key F.2
VOICE MAIL key D.1
RECORD key D.8
Programmable feature keys C.2
PAGE key E.16
Hint: On any of these ESI phone varieties (including the Expansion Consoles), you can perform direct
programming by holding down a programmable feature key for at least two seconds (similar to how you
might program a car radio button). This isn’t applicable to the fixed-feature keys which, as their name
implies, are already programmed.

User’s Guide Introduction
A.3
ESI 40 Business Phone
The ESI 40 Business Phone has a variety of programmable and built-in features. It comes in two models: the
ESI 40D,a digital phone; and the ESI 40IP, a 10/100 Ethernet IP phone.Additionally, it supports up to two optional
Expansion Consoles (see page A.5).All ESI 40 Business Phone models offer the same basic features which are
described throughout this User’s Guide. The ESI 40 Business Phone’s built-in voice mail features and voice
prompts make it easy to program and use.
Items referenced elsewhere
Item Page
Item Page
PROG/HELP soft feature key C.2
Verbal User Guide and tutorial B.1
P/UP (pickup) key E.16
Status indicator lamp D.10
Fixed feature keys E.2
ESI-DEX soft feature key F.2
VOICE MAIL key D.1
RECORD key D.8
Programmable feature keys C.2
PAGE key E.16
Hint: On any of these ESI phone varieties (including the Expansion Consoles), you can perform direct
programming by holding down a programmable feature key for at least two seconds (similar to how you
might program a car radio button). This isn’t applicable to the fixed-feature keys which, as their name
implies, are already programmed.

User’s Guide Introduction
A.4
48-Key Feature Phone (legacy product)
The legacy 48-Key Feature Phone, still in use on many installed ESI systems, has a variety of programmable and
built-in features. It has two versions: 48-Key Digital Feature Phone and 48-Key IP Feature Phone II.Additionally, it
supports up to two optional Expansion Consoles (see page A.5). Allversions of the 48-Key Feature Phone offer the
same basic features which are described throughoutthis User’s Guide. The 48-Key Feature Phone’s built-in voice mail
featuresand voice prompts make it easy toprogramand use.
Items referenced elsewhere
Item Page
Item Page
PROGRAM soft feature key C.2
HELP key for Verbal User Guide and tutorial B.1
P/UP (pickup) key E.16
Status indicator lamp D.10
Fixed feature keys E.2
ESI-DEX soft feature key F.2
VOICE MAIL key D.1
RECORD key D.8
Programmable feature keys C.2
PAGE key E.16
Hint: On any of these ESI phone varieties (including the Expansion Consoles), you can perform direct
programming by holding down a programmable feature key for at least two seconds (similar to how you
might program a car radio button). This isn’t applicable to the fixed-feature keys which, as their name
implies, are already programmed.

User’s Guide Introduction
A.5
Optional Expansion Consoles
Note: Your Installer or SystemAdministrator must enable Expansion Console support for your extension before
you can use one or both Expansion Consoles.
The ESI 60 Business Phone, ESI 40 Business Phone, and legacy 48-Key Feature Phone each can support up to
two optional Expansion Consoles, fora possible total of 120 additional programmable feature keys.
The 60-Key Expansion Console connects directly to the phone, while the Second Expansion Console
connects to the first Console.
You program each Expansion Console’s keys just as you do the programmable feature keys on your ESI phone,
using either direct or traditional programming (see page C.2).
Note: Only one key can exist per extension, feature or operation. If you program asecond key for the same
extension, feature or operation, this automatically erases the first key so programmed, thus making it
available for a new extension, feature or operation.
Hint: You may find it easier to write in the names on the overlay before you program the keys and attach the
overlay to the Console.
60 programmable
feature keys
(pg. C.2)
in two banks
of 30 each
Hint: On any of these ESI phone varieties (including the Expansion Consoles), you can perform direct
programming by holding down a programmable feature key for at least two seconds (similar to how you
might program a car radio button). This isn’t applicable to the fixed-feature keys which, as their name
implies, are already programmed.

User’s Guide Introduction
A.6
24-Key Feature Phone
The 24-Key Feature Phone has features similar to those of the ESI desktop phones mentioned earlier.
However, the 24-Key Feature Phone is available only as a digital model and doesn’t support IP, ESI’sVIP family
of software applications1, or the Expansion Consoles. As is true for the ESI phones mentioned earlier, the 24-Key
Feature Phone has built-in voice mail features and voice prompts thatmake it easy to program and use.
Items referenced elsewhere
Item Page
Item Page
PROG/HELP soft feature key C.2
Verbal User Guide and tutorial B.1
P/UP (pickup) key E.16
Status indicator lamp D.10
Fixed feature keys E.2
ESI-DEX soft feature key F.2
VOICE MAIL key D.1
RECORD key D.8
Programmable feature keys C.2
PAGE key E.16
Hint: On any of these ESI phone varieties (including the Expansion Consoles), you can perform direct
programming by holding down a programmable feature key for at least two seconds (similar to how you
might program a car radio button). This isn’t applicable to the fixed-feature keys which, as their name
implies, are already programmed.
1For information concerning these software applications, see the ESI Web site atwww.esi-estech.com.

User’s Guide Introduction
A.7
12-Key Feature Phone (legacy product)
The legacy 12-Key Feature Phone, still in use on many installed ESI systems, includes the basic, most
commonly used phone features. This simplified model is available only as a digital model and doesn’tsupport IP,
ESI’s VIP family of software applications1, the Expansion Consoles, speakerphone operation2, or Esi-Dex.
Items referenced elsewhere
Item Page
Item Page
PROG/HELP soft feature key C.2
PROG/HELP key for Verbal User Guide, tutorial B.1
P/UP (pickup) key E.16
Status indicator lamp D.10
Fixed feature keys E.2
PAGE key E.16
Programmable feature keys D.1
Note: The following features aren’t available on a 12-Key Feature Phone:
• Certain special keys and features (see “Special keys,” page F.1).
• Esi-Dex.
• ACD operation.
Additionally: to use voice mail, conference calling and mute/DND on a 12-Key Feature Phone, you must
program these features into programmable feature keys (see “Programmable feature keys,” page C.3, and
“Optional features,” page F.14).
Hint: On any of these ESI phone varieties (including the Expansion Consoles), you can perform direct
programming by holding down a programmable feature key for at least two seconds (similar to how you
might program a car radio button). This isn’t applicable to the fixed-feature keys which, as their name
implies, are already programmed.
1For information concerning these software applications, see the ESI Web site atwww.esi-estech.com.
2The 12-Key Feature Phone lacks a hands-free microphone, and thereforecan’t serve as a true two-way speakerphone. Its speaker plays pages.

User’s Guide Introduction
A.8
ESI Cordless Handset II
ESI’s DigitalCordless Handset II gives you most of the same features found in the 24-Key Feature Phone,but in
a compact, portable form. Note that it does not have the following features found on some ESI desktop phones:
Esi-Dex support (or ESI-DEX key), Caller ID key, Virtual Mailbox Key support, or Verbal User Guide.
Each ESI Cordless Handset II comes with a charger/AC adapter, base station, belt clip, battery pack, and wall mount.
Depending on your installation, your location may have one ormore optionalESI Cordless Handset Repeaters
so you can more easily stay in communication with your ESI system while you travel throughout the facility. If
you are unsure about whether your location has this capability, contact your System Administrator.
Items referenced elsewhere
Item Page
Programmable feature keys C.2
VOICE MAIL key D.1
Fixed feature keys E.2

User’s Guide Introduction
A.9
Connecting your ESI phone
Depending on which ESI phone you have, use the appropriate diagram (below) to connect it. Each diagram
represents the panelon the phone’s underside.
Notes: The “Top of phone” and “Bottom of phone” references in these diagrams show the correct vertical
orientation of the phone — i.e., the part with the display is the top.
When the phone is in the highest upright position, use the wall-mount hook located under the handset to
secure the handset when you’re not using the phone.
24-Key Feature Phone
12-Key Feature Phone(legacy product)
• Connects like a basic phone.
• Handsetplugs into right-side jack.
• Line cord plugs into left-side jack.
ESI 60 Business Phone (digital version)
ESI 40 Business Phone (digital version)
In addition to how the 24-Key Feature Phone connects to
the handset and line cord,note that each phone in this
group accepts a 60-Key Expansion Console cable
(included with each Console) which uses standard RJ-11
telephone connectors.
ESI 60 Business Phone (either IP version)
ESI 40 Business Phone (IP version)
In addition to the details mentioned previously for the ESI 60
Business Phone and ESI 40 Business Phone,each IP phone
model includes an Ethernet cable which connects the phone
to a PC (or, if no PC is present, directly to a router, switch,
or hub) to achieve connectivity to a local area network
(LAN). These phones are Power Over Ethernet (POE)
models, and thus require noAC wall cord or AC adapter.

User’s Guide Introduction
A.10
48-Key Digital Feature Phone(legacy product)
In addition to how the 24-Key Feature Phone connects to
the handset and line cord,note that this phone accepts a
60-Key Expansion Console cable (included with each
Console) which uses standard RJ-11 telephone
connectors.
48-Key IP Feature Phone II(legacy product)
In addition to the details mentioned previously for
the 48-Key Digital Feature Phone, the 48-Key IP Feature
Phone II includes:
• A power supply that is unswitched (i.e., always-on AC
outlet) and plugs into the phone.
• An Ethernet cable, which connects the phone to a PC
(or, if no PC is present, directly to a router, switch or hub)
to achieve connectivity to a local area network (LAN).

User’s Guide Introduction
A.11
60-Key Expansion Console connection
Notes: Your Installer or System Administrator must enable Expansion Console support for your extension before
you can use one or both Expansion Consoles.
The 60-Key Expansion Console can be connected to an ESI 60 Business Phone (any model), ESI 40
Business Phone (any model), or a legacy 48-Key Feature Phone (any model).
If connecting both a 60-Key Expansion Console and a Second Expansion Console to a phone, see “Second
Expansion Console connection,” page A.12.
1. Unplug the line cord or Ethernetcable from your ESI phone.
If it’s an ESI IP phone with a power supply plugged into it, unplug the power supply, too.
2. The 60-Key Expansion Console (right) includes a six-conductor
expansion cable. Connect one end of the expansion cable to the
appropriate connector on the bottom of the ESI phone (below).
Then,connect the other end of the expansion cable to the 60-Key
Expansion Console.
3. To keep cabling out of the way, thread the expansion cable into the
slots on the bottom of the phone and 60-Key Expansion Console.
4. Program the keys on the 60-Key Expansion Console using the same
procedure as with the phone (press PROG/HELP 2).
5. If necessary, remove the clearplastic overlay from the keys on the
Expansion Console.
6. For maximum convenience, label the paper overlay to show how
the keys are programmed (your Installer or System Administrator can do this with ESI software).
7. Install the labeled paper overlay on the 60-Key Expansion Console.
8. Install the clear plastic overlay over the paper overlay, to protect it.
9. Use the provided Velcro®tape to attach the left side of the 60-Key Expansion Console to the right side of
the ESI phone.
10. Plug the line cord or Ethernetcable back into your phone.
If you unplugged a power supply in step 1,plug it back in, as well.
Connectors on bottom of phone

User’s Guide Introduction
A.12
Second Expansion Console connection
Notes: Your Installer or System Administrator must enable Expansion Console support for your extension before
you can use one or both Expansion Consoles.
The Second Expansion Console can be connected to a 60-Key Expansion Console that is connected to an
ESI 60 Business Phone (any model), ESI 40 Business Phone (any model), or a legacy 48-Key Feature
Phone (any model). If connecting only one Expansion Console to one of these phone models, see “60-Key
Expansion Console connection,” page A.11; the Second Expansion Console connects to the 60-Key
Expansion Console and cannot connect directly to the ESI phone.
1. Unplug the line cord or Ethernetcable from your ESI phone.
If it’s an ESI IP phone with a power supply plugged into it, unplug the powersupply, too.
2. The Second Expansion Console1includes an expansion
“Y” cable (right)2. Lay out the cable across the back of
the equipment so that the AC adapter is on left and the
end of the cable is on the right.
3. Connect the right end of the expansion “Y” cable to the
appropriate connector on the bottom of your ESIphone
(below).
4. Then, connect the expansion “Y” cable’s middle plug to the 60-Key Expansion Console, the left plug to
the Second Expansion Console,and theAC adapter to an appropriate 110 VAC outlet to provide power to
the Second Expansion Console (above).
5. To keep cabling out of the way, thread the expansion “Y” cable into the slots on the bottom of the phone
and the two Expansion Consoles.
6. Program the keys on the two Expansion Consolesusing the same procedure as with the phone (press
PROG/HELP 2).
7. If necessary, remove the clearplastic overlay from the keys on the two 60-Key Expansion Consoles.
8. For maximum convenience, label the paper overlay to show how the keys are programmed (your Installer
or System Administrator can do this with ESI software).
9. Install the labeled paper overlays on the two 60-Key Expansion Consoles.
10. Install the clear plastic overlays over the paper overlays, to protect them.
11. Use the provided Velcro®tape to attach the left side of the 60-Key Expansion Console to the right side of the
phone, and the right side of the 60-Key Expansion Console to the left side of the Second Expansion Console).
12. Plug the line cord or Ethernetcable back into your ESI phone.
If you unplugged a power supply in step 1,plug it back in, as well.
Connectors on bottom of Console-compatible ESI digital phone
1It’s physically identical to a 60-Key Expansion Console; consult your Installer if you have trouble determining which one it is.
2This diagramshows the backs of the Expansion Consoles.

User’s Guide Introduction
A.13
ESI Cordless Handset II connection
Each ESI Cordless Handset II comes with:
• A charger/cradle to charge the Handset.
• An AC adapter for use with only the charger.
• A base station to provide a digital interface between the ESI phone system and ESI Cordless Handset II.
This base station is line-powered and thus needs no AC power.
• Wall-mount(s), a belt clip, and a Quick Reference Guide.
Base station installation
Due to each site’s unique characteristics, the range and distance information we’ll provide herein is
only approximate.
Characteristics thatpositively affect performance:
• The base station should be installed so it has a clear line-of-sight with the Cordless Handset.
• The base station antenna should always be pointed in its uppermost vertical position.
Characteristics thatnegatively affect performance:
• Large amounts of metal shelving (such as in manufacturing or warehouse areas).
• Close proximity to (within one mile of)a radio tower.
• Concrete walls that divide spaces where Cordless Handsets are used (assuming the base stations are in
one location).
Don’t install the base station:
• Close to a wall with metal studs.
• On a metal wall.
• Next to a device that emits RFI or EMI1— e.g., a television, radio, computer, computer printer,
fluorescent light fixture,or fax machine.
• In a ceiling that has foil-backed insulation.
• Behind doors that typically are closed, tinted windows, one-way glass, or other areas that limit or
cut off transmission to the Cordless Handset.
Base stations must be installed at least 10 feet apart, regardless of whether the base station is for the small-
model or large-model Cordless Handset. Don’t install more than six base stations in one area (such as a
network room). Choose a location at least 30 feet away if more than six base stations are needed in a building.
Note: Your facility may be equipped with one or more optional Cordless Handset II Repeaters. For more
information about this, consult your System Administrator or your Certified ESI Reseller.
A Digital Cordless Handset IIbase station requires only a line cord to the phone system;AC power isn’t
needed because the base station receives power from the phone system via the line cord.
An IP Cordless Handset II base station receives PoE. If PoE isn’t already being supplied, you’ll need to install
the separately purchased PoE adapter (sold in five-packs as ESI part # 5000-0437).
Notes: If the PoE equipment plugs into AC outlets and a power failure occurs, all IP Cordless Handsets II on the
system will be unable to originate or receive phone calls. Therefore, either: (a.) use an appropriately
sized uninterruptible power supply (UPS) to power all the IP equipment (base station, PoE adapter,
router, etc.) involved in making phone calls or (b.) have a traditional phone available for originating and
receiving analog CO calls.
Feedback may result if the Cordless Handset is within three inches of an ESI desktop phone.
1RFI is radio frequency interference. EMI is electromagnetic interference.

User’s Guide Help mode (Verbal User Guide)
B.1
Help mode (Verbal User Guide)
Your ESI phone system’s Help mode (also called the Verbal User Guide) — a carefully conceived combination
of spoken information, display readouts and even key illumination when appropriate — is a powerful tool to help
you learn how to use the system’s many features.
Notes: As explained on page A.1, your ESI phone has a combo PROG/HELP key unless it is a legacy 48-Key
Feature Phone (which has separate PROGRAM and HELP keys). Under the circumstances described in
this section, the PROG/HELP key will invoke Help mode.
The ESI Cordless Handsets have no access to the Verbal User Guide (and, thus, no key to invoke it).
Tutorial
When your station is idle, press PROG/HELP, and then follow the spoken Help menu to:
• Learn how to use the phone • Heara description of how any key is used
• Learn how to use voice mail features • Hear a complete tutorial on phone operation
Help during station programming
To hear a detailed description ofa function you wish to program, press PROG/HELP while programming it.
Help during a call
Press PROG/HELP while on a call and this will place the call on hold, whereupon youcan use Help mode to
hear a description of the function you wish to perform. When you exit Help mode, you will be reconnected to
the call.
While you are either in Help mode or programming your phone, your station will be temporarily placed in DND
(see “MUTE/DND,” page E.4). Anyone calling your station while you are in DND will be forwarded to your
mailbox (or other destination set by the Installer).
Exiting Help mode
To exit Help mode, simply hang up.
For on-line help, visit www.esi-estech.com/users.

User’s Guide User programming: An introduction
C.1
User programming: An introduction
Voice prompts will play menu and sub-menu options to access the desired feature. You don't have to wait for the
entire prompt to be played. Therefore, once you’ve become familiar with the prompts (consult “User
programming menu overview,” below), you can quickly setany frequently used feature.
Programming help
During any of the programming steps, press PROG/HELP to heara more detailed description of the feature
and related programming options.
Exiting programming mode
To exit programming mode, simply hang up.
User programming menu
Overview
1 Select personal greeting
1 Record
2 Delete
3 Hear
2 Programmable feature keys
(Station keys, line keys, speed-dial keys,
other feature keys)
3 Station options
1 Call waiting/background announce
2 Personal greeting reminder
4 Outside dial tone preference
5 Hands-free answer
6 Message monitor
7 Power-saving mode1
4 Station audibles
1 Station ring tone
2 Station ring volume
3 Message ring
5 Password
1 Enter
2 Delete
3 Play back
4 Security level
6 External message notification
1 Delivery options
2 Phone delivery
3 Pager notification
4 Urgent message
5 ESI Mobile Messaging
1 Active e-mail setting
2 Main e-mail setting
3 Alternate e-mail setting
6 Twinning programming
1 Enable/disable
2 Select destination
7 Personal Call Routing
1 ESI Presence Management settings2
1 Entry settings
2 Exit settings
3 Quiet time settings
2 ESI Cellular Management settings3
1 PIN setting
2 Voice mail setting
3 Cell phone audibles
4 Shared line setting
5 Bluetooth settings
9 Message Recycle Bin
Note: Selections 3, 5 and 6, as well as the background announce function under “Station options” (see page
E.13), are not available on a legacy 12-Key Feature Phone. In addition, selection 6 6 (twinning
programming) is not available on an ESI Cordless Handset.
1For use with only ESI Cordless Handsets.
2Available only if your phone system is using ESI Presence Management. If you’re not sure whether it is, consult your SystemAdministrator.
For more information about ESI Presence Management, visitwww.esi-estech.com/presence.
3Available only if your phone system is using ESI Cellular Management. If you’re not sure whether it is, consult your System Administrator.
For more information about ESI Cellular Management, visitwww.esi-estech.com/BT.

User’s Guide User programming: An introduction
C.2
1 Select personal greeting
Select the desired greeting — 1, 2 or 3. The system will play the current greeting, followed by prompts to re-
record, delete or hear again — or select the current greeting by pressing #.
1 Record personal greeting
Begin recording at the tone. Press 1to stop. The new personal greeting automatically replaces the
previous greeting.
2 Delete personal greeting
When prompted, press 2again to confirm deletion.
Warning: Your mailbox is disabled if no personal greeting exists. Never delete all of your existing personal
greetings before you record at least one new one.
3 Hear current personal greeting
2 Programmable feature keys
There are two methods for performing programming ofyour phone’s programmable feature keys:
• Direct programming — Select the key you want to program, and hold it down for at least two seconds.
This notonly initiates programming but also lets you immediately program thatspecific key.
• Traditional programming — Press PROG/HELP. The Verbal Help Guide will speak to you, walking you
through the full menu,during which you can choose the appropriate option.
Direct programming example:
You wish to set one of the keys to dial a co-worker, whose extension is 105. Hold down the key for at
least two seconds. This automatically puts you in feature key programming. Follow the prompts to enter
1 0 5. (This has allowed you to skip two steps — pressing PROG/HELP and selecting a menu option —
that you’d have had to perform if using traditional programming.)
(Continued)

User’s Guide User programming: An introduction
C.3
How the programmable feature keys can be set
• Line keys — Programming a line number into a programmable feature key makes it a line key, which
provides the appropriate lamp information and manual outside-line access.
• Station keys — Ifyou program a programmable feature key with any of the following, it becomes a
station key, providing the appropriate lamp information and easy access or transfer:
— User extensions — Group mailboxes
— Department pilot numbers — Cascade paging mailboxes
— Guest/info mailboxes — System speed dial numbers
— Q & A mailboxes
• Speed-dial keys — In addition to programming a programmable feature key with asystem speed-dial
number, you can create personal speed-dial keys for automatic dialing of frequently called outside
numbers. The speed-dial number can be up to 24 characters long. If you program 9(or 8or 71–76)
plus a phone number, the programmable feature key becomes a speed-dial key. When you program a
speed-dial key, there's no need to insert a pause after the 9(or 8or 71–76). Use the scroll key to
enter specialcharacters for dialing:
–P= Three-second pause
–F= Hook-flash
–#= #(pound) key
–
=
(star) key
Notes: You can also program Location Keys for use with Esi-Link. See page H.1 for more information.
Speed-dial keys cannot be programmed for emergency services, such as 9 1 1.
• Other feature keys — If you enter a feature code, the programmable feature key will serve as an
enable/disable key for that feature. The Installer may have programmed certain stations for accessing
additional features (see “Optional features,” page F.14); consult your System Administrator to
determine your access.
Keys’ LED activity during programming
Key type and LED indication
Mode Station key or
Virtual Mailbox Key
Line key Feature key
or speed-dial key
Currently being programmed and
previously assigned Flashing red Flashing green Flashing amber
Currently being programmed and
previously unassigned Flashing red Flashing red Flashing red
Programming mode — Was assigned or
viewed in current session Blinking red Blinking green Blinking amber
Assigned in a previous programming session
and not yet viewed in current session Solid red Solid green Solid amber
Never assigned and not yet viewed in current
session Off Off Off
Note: Each ESI Cordless Handset has only one LED color — red — with similar blinking rates.

User’s Guide User programming: An introduction
C.4
3 Station options
The station options sub-menu (PROG/HELP 3) lets you activate or deactivate several features your station
can provide.At each option sub-menu, 1enables the option and 0disables it. (Each option listed below is
explained elsewhere in this manual, as noted.)
1 Call waiting/background announce
See page E.13 for call waiting and page E.13 for background announce.
Note: Background announce is not available on a legacy 12-Key Feature Phone.
2 Personal greeting reminder
See page F.10.
3 [Unused]
4 Outside dial tone preference
See page F.13.
5 Hands-free answer
Note: With an ESI Cordless Handset, use of this feature requires a headset.
See page E.3.
Note: Not available on a legacy 12-Key Feature Phone.
6 Message monitor
See page F.10.
Note: Not available on a legacy 12-Key Feature Phone.
7 Power-saving mode
Note: Applicable to only an ESI Cordless Handset.
Allows you to enable or disable an ESI Cordless Handset’s power-saving mode. Enabling this mode helps
achieve full battery life. However, if full-time status monitoring is required, you can disable this mode. In
power-saving mode, the phone system blocks all status updates1to the Cordless Handset when the
Handset has been idle for 30 seconds. Pressing the Cordless Handset’s keys or receiving an incoming call
on it will discontinue power-saving mode.
Note: When the handset has received no calls or status updates1for five minutes, the Cordless Handset
enters deep-sleep mode. During it, the display is blank and the LEDs don’t light up. If the system
sends any updates to the Cordless Handset, it will discontinue deep-sleep mode.
1For example: If you have a programmable feature key set as a station key for someone’s extension, the system updates your Cordless Handset
based on that extension’s current status (busy, idle, do-not-disturb, or — with optional ESI Presence Management — off-premises).
Other manuals for ESI-1000
3
This manual suits for next models
13
Table of contents
Other ESI Telephone System manuals
Popular Telephone System manuals by other brands

Linksys
Linksys SPA9000-NA Installation and configuration guide

Samsung
Samsung OfficeServ 7200 Technical manual

KANDA
KANDA EKN-2464 Installation & maintenance manual

ZETRON
ZETRON 30 Worldpatch instruction manual

Philips
Philips SOPHO 2000 IPS user manual

INIM Electronics
INIM Electronics SmartLink Advanced Series Installation and programming manual