Eskimo, une division de Ardisam, Inc.
1160 Eighth Avenue; P.O. Box 666
Cumberland, Wisconsin 54829
800-345-6007 · Téléc. (715) 822-4180
GAMME QUICKFISH MONTAGE ET INSTRUCTIONS
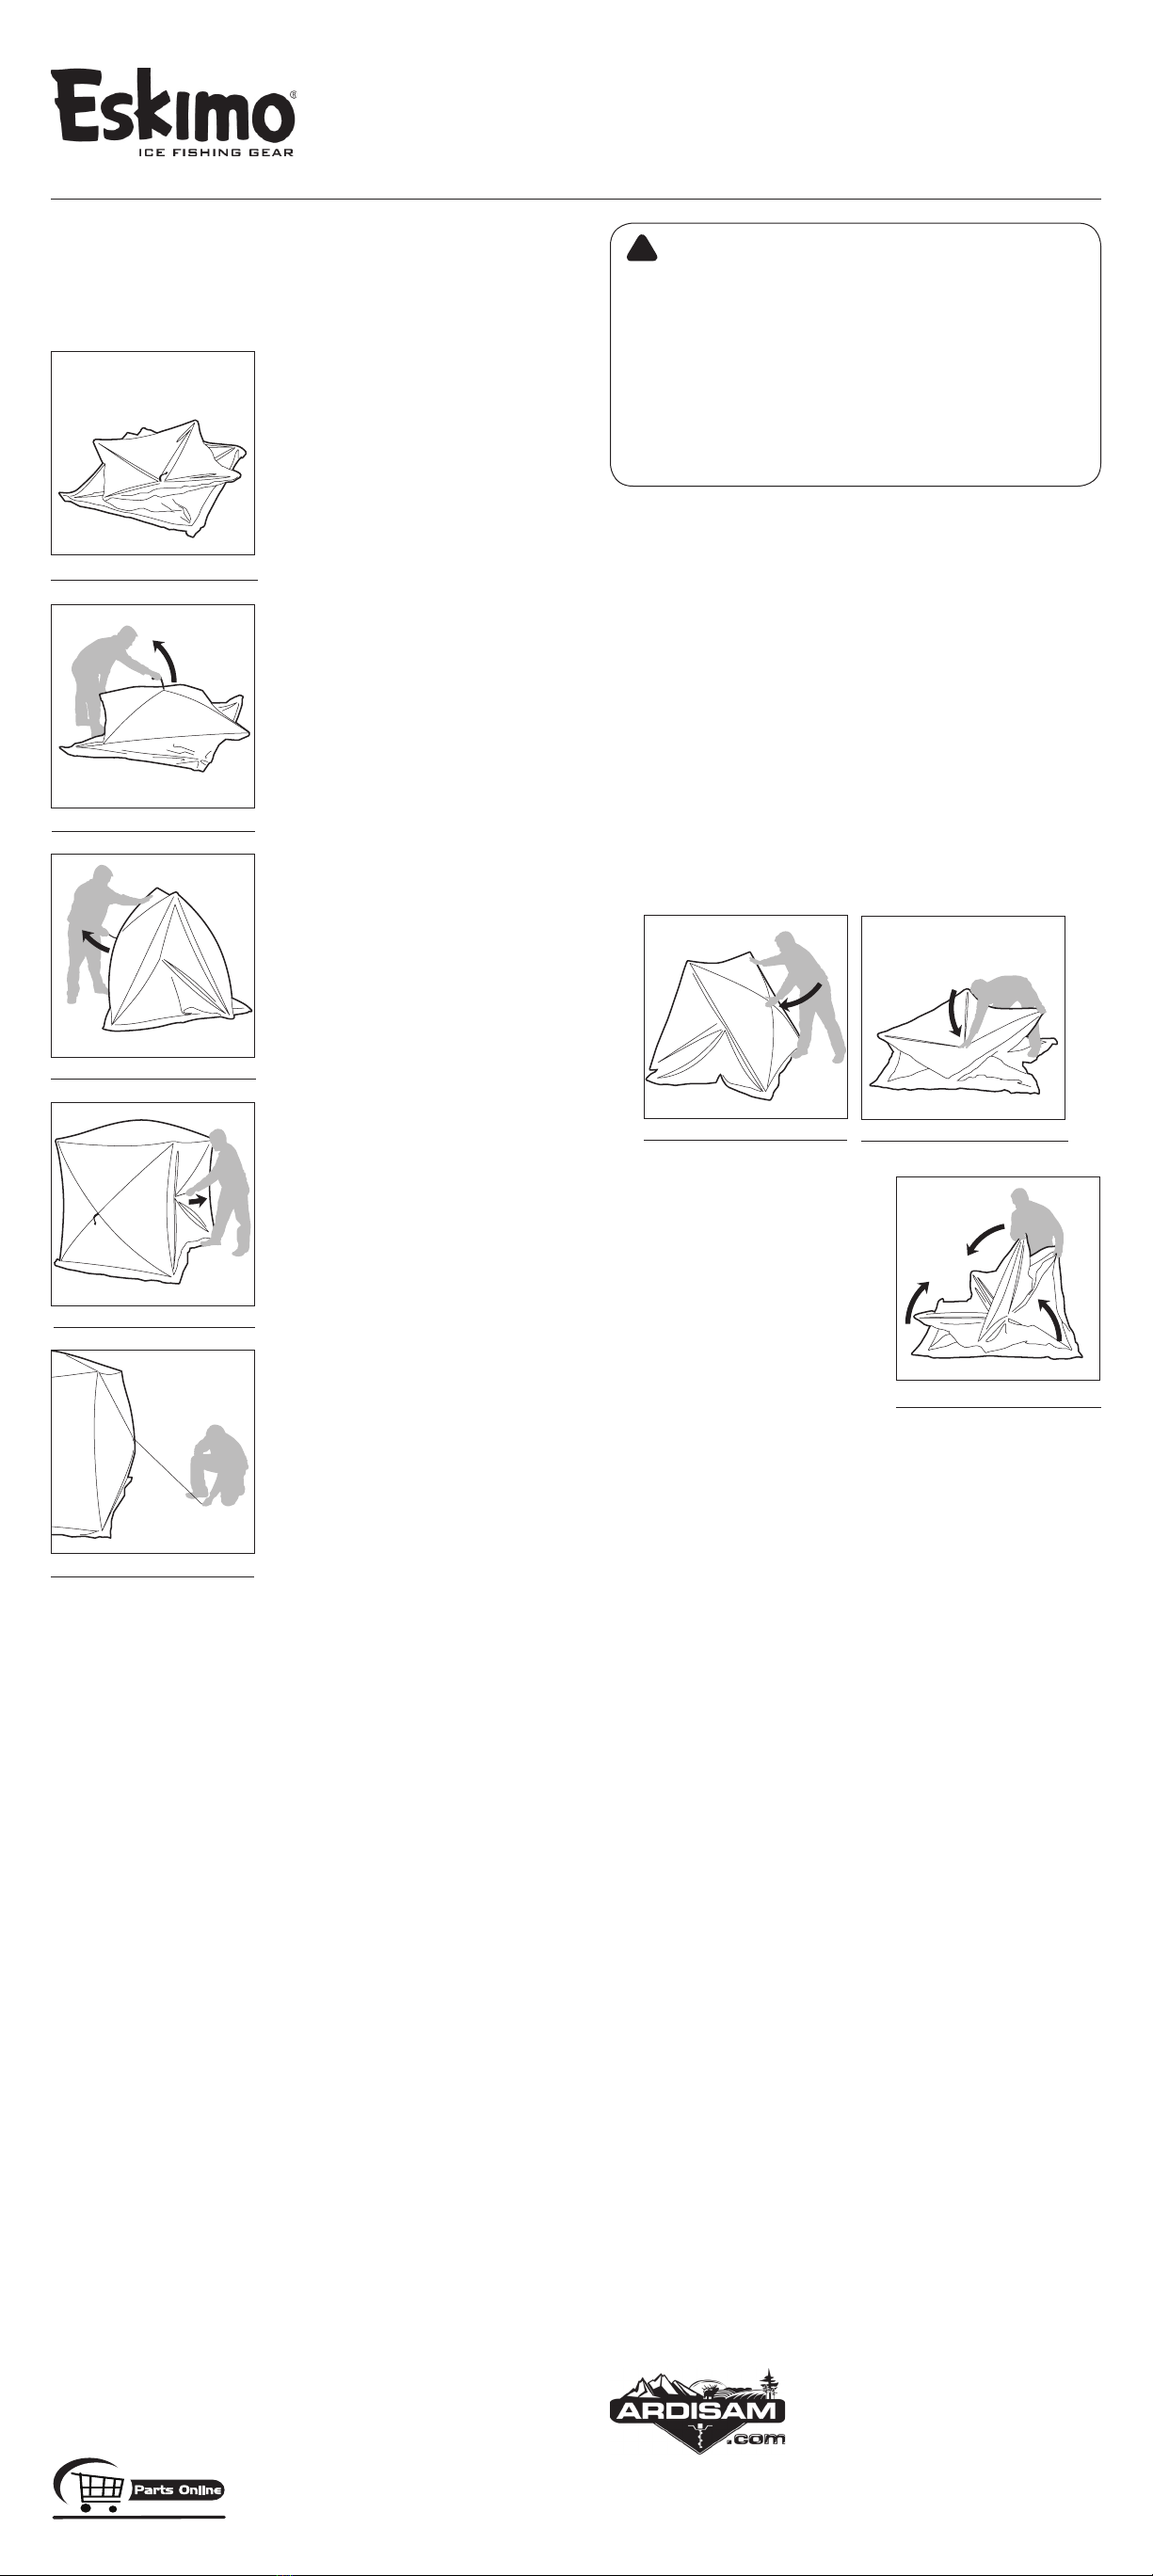
1. Sortez l’abri pour la pêche sur glace du sac à dos de transport. Enlevez
la sangle d’attache qui entoure l’abri.
2. Placez l’abri pour la pêche sur glace à
plat sur le sol et assurez-vous que le
tissu n’est pas tordu ou ne déborde
pas sur les extrémités des perches.
VOIR ILLUSTRATION 1. N’UTILISEZ
PAS une trop grande force lorsque
vous pliez l’abri. Assurez-vous que
les perches ne sont pas mêlées.
NOTEZ BIEN: lorsqu’il y a du vent et
avant de tirer sur les murs et le toit pour
mettre l’abri en place, xez tous les coins
de l’abri à l’aide des ancres à glace (voir
létape 6 pour les instructions.) Cette
manœuvre empêchera l’abri d’être em-
porté lorsqu’il y a du vent.
3. Saisissez la ganse de filet cousue
à l’œillet situé au centre du toit et
tirez vers le haut jusqu’à ce que le
toit de l’abri se place en position.
VOIR ILLUSTRATION 2.
4. Saisissez la ganse de filet cousue à
l’œillet situé au centre de l’un des
murs et tirez vers l’extérieur pour
que le mur se place en position.
VOIR ILLUSTRATION 3.
NOTEZ BIEN: placez votre pied sur la
jupette de la toile de fond pour tenir
l’abri en place lorsque vous placez les
murs en position.
5. Faites le tour de l’abri en tirant sur
chacune des ganses xées aux murs
pour mettre ceux-ci en position.
VOIR ILLUSTRATION 4.
NOTEZ BIEN: les modèles QUICKFISH 4
possèdent quatre (4) murs.
6. Votre abri devrait être érigé comme
le montre.Vous pouvez maintenant
xer l’abri à la glace à l’aide des ancres
à glace et de la corde fournis. Vissez
complètement les ancres (4) dans les
rondelles situées dans chacun des
coins. Utilisez les cordes (4) fournies et
nouez une extrémité à l’œillet au milieu
de chaque mur et l’autre extrémité à
uneancreàglacedéjàvisséecomplète-
ment dans la glace à quelques pieds
de distance. Utilisez les tendeurs sur
la corde pour obtenir la tension idéale.
L’ILLUSTRATION 5
7. Attachez le panneau de plafond isolant Cold Air Barrier amovible au moyeu
de toit intérieur en accrochant le mousqueton situé au centre du panneau
à la boucle en sangle du moyeu de toit. Il peut être nécessaire d’enfoncer
lemoyeudetoitvers l’intérieurpourl’atteindreplusfacilement.Repoussez
le moyeu de toit vers l’extérieur une fois le panneau attaché.
8. Attachez les deux côtés longs du panneau isolant aux côtés longs de
l’abri (les côtés qui comportent des évents d’air cousus sur les parois) en
se basant sur les deux étiquettes cousues « MUST ATTACHTOVENT SIDE
OF SHELTER » (À attacher au côté évent de l’abri). Fixez tous les points
d’attache Velcro sur tout le pourtour intérieur de l’abri.
9. Attachez les deux boucles à ouverture rapide trouvées dans chaque coin
intérieur haut (8 boucles au total). Tendre les sangles. Cela renforce le sup-
port du panneau isolant Cold Air Barrier et accroît la tension sur les moyeux
pour plus de stabilité. Le panneau isolant permet de conserver la chaleur à
l’intérieur de l’abri tout en réduisant la condensation et les égouttements.
PIÈCES DE L’ABRI:
QUICKFISH4 -
(4) cordes (48723)
(8) ancres à glace (69141)
(8) fenêtres 13.5 in. x 13.5 in. (69534)
ILLUSTRATION 1
ILLUSTRATION 2
ILLUSTRATION 3
ILLUSTRATION 4
ILLUSTRATION 5
INSTRUCTIONS POUR LE DÉMONTAGE:
1. Vous DEVEZ démonter le panneau isolant Cold Air Barrier de l’intérieur de l’abri
avantdereplierl’abrietdelerangerdanslesacàdos.Détacheztouteslesboucles
àouverturerapideintérieuresetlespointsd’attacheVelcro.Décrochezlemous-
quetondumoyeu detoitet mettezlepanneauisolantColdAirBarrierde côté.
REMARQUE :Fermeztoutesles fermetureséclairdeporte.Neleslaissez
pas ouvertes. Fermez toutes les fenêtres et tous les évents.
2. Enlevez toutes les cordes et les ancres à glace et rangez-les dans la pochette
prévue à cet eet.
NOTEZ BIEN: lorsqu’il vente, enlevez les ancres à glace après avoir plié
le toit et les murs vers l’intérieur.
3. À la main, poussez le moyeu central du toit et des murs vers l’intérieur
jusqu’à ce qu’ils se replient. L’abri s’affaisse de lui-même sur la glace.
VOIR ILLUSTRATIONS 6 ET 7.
4. L’abri sera alors complètement à plat sur
la glace comme il l’était au moment de le
sortir du sac de transport. Ramenez les
coins de l’abri ensemble et repliez-les.
VOIR ILLUSTRATION 8. N’UTILISEZ
PAS une trop grande force lorsque
vous pliez l’abri. Assurez-vous que
les perches ne sont pas mêlées. En-
veloppez le panneau Cold Air Barrier
bien serré autour de l’abri replié.
5. Placezlasangled’attacheautourdel’abri
replié pourfaciliter son insertion dans
lesacàdos. Placezl’abrirepliédanslesac
à dos de transport avec les moyeux toujours vers le fond du sac. Placez aussi
la pochette contenant les ancres à glace et les cordes dans le sac de transport.
ILLUSTRATION 6
ILLUSTRATION 7
ILLUSTRATION 8
INSTRUCTIONS POUR L’ENTRETIEN ET L’UTILISATION SÉCURITAIRE:
À cause de la circulation sur les lacs, la pêche sur glace la nuit peut être dan-
gereuse. Si vous décidez de pêcher durant la nuit, ou lorsque la visibilité n’est
pas bonne, prenez toutes les précautions nécessaires.
Ne laissez jamais l’abri sans surveillance.
Pour éviter les dommages, démontez l’abri si vous ne l’utilisez pas.
Utilisez des points d’attache supplémentaires lorsqu’il y a du vent.
REMISAGE POUR UNE LONGUE PÉRIODE:
Assurez-vous que votre abri Eskimo est complètement sec avant de le remiser
pour une longue période.
Rangez l’abri dans un endroit sec et frais, loin des rongeurs.
GARANTIE LIMITÉE D’UN AN
Ardisam, Inc.,lefabricant,garantitcetabripourlapêchesurglaceEskimocontretousles
défautsdefabricationoudematériaux pour une périoded’uneannéeà partirdeladate
d’achat. Durant lapériode degarantie d’une année deceproduit,Ardisam fournirades
pièceset delamaind’œuvre pourla correctiondesdéfautscausésparunemalfaçonou
des matériaux défectueux. Cette garantie ne s’applique pas aux fenêtres ssurées, aux
déchirures de la toile ou aux mâts pliés résultant de vents violents ou d’un manque de
surveillance. LesréparationssousgarantiedoiventêtreenvoyéesdirectementàArdisam,
Inc. ou à un centre de service mandaté. Pour obtenir du service sous garantie et/ou
desinstructionspourleremplacement,vousdevezfaireapprouvervotredemande
aupréalableavantdenousfaireparvenirvotrecolisencommuniquantavecnotre
serviceàlaclientèleau1-800-345-6007pourrecevoirunnumérod’autorisationde
retourdeproduit(RMA#).Touslesitemsdoiventnousparvenirportpayé. Ardisam,Inc.
répareraou remplacerasansfrais, àsa discrétion, toutepièce quia unedéfaillanceet qui
tombesouslesconditionsmentionnéesci-dessus. Ardisamconserveledroitd’eectuer
des changements de modèles, de caractéristiques ou de prix sans avis préalable. Ce
produit,s’ilestutilisécommeprévu,vousfourniradesannéesd’utilisationsansproblèmes.
Nous espéronsque vous proterezdelaqualité denosproduitsdanslesannéesàvenir.
Pour des pièces de remplacement, communiquez avec nous par téléphone au 1-
800-345-6007ouenligneau GetEskimo.com.
Cettegarantie s’applique seulement au premieracheteurmunid’une preuve d’achat et n’est
pastransférable. Cettegarantie remplace toute autregarantie implicite ouexplicite ettoute
autreobligationouresponsabilité denotrepart. Ardisam,Inc.déclinetouteresponsabilitéet
n’autorise aucune autre personne à assumer de notre part, une responsabilité quelconque
relativementàlaventedenosproduits. Cettegaranties’appliqueuniquementauxproduitsqui
n’ontpasétéutilisésdefaçonnégligente,quin’ontpasétémalutilisés,quin’ontpasétéaltérés,
quin’ontpasétéaccidentésouquin’ontpasétéréparésparunepersonnenonmandatéepar
Ardisam,Inc. Cettegarantieestnulleàmoinsquelacarted’enregistrementdelagarantienesoit
rempliecorrectementetreçuepar Ardisam, Inc.,dansles30jourssuivantladate d’achat.
WARNING
!
AVERTISSEMENT! LISEZ BIEN ET MAÎTRISEZ TOUTES LES INSTRUCTIONS
FOURNIES CONCERNANT LE MONTAGE, L’INSPECTION ET L’UTILISATION
DE CE PRODUIT AVANT CHAQUE UTILISATION. LE NONRESPECT DES IN
STRUCTIONS POURRAIT AVOIR COMME CONSÉQUENCE DES BLESSURES
GRAVES OU MÊME LA MORT.
N’UTILISEZ PAS D’APPAREIL À CHAUFFAGE À FEU NU DANSVOTRE ABRI
POUR LA PÊCHE SUR GLACE.
GARDEZTOUTE SOURCE DE CHALEUR ETTOUTE FLAMME LOIN DUTISSU
DE CETTETENTE.
CETTETENTE EST FABRIQUÉE D’UNTISSU QUI RENCONTRE LES NORMES
CPAI84POUR LA RÉSISTANCE À LA FLAMME. ELLE N’EST PAS À
L’ÉPREUVE DU FEU. CETISSU BRÛLERA S’IL DEMEURE EN CONTACT CON
TINUEL AVEC UNE FLAMME QUELLE QU’EN SOIT LA SOURCE.
QUICKFISH 4
INSTRUCTIONS POUR LE MONTAGE ET L’UTILISATION
OMQUICKFISH4
Rev. 04/20/10
© 2010 Ardisam, Inc.