Eskimo 30610 User manual

Get parts online at www.GetEskimo.com or Call 800-345-6007 M-F 8-5 CST
P/N: 30634 | REV 1 05/01/2018 | © 2018 Ardisam, Inc. | All Rights Reserved
Owner’s Manual
UNIVERSAL TABLE ACCESSORY (30610)
INTRODUCTION
Thank you for purchasing your product from Eskimo®. We have worked to ensure that this product meets the highest standards for
usability and durability. With proper care, your purchase will provide many years of service.
Please read this entire manual before installation and use. Eskimo® reserves the right to change, alter or improve the product and
this document at any time without prior notice. Due to continuous product improvements, product images may not be exact.
Some assembly may be required.
Read and keep this manual for future reference. This manual contains important information on safety, assembly, operation and
maintenance. The owner must be certain that all the product information is included with the unit. This information includes the
manual, the replacement parts and the warranties. This information must be included to make sure state laws and other laws are
followed.
SERVICE PARTS LIST
PART # DESCRIPTION QTY
30623 LID MOLDED 1
30632 CLEVIS PIN 1
31061 PIN COTTER HAIRPIN 1
30627 PARTS BAG 30610 1
WARRANTY
Ardisam, Inc., warrants this product to be free from defects in the material and workmanship for a period of one-year from
the date of purchase. During the one-year warranty of this product, Ardisam, Inc., will, at their discretion, furnish parts and/or
labor to correct any defect caused by faulty material or workmanship. The warranty does not cover damage due to unintended
use. Warranty work must be sent to an authorized repair center. (For a complete list of repair centers in your area, please visit
www.GetEskimo.com/Locations/ServiceCenter). Ardisam, Inc., will at no charge, repair or replace, at their discretion, any defective
part which falls under the conditions stated above. Ardisam, Inc., retains the right to change models, specications and price
without notice. For replacement parts, please visit www.GetEskimo.com.
This warranty applies to the original owner with a proof of purchase and is not transferable. It supersedes all other warranties either
expressed or implied and all other obligations to liabilities on our part. Ardisam, Inc., does not assume, and does not authorize any other
person to assume for us, any liability in connection with the sale of our products. The warranty applies only to products which have not
been subjected to negligent use, misuse, alteration, accident or repiars made by anyone not certied by Ardisam, Inc. This guarantee is
void unless the warranty card is submitted online or properly lled and received by Ardisam, Inc., within 30 days of purchase.
CLEVIS PIN
PIN COTTER
HAIRPIN
MOLDED LID
WARNING
READ, UNDERSTAND AND FOLLOW ALL ASSEMBLY,
SAFETY, SET-UP AND USE INSTRUCTIONS PROVIDED
BEFORE EACH USE. FAILURE TO FOLLOW ALL WARNINGS
AND INSTRUCTIONS COULD RESULT IN SERIOUS INJURY.
MAXIMUM WEIGHT CAPACITY IS 10 POUNDS.
THIS ITEM IS NOT INTENDED TO BE SAT OR STOOD ON.

Owner’s Manual
UNIVERSAL TABLE ACCESSORY (30610)
Get parts online at www.GetEskimo.com or Call 800-345-6007 M-F 8-5 CST
Ardisam, Inc. | 1160 Eighth Ave; PO Box 755 | Cumberland, WI 54829 | Fax: (715) 822-2124
ASSEMBLY
TOOLS NEEDED
• 5/16 IN drill bit
• (2) 7/16 IN wrenches and/or sockets with drivers
ASSEMBLY INSTRUCTIONS
Important Tip: Do not fully tighten any nut and bolt
combination until all bolt-on parts are assembled together!
Finger-tighten only. This will help with hole alignment of
all parts.
Decide where the best position for the table assembly is
on the shelter it is being assembled to. In most cases this
will be centered on the front lip (forward facing shelter
position) of the sled, but depends on the individual shelter
this product is being mounted to.
1. Using the installed bracket in the position shown in
FIGURE 1, mark the (4) hole pattern onto the sled with a
marker. Remove the table assembly and set aside.
2. Using the marked hole pattern, drill each hole with the
5/16 inch drill bit and power drill.
3. Using the (4) 1/4-20 x 3/4 inch bolts and (4) nyloc nuts
attach the table assembly to the sled. SEE FIGURE 2.
OPERATION
1. With the table assembled on the sled it should be
positioned in the“in use” position. SEE FIGURE 3A.
2. To store the table while not in use, lift upward on the
sides of the table (there should be approximately 1 inch
of movement). SEE FIGURE 3B. With the table at the top
of the slot travel, it is now free to tilt back into the sled as
shown in FIGURE 3C.
3. Lower the table into the sled. It should now be parallel to
the inside face of the sled. SEE FIGURE 3D.
x x
x x
FIGURE 1
FIGURE 2
FIGURE 3D
FIGURE 3B
FIGURE 3C
FIGURE 3A

Pièces détachées en ligne à www.GetEskimo.com ou composer le 800-345-6007 L-V 8h-17h HNC
Réf.: 30634 | RÉV 1 05/01/2018 | © 2018 Ardisam, Inc. | Tous droits réservés
Manuel de l’utilisateur
TABLETTE ACCESSOIRE UNIVERSELLE (30610)
INTRODUCTION
Merci d’avoir acheté ce produit Eskimo®. Nous nous sommes attachés à ce que ce produit réponde aux plus hautes normes
d’utilisation et de durabilité. Moyennant des soins corrects, votre achat orira de nombreuses années de service able.
Lire ce manuel en entier avant de l’installer et de l’utiliser. Eskimo® se réserve le droit de changer, modier ou améliorer ce produit
et cette documentation à tout moment sans préavis. En raison des constantes améliorations de nos produits, les représentations
du produit peuvent être inexactes. Un certain assemblage peut être requis.
Lire ce manuel et le conserver pour toute consultation ultérieure. Ce manuel contient des renseignements importants sur
la sécurité, l’assemblage, l’utilisation et l’entretien. Le propriétaire doit veiller à ce que toute la documentation sur le produit
soit fournie avec l’appareil. Cette documentation comprend le manuel, la liste des pièces de rechange et les garanties. Cette
documentation doit être fournie en vertu de la réglementation en vigueur.
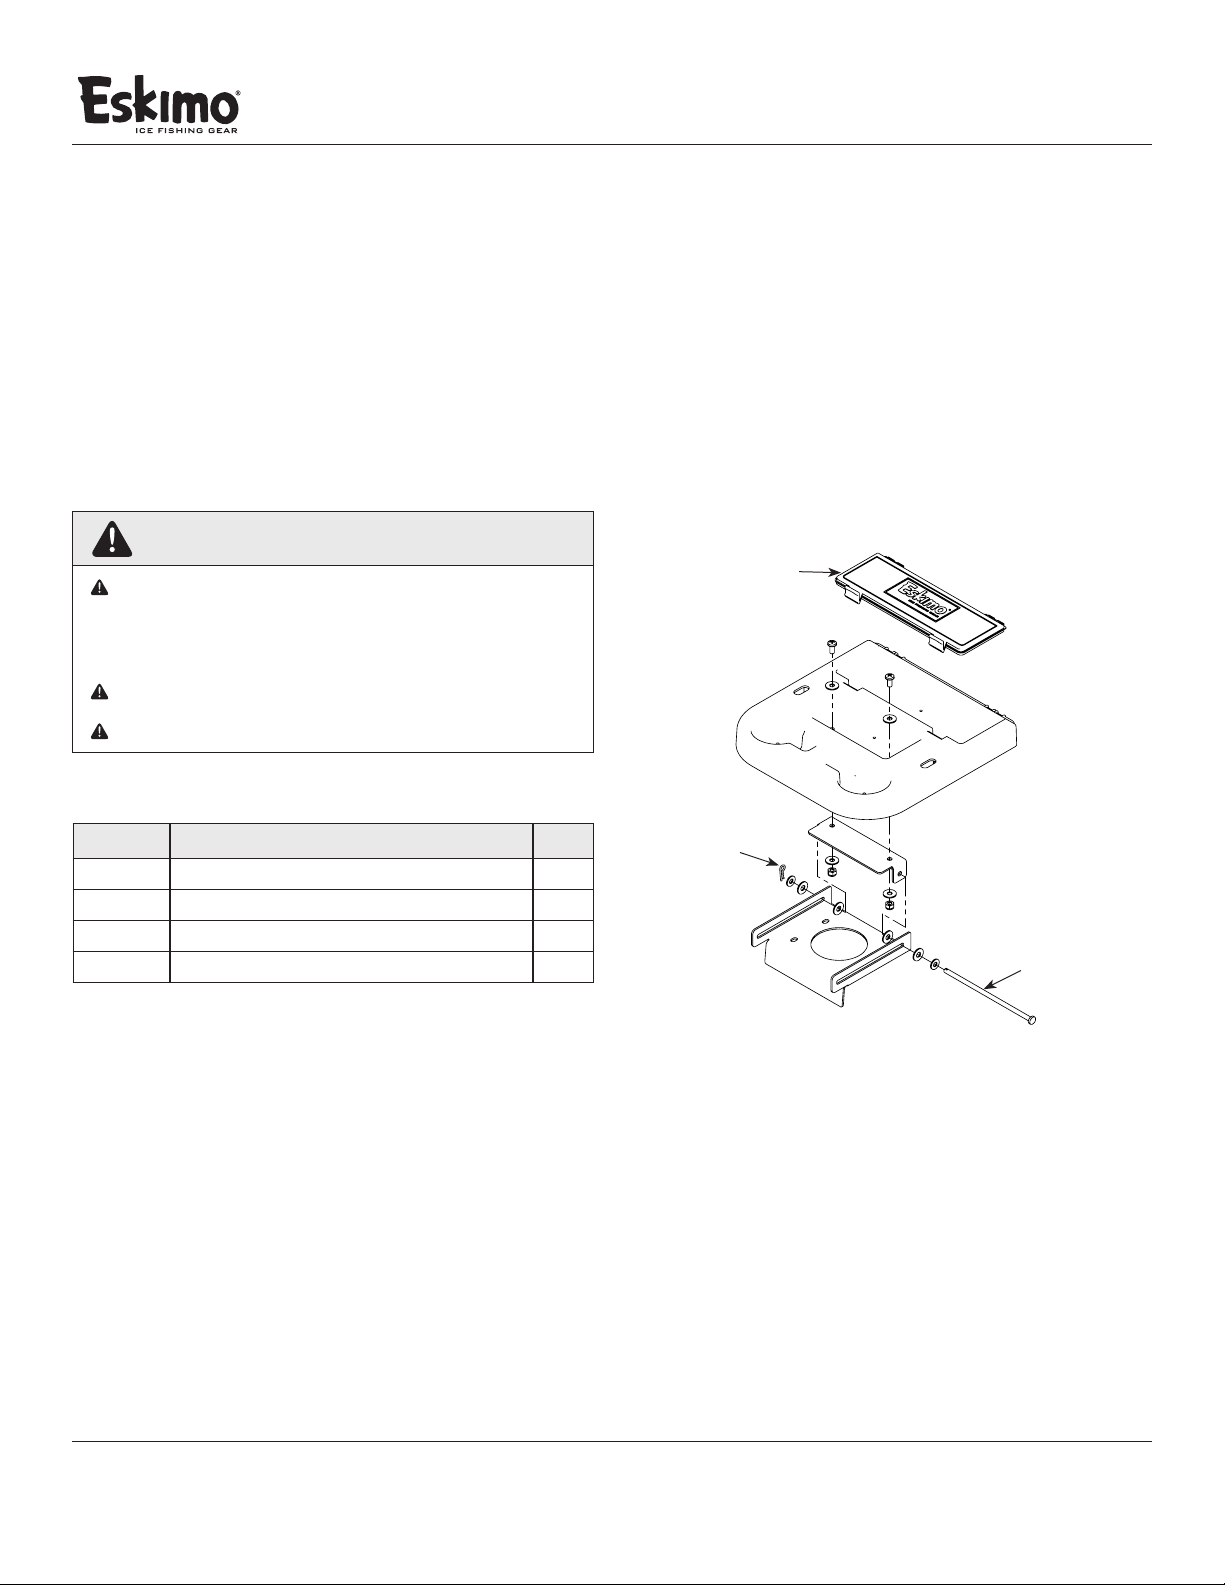
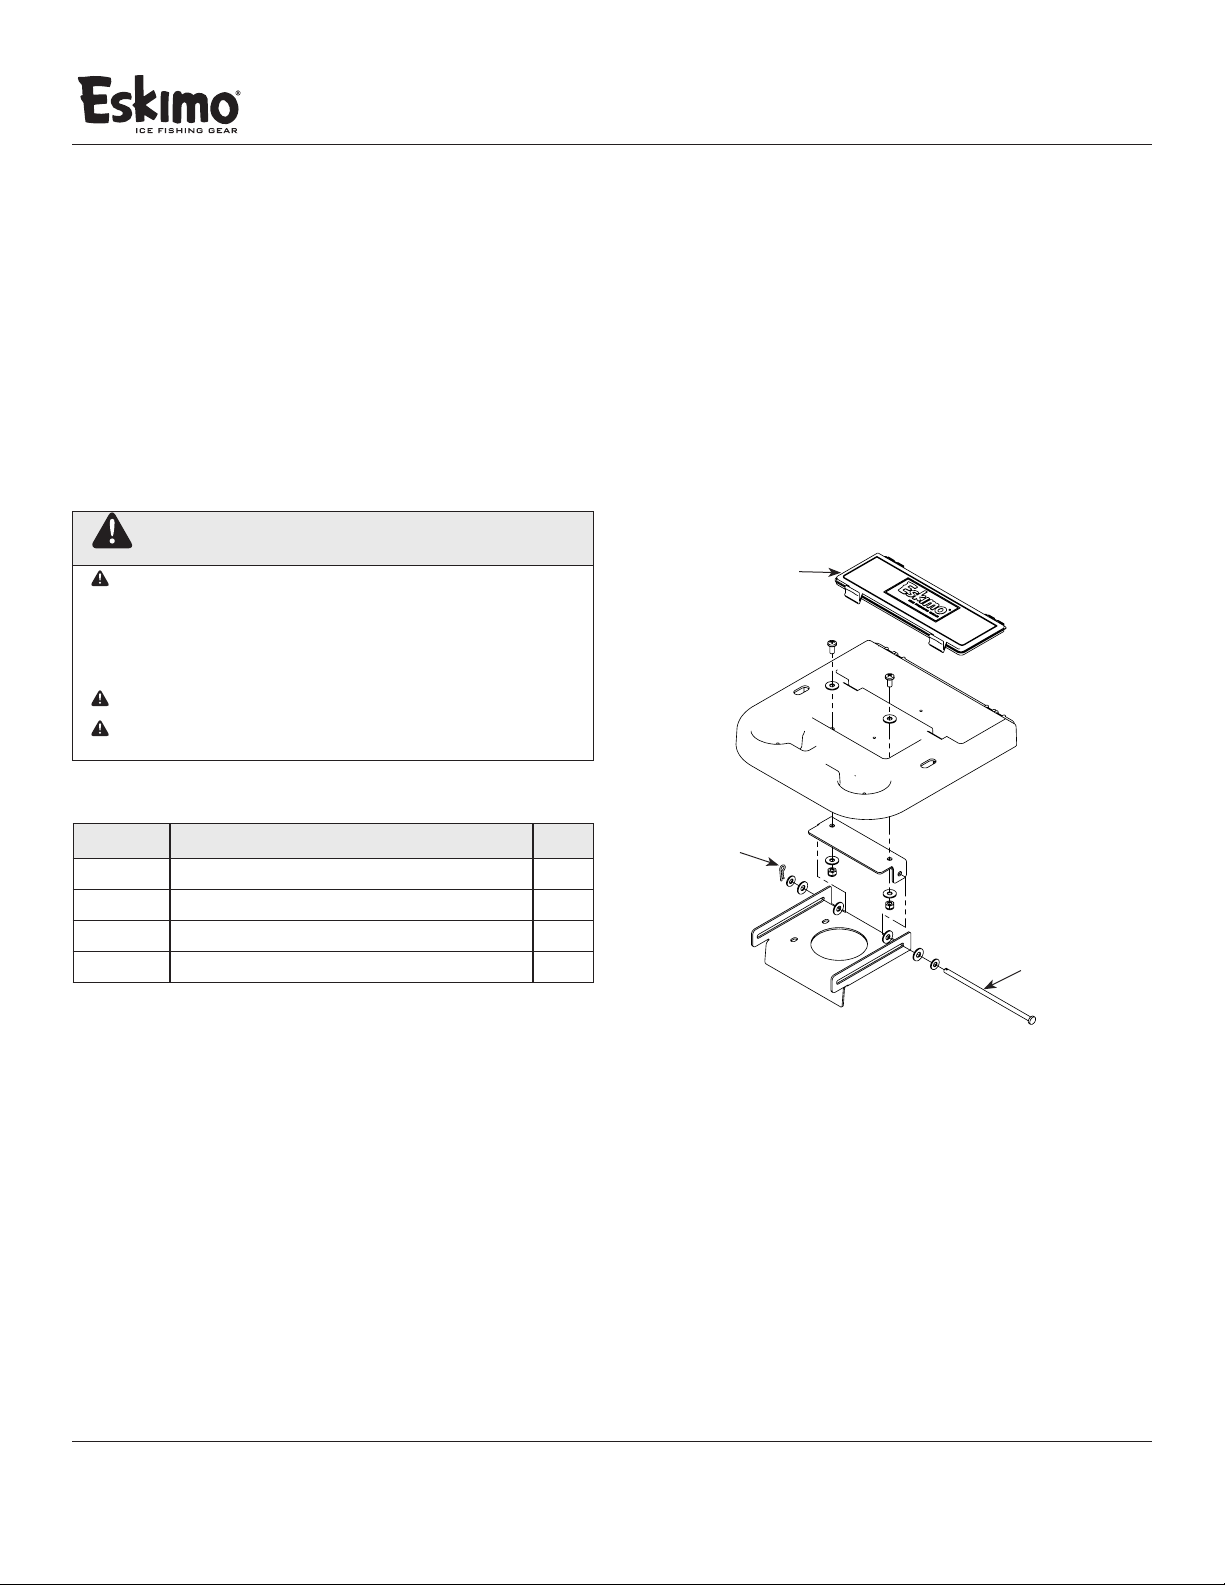
LISTE DES PIÈCES DÉTACHÉES
N° RÉF. DESCRIPTION QTÉ
30623 COUVERCLE MOULÉ 1
30632 BROCHE DE CHAPE 1
31061 GOUPILLE FENDUE EN ÉPINGLE 1
30627 SACHET DE PIÈCES 30610 1
GARANTIE
Ardisam, Inc. garantit ce produit pièces et main-d’œuvre pendant une durée d’un an à compter de la date d’achat. Durant la
période de garantie d’un an de ce produit, Ardisam, Inc., à son entière discrétion, fournira les pièces et/ou la main-d’œuvre
nécessaires pour corriger toute défaillance résultant de défauts de matériel ou de fabrication. La garantie ne couvre pas les
dommages résultants d’une utilisation abusive. Les travaux sous garantis doivent être envoyés à un centre de réparation agréé
(voir la liste complète des centres de réparation dans la région à www.GetEskimo.com/Locations/ServiceCenter). Ardisam, Inc., à
son entière discrétion, réparera ou remplacera sans frais toute pièce défectueuse qui remplit les conditions énoncées ci-dessus.
Ardisam, Inc., se réserve le droit de modier les modèles, les caractéristiques et les prix sans préavis. Pour toute pièce de rechange,
visiter www.GetEskimo.com.
Cette garantie s’applique au propriétaire initial disposant d’un justicatif d’achat et n’est pas transférable. Elle remplace toute les autres
garanties expresses ou implicites et toutes les autres obligations ou responsabilités de notre part. Ardisam, Inc., n’assume aucune
responsabilité, et n’autorise personne à assumer en son nom une quelconque responsabilité, en rapport avec la vente de ses produits.
La garantie s’applique uniquement à des produits n’ayant pas subi de négligence, d’emploi abusif, de modications, d’accident ni de
réparations eectuées par quiconque non certié par Ardisam, Inc. Cette garantie est annulée si la carte de garantie n’est pas soumise en
ligne ou dûment remplie et reçue par Ardisam, Inc., dans les 30 jours après l’achat.
BROCHE
DE CHAPE
GOUPILLE
FENDUE
EN ÉPINGLE
COUVERCLE
MOULÉ
AVERTISSEMENT
LIRE, COMPRENDRE ET RESPECTER TOUTES LES
INSTRUCTIONS D’ASSEMBLAGE, DE SÉCURITÉ,
D’INSTALLATION ET D’UTILISATION FOURNIES AVANT
CHAQUE UTILISATION. RESPECTER TOUTES LES MISES EN
GARDE ET INSTRUCTIONS POUR ÉVITER LES BLESSURES
GRAVES.
CAPACITÉ DE CHARGE MAXIMALE 4,5KG (10LB).
CET ARTICLE N’EST PAS CONÇU POUR S’ASSEOIR NI GRIMPER
DESSUS.

Manuel de l’utilisateur
TABLETTE ACCESSOIRE UNIVERSELLE (30610)
Pièces détachées en ligne à www.GetEskimo.com ou composer le 800-345-6007 L-V 8h-17h HNC
Ardisam, Inc. | 1160 Eighth Ave; PO Box 755 | Cumberland, WI 54829 États-Unis | Télécopieur: (715) 822-2124
ASSEMBLAGE
OUTILS NÉCESSAIRES
• Foret de 5/16po
• (2) Clés ou douilles avec cliquets de 7/16po
INSTRUCTIONS D’ASSEMBLAGE
Conseil important: Ne serrer aucun ensemble vis et écrou
complètement avant d’avoir assemblé toutes les pièces
boulonnées. Les serrer à la main seulement. Cela facilite
l’alignement des trous de xation de toutes les pièces.
Décider du meilleur emplacement pour la tablette dans l’abri
dans lequel elle doit être installée. Dans la majorité, ce sera
au centre du rebord avant du traineau (position face à l’avant
de l’abri), mais cela dépend de l’abri particulier dans lequel le
produit est monté.
1. En se servant du support attaché à la tablette placé
comme sur la FIGURE 1, marque les quatre (4) trous sur le
traîneau avec un marqueur. Enlever la tablette et la mettre
de côté.
2. En se servant des marques de trous, percer chaque trou à
la perceuse électrique avec le foret de 5/16po.
3. À l’aide des quatre (4) vis de 1/4-20 x 3/4po et des quatre
(4) écrous autobloquants, attacher la tablette au traîneau.
VOIR FIGURE 2.
UTILISATION
1. Lorsque la tablette est attachée au traîneau, elle devrait
être en position «utilisation». VOIR FIGURE 3A.
2. Pour replier la tablette lorsqu’elle n’est pas utilisée,
soulever la tablette vers le haut par les côtés (il devrait y
avoir environ 2,5cm de mouvement). VOIR FIGURE 3B.
Une fois que la tablette est au sommet de sa course, elle
est libre de basculer vers l’arrière dans le traîneau comme
sur la FIGURE 3C.
3. Abaisser la tablette dans le traîneau. Elle devrait désormais
être parallèle à la face intérieure du traîneau. VOIR
FIGURE 3D.
x x
x x
FIGURE 1
FIGURE 2
FIGURE 3D
FIGURE 3B
FIGURE 3C
FIGURE 3A
Table of contents
Languages:
Other Eskimo Fishing Equipment manuals

Eskimo
Eskimo M43Q10 Parts list manual

Eskimo
Eskimo WIDE1 INFERNO User manual

Eskimo
Eskimo FatFish 6120i User manual

Eskimo
Eskimo StingRay S33 User manual

Eskimo
Eskimo Z71Q10 User manual

Eskimo
Eskimo F1 ROCKET User manual

Eskimo
Eskimo Shark 9403S User manual

Eskimo
Eskimo QUICKFISH 4 Quick setup guide

Eskimo
Eskimo QuickFlip 2 User manual

Eskimo
Eskimo HC40Q8 User manual