Eskimo 11608 User manual

Check for parts online at www.geteskimo.com or call 800-345-6007 M-F 8-5 CST
Assembly Instructions
Universal Tow Hitch
(Fits sleds widths of 19, 21.5, 26.5, 28, & 32 inch)
ENGLISH
INSTRUCTIONS FOR THE FOLLOWING MODEL:
• Universal Tow Hitch (11608)
NOTE: Make sure there is enough room for the hitch to
pivot up or down without the hitch hitting the
lip of the sled. Attaching the hitch higher up will
cause the sled to tow “downward” and plow the
snow rather than ride on top of the snow.
2. Use the supports as a template to drill (4) 5/16”holes
through the sled, two holes on each side.
3. Attach the clamped supports to the sled using (4) 1/4-20
x 1-1/4”bolts, (4) 1/4”at washers, and (4) 1/4”nyloc nuts.
4. Attach assembled tow hitch to outer tub supports using
(2) 1/4-20 x 1-1/4”bolts and (2) 1/4-20 nyloc nuts.
WARNING
BEFORE EACH USE, READ, UNDERSTAND, AND
FOLLOWALLASSEMBLY,SAFETY,SETUP,ANDUSE
INSTRUCTIONS PROVIDED . FAILURE TO FOLLOW
ALL WARNINGS, CAUTIONS, AND INSTRUCTIONS
CAN RESULT IN INJURY OR DEATH.
• DO NOT MAKE SHARP TURNS.
• MAKE SURE TOW BAR IS SECURELY ATTACHED
BEFORE TOWING.
• DO NOT ALLOW CHILDREN OR PET TO RIDE IN
TUB WHEN TOWING.
• DO NOT USE ON UNEVEN TERRAIN OR SIDE OF
HILLS.
• DO NOT TOW UNDER THE INFLUENCE OF
DRUGS OR ALCOHOL.
• ALLOW EXTRA TIME AND DISTANCE WHEN
SLOWING DOWN OR STOPPING.
• DO NOT ATTACH HITCH TO AN UNAPPROVED
HITCH OR TOWING VEHICLE.
Assembly Instructions For Tow Hitch:
Tools Needed: Two 1/2”wrenches, C-clamp, and 5/16 drill bit.
IMPORTANT NOTE: Do not fully tighten any nut and
bolt combination until all bolt-on parts are assembled
together! Figer tighten only! This will allow alignment of
all parts during assembly.
1. To assemble tow hitch to the sled, attach the bolt
extension arms to the tow hitch receiver using (2) 1/4-20
x 1-13/4”bolt, (4) 1/4”at washers, and (2) 1/4-20 nyloc
nuts. SEE FIGURE 1.
NOTE: Make sure the hitch receiver is centered with the
front of the sled. Correct alignment will allow
the attaching bolts to insert into the correct hole
locations.
2. Attach the hitch tongue to the hitch receiver using (1) 1/4
x 1-3/4”snap pin.
Assemble Tow Hitch To Sled:
1. Use a C-clamp to hold the inner and outer tub supports
to the sides of the tub. The tub supports should be about
2-3/4”down from the lip of the tub. SEE FIGURE 2.
12122-0001R1
SLED TUB
1/4”-20 NYLOC NUT
1/4”FLAT WASHER
INNER TUB SUPPORT
OUTER TUB SUPPORT
1/4”-20 X 1-1/4 BOLT
1/4”-20 FLAT WASHER
1/4”FLAT WASHER
1/4”-20 X 1-1/4 BOLT
UNIVERSAL
TOW HITCH
FIGURE 2
12122-0002R1
1/4”-20 NYLOC NUT
1/4”FLAT WASHER
HITCH RECEIVER
EXTENSION ARM
1/4”-20 X 1-3/4 BOLT
1/4”FLAT WASHER
SNAP PIN
HITCH TONGUE
HITCH PIN
HAIR PIN
FIGURE 1

Assembly Instructions
Universal Tow Hitch
Eskimo®, Division of Ardisam, Inc. 800-345-6007 • Fax (715) 822-2223 E-mail: [email protected]
P/N: 12122-REV 3: 08/15/14: ECN 10222
© 2014 Ardisam, Inc. All Rights Reserved
More ice fishermen choose Eskimo
than any other brand
*Extra hardware may be included in parts bag.
All weights, specications and features are approximate and are subject to change without notice. Due to continuous product improvements, product images
may not be exact. Items used for props not included. Some assembly may be required.
PART # DESCRIPTION QT Y.
12116 SUPPORT, OUTER TUB 2
12117 SUPPORT, INNER TUB 2
63281 SNAP PIN, ROUNDED RETAINER (1/4 X 1-3/4” ) 1
8909 BOLT, (1/4-20 X 1-1/4”HHCS GR5 ZN) 6
67538 NUT, (1/4-20 HNYLK ZN) 8
48261 WASHER, FLAT (1/4” ZN) 16
12118 HAIR PIN, COTTER PIN 1
12119 HITCH PIN 1
48250 BOLT (1/4-20 X 1-3/4 HHCS GR5 ZN) 2
ONEYEAR LIMITED WARRANTY
Ardisam, Inc., warrants this Eskimo tow hitch to be free from defects in the material or workmanship for a period of one
year from the date of purchase. During the one-year warranty of this product, Ardisam, Inc., will, at their discretion,
furnish parts and/or labor to correct any defect caused by faulty material or workmanship. The warranty does not
cover damage due to unintended use.Warranty work must be sent directly to Ardisam, Inc., or to an authorized service
center. To obtain warranty service, you must have prior approval by calling our customer service department
at 1-800-345-6007. Ardisam, Inc. will at no charge, repair or replace, at their discretion, any defective part which falls
under the conditions stated above. Ardisam, Inc. retains the right to change models, specications and price without
notice. This product, if used as intended, will give you years of trouble free service. We hope you will enjoy the quality
of our products for years to come. For replacement parts, phone 1-800-345-6007 or go online to geteskimo.com.
This warranty applies to the original owner with a proof of purchase and is not transferable. It supersedes all other warranties
either expressed or implied and all other obligations to liabilities on our part. Ardisam, Inc. does not assume, and does not
authorize any other person to assume for us, any liability in connection with the sale of our products. The warranty applies
only to products which have not been subjected to negligent use, misuse, alteration, accident or repairs made by anyone not
certied by Ardisam, Inc. This guarantee is void unless the warranty card is properly lled out and received by Ardisam, Inc.,
within 30 days of purchase.
PARTS BREAKDOWN FOR UNIVERSAL TOW HITCH 11608

Instructions d’assemblage de l’attelage:
Outillage nécessaire - deux clés de 1/2po, serre-joint et foret de
5/16po.
CONSEIL D’ASSEMBLAGE IMPORTANT: Ne serrer aucun
ensemble vis et écrou complètement avant d’avoir assemblé
toutes les pièces boulonnées. Les serrer à la main seulement.
Cela facilite l’alignement des trous de xation des pièces.
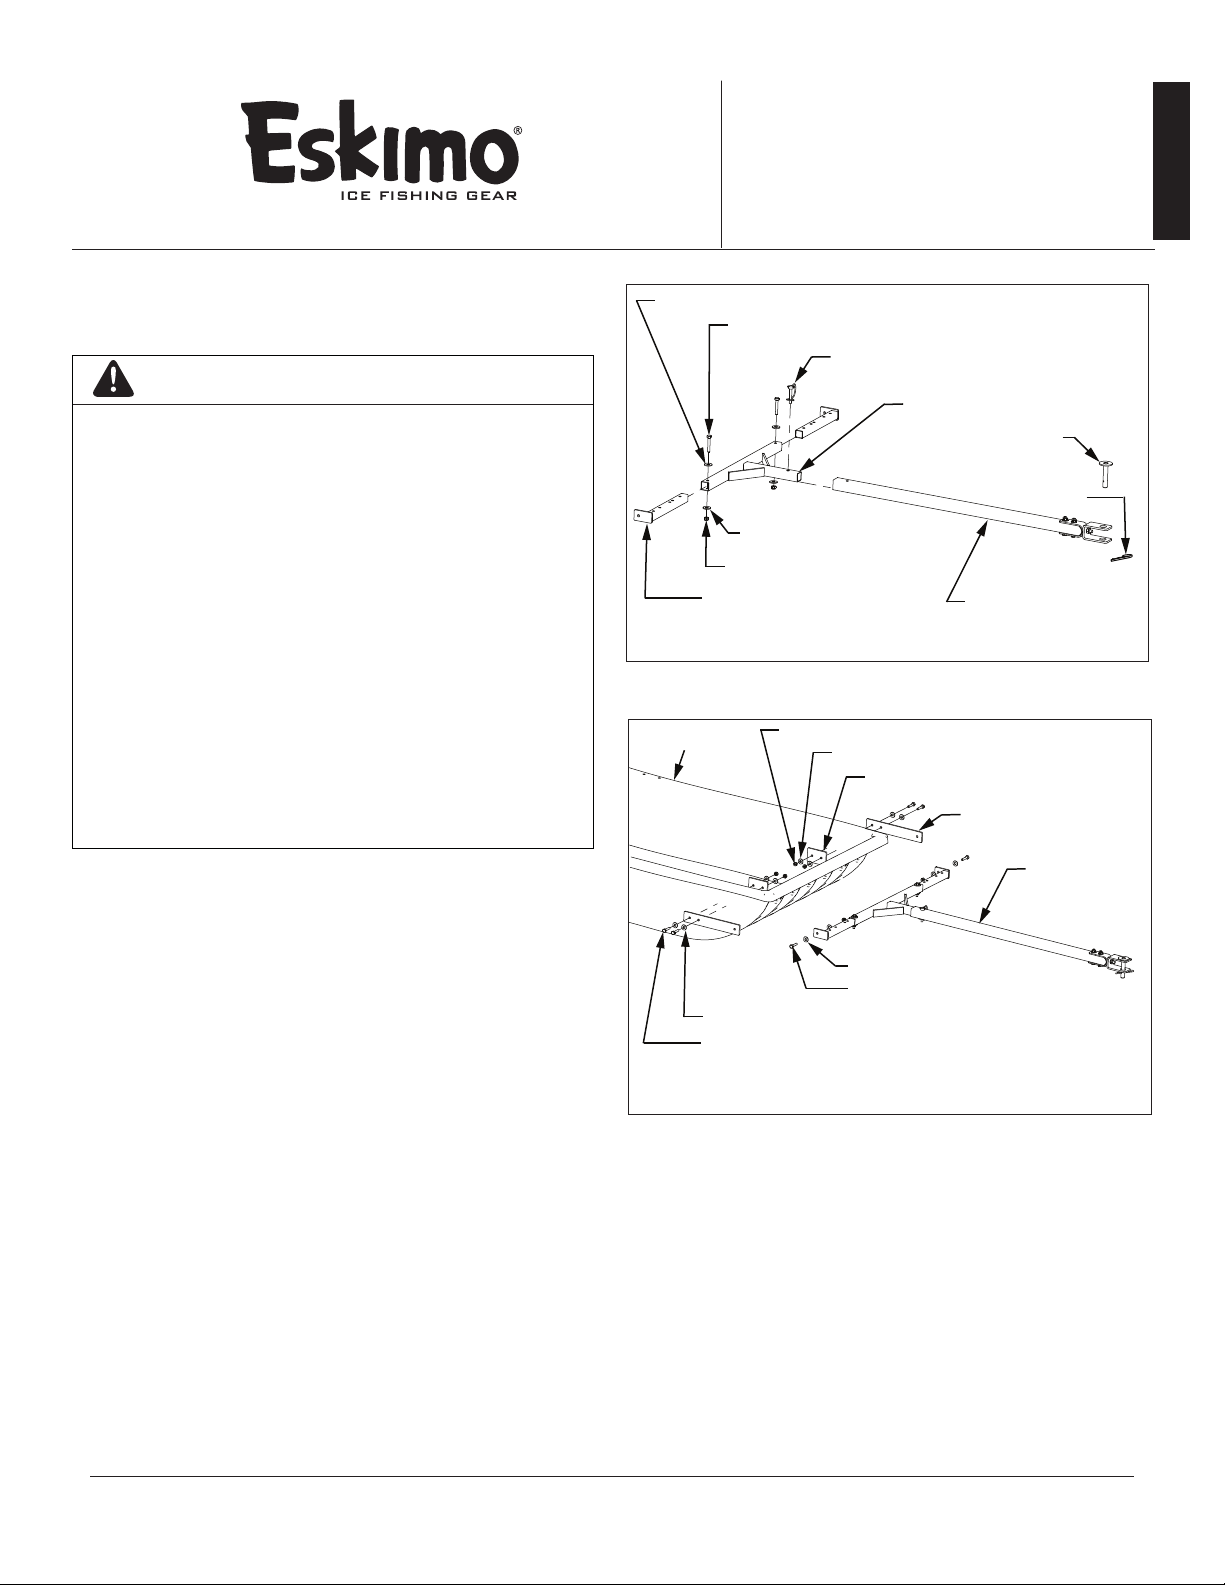
1. Pour monter l’attelage sur le traîneau, xer les deux bras de
rallonge au tube d’attelage avec deux (2) vis de 1/4-20 x 1-3/4po,
quatre (4) rondelles plates de 1/4po et deux (2) écrous Nyloc de
1/4-20. VOIR FIGURE 1.
REMARQUE : Centrer le tube d’attelage sur l’avant du traîneau;
cela permet de repérer les trous de xation corrects pour la
pose des boulons.
2. Attachez la èche d’attelage au tube d’attelage à l’aide d’une (1)
goupille de sécurité de 1/4 X 1-3/4po.
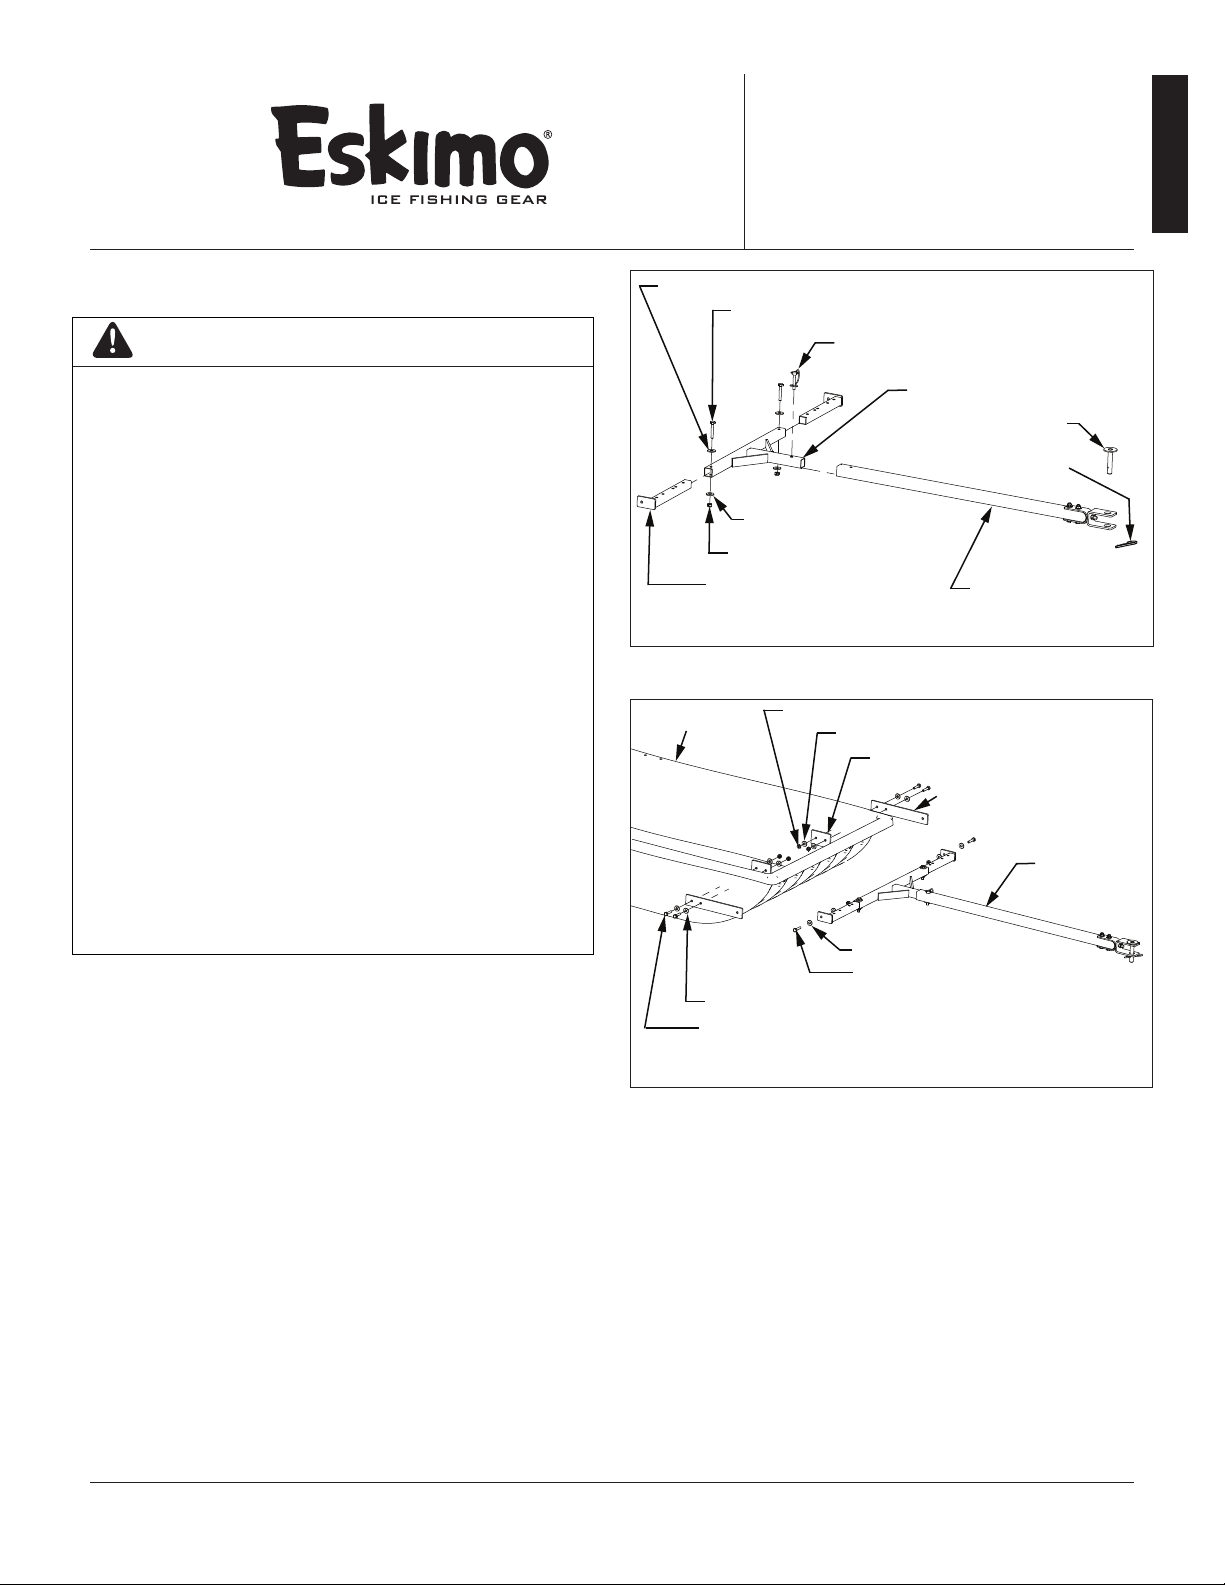
Montage de l’attelage sur le traîneau:
1. À l’aide d’un serre-joint, serrer les supports de bac intérieur et
extérieur sur le côté du bac. Les supports de bac doivent être à
7cm environ sous le rebord du bac. VOIR FIGURE 2.
COMPREND LE MODÈLE SUIVANT:
Attelage universel (11608)
AVERTISSEMENT
LIRE, COMPRENDRE ET SUIVRE TOUTES LES
INSTRUCTIONS D’ASSEMBLAGE, DE SÉCURITÉ, DE
MISE EN SERVICE ET D’UTILISATION FOURNIES
AVANT CHAQUE UTILISATION. POUR ÉCARTER
LES RISQUES DE BLESSURE GRAVE OU DE MORT,
VEILLERÀRESPECTERTOUTESLESINSTRUCTIONS
ET MISES EN GARDE.
• NE JAMAIS PRENDRE DE VIRAGE SERRÉ.
• S’ASSURER QUE LA BARRE D’ATTELAGE EST
SOLIDEMENT FIXÉE AVANT DE REMORQUER.
• NE JAMAIS LAISSER DE PERSONNES NI
D’ANIMAUX SE TENIR DANS LE BAC DURANT
LE REMORQUAGE.
• NE JAMAIS UTILISER SUR DES TERRAINS
ACCIDENTÉS OU À FLANC DE COLLINE.
• NE JAMAIS REMORQUER ALORS QU’ON EST
SOUS L’EMPRISE D’ALCOOL OU DE DROGUE.
• PRÉVOIR UNE DURÉE ET UNE DISTANCE
SUPPLÉMENTAIRES POUR RALENTIR ET
S’ARRÊTER.
• NE JAMAIS ATTACHER L’ATTELAGE À UN
POINT D’ATTELAGE OU UN VÉHICULE DE
REMORQUAGE NON HOMOLOGUÉ.
REMARQUE : Vérifier qu’il y a suffisamment de place pour
permettre à l’attelage de pivoter vers le haut ou le bas sans
heurter le rebord du traîneau. Si l’attelage est attaché plus
haut, le traîneau peut être tracté vers le bas et pousser contre
la neige plutôt que glisser dessus.
2. En utilisant les supports en tant que gabarit, percer quatre (4)
trous de 5/16po à travers les côtés du traîneau, deux de chaque
côté.
3. Fixer les supports au traîneau avec quatre (4) rondelles plates
de 1/4po, quatre (4) écrous Nyloc de 1/4-20 et quatre (4) vis de
1/4-20 x 1-1/4po.
4. Attacher l’attelage assemblé aux supports de bac extérieurs à
l’aide de deux (2) goupilles de sécurité de 1/4 X 1-3/4po.
FRANÇAIS
Instructions d’assemblage
Atelage Universal
(Convient aux traîneaux de 19po, 21,5po,
26,5po, 28po et 32po de largeur)
Voir les pièces détachées en ligne à www.geteskimo.com ou composer le 800-345-6007 L-V 8h-17h HNC
12122-0002R1FR
1/4”-20 Écrou Nyloc
Rondelle plate de 1/4po
Tube d’attelage
Bras de rallonge
Vis de 1/4-20 X 1-3/4po
Rondelle plate de 1/4po
Goupille de sécurité
Flèche d’attelage
Broche d’attelage
Goupille en épingle
FIGURE 1
12122-0001R1FR
Traîneau
1/4”-20 Écrou Nyloc
Rondelle plate de 1/4”po
Support de bac intérieur
Support de bac extérieur
Vis de1/4”-20 X 1-1/4”po
Rondelle plate de 1/4”po
Vis de1/4”-20 X 1-1/4”po
Attelage
universel
FIGURE 2

Voir les pièces détachées en ligne à www.geteskimo.com ou composer le 800-345-6007 L-V 8h-17h HNC
P/N 12122 Rév 3: 08/15/14: ECN 10222
© 2014 Ardisam, Inc. Tous droits réservés.
Instructions d’assemblage
Atelage Universal
*Le sachet de pièces peut contenir de la visserie supplémentaire.
Tous les poids, dimensions et caractéristiques indiqués sont approximatifs et sujets à modication sans préavis. En raison des constantes améliorations de nos
produits, les représentations du produit peuvent être inexactes. Articles utilisés en tant qu’accessoires non compris. Un certain assemblage peut être requis.
N° RÉF. DESCRIPTION QTÉ
12116 SUPPORT DE BAC EXTÉRIEUR 11/2PO x9PO x 3/16PO 2
12117 SUPPORT DE BAC INTÉRIEUR 2PO x3PO x 3/16PO 2
63281 GOUPILLE DE SÉCURITÉ, 1/4 x13/4 PO, ATTACHE ARRONDIE 1
8909 VIS 1/420 x 11/4PO HHCS GR5 ZN 6
67538 ÉCROU 1/420 HNYLK ZN 8
48261 RONDELLE PLATE 1/4 PO STANDARD ZN 16
12118 GOUPILLE FENDUE EN ÉPINGLE 1
12119 BROCHE D’ATTELAGE 1
48250 VIS 1/420 x 13/4PO HHCS GR5 ZN 2
GARANTIE LIMITÉ UN AN
Ardisam, Inc. garantit cet attelage Eskimo pièces et main-d’œuvre pendant une durée d’un an à compter de la date
d’achat. Durant la période de garantie d’un an de ce produit, Ardisam, Inc., à son entière discrétion, fournira les pièces
et/ou la main-d’œuvre nécessaires pour corriger toute défaillance résultant de défauts de matériel ou de fabrication.
La garantie ne couvre pas les dommages résultants d’une utilisation abusive. Les travaux sous garantis doivent être
envoyés directement à Ardisam, Inc. ou à un centre de réparation agréé. Pour recourir à la garantie, veiller à obtenir un
accord préalable en appelant notre service après-vente au 1-800-345-6007. Ardisam, Inc., à son entière discrétion,
réparera ou remplacera sans frais toute pièce défectueuse qui remplit les conditions énoncées ci-dessus. Ardisam, Inc.
se réserve le droit de modier les modèles, les caractéristiques et les prix sans préavis. Utilisé aux ns prévues, ce produit
orira des années de service sans problème. Nous espérons que vous apprécierez la qualité de nos produits pendant
de nombreuses années. Pour toute pièce de rechange, appeler le -800-345-6007 ou aller à geteskimo.com.
Cette garantie s’applique au propriétaire initial disposant d’un justicatif d’achat et n’est pas transférable. Elle remplace toute
les autres garanties expresses ou implicites et toutes les autres obligations ou responsabilités de notre part. Ardisam, Inc.
n’assume aucune responsabilité, et n’autorise personne à assumer en son nom une quelconque responsabilité, en rapport avec
la vente de ses produits. La garantie s’applique uniquement à des produits n’ayant pas subi de négligence, d’emploi abusif, de
modications, d’accident ni de réparations eectuées par quiconque non certié par Ardisam, Inc. Cette garantie est annulée
si la carte de garantie dûment remplie n’est pas reçue par Ardisam, Inc. dans les 30 jours après l’achat.
More ice fishermen choose Eskimo
than any other brand
PIÈCES RÉPARTITION POUR UNIVERSAL ATTELAGE DE REMORQUAGE 11608
Table of contents
Languages:
Other Eskimo Fishing Equipment manuals

Eskimo
Eskimo Mako M43 User manual

Eskimo
Eskimo QUICKFISH 4 Quick setup guide

Eskimo
Eskimo Grizzly 26500 User manual

Eskimo
Eskimo M43Q10 Parts list manual

Eskimo
Eskimo WIDE1 INFERNO User manual

Eskimo
Eskimo Shark 9403S User manual

Eskimo
Eskimo StingRay S33 User manual

Eskimo
Eskimo Z71Q10 User manual

Eskimo
Eskimo HC40Q8 User manual

Eskimo
Eskimo STINGRAY User manual
Popular Fishing Equipment manuals by other brands

Bass Pro Shops
Bass Pro Shops Bionic Plus BI10SHF quick start guide

Norcross
Norcross Sonic-Laser Scale XP instruction manual

Moultrie
Moultrie Pro Hunter II instructions

OFF SHORE TACKLE
OFF SHORE TACKLE PRO WEIGHT SYSTEM OR20 instructions

Wolf
Wolf ICON PIR instruction manual

Browning Fishing
Browning Fishing 9912004 quick start guide