eSmart MIRALE User manual

RAHMEN / FRAME / CADRE / TELAIO / BASTIDOR
MIRALE
Deutsch
English
Français
Italiano
Español
LEINWAND Gebrauchsanweisung
PROJECTOR SCREEN Instruction Manual
ÉCRAN DE PROJECTION Mode d’emploi
SCHERMO Istruzioni per l’uso
PANTALLA PARA PROYECTOR Instrucciones de manejo
DE
GB
FR
IT
ES


3
v1.163
DE Inhalt
Wichtig ..........................................................................................................................5
Lieferumfang................................................................................................................. 8
Vorbereitung zur Montage..............................................................................................9
Montage ........................................................................................................................9
GB Contents
Important.....................................................................................................................13
Scope of delivery .........................................................................................................16
Preparing for installation................................................................................................ 17
Assembly .....................................................................................................................17
FR Table des matières
Important.....................................................................................................................21
Contenu de la livraison................................................................................................ 24
Préparation pour le montage....................................................................................... 25
Montage ..................................................................................................................... 25
IT Sommario
Importante.................................................................................................................. 29
Materiale fornito.......................................................................................................... 32
Preparazione all‘installazione........................................................................................ 33
Montaggio................................................................................................................... 33
ES Contenido
Importante...................................................................................................................37
Incluye........................................................................................................................ 40
Preparación para el montaje .........................................................................................41
Montaje.......................................................................................................................41


5
Deutsch
Sicherheit
Brandgefahr!
• Setzen Sie das Gerät sowie das Zubehör nie offenem
Feuer oder anderen Wärmequellen (z. B. direktem
Sonnenlicht) aus.
Gefahr von Beschädigungen für das
Produkt und Verletzungsgefahr!
• Unsachgemäße Montage, Wartung oder Reparatur
können erhebliche Gefahren für den Benutzer her-
vorrufen, für die der Hersteller nicht haftet. Verände-
rungen an der Mechanik dürfen nicht vorgenommen
werden! Sie können zu Fehlfunktionen und Beschädi-
gungen der Leinwand führen.
• Überprüfen Sie vor der Montage das Produkt und das
mitgelieferte Montagematerial auf deren Richtigkeit und
Unversehrtheit.
• Achten Sie beim Bewegen der Leinwand auf Perso-
nen, Gegenstände, Wände, Türen und Fenster. Durch
die großen Abmessungen kann es leicht zu Schäden
an Personen der Leinwand und/oder Gegenständen
kommen.
Wichtig

6
Deutsch
• Tragen Sie die Leinwand immer mit mindestens 2 Per-
sonen.
• Herabfallende Gegenstände können erheblichen Scha-
den verursachen. Prüfen Sie daher nach der Montage
sorgfältig, ob alle Befestigungen ordnungsgemäß ange-
bracht sind. Wiederholen Sie diese Prüfung in regelmä-
ßigen Abständen.
• Platzieren Sie das Gerät niemals auf Netzkabeln oder
anderen elektrischen Geräten.
• Teile dieses Produkts können scharfkantig sein. Seien Sie
vorsichtig, um Verletzung und Beschädigungen zu ver-
meiden.
Bestimmungsgemäßer Gebrauch
• Das Produkt ist ausschließlich seinem Zweck entspre-
chend zu gebrauchen. Jede unsachgemäße Anwendung
kann zu Sach- oder Personenschäden führen, für die
der Hersteller keine Haftung übernimmt.
Pege Ihres Geräts
• Fassen Sie nicht ohne saubere Stoff-Handschuhe auf
die Projektions-Fläche der Leinwand. Schmutzige oder
fettige Finger können leicht Verunreinigungen auf der
Leinwand hinterlassen.

7
Deutsch
• Verwenden Sie zur Reinigung des Produkts (z. B.
Entfernen von Staub und Schmutz auf dem Gehäuse
oder dem Leinwandtuch) nur Mikrofasertücher und ein
mildes Reinigungsmittel. Üben Sie dabei keinen Druck
auf die Leinwand aus, damit die Beschichtung der Lein-
wand nicht beschädigt wird.
• Farbe und Struktur des Gehäuses können sich aufgrund
der Verwendung natürlicher Materialien verändern.
Garantie und
Reparaturbedingungen
Bitte wenden Sie sich im Garantiefall an Ihr Fach-
geschäft oder direkt an die Servicestelle. Sollten
Sie das Gerät einschicken müssen, geben Sie
bitte den Defekt an und legen eine Kopie der
Kaufquittung oder Rechnung bei.
Es gelten dabei die folgenden Garantiebedingun-
gen:
1. Auf eSmart Germany-Produkte wird ab
Verkaufsdatum eine Garantie von einem
Jahr gewährt. Das Verkaufsdatum ist im
Garantiefall durch die Kaufquittung oder
Rechnung nachzuweisen.
2. Mängel infolge von Material- oder Ferti-
gungsfehlern werden innerhalb der Garan-
tiezeit kostenlos beseitigt.
3. Durch eine Garantieleistung tritt keine Ver-
längerung der Garantiezeit, weder für das
Gerät noch für ausgewechselte Bauteile,
ein.
4. Von der Garantie ausgeschlossen sind:
a. alle Schäden, die durch unsachgemä-
ße Behandlung, z.B. durch Nicht-
beachtung der Gebrauchsanleitung,
entstanden sind.
b. Schäden, die auf Instandsetzung oder
Eingriffe durch den Käufer oder un-
befugte Dritte zurückzuführen sind.
c. Transportschäden, die auf dem Weg
vom Hersteller zum Verbraucher
oder bei der Einsendung an den
Kundendienst entstanden sind.
d. Zubehörteile, die einer normalen
Abnutzung unterliegen.
5. Eine Haftung für mittelbare oder unmittel-
bare Folgeschäden, die durch das Gerät
verursacht werden, ist auch dann ausge-
schlossen, wenn der Schaden an dem Ge-
rät als ein Garantiefall anerkannt wird.

8
Deutsch
Lieferumfang
• 1x Leinwand • 1x Handbuch
Rahmenteile (ab 180“ geteilte Rahmenteile)
Spannstangen
Stützstange (ab 180“)
Metallwinkel Aufhänger Verbinder
(ab 180“)
Feingewinde-
schrauben
Halterungsstempel
Grobgewinde-
schrauben
Dübel
Umweltschutz
Entsorgung von Altgeräten und
Batterien
Ihr Gerät wurde unter Verwendung
hochwertiger Materialien und Kom-
ponenten entwickelt und hergestellt,
die recycelt und wiederverwendet
werden können.
Konformitätserklärung
Hiermit erklärt die eSmart
GmbH, dass der Artikel
„eSmart Germany Rahmen
Leinwand MIRALE“ der Richtlinie 2011/65/EU
entspricht.
Kontakt
bei Fragen, Ideen oder Beanstandungen:
eSmart GmbH
Dat Middelfeld 21
19065 Pinnow
E-Mail: [email protected]
Vielen Dank
für Ihr Vertrauen und herzlichen Glückwunsch!
Mit diesem Artikel haben Sie ein Qualitätspro-
dukt von eSmart Germany erworben. Lesen
Sie alle Anweisungen gründlich durch, bevor Sie
Ihr Gerät verwenden. Wenn Sie sich bei der
Verwendung nicht an die folgenden Hinweise
halten, kann Ihre Garantie erlöschen.
Zur Kenntnisnahme
Im Zuge ständiger Produktverbesserungen be-
halten wir uns technische und gestalterische Än-
derungen vor.
Originalverpackung
Für den Fall, dass Sie den Artikel zurückgeben
möchten, bitten wir Sie, die Originalverpackung
unbedingt aufzubewahren.

9
Deutsch
Montage
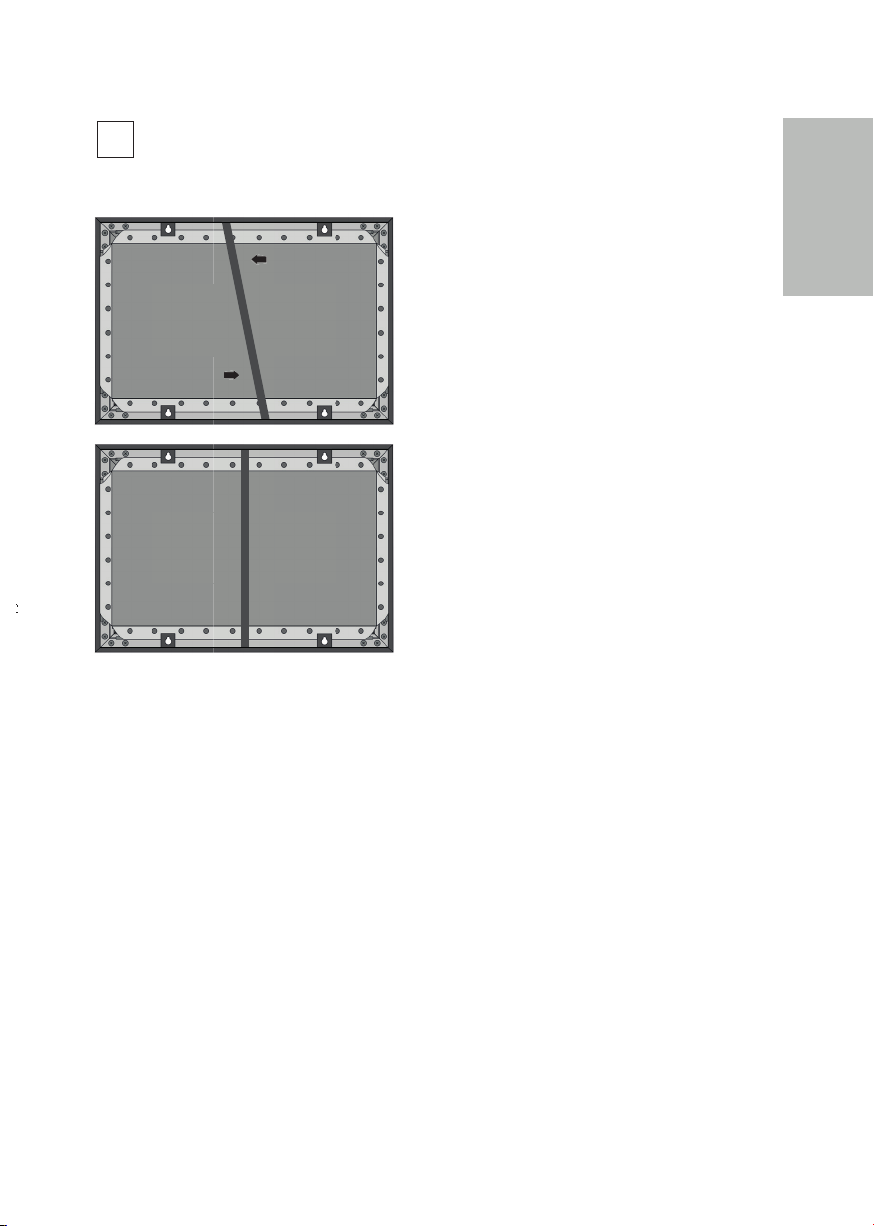
Ab 180“ und größer: Verbinden Sie
die vier halben Rahmenteile wie nachfol-
gend abgebildet mithilfe der Verbinder zu zwei
langen Rahmenteilen.
Schieben Sie die Aufhängewinkel in die
obere Führung der oberen Rahmentei-
le. Bitte beachten Sie genau die Ausrichtung der
Aufhängewinkel, da für das obere und untere
Rahmenteil unterschiedliche Aufhängewinkel
mitgeliefert werden.
Schieben Sie die Aufhängewinkel in die
untere Führung der unteren Rahmen-
teile.
Als Nächstes schieben Sie die Halte-
rungsstempel in die untere Führung aller
Rahmenteile und positionieren diese an den ro-
ten Pfeilen.
1
2
3
4
2
4
Vorbereitung zur
Montage
Montieren Sie diese Leinwand nur an geeigneten
Flächen. Beachten Sie dabei die Produktspezi ka-
tion und beauftragen Sie ggf. einen quali zierten
Auftragnehmer, um die fachgerechte Montage
der Leinwand zu gewährleisten.
Bewahren Sie die Verpackung bitte gut
auf, falls Sie die Leinwand zurückgeben
möchten.
Bitte seien Sie vorsichtig,
wenn Sie die ausgepack-
te Leinwand transportieren,
besonders beim Durchqueren
von Türen.
Wählen Sie eine geeig-
nete Stelle zur Monta-
ge und stellen Sie sicher, dass
die Fläche eben und sauber ist.
Markieren Sie an der
Wand die entspre-
chenden Maße für die Bohrlö-
cher Ihrer Leinwand.
1
3
unteres Rahmenteil
oberes Rahmenteil

10
Deutsch
Schieben Sie die Metallwinkel in die Sei-
ten der Schienen.
5
6
Verschrauben Sie die Metallwinkel mit
dem Rahmen.
Jetzt schieben Sie die Spannstangen
in die jeweils dafür vorgesehenen
Führungen an den Seiten des Leinwandstoffs
und verteilen den Leinwandstoff gleichmäßig
und wellenfrei über die gesamte Fläche.
Stülpen Sie anschließend die
Ösen des Leinwandstoffs über die
Halterungsstempel. Beginnen Sie an einer Seite
und arbeiten Sie sich im Uhrzeigersinn vor.
8
10
11
Nun können Sie die Schienen auf die an-
dere Seite der Metallwinkel aufstecken.
7
Sobald Sie die Leinwand vollständig
aufgespannt haben, überprüfen Sie bitte,
ob der Stoff überall wellenfrei ist. Andernfalls
spannen Sie den Leinwandstoff wieder ab
und verteilen Sie den Stoff gleichmäßig über
die gesamte Fläche, bis er komplett straff und
wellenfrei aufgespannt ist.
Legen Sie die Leinwand auf den
vormontierten Rahmen auf. Da die
Position des Leinwandstoffs nach der Montage
nicht mehr korrigiert werden kann, achten Sie
bitte jetzt darauf, dass das Leinwandtuch exakt
gleichmäßig über die gesamte Fläche verteilt ist
und sich nicht in den Ecken aufstaut.
9

11
Deutsch
12 Ab 180“: Zum Schluss schieben Sie die
Stützstange wie nachfolgend abgebildet
in der Mitte der Leinwand ein.


13
English
Safety
Risk of re!
• Never place the product and accessories near naked
ames or other heat sources, including direct sunlight.
Risk of injury or damage to this
product!
• Improper installation, maintenance or repairs can cau-
se major danger for the user. The manufacturer does
not adhere to these. It is not allowed to make changes
to the mechanics! These could lead to damages on the
whole screen.
• Before you install the screen, please check the product
itself and the mounting material for completeness and
integrity.
• When you transport the screen, please watch out for
other people, objects, walls, doors and windows. The
long size can easily cause damage on people, the screen
itself and/or objects.
• At least two people should carry the screen.
• Falling objects can cause serious damage. Carefully
check after the installation, if all attachments have been
Important

14
English
installed properly. Repeat these checks regularly.
• Never place the product or any objects on power cords
or on other electrical equipment.
• Parts of this product can be made of glass. Handle with
care to avoid injury and damage.
Intended use
• The product is to be used exclusively for its intended
purpose. Any improper use can result in damage or in-
jury, for which the manufacturer accepts no liability.
Care for your product
• Do not touch the projection surface without clean
gloves. Dirty or oily ngers can easily soil the surface.
• Only clean the product (e.g. removal of dust and dirt on
the housing or the screen-cloth) with microbre cloths.
Do not use cleaners. Do not put pressure on the cloth
whilst touching it to avoid the coating getting damaged.
• The colour and texture of the housing may alter due to
the use of natural materials.

15
English
Warranty and repair
terms
Please contact your supplier or the service cent-
re in case of a claim under the warranty. Should
you have to return the device, please state the
defect and add a copy of the purchase receipt
or invoice.
The following warranty terms apply:
1. eSmart Germany products have a one year
warranty from the date of purchase. In case
of a warranty claim, the date of purchase
has to be proven by means of the sales
receipt or invoice.
2. Defects in material or workmanship will be
removed free of charge within the warran-
ty period.
3. Repairs under warranty do not extend the
warranty period either for the unit or for
the replacement parts.
4. The following is excluded under the war-
ranty:
a. All damage which has arisen due to
improper treatment, e.g. nonobser-
vance of the user instructions.
b. All damage which is due to repairs or
tampering by the customer or unau-
thorised third parties.
c. Damage which has arisen during
transport from the manufacturer to
the consumer or during transport to
the service centre.
d. Accessories which are subject to
normal wear and tear.
5. Liability for direct or indirect consequenti-
al losses caused by the unit are excluded
even if the damage to the unit is accepted
as a warranty claim.
Care of the
environment
Disposal of your old product and
battery
Your product is designed and manu-
factured with high quality materials
and components, which can be recy-
cled and reused.
Declaration of
Conformity
Hereby the eSmart GmbH declares that the ar-
ticle „eSmart Germany Frame Projector-Screen
MIRALE“ applies to the rule 2011/65/EU.
Contact us
if you have any questions, ideas or complaints:
eSmart GmbH
Dat Middelfeld 21
19065 Pinnow, Germany

16
English
English
Scope of delivery
• 1x Projector Screen
• 1x Manual
Frame sections (from 180 inches divided frame
parts)
Drawbars
Stabilizer (from 180 inches)
Metal bracket Suspension bracket Connecting plate
(from 180 inches)
Fine thread
screws
Mounting support
Coarse thread
screws
Dowel
Thank you
for your con dence and congratulations! You
have purchased a high-quality eSmart Germany
product. Read and understand all instructions
before you use your product. If damage is cau-
sed by failure to follow instructions, the warranty
does not apply.
For your information
In accordance with our policy of continual pro-
duct improvement, we reserve the right to make
technical and optical changes without notice.
Original packaging
Please keep the original packaging in the event
you wish to return the product.

17
English
English
Assembly
2
4
Preparing for
installation
Please keep the packaging in a good
condition, in case you wish to return the
screen.
Please be careful when
moving the unpacked
screen, especially when passing
through doors.
Select a suitable locati-
on for installation and
make that sure that the surface
is at and clean.
Mark the appropria-
te dimensions on the
wall for the drill holes of your
screen.
3
Mount this screen only on suitable surfaces. Pay
attention to the product speci cations and if
necessary, hire a quali ed contractor to guaran-
tee the professional assembly of the screen.
1
From 180 inches and larger:
Connect the four halfed frame parts like
shown in the next picture by using the connec-
ting plates in order to get two long frame parts.
Slide the suspension bracket into the
upper tracks of the top frame sections.
Please note exactly the alignment of suspension
angle, as for the upper and lower frame part dif-
ferent suspension angle are included.
Slide the suspension bracket into the lo-
wer tracks of the bottom frame sections.
Next, slide the mounting support into the
lower track of each frame component
and position these on the red arrows.
1
2
3
4
bottom frame section
top frame section

18
English
English
Slide the metal brackets into the sides of
the rails.
5
6
Screw the metal bracket to the frame.
Now push the drawbars into the
respective tracks located on the sides of
the screen material, and distribute the screen
material evenly and over the entire area,
avoiding wrinkles.
Next, place the eyelets in the canvas
screen over the mounting support. Start
on one side and work in a clockwise manner.
8
10
11
Now you can attach the rails to the other
side of the metal bracket.
7
Once you have the completely stretched
out the screen material, please check to
ensure that the screen is completely wrinkle-
free. If not, stretch out the screen again and
distribute the material evenly over the entire
surface until it is completely taut and wrinkle-
free.
Place the screen material onto the pre-
assembled frame. Since the position of
the screen material cannot be corrected after
assembly, please ensure at this stage that the
screen material is distributed exactly uniformly
over all of the surfaces and not is not gathered
up at the corners.
9
19
English
English
12 From 180 inches and larger: At the
end, slide the stabilizer onto the back of
the screen as shown in the following picture.

Table of contents
Languages:
Other eSmart Projector Accessories manuals


