esotec 102028 User manual

age 8
GB
Table of Contents
1. Introduction Page 8
2. Safety Instructions Page 8
3. Usage according to determination Page 9
4. Operating elements Page 9
5. Set up and starting of operation Page 10
6. Exchange of the accumulators Page 12
7. alfunctions Page 12
8. Technical data Page 12
These instructions relate ONLY to this product and contain important information for
using the product for the first time. lease keep these instructions for later reference
and should always accompany the product in the event of transference to a new user.
1. Introduction
Dear Costumer,
Thank you for purchasing the solar light. With this solar light you purchased a product manu-
factured according to the current state of technology.
This product fulfils all requirements of the valid European and national regulations.
The conformity was proved. The relevant declarations and documentation are deposi-
ted with the manufacturer.
To maintain this state and guarantee a safe operation, you as the user will have to follow this
operating manual!
2. Safety Instructions
- In case of damages caused by not following this operating
manual, the warranty rights will expire! We exclude liability
for any consequential damages!
- We exclude liability for property or personal damages
caused by inappropriate handling or not following
the safety instructions.
- In these cases any guarantee rights will expire.
Due to safety and admission reasons (CE) it is not allowed to arbitrarily reconstruct and/or
change the solar light.
Therefore, please keep to the operating manual.
The accident prevention rules of the association of the industrial trade cooperative associa-
tion for electric plants and working material are to be considered in industrial environments.
!
Customer support:
If you have problems or questions regarding this product, simply contact us!
Monday to Friday 8 am to 12 noon and 1 pm to 4 pm.
By phone: 09605-92206-27
roduct: Manufacturer Item No.: 102028

4. Operating elements
1. lastic luminary
Can be switched off the lower part via
a thread
2. Special steel lid with solar module
Can be taken off the lower part
3. Special steel lower part
With assembly borings
4. Solar module
1
3
2
3. Usage according to determination
The solar lamp is designed for the outdoor usage. The installed accumulators are charged
by the solar cells in the lower part of the lamp. At darkness, the light is automatically swit-
ched on and is switched out at sunrise. The color of the light automatically changes between
7 colors approximately every minute. If necessary, one single color can be set fix via a switch.
As light source, a very strong light emitting diode (LED) is used.
4
age 9
GB
Rechargeable battery notes
- Rechargeable batteries should not be played with by children. Never leave recharge-
able batteries lying around; they could be swallowed by children or pets.
- Rechargeable batteries must never be short-circuited, disassembled or thrown into
fire. This leads to a danger of explosion!
- Leaking or damaged rechargeable batteries can cause chemical burns when they
come into contact with skin. For this reason, please make use of suitable protective
gloves.
- Rechargeable batteries should only be replaced by structurally identical rechargeable
batteries from the same manufacturer. Normal batteries must not be used since these
are not rechargeable.
- ake sure the rechargeable batteries are inserted with the correct polarity.
- For long periods of time of non-use (for example, storage), remove the inserted
rechargeable batteries to avoid damages via the leaking rechargeable batteries.

age 10
GB
5. Set up and starting of operation
The Pro-Design-Garden-Ball should be set
up in a sunny location. Please note that no
bushes or trees may impede the insolation
to the solar module.
Note: However, please note that the durati-
on of illumination is strongly dependent on
the intensity and duration of the insolation
during the day. In the winter months please
generally calculate with a short duration of
illumination.
Please carefully take all parts out of the
package.
The Pro-Design-Garden-Lamp can be fixed
to solid ground with the help of the attached
screws and pins in order to prevent theft.
You may also fix the lamp to a wall in verti-
cal direction with the solar module on the
top side.
Assembly:
1. In order to firmly set up the lamp, unscr-
ew the plastic luminary anticlockwise up
to the buffer (picture 1) and remove the
luminary.
2. Remove the special steel upper part by
drawing it upward with both hands as
shown in the picture and move (Picture
2).
3. Now, the pedestal can be fixed via the 3
holes (picture 3) (therefore, please use
the supplied screws).
4. Put the special steel upper part on top of
the pedestal by first hanging in the side
of the upper part into which the solar
module is integrated (picture 4) into the
pedestal and then press the upper part
over the pedestal on the other side. (pic-
ture 5).
Picture 1
Picture 2
Picture 3
Picture 4

5. Plug in the connector of the accumulator
(picture 6).Note: The connector is equip-
ped with reverse battery protection.
Please do not execute force.
6. Re-attach the plastic luminary and fix it
by screwing it clockwise up to the buffer.
Now, the lamp is ready for operation. At dar-
kness, the color of the light automatically
changes between 7 different colors approxi-
mately every minute the lamp will.
ermanent light ( icture 7):
If you want to set a certain color of light as
a permanent light, please remove the pla-
stic luminary and set the switch on the plate
to the position "STOP”. Now the currently
active color of light is adjusted to permanent
light. In order to re-activate the exchanging
light, please re-adjust the switch.
Picture 6
Picture 7
Picture 5
STO
erm. light
Exch. light
switch-position
age 11
GB

age 12
GB
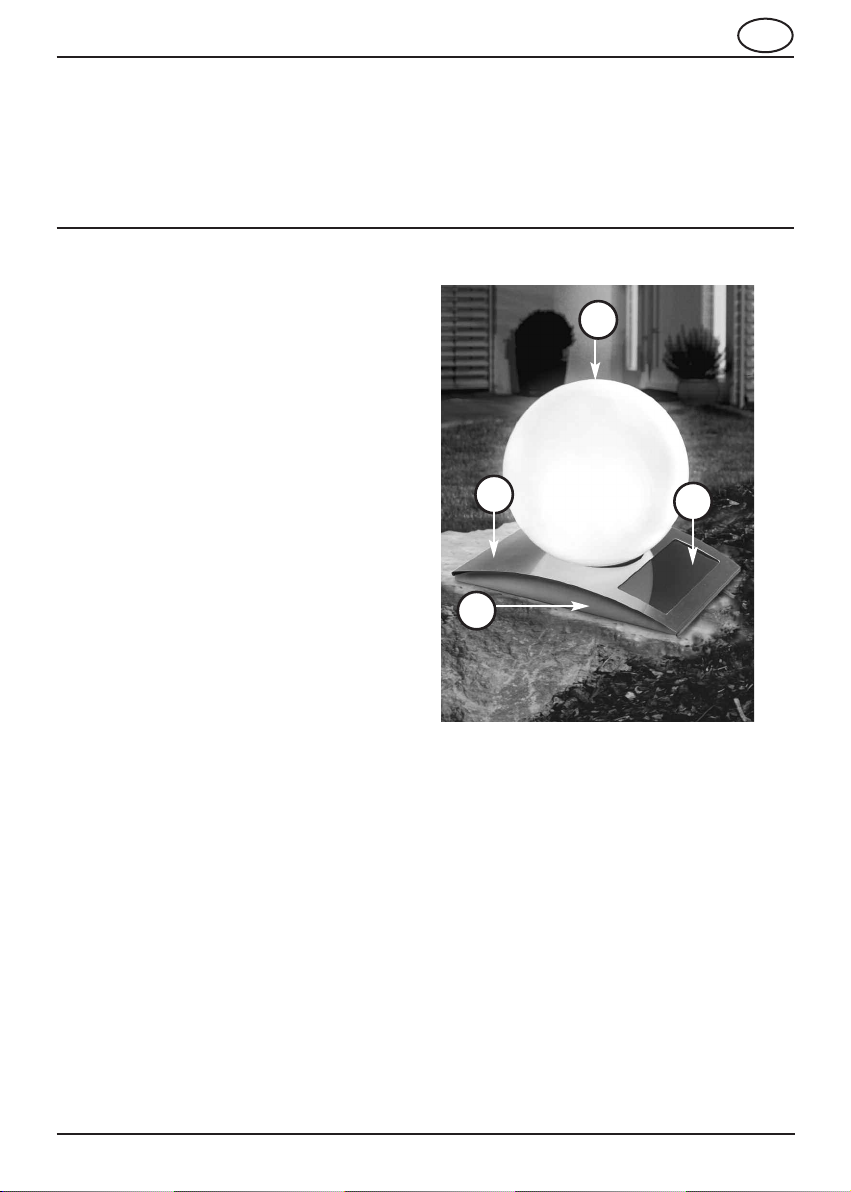
1. Please remove the plastic luminary (see
chapter 4)
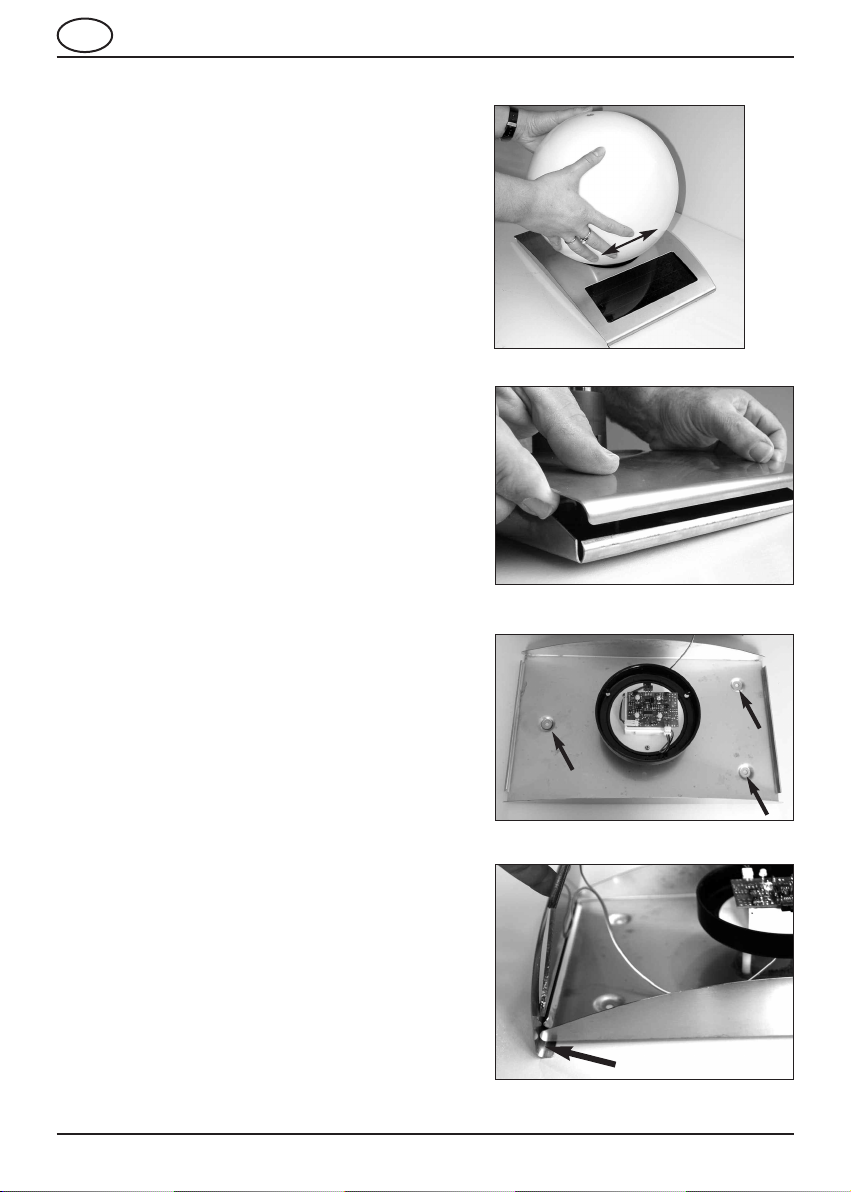
2. Press both tappets (picture 6) at the bat-
tery box and swing open the lid.
3. Remove the accumulator and exchange
it with an identical accumulator (picture
7). This is available from your dealer or
the manufacturer.
4. Now reassemble the lamp in reverse
order. Please take care of the polarity
when plugging in the accumulator switch.
Note: Used batteries or accumulators
must be disposed of in a non-polluting
way and do not belong into the domestic
waste. Your dealer is obliged to take
back and recycle old accumulators.
.
6. Exchange of the
Accumulators
6. Malfunctions
Disorder:
Light is not automatically switched on at
darkness.
Light is not automatically switched on at
darkness in spite of sunshine or is only
switched on for a short time.
Remedy:
A further light source (e. g. street lamp) "simulates” daylight and prevents a
switching on. Place the light at a darker location.
Accumulator is weak or defective. Exchange the accumulator pack.
8. Technical data
Picture 6
Picture 7
Operation voltage: 3.6 V (set of accumulators)
Set of accumulators: Ni H 3.6 V/1300 mAh
Light emitting diode: 4 light emitting diodes (LED)
Solar module: ASI-technology
Duration of illumination: max. 20 h in case of fully
charged set of accumulators
Ball ø: 250 mm
Basic plate: 350 x 240 mm
Battery take-back
- Batteries must not be discarded into domestic waste.
- The consumer is legally required to return batteries after use, e.g. to public
collecting centers or to battery distributors.
- Contaminant-containing batteries are labeled with the sign “crossed-out
trashcan“ and one of the chemical symbols. Used batteries should be dis-
posed environmentally friendly and should not be discarded into domestic
waste. Your dealer is legally required to take back old batteries. NiMh
Table of contents
Other esotec Lighting Equipment manuals
Popular Lighting Equipment manuals by other brands

Konig & Meyer
Konig & Meyer Concert Light 12248 quick guide

Elecro Engineering
Elecro Engineering MINI H.R.UV-C STANDARD Installation & operating manual

Elumen8
Elumen8 ELUM094 user manual

ESI
ESI Amble Classic Operation instructions

YELLOWRIVER
YELLOWRIVER YR-L0308T user manual

GrowFlux
GrowFlux FluxScale 600TL v2.0 user manual