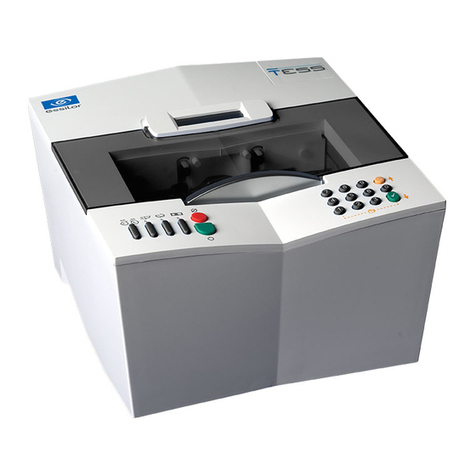
Essilor e-Tess User manual

IMETESSE. V3
ESSILOR
e-Tess
User’s guide

Essilor E-Tess Tracer
2
Congratulations! You have just acquired a high precision Essilor tracer.
We strongly recommend that you read this entire manual before using your Essilor tracer, in order to
obtain the greatest satisfaction.
IMPORTANT
The information in this document is non-contractual and provided as a guide.
It is subject to change without prior notice. Although great care has been taken to
avoid them, some errors or omissions may occur in a document of this type.
Essilor cannot be held liable for any operating defects or data loss that may result
from such errors or omissions.

Essilor E-Tess Tracer
3Contents
CONTENTS
1. PRECAUTIONS REQUIRED _____________________________________________ 6
1.1. Work surface ___________________________________________________________ 6
1.2. Environment____________________________________________________________ 6
1.3. Electrical installation_____________________________________________________ 6
1.4. Symbols _______________________________________________________________ 7
1.5. cleaning _______________________________________________________________ 7
2. INSTALLATION _______________________________________________________ 8
2.1. Introduction ____________________________________________________________ 8
2.2. Connections____________________________________________________________ 9
Connection to a PC ___________________________________________________________ 9
Connection to an edger:________________________________________________________ 9
2.3. First time use __________________________________________________________ 10
Description of the main screen _________________________________________________ 10
Navigation principle _________________________________________________________ 11
Main icons _________________________________________________________________ 11
2.4. Customising the display_________________________________________________ 12
2.5. Configuring the tracer___________________________________________________ 14
Choose the language _________________________________________________________ 15
Configure the connection and the communication parameters _________________________ 15
3. CHECK PRO_________________________________________________________ 17
3.1. Installation ____________________________________________________________ 17
3.2. Use __________________________________________________________________ 19
4. USING THE e-TESS TRACER ___________________________________________ 26
4.1. Description of the tracer_________________________________________________ 26
4.2. Initialisation ___________________________________________________________ 26
4.3. Frame tracing__________________________________________________________ 28
Standard tracing_____________________________________________________________ 28
Special cycles ______________________________________________________________ 29
4.4. Recalling a job _________________________________________________________ 32
4.5. Shape alteration________________________________________________________ 33
5. AUTOMAINTENANCE _________________________________________________ 36
5.1. Calibration check_______________________________________________________ 36
5.2. Calibration ____________________________________________________________ 38
5.3. Self-tests______________________________________________________________ 39
5.4. Statistics______________________________________________________________ 41
5.5. List of errors __________________________________________________________ 42
5.6. Touch screen calibration ________________________________________________ 43
6. IMPORT-EXPORT ____________________________________________________ 45
6.1. Export ________________________________________________________________ 45
6.2. Import ________________________________________________________________ 45
Adding a standard ___________________________________________________________ 46
Software update_____________________________________________________________ 46
7. ERROR CODES ______________________________________________________ 48

Essilor E-Tess Tracer
4

Essilor E-Tess Tracer
Warning 5
WARNING
In order to reduce the risks associated with the use of electrical equipment - fire, electric shock, injury,
etc., it is essential to comply with the basic safety rules.
We therefore strongly recommend that you read this manual before switching on your Essilor e-Tess
tracer and that you keep it in a safe place for future reference.
The mechanical and electronic adjustments and the electrical servicing must be performed by an after-
sales service technician approved by Essilor.
To ensure that you operate your tracer in complete safety, we recommend that you comply with the
following instructions :
- Your workbench must be clean, free of clutter, and illuminated sufficiently to allow you to work in
safety.
- Do not use your tracer in the presence of inflammable liquids or gases.
- Check the mains cable periodically. If damaged, it must be replaced by an approved repairer.
- Keep the cable well away from heat sources, sharp objects and oily substances.
- Never pull on the cable in order to unplug it from the mains supply.
- Before connecting your tracer to the mains supply, make sure that the switch is in the Off position:
"0”.
- If the mains switches are no longer performing their “ON/OFF” function, stop using your tracer at
once. Faulty switches should be replaced by an approved technician.
- When the equipment is not to be used for an extended period, or before carrying out any
maintenance, and/or when replacing certain accessories, it is imperative that you disconnect your
tracer from the electric mains supply.
- Your tracer is a professional tool whose use is reserved for specialist and responsible operators.
Use by anyone other than these operators should be strictly forbidden.
- Before using your tracer, check that it is operating correctly, and make sure that it is performing its
function correctly.
- The use and operation of any accessory other that those recommended in this manual may pose
hazards for the operators using the product.
- Do not use your tracer for any purposes other than those described in this document.
- Your tracer should be carefully maintained, in accordance with the detailed instructions in this
document.
- Your tracer is an electrical device which conforms to the appropriate safety rules. If it malfunctions,
any repair operations must be performed by a qualified technician approved by Essilor. Otherwise,
the user’s safety could be at risk.

Essilor E-Tess Tracer
1- Precautions 6
1. PRECAUTIONS REQUIRED
1.1. W
ORK SURFACE
In order to take full advantage from the high precision of your Essilor e-Tess tracer, we recommend
that it is placed on a flat stable surface, free from shocks and vibrations.
Your Essilor e-Tess tracer can be positioned up to 5 metres from your PC and/or your edger.
Longer power cords are available on option.
1.2. E
NVIRONMENT
The temperature and relative humidity of the room where you use your Essilor e-Tess tracer must lie
within the following limits:
Remote edging operation +15 °C (+59 °F) to +30 °C (+86 °F)
30 % to 75 % humidity
Local edging operation +10 °C (+50 °F) to +40 °C ( +104 °F)
30 % to 75 % humidity
Storage -5 °C (+23 °F) to +50 °C (+122 °F)
10 % to 95 % humidity
Altitude < 2000 m
Avoid sudden changes in temperature or in relative humidity and install your tracer:
- in an area not exposed to direct sunlight,
- away from all heat sources,
- sheltered from any intense magnetic sources,
- away from all chemical products or corrosive gases and/or liquids.
Leave a clear space above the tracer. Do not place anything on top of the tracer.
IMPORTANT
This machine is not suitable for nor intended to operate in an environment
classified as being under risk of explosion.
1.3. E
LECTRICAL INSTALLATION
Electrical specifications:
Tracer voltage:
12 volt
Power supply voltage (external power supply):
100-240 VAC
Frequencies: 50 - 60 Hz

Essilor E-Tess Tracer
71- Precautions
Earth connection:
The tracer must be connected to a power supply with earth.
The earth connection must comply with public standards and be checked by a qualified electrician.
Interference and micro-outages:
The tracer has been designed to withstand interference and the possibility of micro-outages on the
power supply and continue operating correctly.
However, in the event of serious and abnormal faults, normal operation of the tracer cannot be
guaranteed.
1.4. S
YMBOLS
O Off (power).
I On (power).
Direct current
Caution: risk of electric shock.
Caution: risk of danger (see note).
1.5.
CLEANING
To prevent accidents, unplug the device before you start to clean it.
Clean the tracer regularly (except the feeler) with a soft cloth dampened with water or neutral
detergent (e.g. washing-up liquid).
N.B. To prevent the accumulation of dust which could affect the precision of your e-Tess tracer, we
recommend closing the protective cover after use.
IMPORTANT
Never clean your Essilor tracer with thinner, solvent, alcohol, benzene, acetone or
other type of organic or mineral solvent.

Essilor E-Tess Tracer
3- Check Pro 8
2. INSTALLATION
2.1. INTRODUCTION
Technical Characteristics
- Power up with the tracer on/off switch.
- Compliant with standard ISO
16284
(OMA 3.04 compatible).
- Automatic self-test on power up.
- Calibration, linked to the computer (PC) or from the tracer.
- Cycle counter available on the software installed on the PC.
- Automatic feeler insertion.
- 3-D tracing for frames, 2-D tracing for patterns, pre-cut lenses and demo lenses.
- The "remote edging" precision will only be guaranteed on closed frames.
- High precision tracing with reading of the frame groove profile.
- Holder provided to trace a pattern or lens (demonstration or pre-cut).
- Automatic measurement of the frame bridge, binocular tracing.
- Frame thickness measurement.
- Differential tightening of the grips.
- RS232 and RJ45 ports.
- Memory update by Essilor external USB stick.
- Internal memory: 1000 Jobs.
-5.7" touch screen.
- Tracer inclination 0°or 10°.
- Built-in auto-maintenance functions, from the computer (PC).
- Shape modification function.
- Power supply voltage: 12 V .
- External power supply: 100-240 VAC, 1 A, 50-60 Hz, Output 12 V .
- Frame dimension limits:
B-dimension min. 17 mm (pattern: 18.5 mm), max. 58 mm.
A-dimension min. 28 mm, max. 70 mm.
Limit Z height: 30 mm in binocular, 40 mm in monocular.
Frame thickness: min. 1.45 mm, max. 12 mm.
- Dimensions: (L) 280 mm x (D) 285 mm x (H) 180 mm.
- Weight: 7.5 kg.
N.B.: As improvements are made these specifications may be changed without prior notice.

Essilor E-Tess Tracer
93- Check Pro
2.2.
C
ONNECTIONS
Depending on your configuration, your Essilor e-Tess tracer can be connected to either a PC or an
Essilor Delta T edger.
Connection to a PC
1. Connect the RS232C cable to the tracer socket (5) and to an RS232C serial port on the PC. (see
above figure),
or
Connect the RJ45 cable to the tracer socket (2) and to the Ethernet RJ45 port on the PC. (see above
figure).
N.B. Before any Ethernet connection, it is essential to know the structure of the network to which your
tracer will be connected.
Connection to an edger:
IMPORTANT
Before connecting the tracer to the edger, switch both machines off.
The voltage indicated on your machines (tracer, power supply) must correspond to
the mains voltage.
Avoid using extension cords or intermediary multiple-socket connectors which might
result in poor contact.
Make sure that the cables are not routed near electrical equipment that may produce
interference: electric motor, fluorescent lighting tube, radio, etc.
1. Connect the dedicated cable supplied with your edger: refer to the identification labels on the side
and connect the tracer port (4) to the edger RS232 port,
PC
-
Ethernet
Connector (2)
Update - USB
Connector (3)
PC
-
RS 232
Connector (5)
Edger / Bar code
RS232
Connector (4)
RS485
connector
Not used
Power supply
Connector (1)

Essilor E-Tess Tracer
3- Check Pro 10
N.B. A crossed cable is used. Make sure to respect the connection direction shown on the cable labels
corresponding to the symbols used on the edger and the tracer.
2. Make sure that the tracer on/off switch is on the "0" position,
3. Connect the external power supply cable to the tracer (socket 1) and to the mains socket once you
have ensured that this socket is properly earthed,
Have an electrician check the earth connection if necessary.
4. Switch on the tracer, the switch is on the "I" position,
5. Refer to the user's manual of your edger to configure your installation correctly.
N.B. For a configuration with PC and edger connection, you can use both installations described above.
2.3. FIRST TIME USE
Description of the main screen
Tracing screen
Dimension screen
Library Customisation
Maintenance / Configuration
About…
Right eye data Left eye data
Dimensions
Tracing mode
Tracing type
Job number entry Start cycle
Display, scale 1
On/off switch

Essilor E-Tess Tracer
11 3- Check Pro
Navigation principle
Main icons
Standard tracing
Start cycle.
"Precal" tracing
Stop cycle.
Very high curve tracing.
Validate, move to next step.
Shape alteration.
Cancel, return to previous step.
Dissymmetric binocular tracing.
Save.
Left eye monocular tracing.
Delete.
Right eye monocular tracing.
Frame thickness.
Symmetric binocular tracing.
Curve angle.
Frame bridge indication.
Frame curve.
Menu bar
Action bar
Choice cascade
Display zone

Essilor E-Tess Tracer
3- Check Pro 12
2.4. CUSTOMISING THE DISPLAY
Your e-Tess tracer allows you to customise the display of the default trace parameters. Irrespective of the
configuration chosen here, each item can still be modified before each tracing job.
1. Press to enter the customisation menu,
2. Choose your default tracing type (standard, very high curve, Precal, shape alteration), by clicking on
the corresponding icon,
3. Validate your choice ,

Essilor E-Tess Tracer
13 3- Check Pro
4. Choose the default tracing side (dissymmetric binocular, right eye/left eye monocular, symmetric
binocular), by clicking on the corresponding icon,
5. Validate your choice or return to the previous screen ,
6. Select the dimensions you want to display in the trace screen (maximum 4), from: A, B, D, E, P,
7. Validate your choice or return to the previous screen ,
8. Choose the configuration type required for the next job:
- Job + 1 = Job configuration,
- Job + 1 = default configuration.
+ 1 =
+ 1 =

Essilor E-Tess Tracer
3- Check Pro 14
9. Save your configuration or return to the previous screen .
2.5. CONFIGURING THE TRACER
1. Press to enter the product configuration menu,
2. Click on to access tracer configuration. On this screen, you can:

Essilor E-Tess Tracer
15 3- Check Pro
Choose the language
Choose the required language from the dropdown list.
Configure the connection and the communication parameters
The default parameter configuration is shown below:
N.B. Modifying this configuration could have an adverse effect on the operation of your instruments. The
configuration in this menu should only be modified if your configuration is not compatible with that
proposed by default, with support from your Essilor technician.
a. Edger connection :
Three icons are available to configure the connection with the edger:
- Port type used, choose by pressing repeatedly:
Serial port
No edger
- Communication protocol:
OMA,
- Communication port configuration :
Choose the baud rate (19200: usual rate)
Choose the flow control (Hardware control = usual configuration)
Validate your configuration .
b. PC connection :
Three icons are available to configure the connection with the edger:
Speed Flow control Use
PC serial
port 19200 Control Opsys configuration
Edger
serial port 19200 Control Delta T configuration
Mode IP address Subnet mask Use
IP Static Tracer IP address Opsys configuration Regular

Essilor E-Tess Tracer
3- Check Pro 16
- Port type used, choose by pressing repeatedly:
Serial port
Ethernet port
No PC
- Communication protocol, choose by pressing repeatedly:
OMA (serial port and Ethernet),
OMA+ (serial port only), used for the connection with Check Pro, (see Chapter 3),
PCCOM (serial port only), used for the connection with Opsys V1,
- Communication port configuration :
Serial port:
Choose the baud rate (19200: usual rate)
Choose the flow control (Hardware control = usual configuration), None = Visual Lab
Pro configuration)
Validate your configuration .
Ethernet port:
Choose the mode type:
•
Static: usual mode,
•
Apipa: P to P operation,
•
DHCP: network operation.
Check the IP address, IP, if it does not correspond to your configuration:
•
Click on the "IP" zone, enter the required address on the numeric keypad,
•
Validate your entryor cancel your request .
Check the subnet mask, MSK, if it does not correspond to your configuration:
•
Click on the "MSK" zone, enter the required address on the numeric keypad,
•
Validate your entryor cancel your request.

Essilor E-Tess Tracer
17 3- Check Pro
Check Pro
Check Pro is an Essilor software program used to:
- Display the trace statistics,
- Display the error messages generated by the tracer,
- Configure the PC communications,
- Perform a self-test from the PC,
- Perform a calibration check from a PC,
- Perform a calibration from a PC.
2.6. INSTALLATION
Check Pro is compatible with the following operating systems: Windows 98, 2000, XP, Millenium.
1. Insert the CD-ROM supplied with your e-Tess tracer. The following window is displayed:
2. Click on "CheckPro" then "OK": the installation procedure starts,

Essilor E-Tess Tracer
3- Check Pro 18
3. Click on "Next >" and follow the installation steps up to the next screen:
4. Close this window, the application starts automatically.

Essilor E-Tess Tracer
19 3- Check Pro
2.7. USE
Click on the icon on your PC desktop, the application starts:
From this screen, all functions can be accessed using icons.
N.B. So that Check Pro can communicate with your e-Tess tracer, remember to configure them together
(see Chapter 2.3.).
Statistics
1. Click on: ,
Total number of cycles
Number of symmetric binocular cycles
Number of dissymmetric binocular cycles
Number of right eye monocular cycles
Number of left eye monocular cycles
Number of very high curve cycles
Number of pattern cycles
Number of calibrations
Number of calibration checks
Number of High Precision traces (metal)
Number of "precal" cycles

Essilor E-Tess Tracer
3- Check Pro 20
2. To exit the screen and return to the previous screen, click on .
Error messages
1. Click on: ,
2. The error codes are displayed in the left column with the quantities saved opposite,
3. To exit the screen and return to the previous screen, click on .
: Partial statistics
: Total statistics
Each line indicates a dedicated function of your tracer.
List of "technician" errors saved.
List of "optician" errors saved.
Table of contents
Other Essilor GPS manuals
