EunSung HydraBeauty User manual

Operator Manual

ⓒ2017 EUNSUNG GLOBAL CORP.
This manual is copyrighted with all rights reserved. This manual may not be copied in whole
pages or in part reproduced such as graphic, electronic, mechanical, including photocopying,
typing, or information retrieval systems without written permission of EUNSUNG GLOBAL.
The system specifications and the information contained in this manual book are subject to
change without notice.
EUNSUNG GLOBAL CORP.
120, Gieopdosi-ro, Jijeong-myeon, Wonju-si,
Gangwon-do, Republic of Korea
Tel. : +82-2-514-9713
Fax. : +82-2-514-9716
Website : www.esglobal.co.kr
Manufactured by EUNSUNG GLOBAL CORP.
120, Gieopdosi-ro, Jijeong-myeon, Wonju-si,
Gangwon-do, Republic of Korea
Tel. : +82-2-514-9713
Fax. : +82-2-514-9716
Website : www.esglobal.co.kr
Authorized representative:
EUNSUNG GLOBAL CORP.
120, Gieopdosi-ro, Jijeong-myeon, Wonju-si,
Gangwon-do, Republic of Korea

HYDRABEAUTY
3
1. Product overview
1.1 General subjects
1.2 Marking used in the manual and equipment
2. Safety Precautions
2.1 Outlines
2.2 General precautions
2.3 Power Risk Precautions
2.4 Fire Risk Precautions
2.5 Precautions for Cleaning
2.6 Regulations
2.7 Taboo
3. Product composition
3.1 Product structure
3.2 Components
Contents
5
5
6
6
8
9
4. Installation of the product
4.1 Outlines
4.2 Handpiece installation
4.3 Handpiece decomposition
4.4 installation of the body & solutions
4.5 Cleaning & replacement for solution filters
4.6 installation of the body & waste container
4.7 Power supply
10
10
6
7
7
7
13
14
15
16
7
16

HYDRABEAUTY
4
5. How to use
5.1 Outlines
5.2 Precaution before using
5.3 Screen & Control board
5.4 The way to use the device
5.5 Large waste container
6. Maintenance
6.1 Outlines
6.2 Cleaning
6.3 Storage
6.4 Checking before reporting the fault
7. Warranty
7.1 Outlines
7.2 Guarantee for free
7.3 Exclusions within free warranty period
7.4 Compensatory guarantees
Contents
17
17
18
19
23
8. Product specifications
9. Customer services / Sales
27
27
24
25
25
25
26
26
26
26

HYDRABEAUTY
5
1.1 General subjects
1. Product overview
The system for Hydrabeauty is designed to meet the international standard for medical devices, so it is
secure, rugged, and easy to use. Please keep the basic maintenance list such as handpiece tip replacement,
proper cleaning and so on.
1.2 Marking used in the manual and equipment
Marking 내 용
MFDS
Warning
In case of violating instructions or serious injury or danger
Caution
Any violation of the instructions could result in
minor injury or damage to the product.
Notes
The case of showing something important when using the device.
”Conformity to European”
Certification Mark that it complies with European Union
integration standards conditions relating to consumer
safety and health, hygiene and environmental protection
”Ministry of Food and Drug Safety”
Certification mark that identifies a product as safe product
that is licensed and compliant with the specifications of
Korean Food and Drug Administration (FDA)
”Good Manufacturing Practices”
A mark that authenticates the company's compliance with
procedures and standards needed to ensure quality
medical equipment is maintained on a raw material basis,
through availability of quality materials, and shipment of
finished products
The mark to do not drop the large waste container which can be
damaged or broken.
The mark that shows to install the large waste container correctly

HYDRABEAUTY
6
Be sure to read and use the instructions and instructions of use properly when using this product, and use
it by someone who can perform the procedure according to the proper procedures.
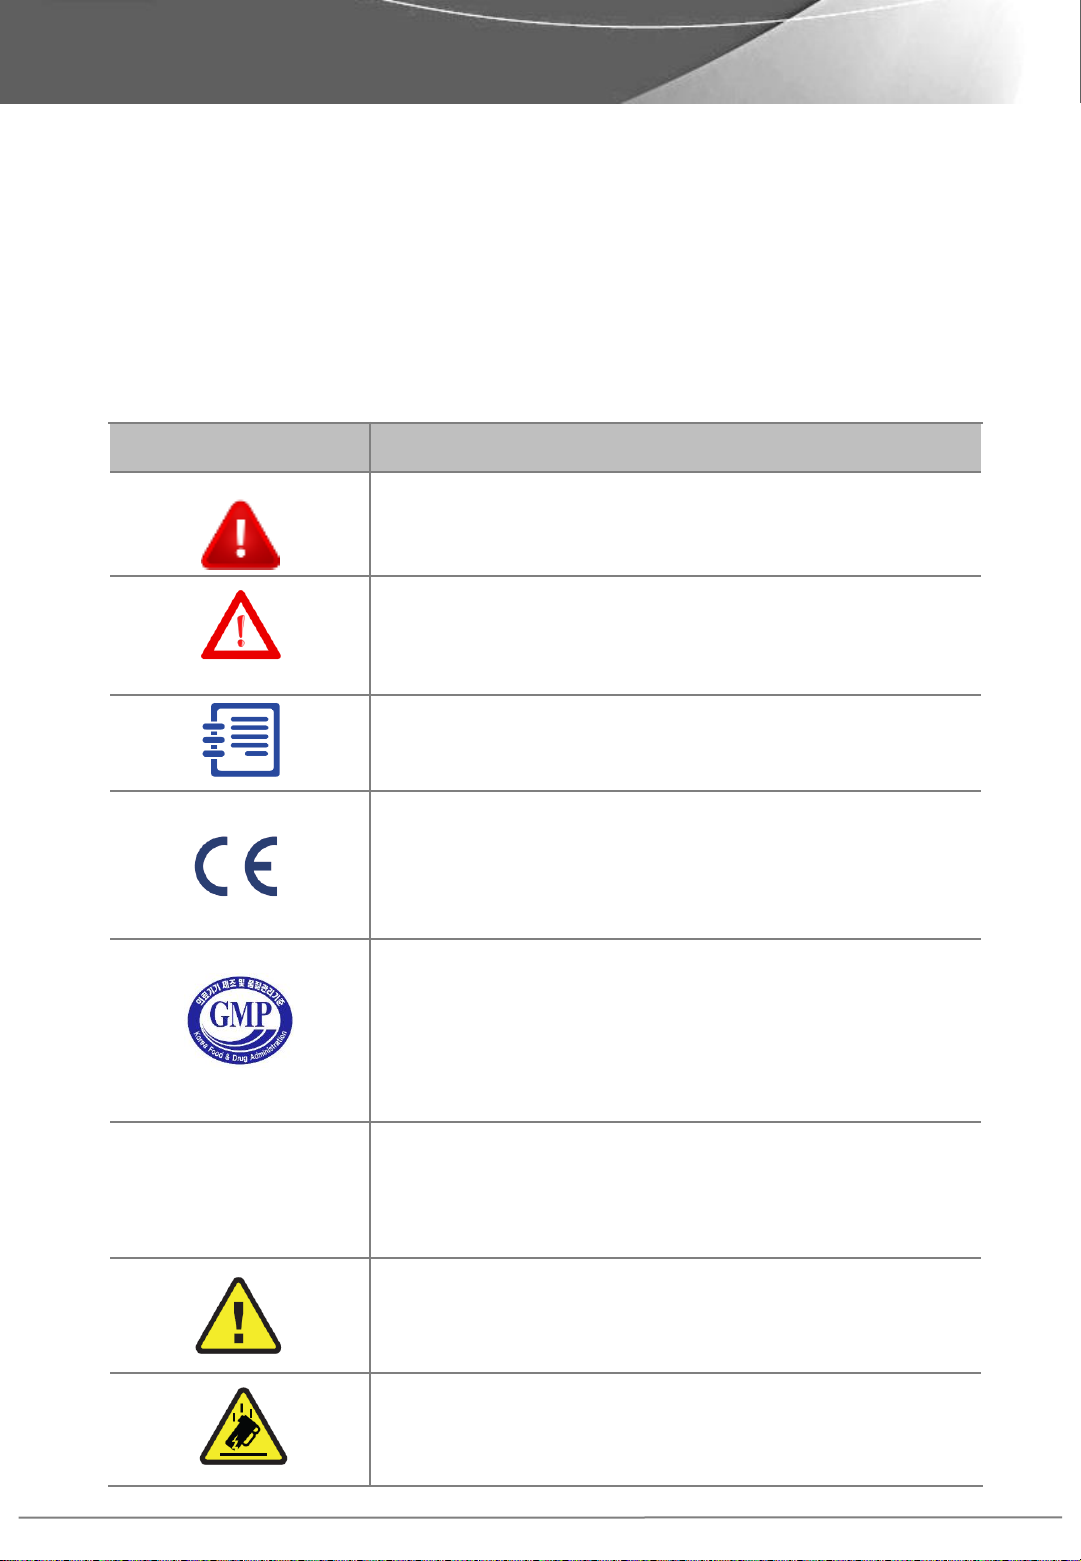
Provides basic safety precautions for the device and precautions on its operation..
Persons who intend to work with this device should be familiar with their safety precautions.
The equipment must be operated by appropriately trained safety personnel and must provide the correct
pre-procedure precautions to those who need to be operated.
2.1 Outlines
2. Safety Precautions
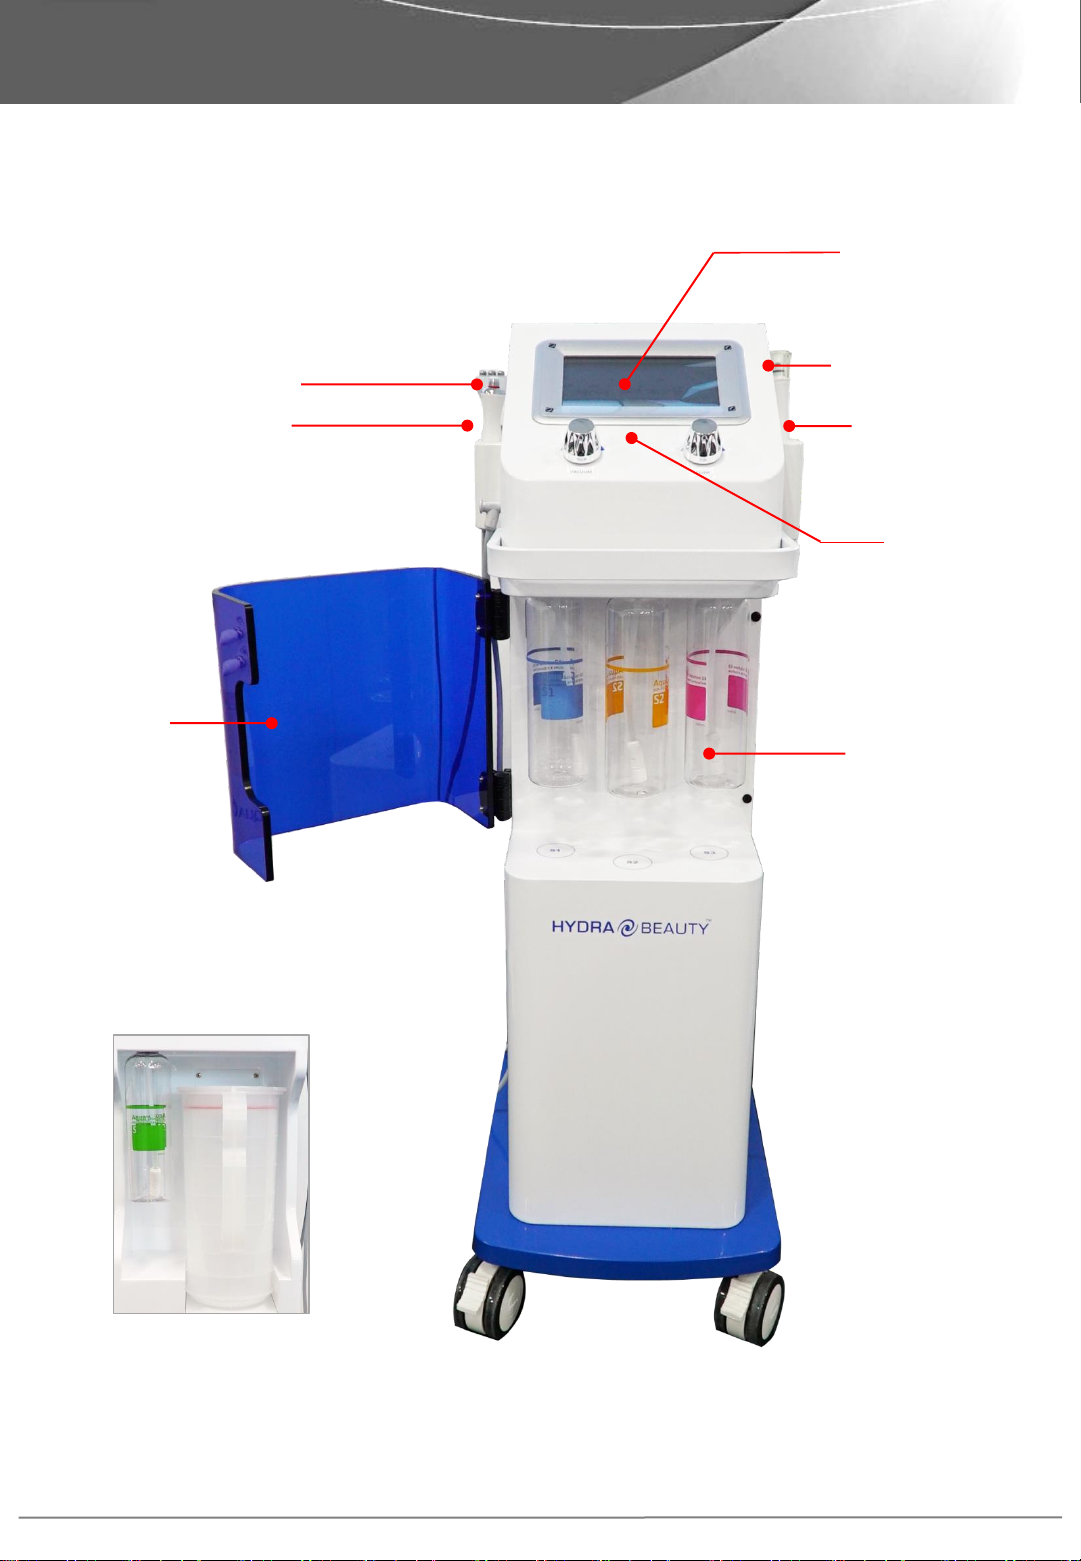
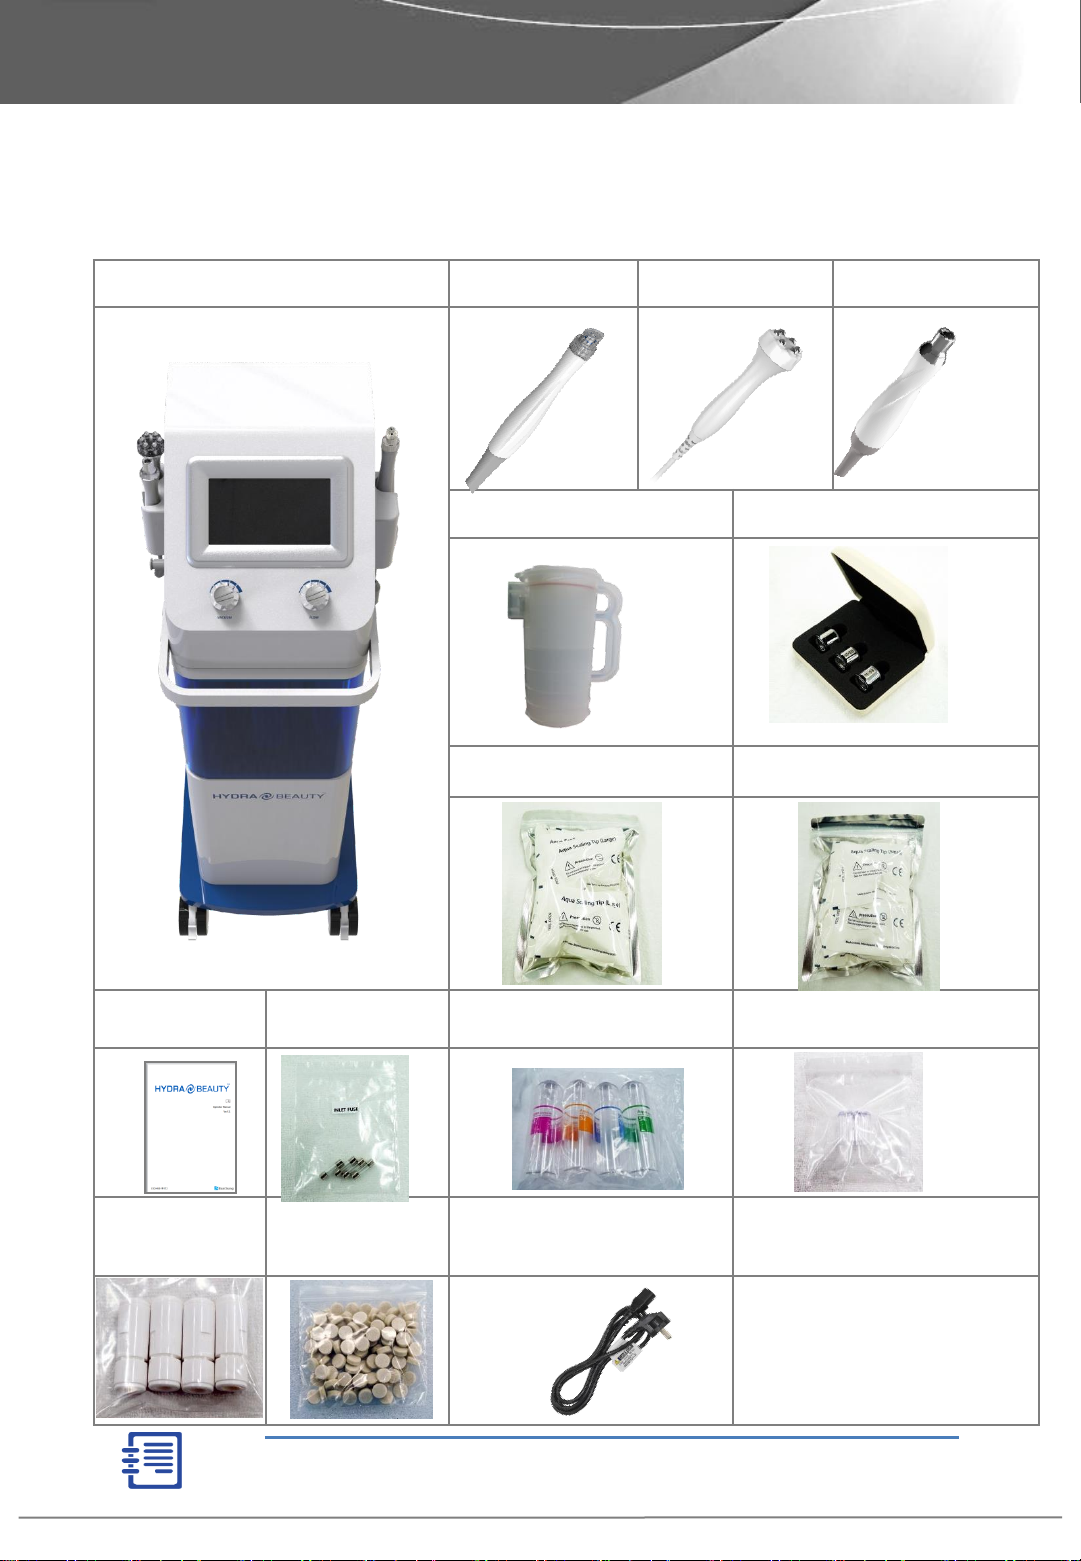
Be sure to check the main body and hand piece, tips, solutions, and large waste containers that you want
to use before using the device.
Install the instrument indoors in a well-ventilated place from high temperature, humidity, and direct
sunlight..
-Recommended temperature when operating : 0 - 26 ℃
-Recommended storage temperature : 0 - 35 ℃
-Relative Humidity : not more than 80 %
Install in a well-ventilated room from away from direct sunlight.
Install correctly on a flat surface.
Be careful when you move the device, do not cause external shock, as this device can cause significant
damage even in minor shocks.
2.2 General precautions
Do not use with other electric heating appliances when operating the device.
Be careful not to get water into the device. A high pressure wet current may form, causing an electric
shock or fire.
Do not use damaged power plugs or loose outlets.
Remove the power plug and keep it clean for a long time when not in use. This may cause an electric
shock, a short circuit or a fire.
If the device has flooded, unusual sounds, burning smells, or smoke, turn off the power immediately
before calling the service center.
2.3 Power Risk Precautions
Be sure to read the user manual and use it correctly.
The user manual contains instructions for use, as well as safety precautions, storage, and product warranty
information. For safe use, check all of the following safety information and operating instructions before using
this device. We are not responsible for personal injury or damage caused by not following any measures.

HYDRABEAUTY
7
Turn off the power and do not allow water to reach the device.
Wipe the affected area lightly with a soft cloth, and keep the handpiece and the main body clean by storing
in a sanitary condition.
2.5 Precautions for Cleaning
2. Safety Precautions
2.7 Taboo
This device is a clinically validated safe device. However, please do not attempt the procedure if the
patient has the following symptoms :
Do not use the device without operator's instructions even though person has no following symptoms.
In case of scar or infection in the surgical area
Keloid
In case of skin diseases (catching)
Has a condition such as skin irritation
Heart disease or artificial heart transplanter
Please consider the patient's condition and the procedure
environment during the procedure.
Procedures are performed with reference to the proposed procedural guidelines for this equipment,
but the results may vary depending on the patient's condition and the procedure environment. Please
set the procedure value and apply the procedure technique with sufficient consideration of the
patient's condition before perform the procedure
!
2.6 Regulations
Be sure to read the user manual before using the device.
Use genuine accessories because false one can cause device failure and, if damaged by false
accessories, no charge can be obtained.
Do not dismantle, modify or repair the appliance at will. Problems caused by random
disassembly / repair are not compensated.
Keep flammable materials away from installation site or surrounding area of procedure
Do not use the machine with a cover or cloth on it.
2.4 Fire Risk Precautions

HYDRABEAUTY
8
3.1 Product structure
3. Product composition
Aqua handpiece
Screen LCD
Cover Solution
(Inside)
Aqua
handpiece tip
- Front side -
Control lever
EP handpiece
-Rear side–
Solution4 (Cleansing mode)
&
Bulk waste basket
Peeling handpiece

HYDRABEAUTY
9
3. Product composition
3.2 Composition
NOTE
Each component is available through contact Eunsung Global Corp.(TEL: 02-514-9713)
①Main body ②Aqua handpiece ③EP handpiece ④Peeling handpiece
⑥Bulk waste basket ⑤3types diamond peeling tips
⑥Aqua tip large(10ea/1pack) ⑦Aqua tip small(10ea/1pack)
⑧User manual ⑨Fuses ⑩Empty solution bottle
500ml * 4ea(Extra) ⑪Handpiece cap(Extra)
⑫Solution
filters
*4ea(Extra)
⑫Peeling
handpiece filter
(100ea/1pack) ⑬Power cable
D10 / D20 / D30

HYDRABEAUTY
10
1. This device must be installed by an educated or licensed person in Eunsung Global Corp.
2. Before installation the device, taking into consideration its position and space, and at appropriate distances
from the device or other medical device that generates heat
3. Install in well-ventilated place with good temperature and humidity and avoid direct sunlight and high
humidity.
4.1 Outlines
4. Product installation
1. Position the device main body on the flat place, match the aqua handpiece cable exactly to the right hand
(when viewed from the front) connector hole and push the handpiece until an audible " click " is heard.
4.2 Handpiece installation
4.2.1 Aqua handpiece installation
- Handpiece connector hole- - Installed-
1. Place the peeling handpiece on the left side of the main body and connect it to the connector located on
the right side of the connector.
2. Align the square mark on the connector with the triangle mark on the cable and push in until an audible
click is heard.
3. Place the EP handpiece on the left side of the body and connect it to the connector located on the left
side of the hanger.
4. After connecting the cables, turn the locking screw to the right to fully fix it.
-Left side hanger of main body-
-Peeling handpiece connection-
4.2.2 Peeling handpiece & EP handpiece Installation
-EP handpiece connection-

HYDRABEAUTY
11
1. Choose the tip for use and connect to the handpiece correctly.
When replacing the size of the tip, pull the tip out and connect it to the handpiece correctly with the tip
you want to replace.
4.2 Handpiece installation
4. Product installation
2. When the treatment is done, in the case of cleaning or storing, should remove the tip and apply the cap on
the handpiece.
-Remove the tip- -Applying cap- -Correctly applied-
-Connector part- -Tip installation- -Correctly installed-
NOTE
Clean the hand piece cables after the solution 2 procedure using the " C " cleaning mode before
do the solution 3 procedure.
After all procedures (after all 3 solutions ), clean the handpiece again with cleansing mode and
store it.
4.2.3 Aqua tip connection

HYDRABEAUTY
12
1. Place the peeling handpiece filter correctly into the connector part.
2. Select the peeling tip you want to use, match it exactly to the connector part and connect it by turning it
clockwise.
When replacing the peeling tip, turn the tip counterclockwise to remove it and match the tip exactly to
the connector part.
3. Please install or replace the filters and tips correctly, refer to the pictures below.
4.2 Handpiece installation
4. Product installation
4.2.4 Peeling handpiece tip & installation and replacement of filters
- Remove peeling tip- - Filter
replacement -
- Ready to use -

HYDRABEAUTY
13
1. The aqua handpiece cable can be disconnected by pushing and pulling down the cable connection button.
4. Product installation
CAUTION
Follow the instruction when connecting the cable to the device. Otherwise, it will not operate properly and cause a
device malfunction.
4.3 Handpiece disconnection
4.3.1 Aqua handpiece disconnection
1. Remove by grabbing and pulling on the cable connector.
4.3.2 Peeling handpiece disconnection
1. Fully loosen the locking screw by turning it to the left and pull out the cable connector.
4.3.3 EP handpiece disconnection
- Aqua handpiece -
Button

HYDRABEAUTY
14
1. Open the cover at the front of the body and connect it to the connector part of solutions 1, 2, and 3,
which is starting from the left, and turn the cover counterclockwise to connect each hose. Solution 1, 2,
and 3 bottles are installed when the device is new. Then remove and mix the solution concentration with
distilled water together and connect them to the main body.
4.4 Installation of main body & solution bottles
4. Product installation
-All 3 solutions are installed correctly--Place for solution1, 2, 3 -
2. Solution 4 (for clanging mode) is connected separately to the rear of the main body. After you adjust the
connection part exactly, turn it counterclockwise to tighten it in order to connect it to the hose.
-Solution 4 is installed correctly-

HYDRABEAUTY
15
4.5 Cleaning & replacement for solution filter
4. Product installation
1. Default filters are installed when the device is new.
2. Clean the filter every time before you replace the solution.
3. See the illustration below and install the filter correctly
Lightly press the top of the filter to remove it.
Rinse in running water and pat on the flat surface.
Drain and reuse.
Fit the arrow on the filter
facing up.
Filter equipped appearance
(Rear side of device)
Filter equipped appearance
(Front side of device)

HYDRABEAUTY
16
4. Product installation
1. Place the connection parts for installing the large storage tank (hereinafter referred to as the storage tank)
in the connecting hole, and push the storage tank groove all the way to the end. When separating, hold the
handle firmly and pull it lightly.
-Connection parts for
waste container -
-
4.5 Installation of main body & large waste container
-Container has installed correctly-
-Connection parts for
waste container on the
mainbody-
!
CAUTION
The container must be pushed fully into place to exactly coincide with the connecting parts.
If not correctly installed, the valve pressure is decreased and may cause the device to be
damaged.
1. Connect the power cable to power socket at the rear-side of the body, and start the system by pressing the
switch at the top with the switch O (OFF) and l (ON).
4.6 Power supply
-Power on-
-Power off-

HYDRABEAUTY
17
5. How to use
1. Details the function and use of each button to ensure proper use of the instrument, and includes cautions,
and warnings in each procedure.
2. 2. Check the following before using this instrument :
- Are the hand piece, tip, and device clean to use?
- Is the solution correctly located?
- Is the device secured against movement?
- Is the power cable connected properly?
5.1 Outlines
5.2 Precaution before using
1. If the vacuum level is set too high, this can have side effects.
2. Be sure to perform the procedure safely by testing before performing the procedure.

HYDRABEAUTY
18
5. How to use
5.3 Screen & Control board
Control lever
①Vacuum level control lever
②Solution dispensing lever
Screen
①Aqua handpiece selection button
②
Aqua solution selection button
-1~3 : Skin treatment
-C : Cleansing mode
③Large waste container level
warning indication
④Peeling handpiece selection button
⑤EP handpiece selection button
⑥Procedure time display
⑦EP level control button
⑧Start / Stop button
⑨System management
Screen
Control lever
1
2
3
4
5
6
7
1
8
2
9

HYDRABEAUTY
19
5. How to use
5.4 The way to use the device
5.4.1 Diamond peeling mode
1. When the device is turned on, the peeling handpiece selection button is selected as follows :
2. After using a different handpiece, select the diamond peeling mode by pressing the ' Peeling hand
piece selection button in the screen
3. Adjust the vacuum lever on the control screen to set the vacuum level. Vacuum level can be adjusted
during the procedure.
4. Press the ' start/stop ' button to start the procedure.
5. When the treatment is done, press the ' start/stop ' button to finish..
- The screen which has selected diamond peeling handpiece -

HYDRABEAUTY
20
5. How to use
5.4 The way to use the device
5.4.2 Electroporation mode
1. Press the select button on the screen to select the electroporation mode
2. Adjust the level using the ' EP Level Adjustment Button '. [Default 5/ levels 1 to 10]
3. Press the ' start/stop button ' to start the procedure.
4. LED's can be selected by repeatedly pressing the ' electroporation selection button ' during the
procedure. [4 kinds LED: red, blue, purple, off]
5. When the treatment is done, press the ' start/stop ' button to finish.
- The screen which has selected electroporation
handpiece -
Table of contents