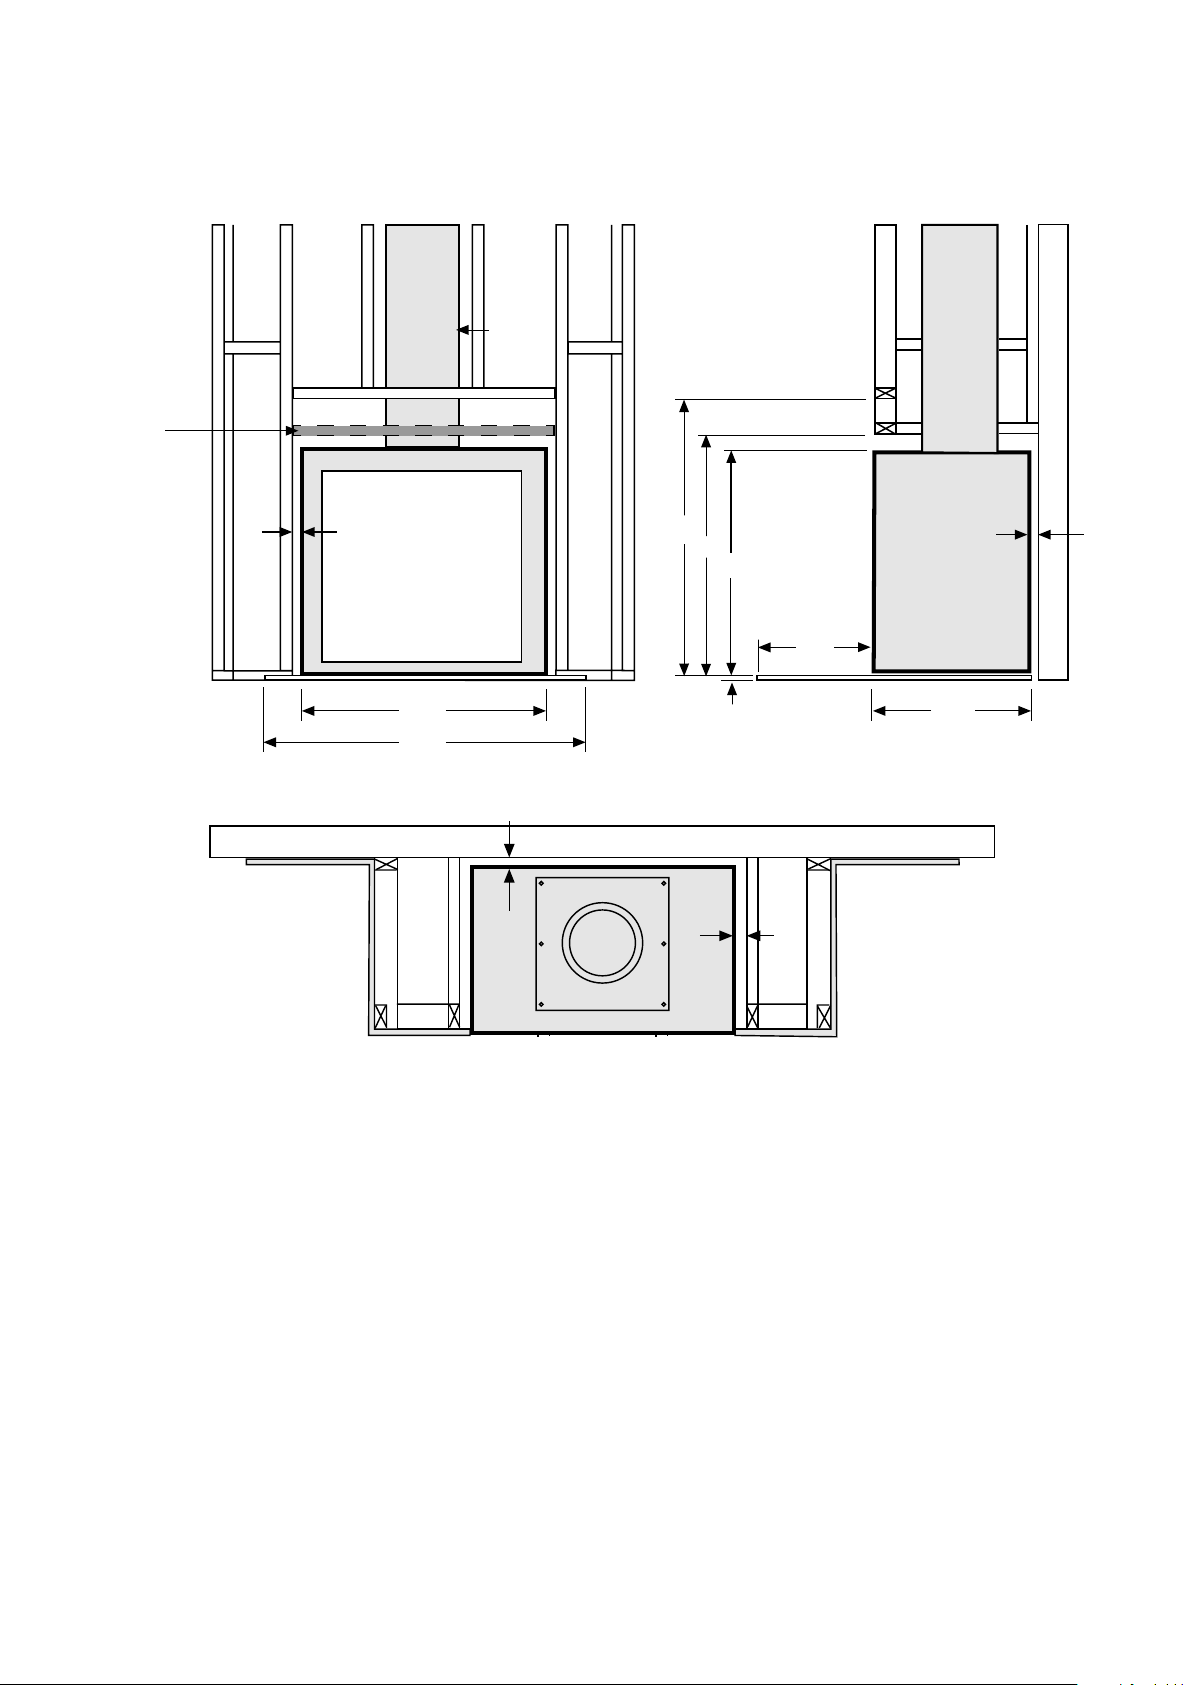
manuals.online logo
Brands
  1. Home
  2. •
  3. Brands
  4. •
  5. Eureka
  6. •
  7. Wood Stove
  8. •
  9. Eureka Jindara Quick start guide

Eureka Jindara Quick start guide

Zero Clearance
Cabinet Installation
ZCC Part No. 232367
Sheet 1 NEXT 2 GPN 232738 Rev.*
To suit Insert Models: Pearl & Tilga
35
40
ZCC Installation notes
This appliance has beenfactory tted and attached inside the ZCC. Depending on your desiredinstallation type, whether
it be at ground level, or elevated for a mid-wall installation, the following sequence of installation steps may needtobe adjusted
to suit. For any additional information please referto the Operation and Installation Instructions supplied with the appliance, orcontact
the dealerfrom whomyou purchased the heater from.
• Select the position that you wish to install your Insert ZCC, carefully allowing for ue clearances of 305mm inthe
roof cavity (the outer ue being 255mm requiresa25mm clearance on either side tocombustibles, making overall clearance of
305mm), and allowing for sucient clearances for combustibles where rear and side walls may play a roll in the installation
process.
•Ensure there is access to a power supply inside the enclosure for connecting the fan in the heater. Insome instancesan
extension cord maybe required to reach a powersupply. Please keep in mind that the fan will need tobe removed for cleaning,
and access to the power supply should be made relatively easy.
• Remove door (opendoor handle and swing door open to roughly 45deg and lifto hinge), remove castiron linersand bae
system from inside the rebox toreduce overall weight of unit.
•Using a 5mm allan key, remove x4 M8 cap screws which attach the fascia to the rebox. Carefullly remove the fascia and place
to the side. Removing fascia allows the ZCC to be mounted ush with front of enclosure face fora ush fascianish.
• If installing atground level ontoacombustible oor surface, place required oor protectorunderthe desired position ofthe
ZCC than carefully lift the ZCC into position.
• Fit ue system to upstands and appliance. Install throughroof as per ue manufactures instructions, and terminate at the
required height above the roof line, t cowl. Note: the base of the active ue will need to be trimmed and sealedwith re cement.
•Build your frame around the ZCC maintaining the clearances listed previously.
•Enclose the front of the frame with minimum 9mm non-combustible cement sheet, villaboard, bellis board etc.
•Enclose the sidesof the frame with plaster, timber, MDFetc.
• Install the mantle if required as per mantle clearances on the following page.
Note: If mantle is made out of combustible material, this appliance must have it’s hot air deector attached to the fasica.
• Re-attach removable fascia&door.
40 1000
835600
765
35
Zero
Clearance
Cabinet
(ZCC)
18mm Bellis Board,
cement sheet or
equivalent min.
Tripleskin
Flue
noggin
800
side studs
945
min. width
Hearth
550
For elevated
installation detail
or hearth reduction
refer Installation
Instructions
Sheet 1 NEXT 2 GPN 232738 Rev.*
If desirable, a non-
combustible noggin can
be attached closer than
1000mm above the base
of the appliance.
Non-combustible
hearth
Breast plate no
thicker than 30mm
55 (appliance
to mantle upright)
250
2petS1petS
Plaster, timber, MDF etc.
Minimum 9mm thick
cement sheet, villaboard
or non-combustible
material on front face
of framing
Non-combustible material can
overlap clearance gap between
ZCC and frameing, and run over
the front of the ZCC. DO NOT
silicon or adhear material to ZCC
as heat expansion of ZCC will
cause cracking.
Vent (optional) - Position vent
such that access is
available to fan power
supply when vent is
removed.
Hearth depth
mm in front
of unit
Vent may be
located in the
wall of on the oor.
Zero Clearance
Cabinet Installation
ZCC Part No. 232367
To suit Insert Models: Pearl & Tilga
1500
1410
Door
Removable fascia
Mantle only
hot air deflector
M8 cap screw
• 10” Upstands
55mm 97mm
• 8” Upstand
425mm 370mm
10” 8”
450mm 385mm
6 inch Flue Kit
Spigot
3rd Skin
2nd Skin
1st Skin
Heater
10” Gal Flue
8” Gal Flue
6˝ S/S Flue
4th Skin
Minimum Requirements:
Note: Some states will use dierent
size ue kits which will require the
appropriate upstande.
10” Upstand
8” Upstand
•5 x 6” S/S Flue
•4 x 8” Gal Flue
•4 x 10” Gal Flue
Sheet 2 NEXT 2 GPN 232738 Rev.*

Other Eureka Wood Stove manuals

Eureka Jewel Module User manual

Eureka

Eureka Jewel Module User manual

Eureka Jasper User manual

Eureka

Eureka Jasper User manual

Eureka 2572200 User manual

Eureka

Eureka 2572200 User manual

Eureka Pearl Freestanding User manual

Eureka

Eureka Pearl Freestanding User manual

Eureka Pearl Insert User manual

Eureka

Eureka Pearl Insert User manual

Eureka Jindara Duet SRS2/Duplicity User manual

Eureka

Eureka Jindara Duet SRS2/Duplicity User manual

Eureka Nugget Mk2 Freestanding User manual

Eureka

Eureka Nugget Mk2 Freestanding User manual

Popular Wood Stove manuals by other brands

Century Heating FW2900 Installation and operation manual

Century Heating

Century Heating FW2900 Installation and operation manual

Bosca CLASSIC 450 owner's manual

Bosca

Bosca CLASSIC 450 owner's manual

Pacific energy ALDERLEA T5 LE Installation and operating instructions

Pacific energy

Pacific energy ALDERLEA T5 LE Installation and operating instructions

Nibe Contura C820TG manual

Nibe

Nibe Contura C820TG manual

Jøtul Oslo F 500 Installation and operating instructions

Jøtul

Jøtul Oslo F 500 Installation and operating instructions

Ashley AF700 Owner's installation and operation manual

Ashley

Ashley AF700 Owner's installation and operation manual

Invicta IWAKI Specific User and Installation Manual

Invicta

Invicta IWAKI Specific User and Installation Manual

Morso 8800 Instructions for installation and use

Morso

Morso 8800 Instructions for installation and use

Vogelzang International PERFORMER TR009 owner's manual

Vogelzang International

Vogelzang International PERFORMER TR009 owner's manual

Olympia ELLIPS Installation and user manual

Olympia

Olympia ELLIPS Installation and user manual

Empire Comfort Systems GATEWAY 3500 Installation and operation manual

Empire Comfort Systems

Empire Comfort Systems GATEWAY 3500 Installation and operation manual

Nibe Contura C890G manual

Nibe

Nibe Contura C890G manual

Century Heating CB00027 owner's manual

Century Heating

Century Heating CB00027 owner's manual

Osburn 2300 owner's manual

Osburn

Osburn 2300 owner's manual

Harvia M1 Instructions for installation and use

Harvia

Harvia M1 Instructions for installation and use

MIDTHERM Pyrus V operating instructions

MIDTHERM

MIDTHERM Pyrus V operating instructions

HWAM 3110 Mounting instructions

HWAM

HWAM 3110 Mounting instructions

Town & Country Fires Caedmon ECO Smoke Control Installation and user instructions

Town & Country Fires

Town & Country Fires Caedmon ECO Smoke Control Installation and user instructions

manuals.online logo
manuals.online logoBrands
  • About & Mission
  • Contact us
  • Privacy Policy
  • Terms and Conditions

Copyright 2025 Manuals.Online. All Rights Reserved.