Euro-Gas CO2-SS-20 User manual

1
CARBON DIOXIDE CO2
CO2-SS-20 ANALYSER
USER MANUAL
EURO-GAS MANAGEMENT SERVICES LTD
CHURSTON HOUSE, BASCOMBE ROAD, CHURSTON FERRERS, DEVON, TQ5 0JJ, UK
«: +44 (0)1803 844414 Fax: +44 (0)1803 844224

2
Table of contents
1
Introduction ............................................................................................................3
2
Getting Started..........................................................................................................3
2.1
Case contents ................................................................................................3
2.2
Device Layout.................................................................................................4
2.3
Charging the battery......................................................................................4
2.4
Connecting the tubing and filter......................................................................6
3
Operation..................................................................................................................7
3.1
Switching the unit ON/OFF...............................................................................7
3.2
Indicator icons ...............................................................................................7
3.3
Home Screen layout.........................................................................................8
3.4
Using the touch screen.................................................................................. 8
3.5
Sampling/Measuring Mode ........................................................................... 9
3.6
Resolution adjustment................................................................................... 9
3.7
Measurement procedure............................................................................... 9
4
Calibration
.......................................................................................................... 10
5
Available Accessories ........................................................................................... 11
6
Service, Factory Calibration, Technical Support & Warranty
.................................. 11

3
1. INTRODUCTION
The CO2-SS-20 is an handheld Carbon Dioxide (CO2) analyser, which offers simple and
highly accurate CO2 analysis with fast and intuitive touch screen interface.
The unit has been specially developed to measure, verify and validate CO2 levels in CO2
incubators, proving popular in medical departments, research and laboratories.
The product is also utilised by field service engineers to repair, validate and calibrate
CO2 incubators and equipment.
Patented dual beam selective infrared sensor technology ensures extremely fast start
and minimal warm up time. This advanced equipment offers an host of advantages, as
well
as ease of use for all personnel, extending appeal of the CO2-SS-20 into the more
traditional areas of CO2 measurement, including horticulture, air quality and safety.
The CO2-SS-20 CO2 Analyser is extremely easy to use but it is essential that these
Operating Instructions are read prior to use.
2. Getting Started
2.1 Case contents
1. CO2-SS-20 CO2 Analyser
2. 1 metre of sample tubing with filter and 1 x Spare Filter
3. User Manual
4. Mains charger with UK AC head
5. USB A Male to Right Angle Mini USB
6. US, EU and AU Mains charger heads
3
5
6
1 4
2

4
Getting Started
2.2 Device Layout
1. On/Off Button
2. Gas Inlet Luer
3. Touch screen
4. USB/ charging port
5. Tilt stand
6. Gas outlet
Getting Started
3
4
1
5
2
6
2.3 Charging the battery
Use the charger to charge the battery before using it for the first time. A computer can
be used to charge the device by connecting via the USB cable.
NOTE: The device should always be switched On while charging.
The device can be used while it is charging but it may take longer to fully charge the
battery.
IMPORTANT NOTE: Use only the approved chargers, batteries, and cables. Unapproved
chargers or cables can cause the battery to explode or damage the device.
5
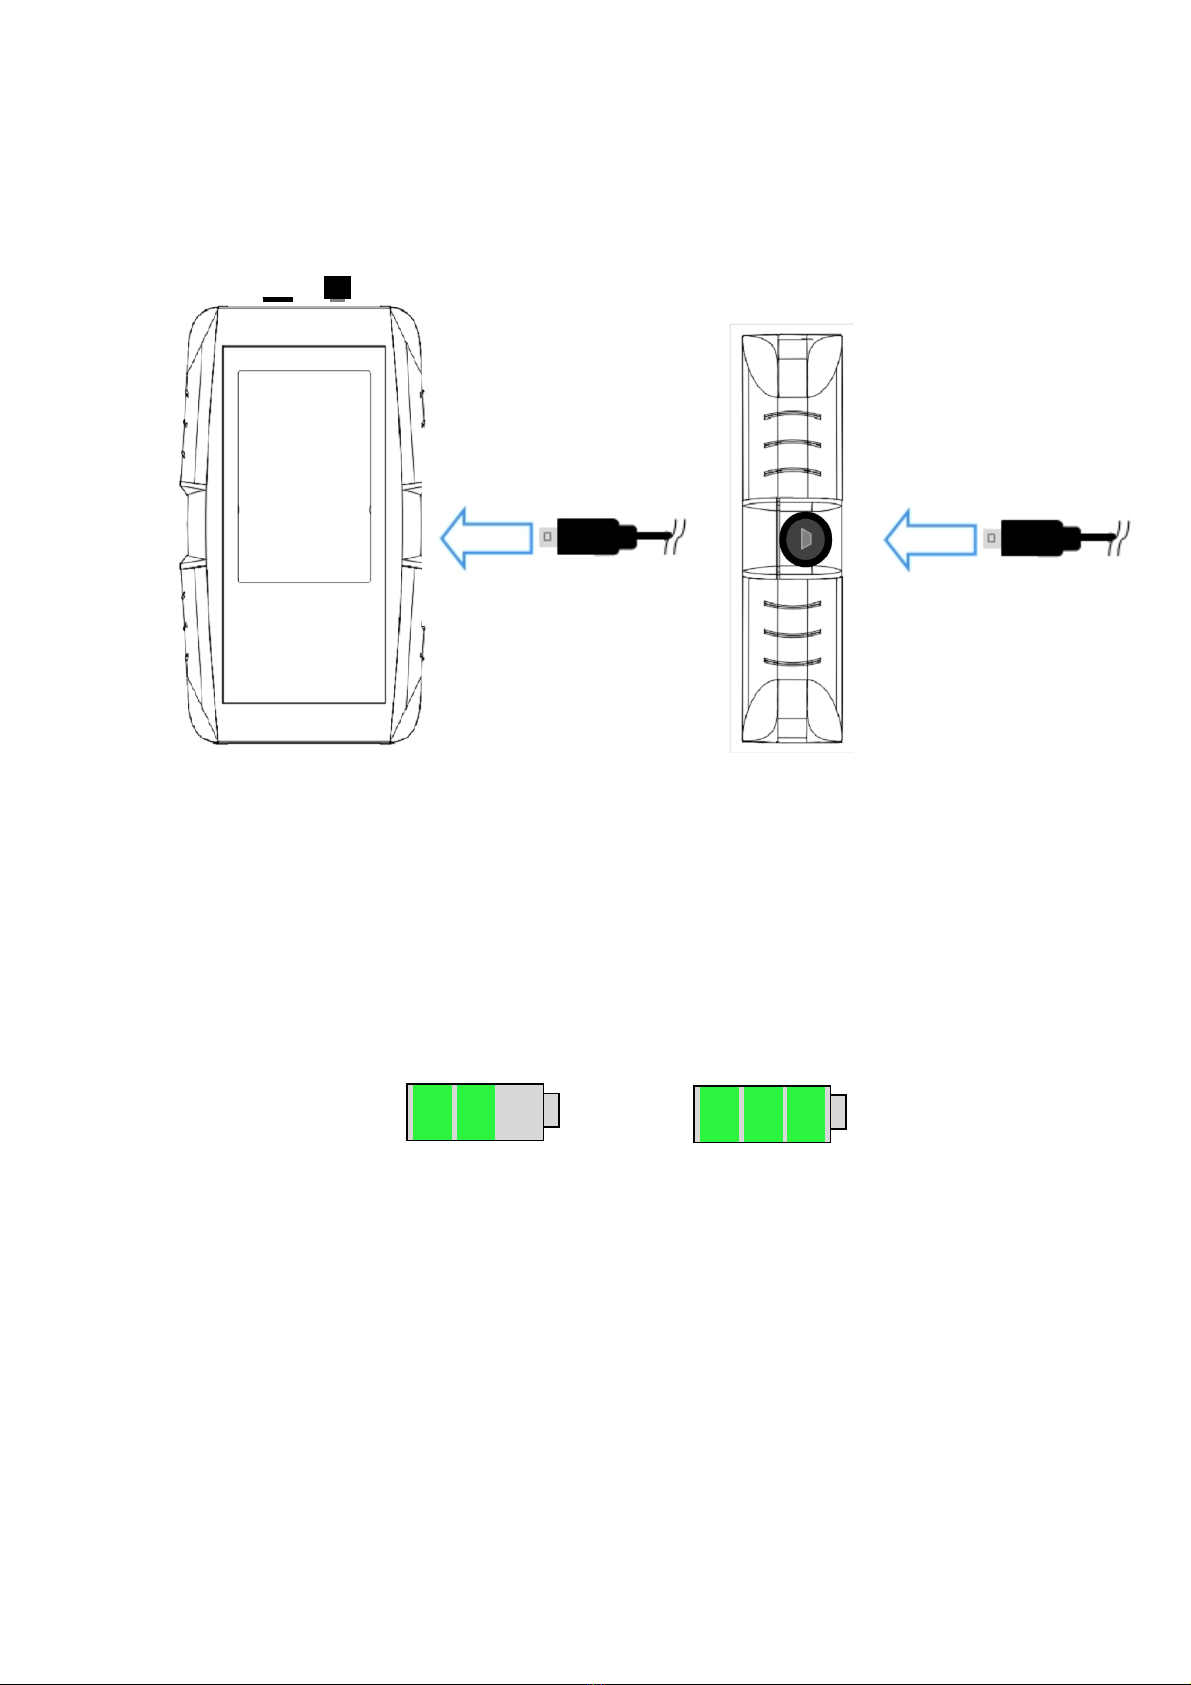
Charging with the charger
Connect the USB cable to the USB power adaptor and then plug the end of the USB
cable into the CO2-SS-20 USB port.
IMPORTANT NOTE: Connecting the charger improperly may cause serious damage to
the device. Any damage caused by misuse is not covered by the warranty.
Checking the battery charge status
When charging the device the battery charge status icon will appear in the middle of
the screen:
Charging Charged
After fully charging, disconnect the device from the charger.
6
Getting Started
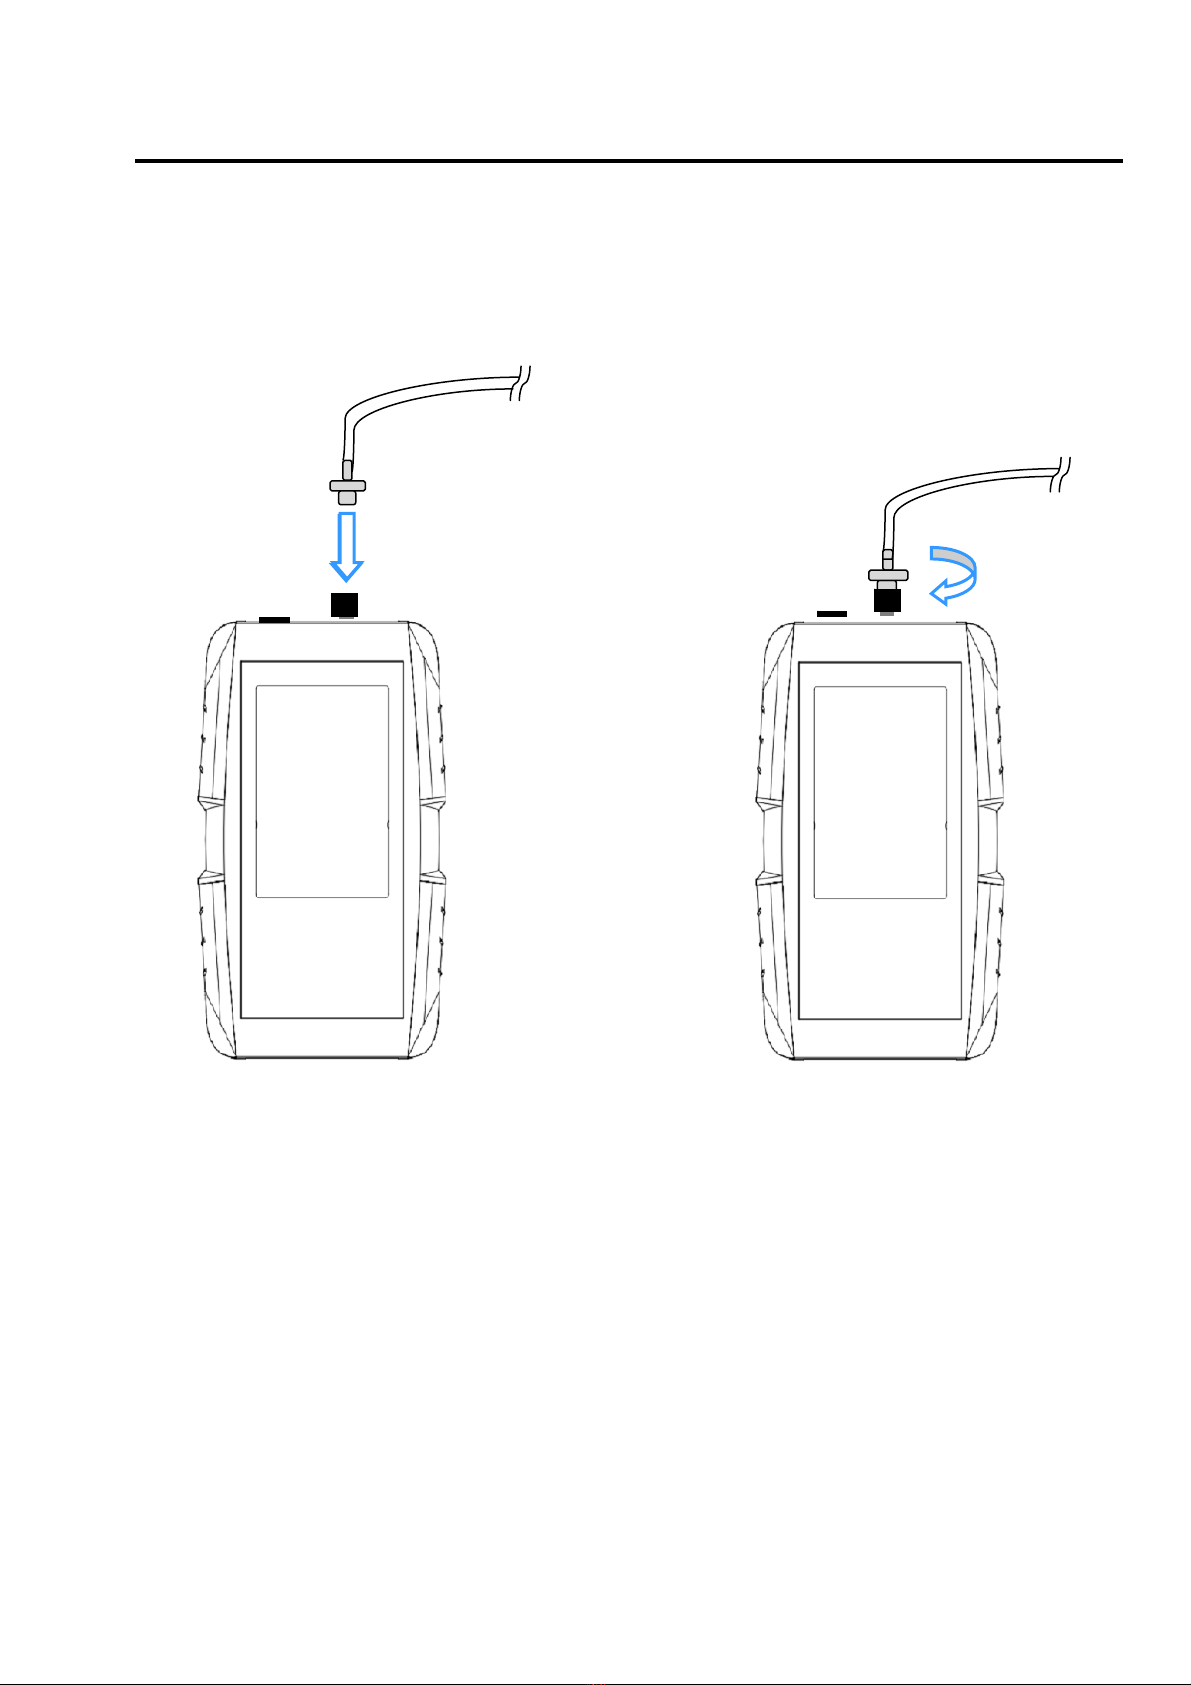
2.4 Connecting the tubing and filter
IMPORTANT NOTE: Always ensure that the filter provided is used.
Connect the filter and tube to the gas inlet luer connector. Push the filter onto the luer
and twist clockwise to lock.
7
3. Operation
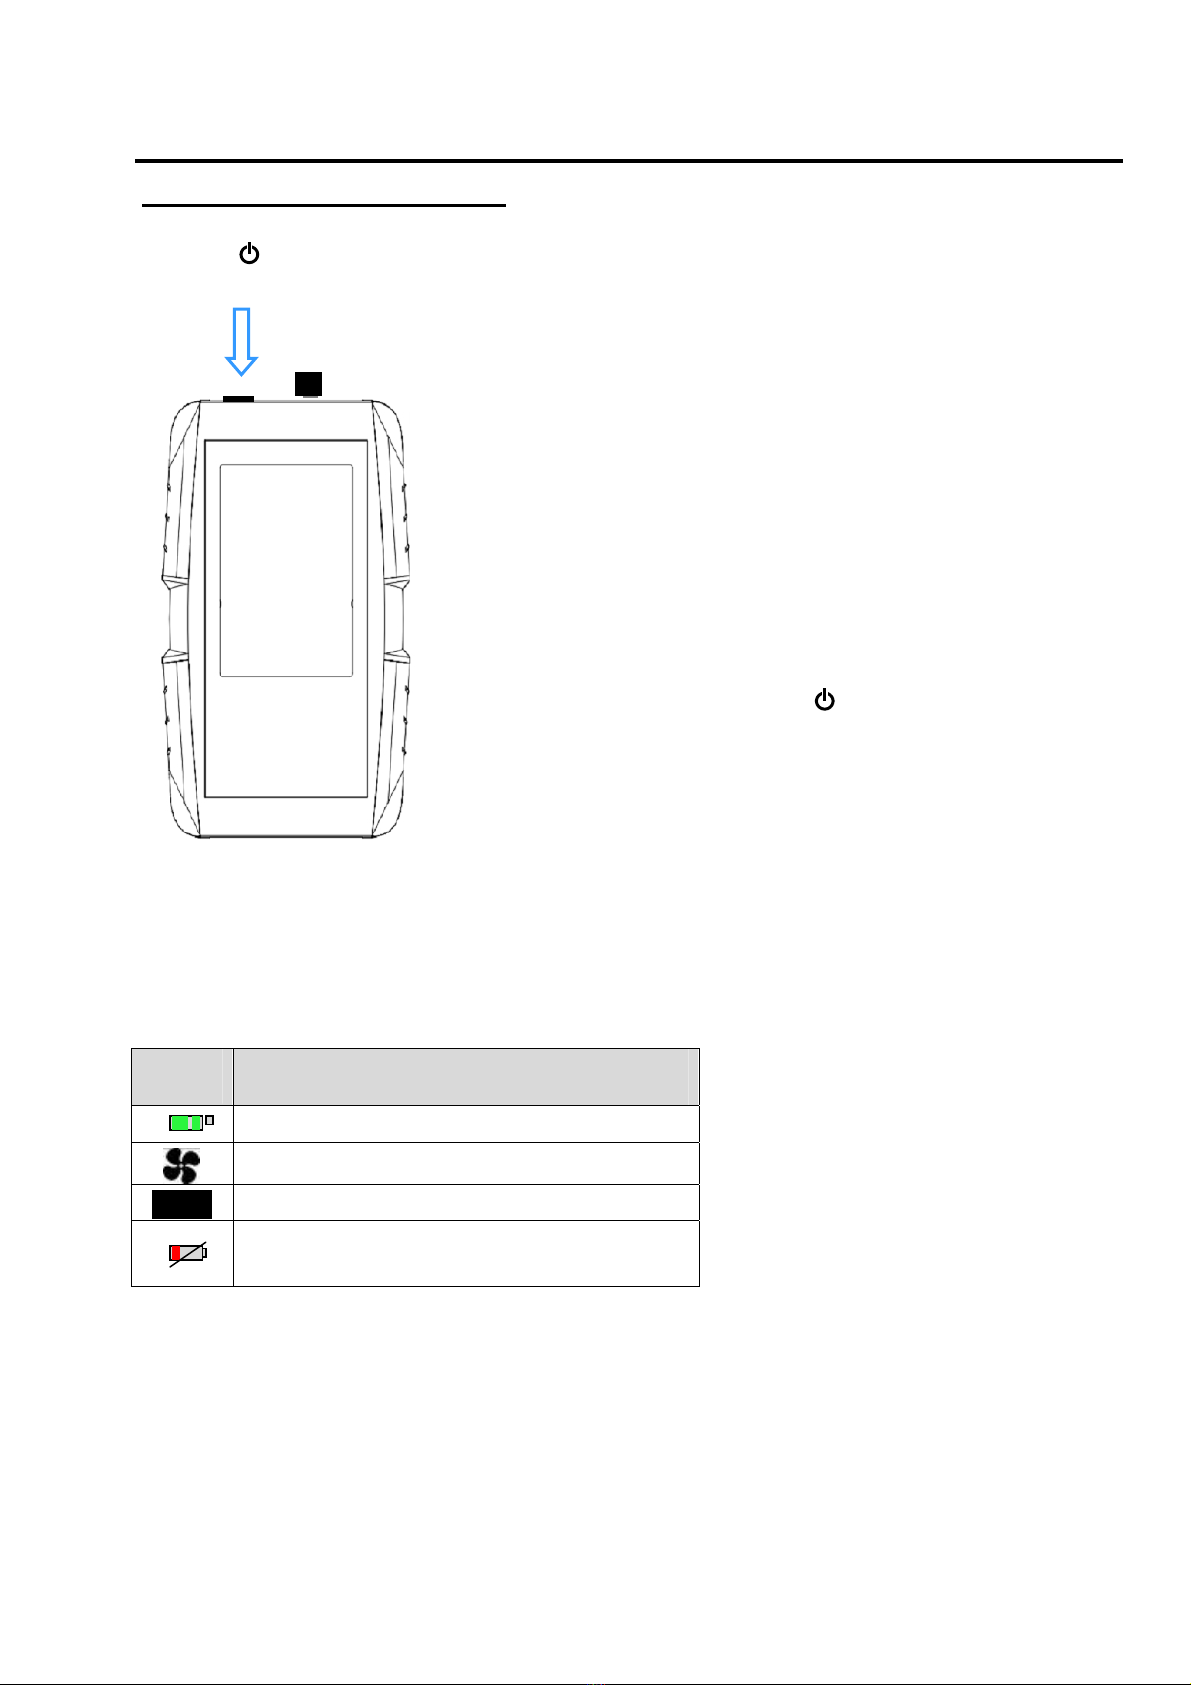
3.1 Switching the unit ON/OFF
Press the button. The unit is now switched on.
After being turned on, the unit will start up within
6 seconds and the current CO2 measured value will be
displayed.
To turn the analyser off, press the button again.
3.2 Indicator icons
The icons displayed on the screen provide information about the status of the device.
The icons listed in the table below are most common.
Icon Meaning
Battery power level
Pump running
HOLD Measurement ‘Hold’ enabled
Battery level low connect
charger
8
3. Operation
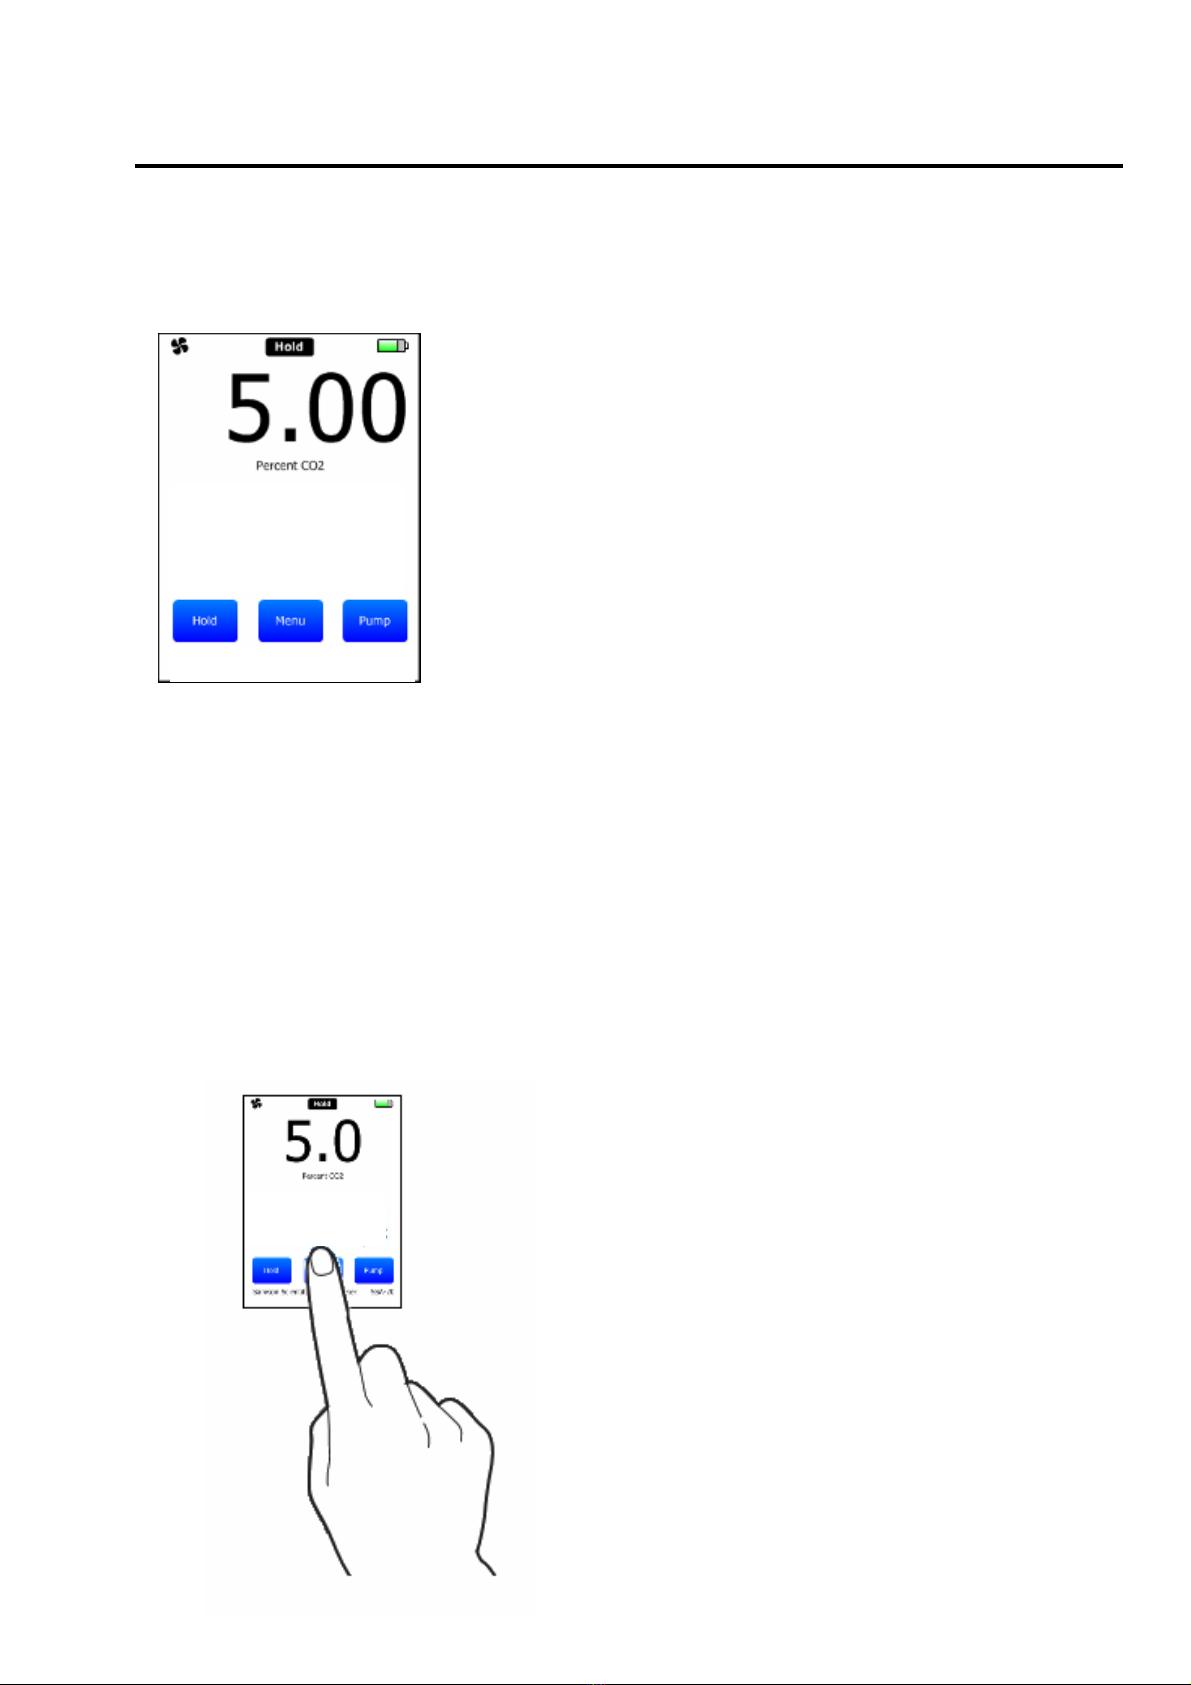
3.3 Home Screen layout
The Home screen is the starting point to access all of the device’s features. It displays
the currently measured “PERCENT CO2” level, indicator icons, Hold, Menu and Pump
buttons.
3.4 Using the touch screen
IMPORTANT NOTE: Use only fingers to use the touch screen.
•Do not allow the touch screen to come into contact with other electrical devices
as electrostatic discharges could cause the touch screen to malfunction.
•Do not allow the touch screen to come into contact with water. The touch screen
may malfunction in humid conditions or when exposed to water.
•To avoid damaging the touch screen, do not tap it with anything sharp or apply
excessive pressure to it with your fingertips.
To operate any of the on-screen buttons, tap it with a finger.
9
3. Operation
3.5 Sampling/Measuring Mode
IMPORTANT NOTE: Always ensure that the filters provided are used and
replaced regularly
IMPORTANT NOTE: Before each day of use, we recommend that the unit
is zeroed in air by following the “Calibrate in Air” procedure in
Section 4. Calibration.
To turn on the integral gas pump, briefly press the Pump button.
To turn off the pump, again briefly press the Pump button.
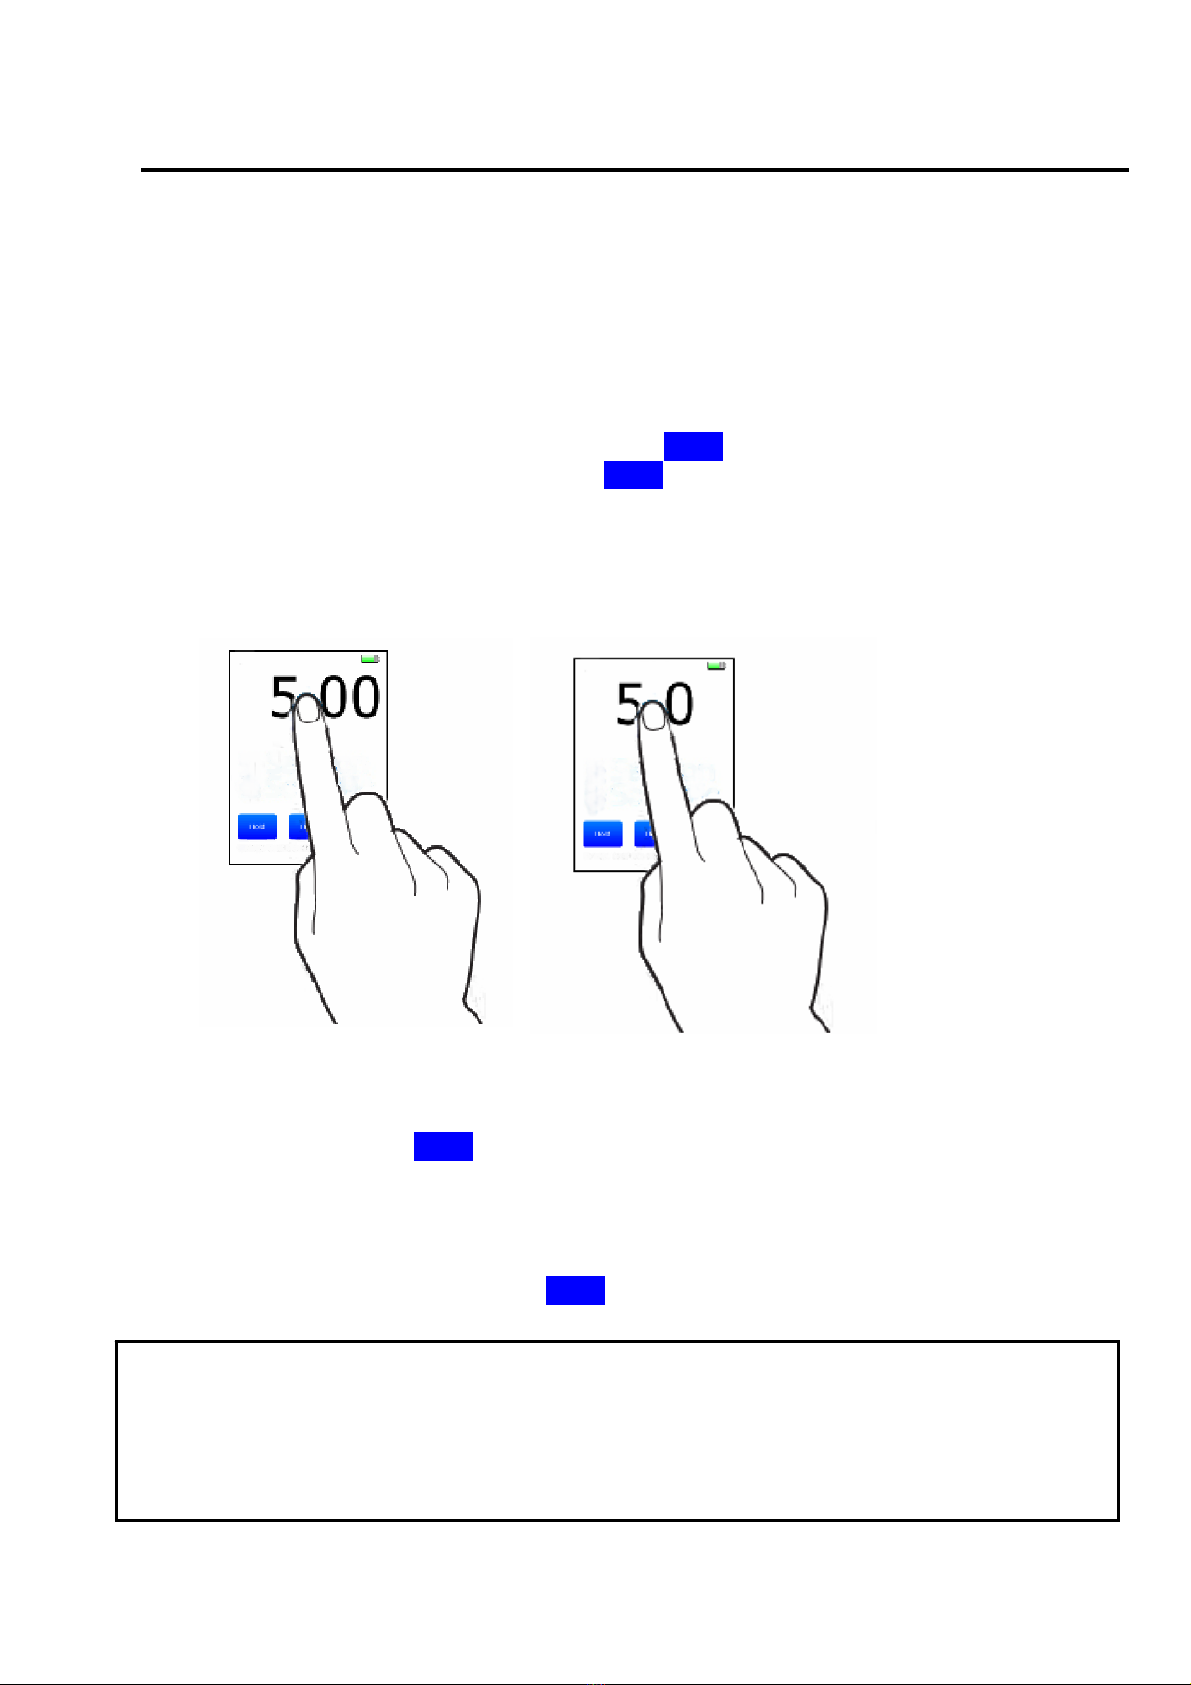
3.6 Resolution adjustment
To adjust the measurement resolution from 1 decimal place to 2 decimal places tap the
“Percent CO2” area of the screen:
3.7 Measurement procedure
When sampling the CO2 level of a CO2 Incubator, connect the unit tubing to the
sample port and press the Pump button to turn on the metering gas pump.
A sample of the atmosphere from the CO2 Incubator will then be drawn in through the
tube and the “PERCENT CO2” reading will start to change as the gas to be measured is
drawn into the unit.
Monitor the reading until it stabilises. This will typically take around 90 seconds.
Take note of the reading and press the Pump button to turn off the metering gas pump.
IMPORTANT NOTE: As the atmosphere in an incubator is normally kept at a high humidity,
we recommend that you DO NOT leave the analyser sampling on a humidified incubator for
longer than 2 minutes. After sampling on a humidified Incubator for a long period, we
recommend that you continue to run the analyser pump in air for 30 seconds to flush out any
humidity which could have built up inside the sensor.
10
4. Calibration
IMPORTANT NOTE: Before each day of use, we recommend that the unit is
zeroed in air by following the “Calibrate in Air” procedure below.
ZERO CALIBRATION
The analyser can be calibrated in clean outside air or by using Nitrogen.
Calibrate in Air
IMPORTANT NOTE: It is essential to ensure that the unit is in clean air in an outdoor
environment before attempting an air calibration and ensure your exhaled breath does
not affect the procedure. Failure to adhere to these guidelines could result in an
incorrect calibration result.
- From the home screen, press Menu
- Press Calibrate in Air and follow the on screen instructions.
- Press the Pump button and run the pump for 1 minute. When the reading has
stabilised, press Calibrate and the unit will adjust the level to atmospheric CO2 0.04%.
- Press the Pump button to switch off the pump.
- Press the Back button two times to return to the home screen.
Calibrate in Nitrogen
- From the home screen, press Menu
- Press Calibrate in Nitrogen and follow the on screen instructions.
- Connect a Nitrogen source with pressure set no higher than 0.3L/min and press the
Pump button.
- Run the pump for 90 seconds and when the reading has stabilised press Calibrate and
the unit will adjust the level to CO2 0.00%.
- Press the Pump button to switch off the pump.
- Press the Back button two times to return to the home screen.
Reference to Calibrated Gas
NOTE: There should be no need to Reference the analyser to a calibrated gas mixture
between service intervals but if you do wish to verify the calibration using a calibrated
gas mixture, it is essential to ensure that the unit is zeroed in clean air in an outdoor
environment before referencing. Ensure your exhaled breath does not affect the
procedure during the air calibration, as failure to adhere to these guidelines could result
in an incorrect calibration result.
- From the home screen, press Menu
- Press Reference to Calibrated Gas and follow the on screen instructions.
- Connect a calibration gas supply with pressure set no higher than 0.3L/min and press
the Pump button.
- Enter the value of the calibration gas cylinder by using the Down and Up buttons. The
default value is 5.00 but this value can be adjusted to any level from 0-21%.
- Run the pump for 90 seconds and when the reading has stabilised, press Calibrate and
the unit will adjust the measured level to CO2 5.00%.
- Press the Pump button to switch off the pump.
- Press the Back button two times to return to the home screen.

11
5. Available Analysers & Accessories
CO2 Analyser Accessories Part Number
CO2-SS-20 CO2 Analyser with hard case 20-001
CO2-SS-20 CO2 Analyser with Datalogging
& hard carry case 20-002
Spare Inlet filter pack (2 filters) 20-005
Spare length of sample tubing with filter 20-006
Car charging adapter 20-007
Spare mains charger kit 20-008
Annual Calibration 20-009
Full service & Calibration 20-SERV
Hard Carry Case 20-CASE
6. Service, Factory Calibration, Technical Support & Warranty
Servicing
There are no user-serviceable parts inside the CO2 Analyser. Unauthorised removal of
the rear cover of the unit will invalidate the warranty.
Your CO2 analyser
should be regularly calibration checked - a range of calibration check
gases can be supplied directly by Air Products plc (details on request). We recommend
the analyser is serviced at regular intervals (twelve months) – servicing is available from
Euro-Gas.
The inline filter, connecting to the gas inlet port must be replaced when the PTFE
membrane becomes contaminated or saturated with moisture. New filters are available
from Euro-Gas.
Getting Technical Support
If you have questions about the use or features of your CO2 Analyser or have any issues,
please email: [email protected]. When contacting us for support, please include
as much information as you can, along with the Serial Number of your unit. This will
allow us to help you more quickly.
Warranty
Euro-Gas warrants this unit to be free of defects in materials and workmanship for a
period of 12 months from date of despatch. If the unit malfunctions, it should be
returned to the factory for evaluation. Upon examination by Euro-Gas, if the unit is
found to be defective within the warranty period, it will be repaired or replaced at no
charge. Our WARRANTY does not apply to defects resulting from any action of the
purchaser, including but not limited to mishandling, improper interfacing, operation
outside of design limits, improper repair, or unauthorised modification.
This WARRANTY is VOID if the unit shows any evidence of having been tampered with
or shows evidence of having been damaged as a result of excessive corrosion, current,
heat, moisture, vibration, improper specification, misapplication, misuse or other
operating conditions outside of the manufacturer’s control. The warranty excludes:

12
damages attributable to improper use, normal wear and defects that have only a
negligible influence on the device's value or suitability for use.
Liability for the functioning of the CO2-SS-20 unit shall pass at all events to the owner
or operator if the unit is improperly maintained or repaired or if it is used other than for
its intended purpose. Euro-Gas accepts no liability for damage caused by failure to
observe the above information. The warranty expires in the event that work is carried
out by agents we have not authorised or if parts are used other than original spare
parts.
Claims under the warranty may be made in all countries where this device is sold by
authorised dealers.
In the event of any claim under the warranty, please return the device to us. The buyer
shall bear the costs of transportation and the risk while the device is in transit. The
execution of work under the warranty does not affect the warranty period in any way.
The above information does not extend the conditions of warranty and liability
contained in the Terms and Conditions of Sale and Delivery of Euro-Gas Management
Services Limited.
Packaging & Transportation
This unit is supplied together with these operating instructions. Please check the
packaging for any damage when the product is delivered and report any damage
immediately to the forwarding agency and dealer. Do not throw or drop, as the unit
may be damaged or scratched. Protect against wet conditions, humidity, dirt and dust.
This device is a measuring instrument with sensitive electronic components. When
returning it, please use the appropriate class of packaging according to the applicable
regulations.
Disposal
Obsolete devices should be rendered unusable and disposed of according to the
relevant regulations. Please contact your local authority for information about disposal.
The data contained in this document is believed to be accurate and reliable. The data given is for guidance only.
Euro-Gas Management Services Ltd accepts no liability for any consequential losses, injury or damage resulting
from the use of this datasheet or the information contained in it. Customers should test the equipment under their
own conditions to ensure that the equipment is suitable for their own requirements and in accordance with the
plans and circumstances of the specific project and any standards/regulations pertaining to the country in which
the units will be utilised. This datasheet is not intended to form the basis of a contract and in the interest of
product improvement, Euro-Gas reserves the right to alter design features and specifications without notice.
03/15
EURO-GAS MANAGEMENT SERVICES LTD
CHURSTON HOUSE, BASCOMBE ROAD, CHURSTON FERRERS,
DEVON, TQ5 0JJ, UK
«: +44 (0)1803 844414 Fax: +44 (0)1803 844224
Table of contents
Popular Measuring Instrument manuals by other brands

ProCharger
ProCharger LADEAMPEL Instructions for installation and use

SEC
SEC Signature DIR Instruction and operation manual

Krautkramer
Krautkramer DM4 manual

Turner Designs
Turner Designs 8000 Operating procedure

Contrec
Contrec 515 Operation manual

Endress+Hauser
Endress+Hauser Proline Promag 50P technical information


