Eurolyser Cube User manual
8e6b5250-532e-4fc8-bc8f-0be2f7ec7200 / DP1.0 / 2013-06-19 1 / 12 Eurolyser Diagnostica GmbH
Quick Reference

8e6b5250-532e-4fc8-bc8f-0be2f7ec7200 / DP1.0 / 2013-06-19 2 / 12 Eurolyser Diagnostica GmbH
ENGLISH
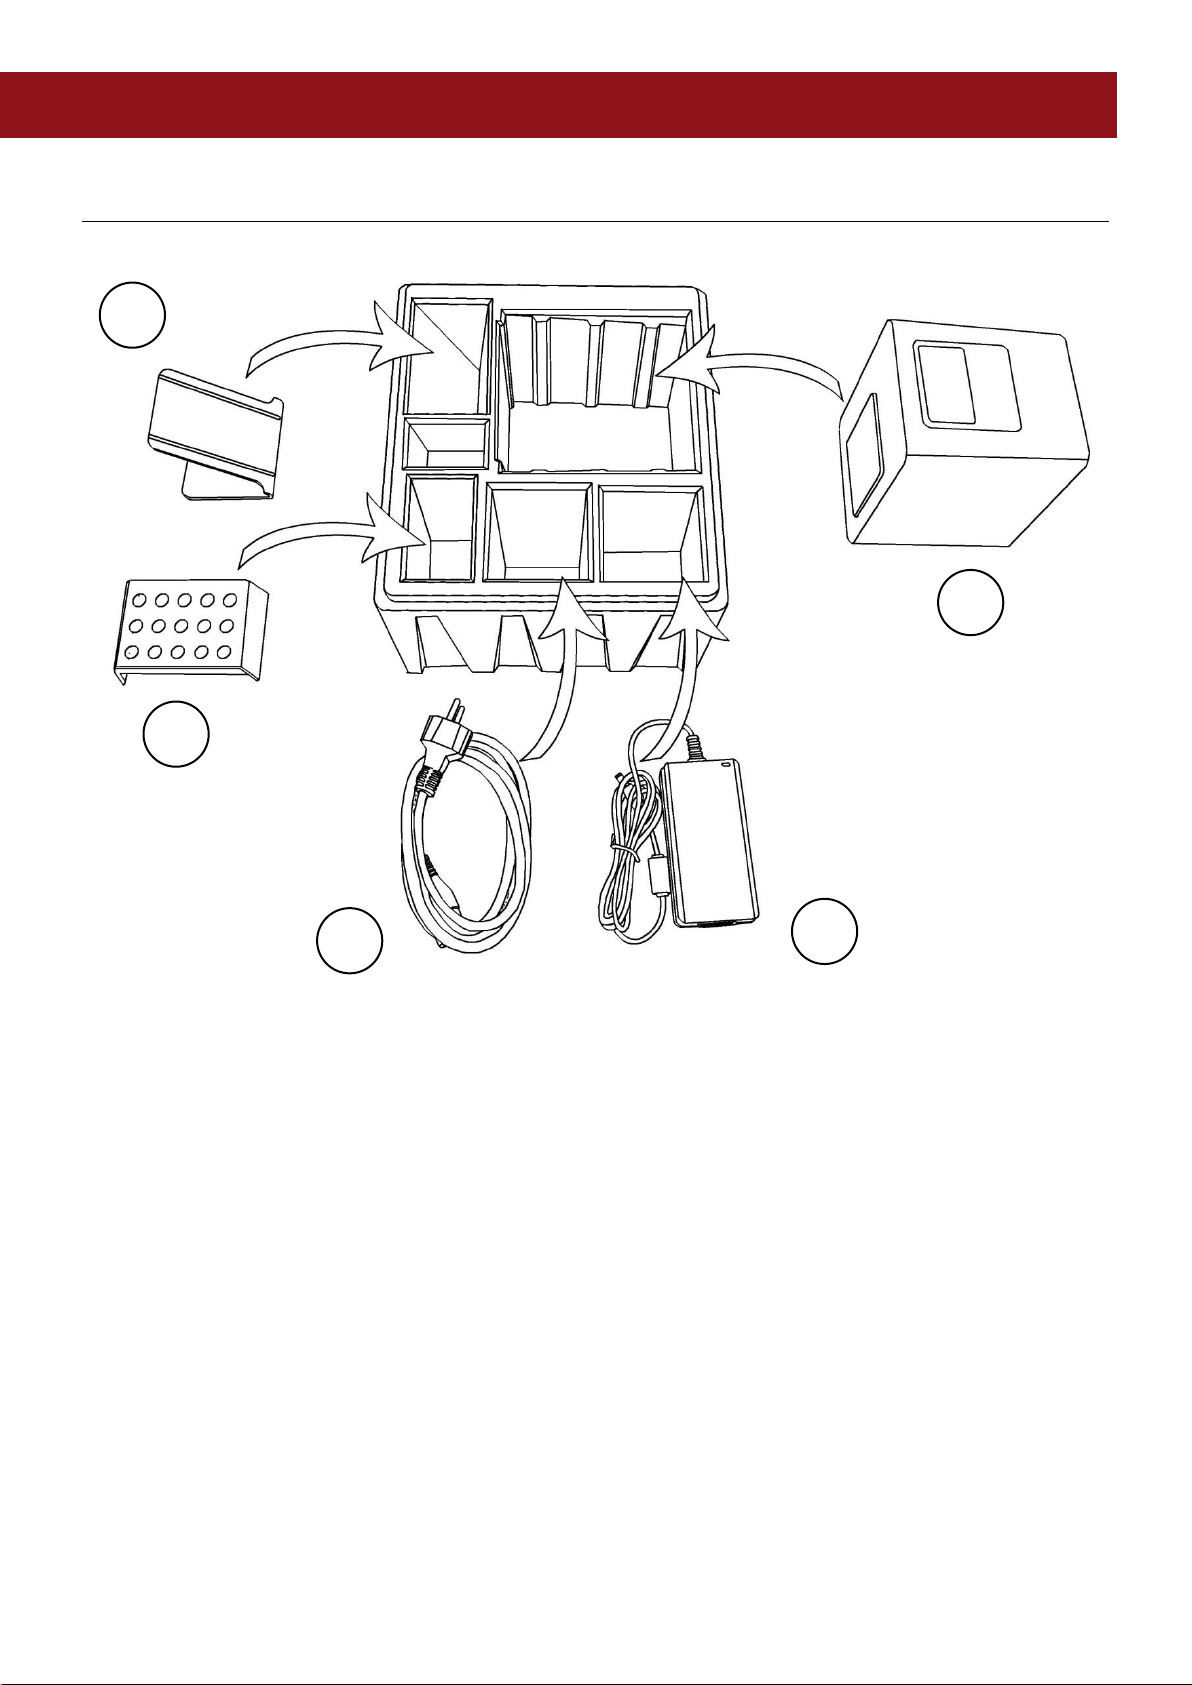
Packaging: Eurolyser CUBE Laboratory Photometer
1. Tablet Stand
2. Test-Kit Rack
3. Power Cable
4. Main Adapter
5. CUBE Instrument
Note: In case of a necessary return of the Instrument to the manufacturer or before transport please
repack the CUBE Instrument contents in the original packaging according to the illustration above!
Moreover, please remember to reinsert the white transport lock into the CUBE Instrument door before
repacking (see following page)!
Note: The CUBE Tablet PC is delivered in a separate package and must be returned in this if necessary.
WARNING: Wrong packing and/or the use of inappropriate
packaging can cause severe damage to the Instrument!
1
2
3
4
5
8e6b5250-532e-4fc8-bc8f-0be2f7ec7200 / DP1.0 / 2013-06-19 3 / 12 Eurolyser Diagnostica GmbH
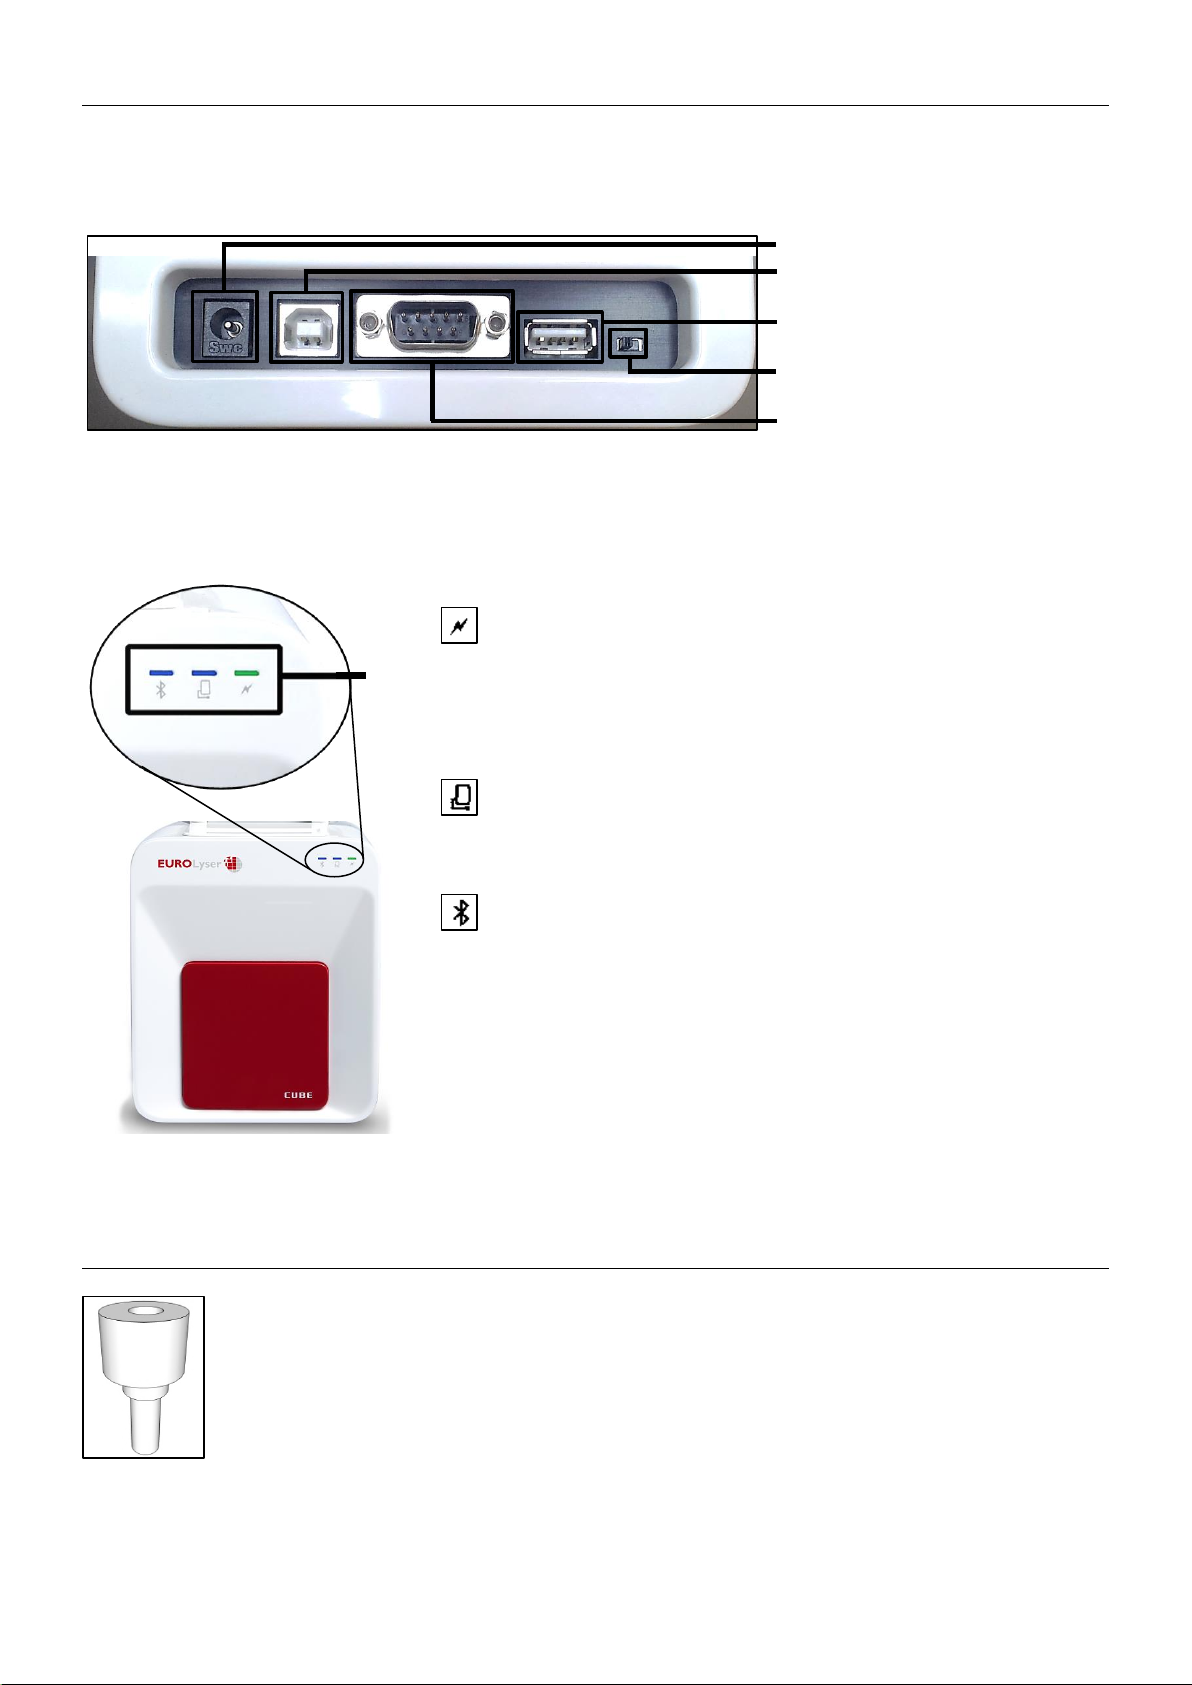
LEDs
Setting up the Eurolyser CUBE Laboratory Photometer
Set up the Eurolyser CUBE laboratory photometer. Plug the power supply (AC adaptor plug) to the
Instrument and the power cable into the wall socket.
.Eurolyser CUBE back
Power supply
USB Socket for connecting a
PC (for data transfer)
USB Port for connecting a
Tablet PC
Bluetooth on/off switch
(left: Bluetooth OFF)
RS 232 socket for connecting a
printer, a barcode reader or a
PC (for data transfer)
Eurolyser CUBE front
LEDs on the Eurolyser CUBE
This green LED indicates the readiness of the photometer
Flashing: the Instrument is warming up and testing cannot be
started yet (Note: this takes approximately 10 min.)
Constantly lit: the Instrument is warmed up and ready for use
Off: the Instrument is not plugged in
This blue LED indicates a connection to a Tablet PC:
Constantly lit: a connection with a Tablet PC is established
Off: the Tablet PC is not connected
This blue LED indicates a Bluetooth connection to Tablet PC:
Constantly lit: a connection with a Tablet PC is established
Flashing: Bluetooth is activated on the photometer but no
Instrument is connected via Bluetooth
Off: Bluetooth is switched off
Note: the Bluetooth connection is currently not operational.
The Tablet PC must be connected to the Instrument via the
USB-cable!
Transport lock
Upon first use the white transport lock is to be removed from the door of the Instrument.
Note: keep both the transport lock and the original packaging. In case of a defect the
Instrument is to be returned in the original packaging with the transport lock installed to
prevent further damage from transport!

8e6b5250-532e-4fc8-bc8f-0be2f7ec7200 / DP1.0 / 2013-06-19 4 / 12 Eurolyser Diagnostica GmbH
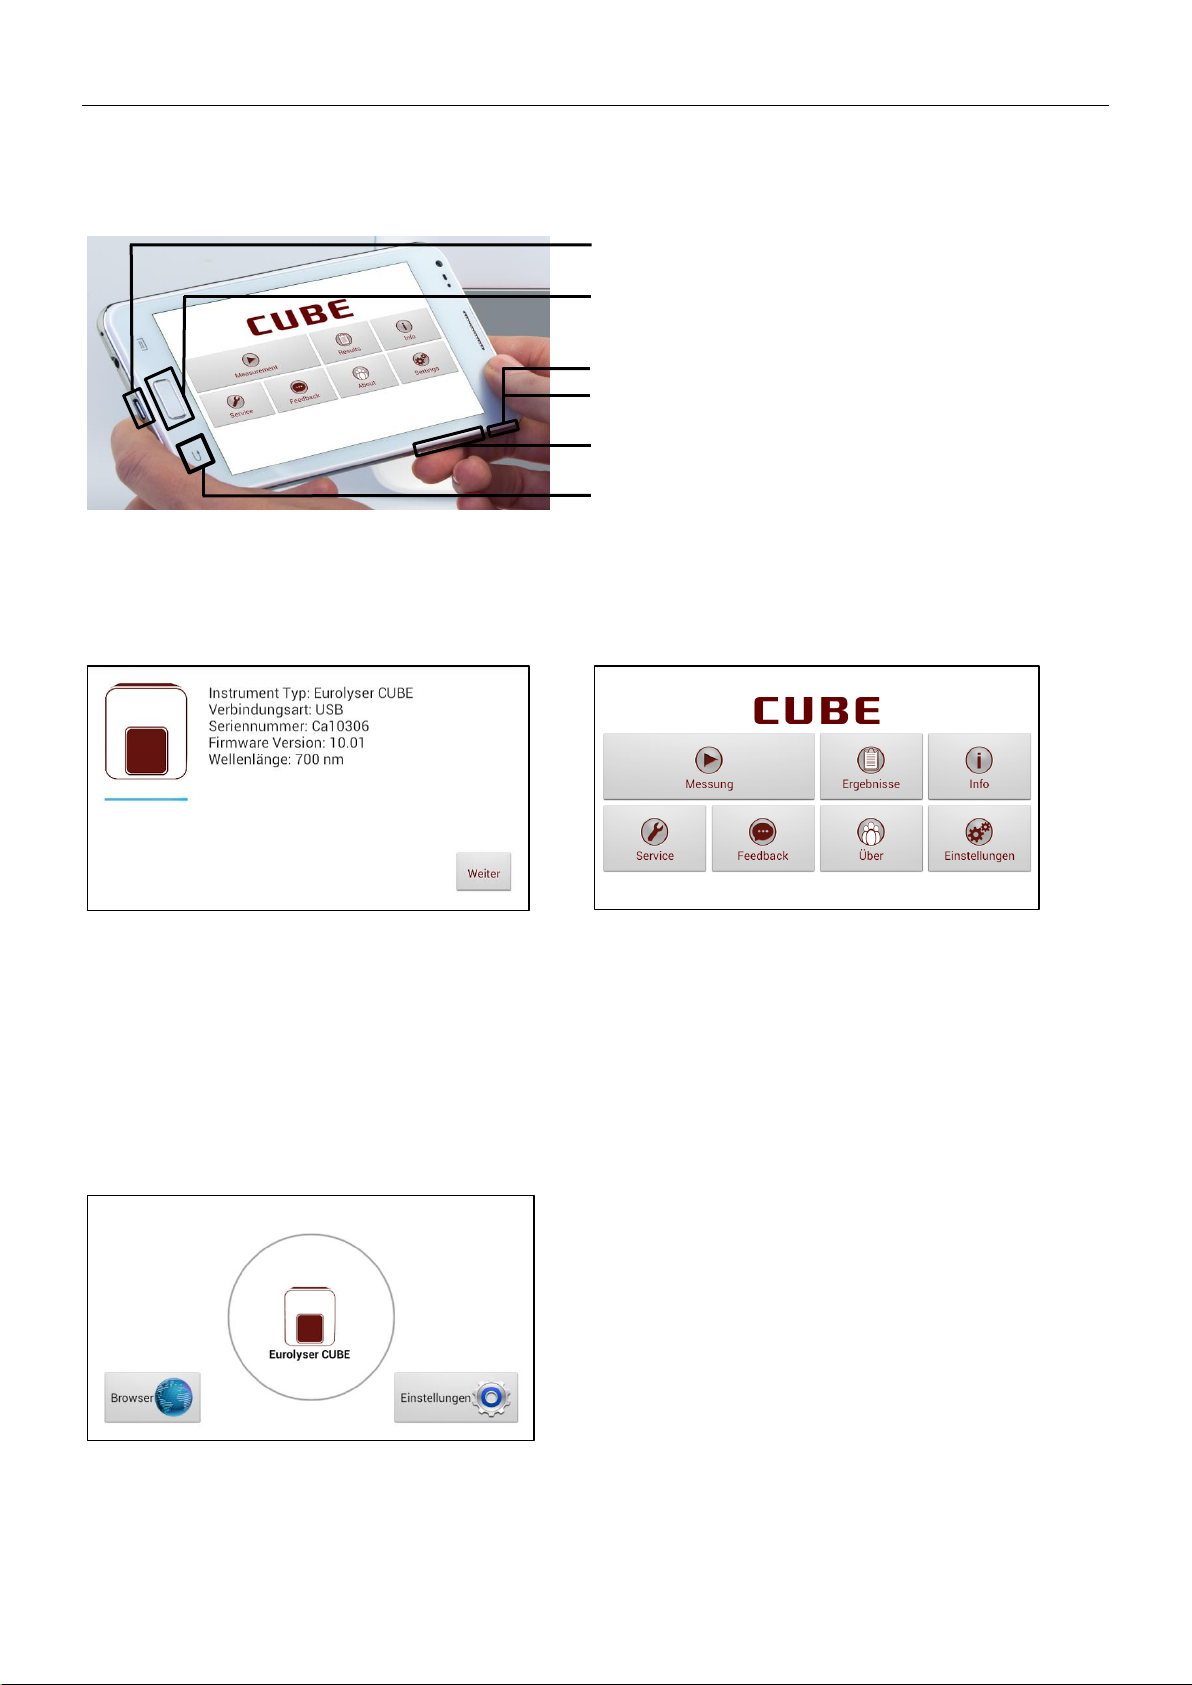
The Tablet PC
The Eurolyser CUBE laboratory photometer is operated with a Tablet PC.
Connect the Tablet PC to the USB port of the plugged-in Instrument. Then turn on the Tablet PC.
Tablet PC Buttons and Interface
Power Supply & USB Port
Home-Button: press to open the Launcher
see Eurolyser CUBE Launcher
On/Off switch: hold to turn the Tablet PC on/off
& Lock switch: press to lock or unlock the screen
Volume up/down buttons
Return-Arrow: press to undo an action or to return
to the previous screen
Starting/Operating the Tablet PC
1. Connection Screen
2. Main Menu
The connection screen appears upon connecting
the Tablet PC with the CUBE Instrument.
Tap Next to continue.
The CUBE app starts and the main menu appears.
Note: while the Eurolyser CUBE Instrument is
warming up (indicated by the flashing green LED on
the front) the “Measurement” Button is grey and
inactive.
The Eurolyser CUBE Launcher
Eurolyser CUBE Launcher
When the Tablet PC is not connected to the
analyzer or by pressing the Home Button the
Eurolyser CUBE Launcher appears:
Tapping Browser opens the Android web browser
Tapping Eurolyser CUBE starts the CUBE app
Tapping Settings opens the Android settings menu
Note: If the standard Android Desktop appears
instead, switch the Tablet PC off, back on, select
“CUBE Launcher” and confirm by tapping “Always”.

8e6b5250-532e-4fc8-bc8f-0be2f7ec7200 / DP1.0 / 2013-06-19 5 / 12 Eurolyser Diagnostica GmbH
Analysing a patient sample
1. RFID card placement
2. Main menu
3. Test Screen
Take the provided RFID card out of
the test kit package and place it on
the RFID card pit on top of the
Instrument.
Tap in the main menu to
start a measurement.
The Eurolyser CUBE automatically
reads the RFID card and the Test
Screen appears.
The Eurolyser CUBE displays the
type of test and number of tests
remaining on the RFID card.
Tap to proceed.
Tap to exit to the main menu.
4. Input Menu
5. Insert cartridge and close door
Tap the desired input field (e.g.
“Name”), the Tablet PC keyboard
appears. Enter the information and
confirm with “Done”.
Next, tap and select an entry
from the drop down-menu.
Tap to confirm the input or
to exit to the main menu.
The door opens automatically.
Insert the cartridge and close the
door.
The test procedure starts
automatically.
Handle the test cartridge according the instructions on the package insert
and make sure the cartridge is firmly capped before inserting it completely
into the proper opening of the Eurolyser CUBE laboratory photometer!
Use only test cartridges approved by the manufacturer. Otherwise severe
damage to the Instrument and/or incorrect results can occur.
Do NOT attempt to open the door manually!
Do not use liquid cleaners on the Instrument or Tablet PC! Use a lint-free,
slightly damp cloth only!
8e6b5250-532e-4fc8-bc8f-0be2f7ec7200 / DP1.0 / 2013-06-19 6 / 12 Eurolyser Diagnostica GmbH
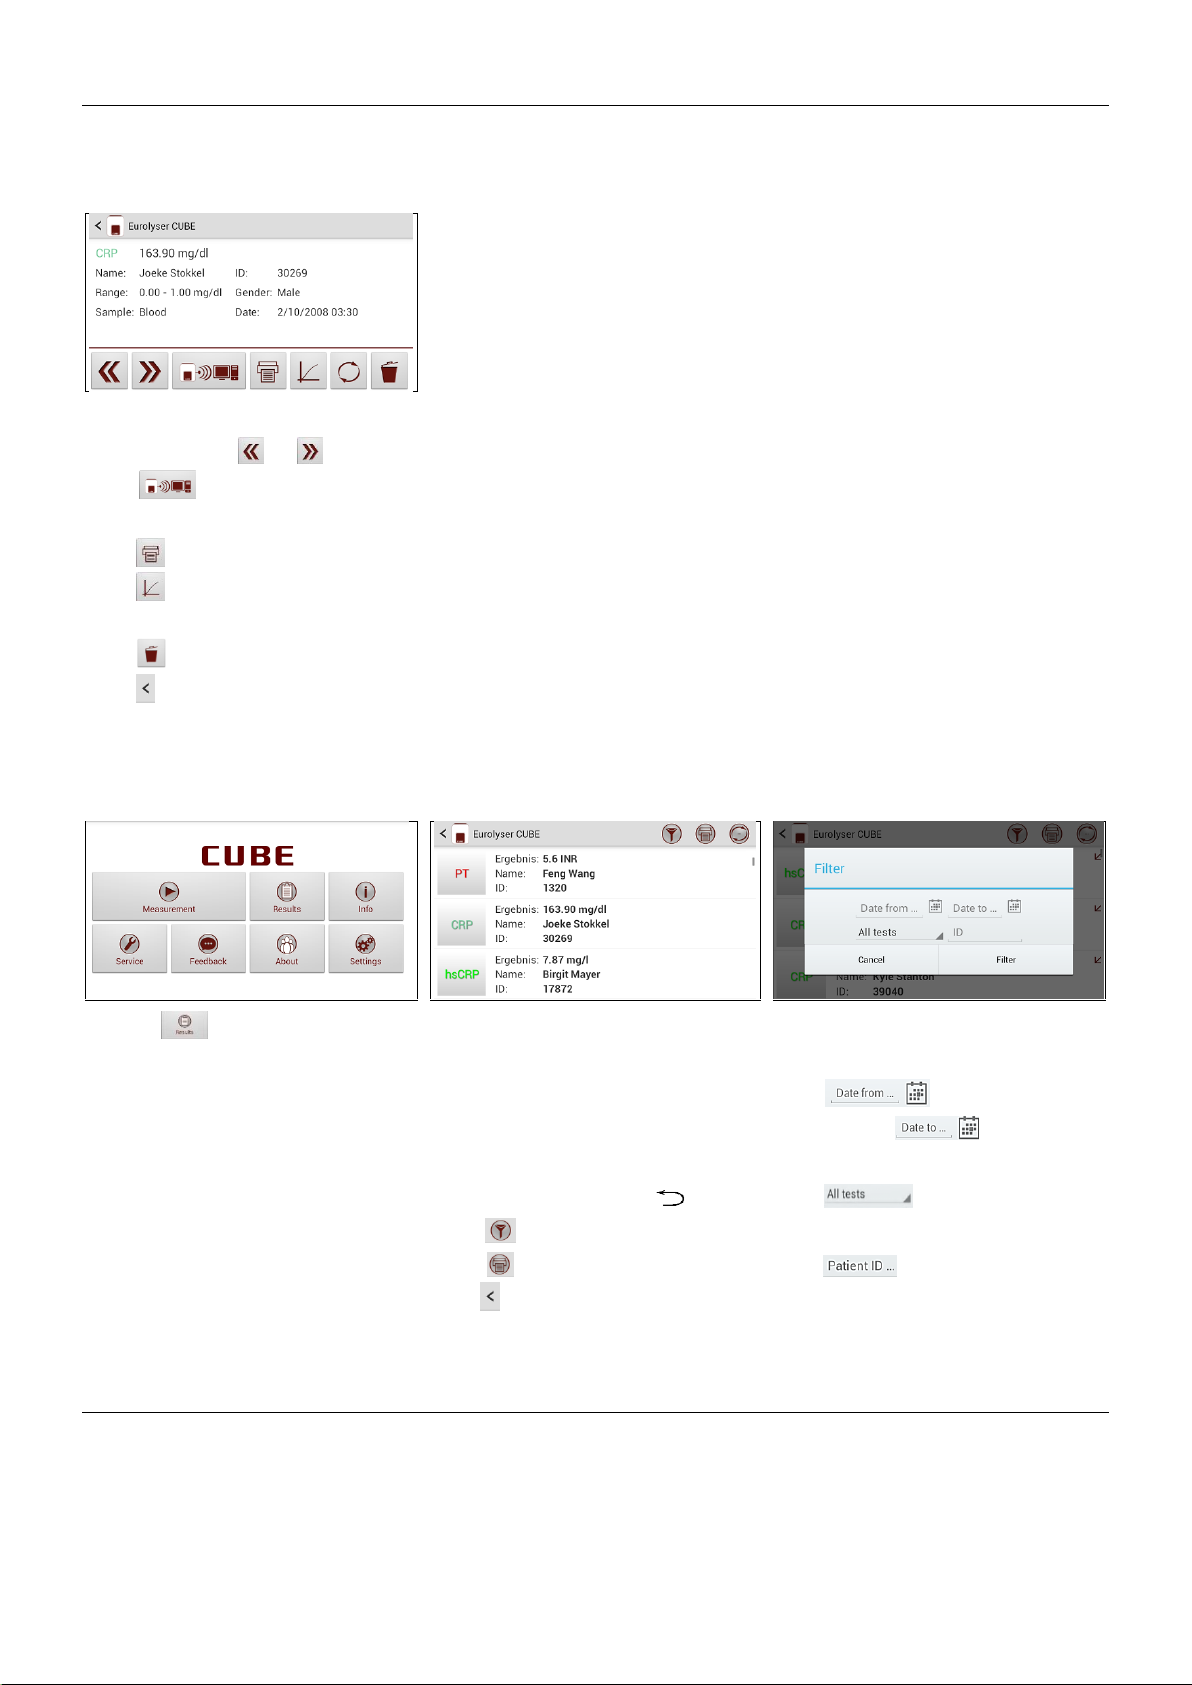
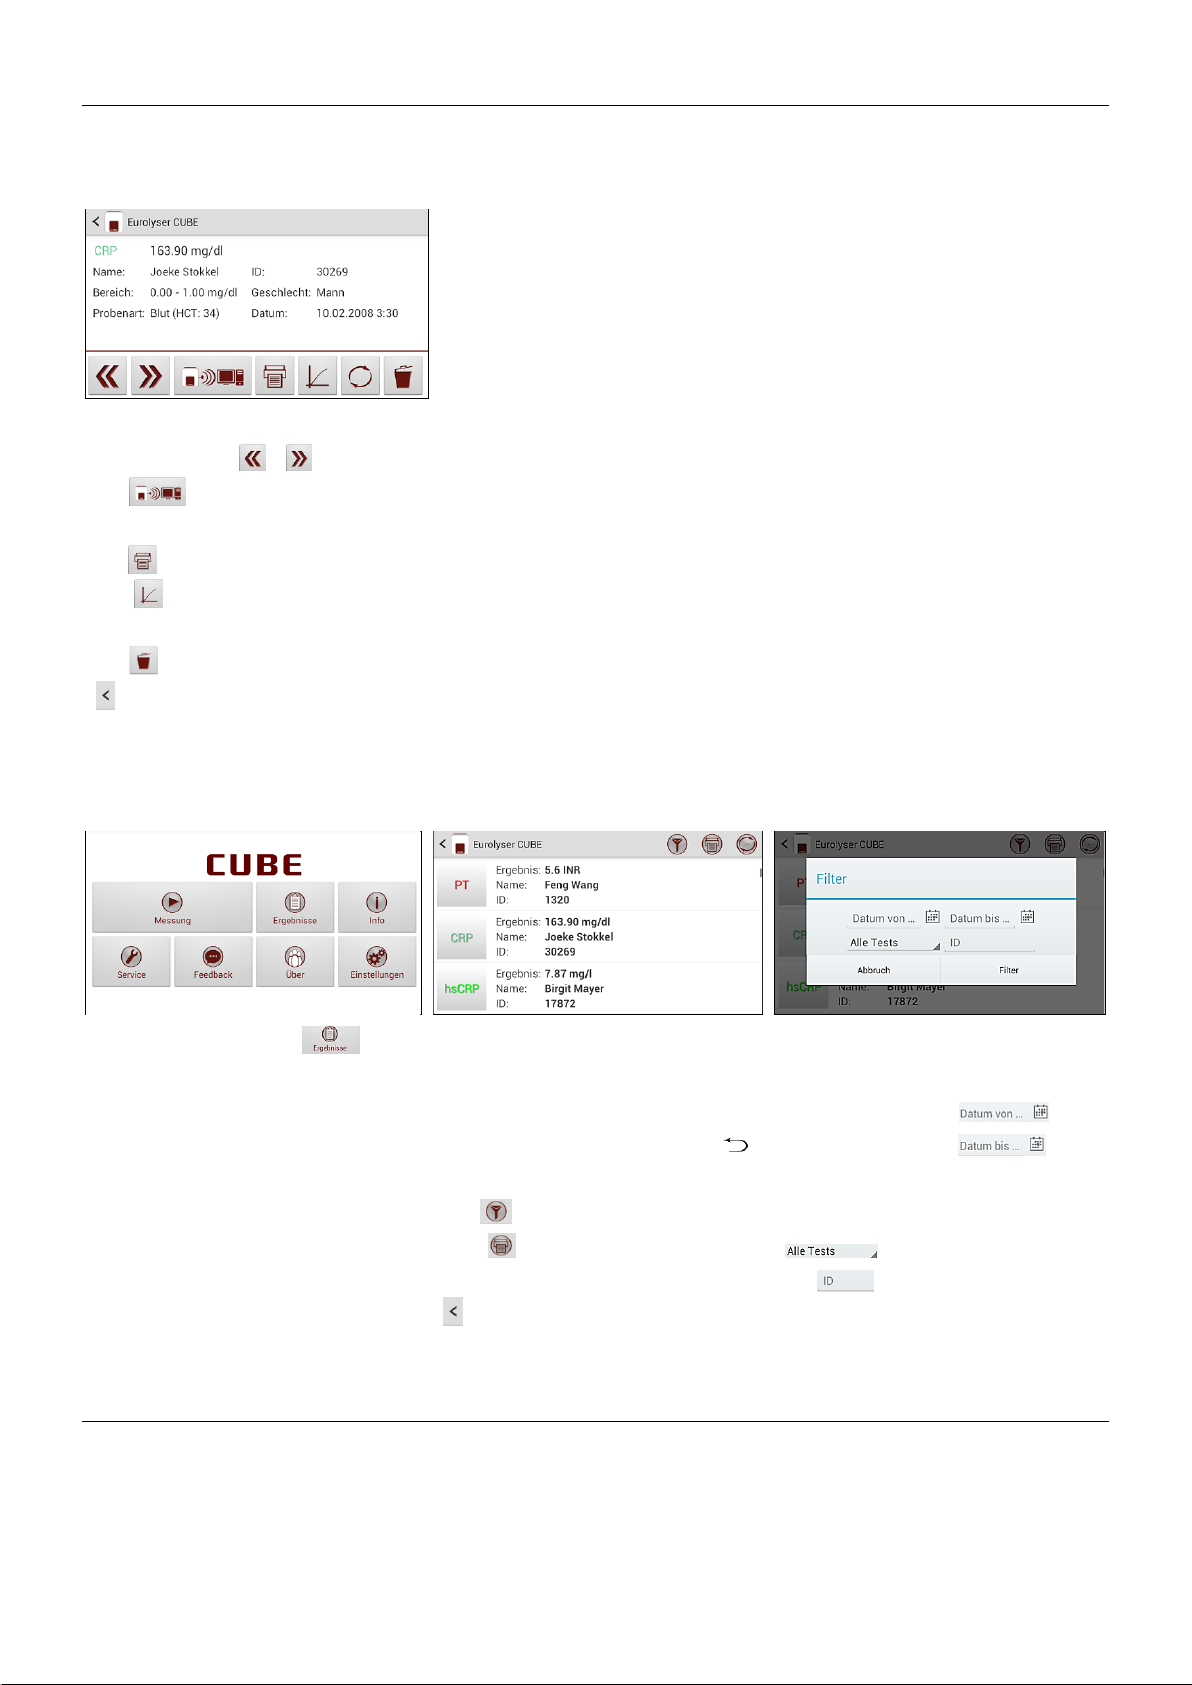
Viewing and processing test results
After processing a test, the result screen appears on the Tablet PC:
1. Result Screen
The test result is displayed on the
Tablet PC, use or to scroll.
Tap to export to a HIS/LIS
or PC or send it as an Email.
Tap to print the result.
Tap to view measurement data
and the photometric data curve.
Tap to delete the result.
Tap to exit to the main menu.
All test results are stored on the Tablet PC. They can be accessed as follows:
1. Main Menu
2. Result List Screen
2.1 Filter Options
Touch in the main menu to
open the Result List.
The stored results can be browsed
by swiping up and down.
Tap a result to open the result
screen (see above), to return to
the result list from a result screen
press the Return Arrow
Tap to open the filter options
Tap to print, mail or export.
Tap to return to the main menu.
Results can be filtered by date,
test type and Patient ID.
Tap to set the desired
start date, to set the
desired end date.
Tap to select a test type
in the drop down menu (e.g. PT).
Tap to filter by patient ID.
How to wake CUBE up or completely switch it OFF
When the Tablet PC displays the main menu, the “power safe” function dims the screen. Pressing the
Lock Switch will re-illuminate the display to its customary level of brightness.
It is not necessary to switch the Instrument off every day. Switching the Instrument off completely can
only be done by disconnecting it from the power supply.

8e6b5250-532e-4fc8-bc8f-0be2f7ec7200 / DP1.0 / 2013-06-19 7 / 12 Eurolyser Diagnostica GmbH
Kurzanleitung
8e6b5250-532e-4fc8-bc8f-0be2f7ec7200 / DP1.0 / 2013-06-19 8 / 12 Eurolyser Diagnostica GmbH
DEUTSCH
Packungsinhalt: Eurolyser CUBE Laborfotometer
1. Tablet Ständer
2. Test-Kit Rack
3. Stromkabel
4. Netzteil
5. CUBE Instrument
Anmerkung: Sollte das Gerät an den Hersteller zurückgeschickt werden oder aus einem anderen Grund
transportiert werden müssen, bitte verpacken Sie alle Teile des CUBE Lieferumfangs wieder gemäß
obiger Illustration in die Originalverpackung! Platzieren Sie außerdem das weiße Transportschloss
wieder in der Tür des CUBE Instruments (siehe Folgeseite)!
Anmerkung: Der Tablet PC ist in einer extra Packung und muss wenn nötig in dieser versendet werden.
WARNUNG: Inkorrektes Verpacken und/oder eine falsche Verpackung
können schwere Schäden am Instrument / Tablet PC verursachen!
1
2
3
4
5

8e6b5250-532e-4fc8-bc8f-0be2f7ec7200 / DP1.0 / 2013-06-19 9 / 12 Eurolyser Diagnostica GmbH
LEDs
Inbetriebnahme des Eurolyser CUBE Laborfotometers
Stellen Sie das Eurolyser CUBE Instrument auf und schließen Sie das Netzteil am Gerät sowie der
Spannungsversorgung an.
.Eurolyser CUBE Interfaces auf der Instrument-Rückseite
Spannungsversorgung
USB Socket zur Verbindung mit
dem PC (für Datenübertragung)
USB Port zur Verbindung mit
dem Tablet PC
Bluetooth on/off Schalter
(Schalter links: Bluetooth AUS)
RS 232 Socket zur Verbindung
mit Drucker, Barcode Reader
oder PC (für Datenübertragung)
Eurolyser CUBE Instrument
LEDs am Eurolyser CUBE Instrument
Diese grüne LED zeigt die Bereitschaft des Instrumentes an:
Blinkend: das Instrument wärmt auf und der Testvorgang
kann nicht gestartet werden (Anmerkung: Dauer ca. 10 min.)
Durchgehend an:das Instrument ist aufgewärmt und bereit
Aus: das Instrument ist nicht eingesteckt
Diese blaue LED zeigt die Verbindung mit dem Tablet PC an:
Durchgehend an: ein Tablet PC ist verbunden
Aus: keine Verbindung mit einem Tablet PC
Diese blaue LED zeigt die Bluetooth Verbindung mit dem
Tablet PC an:
Durchgehend an: ein Tablet PC ist verbunden
Blinkend: Bluetooth ist aktiviert am aber kein Tablet PC ist
über Bluetooth verbunden
Aus: Bluetooth ist ausgeschalten (Schalter auf der Rückseite)
Anmerkung:die Bluetooth Verbindung ist momentan noch
nicht verfügbar. Der Tablet PC muss daher mit dem USB Kabel
am CUBE Instrument angeschlossen werden!
Transportschloss
Bei erstmaligem Gebrauch muss das weiße Transportschoss aus der Tür des Instruments
genommen werden.
Anmerkung: heben Sie sowohl das Transportschloss als auch die Originalverpackung
auf. Im Fall einer Servicierung muss das Instrument in der Originalverpackung mit
eingesetztem Transportschloss zurückgeschickt werden um Transportschäden zu
verhindern!
8e6b5250-532e-4fc8-bc8f-0be2f7ec7200 / DP1.0 / 2013-06-19 10 / 12 Eurolyser Diagnostica GmbH
Der Tablet PC
Der Eurolyser CUBE wird mit einem Tablet PC bedient. Verbinden Sie den Tablet PC mit dem USB Port
des eingesteckten CUBE Instruments und schalten sie dann den Tablet PC ein.
Tablet PC Tasten und Anschlüsse
Spannungsversorgung & USB Port
Home-Button: Hier drücken öffnet den Launcher
(siehe Eurolyser CUBE Launcher)
Ein/Aus: Halten schaltet das Tablet ein/aus
&Sperren: Kurz drücken (ent-) sperrt das Tablet
Lauter/Leiser Tasten
Zurück-Pfeil: Hier tippen um eine Aktion rück-
gängig oder einen Schritt zurück zu machen
Den Tablet PC in Betrieb nehmen
1. Verbindungs-Screen
2. Hauptmenü
Der Verbindungs-Screen erscheint beim
Verbinden des Tablet PCs mit dem CUBE
Instrument.
Tippen Sie auf Weiter um fortzufahren.
Die CUBE App startet, das Hauptmenü erscheint.
Anmerkung: während sich der Eurolyser CUBE
Laborfotometer aufwärmt (erkennbar durch die
blinkende grüne LED) ist der „Messung“ Button
ausgegraut und reagiert nicht auf Eingaben!
Der Eurolyser CUBE Launcher
Eurolyser CUBE Launcher
Wenn Sie den Home Button drücken, oder das
Tablet bei Inbetriebnahme nicht am CUBE
angeschlossen ist, erscheint der CUBE Launcher:
Tippen auf Browser öffnet den Internet Browser
Tippen auf Eurolyser CUBE startet die CUBE App
Tippen auf Einstellungen öffnet die Einstellungen
Anmerkung: wenn statt dem CUBE Launcher das
Android Desktop angezeigt wird, schalten Sie den
Tablet PC aus, wieder an, wählen dann “CUBE
Launcher” aus bestätigen mit „Immer“.
8e6b5250-532e-4fc8-bc8f-0be2f7ec7200 / DP1.0 / 2013-06-19 11 / 12 Eurolyser Diagnostica GmbH
Analyse einer Patientenprobe
1. Platzieren der RFID Karte
2. Hauptmenü
3. Testinfo Screen
Nehmen Sie die mitgelieferte RFID
Karte aus der Testpackung und
platzieren Sie sie auf der dafür
vorgesehenen Stelle auf der
Oberseite des CUBE Instrument.
Tippen Sie im Hauptmenü auf
um einen Test zu starten.
Das CUBE Laborfotometer liest nun
automatisch die RFID Karte, der
Testinfo Screen erscheint.
Die Art des Tests, sowie die auf
der RFID Karte restliche Anzahl
an Tests werden hier angezeigt.
Tippen Sie um mit dem
Test fortzufahren.
Tippen Sie um abzubrechen
und ins Hauptmenü zu gelangen.
4. Eingabemenü
5. Cartridge einführen, Tür schließen
Tippen Sie auf ein Eingabefeld (z.B.
“Name”), das Tablet PC Keyboard
öffnet. Geben Sie die Information
ein und bestätigen mit „Fertig“.
Tippen Sie und wählen Sie
einen Eintrag im Drop Down Menü.
Tippen Sie um fortzufahren,
um ins Hauptmenü zurückzukehren.
Die Tür öffnet automatisch.
Platzieren Sie die ERS Cartridge
und schließen Sie die Tür.
Der Testvorgang startet nun
automatisch.
Achten Sie auf die korrekte Handhabung der Testcartridge gemäß dem
Testkit Beipackzettel und achten Sie darauf, dass die Cartridge
ordnungsgemäß verschlossen ist bevor sie in das Instrument gegeben wird!
Verwenden Sie ausschließlich vom Hersteller zugelassene Testcartridges.
Andernfalls kann es zu schweren Schäden am Instrument und/oder zu
falschen Messergebnissen kommen!
Versuchen Sie NICHT die Tür manuell zu öffnen!
Das Instrument und Tablet NICHT mit flüssigen Mitteln reinigen! Verwenden
Sie zur Reinigung nur fuselfreie, angefeuchtete Tücher.
8e6b5250-532e-4fc8-bc8f-0be2f7ec7200 / DP1.0 / 2013-06-19 12 / 12 Eurolyser Diagnostica GmbH
Anzeigen oder Verarbeiten der Analyseergebnisse
Nachdem ein Test abgearbeitet ist wird der Ergebnis Screen am Tablet PC angezeigt:
1. Ergebnis Screen
Das Ergebnis wird angezeigt:
blättern Sie mit / vor/zurück.
Mit wird das Ergebnis an PC
od. HIS/LIS exportiert bzw. gemailt.
Mit drucken Sie das Resultat.
Mit öffnen Sie die Fotometer-
daten und Messkurve.
Mit löschen Sie das Ergebnis.
bringt Sie zum Hauptmenü.
Die Ergebnisse werden zudem im Speicher des Tablet PCs abgelegt. Sie werden wie folgt abgerufen:
1. Hauptmenü
2. Ergebnis Liste
2.1 Filter Optionen
Tippen Sie auf im
Hauptmenü um die Ergebnisliste
zu öffnen.
Scrollen Sie mit dem Finger durch
die Ergebnisse und tippen Sie auf
ein Resultat um es detailliert zu
betrachten (siehe oben), mit
kehren Sie zur Liste zurück.
Mit öffnen Sie den Filter.
Mit können Sie die Liste
drucken, mailen oder exportieren.
bringt Sie zum Hauptmenü.
Filtern Sie Ergebnisse nach Zeit-
raum, Testart und Patienten ID:
So setzen Sie mit ein
Startdatum, mit ein
gewünschtes Enddatum.
Wählen Sie im Drop-Down Menü
einen Testtyp (z.B. PT).
Mit filtern Sie nach einer ID.
CUBE “aufwecken” oder komplett ausschalten
Wenn der Tablet PC das Hauptmenü anzeigt reduziert die Stromsparfunktion nach kurzer Zeit
automatisch die Helligkeit. Drücken Sie die Sperrtaste um den Bildschirm wieder einzuschalten.
Es ist nicht nötig das CUBE Instrument jeden Tag auszuschalten. Um es vollständig abzuschalten muss
das Instrument von der Stromversorgung getrennt werden.
Other manuals for Cube
2
Table of contents
Languages:


