Evacuator E140 User manual

1
User Manual
Version 2023 - V1
www.evacuator.com
1
E140 / E165
3
ATTENTION!
The EVACUATOR® descent device is safe to use, provided that it is serviced, installed and administered in accordance with the instructions
Evacuator
of Evacuator Worldwide BV. Incorrect or improper use of the device, or a failure of the anchor points, may lead to serious injury or death.
In accordance with our general terms and conditions of sale, the customer is obliged to carefully read the operating instructions and safety
instructions prior to any application or use of the products, in order to meet the operational, safety and warranty requirements.
The EVACUATOR® descent device by EVACUATOR Worldwide BV may only be used in case of emergency and is to be installed by an
WARNING!
This user guide provides an overview of the products supplied by Evacuator Worldwide BV. A careful effort has been made to ensure the accuracy
of the information. The user's manual includes only the basic instructions and warnings.
ATTENTION!
The device is permanently installed and left in position at the workplace in indoor environments with temperatures between -32
℃
and +60
℃
,
without potentially explosive atmospheres, far away from flames, sparks or hot metal splash. Avoid contact with sharp edges, electricity,
chemicals, corrosive solutions and substances, excessive heat, oils, paints or any other contaminants.
Outdoor installation only in combination with mounting case supplied by the Evacuator Worldwide BV. to protect against environmental
influences and hazards.
approved installer.
2
Sales, Service & Contact
Evacuator Worldwide BV
T: +31(0)24 4200042
www.Evacuator.com
General
The EVACUATOR® descent device is a rescue device, used to
escape from heights when general evacuaon routes are obstructed.
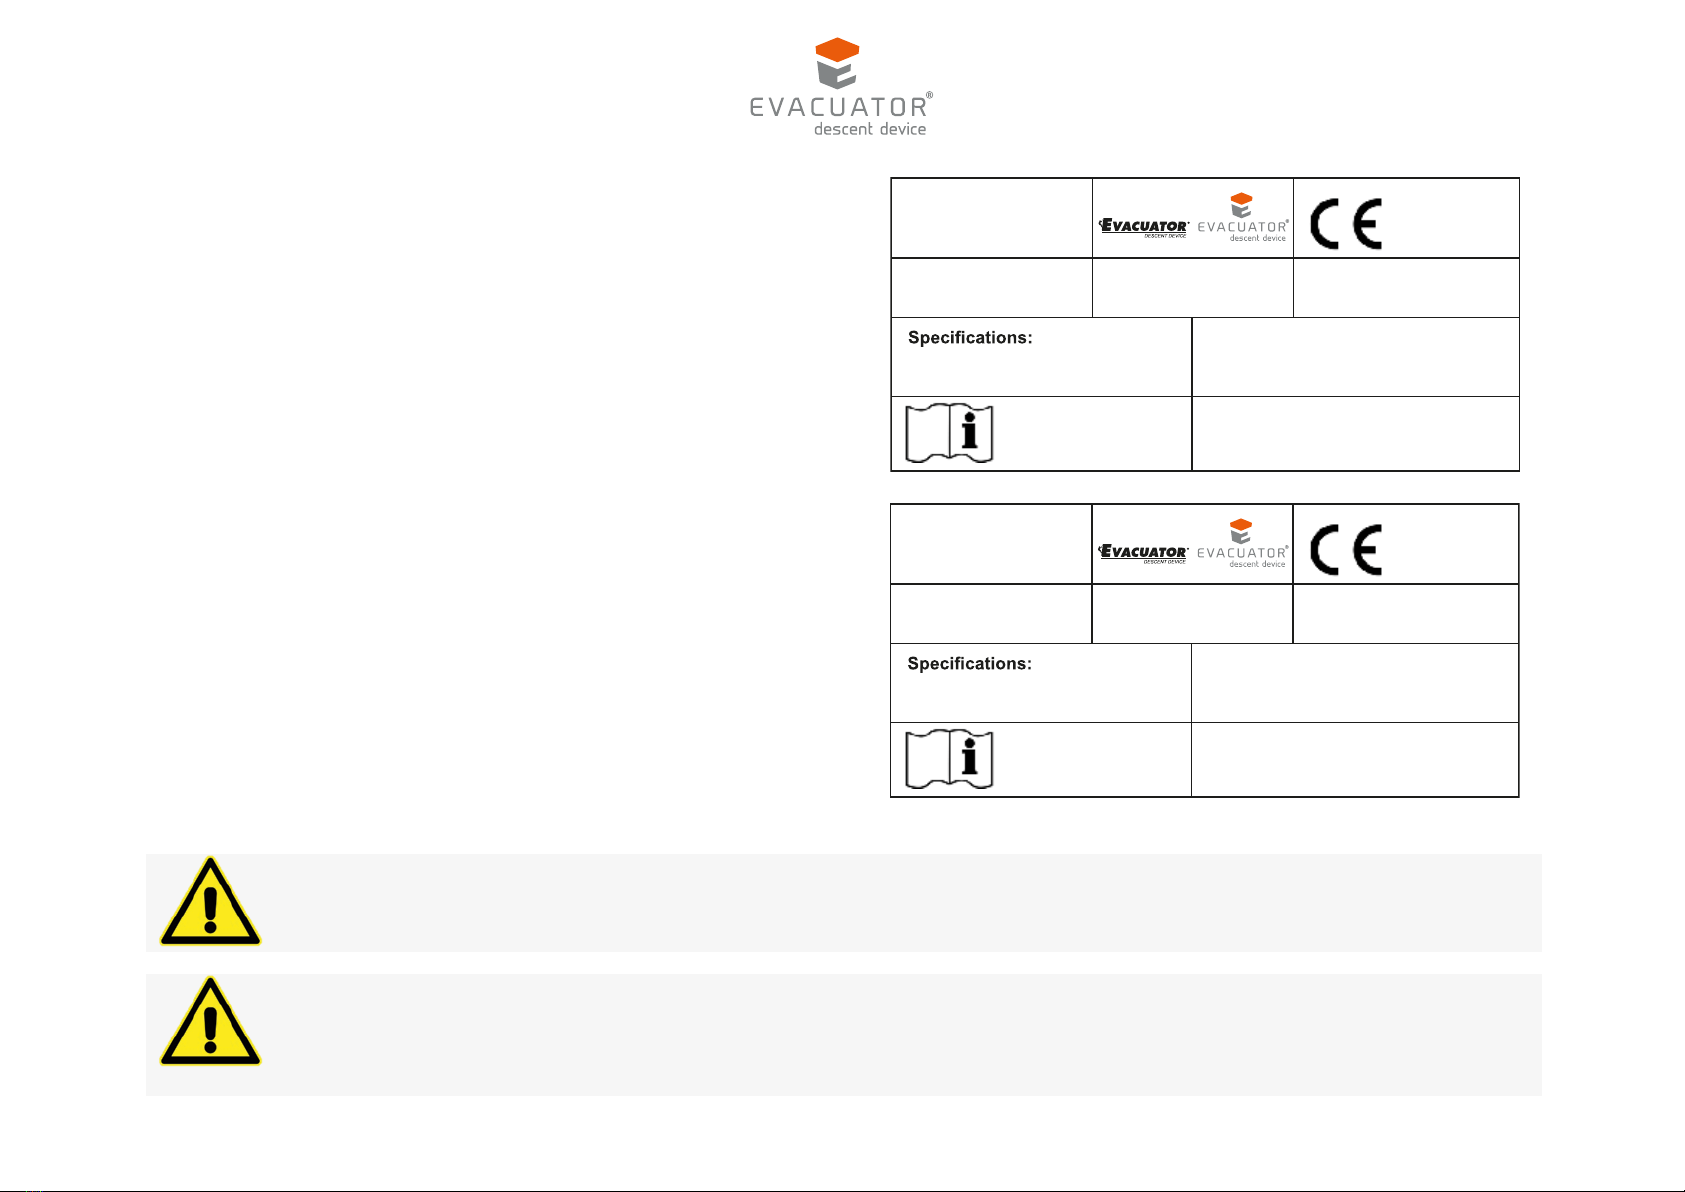
Specificaons
You can find the specificaons of your device on the idenficaon plate
that is supplied with the device, as well as on the CE label of the device,
as shown in the example on the right:
WARNING!
The label must be always present and readable!
WARNING!
This user guide provides an overview of the products supplied by Evacuator Worldwide BV. A careful effort has been made to e nsure the accuracy
of the informaon. The user's manual includes only the basic instrucons and warnings.
Version 2023 - V1
www.evacuator.com
2
Manufacturer:
Model & Type:
Minimum descending height: 6 m
Maximum descending height: 140 m
Read and understand
the manual and always
follow up on warnings
Standards:
WARNING:
EVACUATOR®descent device is meant
FOR SINGLE USE ONLY
Serial Number:
Evacuator Worldwide BV
www.evacuator.com
DIN EN 341:2011/D
Maximum load according to ANSI
0158
E140
Product: Developed & produced in the Netherlands
Worldwide Patented
Minimum load: 50 kg Per Cable
Maximum load: 282 kg Per Cable
2 Cables are allowed to be used at the same time
Lowest operating temprature: -32ºC
Manufacturer:
Model & Type:
Minimum descending height: 6 m
Maximum descending height: 165 m
Read and understand
the manual and always
follow up on warnings
Standards:
WARNING:
EVACUATOR®descent device is meant
FOR SINGLE USE ONLY
Serial Number:
Evacuator Worldwide BV
www.evacuator.com
DIN EN 341:2011/D
Maximum load according to ANSI
0158
E165
Product: Developed & produced in the Netherlands
Worldwide Patented
Minimum load: 50 kg Per Cable
Maximum load: 282 kg Per Cable
2 Cables are allowed to be used at the same time
Lowest operating temprature: -32ºC

3
ATTENTION!
The EVACUATOR® descent device is safe to use, provided that it is serviced, installed and administered in accordance with the instructions
Evacuator
of Evacuator Worldwide BV. Incorrect or improper use of the device, or a failure of the anchor points, may lead to serious injury or death.
In accordance with our general terms and conditions of sale, the customer is obliged to carefully read the operating instructions and safety
instructions prior to any application or use of the products, in order to meet the operational, safety and warranty requirements.
The EVACUATOR® descent device by EVACUATOR Worldwide BV may only be used in case of emergency and is to be installed by an
WARNING!
This user guide provides an overview of the products supplied by Evacuator Worldwide BV. A careful effort has been made to ensure the accuracy
of the information. The user's manual includes only the basic instructions and warnings.
ATTENTION!
The device is permanently installed and left in position at the workplace in indoor environments with temperatures between -32
℃
and +60
℃
,
without potentially explosive atmospheres, far away from flames, sparks or hot metal splash. Avoid contact with sharp edges, electricity,
chemicals, corrosive solutions and substances, excessive heat, oils, paints or any other contaminants.
Outdoor installation only in combination with mounting case supplied by the Evacuator Worldwide BV. to protect against environmental
influences and hazards.
approved installer.
Version 2023 - V1
www.evacuator.com
3

5
Safety
Safety symbols
The following symbols are important in the use of the EVACUATOR®
descent device. Complying with the symbols will prevent improper use.
Notes, advice, precautions and instructions in the operator's manual are:
ATTENTION!
A note with additional information for the user. A note
to alert the user to potential problems.
CAUTION!
The product may be at risk. "Caution" indicates
damage to the product, if the user does not follow the
procedures carefully.
WARNING!
The user may (seriously) injure themselves or cause
severe damage to the product. A warning indicates
damage to the user or to the product, if the user does
not execute the procedures carefully.
Danger Symbols and their meaning
ATTENTION!
Hot Surface
ATTENTION!
Cutting hazard
Informational symbol
INFORMATION:
Displays notes, warnings, and tips
Prohibition symbol
PROHIBITED!
Indicates actions that are prohibited
4
Table of contents
Sales, Service & Contact ........................................................................................................................................................................................ 2
General .................................................................................................................................................................................................................. 2
Specifications......................................................................................................................................................................................................... 2
Safety..................................................................................................................................................................................................................... 5
Safety symbols................................................................................................................................................................................................... 5
General safety warnings.................................................................................................................................................................................... 6
Safety of the device........................................................................................................................................................................................... 7
Maintenance safety........................................................................................................................................................................................... 7
Determine type of installation .............................................................................................................................................................................. 8
User Manual Installation type 1 ............................................................................................................................................................................ 9
User Manual Installation type 2 .......................................................................................................................................................................... 15
User Manual Installation type 3 .......................................................................................................................................................................... 22
Maintenance, repairs and cleaning..................................................................................................................................................................... 29
Maintenance ...................................................................................................................................................................................................29
Repair .............................................................................................................................................................................................................. 29
Cleaning........................................................................................................................................................................................................... 29
Periodic inspection .............................................................................................................................................................................................. 29
Storage and transport ......................................................................................................................................................................................... 29
Disposal ............................................................................................................................................................................................................... 30
Certification......................................................................................................................................................................................................... 30
Identity card ........................................................................................................................................................................................................ 31
Version 2023 - V1
www.evacuator.com
4

5
Safety
Safety symbols
The following symbols are important in the use of the EVACUATOR®
descent device. Complying with the symbols will prevent improper use.
Notes, advice, precautions and instructions in the operator's manual are:
ATTENTION!
A note with additional information for the user. A note
to alert the user to potential problems.
CAUTION!
The product may be at risk. "Caution" indicates
damage to the product, if the user does not follow the
procedures carefully.
WARNING!
The user may (seriously) injure themselves or cause
severe damage to the product. A warning indicates
damage to the user or to the product, if the user does
not execute the procedures carefully.
Danger Symbols and their meaning
ATTENTION!
Hot Surface
ATTENTION!
Cutting hazard
Informational symbol
INFORMATION:
Displays notes, warnings, and tips
Prohibition symbol
PROHIBITED!
Indicates actions that are prohibited
4
Table of contents
Sales, Service & Contact ........................................................................................................................................................................................ 2
General .................................................................................................................................................................................................................. 2
Specifications......................................................................................................................................................................................................... 2
Safety..................................................................................................................................................................................................................... 5
Safety symbols................................................................................................................................................................................................... 5
General safety warnings.................................................................................................................................................................................... 6
Safety of the device........................................................................................................................................................................................... 7
Maintenance safety........................................................................................................................................................................................... 7
Determine type of installation .............................................................................................................................................................................. 8
User Manual Installation type 1 ............................................................................................................................................................................ 9
User Manual Installation type 2 ..........................................................................................................................................................................15
User Manual Installation type 3 ..........................................................................................................................................................................22
Maintenance, repairs and cleaning..................................................................................................................................................................... 29
Maintenance ...................................................................................................................................................................................................29
Repair .............................................................................................................................................................................................................. 29
Cleaning........................................................................................................................................................................................................... 29
Periodic inspection ..............................................................................................................................................................................................29
Storage and transport .........................................................................................................................................................................................29
Disposal ............................................................................................................................................................................................................... 30
Certification......................................................................................................................................................................................................... 30
Identity card ........................................................................................................................................................................................................ 31
Version 2023 - V1
www.evacuator.com
5

7
Safety of the device
Maintenance safety
The EVACUATOR® descent device must be replaced by a new one
after it has been used.
After use, always contact a person who is accredited or authorized by
Evacuator Worldwide BV for this purpose.
Always consult with a person, authorized or accredited by Evacuator
Worldwide BV, if there are any visible signs of damage.
PROHIBITED!
It is not allowed to change the EVACUATOR® descent device or
any components of it.
WARNING!
Check the inspection report of the EVACUATOR® descent device
before use.
ATTENTION!
The device should at all times be installed by an accredited
person, authorized by Evacuator Worldwide BV.
Attention!
For safety reasons, the EVACUATOR® descent device must be taken
out of service immediately if there are doubts about safe use.
PROHIBITED!
It is prohibited to use any combination of equipment where the
function of one item is affected by or interferes with the function
of another.
WARNING!
The EVACUATOR® descent device is permanent installed at a
workplace and left in place.
WARNING!
It is forbidden to make any alterations or additions to the
equipment without prior written consent given by EVACUATOR®
Worldwide BV.
PROHIBITED!
It is not allowed to move the EVACUATOR® descent device. It has
been adjusted to the particular evacuation zone during the
WARNING!
Controlled descent process is essential as it is difficult to regain
control of the device if you lose control .
WARNING!
Install the device only for purposes that it is intended for.
WARNING!
Installation and repairs may only be carried out by an accredited
person or a person authorized by Evacuator Worldwide BV.
installation.
6
General safety warnings
WARNING!
Use the EVACUATOR® descent device only in case of emergency
and when there is no other way at all, to escape from your
ATTENTION!
The EVACUATOR® descent device may only be used by
persons that are sufficiently trained and competent. Read,
understand and follow all instructions before using the
WARNING!
The physical condition of the user may have an impact on their
safety during use.
PROHIBITED!
Do not use the EVACUATOR® descent device if there are visible
signs of previous use.
WARNING!
A rescue plan shall be in place to deal with any emergencies that
could arise.
WARNING!
Any repair shall only be carried out by Evacuator Worldwide BV or
his certified representative.
WARNING!
A full body harness is the only acceptable body holding device
that can be used.
PROHIBITED!
Do not use the EVACUATOR® descent device when there is
visible damage or wear to the device or its accessories.
location.
EVACUATOR® descent device.
Version 2023 - V1
www.evacuator.com
6
7
Safety of the device
Maintenance safety
The EVACUATOR® descent device must be replaced by a new one
after it has been used.
After use, always contact a person who is accredited or authorized by
Evacuator Worldwide BV for this purpose.
Always consult with a person, authorized or accredited by Evacuator
Worldwide BV, if there are any visible signs of damage.
PROHIBITED!
It is not allowed to change the EVACUATOR® descent device or
any components of it.
WARNING!
Check the inspection report of the EVACUATOR® descent device
before use.
ATTENTION!
The device should at all times be installed by an accredited
person, authorized by Evacuator Worldwide BV.
Attention!
For safety reasons, the EVACUATOR® descent device must be taken
out of service immediately if there are doubts about safe use.
PROHIBITED!
It is prohibited to use any combination of equipment where the
function of one item is affected by or interferes with the function
of another.
WARNING!
The EVACUATOR® descent device is permanent installed at a
workplace and left in place.
WARNING!
It is forbidden to make any alterations or additions to the
equipment without prior written consent given by EVACUATOR®
Worldwide BV.
PROHIBITED!
It is not allowed to move the EVACUATOR® descent device. It has
been adjusted to the particular evacuation zone during the
WARNING!
Controlled descent process is essential as it is difficult to regain
control of the device if you lose control .
WARNING!
Install the device only for purposes that it is intended for.
WARNING!
Installation and repairs may only be carried out by an accredited
person or a person authorized by Evacuator Worldwide BV.
installation.
6
General safety warnings
WARNING!
Use the EVACUATOR® descent device only in case of emergency
and when there is no other way at all, to escape from your
ATTENTION!
The EVACUATOR® descent device may only be used by
persons that are sufficiently trained and competent. Read,
understand and follow all instructions before using the
WARNING!
The physical condition of the user may have an impact on their
safety during use.
PROHIBITED!
Do not use the EVACUATOR® descent device if there are visible
signs of previous use.
WARNING!
A rescue plan shall be in place to deal with any emergencies that
could arise.
WARNING!
Any repair shall only be carried out by Evacuator Worldwide BV or
his certified representative.
WARNING!
A full body harness is the only acceptable body holding device
that can be used.
PROHIBITED!
Do not use the EVACUATOR® descent device when there is
visible damage or wear to the device or its accessories.
location.
EVACUATOR® descent device.
Version 2023 - V1
www.evacuator.com
7

9
User Manual Installation type 1
This step-by-step plan provides a directive with advice about what steps
you need to follow in case of evacuation.
Step 1: Remain calm
To minimize the risk of accidents, it is important that you remain calm at
all time.
Use the EVACUATOR® descent device only when regular exits, other
emergency exits, and fire stairs are not accessible.
WARNING!
You should be aware at all times that the EVACUATOR®
descent device is a last resort and may only be used in case
WARNING!
In this user manual it is assumed that you are already
wearing your approved safety harness with snap hook.
ATTENTION!
First check that the descending route of the EVACUATOR®
descent device is accessible and free of obstacles that
could obstruct the descent.
Step 2: Count how many people need to descend
Before use, determine how many people should be evacuated at the
same time. The EVACUATOR® descent device E140 / E165 are both
provided with 2 cable reels.
Both cable reels are allowed to be used at the same time/
simultaneously.
For example the EVACUATOR® descent device E165 is provided with
two cable reels, both with a capacity to evacuate 282 Kg (multiple
persons per cable).
The number of persons per cable depends on the ability to
simultaneously pass through the escape opening without forming a loop
larger than 600 mm.
It is essential that the combined weight of the evacuated persons per
cable reel remains above 50 kg and below 282 kg at all time.
WARNING!
Preferably, the next cable reel should only be used when the
users of the cable reel currently in use, are safely on the
ground, have disconnected themselves from the cable and
the cable reel has come to a standstill.
of emergency.
8
Determine type of installation
Check which type of installation you have and go to the corresponding page:
Installation type 1: Hook-on rings pre-installed (only indoors) | Page 8
Installation type 2: High mounted case that opens from the front | Page 14
Installation type 3: Low mounted case that opens from the top | Page 21
Type 1 Type 2 Type 3
Version 2023 - V1
www.evacuator.com
8

9
User Manual Installation type 1
This step-by-step plan provides a directive with advice about what steps
you need to follow in case of evacuation.
Step 1: Remain calm
To minimize the risk of accidents, it is important that you remain calm at
all time.
Use the EVACUATOR® descent device only when regular exits, other
emergency exits, and fire stairs are not accessible.
WARNING!
You should be aware at all times that the EVACUATOR®
descent device is a last resort and may only be used in case
WARNING!
In this user manual it is assumed that you are already
wearing your approved safety harness with snap hook.
ATTENTION!
First check that the descending route of the EVACUATOR®
descent device is accessible and free of obstacles that
could obstruct the descent.
Step 2: Count how many people need to descend
Before use, determine how many people should be evacuated at the
same time. The EVACUATOR® descent device E140 / E165 are both
provided with 2 cable reels.
Both cable reels are allowed to be used at the same time/
simultaneously.
For example the EVACUATOR® descent device E165 is provided with
two cable reels, both with a capacity to evacuate 282 Kg (multiple
persons per cable).
The number of persons per cable depends on the ability to
simultaneously pass through the escape opening without forming a loop
larger than 600 mm.
It is essential that the combined weight of the evacuated persons per
cable reel remains above 50 kg and below 282 kg at all time.
WARNING!
Preferably, the next cable reel should only be used when the
users of the cable reel currently in use, are safely on the
ground, have disconnected themselves from the cable and
the cable reel has come to a standstill.
of emergency.
8
Determine type of installation
Check which type of installation you have and go to the corresponding page:
Installation type 1: Hook-on rings pre-installed (only indoors) | Page 8
Installation type 2: High mounted case that opens from the front | Page 14
Installation type 3: Low mounted case that opens from the top | Page 21
Type 1
Type 2
Type 3
Version 2023 - V1
www.evacuator.com
9

11
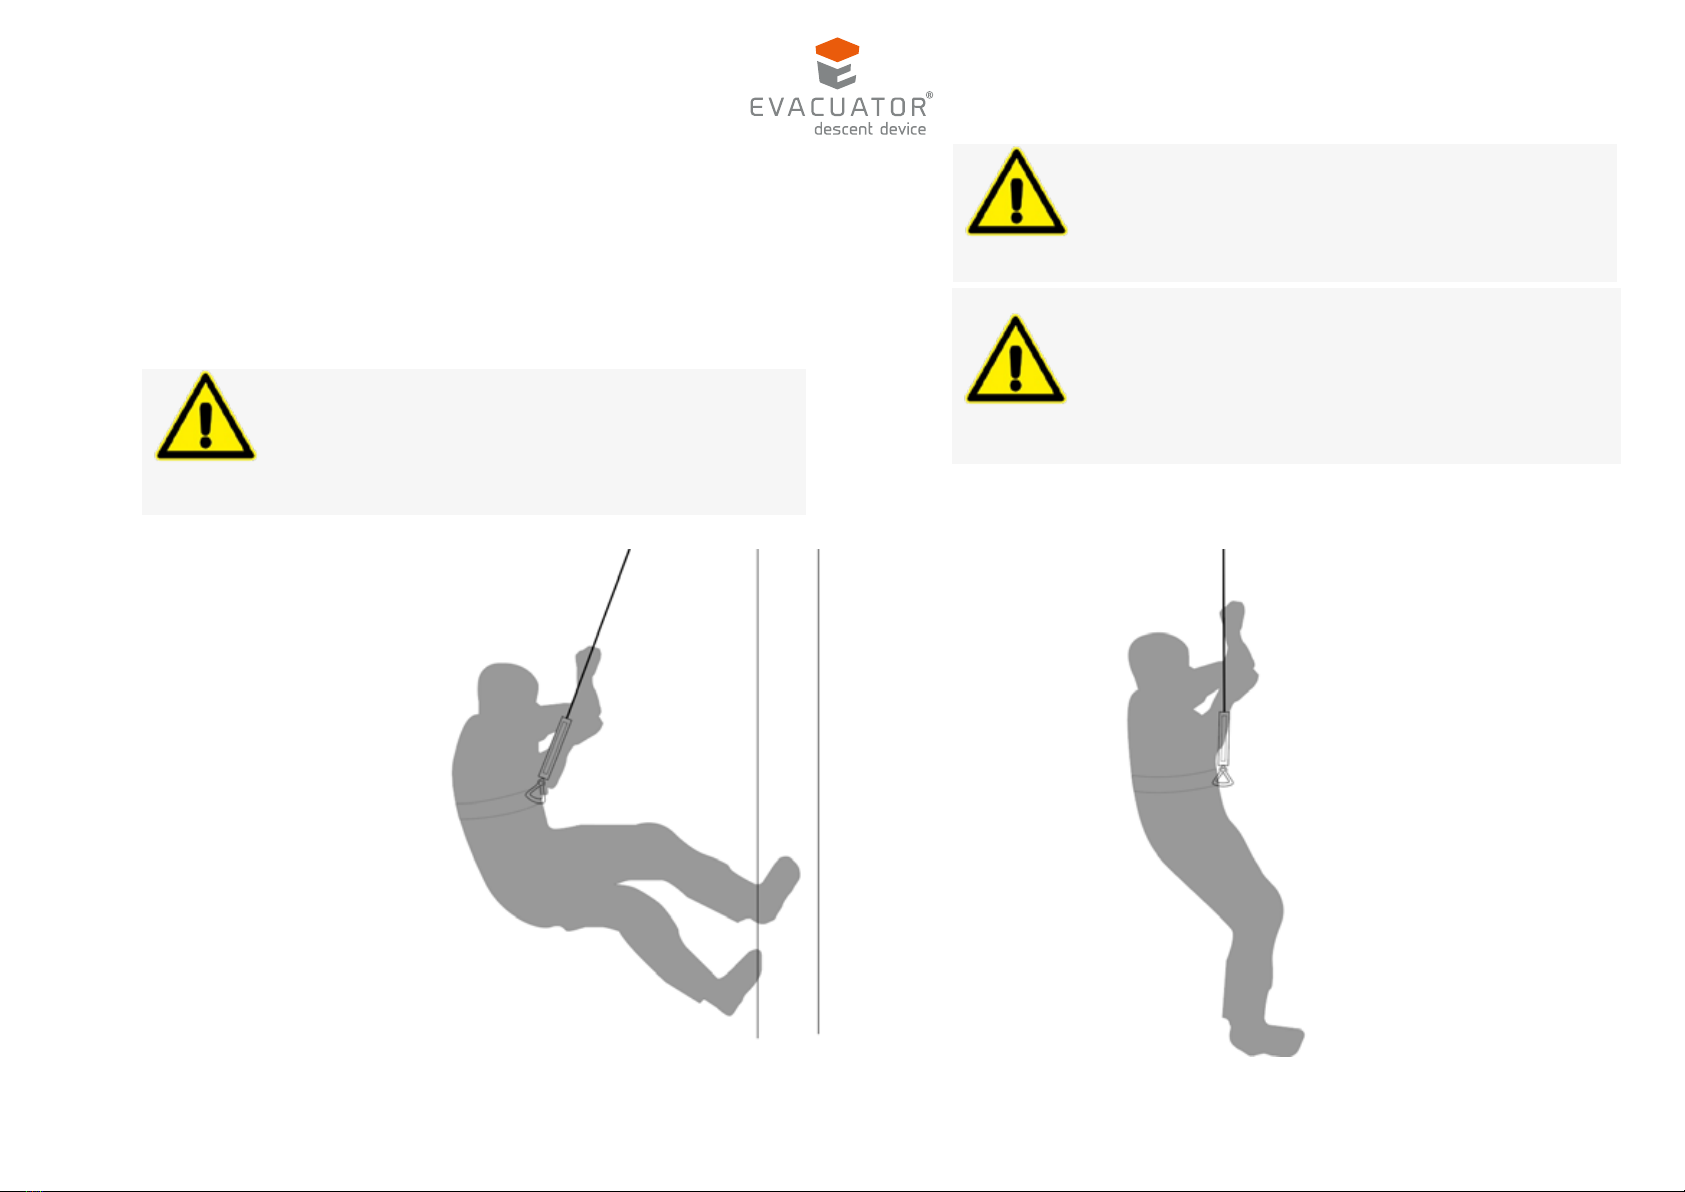
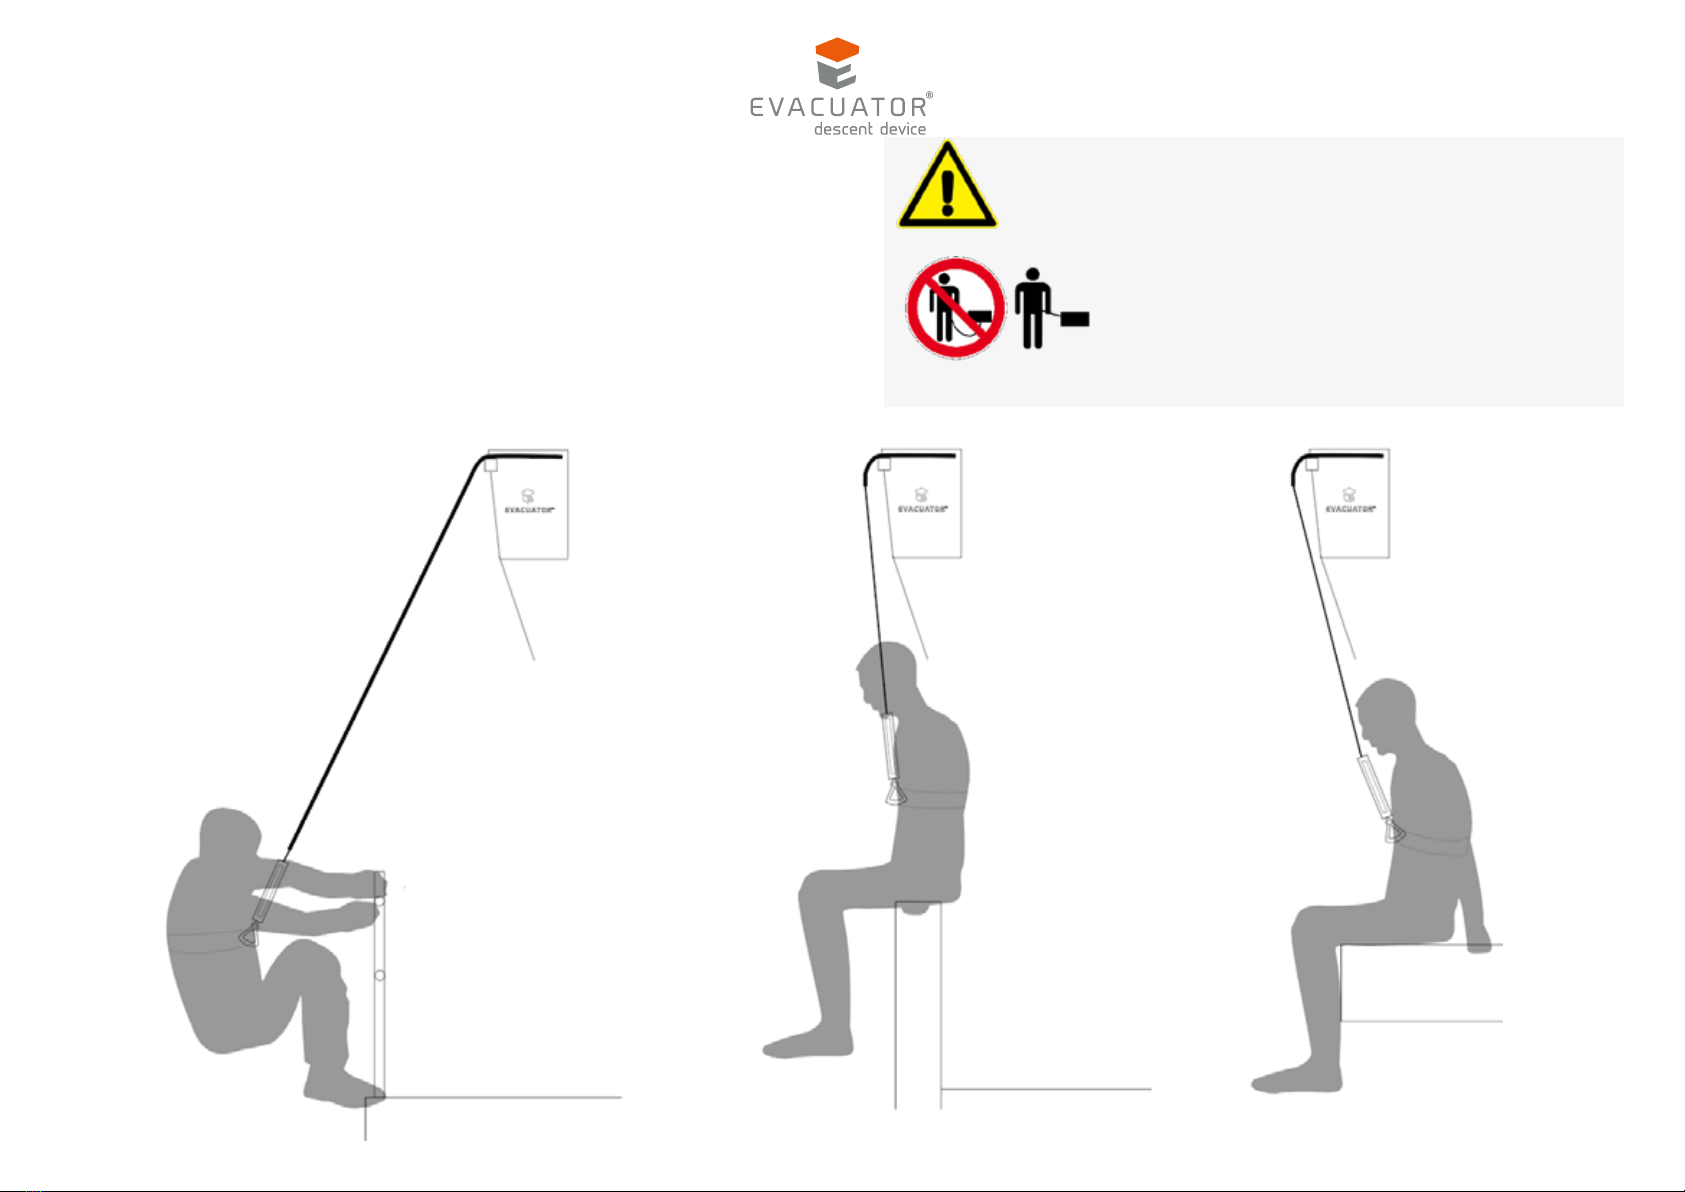
Step 4: Descending
Climb over the railing or onto the railing, sit down in the window opening
or in the hatch and make sure that the cable is kept as tight as possible
and that there is no looping of the cable. In some situations, a loop is
unavoidable during this step. In that case, aim for the smallest possible
loop, one that will disappear during the next step.
Make sure that you do not wear clothing that could obstruct your freedom
of movement or entrap you during the descent. It is also recommended to
tie loose hanging hair to prevent entanglement.
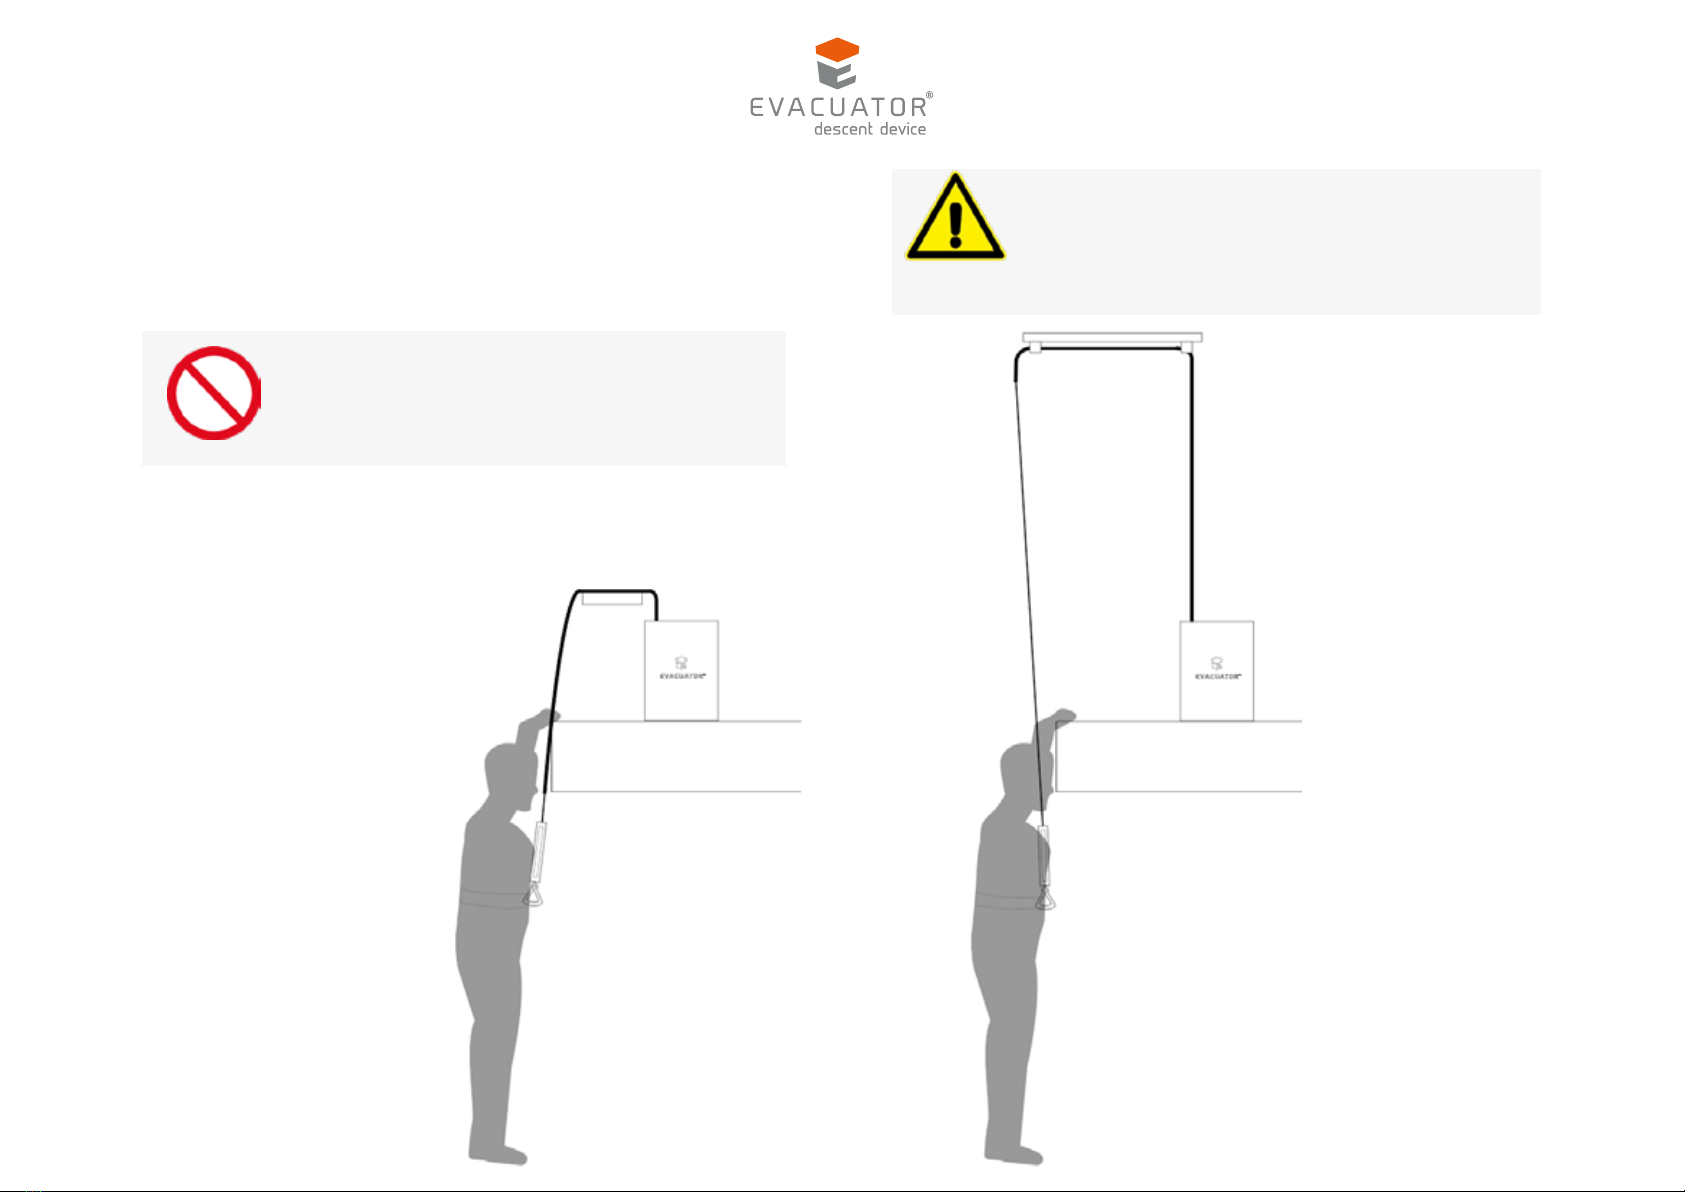
WARNING!
Keep the cable as short as possible! Make sure the cable
cannot bunch-up on the cable reel. This may lead to failures.
Avoid any looping of the cable while you place the guiding
cable (Bowden cable) over the edge of the evacuation zone.
This prevents the cable from having slack or getting tangled
up
10
Step 3: Hook on yourself to the hook-on ring and check all
connections
Hook on yourself (and your co-evacuees), with the snap hook of your
safety harness, to the hook-on ring of the EVACUATOR® descent device.
Ensure that the cable is kept as tight as possible and there is no looping.
Check if your safety harness is connected to the snap hook, that the snap
hook is well secured to the hook-on ring and the hook-on ring/energy
absorber is attached to the cable.
The maximum load that can be connected to the hook-on ring is 282kg.
WARNING!
The EVACUATOR® descent device may only be used with an approved
WARNING!
Keep the cable as short as possible! Make sure the cable
cannot bunch-up on the cable reel. This may lead to failures.
Avoid any looping of the cable while you place the guiding
cable (Bowden cable) over the edge of the evacuation zone.
This prevents the cable from having slack or getting tangled
up.
WARNING!
The brake may become hot during use. Therefore, avoid contact with
the brake.
PROHIBITED!
Never go below the minimum load of 50 kg per cable!
Never exceed the maximum load of 282 kilos per cable!
safety harness.
Version 2023 - V1
www.evacuator.com
10

11
Step 4: Descending
Climb over the railing or onto the railing, sit down in the window opening
or in the hatch and make sure that the cable is kept as tight as possible
and that there is no looping of the cable. In some situations, a loop is
unavoidable during this step. In that case, aim for the smallest possible
loop, one that will disappear during the next step.
Make sure that you do not wear clothing that could obstruct your freedom
of movement or entrap you during the descent. It is also recommended to
tie loose hanging hair to prevent entanglement.
WARNING!
Keep the cable as short as possible! Make sure the cable
cannot bunch-up on the cable reel. This may lead to failures.
Avoid any looping of the cable while you place the guiding
cable (Bowden cable) over the edge of the evacuation zone.
This prevents the cable from having slack or getting tangled
up
10
Step 3: Hook on yourself to the hook-on ring and check all
connections
Hook on yourself (and your co-evacuees), with the snap hook of your
safety harness, to the hook-on ring of the EVACUATOR® descent device.
Ensure that the cable is kept as tight as possible and there is no looping.
Check if your safety harness is connected to the snap hook, that the snap
hook is well secured to the hook-on ring and the hook-on ring/energy
absorber is attached to the cable.
The maximum load that can be connected to the hook-on ring is 282kg.
WARNING!
The EVACUATOR® descent device may only be used with an approved
WARNING!
Keep the cable as short as possible! Make sure the cable
cannot bunch-up on the cable reel. This may lead to failures.
Avoid any looping of the cable while you place the guiding
cable (Bowden cable) over the edge of the evacuation zone.
This prevents the cable from having slack or getting tangled
up.
WARNING!
The brake may become hot during use. Therefore, avoid contact with
the brake.
PROHIBITED!
Never go below the minimum load of 50 kg per cable!
Never exceed the maximum load of 282 kilos per cable!
safety harness.
Version 2023 - V1
www.evacuator.com
11
13
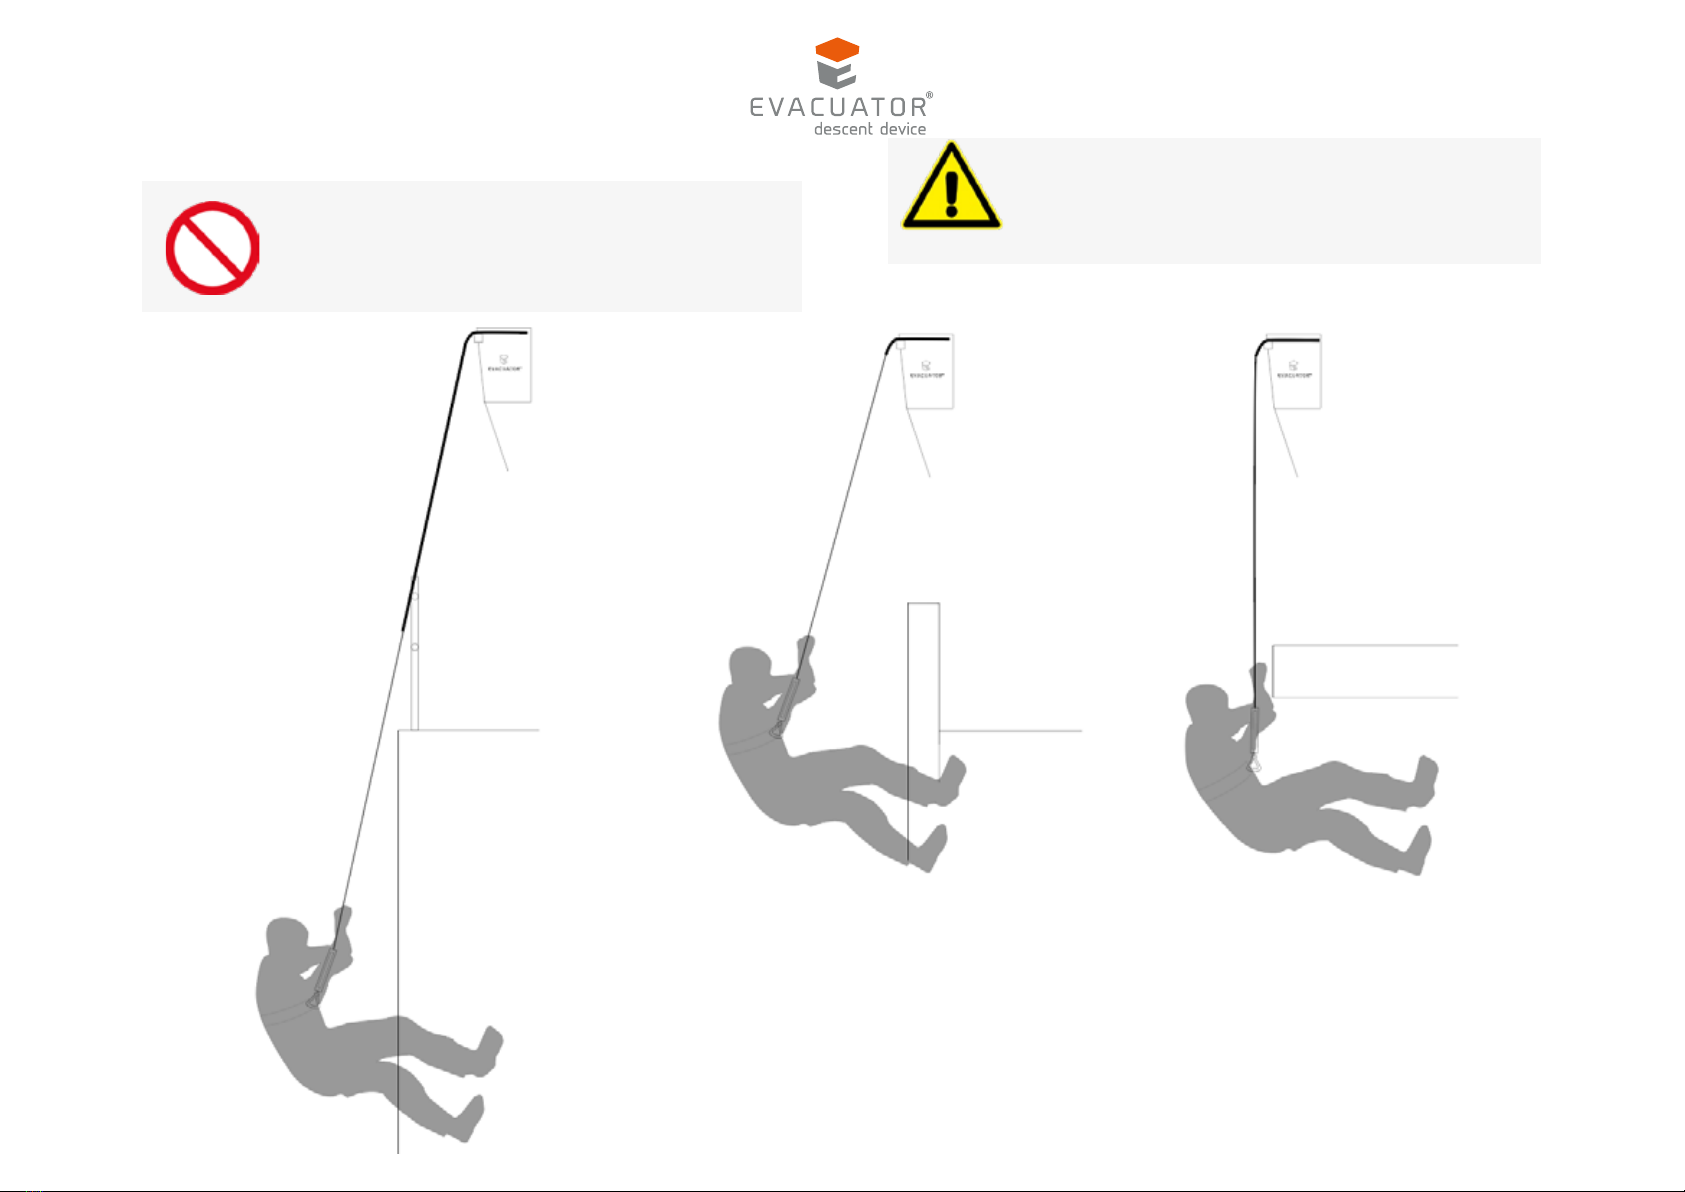
Let go; preferably hold on to the cable with your hands.
ATTENTION!
Avoid obstacles. Preferably hold on to the cable with your
hands.
PROHIBITED!
It is not allowed to interrupt the descent between
starting point and end point!
12
Open the emergency exit and lower yourself as careful as possible over
the railing, the window frame or the hatch. The thick guiding cable
(Bowden cable) must be placed over any edges so that the evacuation
cable is not getting damaged. In doing so, strive for an as short as possible
cable without looping.
WARNING!
Make sure that the thick guiding cable (Bowden cable) is
always placed over any edges so that the evacuation cable is
not getting damaged!
PROHIBITED!
Never use the cable reel more than once.
Version 2023 - V1
www.evacuator.com
12

13
Let go; preferably hold on to the cable with your hands.
ATTENTION!
Avoid obstacles. Preferably hold on to the cable with your
hands.
PROHIBITED!
It is not allowed to interrupt the descent between
starting point and end point!
12
Open the emergency exit and lower yourself as careful as possible over
the railing, the window frame or the hatch. The thick guiding cable
(Bowden cable) must be placed over any edges so that the evacuation
cable is not getting damaged. In doing so, strive for an as short as possible
cable without looping.
WARNING!
Make sure that the thick guiding cable (Bowden cable) is
always placed over any edges so that the evacuation cable is
not getting damaged!
PROHIBITED!
Never use the cable reel more than once.
Version 2023 - V1
www.evacuator.com
13
15
User Manual Installation type 2
This step-by-step plan provides a directive with advice about what steps
you need to follow in case of evacuation.
Step 1: Remain calm
To minimize the risk of accidents, it is important that you remain calm at
all time .
Use the EVACUATOR® descent device only when regular exits, other
emergency exits, and fire stairs are not accessible.
WARNING!
You should be aware at all times that the EVACUATOR®
descent device is a last resort and may only be used in case
WARNING!
In this user manual it is assumed that you are already
wearing your approved safety harness with snap hook.
ATTENTION!
First check that the descending route of the EVACUATOR®
descent device is accessible and free of obstacles that
could obstruct the descent.
Step 2: Count how many people need to descend
Before use, determine how many people should be evacuated at the
same time. The EVACUATOR® descent device E140 / E165 are both
provided with 2 cable reels.
Both cable reels are allowed to be used at the same time/simultaneously.
For example the EVACUATOR® descent device E165 is provided with two
cable reels, both with a capacity to evacuate 282 Kg (multiple persons
per cable). .
The number of persons per cable depends on the ability to
simultaneously pass through the escape opening without forming a
loop larger than 600 mm.
It is essential that the combined weight of the evacuated persons per
cable reel remains above 50 kg and below 282 kg at all time.
WARNING!
Preferably, the next cable reel should only be used when the
users of the cable reel currently in use, are safely on the
the cable reel has come to a standstill.
ground, have disconnected themselves from the cable and
of emergency.
14
Push off from any walls or edges. By lowering yourself, the
EVACUATOR® descent device will automatically lower you in a controlled
way at low speed.
The energy absorber may stretch during the first part of the
descent, allowing any fall to be absorbed at the start of the descent.
The entire EVACUATOR® descent device (including Shock Absorbers)
is made FOR SINGLE USE ONLY.
WARNING!
If possible try to stay in contact with the wall with your feet
during the descent.
WARNING!
Preferably, the next cable reel should only be used when the
users of the cable reel currently in use, are safely on the
ground, have disconnected themselves from the cable and
the cable reel has come to a standstill.
WARNING!
As soon as you reach the ground, disconnect the snap hook
from the hook ring and remove yourself from the landing
site to create space for any subsequent descents!
Version 2023 - V1
www.evacuator.com
14

15
User Manual Installation type 2
This step-by-step plan provides a directive with advice about what steps
you need to follow in case of evacuation.
Step 1: Remain calm
To minimize the risk of accidents, it is important that you remain calm at
all time .
Use the EVACUATOR® descent device only when regular exits, other
emergency exits, and fire stairs are not accessible.
WARNING!
You should be aware at all times that the EVACUATOR®
descent device is a last resort and may only be used in case
WARNING!
In this user manual it is assumed that you are already
wearing your approved safety harness with snap hook.
ATTENTION!
First check that the descending route of the EVACUATOR®
descent device is accessible and free of obstacles that
could obstruct the descent.
Step 2: Count how many people need to descend
Before use, determine how many people should be evacuated at the
same time. The EVACUATOR® descent device E140 / E165 are both
provided with 2 cable reels.
Both cable reels are allowed to be used at the same time/simultaneously.
For example the EVACUATOR® descent device E165 is provided with two
cable reels, both with a capacity to evacuate 282 Kg (multiple persons
per cable). .
The number of persons per cable depends on the ability to
simultaneously pass through the escape opening without forming a
loop larger than 600 mm.
It is essential that the combined weight of the evacuated persons per
cable reel remains above 50 kg and below 282 kg at all time.
WARNING!
Preferably, the next cable reel should only be used when the
users of the cable reel currently in use, are safely on the
the cable reel has come to a standstill.
ground, have disconnected themselves from the cable and
of emergency.
14
Push off from any walls or edges. By lowering yourself, the
EVACUATOR® descent device will automatically lower you in a controlled
way at low speed.
The energy absorber may stretch during the first part of the
descent, allowing any fall to be absorbed at the start of the descent.
The entire EVACUATOR® descent device (including Shock Absorbers)
is made FOR SINGLE USE ONLY.
WARNING!
If possible try to stay in contact with the wall with your feet
during the descent.
WARNING!
Preferably, the next cable reel should only be used when the
users of the cable reel currently in use, are safely on the
ground, have disconnected themselves from the cable and
the cable reel has come to a standstill.
WARNING!
As soon as you reach the ground, disconnect the snap hook
from the hook ring and remove yourself from the landing
site to create space for any subsequent descents!
Version 2023 - V1
www.evacuator.com
15
17
Step 4: Hook on yourself to the hook-on ring and check all
connections
Hook on yourself (and any co-evacuees), with the snap hook of your
safety harness, to the hook-on ring of the EVACUATOR® descent device.
Ensure that the cable is kept as tight as possible and there is no looping.
Check if your safety harness is connected to the snap hook, that the snap
hook is well secured to the hook-on ring and the hook-on ring/energy
absorber is attached to the cable.
The maximum load that can be connected to the hook-on ring is 282kg.
PROHIBITED!
Never go below the minimum load of 50 kg per cable!
Never exceed the maximum load of 282 kilos per cable!
WARNING!
The EVACUATOR® descent device may only be used with an approved
WARNING!
Keep the cable as short as possible! Make sure the cable
cannot bunch-up on the cable reel. This may lead to failures.
Avoid any looping of the cable while you place the guiding
cable (Bowden cable) over the edge of the evacuation zone.
This prevents the cable from having slack or getting tangled
up
WARNING!
The brake may become hot during use. Therefore, avoid contact with
the brake
safety harness.
16
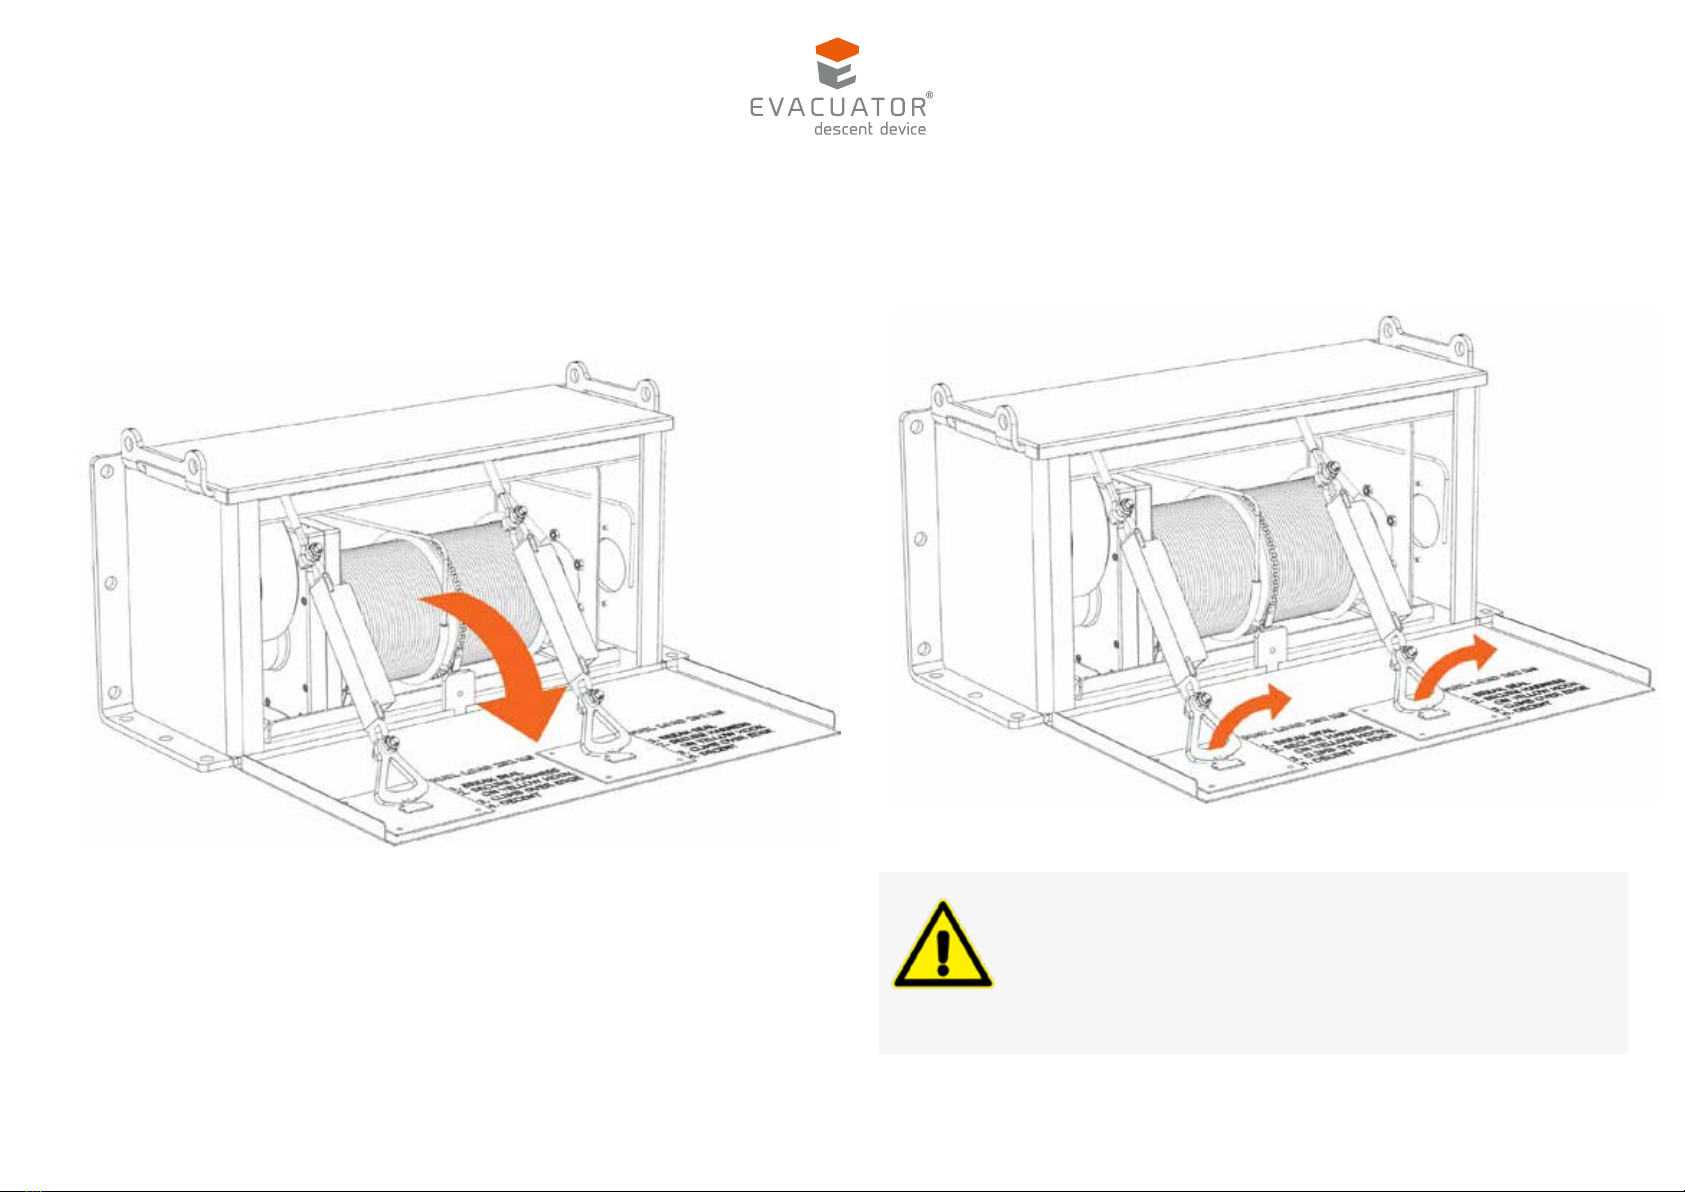
Step 3: Open the EVACUATOR® descent device
Open the front latch of the EVACUATOR® descent device.
Pull the sealed hook-on rings off the latch.
WARNING!
Use the EVACUATOR® descent device only if the cable seals
If the seal is broken, the safety of the system cannot be
guaranteed any more.
are still intact!
Version 2023 - V1
www.evacuator.com
16

17
Step 4: Hook on yourself to the hook-on ring and check all
connections
Hook on yourself (and any co-evacuees), with the snap hook of your
safety harness, to the hook-on ring of the EVACUATOR® descent device.
Ensure that the cable is kept as tight as possible and there is no looping.
Check if your safety harness is connected to the snap hook, that the snap
hook is well secured to the hook-on ring and the hook-on ring/energy
absorber is attached to the cable.
The maximum load that can be connected to the hook-on ring is 282kg.
PROHIBITED!
Never go below the minimum load of 50 kg per cable!
Never exceed the maximum load of 282 kilos per cable!
WARNING!
The EVACUATOR® descent device may only be used with an approved
WARNING!
Keep the cable as short as possible! Make sure the cable
cannot bunch-up on the cable reel. This may lead to failures.
Avoid any looping of the cable while you place the guiding
cable (Bowden cable) over the edge of the evacuation zone.
This prevents the cable from having slack or getting tangled
up
WARNING!
The brake may become hot during use. Therefore, avoid contact with
the brake
safety harness.
16
Step 3: Open the EVACUATOR® descent device
Open the front latch of the EVACUATOR® descent device.
Pull the sealed hook-on rings off the latch.
WARNING!
Use the EVACUATOR® descent device only if the cable seals
If the seal is broken, the safety of the system cannot be
guaranteed any more.
are still intact!
Version 2023 - V1
www.evacuator.com
17
19
Open the emergency exit and lower yourself as careful as possible over
the railing, the window frame or the hatch. The thick guiding cable
(Bowden cable) must be placed over any edges so that the evacuation
cable is not getting damaged. In doing so, strive for an as short as possible
cable without looping.
WARNING!
Make sure that the thick guiding cable (Bowden cable) is
always over any edges so that the evacuation cable is not
getting damaged!
PROHIBITED!
Never use the cable reel more than once.
Guiding Cable
(Bowden cable)
18
Step 5: Descending
Climb over the railing or onto the railing, in the window opening or in the
hatch and ensure that the cable is kept as short as possible and that no
looping occurs.
Make sure that you do not wear clothing that could obstruct your freedom
of movement or entrap you during the descent. It is also recommended to
tie loose hanging hair to prevent entanglement.
WARNING!
Keep the cable as short as possible! Make sure the cable
cannot bunch-up on the cable reel. This may lead to failures.
Avoid any looping of the cable while you place the guiding
cable (Bowden cable) over the edge of the evacuation zone.
This prevents the cable from having slack or getting tangled
up
Version 2023 - V1
www.evacuator.com
18

19
Open the emergency exit and lower yourself as careful as possible over
the railing, the window frame or the hatch. The thick guiding cable
(Bowden cable) must be placed over any edges so that the evacuation
cable is not getting damaged. In doing so, strive for an as short as possible
cable without looping.
WARNING!
Make sure that the thick guiding cable (Bowden cable) is
always over any edges so that the evacuation cable is not
getting damaged!
PROHIBITED!
Never use the cable reel more than once.
Guiding Cable
(Bowden cable)
18
Step 5: Descending
Climb over the railing or onto the railing, in the window opening or in the
hatch and ensure that the cable is kept as short as possible and that no
looping occurs.
Make sure that you do not wear clothing that could obstruct your freedom
of movement or entrap you during the descent. It is also recommended to
tie loose hanging hair to prevent entanglement.
WARNING!
Keep the cable as short as possible! Make sure the cable
cannot bunch-up on the cable reel. This may lead to failures.
Avoid any looping of the cable while you place the guiding
cable (Bowden cable) over the edge of the evacuation zone.
This prevents the cable from having slack or getting tangled
up
Version 2023 - V1
www.evacuator.com
19
21
Push off from any walls or edges. By lowering yourself, the
EVACUATOR® descent device will automatically lower you in a controlled
way at low speed.
The energy absorber may stretch during the first part of the
descent, allowing any fall to be absorbed at the start of the descent.
The entire EVACUATOR® descent device (including Shock Absorbers)
is made FOR SINGLE USE ONLY.
WARNING!
If possible try to stay in contact with the wall with your feet
during the descent.
WARNING!
Preferably, the next cable reel should only be used when the
users of the cable reel currently in use, are safely on the
ground, have disconnected themselves from the cable and
the cable reel has come to a standstill.
WARNING!
As soon as you reach the ground, disconnect the snap hook
from the hook ring and remove yourself from the landing
site to create space for any subsequent descents!
20
Let go; preferably hold on to the cable with your hands.
ATTENTION!
Avoid obstacles. Preferably hold on to the cable with your
hands.
PROHIBITED!
It is not allowed to interrupt the descent between
starting point and end point!
Version 2023 - V1
www.evacuator.com
20
This manual suits for next models
1
Table of contents


