Evergreen homely CEF9H7TC3FR User manual

Homely System
Installation Manual
Samsung
For all AE model numbers manufactured after 2015


Safety Symbols
Hazards or unsafe practices
that may result in electric
shock and severe personal
injury or death.
The following symbols are used in this manual.
Hazards or unsafe practices
that may result in severe
personal injury or death.
Safety Information
Installation by unqualified persons may result in product
malfunction, electric shock or fire.
The installation must be performed in accordance with
the installation instructions before energising.
Incorrect installation of equipment may result in electric
shock or fire.
DANGER
WARNING
Before proceeding, ensure
that all power supplies in the
property are isolated. Failure
to isolate the power supply
may result in electric shock,
fire or death.
All electrical works must be
conducted by a qualified
technician and must comply
with local regulations.
DANGER
WARNING

About this Manual
This manual has been developed to make installation of the
Homely system a straightforward process.
Follow the steps illustrated in the following pages to ensure
that the Homely device is installed safely and correctly.
Scan the QR code below to visit our YouTube channel where
you will nd further information about Homely, as well as
various installation how-to videos.
We welcome your feedback! Please send all comments to
homely@evergreenenergy.co.uk.

1
Contents
22Installation Requirements
44Determine Primary Pump Type
66Pre-Installation Checks
77Installer’s Notes
88 System Diagram
1010 Step 1: Configure the Samsung Controller
1111 Step 2: Install the MIM-B19 Board
1212 Step 3: Complete Connections
1313 Step 4: Connect the Power Supply
1414 Step 5: System Configuration
1616 System Checks
1818 Specifications
2020 Declarations of Conformity

2
Installation Requirements
Items Supplied
HOMELY NODEHOMELY HUB
POWER
SUPPLY
2 X CRIMP
FERRULE
STICKY PAD
NODE
STICKER
120-OHM
RESISTOR
MIM-B19N
CABLES
SAMSUNG
MIM-B19N BOARD

3
HOMELY
INSTALLER
APP
RELPOL RELAY
& SOCKET
BELDEN 8723 OR STRANDED
CAT-5 RECOMMENDED
DATA CABLE
Items Supplied for
Fixed-Speed Pump
Installations Only
Items Required
But Not Supplied
Tools Required
CRIMP TOOL
WIRE
STRIPPERS
MULTIMETER
SCREWDRIVERS
PLIERS

4
Determine Primary Pump Type
The heat pump may be installed with a PWM pump (variable
speed) or a standard pump (xed speed).
To determine which type of pump has been installed, check
for connections to the control board at B1 and B6.
If the primary pump is connected at B1 and B6, it is a PWM
pump and no further action is required.
If there are no connections on B1 and B6 and the primary
pump is connected at B7 and B8, it is a xed-speed pump
and the supplied relay must be installed with the heating
pump as shown opposite.
The order in which you connect the wiring is not important.
The 2-core cable used to connect the relay to B6 and B7 on
the Samsung control board is provided.
Add a wire link between B20 and B22.

5
Heating PumpHeating Valve
B8
B7
B10
B15
B6
B1
2
1
7
8
6
5
3
4
Relpol
Samsung Control Board
The conguration shown above is for installations
with a xed-speed primary pump.

6
Pre-Installation Checks
Before starting Homely installation, perform the following
checks to conrm that the heat pump is working correctly.
Ensure that the Samsung
controller call for heat is
successfully activated and
deactivated
Ensure that the Samsung
controller call for hot water
is successfully activated
and deactivated

7
Use this space to record any
observations about the installed system.
Installer’s Notes

8
Heating
Pump
Air Source
Heat Pump
Data
Power
Immersion
Power
Heat Pump
Power
Homely
DatabaseWeather API
Consumer Unit
Control
Board
Hot Water
Valve
Primary
Pump
Heating
Valve
Wireless
Homely Node
Homely Hub
System Diagram

9
Heating
Pump
Air Source
Heat Pump
Data
Power
Immersion
Power
Heat Pump
Power
Homely
DatabaseWeather API
Consumer Unit
Control
Board
Hot Water
Valve
Primary
Pump
Heating
Valve
Wireless
Homely Node
Homely Hub
10
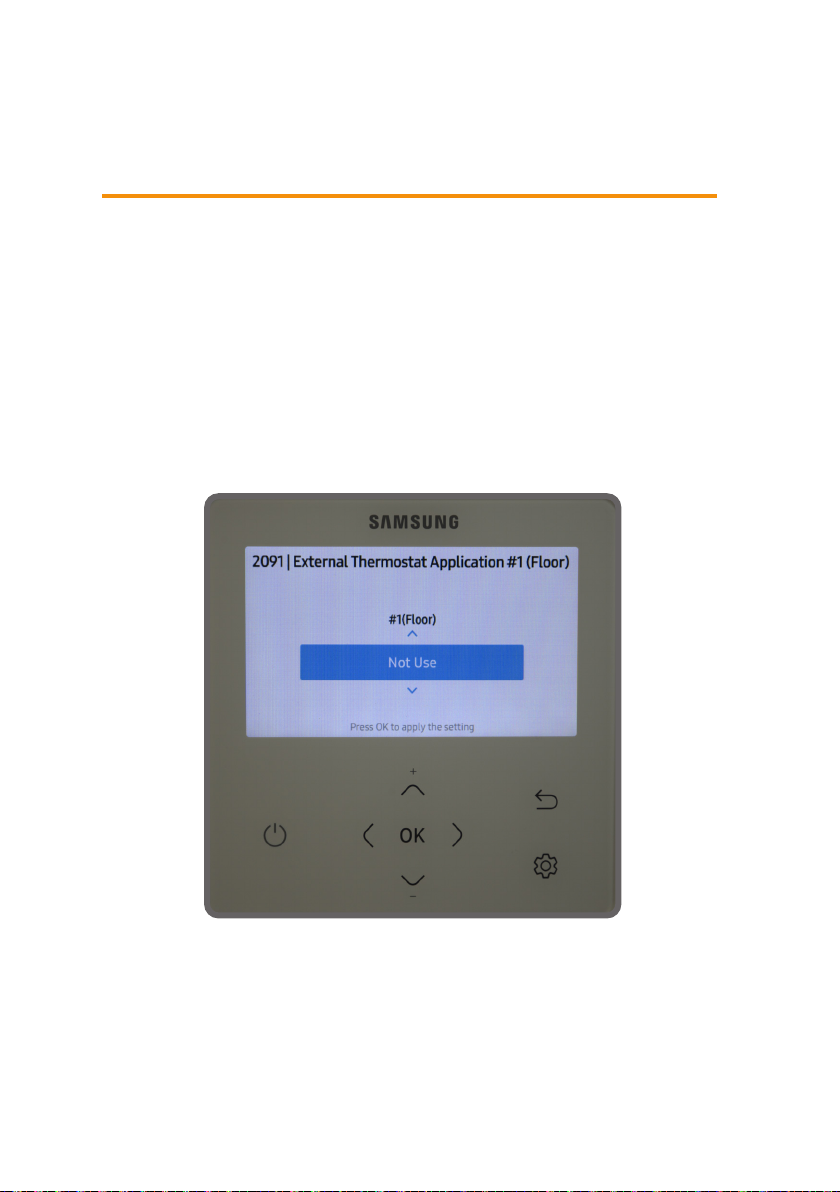
Change the following settings on the Samsung controller.
i. Turn off Water Law mode.
Navigate to the ‘Service Mode’ by pressing the up and
down arrows together. Enter the password.
Go to ‘Water Law’ and nd ‘2091 External Thermostat
Application #1’. Set to ‘Not Use’.
ii. Turn off any hot water schedules.
Select ‘DHW’ on the controller. Press the cog icon and
navigate to ‘Schedule’. Ensure that no schedules are stored.
STEP 1:
Configure the Samsung Controller

11
Install the MIM-B19N board into the Samsung outdoor unit.
Follow the manufacturer’s instructions included with the
MIM-B19N.
Install the MIM-B19N Board
Ensure that the installation work is performed in
accordance with the installation instructions.
Incorrect installation of equipment may result in
electric shock or fire.
WARNING
STEP 2:

12
Connect the Homely Hub to the MIM-B19N board with data
cable. Belden 8723 or stranded Cat-5 are recommended.
Remove the back of the Homely Hub and identify the
terminals for Modbus connection.
A single twisted pair must be used. Connect the A terminal
in the Homely Hub to the A terminal in the heat pump with
one wire and connect the B terminal in the Homely Hub to
the B terminal in the heat pump with the other. Only one
wire should be connected to each terminal.
The supplied 120-ohm resistor must be placed between the
A and B terminals as shown.
Complete Connections
STEP 3:

13
Air Source
Heat Pump
8.8.
AB
Homely Hub
CN4
CN3
RED
CN2
BLK

14
Connect the power supply to the Homely Hub as shown
and plug into a power outlet.
Connect the Power Supply
It may be necessary to install a new outlet
on a spur if there is not one within range.
NOTE
STEP 4:

15
Follow the in-app instructions to connect the Node to the
Hub, connect the Hub to a WiFi network and complete the
Homely conguration.
Contact homely@evergreenenergy.co.uk if you do not have
a login for the Homely Installer App.
System Configuration
Download
the Homely
Installer App
and register
an account
Email
Password
Register New Account
Log in
Reset Password
STEP 5:

16
System Checks
With the system powered on, perform the following checks
to ensure correct operation.
Ensure that a wire link has been installed between B20 and
B22 as specied earlier.
Ensure that Water Law mode has been correctly congured
as shown in Step 1: on the Samsung display, select Heat. As
shown below, the value displayed should be at least 25ºC.
Table of contents


