TigerStop SAWGEAR User manual

1
2017 TigerStop, LLC®
G
u
i
d
e
G
u
i
d
e
G
G
G
G
G
G
G
G
uid
u
uid
u
i
uid
i
d
uid
d
uid
u
uid
u
uid
i
uid
i
uid
i
uid
i
uid
d
uid
d
e
e
e
e
e
e
e
e
Panel Saw
Kit
®
s
tal
l
at
i
o
n
G
s
tal
tal
l
at
at
i
o
n
Ins
I
Ins
I
n
Ins
n
s
Ins
s
Ins
I
Ins
I
Ins
n
Ins
n
Ins
s
Ins
s
tal
ta
tal
tal
ta
tal
l
tal
l
tal
l
tal
l
tal
lat
l
lat
l
at
lat
at
lat
l
lat
l
at
lat
at
lat
at
lat
at
i
i
i
i
i
i
i
i
i
i
i
i
o
o
o
o
o
o
o
o
n
n
n
n
n
n
n
G
G
G
G
G
G
G
Kit
February 2017 Mk 1
2
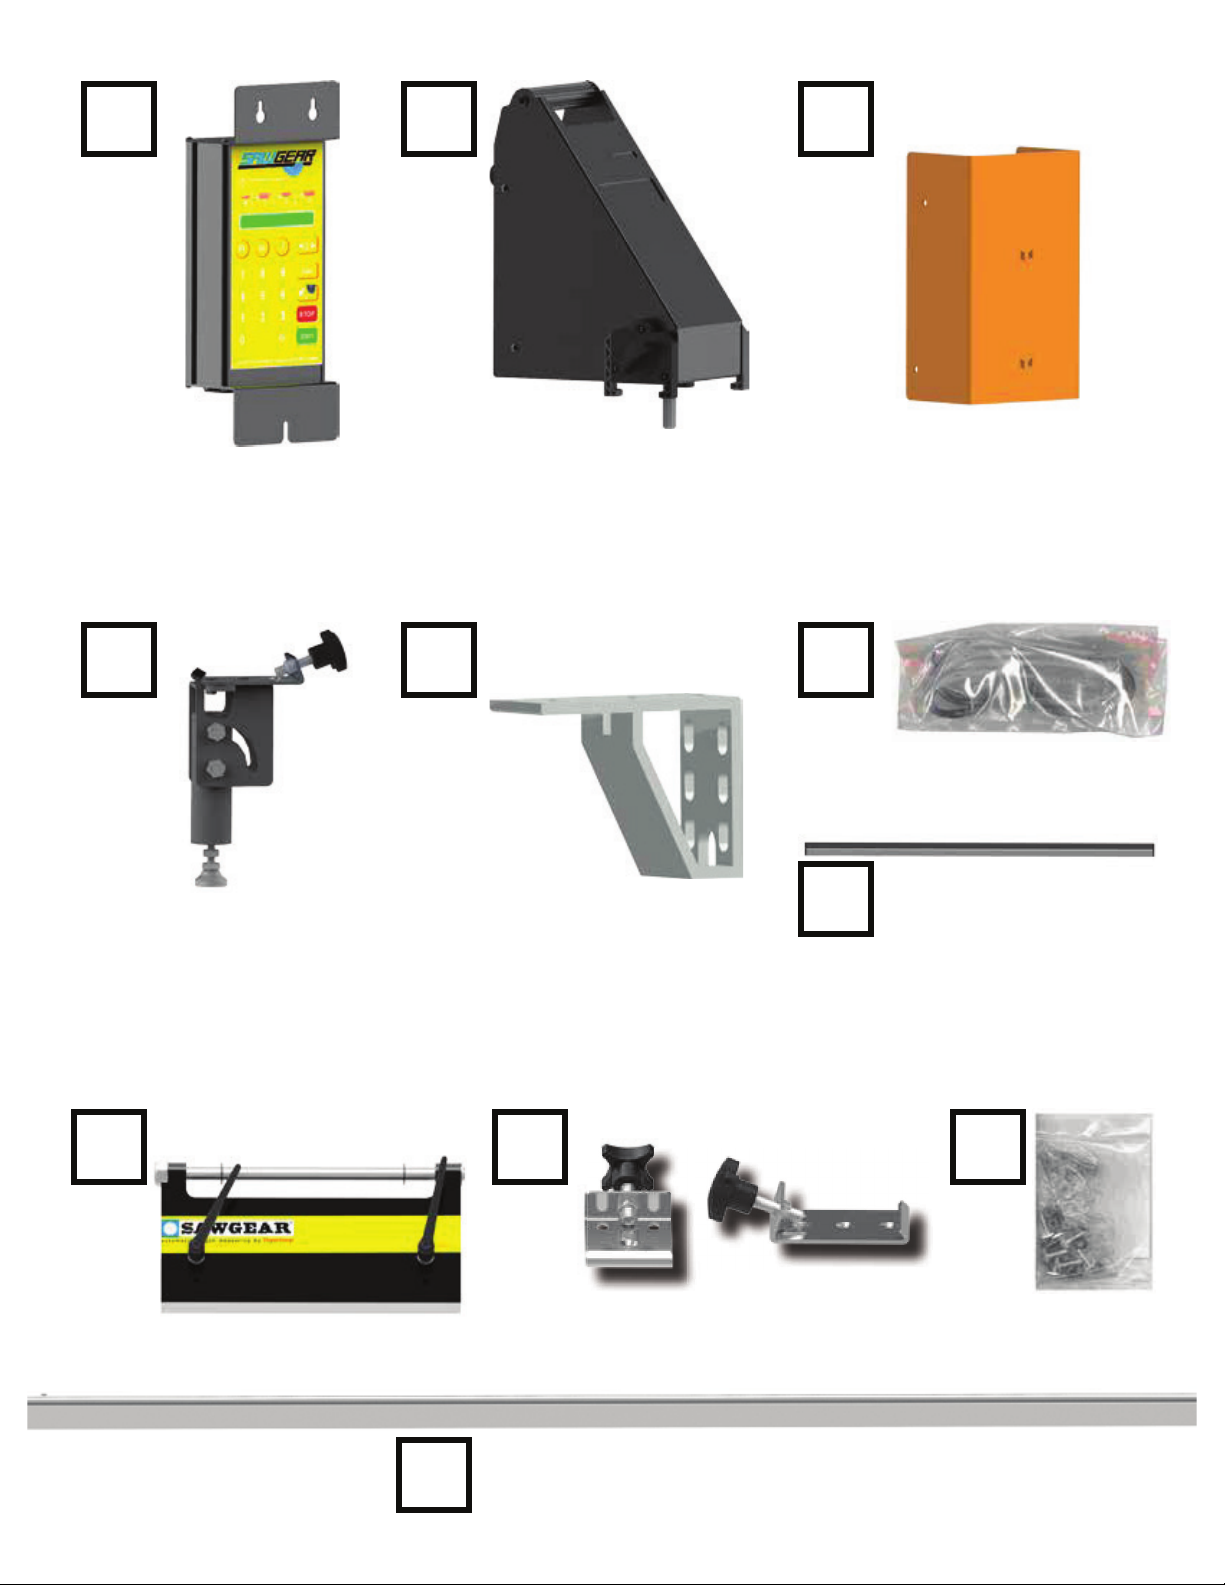
Controller PowerHead Cable Guard
Flip Away Stop Assembly
Measuring Bar
Bench Mount Brackets Nut Pack
Stop Bar
Universal Bracket
Power Cable
Support Leg

3
Nut Pack
Safety First!
WARNING: Installation of your TigerStop Product must be done by a person trained in the safe
design and installation of automation products, and in the safe operation of power equipment. Ensure
that such installation meets all legally required safety requirements and guidelines, and that proper
guarding and safety devices are provided on all sides of the equipment to preclude unintended access
GXULQJRSHUDWLRQ&RQVXOWZLWKDQGIROORZWKHUHFRPPHQGDWLRQVRIDTXDOL¿HGVDIHW\HQJLQHHU
WARNING: TigerStop Products are components intended for use in conjunction with potentially
dangerous machinery. The use of TigerStop Products does not make other machinery safe. TigerStop
Products are not intended to substitute, in any manner, for safe operating practices in general, or for
safety features present in other machines designed to make those machines as safe as possible.
TIGERSTOP PRODUCTS, IF USED OR INSTALLED IMPROPERLY, MAY CAUSE PERSONAL
INJURY OR DEATH AND SHOULD ONLY BE OPERATED BY PERSONS TRAINED IN THEIR
SAFE OPERATING PROCEDURES. Illustrations of TigerStop Products in use do not show, and are
not intended to show, all safety features and practices necessary for their safe operation.
GENERAL
WARNINGS
IMPORTANT SAFETY INFORMATION. READ ALL WARNINGS BEFORE OPERATING THIS PRODUCT.
WARNING: TigerStop Products must be installed in accordance with all local, state, and federal
regulations. Only personnel properly trained in the safe design and installation of automation
machinery and related power equipment should install TigerStop Products onto other equipment, to
ensure a safe and proper work station. TigerStop Products should not be operated without proper
training, both in the operation of TigerStop Products, and in the operation of related equipment.
INSTALLATION
WARNINGS
IMPORTANT CAUTION:
The motor box (compartment) contains DC voltage with potentially FATAL amperage. NEVER attempt
any unauthorized actions inside the motor box.
WARNING: Using a TigerStop interconnect does not relieve you of the responsibility for making sure
that your saw or other tool has all the necessary safety equipment in place. All installations must
meet all legally required safety requirements and guidelines. Installation and training should be done
IROORZLQJWKHUHFRPPHQGDWLRQVRIDTXDOL¿HGVDIHW\HQJLQHHU
INTERCONNECTS
DANGER: This machine can start, move and stop automatically. Keep hands and loose clothing
clear of moving parts while operating. Moving parts can crush and cut. When used with a saw or
other cutting equipment, bodily injury and death may result if operated without safety guards on
all machines. Do not operate with guards removed. Operators must wear adequate eye and ear
protection.
OPERATION
DANGER! Don’t get pinched by the push feeder. Keep your hands away when in motion!

4
IMPORTANT SAFETY INFORMATION. READ ALL WARNINGS BEFORE OPERATING THIS PRODUCT.
Do not use TigerStop machines in a dangerous environment. Using power tools in damp or wet
locations or in rain can cause shock or electrocution.
'RQRWRSHUDWHQHDUÀDPPDEOHOLTXLGVRULQJDVHRXVRUH[SORVLYHDWPRVSKHUHV
Wear proper apparel, no loose clothes, long hair or jewelry which could get pulled into moving
machinery or materials.
Wear non slip footwear, safety glasses, ear protection and a dust mask.
Use only 3- wire extension cords that have 3-prong grounding type plugs and 3-pole receptacles that
accept the tools plug for 120VAC. Use only 5-wire cords and plugs when using 3 phase.
'2127RSHUDWHWKLVRUDQ\PDFKLQHXQGHUWKHLQÀXHQFHRIGUXJVRUDOFRKRO
Do not open motor compartment or controller keypad. DC Voltage with potentially FATAL amperage!
Disconnect power before servicing. No user-serviceable parts inside.
1RRQHVKRXOGRSHUDWHWKLVPDFKLQHH[FHSWIRUIXOO\TXDOL¿HGSHUVRQQHO
Read the manual!
Keep the work area clean and well lighted to avoid accidental injury.

5
Installation...................................................................................................................6
SawGear Setup..........................................................................................................12
Register Your Warranty
Enable Your SawGear
First Power Up Routine
Basic SawGear Use....................................................................................................15
Moving SawGear
Calibrating SawGear
Using the Increment Feature
Using the List Feature
Sleep Mode
Password Protection
Switching Between Inches and Metric
Table of Contents
Table of Contents

6
Installation
Installation
Install Universal Brackets to Saw
Install Bench Mount Brackets to Universal Brackets
Note: Drilling and Tapping may be required.
7
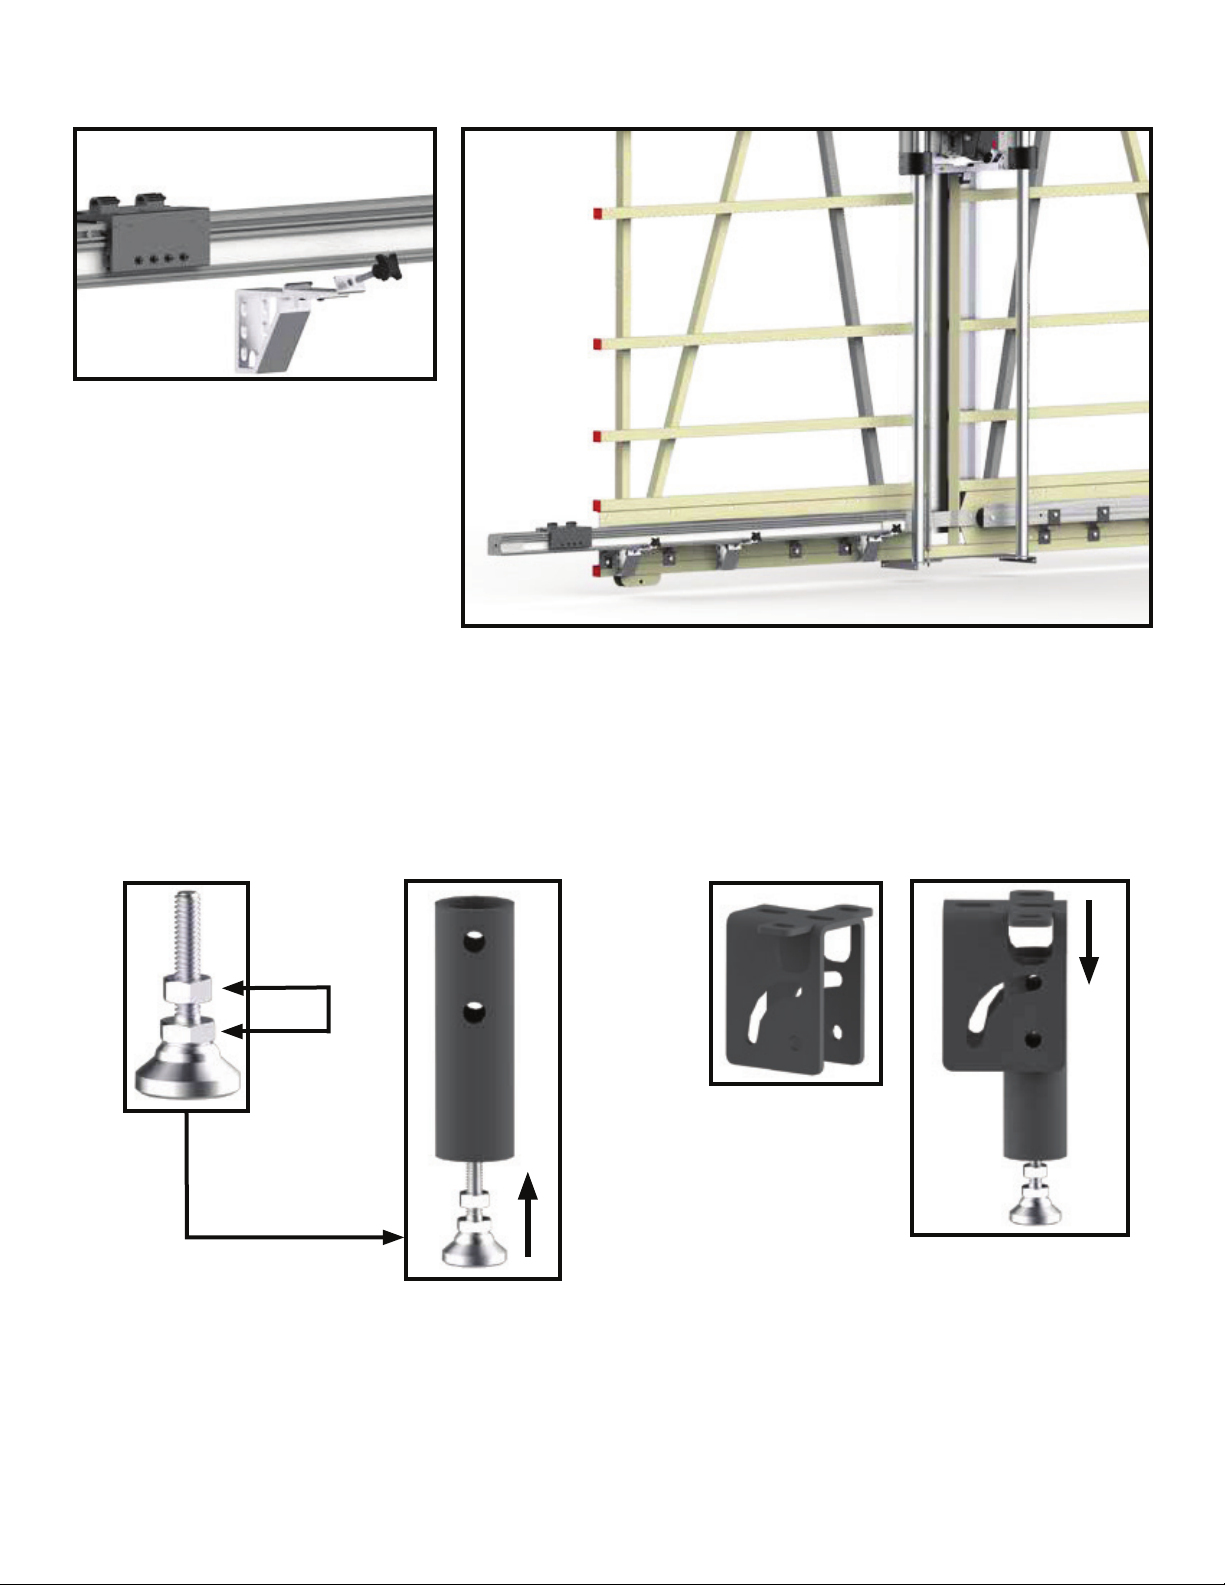
Attach SawGear Measuring Bar to Bench Mount Brackets
Assemble Support Leg
Note: Ensure the Universal Brackets are level before
attaching the SawGear Measuring Bar. Failure to do
so will impact overall system accuracy.
Leveling Nuts
1. 2.

8
Attach Support Leg
3. 4.
5. 6.

9
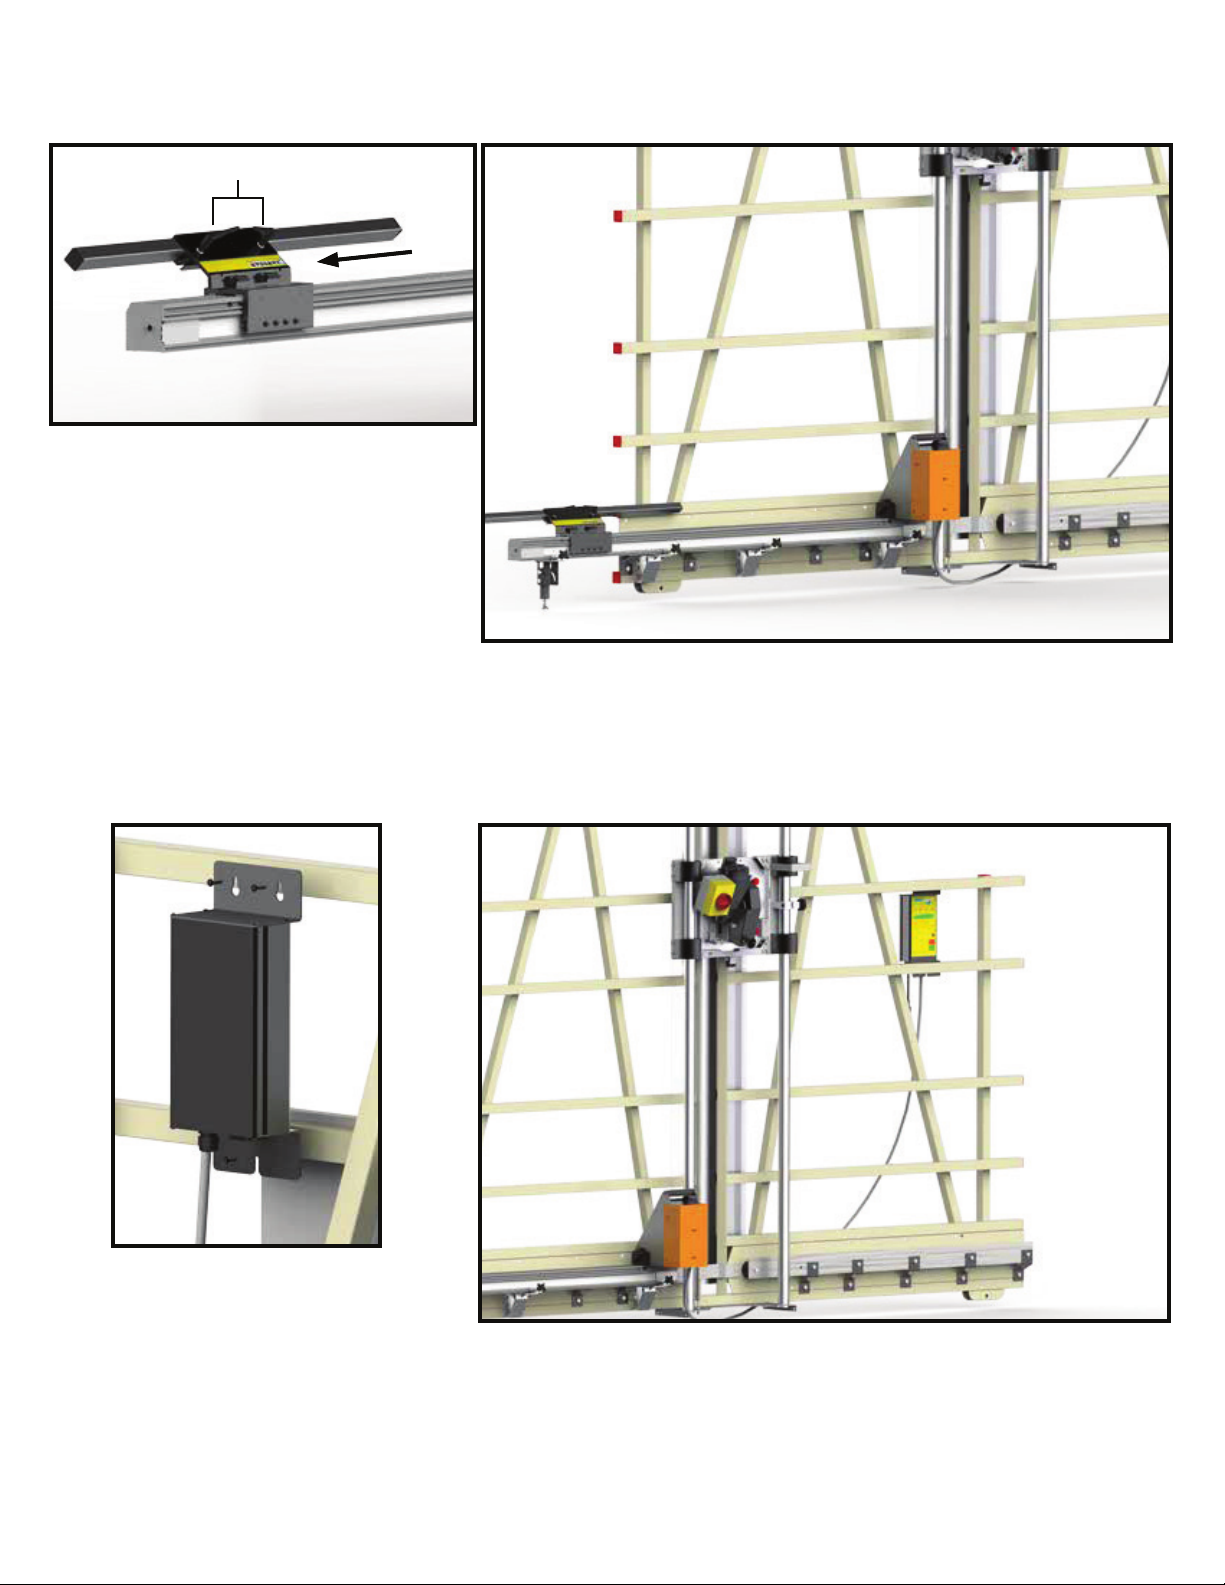
Attach PowerHead to Measuring Bar
Locking Handle
Attach Cable Guard to PowerHead
To attach the Cable Guard to the PowerHead, carefully
remove the 4 screws on the back of the PowerHead. Hold
the Cable Guard in place as shown and replace the 4
PowerHead screws.

10
Attach Flip Away to Carriage
Assemble the Flip Away Stop as shown and attach
it to the SawGear carriage. Tighten the Flip Away
Stop so that it will stay up when its flipped to the up
position.
11
Install Stop Bar in Flip Away Stop
Lock
Attach Controller to Saw
Note: Drilling and Tapping may be required.

12
Attach Power Cable to Controller
110 VAC 10 Amps
SawGear Power
SawGear requires a 110 vac, 10 amp dedicated circuit. This circuit
must be properly grounded.
WARNING! Do NOT use a high leg delta circuit to power SawGear!
If you are not sure what kind of circuit you are using, STOP! Have a
qualified electrician confirm the main power circuit.
SawGear installation is now complete.
SawGear Setup
SawGear Setup
Register Your Warranty
When your new SawGear arrives, you will find a warranty registration sheet in the accessory box. Fill
out this form and fax or e-mail it to TigerStop Customer Service.
(360) 260-0755
TigerStop Customer Service will contact you by phone to give you your SawGear enable code, within
the hour during regular business hours.
Monday - Friday
6:00am - 4:00pm PST
Also, feel free to call us if you would like an instant response.
(360) 254-0661
What is the street address of the TigerStop?
Furniture Manufacturing Mouldings & Millwork
Kitchen & Bath Cabinetry Wood Doors & Windows
Commercial Fixtures Lumber & Panel Products
Doors & Windows Other
Sheet Metal Fabrication
Doors & Windows Other
Eliminate Setup Improve Accuracy
Increase Productivity Improve Material Costs / Optomization
Reduce Labor Costs Eliminate Rework
Reduce Waste Increase Repeatability
Word of mouth Used in a different job
Metal Trade Show Dealer reccomended
Wood Trade Show Mobile Showroom
Internet Search E-mail
Existing user
This TigerStop is being used with (check one)…
Saw: Chop Saw Boring Machine
Saw: Double Miter Drill Press
Saw: Miter Mortiser
Saw: Radial Arm Iron Workers
Saw: Straightline Rip Punch Press
Saw: Table Shears
Saw: Up Cut Tube Bending
Saw: Tube Cutter
Custom Machinery: Other:
Email
Address _________________________
Wood Industry
Metal Industry
Please select your industry
Tel
Fax
Plastic Industry
Where did you first hear about TigerStop?
What problem(s) did you purchase the TigerStop to solve?
TigerStop Warranty Registration
Company Information
Name of Company
Your machine warranty begins on the date that you receive your enable code.
Please fill in your company information and fax this to TigerStop at (360) 260-0755.
Serial Number:
Contact Name
We will send you an email with your enable code.
Please provide your email address so we can send you
important updates. Please be certain you can accept email in
HTML
format to ensure proper enable code delivery.
Please call me with an enable code also.

13
Enable Your SawGear
Once you have registered your SawGear warranty, you can enter your SawGear enable code.
Note: Your SawGear warranty begins on the day your SawGear is enabled.
1. When SawGear is powered up, the screen will ask for your enable code.
2. Enter the code given by TigerStop Customer Service and press .
First Power Up Routine
When SawGear is powered up for the first time, it will need to know a little bit about your saw setup. It
will walk you through 3 questions.
Note: The messages shown below will scroll across the screen if they are longer than 16 characters.
1. SawGear will ask which language you use. Press for English, for Spanish, for
French, for Dutch or for German.
2. SawGear will ask which units you use. Press for Metric or for Inches.
3. SawGear will ask which side of the PowerHead the saw is attached to. Press for Left or
for Right.
SawGear Home Routine
• SawGear will move as far away from the saw as possible
• SawGear will then move as far toward the PowerHead as it can
• SawGear will stop when finished
Note: If SawGear doesn’t do the routine in this exact order, you may have selected the saw side incorrectly. Remove the power cord and hold
while plugging it back in to repeat the first start up routine.
4. Ensure the table is clear. Press Start to begin the home routine.
5. SawGear will display its working length, as calculated during the home routine. Press to
continue.

14
6. SawGear will now move back a few inches. Put a piece of material against the SawGear stop bar
and cut it.
7. Measure the cut piece and enter into the SawGear keypad. Press when finished.

15
Moving SawGear
®
www.sawgear.com
Moving SawGear is as easy as entering a length on the number pad and pressing to move.
Lengths may be entered as decimals or as fractions.
Entering Fractions
Entering Decimals
Number Pad Start
Button
Example: I want to cut a piece that is 2 feet and 8 and 1/2 inches.
Enter .
Press to move SawGear.
Note: SawGear will now display lengths in fractions.
Example: I want to cut a piece that is 2 feet and 8 and 1/2 inches.
Enter .
Press to move SawGear.
Note: SawGear will now display lengths in decimal.
Basic SawGear Use
Basic SawGear Use
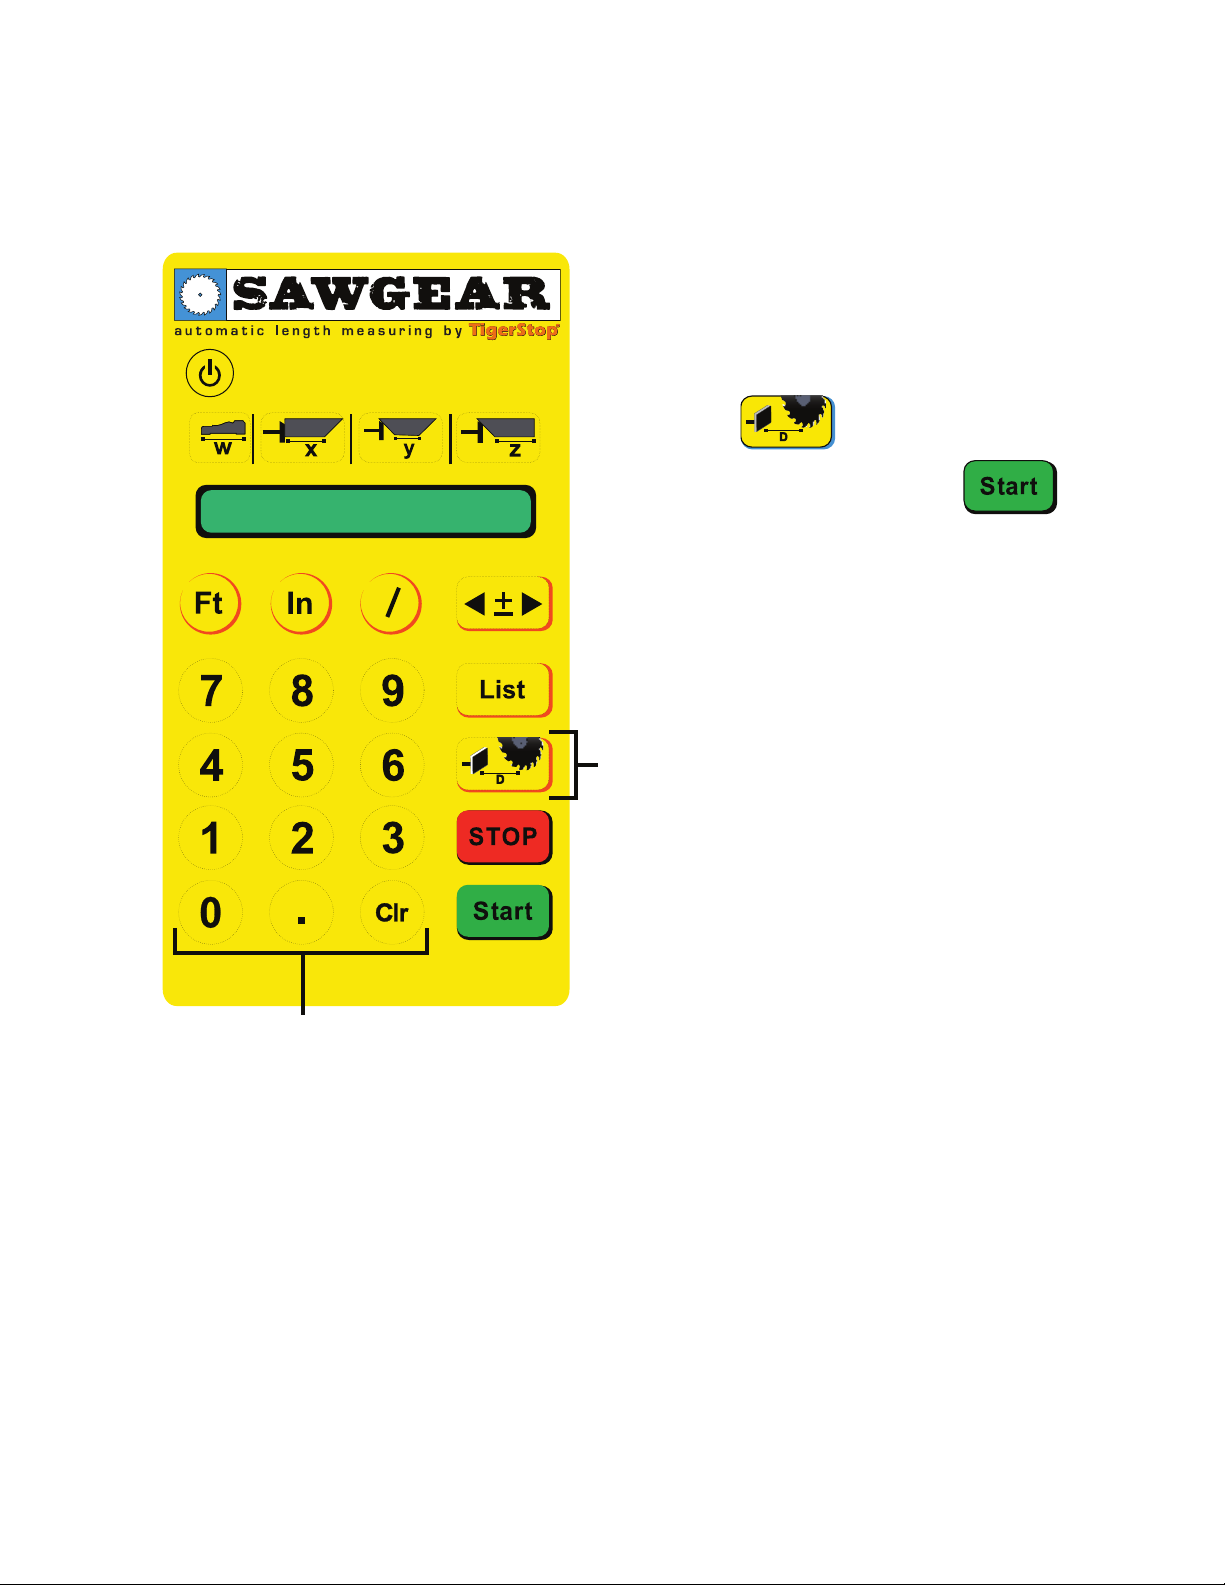
16
Calibrating SawGear
As you use your SawGear, you will have to calibrate the length measurement after saw blade
replacements or each time the machine is moved, before putting it into operation.
®
www.sawgear.com
Number Pad
Calibrate Button
How To Calibrate
1. Send SawGear to any length.
2. Make a cut and measure.
3. Press the button.
4. Enter your measurement and press .
SawGear is now calibrated

17
®
www.sawgear.com
Using the Increment Feature
SawGear has an increment feature that allows you to move SawGear forward or backwards in set
increments.
Setting the Increment
1. Press .
2. Press the right or left increment button.
3. Enter the increment length for the selected button.
4. Press to save setting.
Calibrate Button
Increment Button
How to Increment
1. When SawGear is at a length, press the right or left
increment arrow.
2. SawGear will immediately move in the direction pressed.

18
Using the List Feature
®
www.sawgear.com
List Button
SawGear can store up to 9 dimensions in each of 10 cut list memory slots.
Selecting a Memory Slot
1. Press .
2. Enter a memory slot number (0 - 9).
3. Press .
Programming a List
1. Once you have selected a memory slot, Enter the length
you want to cut.
2. Press to move to the next length.
3. Once you have programmed all the lengths you wish to
program, Press to save the list.
Running a List
1. Press .
2. Enter the list number you wish to run.
3. Press to cycle through each programmed cut size.

19
Sleep Mode
Sleep mode will turn off the SawGear display when left inactive for a set amount of time.
1. Press , then .
2. Enter the number of minutes that SawGear should remain powered up after inactivity.
Note: The smallest value allowed is .25 minutes. Enter a value of 0 to disable sleep mode.
3. Press to enter the value.
4. Use to power up SawGear.
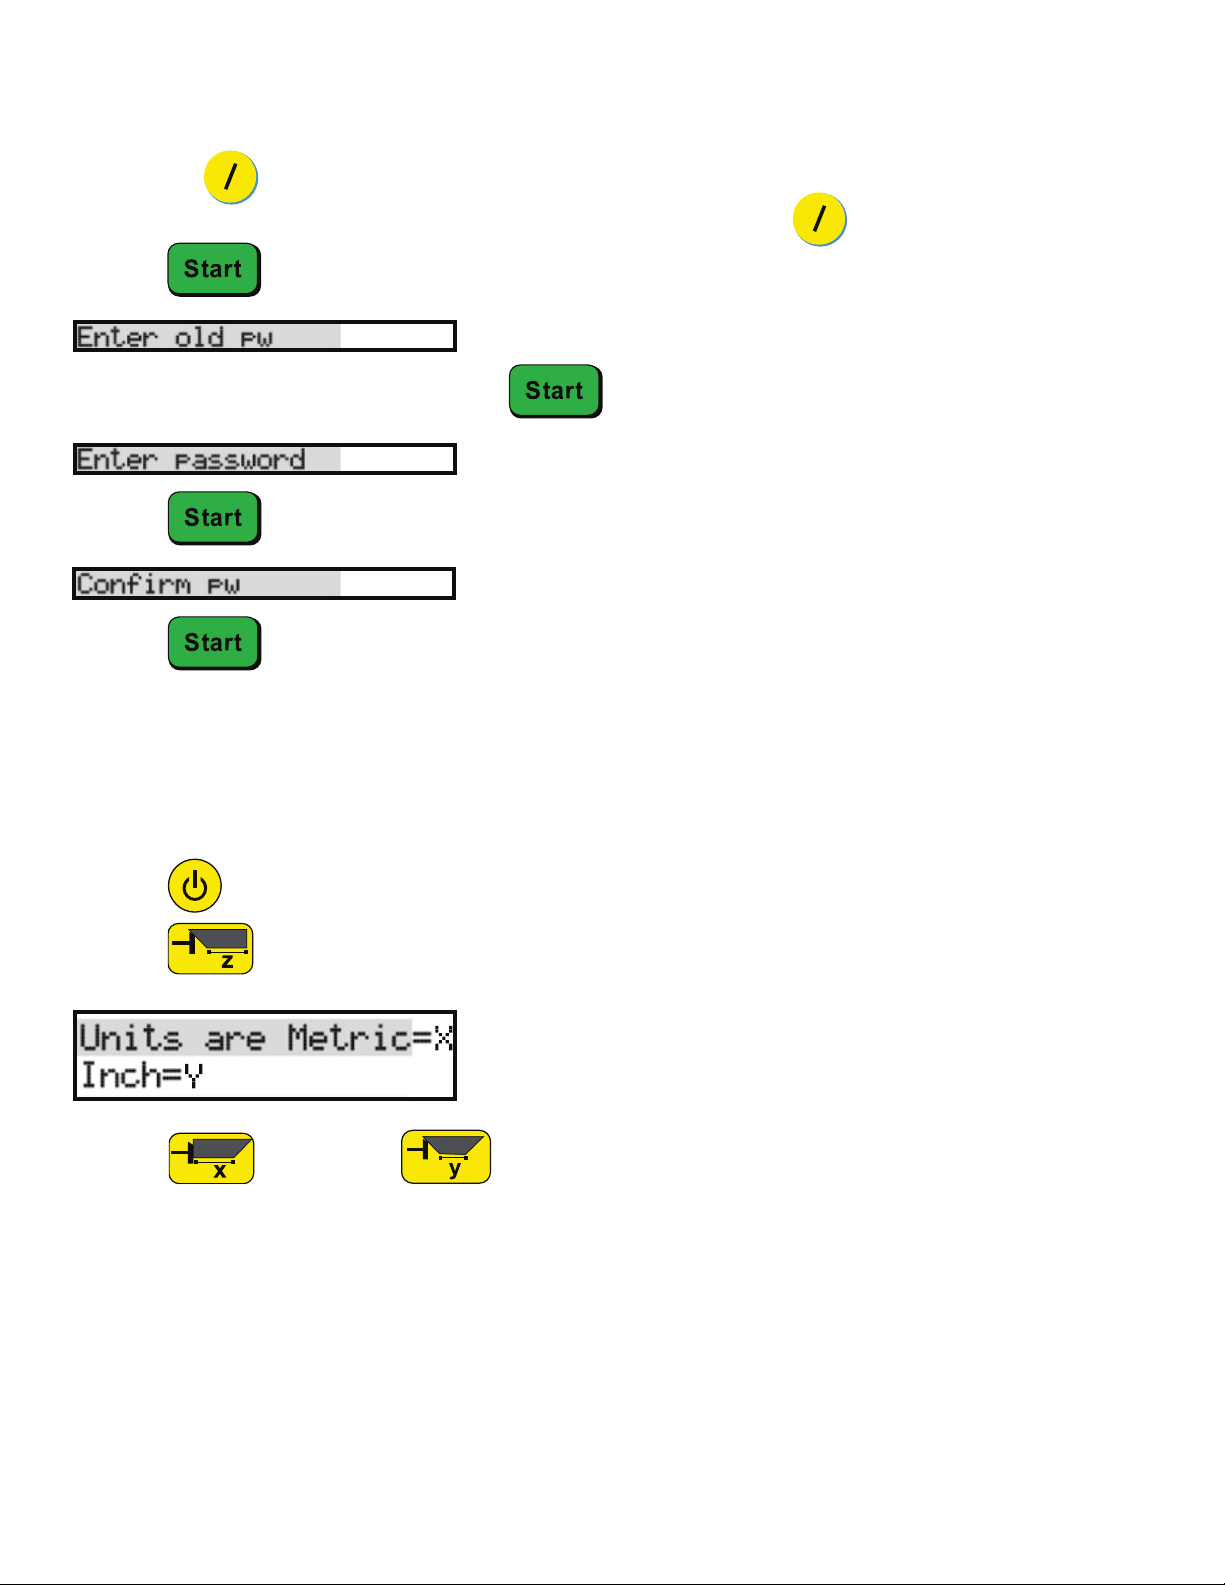
Password Protection
SawGear can be password protected to prevent its use by unauthorized persons. Please note that once the
password is set, SawGear cannot be used without it.
1. Remove the power cable from the SawGear PowerHead.
2. Hold the button.
3. Plug the power cable back into the PowerHead while holding the button.
4. Press .
5. Enter any number, between 4 - 8 numbers in length.
6. Press .
7. Re-enter the password.
8. Press .
20
Deactivate Password Protection
1. Remove the power cable from the SawGear PowerHead.
2. Hold the button.
3. Plug the power cable back into the PowerHead while holding the button.
4. Press .
7. Press .
8. Press .
9. The password is now deactivated.
5. Enter the existing password and press .
Switching Between Inches and Metric
SawGear can switch between inches and metric during operation.
1. Press to power off the SawGear screen.
2. Press .
1. Press for Metric or for Inches.
2. Continue using SawGear as normal.
Other manuals for SAWGEAR
1
Table of contents
Other TigerStop Control System manuals


Popular Control System manuals by other brands


Ruida Technology
Ruida Technology LFS-PM Series operating manual

Saferoads
Saferoads Ironman Hybrid manual

Valco Cincinnati
Valco Cincinnati VCX OT-120 FlexosealPro 2-Corrugated manual

Raven
Raven RS1/HDU installation manual

SVT
SVT 5100 user manual

MSD Ignition
MSD Ignition 7AL-3 7230 installation instructions


