eversense E3 User manual


1
Eversense E3 CGM Quick Reference Guide
Indications for Use
The Eversense E3 CGM System is intended
for continually measuring interstitial glucose
levels in adults (18 years and older) with
diabetes for up to 180 days. The system
is indicated for use to replace fingerstick
blood glucose measurements for diabetes
treatment decisions.
The system is intended to:
•Provide real-time glucose readings.
•Provide glucose trend information.
•Provide alerts for the detection and
prediction of episodes of low blood
glucose (hypoglycemia) and high blood
glucose (hyperglycemia).
•The system is a prescription device.
Historical data from the system can be
interpreted to aid in providing therapy
adjustments. These adjustments should
be based on patterns and trends seen
over time.
•The system is intended for single
patient use.
Refer to the Eversense E3 CGM User Guide for more detailed information.
Contraindications
•The system is contraindicated in people for
whom dexamethasone or dexamethasone
acetate may be contraindicated.
•The smart transmitter is incompatible
with magnetic resonance imaging (MRI)
procedures. The smart transmitter is
MR Unsafe and MUST BE REMOVED before
undergoing an MRI (magnetic resonance
imaging) procedure. The sensor is MR
Conditional. For more information on the
sensor, see MRI Safety Information in the
Eversense E3 CGM System User Guide.
•Mannitol or sorbitol, when administered
intravenously, or as a component of an
irrigation solution or peritoneal dialysis
solution, may increase blood mannitol or
sorbitol concentrations and cause falsely
elevated readings of your sensor glucose
results. Sorbitol is used in some artificial
sweeteners, and concentration levels from
typical dietary intake do not impact sensor
glucose results.

2Eversense E3 CGM Quick Reference Guide
Eversense E3 Smart Transmitter
Your rechargeable smart transmitter
powers the sensor, calculates glucose
readings, and stores and sends data to the
app. It also provides on-body vibe alerts.
The smart transmitter is secured to your
skin with a disposable adhesive patch that
is changed daily.
Turn the Smart Transmitter ON and OFF
To turn the smart transmitter ON, press and hold the power button for about five seconds.
To turn the smart transmitter OFF, press and hold the power button for about five seconds.
To see if your smart transmitter is ON, press the power button once. If the LED appears, the smart
transmitter is ON. If no LED appears, the smart transmitter is OFF.
Wearing the Smart Transmitter
Power
button
LED indicator
(lights green
or orange)
Top Back
Charging contact pins
•Replace the adhesive patch on your
smart transmitter daily.
•The smart transmitter can be removed
and reapplied to the skin at any time.
Note: Your smart transmitter is water
resistant (IP67) to a depth of 1 meter
(3.2 feet) for up to 30 minutes.
3
Eversense E3 CGM Quick Reference Guide
Getting Started Steps
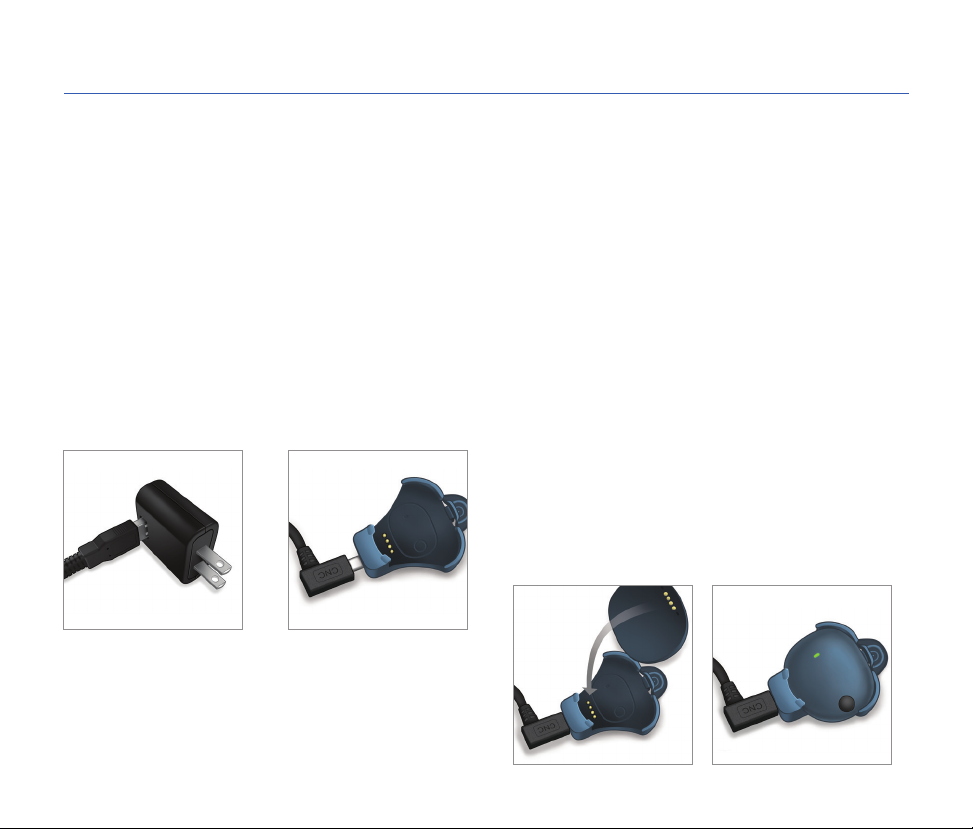
Charging the Smart Transmitter
1. Plug the standard
end of the USB cable
into the adapter on
the USB port.
2. Plug the micro end
of the USB cable
into the charging
cradle USB port.
3. Line up the four gold pins on the bottom
of the smart transmitter with the four gold
pins on the charging cradle.
Once fully charged (about 15 minutes), a
small green light appears on the top side
of the smart transmitter. Remove the USB
cable from the charging cradle after it is fully
charged by pulling back on the tab on the
cradle, and lifting the smart transmitter out.
Before you begin, you need:
•A compatible mobile device.
– For a list of compatible devices, visit www.eversensediabetes.com/compatibility.
•Wireless internet connection.
•Fully charged Eversense E3 Smart Transmitter.

4Eversense E3 CGM Quick Reference Guide
Downloading the Eversense App and Pairing the
Smart Transmitter
. Download the free Eversense App from
the Apple App Store or on Google Play.
The prompts to install the app will vary
between iOS and Android operating
systems.
Note: Make sure your mobile
device is using the latest compatible
operating system.
. On the install screen, tap Install application
and follow the installation instructions.
After 1 - 2 minutes, check your
mobile device display for the
Eversense App icon.
Download and Install the App
IMPORTANT: Make sure that you have a
wireless internet connection, the date and
time are correct on your mobile device,
and that Bluetooth is turned ON before
continuing.
Note: When prompted, review and tap
Accept to agree to the terms of the License
Agreement. A LOG IN screen appears.
5
Eversense E3 CGM Quick Reference Guide
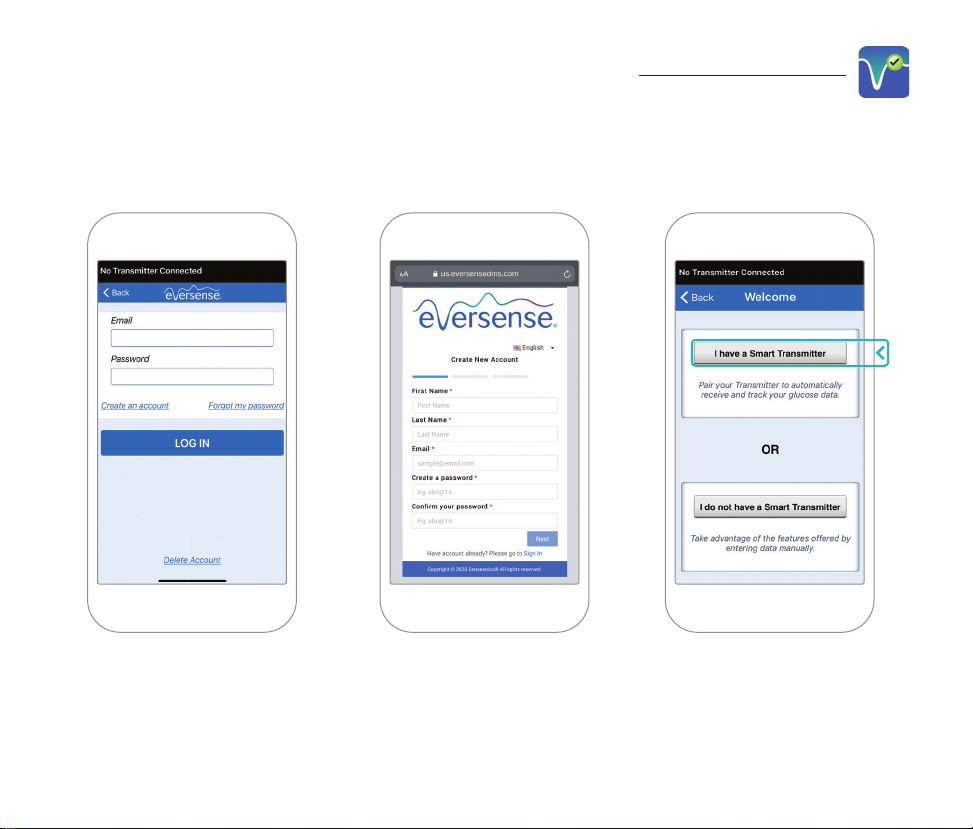
1. Create an account with
an Email and Password.
2. Enter your account
information and tap
Submit.
3. Indicate you have
your smart transmitter
by tapping that option.
Launch the App by Tapping the Eversense Icon
Note: On Android operating systems you will be prompted to acknowledge and enable location
services in order to pair your smart transmitter with your mobile device and receive alerts from
the Eversense E3 CGM system.
To complete registration check the email address you provided and click the link in the email.

6Eversense E3 CGM Quick Reference Guide
4. Turn your smart
transmitter on and set it
to "Discoverable Mode"
by pressing the power
button three times.
The LED light will blink
green and orange.
5. Tap Not Connected
to begin the pairing
process.
Note: If you do not see
your smart transmitter
as an option see the
User Guide for more
information.
6. Tap Pair and then tap
Next to continue when
“Connected” appears.
Power
button
LED
indicator

7
Eversense E3 CGM Quick Reference Guide
7. The unit of measurement
is used for calculating and
displaying your glucose
readings. DO NOT change
the unit of measurement
until you consult with your
health care provider.
Tap Finish to continue.
8. Tap through the introduction screens that provide
information about when to make treatment decisions
with the Eversense E3 CGM System.
8Eversense E3 CGM Quick Reference Guide
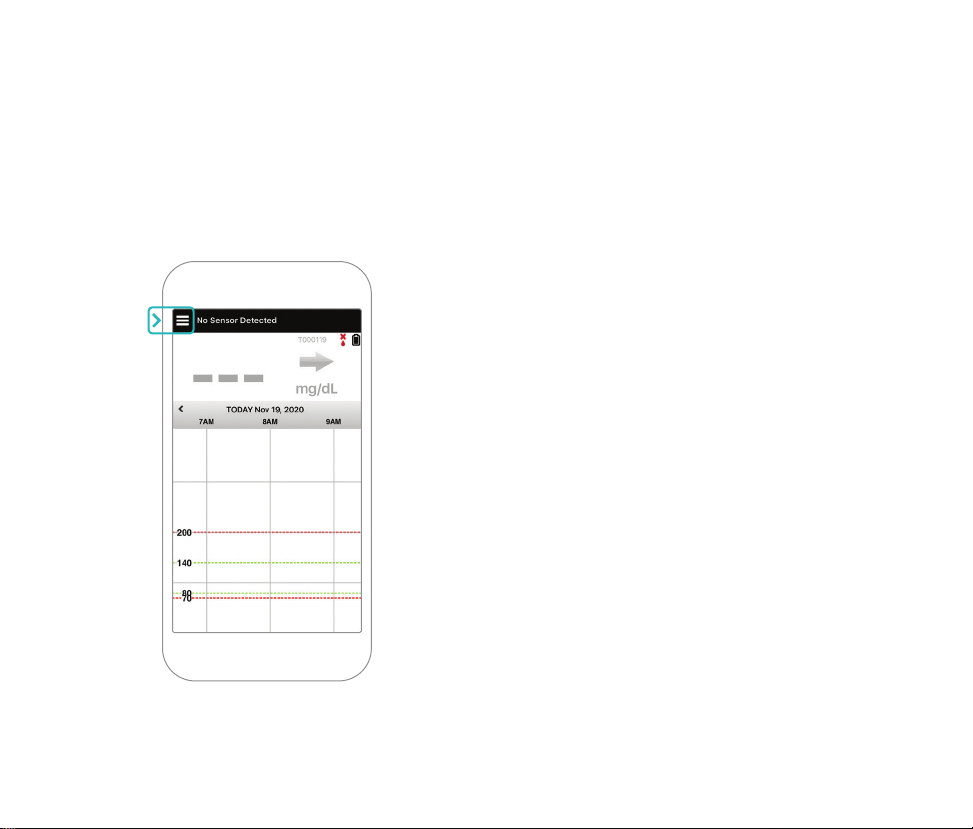
9. Tap the MAIN MENU icon to get access to
all app functions from a drop-down menu.
Note: This screen will not have any
glucose data to display until your sensor
has been inserted and you have started
calibrating the system.

9
Eversense E3 CGM Quick Reference Guide
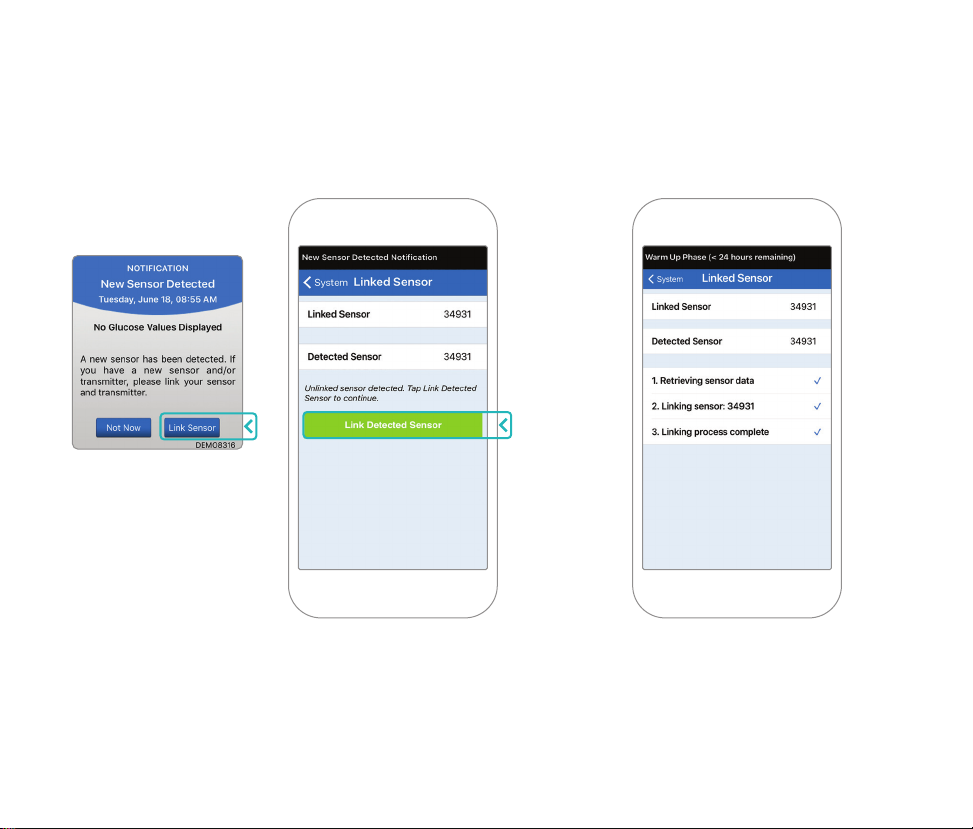
Once the sensor has been inserted by your health care provider and you have paired your
transmitter and the app, your sensor needs to be linked to your smart transmitter. This will start
the 24 hour Warm-Up Phase. There is no need to wear the smart transmitter during the
Warm-Up Phase. To link the sensor, your mobile device must be connected to the internet and
your transmitter must be charged, turned on, and paired with your mobile device.
When you first link the sensor, with the Tegaderm™ bandage over the insertion site, the incision
is likely in the center of the Tegaderm. This means the sensor is likely above the center of the
Tegaderm. The first time you link the sensor, do not use an Eversense adhesive patch on the smart
transmitter. When positioning the smart transmitter over the sensor, it should be slightly above the
center of the Tegaderm patch.
Tip: Your sensor may not be precisely perpendicular to the incision. If you find it dicult to get
a Good or Excellent signal in the Placement Guide, do not apply pressure. Do try slightly rotating
the smart transmitter over the sensor. Wait about 1 second for the Placement guide to refresh
between each adjustment to the smart transmitter’s position over the sensor.
For details on linking the sensor, please review Linking the Sensor in the Eversense E3 CGM System
User Guide.
Linking the Sensor and Smart Transmitter
10 Eversense E3 CGM Quick Reference Guide
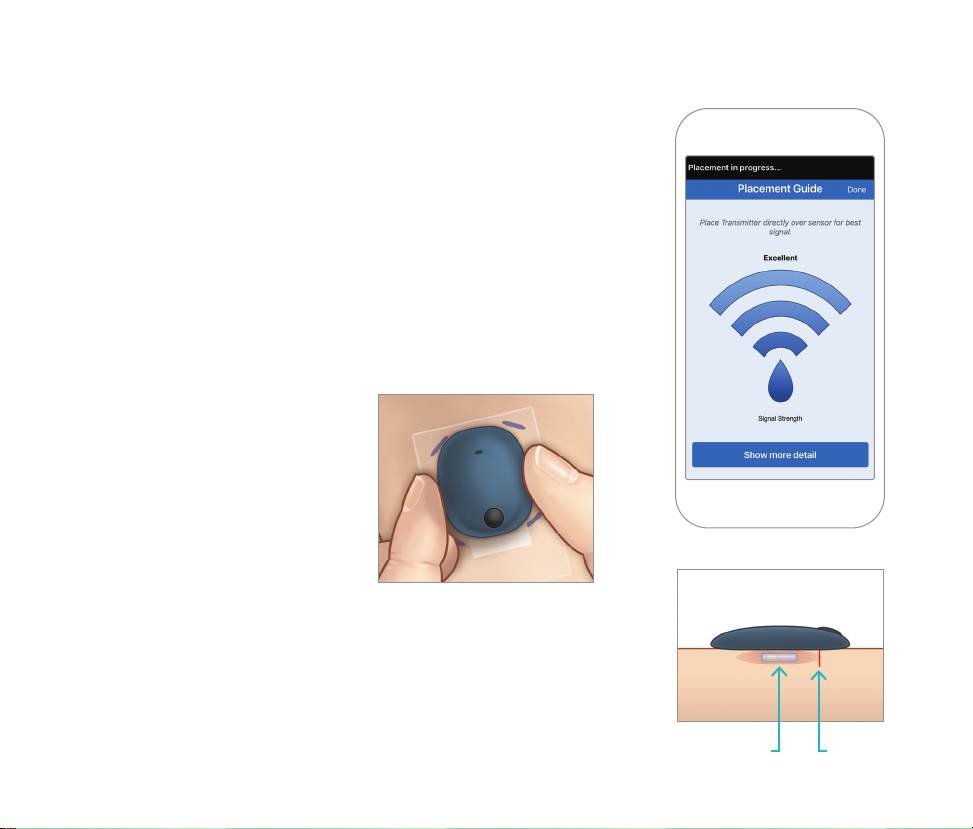
. Position the smart
transmitter directly over
the inserted sensor until
the smart transmitter
stops vibrating and the
New Sensor Detected
message appears on
the app.
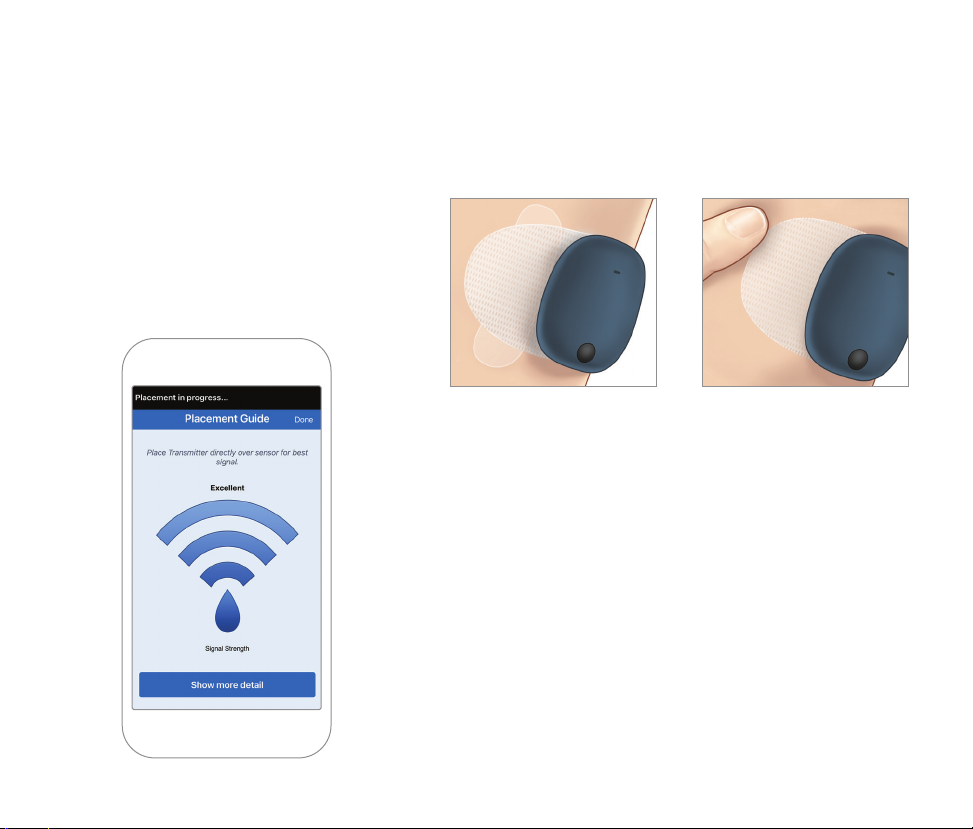
Place Smart Transmitter over Sensor
•Open the placement
guide in the app.
•Using any visible smart
transmitter corner marks
as a guide, gently place
your smart transmitter
toward the top half of
the bandage.
•Watch the placement
guide for signal strength
– this may take several
seconds.
•To get the best signal, gently
lift and move the smart
transmitter as needed until
the placement guide shows
2-3 bars (good to excellent).
•Close the placement guide.
Tip: It may be helpful to look
in a mirror as you position
your smart transmitter.
IncisionSensor
11
Eversense E3 CGM Quick Reference Guide
2. Tap Link Sensor and then Link Detected
Sensor. DO NOT remove the smart
transmitter from your insertion site until the
third check mark is displayed.
3. When the smart transmitter and
sensor are successfully linked, the
LINKED SENSOR screen displays
the sensor ID number.

12 Eversense E3 CGM Quick Reference Guide
The 24 hour Warm Up Phase begins once you have linked your sensor. Turn o the smart
transmitter and do not place it on your arm until the 24-hour Warm Up Phase is over. The sensor
requires 24 hours to stabilize in your body before the smart transmitter will calculate glucose
values. If you decide to wear the smart transmitter over the sensor during this time, you will
receive a message on the app indicating the Warm-Up Phase is in progress.
For more information, please review the section titled Calibrating the System in your Eversense E3
CGM System User Guide.
Warm-Up Phase

13
Eversense E3 CGM Quick Reference Guide
Daily Transmitter Wear and Calibrating the System
2. Remove the larger clear backing and
position the smart transmitter directly
over the sensor.
. Peel o the paper backing with the
Eversense logo on it and place the
smart transmitter in the center.
Once the Warm-Up Phase has ended, the Initialization Phase begins, and you're ready to start
wearing the smart transmitter. For the first few days, you'll wear the smart transmitter over the
Tegaderm™ bandage. Always start with a freshly charged smart transmitter.
Daily Transmitter Wear
14 Eversense E3 CGM Quick Reference Guide
4. Press the adhesive
patch firmly on skin
surface over the
sensor.
5. Use the tab to pull
o the remaining
clear liner.
3. Check the connection between the
smart transmitter and the sensor.
Select Placement Guide from
the Main Menu drop-down to help
you determine where to place your
smart transmitter.
Slide the smart transmitter over the
sensor insertion area until you get
a good or strong signal on the app.
Note: For more information on using the Placement Guide,
review Placement Guide - Show More Detail Screen in the
Linking the Sensor section of the Eversense E3 CGM System
User Guide.

15
Eversense E3 CGM Quick Reference Guide
About 10 minutes after Initialization Phase begins, the system
will display the Calibrate Now Notification.
•Do a fingerstick blood glucose check.
Tap Calibrate on the notification and enter the glucose
value into the app.
•You will receive three more calibration prompts during
initialization, each 2 hours after the previously completed
calibration. You can complete all 4 calibrations in as quickly as
6 hours. All 4 calibrations must be completed within 36 hours.
You can record the times below as a reference.
Initialization Phase
Calibration times for initialization
Warm-Up Phase ends: ____________________________
#1_____________ AM/PM #2_____________ AM/PM*
#3_____________ AM/PM #4_____________ AM/PM
*Glucose data available after 2nd calibration

16 Eversense E3 CGM Quick Reference Guide
Once the Initialization Phase has passed, the system requires two calibrations each day for
the first 21 days. After 21 days, the system will prompt you for calibration either once or
twice per day. Please see Calibrating the System in the Eversense E3 CGM System User Guide
for more information.
Daily Use
Calibration Tips:
•Wash and dry hands thoroughly.
•Avoid calibrating when glucose may be changing rapidly (such as after meals, after taking
insulin, or during/after exercise).
•Always use an actual blood glucose value, and enter calibration within 10 minutes.
•Keep smart transmitter in place over the sensor 5 minutes before and 15 minutes after
each calibration.
17
Eversense E3 CGM Quick Reference Guide
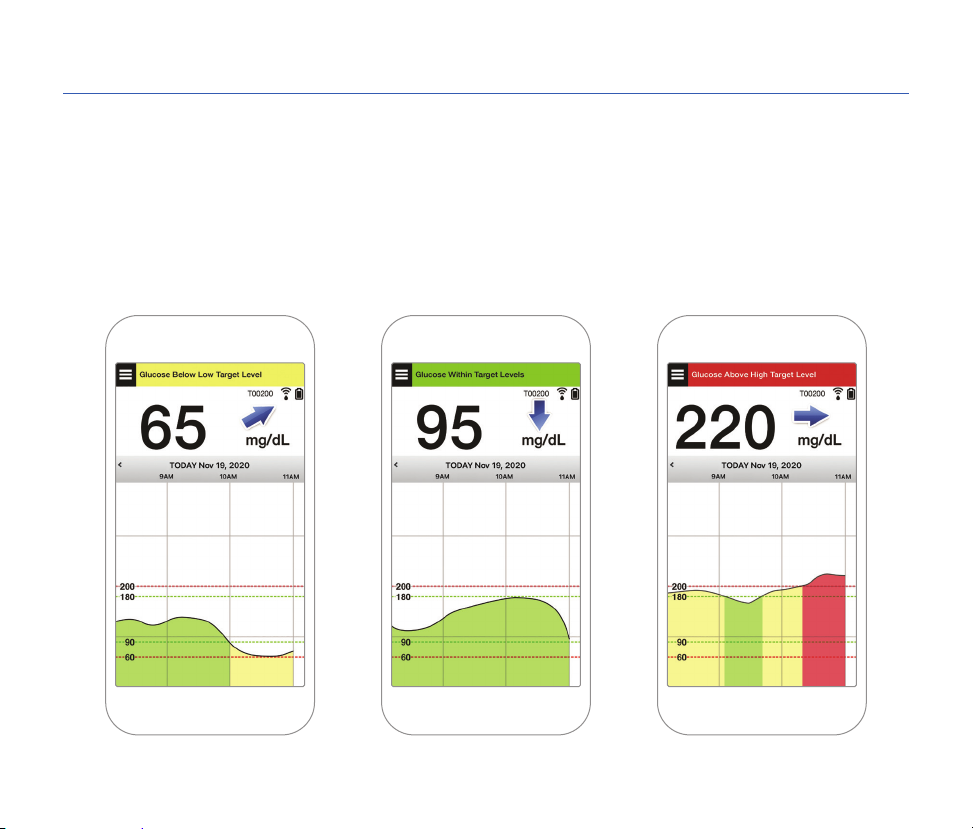
Making Treatment Decisions with Eversense E3
To make a treatment decision, you should consider:
•Status bar information
•Current sensor glucose value – the current glucose value should be displayed in black
•Trend arrow – a trend arrow should be displayed
•Recent trend information and alerts
18 Eversense E3 CGM Quick Reference Guide
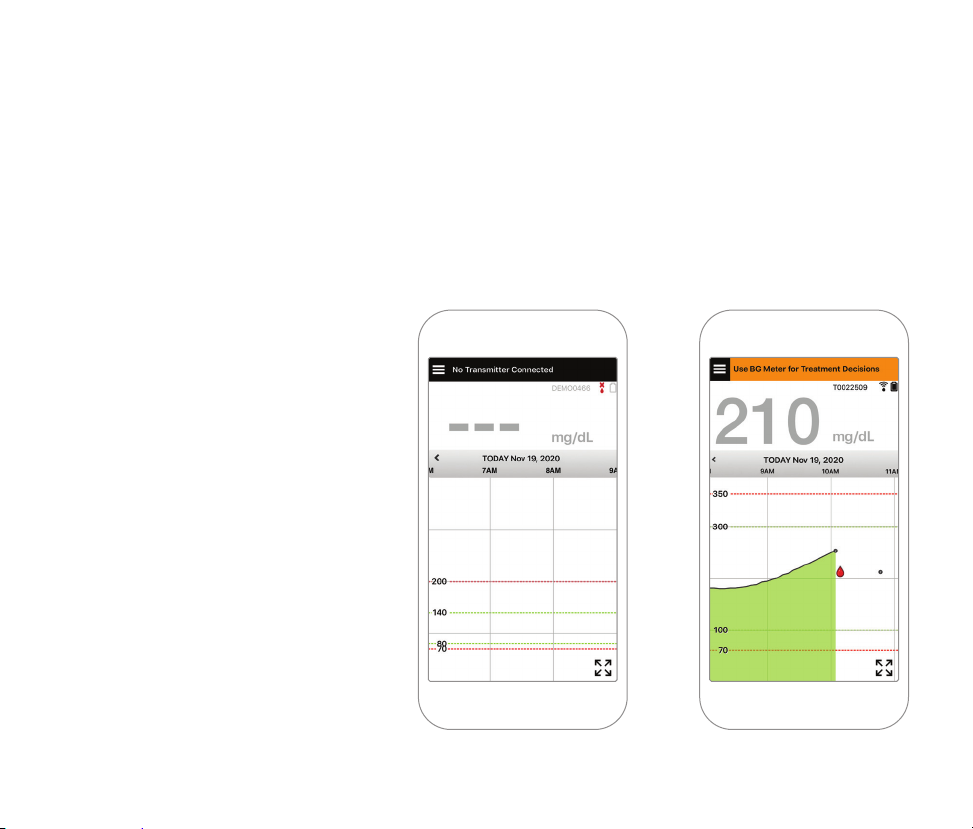
When to NOT make a treatment decision:
•No glucose value is displayed
•No trend arrow is displayed
•Your symptoms do not match the glucose information displayed
•The current sensor glucose value is displayed in grey
•The status bar is displayed in orange
•You are taking medications of the tetracycline class
Note: Always refer to the glucose
information on your Eversense
CGM App on your smartphone to
make treatment decisions. Do not
utilize a secondary display like the
Apple Watch or Eversense NOW.
Other manuals for E3
1
Table of contents
Other eversense Blood Glucose Meter manuals


Popular Blood Glucose Meter manuals by other brands

Accu-Chek
Accu-Chek ACTIVE quick start guide

Prodigy
Prodigy Autocode reference guide

TULA HEALTH
TULA HEALTH THG001 owner's manual

Emfit
Emfit SafeBed Installation and user guide

Smart Meter
Smart Meter iGlucose owner's booklet

Bayer HealthCare
Bayer HealthCare Ascensia Contour Blood Glucose Monitoring... user guide


