Evo R2FS-R User manual

Per una corretta installazione del prodotto e validità della garanzia,
seguire accuratamente le istruzioni di montaggio riportate nel
presente manuale.
For a correct installation of the product and for the validity of the
guarantee, follow carefully assembly instruction reported in the
present manual.
MANUALE UTENTE
USER MANUAL
CU90 096 Rev. 0 del 0 01.08.2022
Evo
CIRCOLARE A BASE RETTANGOLARE CON APERTURA CENTRALE SCORREVOLE
R2FS-R - Cabina doccia circolare con apertura centrale scorrevole
CIRCULAR WITH RECTANGULAR BASE WITH CENTRAL SLIDING OPENING
R2FS-R - Circular shower enclosure with central sliding opening

2
OK
NO
Prima di procedere all’installazione, verificare
che il modello ricevuto sia conforme a quello ordinato,
controllando l’etichetta sulla confezione. Durante il trasporto
e il montaggio maneggiare il prodotto con cura.
L’acquirente è tenuto a verificare l’integrità del prodotto
prima dell’installazione, segnalando eventuali anomalie o
non conformità al Rivenditore Autorizzato: il mancato
rispetto di quanto sopra può provocare l’immediato
decadimento della garanzia.
Before to proceed with the installation, check that the model
received is as per the one ordered, checking the label on the
packaging.During transport and installation handle the
product with care.
The purchaser must check the integrity of the product before
installing, reporting to the authorized seller possible fault or
non compliance: Not doing the aforementioned check or
report it can cause the immediate decline of the guarantee
1 Prima di procedere all’installazione verificare
che il piatto doccia sia in bolla (orizzontale e planare) e le
condizioni in cui si trovano la parete le linee di luce ed acqua.
In caso di montaggio su piatti storti o non planari, non si
garantisce il corretto funzionamento della cabina.
Prima di procedere al montaggio della cabina accertarsi che
non siano state richieste modifiche all’installazione standard
(come sostituzione di braccetti, misure particolari, profili
particolari, ed altro).
Before proceeding to the installation, check that the shower
tray is levelled ( horizontal and planar) the wall condition and
position of electrical wiring and water piping. In case of
installing on shower tray not straight or levelled, does not
guarantee the correct functioning of the enclosure.
Before proceeding to the installation of the enclosure make
sure that have not been made request of changes to the
standard installation ( like replacement of brackets, particular
measures, etc.).
2
TEMPERED
H A ND L E
W I T H C A R E
GLASS
M A N E G G I A R E C O N C U R A
OK
NO
3
Manovrare con cautela le parti vetrate poiché l’urto con una superficie dura o con spigoli potrebbe causare la
frantumazione del cristallo (secondo le norme UNI EN 14428).
Non disperdere o lasciare alla portata dei bambini i materiali d’imballo (sacchetti in plastica, viti ed altri elementi di minuteria) in
quanto possono essere potenziale fonte di pericolo, per lo smaltimento del prodotto o dei suoi componenti attenersi ai
regolamenti locali in materia di smaltimento rifiuti. Per assistenza nel montaggio, richiesta di ricambi o accessori Originali, si prega
di interpellare il Rivenditore Autorizzato.
Handle with care the glass part the impact with solid surface or corners can cause the shattering of the glass (according to the
UNI EN 14428 norm).If you are not sure of this, contact the person that has transmitted the order.
Do not waste or leave the packaging material ( plastic bags, screws and other bits and pieces) to the reach of children because they
are source of danger, for the disposal of the product and of its components please refer to the local rules in themes of waste
disposal. For the assistance of the installation, request of spare parts or original accessories, please contact the authorized seller.

3
4
Tutte le parti che compongo il prodotto devono
essere pulite utilizzando un panno morbido leggermente
inumidito a detergenti liquidi a base neutra. Non usare detergenti
particolarmente aggressivi: l’utilizzo di tali prodotti potrebbe
causare l’opacizzarsi delle finiture cromo o verniciate. Non usare
getti di vapore: le giunzioni in materiale plastico potrebbero subire
forti shock termici che causerebbero l’immediata frantumazione
degli stessi. Non usare assolutamente detersivi o panni abrasivi
(scotch-bride), solventi o altre sostanze chimiche aggressive.
All the parts that compose the product must be clean by mean of a
soft cloth slightly dumped with neutral base mild detergent. Do not
use detergent that are particular aggressive: the use of such
product could cause the opacify of the chrome or varnish finish. Do
not use steam jet: the jointing in plastic material can undergo to
very much thermic shock that could cause the immediate
shattering of the elements. It is forbidden the use of abrasive soap
or cloth ( ei. Scoth-bride), solvent or other aggressive chemical
substance.
GARANZIA
Il costruttore garantisce i propri prodotti da difetti di
fabbricazione per 24 mesi, con decorrenza dalla data di
acquisto comprovata dalla ricevuta o scontrino fiscale. La
garanzia è valida solo se le conformità dichiarate sono
riconducibili a difetti di fabbricazione e sono state
riconosciute dal costruttore. Un’installazione che non
segue le fasi riportate nel presente manuale d’uso, causa
l’immediata scadenza della garanzia. Sono esclusi dalla
garanzia le parti soggette a normale usura e/o componenti
che dovessero risultare difettosi o danneggiati a causa di
danni accidentali per incuria o inadeguato trattamento, per
uso ed installazione errati od impropri, e da successive
manipolazioni o modifiche eseguite da personale non
autorizzato dal costruttore e/o dalla loro esposizione ad
agenti corrosivi e/o abrasivi anomali. Il costruttore declina
da qualsiasi responsabilità a danni a persone, animali o
cose, causati da errori d’installazione, di regolazione o
imperfetto utilizzo o la mancata osservanza di tutte le
prescrizioni contenute nel presente manuale d’uso e
manutenzione che accompagna il prodotto.
WARRANTY
The m anufact ure r guar anti es its product f rom
manufacturing defects for 24 months , starting from the
date of purchasing proved by the receipt or fiscal slip. The
guarantee is valid only if the conformity declared are
referable to defects of manufacturing and have been
acknowledged by the manufacturer. An installation that
does not follow up the steps reported in the present
installation manual, cause the immediate expiry of the
guarantee. Are not included in the guarantee the parts that
are subject to normal wear and tear and /or components
that results faulty or damaged due to accidental damage
for negligence or inadequate care, for use and incorrect or
improper installation, and from subsequently handling or
changes made from unauthorized personnel of the
manufacturer and / or to the exposition to corrosive and /or
abrasive agents. The manufacturer declines from any
responsibility to damages towards persons, animals or
things caused from mistakes of installation, adjustment or
to incorrect use or lack observance of all the regulation
contained in the present manual of use and maintenance
that accompany the product.
3
4
5
6
Ø6
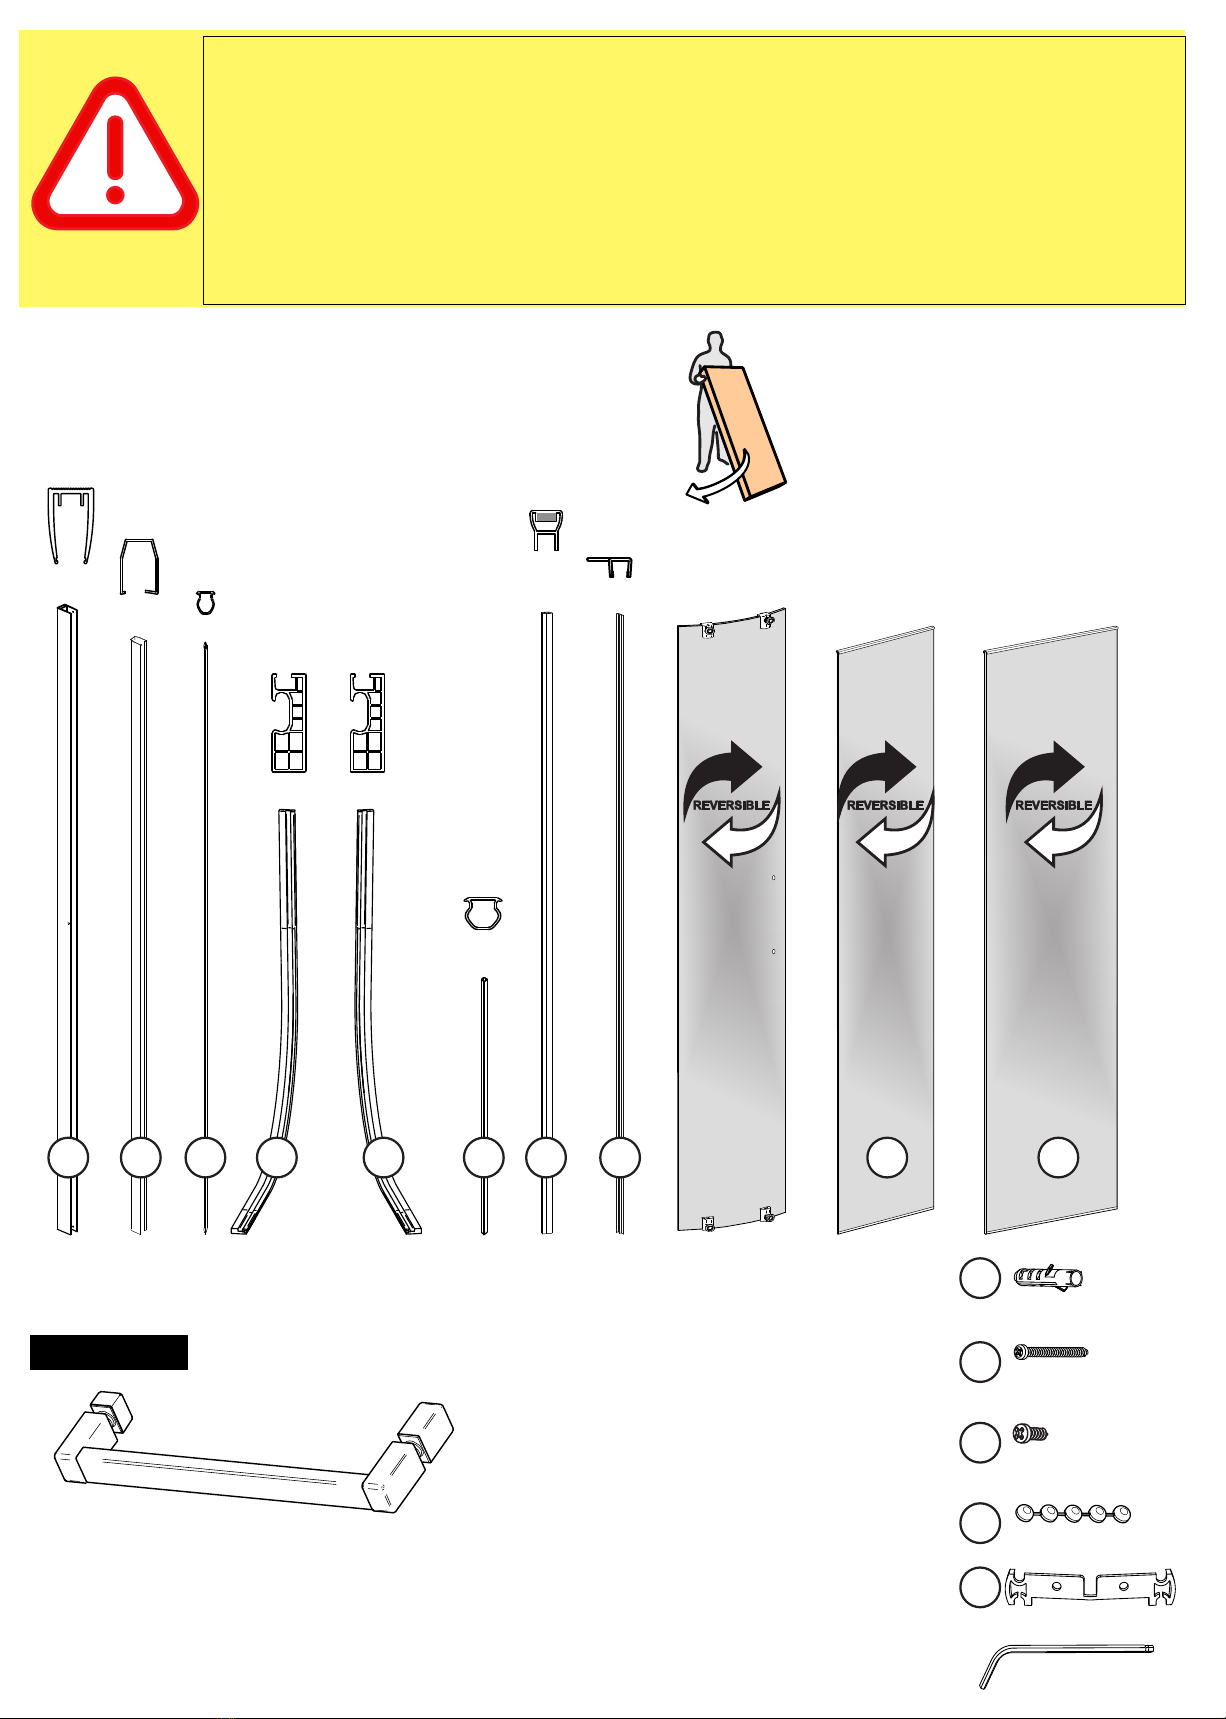
UTENSILI PER IL MONTAGGIO
REQUIRED ASSEMBLY TOOLS:
- Livella / water level
- Matita / Pencil
- Flessimetro / Fleximeter
- Cacciavite a croce
Cross-shaped screwdriver
- Trapano / Drill
- Punta per murature 6 mm / Drill 6 mm
- Seghetto / hacksaw
- Silicone / Silicon
- Scala 3 gradini / Staircase 3 steps
D.P.I.
i

4
BA910N
EV911.1
ANTA SCORREVOLE / SLIDING DOOR
ANTA FISSA / FIXED DOOR
BA6133
ATTENZIONE! Nell’imballo trovate il vostro box doccia in tutte le sue parti e per una corretta
installazione e validità della garanzia,
SEGUIRE
attentamente le istruzioni di montaggio di seguito riportate.
ATTENTION! In the packaging you will find your shower enclosure in all its parts and for a correct
installation and validity of the warranty,
FOLLOW
carefully assembly instruction below.
COMPONENTI NICCHIA CABINA DOCCIA
NICHE SHOWER ENCLOSURE COMPONENTS
Profili e accessori box doccia
Profiles and accessories shower enclosure
Kit maniglia
Handle kit
2 x BAK6126
8x BA126
Fisher ø 6 mm
8x VT1102390380
3,9 x 38 mm Autofilett.
V2
V1
1 KIT x BA5049
T2
4 x BA7071
S1
1x TOOL 3 mm
A
2x 1x 4x 2x 1x
G2 F.1
12x VT1101350095
3,5 x 9,5 mm Autofilett.
V4
BA913.1
2x
A3 A4
2x
BA922
EV9111
B1
2x
BA1037
2x
G1B.1
EV911.2
1x
B.2
ANTA FISSA / FIXED DOOR
1x
F.2

5
BA910N
COD. / IMG.
A
RIF.
BA126
Fisher ø6
V1
VT1102390380
3,9x38 mm AUTOFILETTANTE
V2
G2
BA913.1
A3
BA6133
B1
BA922
A4
EV911.1
B.1
EV9111
S1 BA7071
BA5049
T2
VT1101350095
3,5x9,5 mm
V4
sc
ma
EVK5069
BAK6126
1
V1
V2
3
V4
2
V4
S1
T2
1
1
1
1
1
1
1
1
3
3
2
2
2
B.2
B1
B.1 B1
sc sc
sc sc
A
A3
A4
A
A3
A4
F.1
F.2
AS AS
ma
ma
G2
G2
G2
G2
G5 BA1037
3
2
2
3
2
G5
G5
EV911.2
B.2

6
1
4x
4x
ø 6 mm
.2 .3 BA126
Fisher ø 6 mm
V1
ABA910N
5 mm
DISTANZA OTTIMALE DAL BORDO | OPTIMAL DISTANCE FROM THE EDGE
iPer montaggio su piatto doccia | For mounting on shower tray
.1
V2 VT1102390380
3,9x38 mm
.4
B.1 EV911.1
23
A3 EV913.1
A3 EV913.1

7
4B.2 EV911.2
5
6.1
V4 VT1101350095
3,5x9,5 mm
V4 VT1101350095
3,5x9,5 mm
T2 BA5049
T2 BA5049
.2
.1 .2
7
ATTENZIONE!
Installazione guarnizioni nel lato
interno
ATTENTION!
Installation of seals on the inside
BA922
B1
.1
.2
ATTENZIONE!
Non rimuovere la guarnizione
ATTENTION!
Do not remove the gasket
.1
.2

8
8
ANTA SINISTRA
LEFT DOOR
ANTA DESTRA
RIGHT DOOR
G5
G2
BA1037
G5 BA1037
BA6133
G2 BA6133
.1 .2
9

9
L
.1
L
.2
EV9111
B1
12 Kit maniglia
Handle kit
2x BAK6126
G2 BA6133
G2 BA6133
11
10
Data la buona flessibilità del profilo, accompagnare
delicatamente lo stesso all’interno della sede del profilo di
scorrimento.
Ripetere l’operazione per il binario di scorrimento superiore.
Given the good flexibility of the profile, gently guide it inside
the seat of the sliding profile.
Repeat for the upper sliding profile
i

10
V4 VT1101350095
3,5x9,5 mm
S1 BA7071
.2
V4
VT1101350095
3,5x9,5 mm
.1
14
==
13
V4 VT1101350095
3,5x9,5 mm
V4
VT1101350095
3,5x9,5 mm
.1 .2
V4
VT1101350095
3,5x9,5 mm
iFissare i finecorsa centrali anche sul binario di scorrimento inferiore.
Fix the central limit switches also on the lower sliding track.
S1 BA7071
Prendere come riferimento le due ante fisse, e centrare la chiusura delle porte.
Take the two fixed glass as a reference, and center the clousure of the doors.

11
3 mm
AT T E N ZION E ! L A REG OLA Z I O N E VA
EF F E T T UATA SOLO S U I C US C I N E T T I
INFERIORI SECONDO IL VERSO RIPORTATO
SUL SUPPORTO.
ATTENTION! THE ADJUSTMENT MUST BE
CARRIED OUT ONLY ON THE LOWER
BEARINGS ACCORDING TO THE DIRECTION
SHOWN ON THE SUPPORT.
SILICONE
SEALANT
24 h
iLe impostazioni di fabbrica sui cuscinetti di scorrimento potrebbero non
corrispondere allo stato dei fatti. Per il riallineamento delle ante scorrevoli
procedere come segue.
The factory settings on the slide bearings may not correspond to the state of
affairs. Proceed as follows to realign the sliding doors.

12
3 mm
i
Le impostazioni di fabbrica sui cuscinetti di scorrimento potrebbero non
corrispondere allo stato dei fatti. Per il riallineamento delle ante scorrevoli
procedere come segue.
The factory settings on the slide bearings may not correspond to the state of
affairs. Proceed as follows to realign the sliding doors.
ATTENZIONE! LA REGOLAZIONE VA EFFETTUATA SOLO SUI CUSCINETTI
INFERIORI SECONDO IL VERSO RIPORTATO SUL SUPPORTO.
ATTENTION! THE ADJUSTMENT MUST BE CARRIED OUT ONLY ON THE
LOWER BEARINGS ACCORDING TO THE DIRECTION SHOWN ON THE
SUPPORT.
Table of contents
Popular Bathroom Fixture manuals by other brands

Delta
Delta 56613 Series installation instructions

Symmons
Symmons 0100-TB-20 installation guide

Reece
Reece AXA Uno installation instructions

Miomare
Miomare 96597 Assembly, operating and safety instructions

Blaufoss
Blaufoss Escape 19344 installation guide

Franke
Franke AQUA107 Installation and operating instructions