EVOCA La Radiosa Installation and operating instructions

INSTALLATION, USE, AND MAINTENANCE
Translation of the original instructions
EN English
La Radiosa
Doc. No. H0073EN00
Edition 1 05 - 2019

DICHIARAZIONE DI CONFORMITA’ - DECLARATION OF CONFORMITY
- DÉCLARATION DE CONFORMITÉ - KONFORMITÄTSERKLÄRUNG -
DECLARACIÓN DE CONFORMIDAD - DECLARAÇÃO DE CONFORMIDADE -
VERKLARING VAN OVEREENSTEMMING - OVERENSSTEMMELSESERKLÆRING
- FÖRSÄKRAN OM ÖVERENSSTÄMMELSE - VAATIMUSTENMUKAISUUSVAKUUTUS
- ERKLÆRING OM OVERENSSTEMMELSE - PROHLÁŠENÍ O SHODĚ -
DEKLARACJA ZGODNOŚCI - ДЕКЛАРАЦИЯ СООТВЕТСТВИЯ -
IT La presente dichiarazione di conformità è rilasciata sotto l’esclusiva
responsabilità del fabbricante. Si dichiara che l’apparecchiatura, descritta
nella targhetta di identicazione, è conforme alle disposizioni legislative delle
Direttive Europee e successive modiche ed integrazioni.
Vengono riportate le norme armonizzate o le speciche tecniche (designa-
zioni) che sono state applicate in accordo con le regole della buona arte in
materia di sicurezza in vigore nella UE.
EN This declaration of conformity is issued under the manufacturer’s sole
responsibility. It is declared that the equipment described by the identication
plate is in compliance with the legal provisions of the European Directives as
well as its subsequent amendments and supplements.
The harmonised standards or the technical specications (designations) ap-
plied in compliance with the safety rules of good practice in force in the EU are
stated herein.
FR La présente déclaration de conformité est délivrée sous la responsabilité
exclusive du fabricant. On déclare que l’appareillage décrit sur la plaquette
d’identication est conforme aux dispositions législatives des Directives
européennes et leurs modications et intégrations ultérieures. Sont indiquées
les normes harmonisées ou les spécications techniques (désignations) qui
ont été appliquées conformément aux bonnes règles de l’art en matière de
sécurité en vigueur dans l’UE.
ES La presente declaración de conformidad se entrega bajo la exclusiva respon-
sabilidad del fabricante.Se declara que el aparato, descripto en la etiqueta de
identicación, es conforme con las disposiciones legislativas de las Directivas
Europeas y con sus sucesivas modicaciones e integraciones.
Se indican las normas armonizadas o las especicaciones técnicas (designacio-
nes) que han sido aplicadas de acuerdo con las reglas del buen arte en materia
de seguridad en vigencia en la UE.
DE Diese Konformitätserklärung wurde unter ausschließlicher Verantwor-
tung des Herstellers verfasst. Es wird erklärt, dass das auf dem Typenschild
beschriebene Gerät den gesetzlichen Bestimmungen der Europäischen
Richtlinien und anschließenden Änderungen und Ergänzungen entspricht. Es
werden die harmonisierten technischen Spezikationen (Bestimmungen) auf-
geführt, die gemäß den Regeln der Kunst hinsichtlich den in der EU geltenden
Sicherheitsnormen angewendet wurden.
PT A presente declaração de conformidade é emitida sob exclusiva respon-
sabilidade do fabricante. Declara-se que o equipamento, descrito na placa
de identicação, está em conformidade com as disposições legislativas das
Diretivas Europeias e sucessivas modicações e integrações. São indicadas
as normas harmonizadas ou as especicações técnicas (designações) que
foram aplicadas de acordo com as regras de boa engenharia em matéria de
segurança, em vigor na UE.
Direttive europee
European directives
Sostituita da
Repealed by
Norme armonizzate / Speciche tecniche
Harmonised standards / Technical specications
2006/95/CE 2014/35/EU (LVD) EN 60335-1:2012 + A11:2014
EN 60335-2-75:2004 + A1:2005 + A11:2006 +
A2:2008 + A12:2010
EN 62233:2008
2006/42/EC (MD) EN60335-1:2012+A11:2014
97/23/EC 2014/68/UE (PED) EN60335-1:2012+A11:2014
2004/108/EC 2014/30/EU (EMC) EN 55014-1:2006+A1:2009+A2:2011
EN 55014-2:2015
EN 61000-3-2:2014
EN 61000-3-3:2013
EN 61000-3-11:2001
2002/72/CE+2008/39/CE
EC 1935/2004 EN16889:2016 EDQM Practical Guide CM/RES (2013)9
EC10/2011 EC10/2011+UE2016/1416
EC 2023/2006 (GMP)
2002/95/EC 2011/65/UE (RoHS) EN 50581:2012
2002/96/CE 2012/19/UE (WEEE)
2014/53/EU * (RED) EN62311:2008
EN60335-1:2012+A11:2014
EN60335-2-75:2004+A1:2005+A11:2006
+A2:2008+A12:2010
ETSI EN 301 489-1 V1.9.2:2011
ETSI EN 301 489-17 V2.2.1:2012
ETSI EN 301 328 V2.1.1:2016
ANDREA ZOCCHI
C.E.O
Il fascicolo tecnico è costituito e disponibile presso:
The technical le is compiled and available at: Evoca S.p.A.
NL Deze verklaring van overeenstemming wordt uitsluitend onder de
verantwoordelijkheid van de fabrikant verstrekt. Men verklaart dat het ap-
paraat, beschreven op het identicatieplaatje, overeenstemt met de wettelijke
bepalingen van de Europese Richtlijnen en daaropvolgende wijzigingen en
aanvullingen.Hierna worden de geharmoniseerde normen of de technische
specicaties (aanwijzingen) aangegeven die toegepast werden in overeen-
stemming met de regels van de goede techniek op gebied van veiligheid, die
in de EU van kracht zijn.
DA Denne overensstemmelseserklæring udstedes ene og alene på fabrikan-
tens ansvar. Det erklæres hermed, at apparaturet, der er beskrevet på udsty-
rets typeskilt, opfylder de lovgivningsmæssige i krav i de europæiske direktiver
samt senere ændringer og tilføjelser. De anvendte harmoniserede standarder
eller tekniske specikationer (betegnelser), som er anvendt i overensstemmel-
se med reglerne i de tekniske sikkerhedsforskrifter gældende i EU.
SV Denna försäkran om överensstämmelse utfärdas av tillverkaren på dennes
egna ansvar.Vi försäkrar att utrustningen, som beskrivs på märkskylten,
överensstämmer med lagar och författningar i EU-direktiven och i ändrad och
kompletterad lydelse. Harmoniserade standarder eller tekniska specikationer
(beteckningar) återges som har tillämpats enligt sunda tekniska principer i frå-
ga om säkerheten som gäller inom EU och som anges i listan på samma sida.
FI Tämä vaatimustenmukaisuusvakuutus annetaan valmistajan yksinomaisen
vastuun alla.Vakuutamme, että arvokilvessä kuvattu laite vastaa neuvoston
direktiivejä sekä niihin liittyviä muutoksia ja täydennyksiä. Lisäksi annetaan
yhdenmukaistetut standardit tai tekniset erittelyt (käyttötarkoitukset), joita on
sovellettu EU-maissa, voimassa olevien turvallisuutta koskevien valmistukseen
liittyvien määräysten ohella.
NO Denne samsvarserklæringen er utferdiget under eneansvar av produ-
senten. Det erklæres at apparatet, beskrevet på typeskiltet, er i samsvar med
gjeldende europeiske direktiver og senere endringer og tillegg. Harmoniserte
standarder eller tekniske spesikasjoner (betegnelser) anvendt i samsvar med
EUs gjeldende sikkerhetsregler er angitt.
RU Настоящая декларация соответствия выдается только под экс-
клюзивной ответственностью изготовителя. Свидетельствуется, что
оборудование, описанное в идентификационной табличке, соответствует
законодательным положениям Европейских Директив, а также после-
дующим изменениям и дополнениям. Приводятся гармонизированные
нормы или технические спецификации (указания), которые были при-
менены в соответствии с правилами качественного выполнения работ в
отношении безопасности, действующими в ЕС.
*Solo con moduli radio di Evoca S.p.A. / Only with radio modules of Evoca S.p.A.
Ed. 11 17
EVOCA S.p.A.
ad unico socio
Sede amministrativa e operativa: Via Roma 24
24030 Valbrembo (BG) Italia
Tel +39 035 606111
Fax +39 035 606463
www.evocagroup.com
Sede legale: Via Tommaso Grossi 2
20121 Milano (MI) Italia
Cap. Soc. € 41.138.297,00 i.v.
Reg. Impr. MI, Cod. Fisc. e P.IVA: 05035600963
Reg. Produttori A.E.E.: IT08020000001054
Cod. identicativo: IT 05035600963

Declaration of conformity
The declaration of conformity is
issued under the manufacturer’s
sole responsibility.
The declaration of conformity with
the European Directives and Standards
provided for by the laws in force is supplied
by the rst page of this manual, which is an
integral part of the machine.
-The legal provisions of the European
Directives in force (with the subsequent
amendments and integrations thereof)
-The harmonised standards in force
-The technical specifications (designa-
tions) applied in compliance with the
safety rules of good practice enforced in
the EU and listed on the same page.
integration of radio modules
In compliance with Article 17 of Direc-
tive 2014/53/EU (RED), the manufacturer
checks whether the radio equipment is in
compliance with the essential requirements
of article 3 of the Directive.
The procedure used to check compliance
is at the manufacturer’s discretion.
If a radio module is built in a “non-radio”
equipment, the subject integrating the
module will become the manufacturer of
the end product and it must therefore check
the compliance of the end product with the
essential requirements of the 2014/53/EU
(RED) Directive.
As a matter of fact, the integration of radio
modules in other products can inuence
the compliance of the end product with the
essential requirements of the Directive.
definitions according to the law
The manufacturer is a natural person who
or a public body which manufactures radio
equipment and/or electric material or has it
engineered, manufactured or marketed by
putting its own trademark or name on it.
An importer or distributor who places
radio equipment or electric material on the
market by putting its own name or trade-
mark becomes the manufacturer.
An importer or distributor who makes any
change to radio equipment or electric mate-
rial already placed on the market to such an
extent that the said change may condition
the compliance with the listed directives
is held to be the manufacturer and it must
therefore assume the relative obligations
according to the said directives.
Symbology
The following symbols may be present
inside the machines, according to models
(signs of danger)
Attention: dangerous voltage
Power o before removing the
cover
Attention
Danger of crushing your han-
ds
Attention
Hot surface
The signs of danger must be readable
and visible; they shall be neither hidden
nor removed. Damaged or unreadable
labels must be replaced.

Warnings
This document intended for the technical
personnel is made available in the electron-
ic format at the manufacturer's (reserved
area web site).
for installation
The installation and any subsequent
maintenance operation shall be carried
out by the personnel skilled and trained
on the utilisation of the machine ac-
cording to the rules in force
The use of kits and/or accessories not
type-approved by the manufacturer can not
guarantee the observance of safety stand-
ards, in particular for live parts.
The installer will be the sole person respon-
sible for any damage improper installation
may cause to the machine or to things and
people.
The manufacturer declines all responsibility
for the use of non type-approved compo-
nents.
Assembly and any testing operation
must be carried out by qualied per-
sonnel who have a specic knowledge
of the machine operation from the point
of view of electric safety and health
rules.
The intactness of the machine and its
compliance with the standards of rel-
evant installations must be checked by
skilled personnel at least once a year.
Package materials must be disposed of in
observance of the environment.
For the vending machines of hot drinkts
only
The machine is equipped with an automatic
washing system for the mixers with the rela-
tive water circuit and the brewing unit.
If the machine is not used for some time
(weekends, etc.) even for pauses longer
than two days, it is recommended to enable
the automatic washing functions (e.g. be-
fore starting to use the VM.
for use
The machine can be used by children over
8 years and by people having reduced
physical, sensorial or mental skills under
the supervision of people responsible for
their safety or specically trained on the
use of the machine.
Children shall not be allowed to play with
the machine by the people in charge of
their supervision
Children shall not be allowed to clean or
service the machine.
for the environment
Some tricks will help you to protect the
environment:
-use biodegradable products to clean the
machine;
-properly dispose of all the packages of the
products used to fill and clean the ma-
chine;
-power off the machine during inactivity for
energy saving.
for dismantling and disposal
When dismantling the machine, it is rec-
ommended to destroy the machine rating
plate. The symbol shows that the ma-
chine can not be disposed of as
common waste, but it must be
disposed of as it is established by
the 2012/19/EU (Waste Electrical
and Electronic Equipment - WEEE)
European Directive and by the national
laws arising out of it in order to prevent any
negative consequence for environment and
human health.
The dierentiated collection of the machine
at the end of its life is organised and man-
aged by the manufacturer.
For the correct disposal of the machine
contact the sales point where you have
purchased the machine or our after-sales
service.
The unlawful disposal of the machine im-
plies the application of the administrative
sanctions provided for by the rules in force.
Attention!
If the machine is equipped with a cooling
system, the cooling unit contains HFC-
R134a uoridised greenhouse eect gas
ruled by the Kyoto protocol, the total heat-
ing potential of which is equal to 1300.


English
INTRODUCTION 1
transport and storagE 1
what to do should amalfunction occur 2
appliancE idEntification and fEaturEs 2
positioning thE appliancE 3
tEcHNical spEcificatioNs 3
powEr consumption 5
CLEANING AND LOADING 6
main switch and safEty mEasurEs 6
hygiEnE and clEaning 7
using hot bEvEragE vEnding machinEs (dispEnsing into
opEn containErs) 8
coNtrols aND iNformatioN 8
loaDiNg proDucts 9
coffEE bEans 9
instant products 9
milk 10
intErnally suppliEd tank watEr 10
pErioDical opEratioNs 10
clEaning thE rEsiduE trays 11
clEaning thE mixErs 12
clEaning thE nozzlEs and spouts 13
clEaning thE brEwing unit 14
clEaning thE milk tank 14
clEaning thE watEr supply tank 14
switching thE machinE on 14
wasH cyclEs 14
rinsing thE componEnts 15
washing thE cappuccino makEr 15
brEwing unit wash cyclE 18
clEaning thE touchscrEEn 19
sErvicE suspEnsion 19
INSTALLATION 20
unpacking thE appliancE 20
switchEs and safEty dEvicEs 21
discarding thE solid and liquid rEsiduEs 22
rEmoving thE sidE and rEar panEls 22
watEr supply 23
ElEctrical connEction 24
installing sidE modulEs 25
connEctivity indications 25
iNitial start-up 26
first sanitisation 27
opEratioN 27
brEwing unit 27
variablE-dosE coffEE dosEr 29
dispEnsing hot watEr from thE spout 30
Evomilk cappuccino makEr 30
calibration chEcks and sEttings 30
connEctivity 32
touchscrEEn 32
usiNg usb mEmory sticks 33
opEratiNg iN Normal usEr moDE 33
dispEnsing abEvEragE 33
opEratiNg iN barista moDE 34
appliancE status panEl 34
systEm architEcturE 35
PROGRAMMING 36
accEssing thE programming mEnus 36
EntEring valuEs 37
Daily actioNs 38
clEaning and washEs 38
Emptying thE solid rEsiduE tray 38
monEy managEmEnt 38
sElEctioN sEttiNgs 39
display layout 39
display layout of thE sElEction catEgoriEs 39
sElEction catEgoriEs 39
bEvEragEs 39
rEcipEs 40
containErs 44
physical layout 44
Evomilk sEttings 44
macHiNE sEttiNgs 45
configuration 45
modifying intErfacE strings 45
customising thE intErfacE 45
gEnEral display sEttings 46
playlist 46
input sEnsor sEttings 46
calibrating thE flow mEtEr 46
grindEr calibration 46
motor-dosEr calibration 47
pump/solEnoid valvE calibration 47
output sEttings 47
maintEnancE 48
gEnEral sEttings 48
hEating unit paramEtErs 49
mixEr anti-lock 49
motorisEd adjustmEnt of thE burrs 49
nExt maintEnancE 49

macHiNE iNformatioN 50
faults 50
statistics 54
favouritEs 54
machinE idEntification 55
installation datE 55
tEchnical support contact information 55
ENErgy saviNg moDE 55
sEttings 55
EnErgy saving timE framEs 56
paymENt systEms 57
common paramEtErs 57
validator 57
mdb 58
pricEs 59
import/Export 60
Eva-dts 60
vidEos 60
imagEs 61
log filE Errors 61
systEm 61
dEvElopmEnt 61
tEchnical spEcifications 62
touchscrEEn tEst 63
sEtting thE datE and timE 64
languagE 64
usEr profilEs 64
nEtwork 65
softwarE updatE 67
information 67
coNNEctivity 67
Email sEttings 67
MAINTENANCE 69
gEnEral introduction 69
main switch and fusE 70
connEctivity switch 70
brEwing unit maintEnancE 71
pErioDical opEratioNs 72
sanitisation 72
clEaning thE nozzlEs and spouts 74
rEmoving thE product containErs 75
rEmoving thE sidE and rEar panEls 75
circuit boarD fuNctioNs 76
activation board 77
cpu card 78
Evomilk cappuccino makEr board 79
powEr supply 79
paymEnt modulE board 79
Evomilk thErmal protEction 80
hEating unit thErmal protEction 80
installing and/or updating softwarE 80
APPENDIX 82

05-2019 0073 00 1
Introduction
The technical documentation forms an
integral part of the appliance and must
therefore accompany any movement or
transfer of ownership in order to allow
the various operators to further consult
the documentation.
Before installing and using the appliance,
the document contents need to be scrupu-
lously read and understood, as the manual
provides important information regarding
installation safety, provisions of use and
maintenance work.
Some illustrations in this manual may show
details that are dierent from those of the
appliance, but the essential information will
however remain unchanged.
The manual is divided into three chap-
ters.
Chapter 1 describes the loading and rou-
tine cleaning operations to be performed in
the areas of the appliance that can only be
accessed via a key-operated door, without
needing to use other tools.
Chapter 2 contains instructions regarding
correctly installing the appliance and the
information required to optimise the appli-
ance's performance.
Chapter 3 describes the maintenance work
that requires the use of tools to access po-
tentially dangerous areas.
The operations described in Chapters
2 and 3 must solely be carried out by
the appliance's operation, both from an
electrical safety and hygiene point of
view.
TRANSPORT AND STORAGE
traNsport
Special care must be taken when handling
the appliance in order to avoid causing
damage to the appliance and people.
When handling the appliance, there is a
Move the appliance using lifting equip-
ment that is suitable for the size and
-
ing equipment can use the equipment.
Avoid:
-Tipping over and/or tilting the appliance;
-Dragging or lifting the appliance with ropes
or similar;
-Lifting the appliance with lateral grips;
-Shaking or tossing the appliance and its
packaging.
storagE
The storage environment needs to be dry
and of a temperature between 0 and 40°C.
If the appliance freezes, it must be condi-
tioned in environments with temperatures
between 0 and 40°C.
Wait until the appliance's temperature
reaches the same temperature as its sur-
rounding environment before switching it
on.
If there is any moisture condensation, wait
for it to dry completely before switching the
appliance on.

205-2019 0073 00
WHAT TO DO SHOULD A
MALFUNCTION OCCUR
In most cases, technical problems can be
resolved by means of small interventions;
we therefore suggest that you read this
manual carefully before contacting the
manufacturer.
If the anomalies or malfunctions cannot be
resolved, please contact:
Evoca S. p. A.
Via Roma 24
24030 Valbrembo
Italy - Tel No. +39 035606111
APPLIANCE IDENTIFICATION AND
FEATURES
Each appliance is identied by means of a
specic serial number which can be found
on the nameplate located on the internal
side of the door.
The nameplate is the only one recognised
by the manufacturer and contains all the
information that allows the manufacturer to
quickly and safely provide all kinds of tech-
nical information and easily manage the
spare parts.
TYPECODE MODEL SERIAL NR
BOILER SOLUBLE
PRESSURE Mpa
CAPACITY dm3
MAINS WATER PRESSURE
VOLTAGE FREQUENCY
POWER CURRENT
WPOWER
CAFE VAPOUR
1
2
3
4
5
6
7
8
9
10
Fig. 1
1. Code
2. Type
3. Model
4. Supply voltage
5. Power
6. Heating unit details
7. Serial number
8. Supply frequency
9. Supply voltage
10. Water mains properties
05-2019 0073 00 3
POSITIONING THE APPLIANCE
The appliance is not suitable for outdoor
installations. It must be installed in a dry
environment, with a temperature between
2°C and 32°C and cannot be installed in
environments where jets of water are used
for cleaning (e.g. large kitchens, etc.).
The appliance must be installed in
environments where it can be overseen
by trained sta.
The appliance can be positioned close to
a wall but there must be a gap of at least 4
cm between the wall and the appliance for
ventilation purposes.
Under no circumstances should the ma-
chine be covered with cloths or similar.
The appliance must be placed on a level
surface.
Important!!!
In the event of unscheduled maintenance
work and/or repairs, the appliance must be
able to be accessed from all sides.
Therefore, make sure that the appliance
can be rotated so that the back and side
panels can be removed.
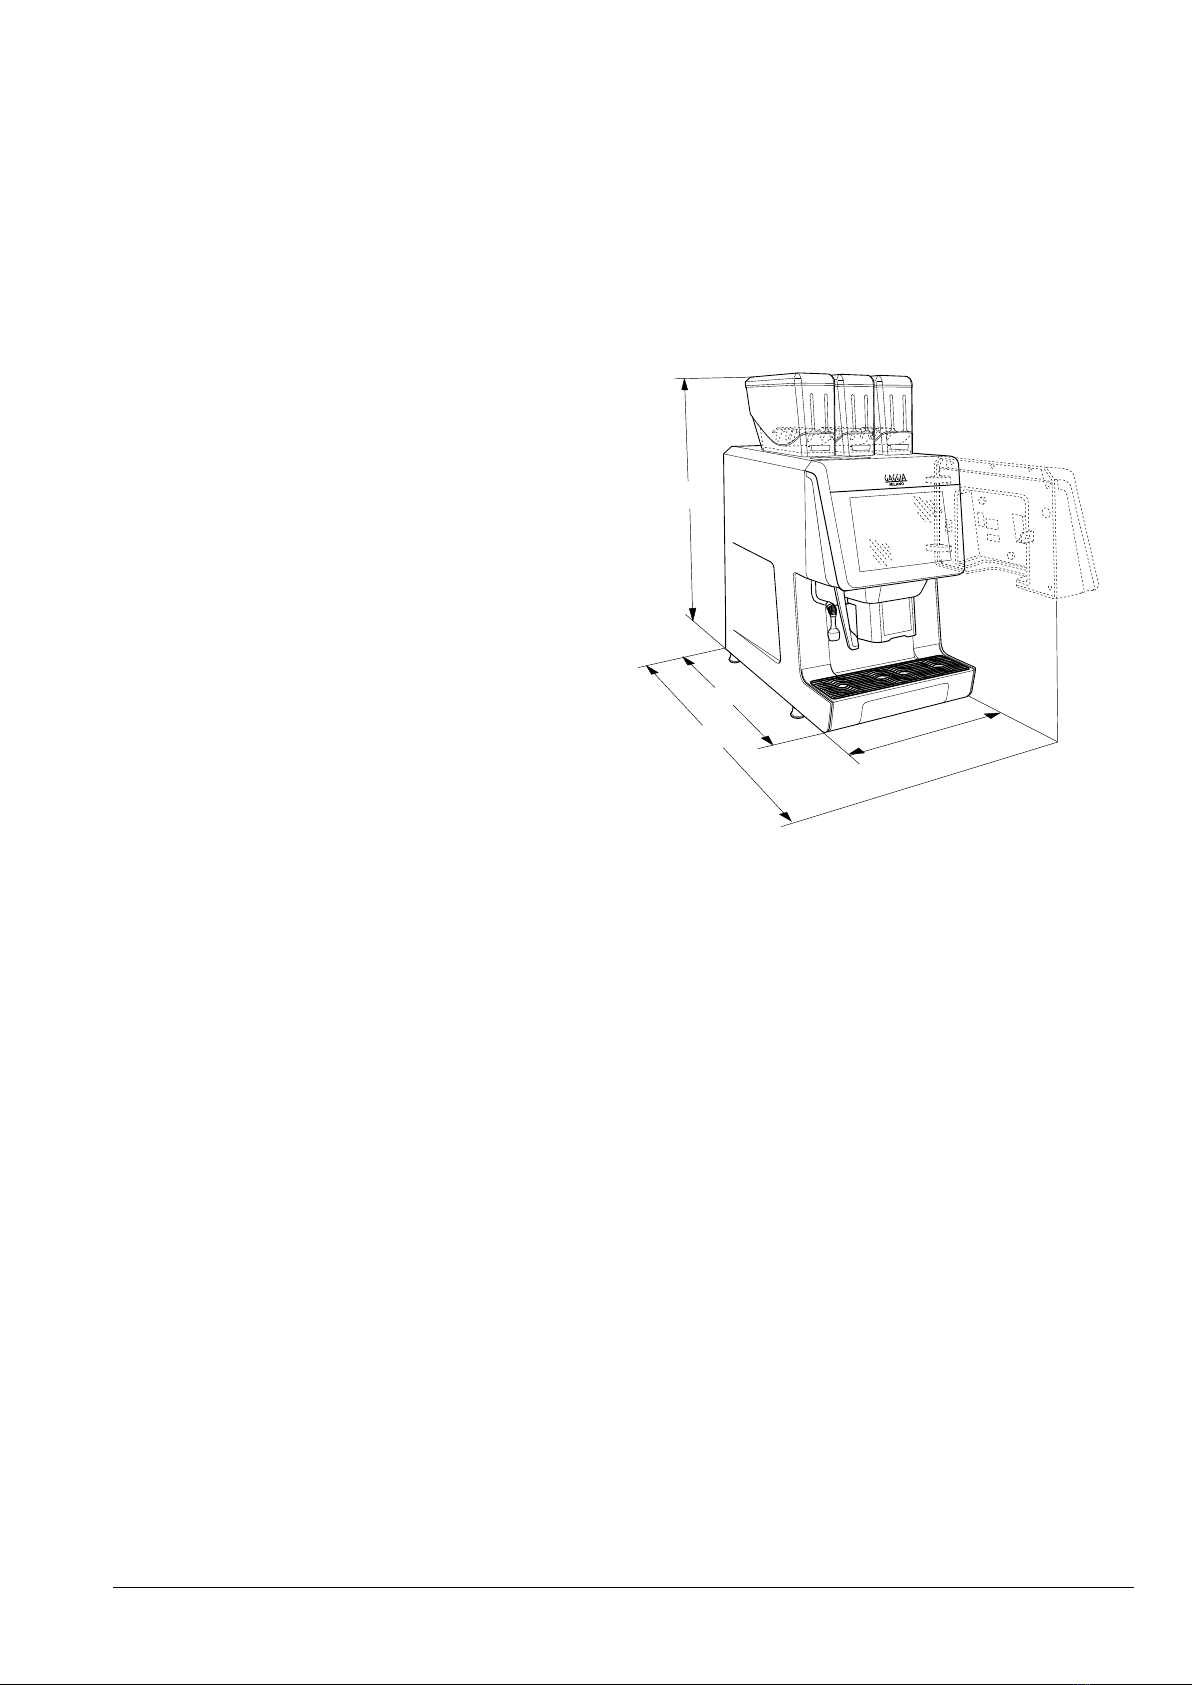
TECHNICAL SPECIFICATIONS
dimensions
-Height: 783 mm
-Width: 368 mm
-Depth: 586 mm
-Depth with door open: 854 mm
-Weight: 44 kg
with cappuccino maker: 47 kg
783
586
368
854
Fig. 2
electrical connection
-Voltage: 230/240 V∿
-Frequency: 50/60 Hz
-Power: 3200 / 2750* W
The electrical features are detailed on the
nameplate located inside the appliance.
* only UK market
water supply
The mains water pressure must be be-
tween 0.12 and 0.85 MPa (1.2 - 8.5 bar).

405-2019 0073 00
NoisE lEvEl
The level of continuous, equivalent, weight-
ed acoustic pressure is less than 70 dB.
EsprEsso aDjustmENts
-Coffee grain size
-Coffee dose
-Water dose
iNstaNt aDjustmENts
-Instant powder doses
-Water dose
milk aDjustmENts
For models with a cappuccino maker only.
-Milk/air emulsion
-Heating temperature
tEmpEraturE aDjustmENt
Via the software
ENablE sigNs
-Water present
-Pressurised hydraulic circuit
-Coffee present
-Brewing unit position
-Heating unit(s) temperature reached
safEty mEasurEs
-Main switch
-Connectivity-disabling microswitch with the
door open
-Product containers present
-Residue trays present
-Closed door sensor
-Heating unit safety thermostats with man-
ual reset
-Evomilk milk-heating safety thermostat
(only models with Evomilk)
-Main electric circuit protection device with
fuse
couNtDowN protEctioN DEvicE of tHE:
-Coffee unit gearmotor
-Grinder(s)
tHErmal protEctioN DEvicE of tHE:
-Coffee unit gearmotor
-Electromagnets
-Coffee heating unit
-Milk heater (only models with Evomilk)
-Grinders
-Motor-doser
-Motor mixer
-Water pump
coNtaiNEr capacity
They can contain the approximate quanti-
ties of the following products:
-Approximately 1.1 kg of coffee beans
-Approximately 1.1 kg of pre-ground coffee
-Approximately 1.8 kg of instant hot choco-
late
-Approximately 1.8 kg of instant ginseng
-Approximately 0.5 kg of instant barley
-Approximately 0.7 kg of instant milk

05-2019 0073 00 5
POWER CONSUMPTION
The power consumption of the appliance
depends on many factors, such as the tem-
perature and ventilation of the environment
where the appliance is located, the temper-
ature of the incoming water and the temper-
ature in the heating unit, etc.
The calculated power consumption is indic-
ative only.
A measurement at a room temperature
of 22°C was carried out and the following
power consumption was detected:
Temperature reached: 63 Wh
24-hour standby: 1171 Wh
accEssoriEs aND kits
The appliance can be tted with accesso-
ries and kits in order to vary its performanc-
es:
The accessories and kits that can be at-
tached to the appliance are available from
the manufacturer.
The accessories and kits are supplied with
installation and test instructions, which
should be scrupulously followed in order to
keep the appliance operating safely.
The party that performed the installation is
responsible for any damage that may occur
to the appliance, or to things and people
due to incorrect installation.
Important!!!
Accessories and kits that have not been
approved by the manufacturer, may not
comply with the safety standards, most
especially in regards to live parts.
The manufacturer is not liable if non-ap-
proved components are used.
The installation and subsequent test
operations must be performed by quali-
of the appliance's operation both from
an electrical safety and hygiene point of
view.
605-2019 0073 00
Chapter 1
Cleaning and loading
The appliance is not suitable for outdoor
installations. It must be installed in a dry
environment, with a temperature between
2°C and 32°C and cannot be installed in
environments where jets of water are used
for cleaning (e.g. large kitchens, etc.).
Wash your hands and wear dispos-
able gloves before proceeding with the
use of gloves does not replace the need
for hand hygiene.
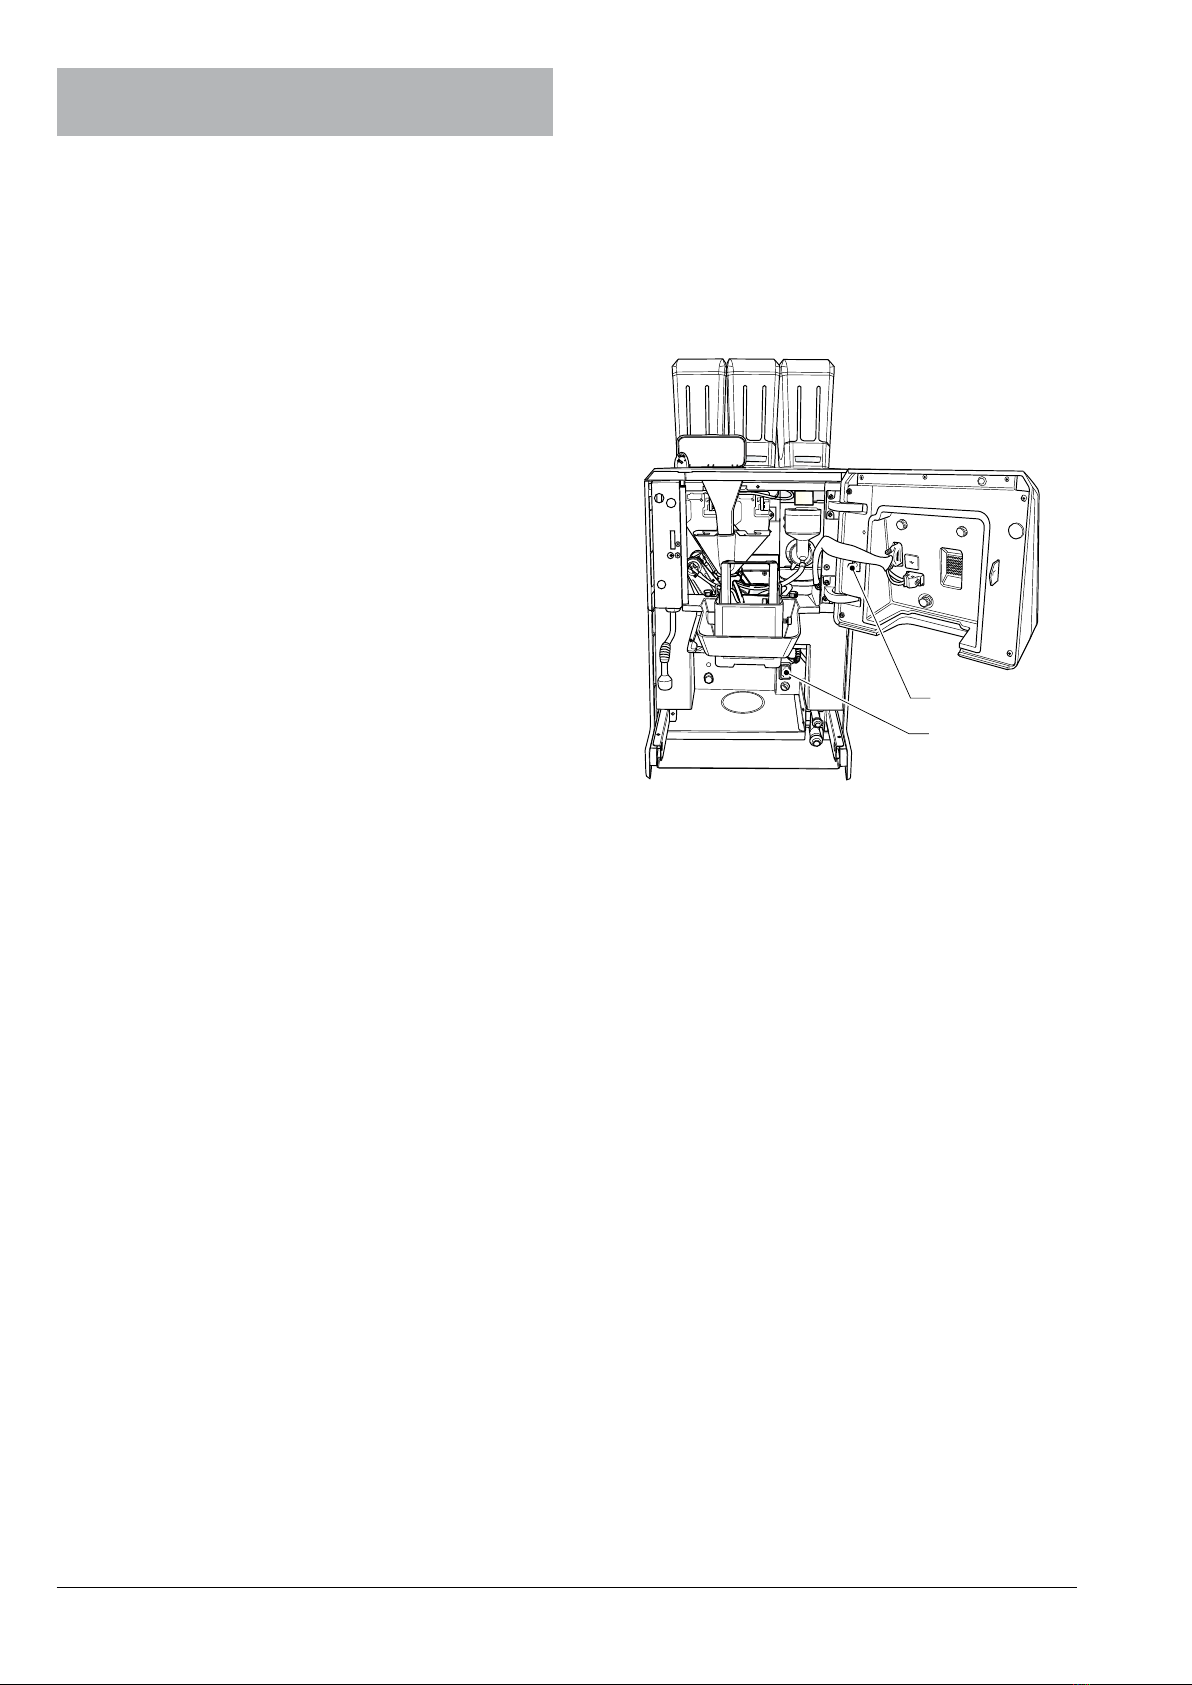
MAIN SWITCH AND SAFETY
MEASURES
maiN switcH
The (manual) main switch cuts o the pow-
er to the appliance and is positioned behind
the solid residue tray.
When carrying out normal cleaning and
product loading tasks, the appliance does
not have to be switched o.
If the appliance needs to be switched o
via the main switch, the residue tray must
be removed.
coNNEctivity switcH
Only for models with connectivity.
When the door is opened, a specic switch
deactivates the appliance’s connectivity
components.
When the door is open, the remote opera-
tion of the functional units and/or the re-
mote control are disabled.
All operations that require the appli-
ance to be live with the door open and
the connectivity functions active, must
EXCLUSIVELY be performed by qual-
-
chine is in this condition.
To activate the connectivity components
(i.e. for a communication test) with the door
open, simply pull the connectivity switch
pin.
If the switch is activated and deactivated
within a short period of time, the appliance
disables the connectivity components; the
appliance will need to be restarted to re-
store these.
safEty mEasurEs
The routine cleaning and product loading
tasks can be performed safely.
The unit has magnetic sensors that detect:
-The closing of the door.
-The presence of the containers.
-The presence of the residue trays.
In the absence of one of the listed condi-
tions, the appliance is disabled.
1
2
Fig. 3
1. Main switch
2. Connectivity switch
05-2019 0073 00 7
HYGIENE AND CLEANING
This manual shows the potential critical
points and includes information about
controlling the possible growth of bac-
teria.
Under the current health and safety
regulations, the operator of the appli-
ance must apply the self-control pro-
the HACCP (Hazard Analysis Critical
legislation.
It is also a good idea to sanitise the surfac-
es that do not come into direct contact with
the food inside the appliance, as well as the
side modules (cup warmers, coolers, etc.).
The sanitisation must be performed using
disinfectants, whilst taking care to mechan-
ically remove the residues and visible lms
using swabs and/or brushes.
Do not use solvents and/or strong-scented
detergents.
Some parts of the appliance can be dam-
aged by aggressive detergents.
The manufacturer shall not be held respon-
sible for any damage caused due to the
non-observance of the above or the use of
aggressive or toxic chemical products.
Under no circumstances should water
jets be used to clean the appliance.
1
2
3
5
6
7
4
8
9
10
Fig. 4
1. Hot water spout*
2. Nozzle-moving handle
3. Brewing unit
4. Coffee conveyor
5. Decaffeinated coffee chute*
6. Door lock
7. Decaffeinated coffee door
8. Container lids
9. Product container
10. Mixer
*Certain models only.

805-2019 0073 00
USING HOT BEVERAGE VENDING
(E.g. plastic cups, ceramic cups and
Vending machines that dispense bever-
ages into open containers must be used
exclusively for the sale and distribution of
drinks which are produced via:
-Coffee infusion.
-The reconstitution of instant or freeze-
dried products.
These products must be declared by the
manufacturer as “suitable for automatically
dispensing” into open containers.
Models with cappuccino makers can also
be used to dispense pasteurised or UHT
milk which has been kept refrigerated and
drawn from an external tank.
Products must be preserved in strict
accordance with the manufacturer’s
instructions regarding storage, storage
temperature and the expiry date.
-
sumed immediately and must, under no
-
aged for later consumption.
Any other use is considered improper
and therefore potentially dangerous.
CONTROLS AND INFORMATION
The appliance must operate at a room tem-
perature between 2°C and 32°C.
The controls and information for the user
are located on the door.
All messages destined for the user are
shown on the appliance's display.
7
6
5
4
3
2
1
Fig. 5
1. Liquid residue tray
2. Dispensing nozzles
3. Nozzle-moving handle
4. Hot water dispensing spout*
5. Touchscreen
6. Decaffeinated coffee door
7. Product containers (2 or 3 depending on the
model)
05-2019 0073 00 9
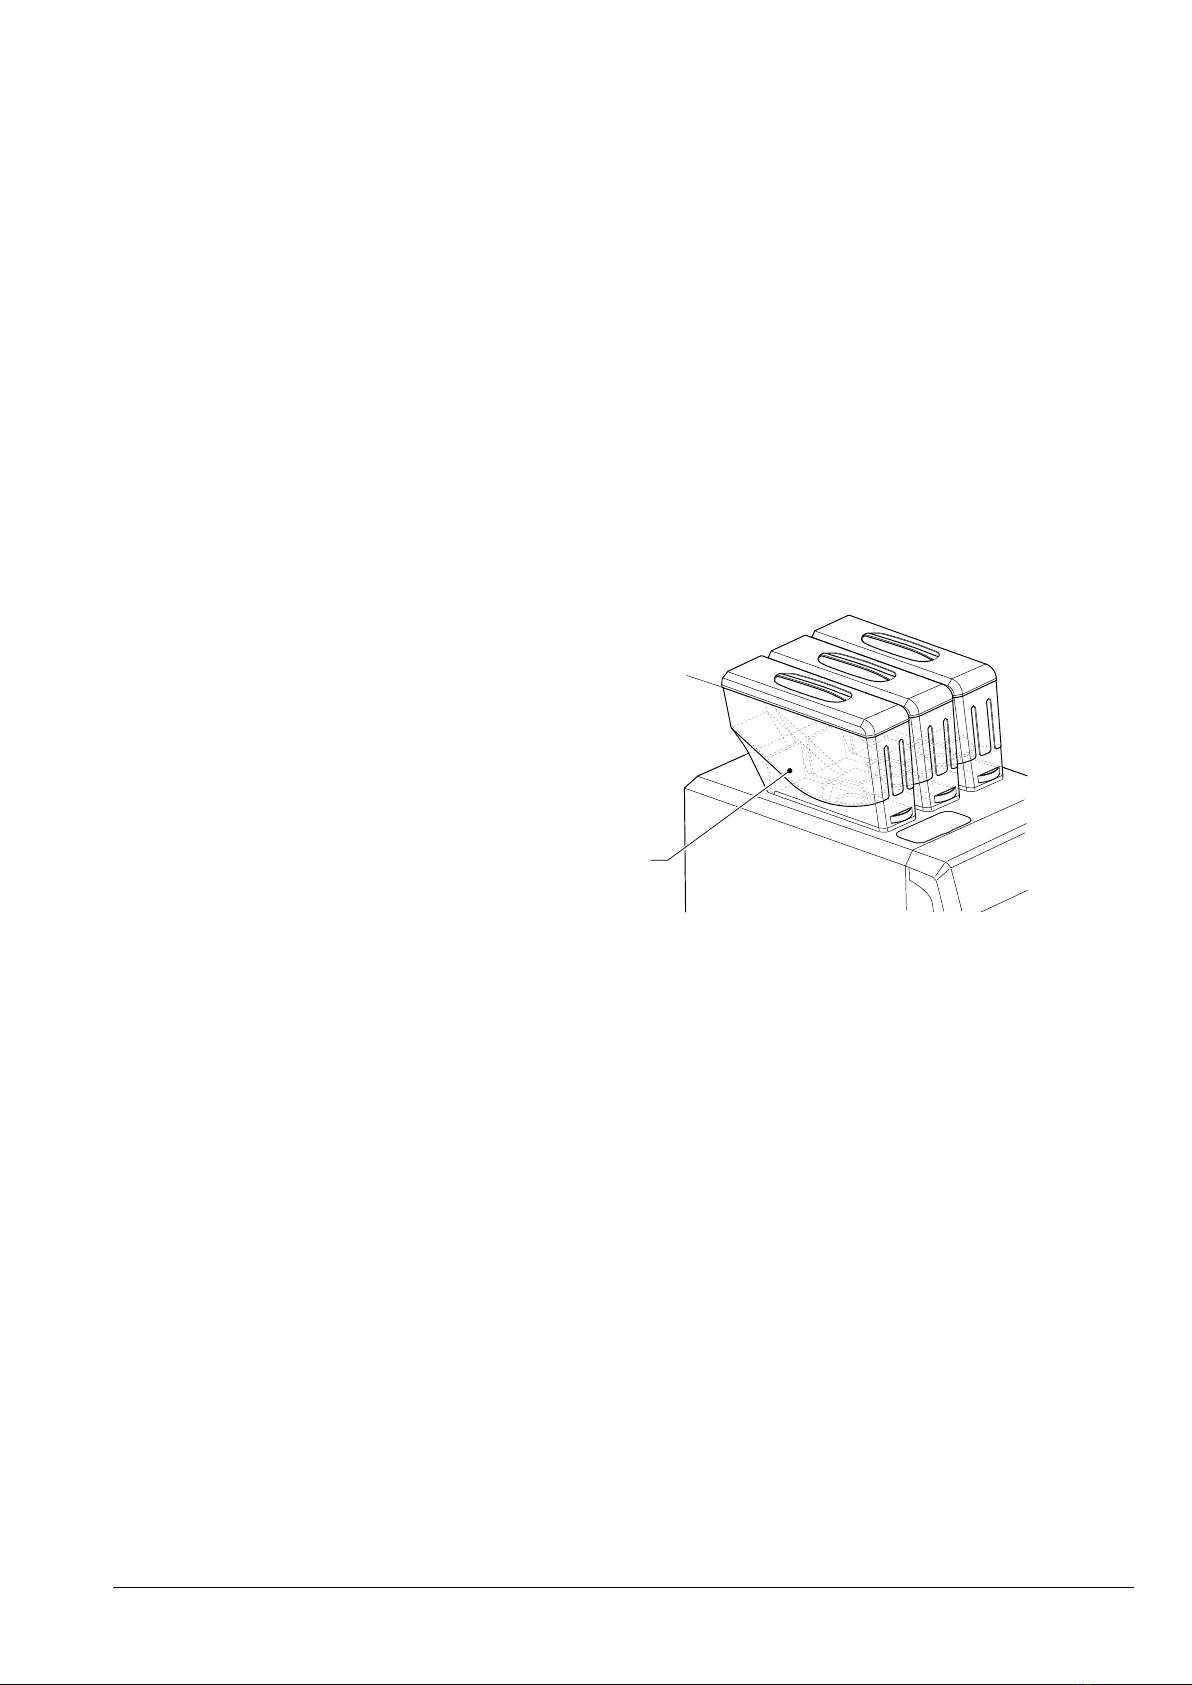
LOADING PRODUCTS
that they have been stored in compli-
ance with the manufacturer instructions
regarding storage and the storage tem-
perature.
the expiration date.
The products must be declared by the
manufacturer as suitable for automatically
dispensing into open containers.
Products may also be loaded with partial-
ly-full containers.
COFFEE BEANS
It is recommended to use high-quality
coee beans in order to prevent appliance
failure resulting from the presence of impu-
rities.
1. Open the container lid using the key (if
present).
2. Fill the container with coffee beans.
3. Carefully close the lid.
Do not exceed the maximum capacity
of the containers; the maximum level of
the containers coincides with the sup-
port point of the lid.
INSTANT PRODUCTS
It is recommended to use high-quality in-
stant products in order to prevent appliance
failure resulting from the presence of impu-
rities.
1. Open the instant powder container lid
using the key (if present).
2. Fill the container with instant powder.
3. Carefully close the lid.
Avoid compressing the powder in
order to prevent it from compacting.
do not contain any lumps.
Do not exceed the maximum capacity
of the containers; the maximum level of
the containers coincides with the sup-
port point of the lid.
MAX
1
Fig. 6
1. Container

10 05-2019 0073 00
MILK
For models with a cappuccino maker only.
The milk is drawn via a pipe from the milk
container.
Only use pasteurised or UHT (Ultra
With regards to preserving milk, carefully
follow the manufacturer's instructions re-
garding storage and check the product's
expiry date.
the appliance.
The suction hose must rest on the bottom
of the milk container and not be looped.
-
ance with the food safety and hygiene
requirements.
Do not exceed the milk tank's maximum
capacity; the maximum level is indicated on
the tank with a reference mark.
INTERNALLY SUPPLIED TANK
WATER
Models with an internally supplied water
tank only.
Every day, when the machine is rst turned
on, the tank must be emptied of any resid-
ual water and sanitised when the no water
warning appears, whilst making sure to me-
chanically remove any residues and visible
lms using swabs or brushes, if necessary.
To restore service:
1. Fill the tank with clear, impurity-free
drinking water.
2. Connect the tank to the appliance.
3. Confirm the reset operation.
-
pacity; the maximum level is indicated
PERIODICAL OPERATIONS
This manual shows the potential critical
points and includes information about
controlling the possible growth of bac-
teria.
Under the current health and safety
regulations, the operator of the appli-
ance must apply the self-control proce-
HACCP (Hazard Analysis Critical Con-
Each time a product is loaded or more
frequently, depending on how often the ap-
pliance is used, the incoming water quality
and the products used, it is necessary to
clean and sanitise the appliance and parts
that come into contact with the food, by
proceeding as described in the following
paragraphs.
In addition to the external parts of the
brewing units and mixers that need to be
cleaned so that any powder residue is re-
moved, especially the funnel area, the parts
of the mixer that come into contact with the
beverage should also be sterilised.
Under no circumstances should jets of
water be directed at the machine when
cleaning it.

05-2019 0073 00 11
CLEANING THE RESIDUE TRAYS
The residue trays can be easily removed to
make emptying and cleaning them easier.
The residue trays must be cleaned with the
machine switched on and the door closed.
liquiD rEsiDuEs
The liquid residue tray can be easily re-
moved, even if it is directly connected to a
mains drain.
Pull out the liquid residue tray to remove it.
If the liquid residue tray is not directly con-
nected to a drain in the mains, it will need to
be emptied on a regular basis.
Proceed to sanitise the tray.
soliD rEsiDuEs
moDEls witH asoliD rEsiDuE tray
The appliance control software noties
when the maximum number of dispenses
has been reached.
Coee-based selections are disabled.
To remove the solid residue tray:
1. Lift the dispensing nozzles using the
movement lever.
2. Remove the liquid residue tray.
3. Empty and wash the trays with a sanitis-
ing solution.
4. Reset the solid residue counters to zero
(solid residue tray empty function).
1
2
3
Fig. 7
1. Nozzle-moving lever
2. Solid residue tray
3. Liquid residue tray
moDEls witH asoliD rEsiDuE DiscHargE oN tHE
bENcH
Proceed as follows:
1. Lift the dispensing nozzles using the
movement lever.
2. Remove the liquid residue tray.
3. Remove the solid residue chute cover.
4. Empty and clean the solid residue tray.
5. Wash the solid residue chute to remove
any coffee residue.
6. Reinsert the residue chute and the liquid
residue tray.
1
2
3
Fig. 8
1. Nozzle-moving lever
2. Solid residue chute
3. Solid residue chute cover

12 05-2019 0073 00
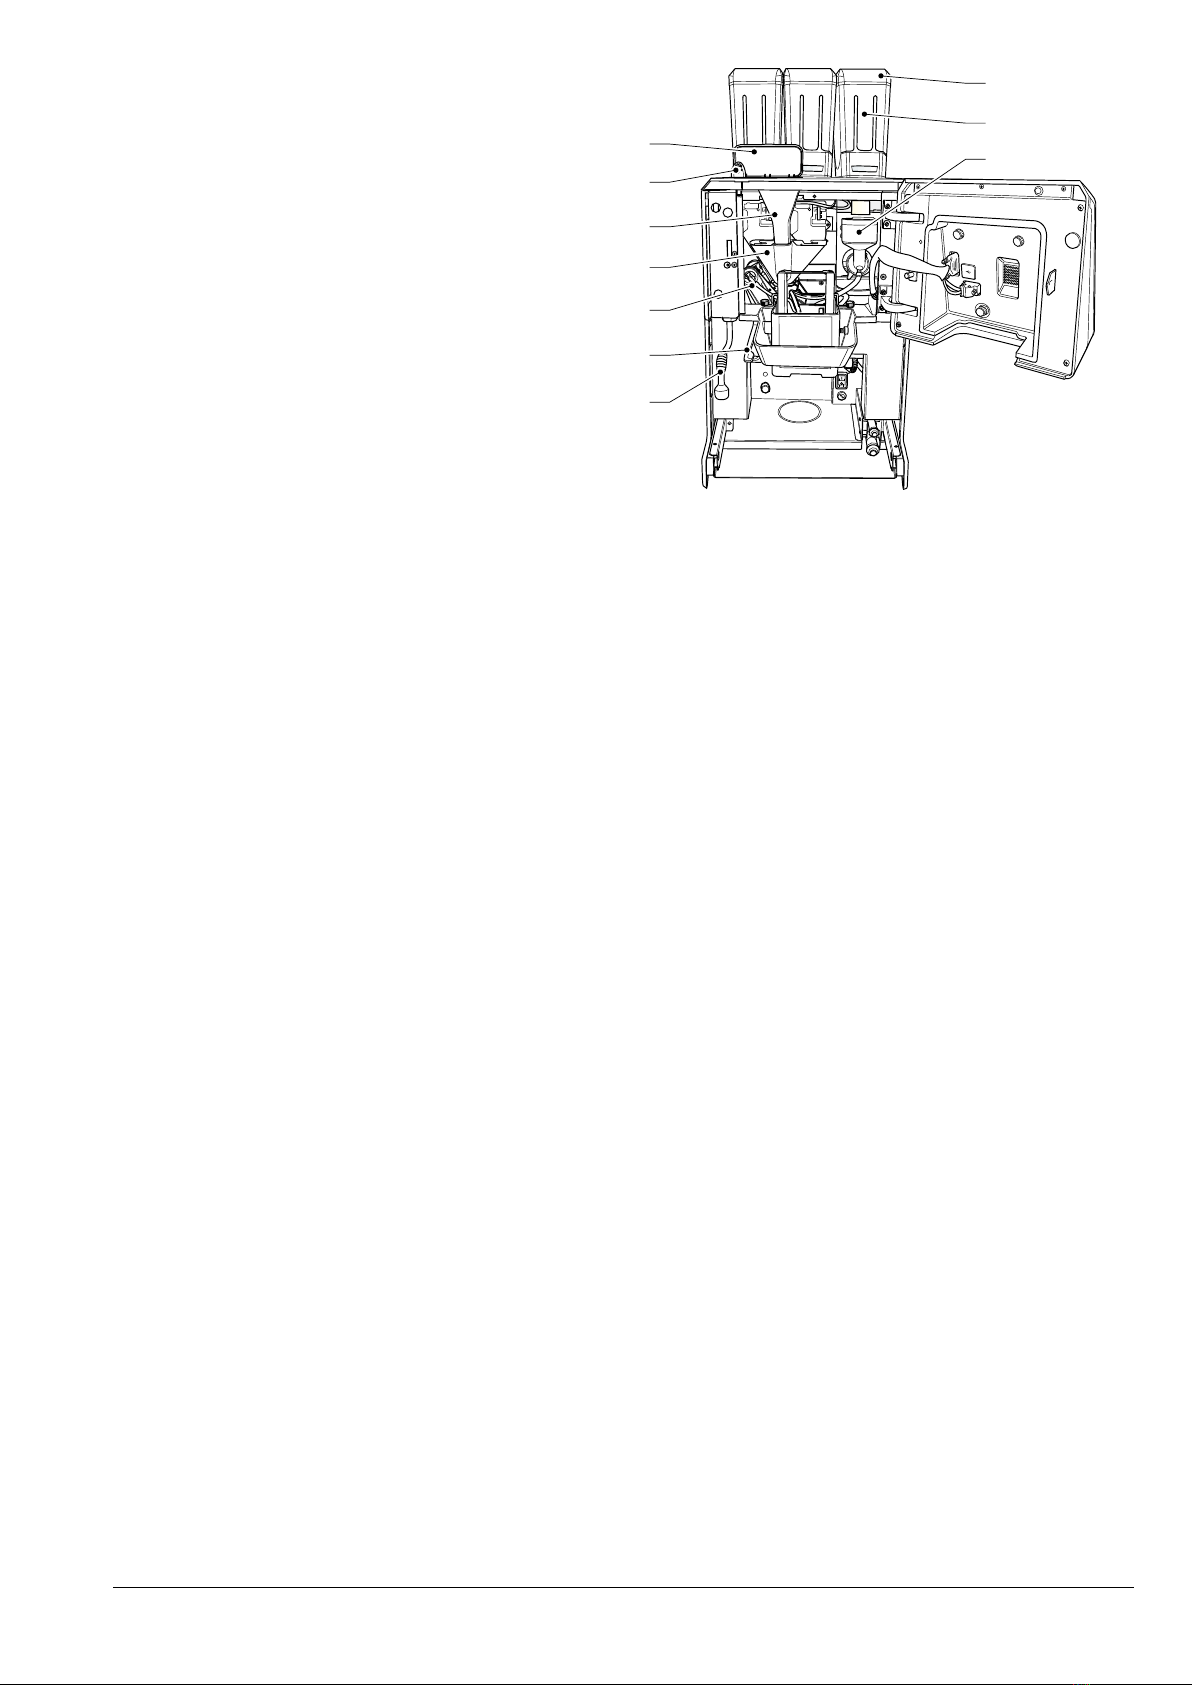
CLEANING THE MIXERS
Each time a product is loaded and/or on a
weekly or more frequent basis, depending
on how often the appliance is used, the
quality of the incoming water and the prod-
ucts used, the mixers must be sanitised.
The parts that need to be cleaned are the
powder trays, mixers, instant drink dispens-
ing pipes and diuser.
5
4
6
3
2
1
Fig. 9
1. Instant powder funnel
2. Instant powder tray
3. Water funnel
4. Mixer fan
5. Instant beverage hose connection
6. Mixer locking ring
To clean the mixer, proceed as follows:
1. Disconnect the instant beverage hose
from the water funnel connection.
2. Turn the water funnel locking ring anti-
clockwise and remove the mixer from the
appliance.
3. Separate all the components (instant
product funnels, water funnels, convey-
ors and powder trays).
4. Remove the fans: block the disk fitted
on the motor mixer shaft with one finger,
then unscrew the mixer fan.
Fig. 10
5. Soak the components for about 20 min-
utes in a container filled with a pre-pre-
pared sanitising solution, whilst taking
care to mechanically remove the resi-
dues and visible films using swabs or
brushes if necessary.
6. Rinse thoroughly and dry each part care-
fully.
7. Reassemble the fans.
8. Reassemble the mixer parts and correct-
ly reposition the water funnel.
Check that it has been correctly inserted.
Fig. 11
9. Turn the water funnel locking ring clock-
wise in order to secure the mixer to the
appliance.
Table of contents
Other EVOCA Coffee Maker manuals


Popular Coffee Maker manuals by other brands

MESTIC
MESTIC MK-60 Instructions for use

La San Marco
La San Marco SERIES 85 / S-E Operation and maintenance

Intact Idea
Intact Idea Flair PRO 2 quick start guide

Breville
Breville Cafe Venezia BES250XL quick start guide

DeLonghi
DeLonghi La Specialista Maestro EC9665M quick guide

Nespresso
Nespresso Jura user manual


