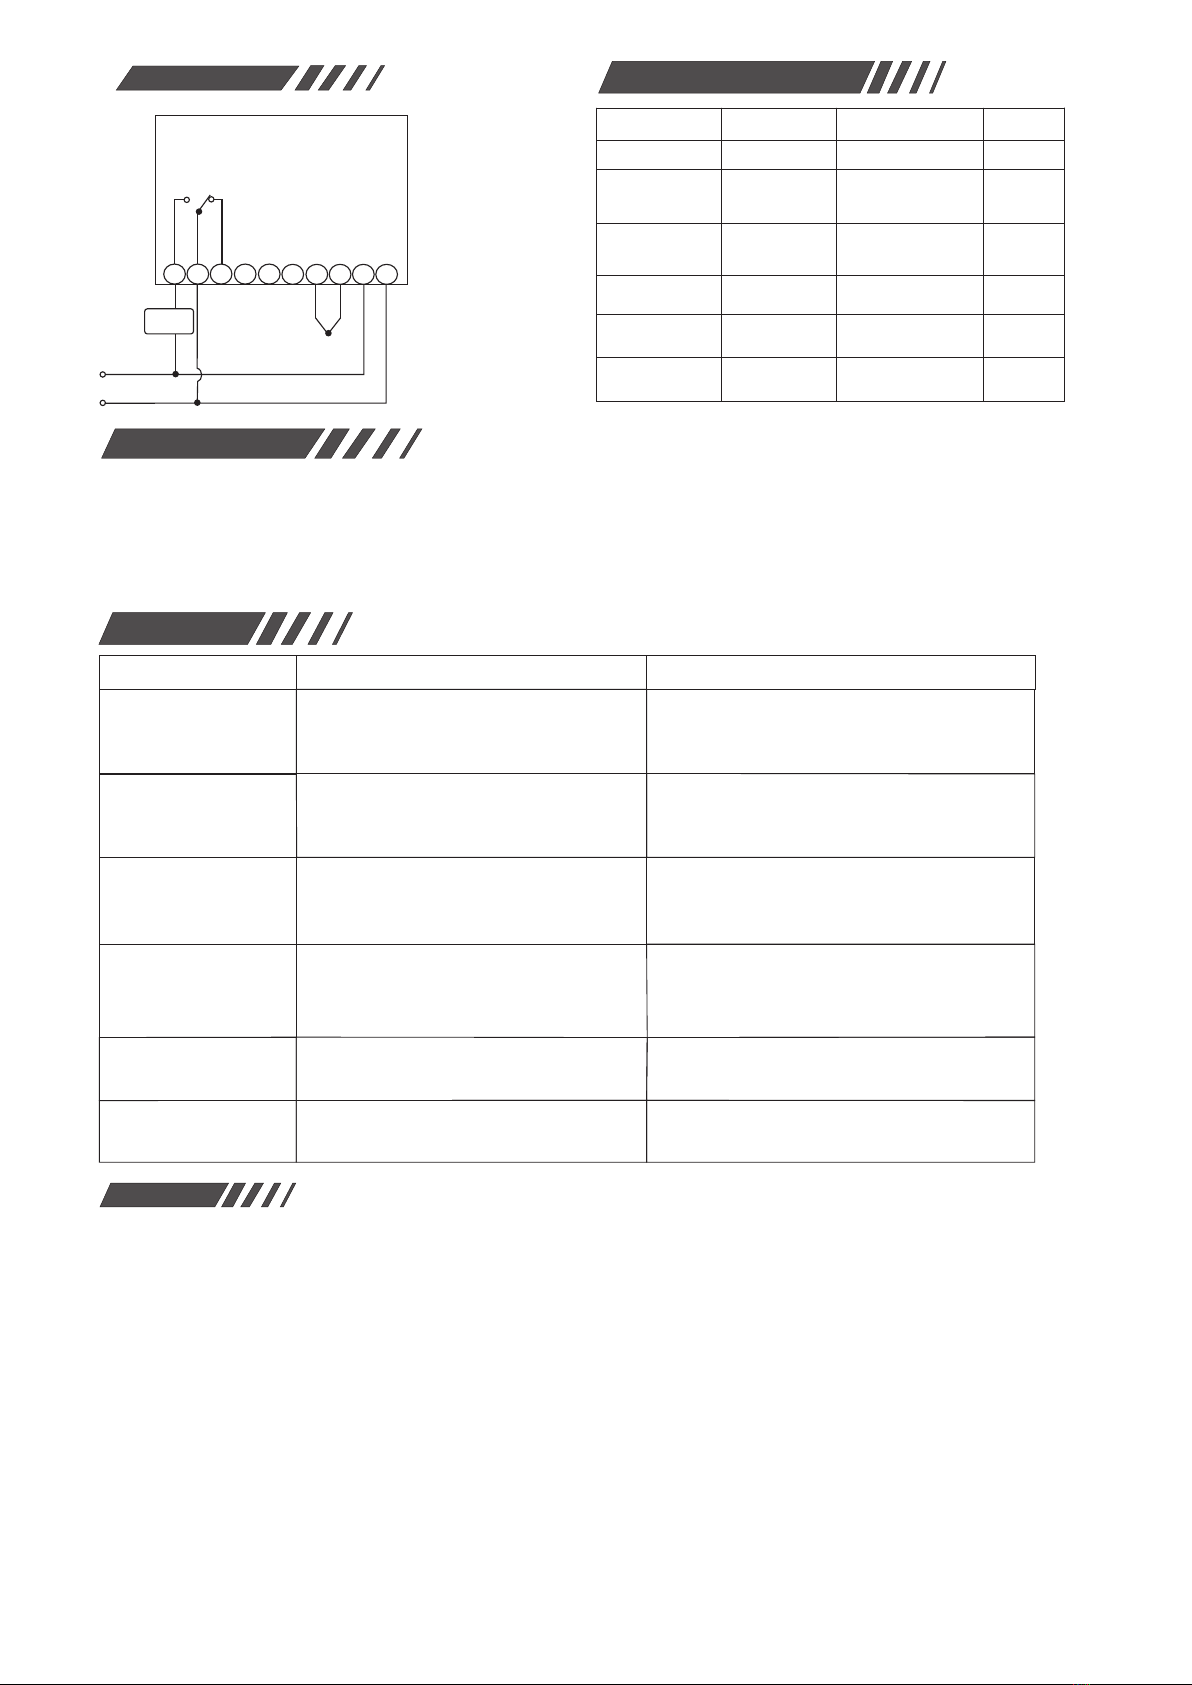
manuals.online logo
Brands
  1. Home
  2. •
  3. Brands
  4. •
  5. EWELLY
  6. •
  7. Thermostat
  8. •
  9. EWELLY EW-986B User manual

EWELLY EW-986B User manual

Other EWELLY Thermostat manuals

EWELLY EW-T207Z Manual

EWELLY

EWELLY EW-T207Z Manual

EWELLY EW-181 User manual

EWELLY

EWELLY EW-181 User manual

EWELLY EW-285A Manual

EWELLY

EWELLY EW-285A Manual

EWELLY EW-T205L User manual

EWELLY

EWELLY EW-T205L User manual

EWELLY EW-802 Manual

EWELLY

EWELLY EW-802 Manual

EWELLY Eliweli EW-T206B Manual

EWELLY

EWELLY Eliweli EW-T206B Manual

EWELLY EW-286 Manual

EWELLY

EWELLY EW-286 Manual

EWELLY EW-181 User manual

EWELLY

EWELLY EW-181 User manual

EWELLY EW-801AH User manual

EWELLY

EWELLY EW-801AH User manual

EWELLY EW-986GP Manual

EWELLY

EWELLY EW-986GP Manual

EWELLY EW-285 User manual

EWELLY

EWELLY EW-285 User manual

EWELLY EW-983A Manual

EWELLY

EWELLY EW-983A Manual

EWELLY EW-988R Technical manual

EWELLY

EWELLY EW-988R Technical manual

Popular Thermostat manuals by other brands

Prolon T1100 Hardware guide

Prolon

Prolon T1100 Hardware guide

Computherm Q20 operating instructions

Computherm

Computherm Q20 operating instructions

Heatmiser neoStat user manual

Heatmiser

Heatmiser neoStat user manual

Mars HEAT CONTROLLER IR Wireless Thermostat user manual

Mars

Mars HEAT CONTROLLER IR Wireless Thermostat user manual

Saswell SAS920XWHB-7-S-RF User manual and warranty card

Saswell

Saswell SAS920XWHB-7-S-RF User manual and warranty card

Aircalo TFP1-ET85P2 operating manual

Aircalo

Aircalo TFP1-ET85P2 operating manual

Honeywell CM721 user manual

Honeywell

Honeywell CM721 user manual

Carrier DEBONAIR 33CS Installation and operating instructions

Carrier

Carrier DEBONAIR 33CS Installation and operating instructions

Lennox iHarmony Zone Thermostat Installation and setup guide

Lennox

Lennox iHarmony Zone Thermostat Installation and setup guide

Gemtech GT7000 Operation

Gemtech

Gemtech GT7000 Operation

Rollei Smartes 45000 manual

Rollei

Rollei Smartes 45000 manual

Sinope TH1300RF user guide

Sinope

Sinope TH1300RF user guide

Honeywell RLV4305 owner's guide

Honeywell

Honeywell RLV4305 owner's guide

Honeywell Prestige 2.0 THX9421 manual

Honeywell

Honeywell Prestige 2.0 THX9421 manual

NuTone NTBZ48 Installation & operation guide

NuTone

NuTone NTBZ48 Installation & operation guide

Stelpro MAESTRO ASMT402AD user guide

Stelpro

Stelpro MAESTRO ASMT402AD user guide

Honeywell T6811 quick guide

Honeywell

Honeywell T6811 quick guide

Aube Technologies TH305 owner's guide

Aube Technologies

Aube Technologies TH305 owner's guide

manuals.online logo
manuals.online logoBrands
  • About & Mission
  • Contact us
  • Privacy Policy
  • Terms and Conditions

Copyright 2025 Manuals.Online. All Rights Reserved.

EW-986B
Set
1、Operating Voltage:AC220V ±10% 50HZ/60HZ
2、Load Current:10A/220V/AC
3、Power Consumpion: ≤3W
4、Working Environment: -10℃~50℃ RH ≤90%
5、Input Signal: K-Thermocouple Sensor ( equipped by user )
6、Control Range:0℃ ~400℃
7、Resolving:1℃ accuracy: ±2℃
8、Overall Dimension:77(length)×34(wide)×62(high)mm
9、Starter:71(length)×29(wide)mm
Code:986B.12.04.27
《EW-986B Directions》
Microcomputer Thermostat Serial
Technical Specifications
Loud power LED
Normal ly displa y
present temperature
Brief on Operation
Demand of install
1.The voltage must accord with controller's demand. The
voltage's deviation is no more than ±5%.
2.The loop of sensor is possible to keep away from the
loop of power.
3.The sequence of line's must have been connected
Properly.
Press key,then press or
simultaneously. Choose lowest
temperature limits: 0℃ ~control
temperature-1℃
Press key,then press or
simultaneously. Choose high-est
temperature limits:control
temperature+1℃ ~400℃
Press key,then simultaneously
press or to set delayed star
time from 0 to 3 minutes.
Press key,then press or
simultaneously. Choose temperature
correction: -15℃~15℃
Hold , then press or
simultaneously. Choose return
difference:1℃~15℃
ON Error: when the sensor is short
circuit. Code “EI” will be
displayed.
Brief on Controlling Procedure
1.Temperature setting:
。
2.Parameter Setting: Press for 6 seconds to start para
meter setting (a “ ” will be displayed). Press or
to adjust the parameters of
Press gently to display con
trolling temperature press or to change controll
-ing temperature.
-
Firstly thanks for using our instrument. This
product is a new product of fully automatic
intelligent control sy-stem especially made for
high-temperature and heating industry.
Wh e n cu r re n t te m per a tur e is
higher than the upper limit, the
screen will display “E2” and the
load will be off.
/
EW- 986B
Set
EW- 986B
Set
EW- 986B
Set
EW- 986B
Set
EW- 986B
Set
EW- 986B
Set
EW- 986B
Set
Mode:EW-986B
K-Thermocouple
Sensor
load:
10A/220V/AC
Wiring diagram Parameters for Procedure
Warnings
1. Please read this product instruction carefully and connect
input/output plugs of power & sensor to the corresponding sockets
strictly by following connection diagram, otherwise the usage &
operations will be affected. Check again to make sure there is no
mistake. Tighten all the screw of connection plugs aga in, and then
connect it to the power for running.
2. Keep away this product from moist or corrosiIve air and high
magnetic field. Otherwise the normal operaton of this product will
be affected.
.
3. All our products have passed strict quality inspections before
leaving factory. We provide one-year quality guarantee (which is
limited to product itself) period for this product.
If you have any doubt or problem concerning the
electronic temperature or humidity controller made by
us, please contact our distributors and we will provide
you high-quality after-sale services. Thanks!
About Failure
Failure
No display when power
is on.
Displayed temperature is
unstable or there exists
misplay..
“EI” is displayed The sensor wiring is short circuit or
open circuit.
Check to see if the sensor wiring has good contact
with coupling end or not.
Check to see if the power is short circuit.
The thermostat fails.
The set temperature is higher than the present
temperature.
The heat protector is open circuit because the
pressure is over loads.
The sensor wiring is interfered, poorly contacted or
is tied with other cables. The current is light because
of damage in the wiring.
The locations for the sensors are not correct or
sensor wiring is too long and its resistance is too
big. The wiring contact is poor and the sensor`s
damag.
The sensor is not correctly installed and cannot
measure the correct temperature. Compressor
contactor fails.
Check power supply and change fuse.
Check if there is 220V power input or change
thermostat with our distributor.
Reset the necessary controlling temperature.
Check the reasons for overload and overheating.
After the trouble is solved, restart to work.
Separate sensor wiring with power cables or change
shielded lines or check if the contact is tight or not.
All sensors should be corrected at their locations.
Enlarge the cross section of the expanded wires.
Make sure the wiring sealing, is good.
Change sensor.
Check if the sensor has accurately measured the
temperature or not. Change compressor contactor.
Causes Precautions
Difference with temperat-
ure within storage and the
displayed temperature is
too big.
Machine does not stop
when the temperature
reaches.
Machine does not work
but display exits
Guangzhou Eliweli Autocontrol Tech.
Co., Ltd.
220V/AC
+
2 3 4 5 678 9 10
1
-
Load
1~15
-15~15
0~400
0~3
00
50
5
1
400
0
Setting range
Alarm on lowlimit
Temperature
Alarm on high limit
Temperature
Delayed Time
Min
Temperature
Correction
Temperature Return
Difference
Setting Range
Function Unit
Ex-factory Value
℃
℃
℃
℃
℃
0℃~control
temperature-1℃
control tempera-
ture+1℃ ~400℃
Feature descriptions
Note:When a high temperature alarm settings should be greater
than the set temperature and hysteresis sum
When you set the temperature alarm should be less than the set
temperature minus the hysteresis sum.
Heating system: When the current temperature ≤the setting
temperature - the temperature hysteresis and delay the
setting of the "delay time", the load relay Off.
Heating system to stop: when the current temperature ≥
setting temperature, the load relay is disconnected.