Ewent EW7016 R1 User manual

EW7016 R1
USB 3.1 to IDE / SATA Converter

2
|
ENGLISH
EW7016 R1 - USB 3.1 to IDE / SATA Converter
Table of contents
1.0 Introduction ...........................................................................................................2
1.1 Functions and features......................................................................................2
1.2 Packing contents...............................................................................................3
2.0 Ports and indication LED’s.....................................................................................3
3.1 Installation of the EW7016 R1 ...............................................................................4
3.1 Windows 2000/XP/Vista/Windows 7/8 ...............................................................4
4.0 Connecting a hard disk or CD-ROM/DVD player....................................................4
4.1 Connecting an IDE hard disk or IDE CD-ROM/DVD player................................4
4.2 Connecting a SATA hard disk or SATA CD-ROM/DVD player ...........................5
4.3 Safely remove a USB device.............................................................................5
5.0 Preparing a hard disk for usage.............................................................................5
5.1 Preparing the hard disk for use with Windows 2000/XP/Vista............................5
5.2 Preparing the hard disk for use with Windows 7/8..............................................6
6.0 Backup function.....................................................................................................6
6.1 Installation of the PC Clone Ex software............................................................7
6.2 Using the backup software and make a backup.................................................7
6.2.1 Using the backup button of the EW7016 R1. .............................................. 7
6.2.2 Making a backup with the PC Clone EX software ....................................... 7
6.2.3 Restore a backup ....................................................................................... 7
7.0 Frequently Asked Questions and other related information....................................8
8.0 Service and support...............................................................................................8
9.0 Warning and points of attention.............................................................................9
10.0 Warranty conditions...........................................................................................10
1.0 Introduction
Congratulations with the purchase of this high-quality Ewent product! This product
has undergone extensive testing by Ewent’s technical experts. Should you
experience any problems with this product, you are covered by a five-year Ewent
warranty. Please keep this manual and the receipt in a safe place.
Register your product now on www.ewent-online.com and receive product updates!
1.1 Functions and features
With the Ewent EW7016 R1 USB 3.1 to SATA/IDE Converter, you can easily connect
a hard disk, CD-ROM player, DVD-ROM player or burner to your computer. The ideal
solution if you do not want to open your case to mount a new device!
3
|
ENGLISH
The EW7016 R1 has a stylish black design which perfectly matches the desk of the
modern computer user. Thanks to it’s compact design, the EW7016 R1 is also very
suitable to be used when you are on the road.
The EW7016 R1 has a connector on each side of the device itself. Thanks to these
connections, the EW7016 R1 is compatible with almost all hard disks, CD-ROM
players and DVD players. The EW7016 R1 is also equipped with a super fast USB 3.1
port. Using USB 3.1, you can obtain 10 times the speeds of USB 2.0. Of course, the
EW7016 R1 is fully compliant with USB 2.0. This means the EW7016 R1 can be used
on computers which only have USB 2.0 ports.
The EW7016 R1 is supplied with a energy efficient power supply which is able to
power your devices.
1.2 Packing contents
The following parts need to be present in the packing:
•EW7016 R1 USB 3.1 to SATA/IDE converter
•USB 3.1 to mini USB 3.1 cable
•SATA cable
•SATA power cable
•IDE power cable
•Power supply
•Power converter
•CD-ROM with PC Clone EX software and manual
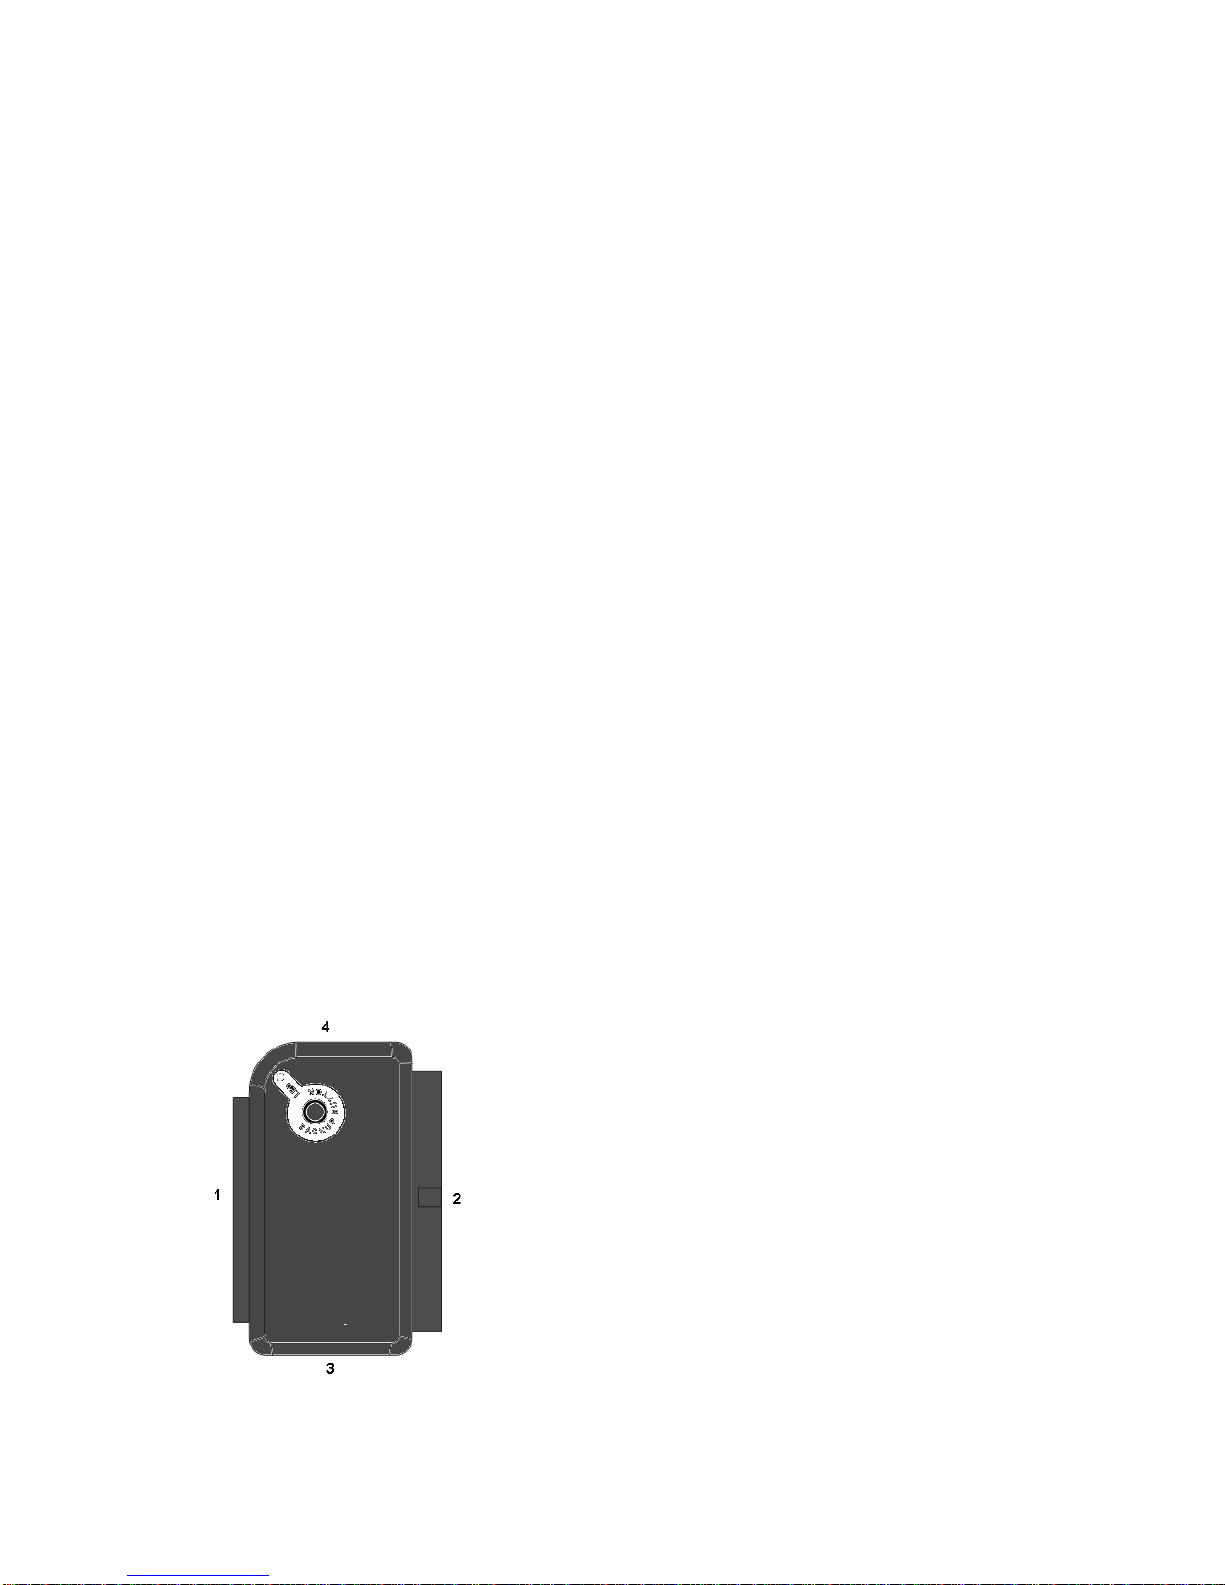
2.0 Ports and indication LED’s
(1)
2.5” IDE connector.
(2)
3.5” IDE connector.
(3)
SATA connector.
(4)
Mini USB port.
LED
Will be lit when the EW7016 R1 is
powered.

4
|
ENGLISH
3.1 Installation of the EW7016 R1
3.1 Windows 2000/XP/Vista/Windows 7/8
From Windows 2000 and up, Windows has built-in drivers for the EW7016 R1. When
using these Windows versions there is no need to install drivers. Windows will install
the correct driver(s) automatically the moment you connect the hardware. Refer to the
following chapter for detailed information how to connect the EW7016 R1.
4.0 Connecting a hard disk or CD-ROM/DVD
player
We recommend that you make a backup of the hard disk you wish to use. Ewent can
not be held responsible should any loss or damage of data occur resulting in the
installation or use of this device. Ewent advises you to disconnect the EW7016 R1
from your computer before connecting a hard disk, CD-ROM or DVD player.
4.1 Connecting an IDE hard disk or IDE CD-ROM/DVD
player
If you use an IDE hard device, you have to set the hard disk to ‘Master’. Refer to the
label on your hard disk or CD-ROM/DVD player for more information on these
settings.
1. Connect the power cable to the power converter.
2. Connect the IDE power cable to the power converter.
3. Connect the other side of the IDE power cable to the power connection of the
IDE disk or CD-ROM/DVD player (Molex).
4. Connect an IDE cable to the IDE hard disk or CD-ROM/DVD player.
5. If you are using a 2.5 inch IDE hard disk: Connect the other side of the IDE cable
to the 2,5 inch IDE connector of the EW7016 R1 (1.). In case you are using a 3.5
inch IDE hard disk: Connect the IDE cable to the 3.5 inch IDE connector of the
EM1016.
6. Connect the USB 3.1 cable to a free USB (3.1) port of your computer.
7. Connect the small plug of the USB 3.1 cable to the USB connection of the
EW7016 R1.
8. Connect the power adapter to a wall outlet.
9. The ‘Wizard New Hardware’ may appear. Should you see the following message:
‘Is Windows Allowed to make a connection to Windows Update to search for
software?’, select ‘No, not now’.
10. Click ‘Next’
11. Select ‘Install the software automatically (recommended)’.
12. Click ‘Next’ and follow the steps shown on screen.

5
|
ENGLISH
4.2 Connecting a SATA hard disk or SATA CD-ROM/DVD
player
1. Connect the power cable to the power converter.
2. Connect the SATA power cable to the power converter.
3. Connect the other end of the SATA power cable to the corresponding SATA
connector of the hard disk or CD-ROM/DVD player.
4. Connect the SATA cable to the corresponding SATA connector of the SATA hard
disk or CD-ROM/DVD player.
5. Connect the other side of the SATA cable to the SATA connection of the
EW7016 R1.
6. Connect the USB 3.1 cable to a free USB (3.1) port of the computer.
7. Connect the small plug of the USB (3.1) cable to the USB connection of the
EW7016 R1.
8. Connect the power supply to a wall outlet.
9. The ‘Wizard New Hardware’ may appear. Should you see the following message:
‘Is Windows Allowed to make a connection to Windows Update to search for
software?’, select ‘No, not now’.
10. Click ‘Next’.
11. Select ‘Install the software automatically (recommended)’.
12. Click ‘Next’ and follow the steps shown on screen.
4.3 Safely remove a USB device
Follow the instructions below to safely disconnect a device from the EW7016 R1.
1. Double-click the ‘Safely remove hardware’ icon in the taskbar, near the clock.
2. Select the EW7016 R1 (USB device for mass storage) and click ‘Stop’.
3. Click ‘OK’ to confirm.
4. Disconnect the hard disk, CD-ROM player or DVD-player from the EW7016 R1.
5.0 Preparing a hard disk for usage
When using a hard disk for the first time, you need to initialize the hard disk in order to
make the hard disk ‘visible’. Use the following steps to initialize the hard disk.
5.1 Preparing the hard disk for use with Windows
2000/XP/Vista
1. Right click the ‘My Computer’ icon.
2. Click ‘Manage’.
3. Select the option ‘Disk Management’ from the left side of the screen.
4. Right click the new hard disk and choose ‘Initialize’.
5. Click ‘Ok’.
6. Right click the new hard disk.
7. Click ‘New Partition’.

6
|
ENGLISH
8. Click ‘Next’.
9. Click ‘Next’.
10. Click ‘Next’.
11. Choose the desired partition format (Note: when using FAT32 the partition size is
limited to 32GB).
12. Click ‘Next’.
13. Select the drive letter you wish to assign to this partition (this is not required).
14. Click ‘Next’.
15. Select the desired file system: FAT32 or NTFS.
Note! If you only use the hard disk on Windows XP or Vista systems we recommend
you to select the NTFS file system.
16. Enter a name for the new partition in the field 'Volume label'
17. Enable the checkbox at ‘Quick format’.
18. Click ‘Next’.
19. Click ‘Finish’.
20. The hard disk is now ready to be used.
5.2 Preparing the hard disk for use with Windows 7/8
1. Click ‘Start’.
2. Click ‘Control Panel’.
3. Click ‘System and security’.
4. Click ‘Manage’.
5. Click ‘Disk Management’.
6. Right-click ‘New volume’.
7. Click ‘Next’.
8. The wizard ’New Volume’ appears,
9. Click ‘Next’.
10. Choose the desired partition format.
11. Click ‘Next’.
12. Select a drive letter at ‘Assign a drive letter’.
13. Click ‘Next’.
14. Choose the desired file system.
15. Click ‘Next’.
16. Click ‘Finish’.
17. The notification ‘New Volume found’ may appear’.
18. The hard disk is now ready to be used.
6.0 Backup function
The EW7016 R1 is equipped with a backup button. When using this button, you are
able to make a backup of the data. In order to use this function you have to install the
supplied PC Clone Lite software.

7
|
ENGLISH
6.1 Installation of the PC Clone Ex software
1. Place the installation disk in your CD-ROM player or DVD player. The installation
disk will start automatically.
2. Choose your language and click ‘Next’.
3. Choose ‘Install PC Clone EX software’.
4. Follow the steps shown on screen to complete the installation.
6.2 Using the backup software and make a backup
There are two methods to make a backup with the EW7016 R1. You can use the PC
Clone EX software to make a backup, or you can use the handy ‘Backup button’ of the
EW7016 R1 itself. During the following examples we will explain how you can use
these two methods.
6.2.1 Using the backup button of the EW7016 R1.
1. Press the ‘Backup’ button of the EW7016 R1 once.
2. The PC Clone EX software will be started.
3. Press the backup button again to start a backup.
4. The EW7016 R1 will now make a backup of your computer’s hard disk.
5. Click ‘OK’ to confirm the backup has finished.
6.2.2 Making a backup with the PC Clone EX software
1. Click ‘Start’.
2. Click ‘Programs’ or ’All programs’
3. Select ‘PC Clone EX’.
4. Click ‘PC Clone EX’. You may need to click the ‘PC Clone EX’ icon to start the
software.
5. Click the second icon in the menu tray (Backup).
6. Select the source at the top part of the screen. When selecting the first folder, all
the subfolders and directories available in this folder will be saved in a backup.
7. Select the destination at the bottom part of the screen.
8. Click at the bottom of the screen on the icon called ‘Backup’.
9. Click ‘Start’. The backup will now start.
10. Click ‘OK’ to confirm the backup has finished.
6.2.3 Restore a backup
You can also use the restore function of the PC Clone EX software. This function
actually is an incremental backup function. This is a very convenient function which
only saves the changed data. Because only the changed data will be saved, there is
no need to make a complete backup again and this can save a lot of time.
1. Click ‘Start’.
2. Click ‘Programs’ or ’All programs’.
3. Select ‘PC Clone EX’.

8
|
ENGLISH
4. Click ‘PC Clone EX’. You may need to click the ‘PC Clone EX’ icon to start the
software.
5. Click the third icon in the system tray (Restore).
6. Now, select the desired files and folders you want to restore at the top of the
screen, if not selected yet.
7. Select the destination at the bottom part of the screen.
8. Click the ‘Restore’ icon.
9. When finished, click ‘OK’ to confirm.
7.0 Frequently Asked Questions and other
related information
The latest Frequently asked questions for your product can be found on the support
page of your product. Ewent will update these pages frequently to assure you have
the most recent information. Visit www.ewent-online.com for more information about
your product.
8.0 Service and support
This user’s manual has been carefully written by Ewent’s technical experts. If you
have problems installing or using the product, please fill out the support form at the
website www.ewent-online.com/
You can also contact us by phone. Please check www.ewent-online.com/ for the
helpdesk phone number and opening hours.

9
|
ENGLISH
9.0 Warning and points of attention
Due to laws, directives and regulations set out by the European parliament, some
(wireless) devices could be subject to limitations concerning its use in certain
European member states. In certain European member states the use of such devices
could be prohibited. Contact your (local) government for more information about this
limitations.
Always follow up the instructions in the manual*, especially where it concerns devices
which need to be assembled.
Warning: In most cases this concerns an electronic device. Wrong/improper use may
lead to (severe) injuries!
Repairing of the device should be done by qualified Ewent staff. The warranty
immediately voids when products have undergone self repair and/or by misuse. For
extended warranty conditions, please visit our website at www.ewent-online.com.
*Tip: Ewent manuals are written with great care. However, due to new technological
developments it can happen that a printed manual does not longer contain the most
recent information.
If you are experiencing any problems with the printed manual or you cannot find what
you are looking for, please always check our website www.ewent-online.com first for
the newest updated manual.
Also, you will find frequently asked questions in the FAQ section. It is highly
recommended to consult the FAQ section. Very often the answer to your questions will
be found here.

10
|
ENGLISH
10.0 Warranty conditions
The five-year Ewent warranty applies to all Ewent products, unless mentioned
otherwise before or during the moment of purchase. After buying a second-hand
Ewent product the remaining period of warranty is measured from the moment of
purchase by the product’s initial owner. Ewent warranty applies to all Ewent products
and parts, indissolubly connected or mounted to the product it concerns. Power supply
adapters, batteries, antennas and all other products not directly integrated in or
connected to the main product or products of which, without reasonable doubt, can be
assumed that wear and tear during use will show a different pattern than the main
product, are not covered by the Ewent warranty. Products are not covered by the
Ewent warranty when exposed to incorrect/improper use, external influences or when
opening the service parts of the product by parties other than Ewent. Ewent may use
refurbished materials for repair or replacement of your defective product. Ewent
cannot be held responsible for changes in network settings by internet providers. We
cannot guarantee that the Ewent networking product will keep working when settings
are changed by the internet providers. Ewent cannot guarantee the working of web
services, apps and other third party content that is available through Ewent products.
Ewent products with an internal hard disk have a limited warranty period of two years
on the hard disk. Ewent could not be held responsible for any data lost. Please make
sure that if the product stores data on a hard drive or other memory source, you will
make a copy before you return the product for repair.
When my product gets defective
Should you encounter a product rendered defective for reasons other than described
above: Please contact your point of purchase for taking care of your defective product.
EW7016 R1 | 11-2015
Table of contents
Other Ewent Media Converter manuals


Popular Media Converter manuals by other brands


H&B
H&B TX-100 Installation and instruction manual

Bolin Technology
Bolin Technology D Series user manual

IFM Electronic
IFM Electronic Efector 400 RN30 Series Device manual

GRASS VALLEY
GRASS VALLEY KUDOSPRO ULC2000 user manual

Linear Technology
Linear Technology DC1523A Demo Manual

Lika
Lika ROTAPULS I28 Series quick start guide

Weidmuller
Weidmuller IE-MC-VL Series Hardware installation guide

Optical Systems Design
Optical Systems Design OSD2139 Series Operator's manual

Tema Telecomunicazioni
Tema Telecomunicazioni AD615/S product manual

KTI Networks
KTI Networks KGC-352 Series installation guide

Gira
Gira 0588 Series operating instructions

Lika
Lika SFA-5000-FD user guide