Ewent EW7016 User manual

Handleiding NL pagina 2
Manual UK page 11
Mode d’emploi FR page 20
Manual de usuario ES página 29
Manuale Ipagina 38
Benutzerhandbuch DE Seite 47
Kàzi HU oldalszám 57

2|NEDERLANDS
EW7016 - USB 3.0 naar IDE / SATA Converter
Inhoudsopgave
1.0 Introductie .............................................................................................................2
1.1 Functies en kenmerken .....................................................................................2
1.2 Inhoud van de verpakking..................................................................................3
2.0 Aansluitingen en indicatie LED..............................................................................3
3.0 Installatie van de EW7016.....................................................................................4
3.1 Windows 2000/XP/Vista/Windows 7 ..................................................................4
4.0 Een harde schijf, CD-ROM of DVD-speler aansluiten............................................4
4.1 Een IDE harde schijf of een IDE CD-ROM of DVD-speler aansluiten.................4
4.2 Een SATA harde schijf of SATA CD-ROM of DVD-speler aansluiten.................5
4.3 USB apparaten veilig verwijderen......................................................................5
5.0 Harde schijf klaar maken voor gebruik...................................................................5
5.1 De harde schijf gereed maken voor gebruik met Windows 2000/XP/Vista..........5
5.2 De harde schijf gereed maken voor gebruik met Windows 7..............................6
6.0 Back-up functie......................................................................................................7
6.1 De PC Clone Ex software installeren.................................................................7
6.2 De back-up software gebruiken en een back-up maken.....................................7
6.2.1 De Back-up knop van de EW7016 gebruiken.............................................. 7
6.2.2 Een back-up maken met de PC Clone EX software.................................... 7
6.2.3 Back-up herstellen...................................................................................... 8
7.0 Veel gestelde vragen en andere relevante informatie............................................8
8.0 Service en ondersteuning......................................................................................8
9.0 Waarschuwingen en aandachtspunten..................................................................9
10.0 Garantievoorwaarden........................................................................................10
11.0 Verklaring van Overeenstemming......................................................................10
1.0 Introductie
Gefeliciteerd met de aankoop van dit hoogwaardige Ewent product! Dit product is door
de technische experts van Ewent uitgebreid getest. Mocht dit product ondanks alle
zorg problemen vertonen, dan kun je een beroep doen op de vijf jaar Ewent garantie.
Bewaar deze handleiding samen met het bewijs van aankoop daarom zorgvuldig.
Registreer je aankoop nu op www.ewent-online.com en ontvang product updates!
1.1 Functies en kenmerken
Met de Ewent EW7016 USB 3.0 naar SATA converter kun je eenvoudig een harde
schijf, CD-ROM speler, DVD speler of een branden op je computer aansluiten zonder
dat je de computer hiervoor hoeft open te schroeven!

3|NEDERLANDS
De EW7016 is een perfecte aanvulling op het bureau van de hedendaagse
computergebruikers dankzij zijn stijlvolle zwarte ontwerp.
Dankzij het compacte ontwerp is de EW7016 tevens erg geschikt om gebruikt te
worden wanneer je op reis of onderweg bent.
De EW7016 heeft op elke zijde een aansluiting. Dankzij deze aansluitingen is de
EW7016 compatible met bijna alle harde schijven, CD-ROM spelers en DVD spelers.
De EW7016 is tevens voorzien van een supersnelle USB 3.0 poort. Door gebruik te
maken van deze USB poort, kun je tienmaal de snelheid van USB 2.0 halen. Uiteraard
is de EW7016 volledig werkzaam met USB 2.0. Dit betekent dat de EW7016 ook op
een computer aangesloten kan worden die alleen maar USB 2.0 poorten heeft.
De EW7016 wordt geleverd met een energiezuinige voedingsadapter die jouw
aangesloten apparaten van stroom voorziet.
1.2 Inhoud van de verpakking
De volgende onderdelen zijn aanwezig in het pakket:
EW7016 USB 3.0 naar SATA/IDE converter
USB 3.0 naar mini USB 3.0 kabel
SATA kabel
SATA stroomkabel
IDE stroomkabel
Voedingsadapter
Stroomomvormer
CD-ROM met PC Clone EX software en product handleiding
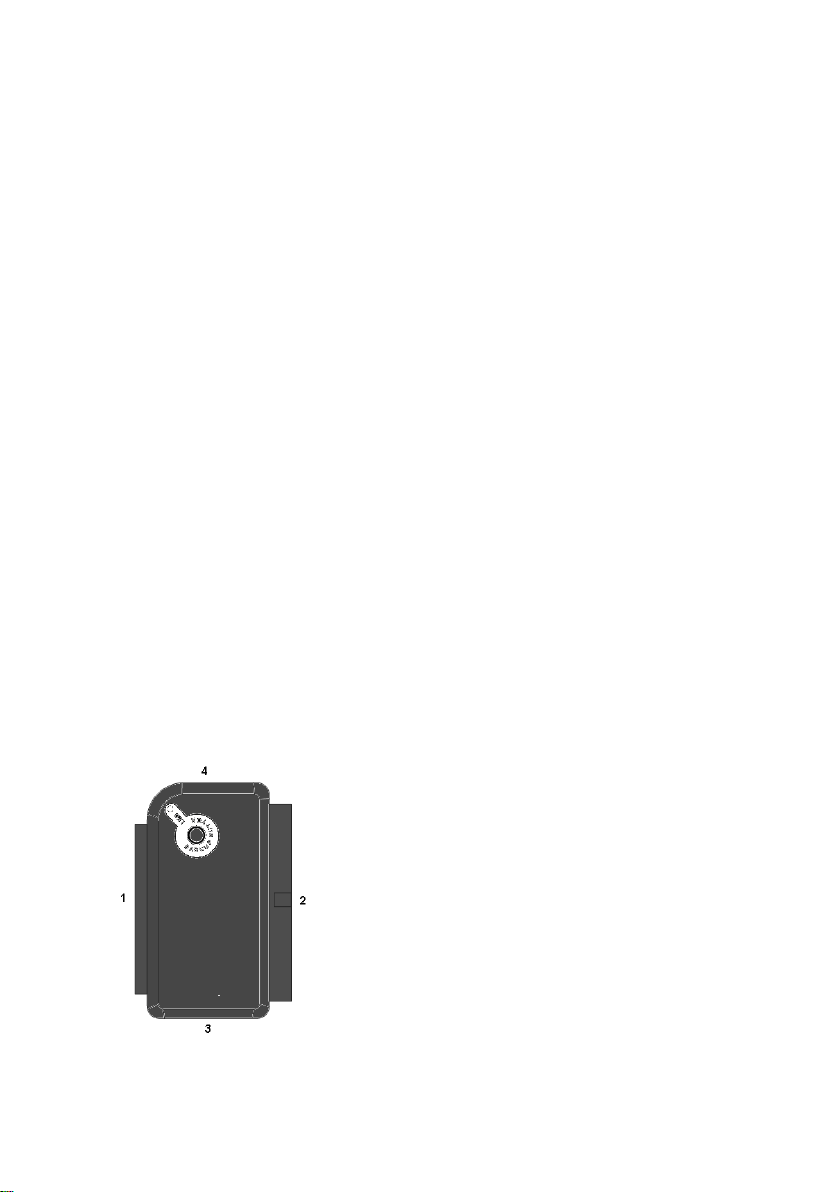
2.0 Aansluitingen en indicatie LED
(1)
2.5” IDE aansluiting.
(2)
3.5” IDE aansluiting.
(3)
SATA aansluiting.
(4)
Mini USB aansluiting.
LED
Gaat branden wanneer de EW7016
ingeschakeld is.

4|NEDERLANDS
3.0 Installatie van de EW7016
3.1 Windows 2000/XP/Vista/Windows 7
Windows 2000 en hoger hebben de driver(s) voor de EW7016 standaard al
ingebouwd in het systeem. Als je deze Windows versies gebruikt hoef je ook geen
driver(s) te installeren. Windows installeert de EW7016 automatisch zodra deze wordt
aangesloten. Ga naar het volgende hoofdstuk voor meer informatie hoe de EW7016
aangesloten dient te worden.
4.0 Een harde schijf, CD-ROM of DVD-speler
aansluiten
Als je een harde schijf gaat gebruiken: We raden je aan een back-up te maken van
eventueel aanwezig data die op de harde schijf aanwezig is. Ewent is niet
verantwoordelijk voor eventueel dataverlies of corrupte data bij het gebruik van de
EW7016. Ewent adviseert om de EW7016 los te koppelen van de computer voordat je
een harde schijf, CD-ROM speler of DVD speler aansluit.
4.1 Een IDE harde schijf of een IDE CD-ROM of DVD-speler
aansluiten
Als je een IDE apparaat wilt gebruiken, dien je dit apparaat op de ‘Master’ stand te
zetten. Raadpleeg de sticker op de harde schijf voor de juiste instelling.
1. Sluit de stroomkabel op de stroomomvormer aan.
2. Sluit de IDE stroomkabel op de stroomomvormer aan.
3. Sluit de andere kant van de IDE stroomkabel op de stroomaansluiting (Molex)
van de IDE harde schijf of de IDE CD-ROM of DVD-speler aan.
4. Sluit een IDE kabel op de IDE aansluiting van de harde schijf of CD-ROM of
DVD-speler aan.
5. Als je een 2.5 inch harde schijf gebruikt: Sluit de andere kant van de IDE kabel
op de 2.5 inch IDE aansluiting (1.). Als je een 3.5 inch harde schijf gebruikt, dien
je de andere kant van de IDE kabel op de 3.5 inch IDE aansluiting (2.) van de
EW7016 aan te sluiten.
6. Sluit de USB 3.0 kabel op een vrije USB (3.0) poort van je computer aan.
7. Sluit de smalle plug van de USB 3.0 kabel op de mini USB aansluiting (4.) van de
EW7016 aan.
8. Sluit de stekker van de stroomadapter op een stopcontact aan.
9. De ‘Nieuwe hardware gevonden wizard’ kan verschijnen. Als Windows vraagt om
‘Verbinding met het internet te maken om te zoeken naar updates,’ dien je dit niet
toe te staan.
10. Klik op ‘Volgende’’.
11. Selecteer ‘Installeer de software automatisch (Aanbevolen).

5|NEDERLANDS
12. Klik op ‘Volgende’ en volg de stappen die op het scherm worden getoond.
4.2 Een SATA harde schijf of SATA CD-ROM of DVD-
speler aansluiten
1. Sluit de stroomkabel op de stroomomvormer aan.
2. Sluit de SATA stroomkabel op de stroomomvormer aan.
3. Sluit de andere kant van de SATA stroomkabel op de juiste SATA aansluiting van
de harde schijf of CD-ROM/DVD-speler aan.
4. Sluit de SATA kabel op de SATA aansluiting van de harde schijf of CD-
ROM/DVD-speler aan.
5. Sluit de andere kant van de SATA kabel op de SATA aansluiting van de EW7016
aan.
6. Sluit de USB 3.0 kabel op een vrije USB (3.0) poort van de computer aan.
7. Sluit de smalle plug van de USB kabel op de mini USB aansluiting van de
EW7016 aan.
8. Sluit de stekker van de stroomadapter op een stopcontact aan.
9. De ‘Nieuwe hardware gevonden wizard’ kan verschijnen. Als Windows vraagt om
‘Verbinding met het internet te maken om te zoeken naar updates,’ dien je dit niet
toe te staan.
10. Klik op ‘Volgende’.’
11. Selecteer ‘Installeer de software automatisch (Aanbevolen).
12. Klik op ‘Volgende’ en volg de stappen die op het scherm worden getoond.
4.3 USB apparaten veilig verwijderen
Gebruik de onderstaande instructies om het apparaat veilig te verwijderen.
1. Dubbelklik op het ‘veilig verwijderen icoontje’ dat in de taakbalk staan, vlak bij de
klok.
2. Selecteer de EW7016 (USB apparaat voor massaopslag) en klik op ‘Stoppen’.
3. Klik op ‘OK’ om dit te bevestigen.
4. Ontkoppel de harde schijf, CD-ROM of DVD-speler van de EW7016.
5.0 Harde schijf klaar maken voor gebruik
Als je een harde schijf voor de eerste keer gebruikt, dient je deze zichtbaar te maken,
ook wel ‘initialiseren’ genoemd, voordat Windows met deze schijf kan werken. Gebruik
de volgende stappen om de harde schijf te initialiseren.
5.1 De harde schijf gereed maken voor gebruik met
Windows 2000/XP/Vista
1. Klik met je rechter muisknop op ‘Deze computer’.
2. Klik op ‘Beheren’.

6|NEDERLANDS
3. Klik links in het menu op ‘Schijfbeheer’.
4. Klik met de rechter muisknop op de nieuwe schijf en selecteer ‘Initialiseren’.
5. Klik op ‘OK’.
6. Klik met de rechter muisknop op de nieuwe schijf.
7. Klik op ‘Nieuwe Partitie’.
8. Klik op ‘Volgende’.
9. Klik op ‘Volgende’.
10. Klik op ‘Volgende’.
11. Selecteer de gewenste omvang van de partitie (NB: voor FAT32 geldt maximaal
32GB per partitie).
12. Klik op ‘Volgende’.
13. Je kunt nu kiezen welke schijfletter je wilt toekennen aan de nieuwe partitie.
14. Klik op ‘Volgende’.
15. Selecteer het gewenste bestandssysteem: FAT32 of NTFS.
Tip! Als je de schijf alleen op Windows 2000, XP, Vista of 7 systemen gaat gebruiken
raden wij gebruik van het NTFS bestandssysteem aan.
16. Vul bij 'Volume label' de naam van de nieuwe partitie in.
17. Zet een vinkje bij ‘Snel formatteren’.
18. Klik op ‘Volgende’.
19. Klik op ‘Voltooien’.
20. De harde schijf is nu klaar om gebruikt te worden.
5.2 De harde schijf gereed maken voor gebruik met
Windows 7
1. Klik op ‘Start’.
2. Klik op het ‘Configuratiescherm’.
3. Klik op ‘Systeem en beveiliging’.
4. Klik op ‘Beheren’.
5. Klik op ‘Schijfbeheer’. Windows 7 geeft ook vaak zelf al aan dat de schijf
geinitialiseerd dient te worden.
6. Klik met de rechtermuisknop op ‘Nieuw volume’.
7. Klik op ‘Volgende’.
8. De ‘nieuwe volume wizard’ verschijnt.
9. Klik op ‘Volgende’.
10. Kies de gewenste hoeveelheid schijfruimte.
11. Klik op ‘Volgende’.
12. Selecteer een schijfletter bij ‘schijfletter selecteren’.Select a drive letter at ‘Assign
a drive letter’.
13. Klik op ‘Volgende’.
14. Kies het gewenste bestandsformaat.
15. Klik op ‘Volgende’.
16. Klik op ‘Voltooien’.

7|NEDERLANDS
17. Het kan zijn dat Windows aangeeft dat er een nieuw station is gevonden.
18. De harde schijf is nu klaar voor gebruik.
6.0 Back-up functie
De EW7016 is voorzien van een back-up knop. Wanneer je deze knop gebruikt kun je
met een druk op de knop een back-up van je data maken. Om deze functie te kunnen
gebruiken dien je de bijgeleverde PC Clone EX software te installeren.
6.1 De PC Clone Ex software installeren
1. Plaats de installatie CD-ROM in de CD-ROM of DVD-speler van je computer.
2. Kies je taal en klik op ‘Volgende’.
3. Kies ‘Installeer PC Clone EX’ software.
4. Volg de stappen die op het scherm worden getoond om de installatie te
voltooien.
6.2 De back-up software gebruiken en een back-up maken
Er zijn twee methodes om een back-up te maken met de EW7016. Je kunt de
software gebruiken of je kunt een back-up maken door de ‘Back-up’ knop van de
EW7016 te gebruiken. In de onderstaande stappen leggen we uit hoe de verschillende
methodes werken en hoe deze gebruikt kunnen worden.
6.2.1 De Back-up knop van de EW7016 gebruiken.
1. Druk eenmaal op de ‘Backup’ knop van de EW7016.
2. De PC Clone EX software wordt gestart.
3. Druk nogmaals op de ‘Backup’ knop om de back-up te starten.
4. De EW7016 maakt nu een back-up van de data die op de harde schijf van je
computer staat.
5. Wanneer de back-up voltooid is, klik je op ‘OK’.
6.2.2 Een back-up maken met de PC Clone EX software
1. Klik op ‘Start’.
2. Klik op ‘Programma’s of ‘Alle Programma’s.
3. Selecteer ‘PC Clone EX’.
4. Klik op ‘PC Clone EX’. Het is mogelijk dat je daarna het ‘PC Clone EX’ icoontje in
de taakbalk dient aan te klikken om de software te starten.
5. Klik op het tweede icoontje van het menu (Back-up bestanden).
6. Selecteer de bron aan de linkerkant. Als je een map selecteert waar submappen
in aanwezig zijn, dan wordt de gehele map inclusief onderliggende structuur
meegenomen in de back-up.
7. Selecteer de bestemming aan de rechterkant van het scherm.
8. Klik op het ‘Back-up bestanden’ icoontje onderaan het menu.
9. Klik op ‘Start’. De back-up wordt nu gestart.
10. Wanneer de back-up voltooid is, klik je op ‘OK’.

8|NEDERLANDS
6.2.3 Back-up herstellen
Je kunt ook gebruik maken van de herstelfunctie van de PC Clone EX software. Deze
functie is feitelijk een incrementele back-up functie. Dit is een zeer handige functie die
alleen aan back-up maakt van de bestanden die ten opzichte van de vorige back-up
zijn gewijzigd. Dit is ideaal aangezien er dan geen volledige back-up gemaakt hoeft te
worden wat veel tijdsbesparing kan opleveren.
1. Klik op ‘Start’.
2. klik ‘Programs’ of ’Alle Programma’s’.
3. Selecteer ‘PC Clone EX’.
4. Klik op ‘PC Clone EX’. Het is mogelijk dat je daarna het ‘PC Clone EX’ icoontje in
de taakbalk dient aan te klikken om de software te starten.
5. Klik op het tweede icoontje in de taakbalk (Back-up Bestanden).
6. Als er nog geen selectie is gemaakt van de bron bestanden maak je een selectie
van de mappen en bestanden waarvan je een back-up wilt maken.
7. Selecteer de bestemming aan de rechterkant van het scherm.
8. Klik op het ‘Restore’ icoontje.
9. Wanneer de back-up is voltooid, klik je op ‘OK’.
7.0 Veelgestelde vragen en andere relevante
informatie
De meest recente veelgestelde vragen voor je product kun je vinden op de
supportpagina van je product. Ewent zal deze veelgestelde vragen regelmatig
bijwerken zodat je bent voorzien van de meest recente informatie. Bezoek de Ewent
website voor meer informatie: www.ewent-online.com
8.0 Service en ondersteuning
Deze handleiding is door de technische experts van Ewent met zorg opgesteld.
Mocht je desondanks problemen ervaren bij de installatie of in het gebruik van je
Ewent product, vul dan het supportformulier in op de website www.ewent-
online.com/support
Je kunt tevens gebruik maken van het Ewent servicenummer. Bel 0900-EWENT
(0900-3646368, 45ct per minuut*) of, in geval je woonachtig bent in Vlaanderen 070
277 286 (30ct per minuut*).
*Exclusief de kosten voor het gebruik van je mobiele telefoon.

9|NEDERLANDS
9.0 Waarschuwingen en aandachtspunten
Vanwege wet- en regelgeving bepaald door het Europese parlement, kan sommige
(draadloze) apparatuur onderhevig zijn aan beperkingen omtrent het gebruik in
bepaalde Europese lidstaten. In sommige Europese lidstaten kan het gebruik van
deze apparatuur verboden zijn. Neem contact op met je (lokale) overheid voor meer
informatie over deze beperkingen.
Volg ten allen tijde de instructies in de handleiding, speciaal wanneer het apparatuur
betreft wat geassembleerd dient te worden.
Waarschuwing: In de meeste gevallen gaat het om een elektronisch apparaat.
Verkeerd of oneigenlijk gebruik van het apparaat kan leiden tot (zware) verwondingen.
Het repareren van het apparaat dient uitgevoerd te worden door gekwalificeerd Ewent
personeel. De garantie vervalt per direct indien het apparaat zelf gerepareerd is en/of
wanneer het product misbruikt is. Voor uitgebreide garantie voorwaarden, ga naar
www.ewent-online.com/garantie

10 |NEDERLANDS
10.0 Garantievoorwaarden
De garantietermijn van vijf jaar geldt voor alle Ewent producten, tenzij anders
aangegeven op het moment van aankoop. Bij aankoop van een tweedehands Ewent
product resteert de garantieperiode gemeten vanaf het moment van de aankoop door
de eerste eigenaar. De Ewent garantieregeling is van toepassing op alle Ewent
producten en onderdelen onlosmakelijk verbonden met het betreffende product.
Voedingen, batterijen, accu’s, antennes en alle andere producten niet geïntegreerd in
of direct verbonden met het hoofdproduct of producten waarvan redelijkerwijs mag
worden aangenomen dat deze een ander slijtagepatroon kennen dan het
hoofdproduct vallen derhalve niet onder de Ewent garantieregeling. De garantie
vervalt tevens bij onjuist of oneigenlijk gebruik, externe invloeden en/of bij opening van
de behuizing van het betreffende product door partijen anders dan Ewent.
11.0 Verklaring van Overeenstemming
Om u te verzekeren van een veilig product conform de richtlijnen opgesteld door de
Europese Commissie kunt u een kopie van de Verklaring van Overeenstemming met
betrekking tot uw product opvragen door een e-mailbericht te sturen naar:
Ewent
Postbus 276
6160 AG Geleen
Nederland
Vermeld bij uw aanvraag duidelijk ‘Verklaring van Overeenstemming’ en het
artikelnummer van het product waarvan u de Verklaring van Overeenstemming
opvraagt.
EW7016 | 11-2012

11 |ENGLISH
EW7016 - USB 3.0 to IDE / SATA Converter
Table of contents
1.0 Introduction .........................................................................................................11
1.1 Functions and features....................................................................................11
1.2 Packing contents.............................................................................................12
2.0 Ports and indication LED’s...................................................................................12
3.0 Installation of the EW7016...................................................................................13
3.1 Windows 2000/XP/Vista/Windows 7 ................................................................13
4.0 Connecting a hard disk or CD-ROM/DVD player..................................................13
4.1 Connecting an IDE hard disk or IDE CD-ROM/DVD player..............................13
4.2 Connecting a SATA hard disk or SATA CD-ROM/DVD player .........................14
4.3 Safely remove a USB device...........................................................................14
5.0 Preparing a hard disk for usage...........................................................................14
5.1 Preparing the hard disk for use with Windows 2000/XP/Vista ..........................14
5.2 Preparing the hard disk for use with Windows 7...............................................15
6.0 Backup function...................................................................................................15
6.1 Installation of the PC Clone Ex software..........................................................16
6.2 Using the backup software and make a backup...............................................16
6.2.1 Using the backup button of the EW7016....................................................16
6.2.2 Making a backup with the PC Clone EX software ......................................16
6.2.3 Restore a backup ......................................................................................16
7.0 Frequently Asked Questions................................................................................17
8.0 Service and support.............................................................................................17
9.0 Warning and points of attention ...........................................................................18
10.0 Warranty conditions...........................................................................................19
11.0 Declaration of Conformity ..................................................................................19
1.0 Introduction
Congratulations with the purchase of this high-quality Ewent product! This product
has undergone extensive testing by Ewent’s technical experts. Should you
experience any problems with this product, you are covered by a five-year Ewent
warranty. Please keep this manual and the receipt in a safe place.
Register your product now on www.ewent-online.com and receive product updates!
1.1 Functions and features
With the Ewent EW7016 USB 3.0 to SATA/IDE Converter, you can easily connect a
hard disk, CD-ROM player, DVD-ROM player or burner to your computer. The ideal
solution if you do not want to open your case to mount a new device!
12 |ENGLISH
The EW7016 has a stylish black design which perfectly matches the desk of the
modern computer user. Thanks to it’s compact design, the EW7016 is also very
suitable to be used when you are on the road.
The EW7016 has a connector on each side of the device itself. Thanks to these
connections, the EW7016 is compatible with almost all hard disks, CD-ROM players
and DVD players. The EW7016 is also equipped with a super fast USB 3.0 port. Using
USB 3.0, you can obtain 10 times the speeds of USB 2.0. Of course, the EW7016 is
fully compliant with USB 2.0. This means the EW7016 can be used on computers
which only have USB 2.0 ports.
The EW7016 is supplied with a energy efficient power supply which is able to power
your devices.
1.2 Packing contents
The following parts need to be present in the packing:
EW7016 USB 3.0 to SATA/IDE converter
USB 3.0 to mini USB 3.0 cable
SATA cable
SATA power cable
IDE power cable
Power supply
Power converter
CD-ROM with PC Clone EX software and manual
2.0 Ports and indication LED’s
(1)
2.5” IDE connector.
(2)
3.5” IDE connector.
(3)
SATA connector.
(4)
Mini USB port.
LED
Will be lit when the EW7016 is powered.

13 |ENGLISH
3.0 Installation of the EW7016
3.1 Windows 2000/XP/Vista/Windows 7
From Windows 2000 and up, Windows has built-in drivers for the EW7016. When
using these Windows versions there is no need to install drivers. Windows will install
the correct driver(s) automatically the moment you connect the hardware. Refer to the
following chapter for detailed information how to connect the EW7016.
4.0 Connecting a hard disk or CD-ROM/DVD
player
We recommend that you make a backup of the hard disk you wish to use. Ewent can
not be held responsible should any loss or damage of data occur resulting in the
installation or use of this device. Ewent advises you to disconnect the EW7016 from
your computer before connecting a hard disk, CD-ROM or DVD player.
4.1 Connecting an IDE hard disk or IDE CD-ROM/DVD
player
If you use an IDE hard device, you have to set the hard disk to ‘Master’. Refer to the
label on your hard disk or CD-ROM/DVD player for more information on these
settings.
1. Connect the power cable to the power converter.
2. Connect the IDE power cable to the power converter.
3. Connect the other side of the IDE power cable to the power connection of the
IDE disk or CD-ROM/DVD player (Molex).
4. Connect an IDE cable to the IDE hard disk or CD-ROM/DVD player.
5. If you are using a 2.5 inch IDE hard disk: Connect the other side of the IDE cable
to the 2,5 inch IDE connector of the EW7016 (1.). In case you are using a 3.5
inch IDE hard disk: Connect the IDE cable to the 3.5 inch IDE connector of the
EM1016.
6. Connect the USB 3.0 cable to a free USB (3.0) port of your computer.
7. Connect the small plug of the USB 3.0 cable to the USB connection of the
EW7016.
8. Connect the power adapter to a wall outlet.
9. The ‘Wizard New Hardware’ may appear. Should you see the following message:
‘Is Windows Allowed to make a connection to Windows Update to search for
software?’, select ‘No, not now’.
10. Click ‘Next’
11. Select ‘Install the software automatically (recommended)’.
12. Click ‘Next’ and follow the steps shown on screen.

14 |ENGLISH
4.2 Connecting a SATA hard disk or SATA CD-ROM/DVD
player
1. Connect the power cable to the power converter.
2. Connect the SATA power cable to the power converter.
3. Connect the other end of the SATA power cable to the corresponding SATA
connector of the hard disk or CD-ROM/DVD player.
4. Connect the SATA cable to the corresponding SATA connector of the SATA hard
disk or CD-ROM/DVD player.
5. Connect the other side of the SATA cable to the SATA connection of the
EW7016.
6. Connect the USB 3.0 cable to a free USB (3.0) port of the computer.
7. Connect the small plug of the USB (3.0) cable to the USB connection of the
EW7016.
8. Connect the power supply to a wall outlet.
9. The ‘Wizard New Hardware’ may appear. Should you see the following message:
‘Is Windows Allowed to make a connection to Windows Update to search for
software?’, select ‘No, not now’.
10. Click ‘Next’.
11. Select ‘Install the software automatically (recommended)’.
12. Click ‘Next’ and follow the steps shown on screen.
4.3 Safely remove a USB device
Follow the instructions below to safely disconnect a device from the EW7016.
1. Double-click the ‘Safely remove hardware’ icon in the taskbar, near the clock.
2. Select the EW7016 (USB device for mass storage) and click ‘Stop’.
3. Click ‘OK’ to confirm.
4. Disconnect the hard disk, CD-ROM player or DVD-player from the EW7016.
5.0 Preparing a hard disk for usage
When using a hard disk for the first time, you need to initialize the hard disk in order to
make the hard disk ‘visible’. Use the following steps to initialize the hard disk.
5.1 Preparing the hard disk for use with Windows
2000/XP/Vista
1. Right click the ‘My Computer’ icon.
2. Click ‘Manage’.
3. Select the option ‘Disk Management’ from the left side of the screen.
4. Right click the new hard disk and choose ‘Initialize’.
5. Click ‘Ok’.
6. Right click the new hard disk.
7. Click ‘New Partition’.

15 |ENGLISH
8. Click ‘Next’.
9. Click ‘Next’.
10. Click ‘Next’.
11. Choose the desired partition format (Note: when using FAT32 the partition size is
limited to 32GB).
12. Click ‘Next’.
13. Select the drive letter you wish to assign to this partition (this is not required).
14. Click ‘Next’.
15. Select the desired file system: FAT32 or NTFS.
Note! If you only use the hard disk on Windows XP or Vista systems we recommend
you to select the NTFS file system.
16. Enter a name for the new partition in the field 'Volume label'
17. Enable the checkbox at ‘Quick format’.
18. Click ‘Next’.
19. Click ‘Finish’.
20. The hard disk is now ready to be used.
5.2 Preparing the hard disk for use with Windows 7
1. Click ‘Start’.
2. Click ‘Control Panel’.
3. Click ‘System and security’.
4. Click ‘Manage’.
5. Click ‘Disk Management’.
6. Right-click ‘New volume’.
7. Click ‘Next’.
8. The wizard ’New Volume’ appears,
9. Click ‘Next’.
10. Choose the desired partition format.
11. Click ‘Next’.
12. Select a drive letter at ‘Assign a drive letter’.
13. Click ‘Next’.
14. Choose the desired file system.
15. Click ‘Next’.
16. Click ‘Finish’.
17. The notification ‘New Volume found’ may appear’.
18. The hard disk is now ready to be used.
6.0 Backup function
The EW7016 is equipped with a backup button. When using this button, you are able
to make a backup of the data. In order to use this function you have to install the
supplied PC Clone Lite software.

16 |ENGLISH
6.1 Installation of the PC Clone Ex software
1. Place the installation disk in your CD-ROM player or DVD player. The installation
disk will start automatically.
2. Choose your language and click ‘Next’.
3. Choose ‘Install PC Clone EX software’.
4. Follow the steps shown on screen to complete the installation.
6.2 Using the backup software and make a backup
There are two methods to make a backup with the EW7016. You can use the PC
Clone EX software to make a backup, or you can use the handy ‘Backup button’ of the
EW7016 itself. During the following examples we will explain how you can use these
two methods.
6.2.1 Using the backup button of the EW7016.
1. Press the ‘Backup’ button of the EW7016 once.
2. The PC Clone EX software will be started.
3. Press the backup button again to start a backup.
4. The EW7016 will now make a backup of your computer’s hard disk.
5. Click ‘OK’ to confirm the backup has finished.
6.2.2 Making a backup with the PC Clone EX software
1. Click ‘Start’.
2. Click ‘Programs’ or ’All programs’
3. Select ‘PC Clone EX’.
4. Click ‘PC Clone EX’. You may need to click the ‘PC Clone EX’ icon to start the
software.
5. Click the second icon in the menu tray (Files Backup).
6. Select the source at the left column. When selecting the first folder, all the
subfolders and directories available in this folder will be saved in a backup.
7. Select the destination at the right column.
8. Click at the bottom of the screen on the first icon called ‘Backup’.
9. Click ‘Start’. The backup will now start.
10. Click ‘OK’ to confirm the backup has finished.
6.2.3 Restore a backup
You can also use the restore function of the PC Clone EX software. This function
actually is an incremental backup function. This is a very convenient function which
only saves the changed data. Because only the changed data will be saved, there is
no need to make a complete backup again and this can save a lot of time.
1. Click ‘Start’.
2. Click ‘Programs’ or ’All programs’.
3. Select ‘PC Clone EX’.

17 |ENGLISH
4. Click ‘PC Clone EX’. You may need to click the ‘PC Clone EX’ icon to start the
software.
5. Click the second icon in the system tray (Files backup).
6. Now, select the desired files and folders you want to backup at the left side of the
screen if not selected yet.
7. Select the destination at the right column.
8. Click the ‘Restore’ icon.
9. When finished, click ‘OK’ to confirm.
7.0 Frequently Asked Questions
The latest Frequently asked questions for your product can be found on the support
page of your product. Ewent will update these pages frequently to assure you have
the most recent information. Visit www.ewent-online.com for more information about
your product.
8.0 Service and support
This users manual has been carefully written by Ewent’s technical experts. If you have
problems installing or using the product, please fill out the support form at the website
www.ewent-online.com/support
You can also contact us by phone. Below you will find a list with phone numbers for
each supported country.
Country
Phone number
Rate per minute*
Belgium (Dutch)
070 277 286
€0.30
Belgium (French)
070 277 286
€0.30
Denmark
+45 69918565
Local Costs
Finland
+35 8942415826
Local Costs
Germany
(+49) (0)30 887
89 298
Local Costs
Italy
+39 0240042016
Local Costs
Norway
+47 21075033
Local Costs
Spain
807 080 042
€0.41
Sweden
+46 840 309985
Local Costs
The Netherlands
0900-3646368
€0.45
UK
(+44) (0)203 318
9998
Local Costs
Hungary
1-4088902 (From
Budapest)
Local Costs
Hungary
06-1-4088902
(From the rest of
Hungary)
Local Costs
Hungary
+36 1-4088902
Local Costs

18 |ENGLISH
(International)
* Rates mentioned in this table do not include cell phone charges.
9.0 Warning and points of attention
Due to laws, directives and regulations set out by the European parliament, some
(wireless) devices could be subject to limitations concerning its use in certain
European member states. In certain European member states the use of such devices
could be prohibited. Contact your (local) government for more information about this
limitations.
Always follow up the instructions in the manual, especially where it concerns devices
which need to be assembled.
Warning: In most cases this concerns an electronic device. Wrong/improper use may
lead to (severe) injuries!
Repairing of the device should be done by qualified Ewent staff. The warranty
immediately voids when products have undergone self repair and/or by misuse. For
extended warranty conditions, please visit our website at www.ewent-
online.com/warranty

19 |ENGLISH
10.0 Warranty conditions
The five-year Ewent warranty applies to all Ewent products unless mentioned
otherwise before or during the moment of purchase. When having bought a second-
hand Ewent product the remaining period of warranty is measured from the moment
of purchase by the product’s first owner. The Ewent warranty applies to all Ewent
products and parts inextricably connected to and/or mounted on the main product.
Power supply adapters, batteries, antennas and all other products not integrated in or
directly connected to the main product and/or products of which, without reasonable
doubt, can be assumed that wear and tear show a different pattern than the main
product are not covered by the Ewent warranty. Products are not covered by the
Ewent warranty when subjected to incorrect/improper use, external influences and/or
when opened by parties other than Ewent.
11.0 Declaration of Conformity
To ensure your safety and compliance of the product with the directives and laws
created by the European Commission you can obtain a copy of the Declaration of
Conformity concerning your product by sending an e-mail message to: ewent@ewent-
online.com. You can also send a letter to:
Ewent
PO Box 276
6160 AG Geleen
The Netherlands
Clearly state ‘Declaration of Conformity’ and the article code of the product of which
you would like to obtain a copy of the Declaration of Conformity.
EW7016 | 11-2012

20 |FRANÇAIS
EW7016 - Convertisseur USB 3.0 à IDE / SATA
Table des matières
1.0 Introduction .........................................................................................................20
1.1 Fonctions et caractéristiques...........................................................................20
1.2 Contenu de la boîte.........................................................................................21
2.0 Ports et voyants DEL...........................................................................................21
3.0 Installation du EW7016........................................................................................22
3.1 Windows 2000/XP/Vista/Windows 7 ................................................................22
4.0 Connexion d'un disque dur ou d'un lecteur CD-ROM/DVD...................................22
4.1 Connexion d'un disque dur IDE ou d'un lecteur CD-ROM/DVD IDE.................22
4.2 Connexion d'un disque dur SATA ou d'un lecteur CD-ROM/DVD SATA..........23
4.3 Déconnexion en sécurité d’un périphérique USB.............................................23
5.0 Préparation d'un disque dur avant utilisation........................................................23
5.1 Préparation du disque dur pour Windows 2000/XP/Vista.................................23
5.2 Préparation du disque dur pour Windows 7 .....................................................24
6.0 Fonction de sauvegarde......................................................................................25
6.1 Installation du logiciel PC Clone Ex .................................................................25
6.2 Utilisation du logiciel de sauvegarde et faire une sauvegarde..........................25
6.2.1 Utilisation du bouton de sauvegarde du EW7016.......................................25
6.2.2 Faire une sauvegarde avec le logiciel PC Clone EX ..................................25
6.2.3 Restaurer une sauvegarde ........................................................................26
7.0 Questions fréquentes ..........................................................................................26
8.0 Service et support................................................................................................26
9.0 Avertissements et mises en garde.......................................................................27
10.0 Conditions de garantie.......................................................................................28
11.0 Déclaration de conformité.................................................................................28
1.0 Introduction
Nous vous félicitons d’avoir acheté ce produit Ewent de haute qualité ! Ce produit a
fait l’objet de tests intensifs, réalisés par les techniciens experts d’Ewent. Si vous avez
des problèmes avec ce produit, vous êtes couvert par une garantie de cinq ans de
Ewent. Veuillez garder ce manuel ainsi que la preuve d’achat dans un endroit sûr.
Enregistrez maintenant votre produit sur www.ewent-online.com pour pouvoir
recevoir les mises à jour de votre produit !
1.1 Fonctions et caractéristiques
Avec le convertisseur USB 3.0 à SATA / IDE Ewent EW7016 vous pouvez facilement
connecter un disque dur, un lecteur CD-ROM, un lecteur DVD-ROM ou un graveur à
Table of contents
Languages:
Other Ewent Media Converter manuals


