Exagerate XCAM720HDS User manual

Sport Action Camera
720P HD Action Camera
User Manual
XCAM720HDS
www.hamletcom.com

2
Dear Customer,
thanks for choosing a Hamlet product. Please carefully follow the instructions for its use and
maintenance and, once this item has run its life span, we kindly ask You to dispose of it in an
environmentally friendly way, by putting it in the separate bins for electrical/electronic waste, or to
bring it back to your retailer who will collect it for free.
WEEE Information (For European Union member users)
According to the WEEE (Waste Electrical and Electronic Equipment) Directive, do not dispose of
this product as household waste or commercial waste. Waste electrical and electronic equipment
should be appropriately collected and recycled as required by practices established for your
country. For information on recycling of this product, please contact your local authorities, your
household waste disposal service or the shop where you purchased the product.
We inform You this product is manufactured with materials and components in compliance with
RoHS Directive 2011/65/EU, with WEEE Directives 2002/96/CE, 2003/108/CE Italian Legislative
Decree 2005/151 and EMC Directive 2014/30/EU for the following standards:
EN 55022: 2010 / AC: 2011
EN 61000-3-2: 2014
EN 61000-3-3: 2013
EN 55024: 2010
EN 60950-1: 2006 + A11: 2009 + A1: 2010 + A12: 2011 + A2: 2013
The complete CE declaration of conformity of the product can be obtained by contacting Hamlet at
info@hamletcom.com specifying the product code and the documentation.
The information on the importer for your country are available in the “About Us” section of the
Hamlet website at www.hamletcom.com.
About this manual
This manual is provided for information purpose only. Contents, specifications and appearance of
the product are indicative and may change without notice.
Trademarks
All trademarks and company names mentioned in this manual are used for description purpose
only and remain property of their respective owners.
Safety Instructions
• Keep the unit away from moisture and extreme heat sources.
• Do not use the unit if it has been dropped or damaged in any way.
• Repairs to electrical equipment should only be performed by a qualified electrician. Improper
repairs may place the user at serious risk.
• Do not put objects into any of the openings.
• Keep the unit free from dust.
• Do not use this unit for anything other than its intended use.
• Keep the unit out of reach of children.
• This appliance is not a toy.

3
INTRODUCTION
Exagerate Sport Action Cam is a compact and lightweight action camera with a built-in 2-inch LCD
display ideal for capturing your adventures. The HD video resolution and 110° wide angle lens
allows impressive shooting. The supplied waterproof case allows underwater use up to 30 meters
and provides protection against shock and dust in every other situation of use. The several
accessories provided offer multiple mounting solutions during the practice of various sport
activities. The rechargeable lithium battery provides up to 90 minutes of video recording.
Key Features
• LCD 2” Display
• Camera lens: 110° Wide Angle
• Focus: 20cm ~ Infinite
• Image Resolution: 12M/10M/8M/5M/3M/2M/1M/VGA
• Video Resolution: 1080P (1920x1080) 20fps, 720P (1280x720) 30fps; VGA (640x480)
• Image file format: JPG
• Video file format: AVI
• Electronic Shutter
• Shooting Mode: Single Mode/Continuous Mode
• Self Timer: 2s, 10s
• Exposure Compensation: -2.0 to +2.0 EV
• Built-in Microphone & Speaker
• Interface: Micro USB 2.0
• Storage Memory: Micro SD HC Class 10 card up to 32GB
• Removable Lithium Battery: 3.7V 750mAh
• Waterproof Case: up to 30 meters underwater
• Dimensions: 59 x 30 x 41 mm
• Weight: 55 g (with battery)
Package Contents
• Action HD Camera
• Waterproof Protective Case
• Micro USB Cable
• Removable Lithium Battery
• 18 Accessories Kit
• User’s Manual
4
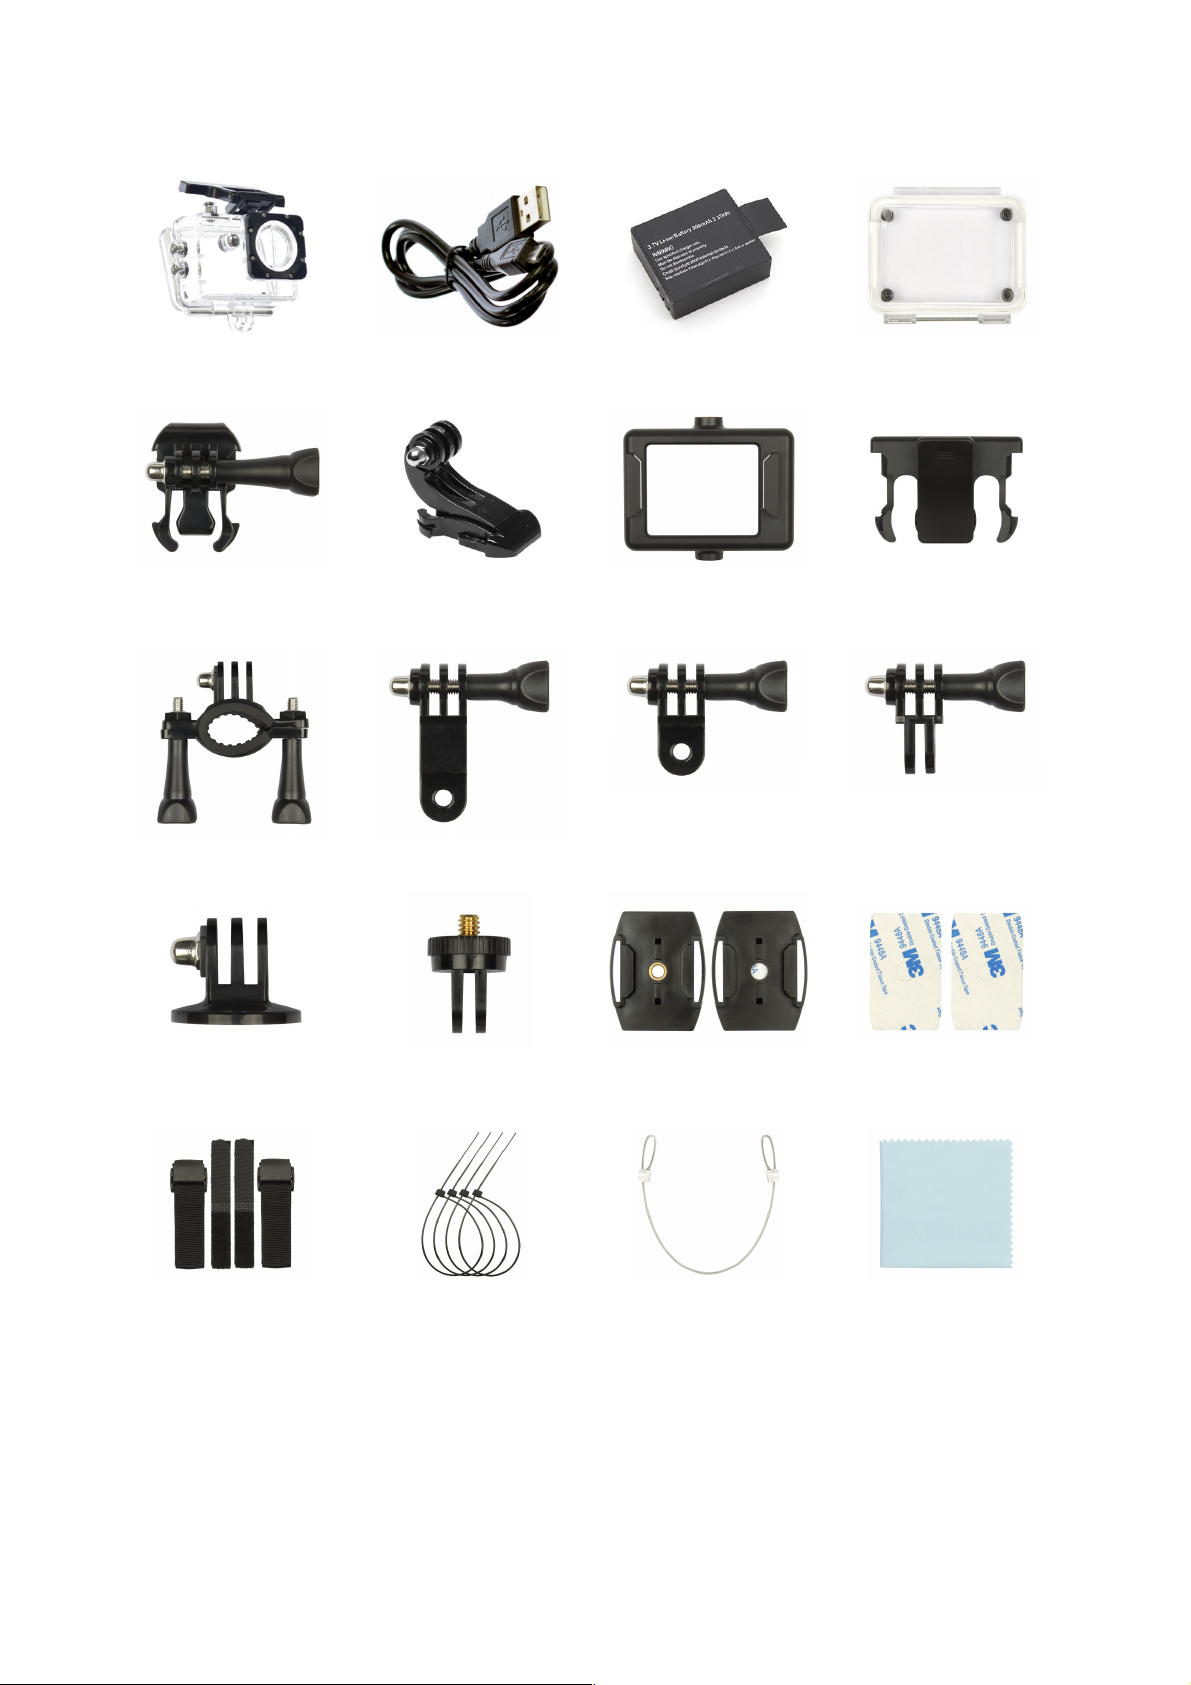
Included Accessories
Waterproof case
USB cable
Lithium battery
Replacement cover
for waterproof case
Quick release
mounting buckle
Quick release J-Hook
mounting buckle
Frame mount
Frame mount back
clip
Handlebar mount
Pivot arm mount
Pivot arm mount
Pivot arm mount
Tripod mount
Tripod mount adapter
Flat adhesive mount
(x2)
Adhesive tape (x2)
Strap set (x4)
Cable ties (x4)
Safety wire
Cleaning cloth
5
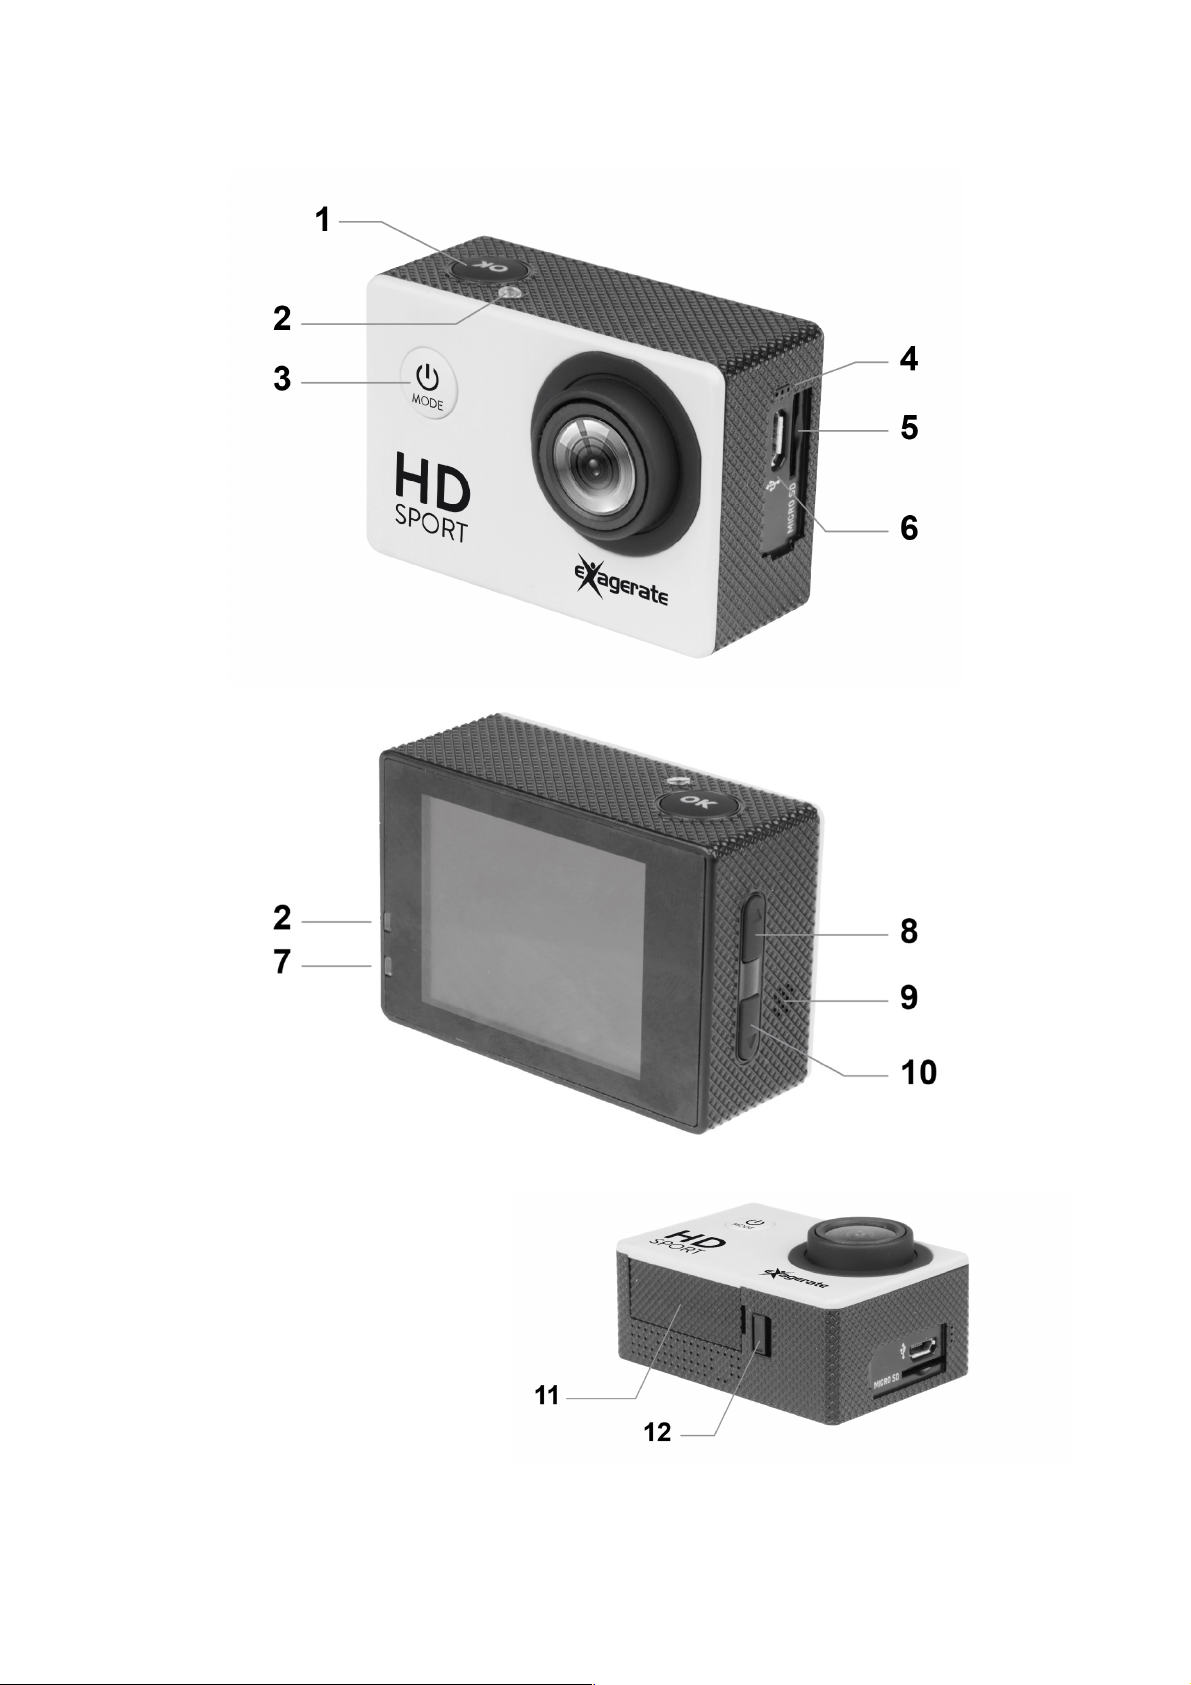
Description of Parts
1. OK/Shutter button
2. Status LED indicators (Red)
3. Power/Mode button
4. Microphone
5. Micro SD card slot
6. Micro USB port
7. Charging LED indicator (Blue)
8. Up button
9. Speaker
10. Down button
11. Battery cover
12. Battery cover lock
6
INSTRUCTIONS FOR USE
Installing the Battery
1. Slide the battery cover lock towards the arrow indicator next to it.
2. Take off the battery cover and insert the lithium battery as per indicated polarity.
3. Replace the battery cover, securely.
Charging the Battery
1. Plug the Micro USB connector of the provided USB cable into the Micro USB port of the
camera.
2. Connect the other end of the cable either to a computer USB Port or a suitable USB wall
charger.
3. While charging is in process, the charging LED indicator turns Blue.
4. When the battery is fully charged, the charging LED indicator turns off.
NOTE: Camera can be charged even when it is powered off. Usually, it takes about 4 hours to fully
charge the battery.
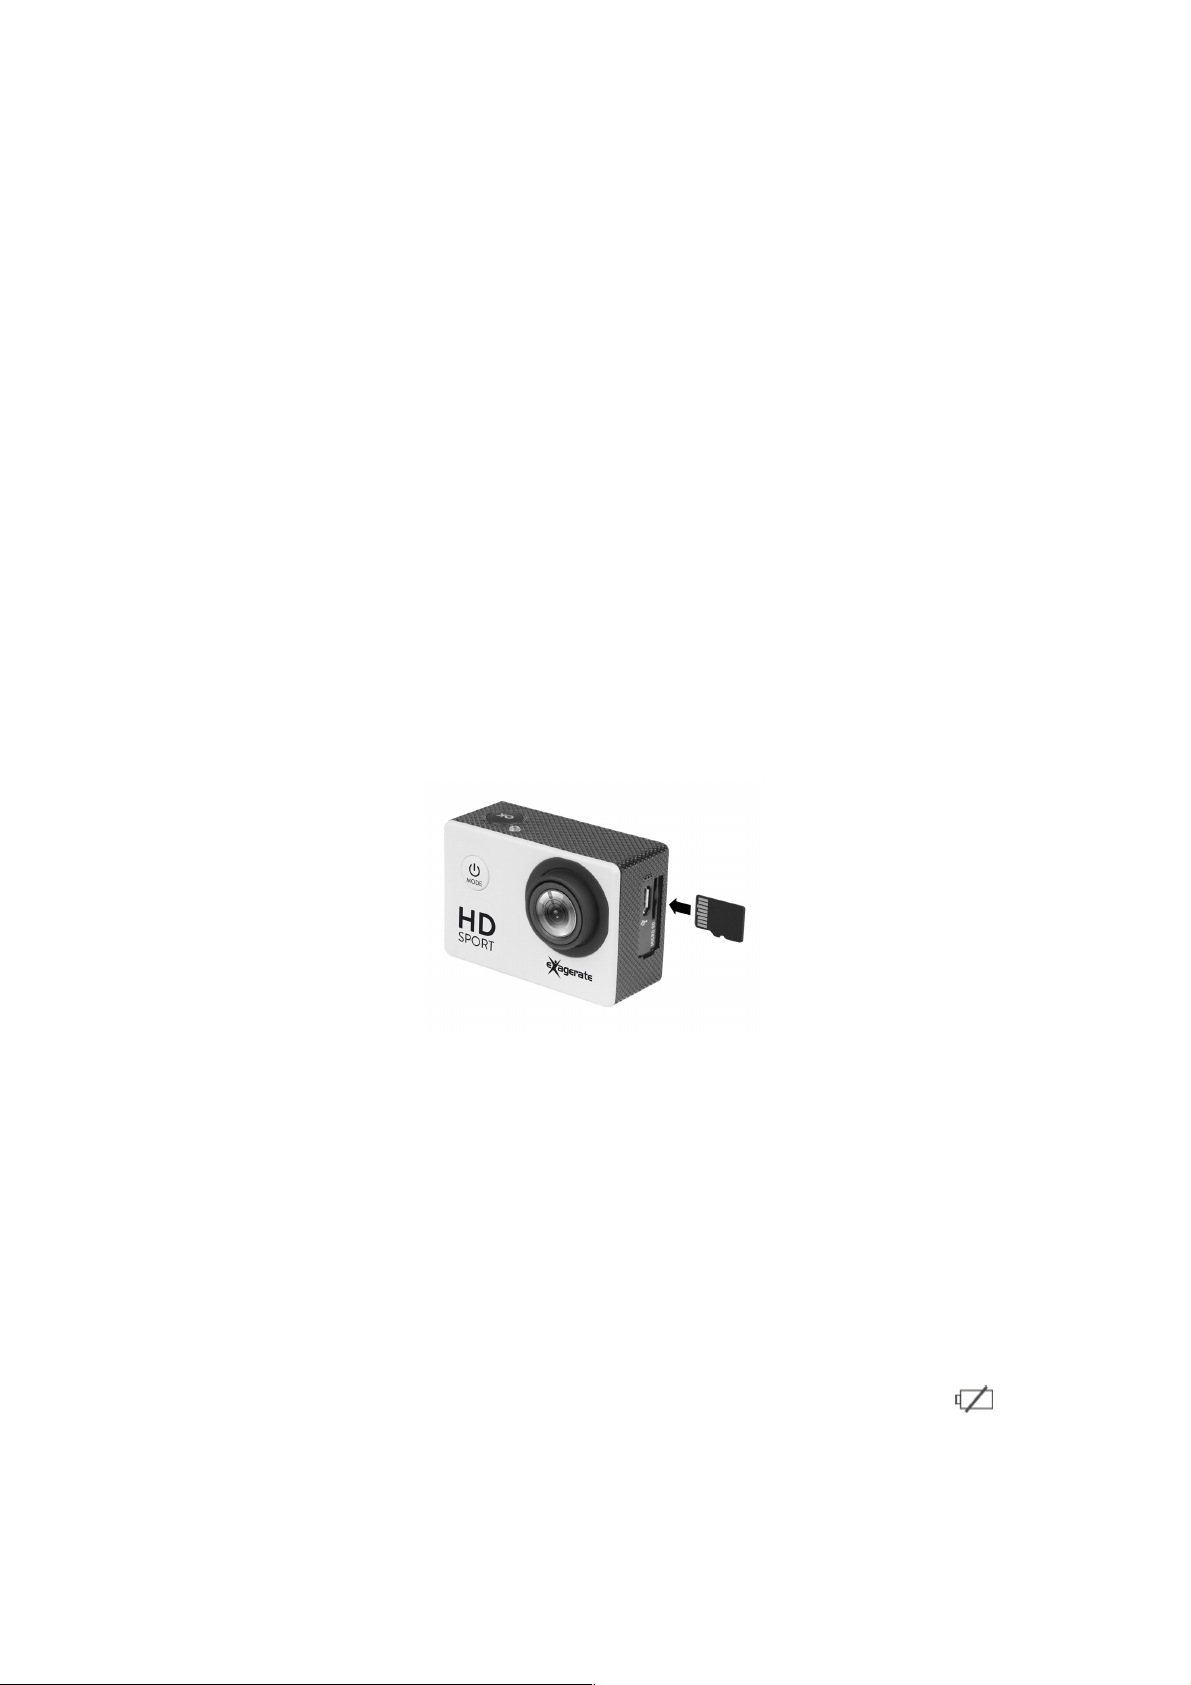
Installing the Memory Card
1. Insert a Micro SD Card into the card slot with the golden contacts facing the camera lens until it
clicks into place.
2. To take the Micro SD card out, gently press the end of the memory card inwards and the card
will be ejected from the card slot.
NOTE
The camera is not equipped with built-in memory, therefore a memory card is required all the time.
We recommend a Micro SD card with a Class 10 speed rating for best performance.
To avoid lose any data, only remove or insert your card while the camera is off.
Power ON/OFF
• Power On: Press the Power/Mode button to turn the camera on.
The red LED indicators will light up.
• Power Off: Press and hold the Power/Mode button for few seconds to turn the camera off.
• Automatic power off: Camera turns off automatically, when it reaches the idle time set up by
the user in the Auto Power Off settings of the camera.
• Power off due to low battery: In case of extremely low battery, the low battery icon may
appear on the LCD screen. The camera will then automatically power off. Please recharge the
battery.
7
CAMERA OPERATION MODES
The camera features three operation modes: Video, Photo and Playback mode.
Once the camera is powered on, user can switch between modes by pressing the Power/Mode
button in the front of the camera.
The operation modes appear in the following order:
Video: Record videos.
Photo: Capture still pictures.
Playback: Playback recorded Videos and Pictures.
VIDEO MODE
To record a video, press the Power/Mode button repeatedly until the Video mode icon is displayed
on the top-left corner of the LCD screen.
Press the OK/Shutter button to start recording. The red LED indicators will flash while recording.
Press the OK/Shutter button again to stop recording.
Camera will automatically stop recording when the memory card is full or the battery is too low.
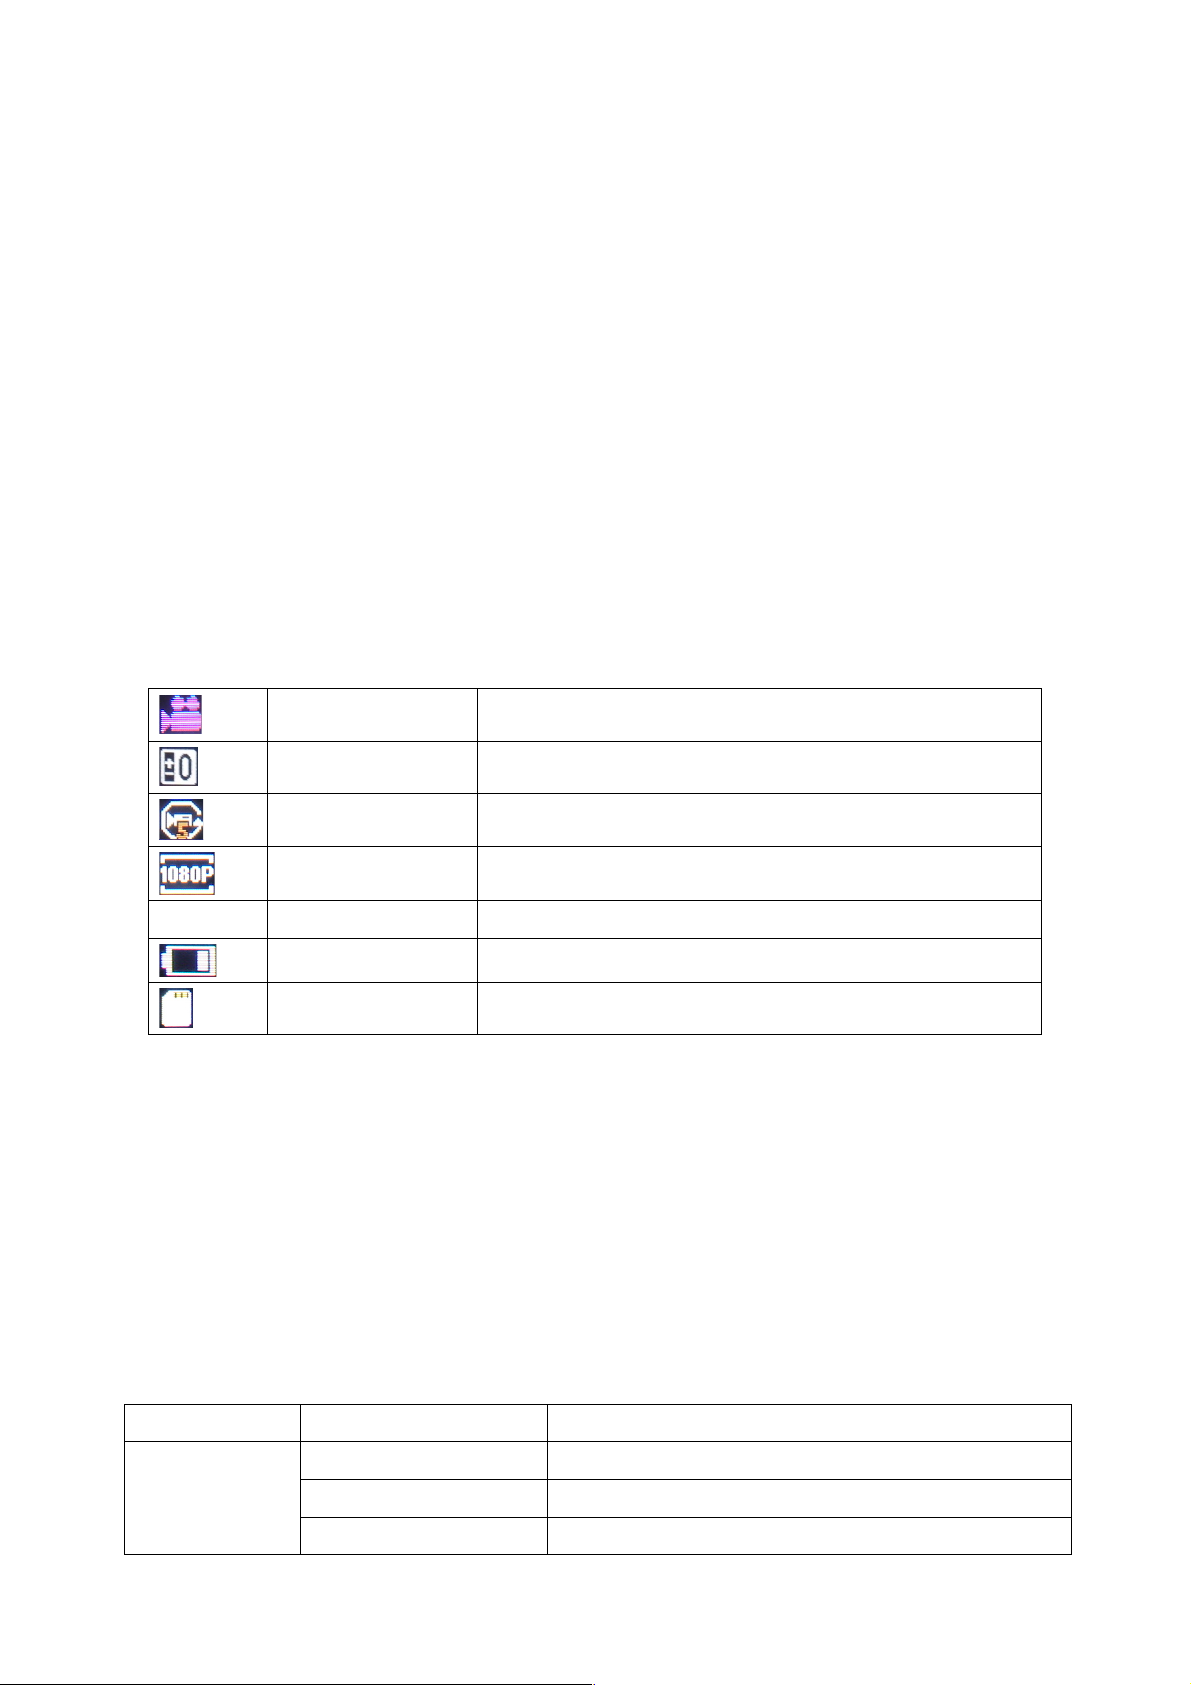
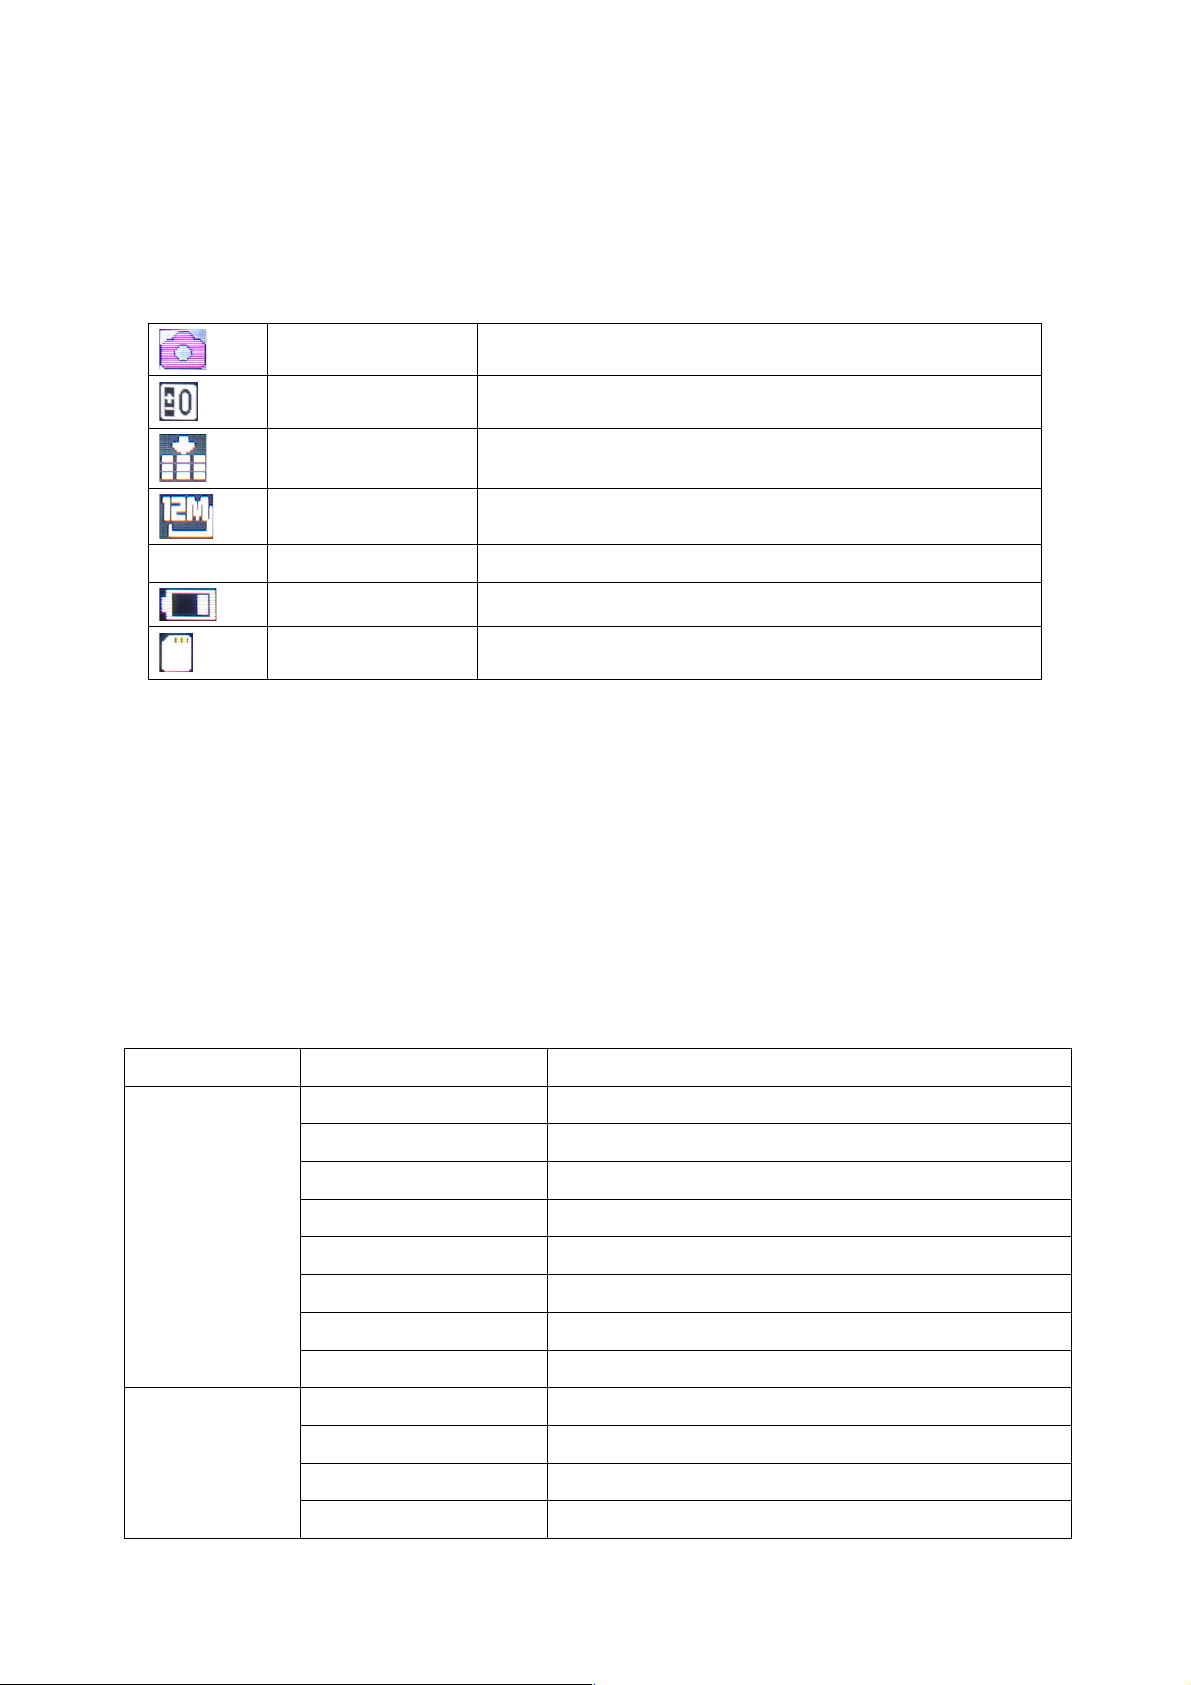
The table below describes the icons displayed on the LCD screen.
Mode icon
Indicates current mode as Video mode.
Exposure
Indicates the current exposure compensation setting.
Loop Recording
Indicates the current loop recording setting.
Resolution
Indicates the current recording resolution of the video.
00:00:01
Time indicator
Indicates the duration of current recording.
Battery
Indicates the current battery level.
Memory Card
Indicates memory card has been inserted.
Video Setup Menu
To enter the Video setup menu do the following.
1. While in Video mode, press and hold OK button for few seconds to open menu settings.
2. Use the Up and Down buttons to navigate through the menu and highlight an item.
3. Press OK/Shutter button to enter the menu options.
4. Use the Up and Down buttons for selection, then press OK/Shutter button for confirmation.
To exit a menu item, press the Power/Mode button.
Video Menu Options
The following table describes the available settings of the Video menu.
Menu Item
Option
Description
Resolution
1080P
1920X1080 resolution format
720P
1280x720 resolution format
VGA
640x480 resolution format

8
Loop
Recording
OFF
The camera will continue recording until the memory
card is full.
5 Minutes
The camera continuously records a video of 5
minutes in length.
When the memory card is full, the camera will
automatically record over the oldest video.
10 Minutes
The camera continuously records a video of 10
minutes in length.
When the memory card is full, the camera will
automatically record over the oldest video.
15 Minutes
The camera continuously records a video of 15
minutes in length.
When the memory card is full, the camera will
automatically record over the oldest video.
Exposure
EV -2.0
This option allows you to select the preferred
Exposure setting, ranging from -2.0 to +2.0 EV.
Default Exposure setting is 0.0.
EV -1.7
EV -1.3
EV -1.0
EV -0.7
EV -0.3
EV +0.0
EV +0.3
EV +0.7
EV +1.0
EV +1.3
EV +1.7
EV +2.0
Date Stamp
OFF
Turn off printing date/time on the video.
ON
During video recording, Date and Time are printed
on the right bottom corner of the video.
9
PHOTO MODE
To take still pictures, press the Power/Mode button repeatedly until the Photo mode icon is displayed
on the top-left corner of the LCD screen.
Press and release the OK/Shutter button to take a photo.
The table below describes the icons displayed on the LCD screen.
Mode icon
Indicates current mode as Photo mode.
Exposure
Indicates the current exposure compensation setting.
Quality
Indicates the current picture quality setting.
Resolution
Indicates the current picture resolution setting.
9999
Counter indicator
Indicates number of pictures available to be taken.
Battery
Indicates the current battery level.
Memory Card
Indicates memory card has been inserted.
Photo Setup Menu
To enter the Photo setup menu do the following.
1. While in Photo mode, press and hold OK button for few seconds to open menu settings.
2. Use the Up and Down buttons to navigate through the menu and highlight an item.
3. Press OK/Shutter button to enter the menu options.
4. Use the Up and Down buttons for selection, then press OK/Shutter button for confirmation.
To exit a menu item, press the Power/Mode button.
Photo Menu Options
The following table describes the available settings of the Photo menu.
Menu Item
Option
Description
Resolution
12M
4032x3024 pixel
10M
3648x2736 pixel
8M
3264x2448 pixel
5M
2592x1944 pixel
3M
2048x1536 pixel
2M
1600x1200 pixel
1M
1280x960 pixel
VGA
640x480 pixel
Capture Mode
Single
Take single photo without delay
Self 2S
Self-timer mode with 2 seconds delay
Self 10S
Self-timer mode with 10 seconds delay
Burst
Take a sequence of 3 photos

10
Quality
Super Fine
Super Fine Quality
Fine
Fine Quality
Normal
Normal Quality
Exposure
EV -2.0
This option allows you to select the preferred
Exposure setting, ranging from -2.0 to 2.0 EV.
Default Exposure setting is 0.0.
EV -1.7
EV -1.3
EV -1.0
EV -0.7
EV -0.3
EV +0.0
EV +0.3
EV +0.7
EV +1.0
EV +1.3
EV +1.7
EV +2.0
Date Stamp
OFF
Turn off printing date/time on the photo.
DATE
Print Date on right bottom corner of the photo.
D&T
Print Date and Time on right bottom corner of the
photo.
PLAYBACK MODE
To select Playback mode, press the Power/Mode button repeatedly until the Playback mode icon
is displayed on the top-left corner of the LCD screen.
In Playback mode, use Up and Down buttons to select the previous or next file.
For video file, press OK/Shutter button to play the video. Press OK button again for pause/resume.
Press Down button for fast forward or Up button for fast backward.
The table below describes the icons displayed on the LCD screen in Playback mode.
Mode icon
Indicates current mode as Playback mode.
Number of files
Indicates the current file selected and the total number
of files recorded.
Video file
Indicates the current file is an AVI video file.

11
SYSTEM SETUP MENU
To enter the System setup menu do the following.
1. While in Video or Photo mode, press and hold OK button for few seconds to open menu settings
and then press OK button again to switch over to the System setup Menu.
2. Use the Up and Down buttons to navigate through the menu and highlight an item.
3. Press OK/Shutter button to enter the menu options.
4. Use the Up and Down buttons for selection, then press OK/Shutter button for confirmation.
To exit a menu item without selecting anything, press the Power/Mode button.
NOTE: While inside the “Sounds” menu, press the OK button to select next item and use Up and
Down buttons to change setting. Press Power/Mode button to go back to main menu. In the main
menu, press Power/Mode button again to exit from the menu.
System Menu Options
Main menu
Sub-menu
Description
Date/Time
09 / 01 / 2016
00 : 01
MM/DD/YYYY
Setup date, time and date format.
Auto Power Off
1 min
Automatic shutdown after 1 minute of idle time.
3 min
Automatic shutdown after 3 minute of idle time.
5 min
Automatic shutdown after 5 minute of idle time.
OFF
Automatic shutdown disabled.
Screen Saver
1 min
LCD screen turns off automatically after 1 minute of
idle time.
3 min
LCD screen turns off automatically after 3 minutes
of idle time.
5 min
LCD screen turns off automatically after 5 minutes
of idle time.
OFF
Screen saver function disabled.
LCD screen stays on.
Sounds
Shutter
On/Off
Start-up
None/1/2/3
Beep
On/Off
Volume
0/1/2/3
Language
En
English
簡
簡體中文
繁
繁體中文
Fr
Français
Ne
Nederlands
Es
Español
Ita
Italiano
Po
Portuguės
De
Deutsch

12
PL
Polski
Tu
Tȕrk
Ru
Pycckᴎӥ
Ko
Korean
Frequency
50Hz
Set to 50Hz
60Hz
Set to 60Hz
Format
Yes/No
Select “Yes” to format the memory card and delete
all the data.
Default Setting
No/Yes
Select “Yes” to reset the camera to default settings.
Version
XCAM720HD
20170424
Firmware version information
Connecting with Computer
To transfer video and photo files to a computer proceed as follows.
1. Connect the camera to the computer using the included USB cable.
2. Plug the Micro USB connector of the cable into the Micro USB port of the camera.
3. Connect the other end of the cable to the USB port of your computer.
4. Once the camera is connected to the computer, press the Power/Mode button to turn on the
camera.
5. Select the “Mass Storage” option that appears on the LCD screen and press the OK button.
6. The camera will be shown as a USB removable disk on your computer.
You can now view the images and videos shot with your camera on your computer. You can also
move/copy the files to your computer to free up space on the memory card.
Care and maintenance
Read the following recommendations before using the device. Following these you will be able to
enjoy the product for many years.
• The camera needs very little maintenance, however the casing may become slightly dirty. To
clean, use a damp soft clean cloth and for stubborn stains, a small amount of detergent may be
used on the case.
• It is recommended that a commercial lens cleaner is used to prevent damage to the lens surface.
• This unit is best stored in a cool dry environment away from bright light and dust.
• Remove all storage media when storing the camera.
• Replace in packaging when dry and store in a cool dry place away from children.
• Uninstall battery and store it in a safe place, if camera is not intended to be used for an extended
duration of time.
Table of contents


