manuals.online logo
Brands
  1. Home
  2. •
  3. Brands
  4. •
  5. Excel
  6. •
  7. TV Mount
  8. •
  9. Excel FM3-C42ST User manual

Excel FM3-C42ST User manual

FM3-C42ST
Full-Motion Mount With Tilt
TM
B
說明手冊
TW
1
需要的工具
Philips Screwdriver
十字螺絲起子
Hammer
鐵槌
Pencil
鉛筆
Drill
電鑽
Stud Finder
木條感測器
Level
水平尺
Ø10 mm
3/8”
Ø5 mm
3/16”
Ø3 mm
1/8”
Socket Wrench
六角扳手
‧ 警告!如果安裝或組裝不當,可能導致重傷、死亡和財產損毀。請在開始安裝會組裝前先閱讀下列警告資訊。
‧ 如果您不瞭解說明或者遇到任何疑問或問題,請與具備資格的安裝人員聯繫。可通過電話號碼1.877.338.4555或電子郵件service@usbrownbear.com與
客戶服務部門聯繫。
‧ 如果產品或硬體有受損或缺失,請不要安裝或組裝。如果您需要更換零件,請通過電話號碼1.877.338.4555或電子郵件service@usbrownbear.com與
客戶服務部門聯繫。
‧ 國際客戶請聯繫本地經銷商以獲得幫助。
‧ 對於壁掛式產品:此產品限在由木牆柱結構或砌築結構(實心混泥土)搭建的豎直牆面上使用。規定的牆壁立木柱最小尺寸為5cm x 10cm,立柱間距最大
為61cm,最小為41cm,牆壁外殼材質(木板牆、立木柱、水泥牆)厚度為19CM。如果您不知道牆壁類型或者需要與其他牆面(金屬立柱、實心混泥土和實心
磚)有關的資訊,請與具備資格的安裝人員聯繫。為確保安全安裝,用於安裝產品的牆壁必須能夠支撐相當於總荷重4倍的重量。否則必須強化牆面以便符
合此標準。安裝人員負責確認牆壁結構/表面以及安裝中使用的螺絲能夠安全的支持總荷重。
‧ 本產品不適用於承載CRT。不要將此產品用於超出指定應用範圍的任何應用。
‧ 不要超過此產品的最大荷重。
‧ 要謹慎的避開牆內管線:如天然氣/水管/電線。
‧ 提供修復或更換不良零件或產品的服務。
‧ 未依操作規定而造成的產品問題則不在保證之列。
‧ 若您的產品需寄美國布朗熊檢測,需自行負擔送修運費,運送替換之新產品所需運費,亦由送修者預付之。
‧ 產品外觀的修改、不適當的安裝、超出限重範圍內的機種,而造成之所有品質異常,亦非美國布朗熊應負之責。
‧ 針對所有不適當的安裝產生的危害,美國布朗熊將免於相關責任歸屬,亦無需負責非美國布朗熊所屬之他方人士之修繕費用。
‧ 規格如有變更,恕不另外通知。
2
內容
A
B
Extensions-A
延伸片-A
Wall Bracket x1
牆板件x1
Flat Screen Bracket x1
面板件x1 Extensions-B
延伸片-B
組裝配件Assembly parts
螺絲Philips Scews
M6 x L10mm
開口扳手
Open-end Wrench
內六角扳手
Allen Wrench
牆板螺絲包 Wall Kit 螢幕螺絲包 Monitor Kit
M-A
M-B
M-C
M-D
M-E
M-F
M-G
M-H
M-I
螺絲Philips Screws
M4x15mm
螺絲Philips Screws
M4x35mm
螺絲Philips Screws
M5x15mm
螺絲Philips Screws
M5x35mm
襯套
Spacers 3/4” M6-M8
墊片
Washers M4-M5-M6
螺絲Philips Screws
M6x15mm
螺絲Philips Screws
M6x35mm
螺絲Philips Screws
M8x15mm
螺絲Philips Screws
M8x35mm
Hardware Kit 螺絲配件包
A.塑膠膨脹管
Wall Anchors
Ø10 Ø8 L50
B.十字自攻釘
Lag Bolts
M8 x65mm
C.墊片
Washer
M8
M-J
3
50” 30kg
66lbs
Max. Screen Size
最大尺寸
Max. Screen Weight
最大承重
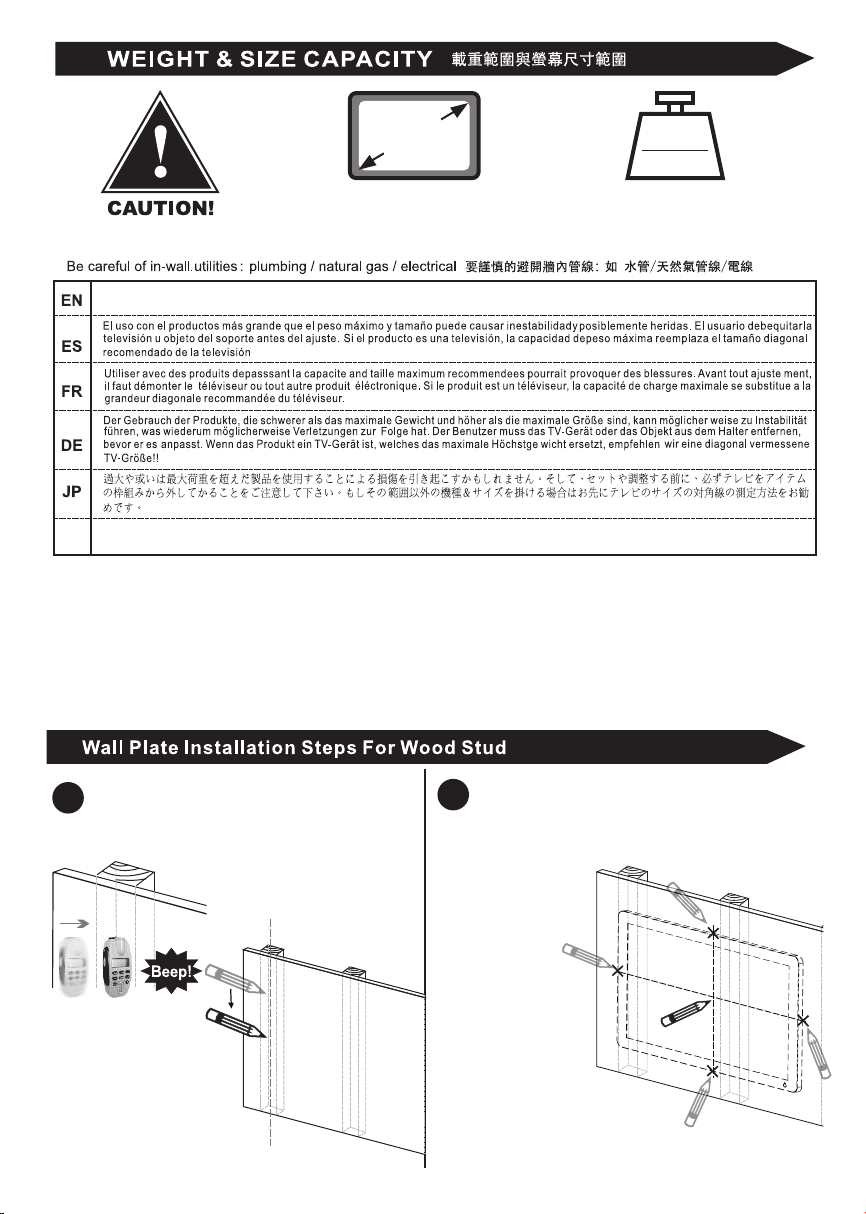
建议在木立柱与水泥墙上使用 Recommended use with Wood Stud &Concrete Wall
如果使用過大/重的產品可能會造成安裝上的損害,使用者在調整前須先將電視或物品從框架上移除,如果這個產品是超出範圍外的電視尺寸,建議以對
角線量測電視尺寸!
TW
Do not exceed the maximum weight capacity for this product. Use with products larger than suggested maximum weight and size may result in
instability causing possible injury or damage.
準備好安裝支架了嗎 : U.S. Brown Bear 提供您安裝前的提示
• 選擇所需要的安裝位置
• 使用水平儀,以確保適當的對齊位置
• 確定您安裝牆面的材質:木材立柱或混泥土
• 不同的安裝步驟適用於不同的牆面材質詳見以下操作說明
• 帶著愉快的心情準備好你所需要的安裝工具
• 確認好所有的支架零件及配件
• 量測所有的電線,以確保電線有足夠的長度
• 若您的螢幕很大,您可能需要其他人協助安裝您的螢幕
Ready, Set, Mount: U.S. Brown Bear
Before You Begin Tips
• Select your desired viewing location
• Use level to ensure proper alignment
• Identify your mounting surface:Wood Stud or Concrete
• Different installation steps apply for different surfaces,
see options on following pages
• Gather the Bear Necessities: Recommended Tools and a Smile
• Get to know the components of your U.S. Brown Bear Mount
• Measure all cables to ensure sufficient cable length
•Assistance may be required to lift your flat screen into position
牆板安裝步驟-木板牆
1
Locate studs with stud finder. Mark stud
edge and center location with pencil.
使用木條感應器測量出木立柱中心點並標註。
Select viewing height. Measure the width and length of your
Flat Screen. Mark top and side center of screen dimensions
with tape or pencil (x4). Determine screen center point and
mark with pencil.
標示出螢幕安裝中心位置
2
* Recommended height :80cm to100cm (30”~40”) from
the floor to the bottom edge of TV .
*建議安裝的高度:從地面至電視下緣為80~100公分(30”~40”)。
4
3
6
5
4
Drill pilot holes at marked locations (x4).
使用電鑽在標記位置鑽4個孔
Use Wall Bracket as template to mark drilling
locations with pencil (x4).
Use level to insure proper alignment.
使用牆板標記鑽孔位置,並利用水平儀確保水準
(右側螺絲須固定在單木立柱上)
Align Wall Bracket to marked Flat Screen
center point.
將牆板件的中心位置對正於螢幕中心線
Screen center
螢幕中心線
Remove cover from Wall Bracket.
拆下牆板保護蓋
2”( 50 mm)
3/16”( 5 mm)
Pilot Hole Size
Pilot Hole Depth
2”( 50 mm)
1/8”( 3 mm)
Pilot Hole Size
Pilot Hole Depth
Drill
Drywall
Wood Stud
鑽孔尺寸
鑽孔深度
鑽孔尺寸
鑽孔深度
木立柱
木板牆
電鑽
5
Secure Lag Bolt and Washer into
pilot holes(x4). Leave 0.6" (1.5 cm) visible.
將牆板螺絲套上墊片,鎖入牆孔,預留0.6”(1.5cm)
螺絲長度。
Place cover back on Wall Bracket.
蓋上牆板保護蓋。
7 8
O
X
0.6”(1.5cm)
Wall Bracket installation complete.
牆板安裝完成
9
Skip to page 8 for flat panel attachment steps.
See below for concrete wall and brick wall installation
螢幕安裝請跳至P.8 水泥牆/磚牆安裝請參考下方步驟
10
Place Wall Bracket on Lag Bolts and
tighten (x4).
將牆板對準螺絲掛上,並將4顆螺絲鎖緊。
Socket Wrench
六角扳手
Socket Wrench
六角扳手
* Option For Drywall Only:
Gently Hammer Drywall Anchors (Not Included), into pilot holes (x2).
Caution: Do Not Use Wall Anchors in Wood Studs.
木立柱不需使用膨脹管
Screen center
螢幕中心線
6
牆板安裝步驟-水泥牆/磚牆
1 2
Use Wall Bracket as template to mark drilling
locations with pencil (x4).
Use level to insure proper alignment.
使用牆板標記鑽孔位置,並利用水平儀確保水準
(右側螺絲須固定在單立木柱上)
34
Select viewing height. Measure the width and length of
your Flat Screen. Mark top and side center of screen
dimensions with tape or pencil (x4). Determine screen
center point and mark with pencil.
標示出螢幕邊際並找出安裝中心的位置。
Remove cover from Wall Bracket.
拆下牆板保護蓋
Align Wall Bracket to marked Flat Screen
center point.
將牆板件的中心位置對正於螢幕中心線
Wall Bracket Installation Steps For Concrete/Brick
* Recommended height :80cm to100cm (30”~40”)
from the floor to the bottom edge of TV .
*建議安裝的高度:從地面至電視下緣為80~100公分
(30”~40”)。
Drill pilot holes at marked locations (x4).
使用電鑽在標記位置鑽4個孔
56
Gently hammer Wall Anchors into pilot holes (x4).
使用鐵錘將膨脹管輕輕捶入孔內(x4)
7
X
Drill
2.4”( 60 mm)
3/8”( 10 mm)
Pilot Hole Size
Pilot Hole Depth
Secure Lag Bolt into pilot holes (x4).
Leave 0.6" (1.5 cm) visible.
將牆板螺絲鎖入牆孔,預留0.6”(1.5cm)螺絲長度。
7
O
X
0.6”(1.5cm)
8
Place Wall Bracket on Lag Bolts and
tighten (x4).
將牆板螺絲鎖入牆孔,預留0.6”(1.5cm)螺絲長度。
鑽孔尺寸
鑽孔深度
Socket Wrench
六角扳手
電鑽
面板安装步骤
Place cover back on Wall Bracket.
蓋上牆板保護蓋
9
Wall Bracket installation complete.
牆板安裝完成,螢幕背板安裝步驟請參考下方
10
Flat Screen Bracket Attachment Steps
8
安裝平板電視不要太過用力旋緊螺絲,並確保螺絲長度不要超過面板孔深!
襯套
墊片
Not Included
9
Before the Installation Steps 安裝前置作業
200
200
100
單位unit:mm
200 X 100
200 X 200
400
300
400
400
Identify your VESA pattern on the back of Flat Screen. Use appropriate configuration to match.
瞭解螢幕背孔孔距,以下為面板延伸片排列組合方式。
*Use Only Flat Screen Bracket for VESAhole patterns 200x200mm or smaller.
*螢幕背孔距離為200x200mm請直接使用背板安裝。
200
200
單位unit:mm
Universal:200 X 200 ~ 400 X 400
10
VESA 200x200 至 400x400,需安裝井支架,以下為安裝步驟。
VESA 200x200 to 400x400,following steps to install extensions 。
Install The Extensions 安裝井支架步驟
Align extensions-Bx2PCS with VESA hole pattern on back of Flat Screen.
Secure with appropriate screw size and washers from Monitor Kit as illustrated.
先將【延伸片-Bx2件】對齊螢幕背面的孔位,再從螢幕螺絲配件中挑選適合您螢幕尺寸的螺絲。
如果需要再依自身需求搭配襯套,並以螺絲起子旋緊四個螺絲。
Be sure to carefully align the holes of the extensions-B
with the mounting holes on the flat screen.
請務必確保將支架鎖固於螢幕的背孔。
Screws from Monitor Kit
適合螢幕尺寸的螺絲
Options
選擇適合螢幕緊固的螺絲
墊片Washers
M4/M5/M6
No Washers 不使用垫片
11
Align extensions-Ax2PCS with extensions-Bx2PCS,then tightening the screw.
*extensions should be the same direction.
將【延伸片-Ax2件】鎖固至【延伸片-Bx2件】上 。
*延伸片方向需一致
Extensions-Bx2PCS
延伸片-Bx2件
*Extensions should be the same direction.
*延伸片方向需一致
Philips Screwdriver
十字螺絲起子
Philips Screwdriver
十字螺絲起子
Tightening the screw.
鎖固螺絲方向
Extensions direction.
延伸片方向
Tightening the screw.
鎖固螺絲方向
Monitor 螢幕
組裝配件
Assembly parts
螺絲Philips Scews
M6 x 10mm
Screws from Monitor Kit
適合螢幕尺寸的螺絲
12
Philips Screwdriver
十字螺絲起子
Align screen bracket with monitor,then tightening the screw.
將面板件對齊螢幕件的孔位,並以螺絲起子旋緊螺絲。
Tightening the screw.
鎖固螺絲方向
Thus side up.
此面朝上
組裝配件
Assembly parts
螺絲Philips Scews
M6 x 10mm
組裝配件
Assembly parts
螺絲Philips Scews
M6 x 10mm
Lift and hang Flat Screen with attached bracket
onto mounting plate connected to the
Wall Bracket.
將螢幕掛到牆板支架上。
To secure bracket into place,
tighten nuts on mounting plate with open-end
wrench (x2).
確保面板定位,使用開口扳手鎖固螺絲(x2)。
1
Remove Wall Bracket Arm Covers and place
cables into the Cable Management System.
Once cables are in place, put Arm Covers
back on.
牆板支架保護蓋拆下,放入電線,蓋上保護蓋
即完成電線收納
2
Finished.
安裝完成
34
13
螢幕背板安裝步驟
Flat Screen Bracket to Wall Mount Attachment Steps
14
To adjust Tilt or Alignment of Flat Screen use open-end wrench.
若螢幕面板部份不平整,請使用開口扳手鬆開螺帽,調整面板角度至水準後,再將螺帽旋緊。
5
a. b. c.
Loosen nuts on
mounting plate (x2).
鬆開螺帽(x2)
Tighten nuts to secure
into place (x2).
將螺帽旋緊(x2)。
Adjust tilt or angle of Flat Screen.
調整面板角度至水準
感謝您購買 的產品。
Come hang with us
THANK YOU FOR PURCHASING U.S. BROWN BEAR PRODUCTS.
GRACIAS POR ADQUIRIR UN PRODUCTO U.S. BROWN BEAR.
North Carolina
São Paulo,
Brazil

Other Excel TV Mount manuals

Excel W4 Series User manual

Excel

Excel W4 Series User manual

Excel VCMB42 User manual

Excel

Excel VCMB42 User manual

Excel U.S. Brown Bear VCMB50 User manual

Excel

Excel U.S. Brown Bear VCMB50 User manual

Popular TV Mount manuals by other brands

GEM LZ-NH-350N Specification sheet

GEM

GEM LZ-NH-350N Specification sheet

ECG LD 326001 instruction manual

ECG

ECG LD 326001 instruction manual

Hama 179050 operating instructions

Hama

Hama 179050 operating instructions

Rosewill RMS-MT3710 user manual

Rosewill

Rosewill RMS-MT3710 user manual

Sony SU-WL450 Installation information

Sony

Sony SU-WL450 Installation information

KSL UKR2EP228 quick start guide

KSL

KSL UKR2EP228 quick start guide

Commercial Electric MB-64102 Use and care guide

Commercial Electric

Commercial Electric MB-64102 Use and care guide

Seura SC-1 installation guide

Seura

Seura SC-1 installation guide

Sony SU-W210 instructions

Sony

Sony SU-W210 instructions

LDI Spaces SAFCO Impromptu 8926 Assembly instructions

LDI Spaces

LDI Spaces SAFCO Impromptu 8926 Assembly instructions

TRAC T10050 user manual

TRAC

TRAC T10050 user manual

Sanus Systems TVS Assembly instructions

Sanus Systems

Sanus Systems TVS Assembly instructions

RectorSeal SAFE-T-SWITCH SS3 Product data sheet

RectorSeal

RectorSeal SAFE-T-SWITCH SS3 Product data sheet

Wavetronix Click 650 U Installation & quick start guide

Wavetronix

Wavetronix Click 650 U Installation & quick start guide

GNCI MRM X1100 installation instructions

GNCI

GNCI MRM X1100 installation instructions

Radioddity X6100-H1 installation guide

Radioddity

Radioddity X6100-H1 installation guide

Sony SU-W100 Dimensional information

Sony

Sony SU-W100 Dimensional information

Premier Mounts PTDM1 installation guide

Premier Mounts

Premier Mounts PTDM1 installation guide

manuals.online logo
manuals.online logoBrands
  • About & Mission
  • Contact us
  • Privacy Policy
  • Terms and Conditions

Copyright 2025 Manuals.Online. All Rights Reserved.