Excel U.S. Brown Bear VCMB50 User manual

VCMB50
A
Full-Motion Mount
with tilt Instruction Manual

1
Philips Screwdriver
十字螺絲起子 Wrench
扳手 Hammer
鐵鎚
Drill
電鑽 Stud Finder
木條感應器 Ø10mm
鑽頭(3/8”) Ø5mm
鑽頭(7/32”)
Level
水平尺
Pencil
鉛筆
‧ 未依以下說明操作規定而造成的產品問題,意外傷害與損失,本公司一概不予以負責。
‧ 對產品外觀的修改、不適當的安裝、超出限重範圍內,而造成之所有品質異常,非敝司應負責任。
‧ 針對所有不適當的安裝產生的危害,本公司將免於相關責任歸屬,亦無需負責修繕費用。
‧ 如果您不瞭解說明或者遇到任何疑問,請與具備資格的安裝人員聯繫。可通過電話號碼
07-359-5931或電子郵件servicetw@usbrownbear.com與客戶服務部門聯繫。
‧ 如果產品或硬體有受損或缺失,請不要安裝或組裝。如果您需要更換零件,請通過電話號碼或電子
郵件與客戶服務部門聯繫。
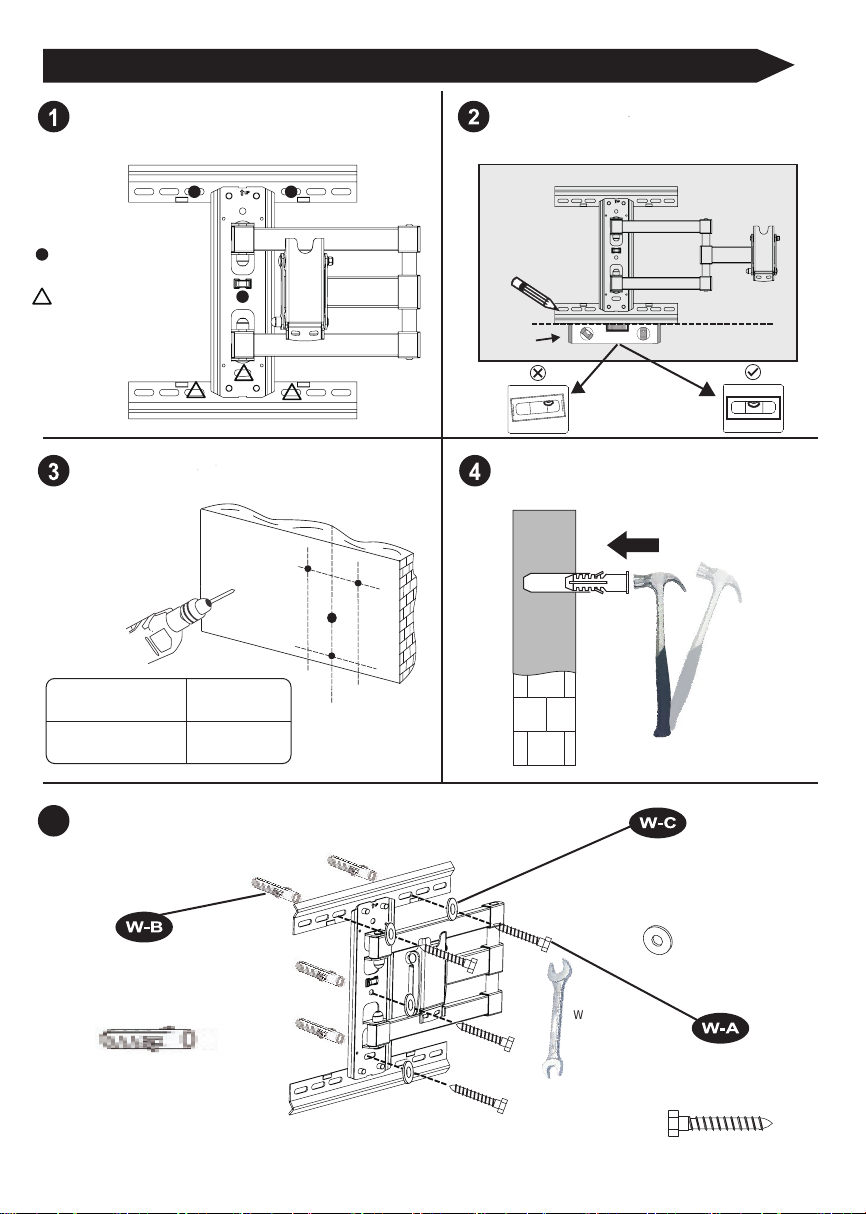
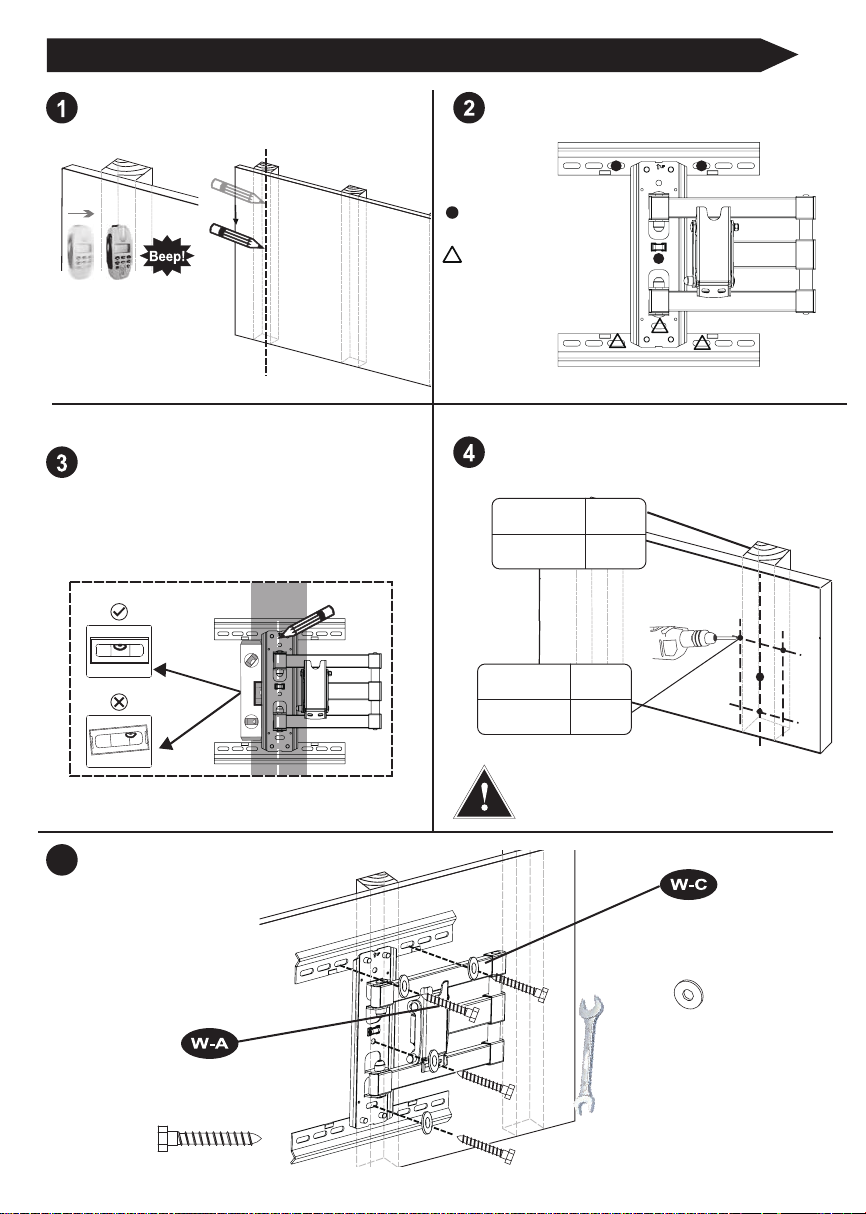
‧ 對於壁掛式產品:此產品限在由木牆柱結構或砌築結構(實心混泥土)搭建的豎直牆面上使用。規定的
牆壁立木柱最小尺寸為5cm x 10cm,立柱間距最大為61cm,最小為41cm,牆壁外殼材質(木板牆
、立木柱 、水泥牆)厚度為19CM,且木版牆面厚度需大於3公分。如果您不知道牆壁類型或者需要
與其他牆面(金屬立柱、實心混泥土和實心磚)有關的資訊,請與具備資格的安裝人員聯繫。為確保
安全安裝,用於安裝產品的牆壁必須能夠支撐相當於總荷重4倍的重量。否則必須強化牆面以便符合
此標准。安裝人員負責確認牆壁結構/表面以及安裝中使用的螺絲能夠安全的支持總荷重。
‧ 本產品不適用於承載CRT。不要將此產品用於超出指定應用範圍的任何應用,也不要安裝超過此產
品的最大荷重。
‧ 安裝時請謹慎的避開牆內管線:如天然氣/水管/電線。
‧ 若您的產品需寄回檢測,需自行負擔送修運費,運送替換之新產品所需運費,需由送修者負擔。
‧ 規格如有變更請詳見於本公司網站Web : www.excelglobal.com.tw,恕不另外通知。
注意事項
需要的工具
請安裝人員在安裝前請務必詳讀以下注意事項
如果安裝或組裝不當,可能導致重傷、死亡和財產損毀。
U.S. Brown Bear Product Warranty
Tools Needed

2
Extensions-Ax2PCS
延伸片A x2件
Extensions-Bx2PCS
延伸片B x2件
组裝配件Assembly Parts
開口扳手
Open-end Wrench M6mm
x1
Wall Bracket Extensions x2PCS
牆板蓋 x2件
Screen Bracketx1PCS
面板件x1件
Wall Bracketx1PCS
牆版件x1件
最大承重
35 kg
77 lbs
*Recommended use with Wood Stud & Concrete Wall
建議在木立柱與水泥牆上使用
螺絲配件包
*Be careful of in-wall utilties:
plumbing / natural gas / electrical
要謹慎地避開牆内管線:如 管/天然汽管線/電線
26”~47”
最大尺寸
螢幕螺絲Monitor Kit
牆板螺絲Wall Kit
螺絲
Philips Screws
M6 x 15mm
M6 x 35mm
螺絲
Philips Screws
M4 x 15mm
M4 x 35mm
螺絲
Philips Screws
M5 x 15mm
M5 x 35mm
金屬墊片
Washers
Ø6mm
M4-5-6
襯套
Spacers
L20mm
x4
x4 x4
x4 x4x4
螺絲
Philips Screws
M8 x 15mm
M8 x 35mm
x4
x4 x4 x4
M-G M-H M-I M-J
六角自攻釘
Lag Bolts
ST8x65mm
塑膠膨脹管
Wall Anchors
∅10 ∅8
L50mm
金屬墊片
Washers
∅16 ∅8
1.5mm
x4 x4 x4
Hardware Kit
載重範圍與螢幕尺寸範圍
Weight & Size Capacity
Contents 內容

3
Remove lines maneger from wall bracket.
將走線槽拆除。備用。
Flat Screen Bracket Attachment Steps 螢幕支架安裝步驟
400
300
*Use Only Flat Screen Bracket for VESAhole
patterns 200x200mm or smaller.
*螢幕背孔距離为200x200mm請直接
使用面板安裝。
單位unit:mm
Before the Installation Steps 安裝前置作業
Identify your VESA pattern on the back of Flat Screen. Use appropriate configuration to match.
了解螢幕背孔孔距,以下為面板延伸片排列组合方式。
300x200 300x300
400x300 400x400
200
200
100
100
100x100 200x100
200x200
400
400
300
200
300
200
100
100
如果使用過大或過重的產品可能會造成安裝上的損害,
使用者在調整前需先將電視或物品從框架上移除,
如果這個產品是超出範圍外的電視尺寸,
建議量測電視尺寸!
Do not exceed the maximum weight capacity
for this product.
Use with products larger than suggested
maximum weight and size may result in instability
causing possible injury or damage.

4
安裝平板電視不要太過用力旋緊螺絲,並確保螺絲長度不要超過面板孔深!
開口扳手
Open-end
Wrench M6mm
Install The Monitor Bracket And Extensions 安裝面板延伸片
Align extensions with monitor bracket hole and secure with nut.
將延伸片的螺釘對齊面板件的孔位,並用螺母 固定。
此圖為螢幕側面
The side view of screen
襯套
墊片
Not Included
Extensions-A
延伸片A
Extensions-A
延伸片A
Extensions-B
延伸片B
Extensions-B
延伸片B
Screen Bracket
面板件

5
Install The Monitor Bracket On Flat Screen. 面板件與螢幕組裝步驟
*Extensions installation way.
*延伸片安装方向
Philips Screwdriver
十字螺絲起子
Align VESA hole pattern on back of Flat Screen.
Secure with appropriate screw size and washers from Monitor Kit as illustrated.
先將面板對齊螢幕背面的孔位,再從螢幕螺絲配件中挑選適合您螢幕尺寸的螺絲,並以十字螺絲起子
旋緊四個螺絲。
此圖為螢幕側面
The side view of screen
Optional
可選擇使用襯套或不用
Options
No Spacers 不使用襯套
With Spacers 使用襯套
選擇使用襯套螺絲
Screws from Monitor Kit
適合螢幕尺寸的螺絲
墊片
Washers
M4-M5-M6
螺絲使用墊片
M-H
M-G
襯套
Spacers
L20mm

6
To Find Out The Screws Drilling Position With Wall Bracket 找出牆版件鑽孔的高度
牆板螺絲鑽孔位置
Make sure expected the installation distance B ,to find out the screws drilling position.
確定預計安裝的距離(B距離),找出鑽孔的高度
Recommended height
牆板螺絲鑽孔位置
Wallbracket screws
drilling position
Wallbracket screws drilling position
牆版鑽孔高度為【A+B】
Wallbracket screws drilling position is [A+B]
此圖為螢幕背面
The back of screen
此圖為螢幕正面透視圖
Screen front perspective view
建議安裝的高度
將支架組件擺放至螢幕面板背面合上面板件相對應的位置,量測支架中心到螢幕邊緣A距離。
Screen center
螢幕中心線
Floor
地面
A距離
78mm
3”
*請注意:支架中心不等於螢幕中心線,須偏移78mm/3”
* Recommended height :80cm to100cm (30”~40”) from
the floor to the bottom edge of TV .
*建議安裝的高度:從地面至電視下緣為80~100公分(30”~40”)。
Align the TV Mount body to proper position with extension bars and measure from center of the TV Mount wall
plate to the edge of the screen to find out the distance. This "A" distance will tell you after TV is mounted where
the edge of theTV will be on the wall. The TV mount wall plate is 3 inches off of the center of the mount.
* Attention:: Center of the wall plate does not equal to the center of the screen.
Distance
A距離 Distance
DistanceB距離

7
Wall Bracket Installation Steps for Concrete 水泥牆安裝步驟
The wall bracket holes(x4 .
選擇牆板安裝孔位(x4)。
必要固定螺絲點
Indispensable screw hole
擇一螺絲安裝點
A1 or A2 or A3
Choose one hole
A1 、A2 、A3
A2 A3
A1
Drill
電鑽
2.76”(70 mm)
3/8”(10 mm)
Pilot Hole Size
鑽孔尺寸
Center中心
Pilot Hole Depth
鑽孔深度
Select desired height. Use Wall Bracket as template
to mark drilling locations with pencil(x4).
Use level to ensure proper alignment.
標註牆板位置,使用水平尺測量以確保水平。
使用電鑽鑽孔(x4)。
Drill pilot holes at marked locations(x4). Gently hammer WallAnchors into pilot holes (x4).
用鐵鎚將膨脹管插入孔洞中(x4)。
使用扳手將自攻螺釘(x4)鎖緊至水泥牆上。
Use a wrench to tighten screws (x4).
Level
水平尺
Concrete
水泥牆
Wrench
扳手
5
六角自攻釘
Lag Bolts
ST8 x 65mm
塑膠膨脹管
Wall Anchors
∅10 ∅8 L50mm
x4
x4
x4
金屬墊片
Washers
∅16 ∅8
2mm

8
Wall Bracket Installation Steps for Wood Studs
Select desired height. Use Wall Bracket as template
to mark drilling locations with pencil. Use level to
ensure proper alignment.
利用牆板調至適當高度後,用鉛筆標注鑽孔位置。
同時利用水平尺確認牆板的水平。
Locate studs with stud finder. Mark stud
edge and center location with pencil.
使用木條感應器測量出木立柱中心點並標註。
木立柱牆安裝步驟
7/32”
(5 mm)
打穿
Pilot Hole Size
鑽孔尺寸
Pilot Hole Depth
鑽孔深度
Drill pilot holes at marked locations.(x4).
在標註處鑽孔(x4)。
使用扳手將六角自攻釘 (x4). 鎖緊至牆上。
Use a wrench to tighten screws (x4).
Attention:It has to install at least two
holes on wood stud.
注意:木立柱上需至少安裝打兩個孔。
7/32”
(5 mm)
2.76”
(70mm)
Pilot Hole Size
鑽孔尺寸
Pilot Hole Depth
鑽孔深度
Center中心
Wood Stud木立柱
Drywall木板牆
Level
水平尺
Stud
木立柱
Wrench
扳手
The wall bracket holes(x4) .
選擇牆板安裝孔位(x4)。
5
六角自攻釘
Lag Bolts
ST8 x 65mm
金屬墊片
Washers
∅16 ∅8
2mm
x4
x4
Drill
電鑽
必要固定螺絲點
Indispensable screw hole
擇一螺絲安裝點
A1 or A2 or A3
Choose one hole
A1 、A2 、A3
A2 A3
A1

9
Lift and hook flat screen with attached brackets to the wall brackets.
Use Philips Screwdriver to tightening the screw.
將螢幕件掛置於牆板件上。使用十字螺絲起子鎖固螺絲。
您可能需要他人協助將螢幕件掛上定位。
Assistance may be the required to lift your flat screen into position.
Philips
Screwdriver
十字螺絲起子
螺絲
Philips Screws
M5 x 10mm
Installation Monitor & Wall Bracket 組裝面板件與牆版件

10
Maneger lines.
整理線材。
To adjust Tilt or Alignment of Flat Screen use open-end wrench.
若螢幕面板部份不平整,請使用開口扳手鬆開螺絲,調整面板角度至
水平後,再將螺絲旋緊。
a. b. c.
Loosen screw on
mounting plate (x2).
鬆開螺絲(x2)
Tighten screw to secure
into place (x2).
將螺絲旋緊(x2)。
Adjust tilt or angle of Flat Screen.
調整面板角度至水平

感謝您購買U.S. BROWN BEAR 的產品。
Other Excel TV Mount manuals
Popular TV Mount manuals by other brands

Perlesmith
Perlesmith PSTVS07 quick start guide

Forging Mount
Forging Mount HY9395-B instruction manual

Spacesaver
Spacesaver 90300 Use and care guide

Speaka Professional
Speaka Professional 62 95 64 operating instructions

USX-MOUNT
USX-MOUNT XAS405-1 instruction manual

peerless-AV
peerless-AV DS508 Installation and assembly