Exclusive Brands Smart Glider User manual

Before you get started, please make sure to read the User Manual.
It is highly recommended to start your first Smart Glider experience with a
friend. Having a spotter during initial use will increase your confidence
and help you become acclimated to your Smart Glider. Always wear the
proper safety gear before operating. ENJOY YOUR Smart Glider!
PLEASE NOTE:
•The original Smart Glider is an Intelligent Personal Mobility Device.
•Before riding, please read the User Manual carefully, and follow all Safety Precautions.
•Improper use of this product can lead to property damage, serious bodily injury, and/or death.
•The information in this User Manual will help you better understand, enjoy and maintain your
Smart Glider.
•For more information or questions regarding the Smart Glider, please contact:
Exclusive Brands Online
150 B Drakensberg Road; Waterkloof Park; Pretoria; 0181
(012) 346 5404 / (082) 828 2032
info@exclusivebrandsonline.co.za

Table of Contents
1. Product Overview...........................................................................
1.1 General Information.....................................................................
1.2 What You Need To Know............................................................
1.3 WARNING...................................................................................
2. Product Description.........................................................................
2.1 Description of Smart Glider...........................................................
2.2 Description of Smart Glider Components......................................
3. Operating Principles .......................................................................
3.1 How Smart Glider Works…............................................................
3.2 READ THE FOLLOWING INSTRUCTIONS CAREFULLY
Step 1-Getting Started…………….……..…………………..…..
Step 2-Checking the Display Board……………………..…...…
Step 3-Charging your Smart Glider…………………………….…..
Step 4-Safety Gear………………………….……………………
Step 5-Stepping On………………………………………………
Step 6-Staying Balanced………………………………….……..
Step 7-Riding your Smart Glider…………………………………..
Step 8-The Dismount………………………..……………….....
4. Special Functions.......................................
4.1 Special Functions -Recalibrating your Smart Glider....................................................................
5. Smart Glider Safety Precautions–MUST READ...........................
6. Weight and Speed Limitations………………………………………
7. Operating Range……….………......................................................
8. Battery Information and Specifications...…............................
9. Charging your Smart Glider………………….......................................
10. Safety Alerts………………………………………………………….
11. Inspection, Maintenance, and Storage.………………………….
12. Smart Glider Specifications and Packing list............................

1.Product Overview
1.1 General Information
The original Smart Glider is an Intelligent Personal Mobility Device. This device is an intuitive,
technologically advanced solution that provides the user personal transportation based on
dynamic balancing principles calculating the user’s center of gravity using gyroscope and
acceleration sensors.
Using the latest technology and production processes, each Smart Glider undergoes strict
testing for quality and durability. With its lightweight, portable design, ease of use, range, and
low carbon footprint, the Smart Glider is the Ultimate Last Mile Solution.
You no longer have to leave your beats behind when taking a ride on your Hoverboards. You
can now track along with your tunes with our new Bluetooth element added to our two-wheel
self-balancing Smart Glider.
1.2 What You Need to Know
Before you first experience your Smart Glider, please read the USER MANUAL thoroughly and
learn the basics to ensure your safety and the safety of others. It is highly recommended that
your initial Smart Glider experience be with a spotter who can assist you in centering your
balance. Once you keep your center of gravity even, you will be able to stand on the Smart
Glider without moving, similar to standing on the ground. The most important thing to do is stay
relaxed and confident. The Smart Glider is very intuitive and senses the slightest motion, so
finding your center of balance is key. Step on quickly, confidently, and evenly, but remember to
keep your body quiet. Please refrain from flaying your arms, leaning too far forward and/or
backwards, or stepping on your I-glide unevenly, as this will cause you to lose control and
increase your probability of injury.
Please follow the detailed directions outlined in the USER MANUAL in Section 3 under Operating
Principles.
1.3 WARNING
Failure to follow the basic instructions and safety precautions listed in the USER MANUAL, can
lead to damage to your Smart Glider which can void your warranty, other property damage,
serious bodily injury, and even death.

2. Product Description
2.1 Description of Smart Glider
The Smart Glider is a technologically advanced Personal Mobility Device. It has two wheels that
balance and transport the user using battery powered brushless motors. The Smart Glider uses
digital gyroscope modules and acceleration sensors to calculate the user’s center of gravity and
move the device accordingly. The Smart Glider can move forwards, backwards, turn in either
direction or turn in place. The compact footprint and zero degree turning radius allow you to
enjoy your I-glide both indoors and outdoors.
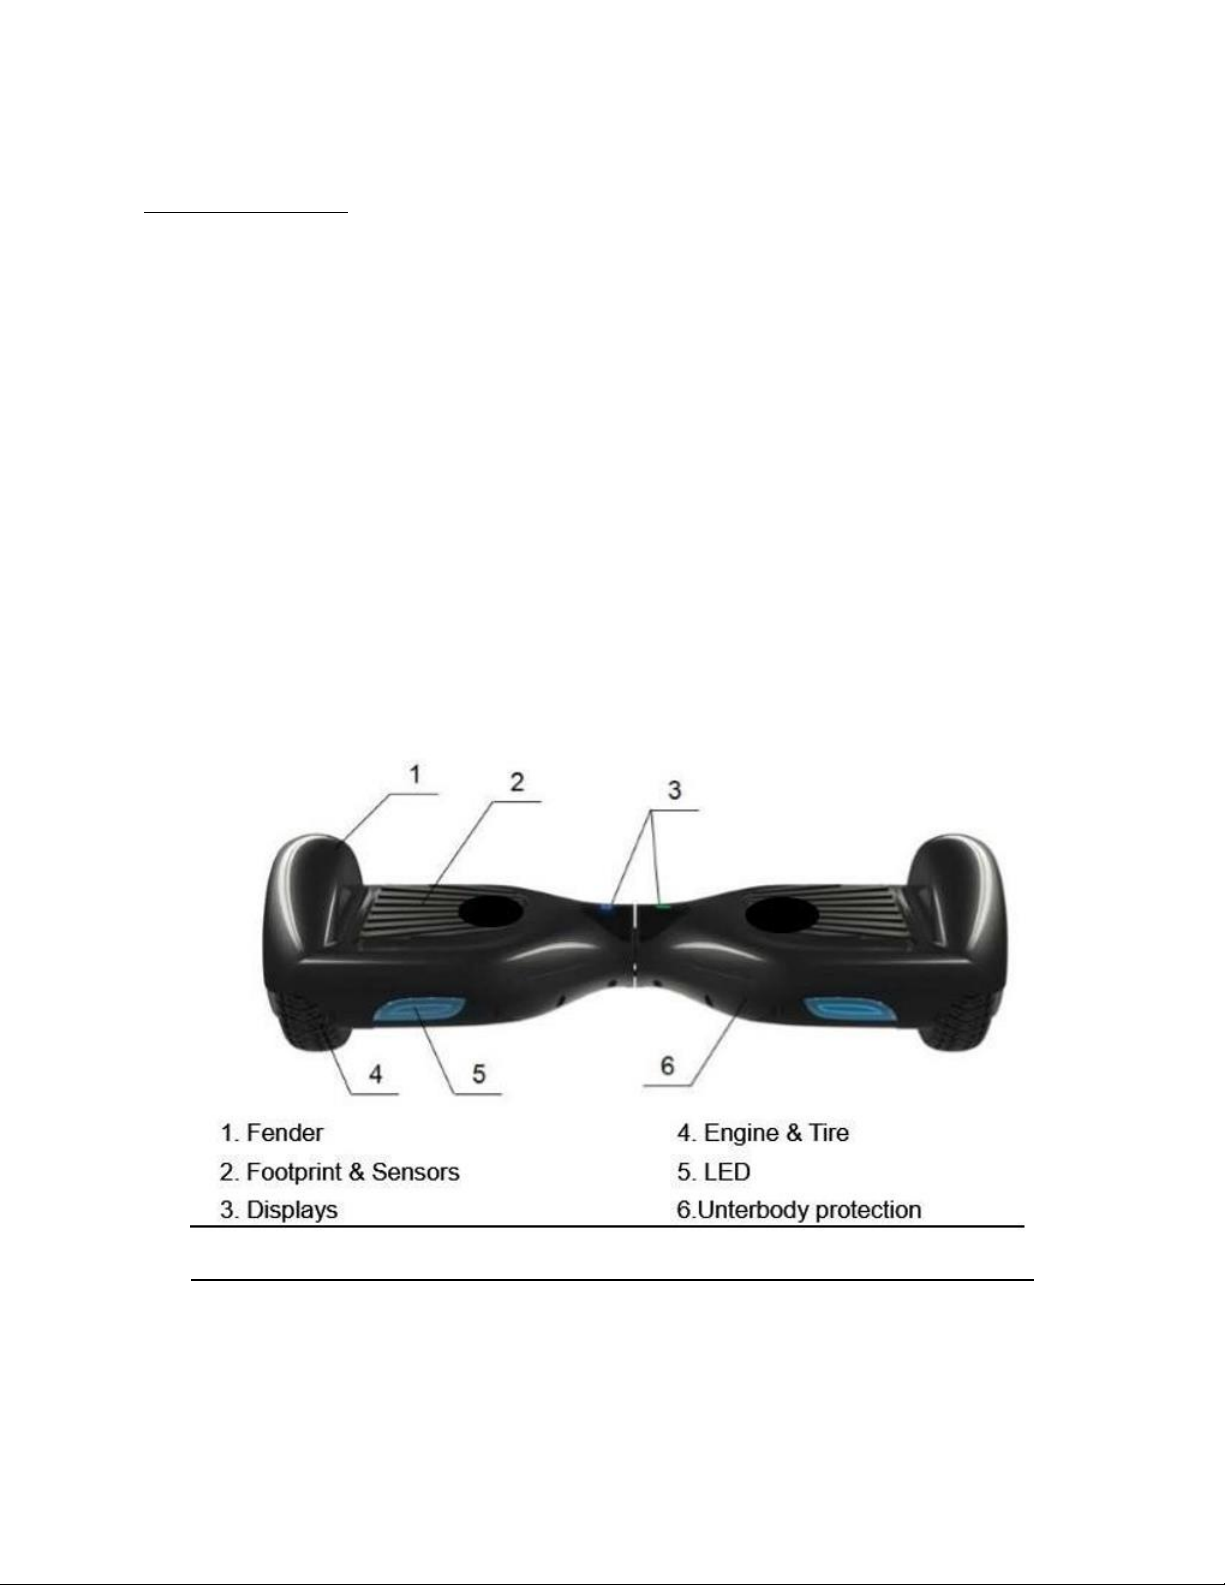
2.2 Description of Smart Glider Components:

3. Operating Principles
3.1 How Smart Glider Works
The Smart Glider uses digital electronic gyroscopes and acceleration sensors to control balance
and motion intelligently, depending on the user’s center of gravity. The device also uses an
intelligent control system to drive the brushless motors that are located within the wheels.
The I-glide has a built-in inertia dynamic stabilization system that can help assist with balance
when moving forward and backwards, but not while turning.
TIP -To increase your stability, you must shift your weight in order to overcome the centrifugal
force during turns, especially when entering a turn at higher speeds.
3.2 PLEASE READ THE FOLLOWING INSTRUCTIONS CAREFULLY
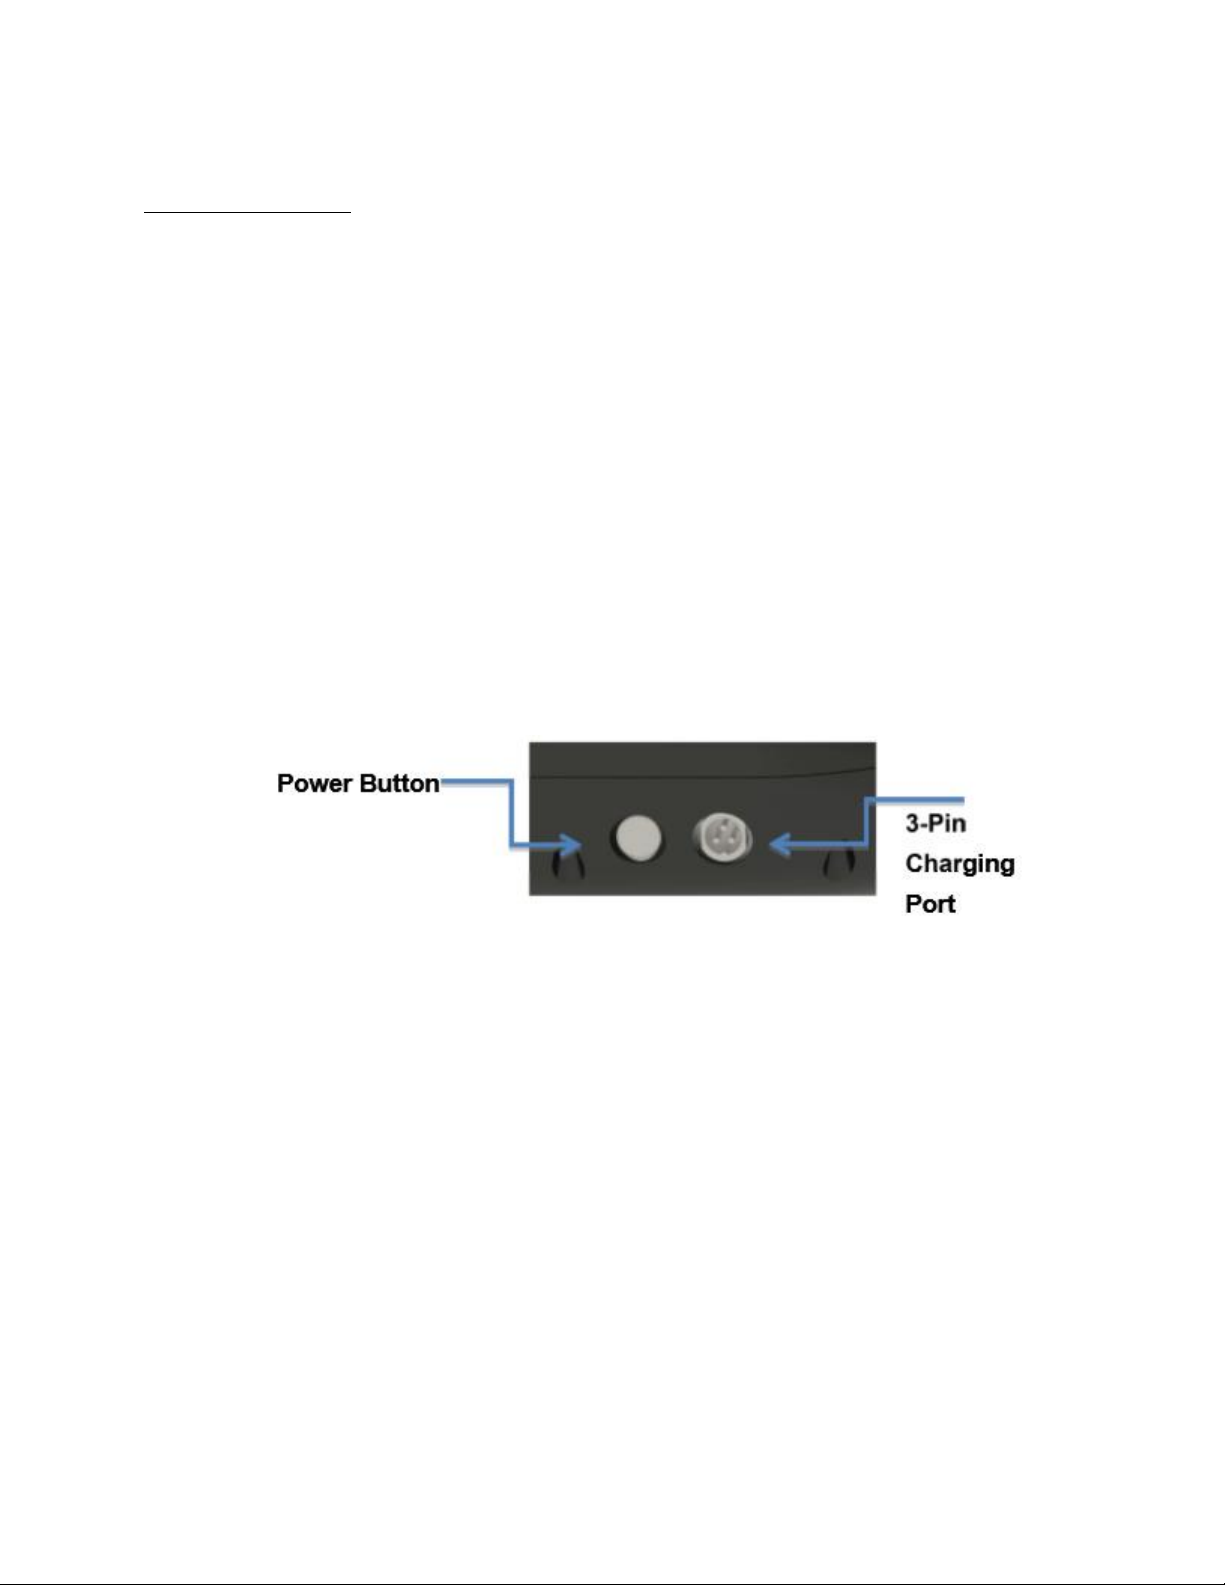
Step 1: Getting Started - Take your Smart Glider out of the box and place it flat on the floor.
Press the silver power button, located on your Smart Glider, next to the 3-pin charging port. You
will hear an alert. (if you have a Bluetooth enabled device you will hear a second alert).
Bluetooth enabled devices must be connected via your cell phone or any other Bluetooth
capable device.
Step 2: Checking the Display Board - located in the center of your Smart Glider. The Smart Glider
should power on and beep indicating it is on. The Battery indicator light should be lit, indicating
there is power to the device.
a. Battery Indicator: The Green LED light indicates the Smart Glider is charged. When
the I-glide is running out of power it will start to warn the rider with a constant
beeping sound and the battery indicator light will turn red. Battery Life is also
indicated upon the App of the Hoverboard
b. Running Indicator: When the operator triggers the rubber foot mats, the Running
Indicator LED will light up, which means that the system enters the running state;
when the system has an error during operation, the running LED light will turn red
and you will hear the system alert you with a beep.

Step 3: Charging your Smart Glider - Make sure the Smart Glider is fully charged before your
initial use. For charging instructions, please follow details in Section 8 under Battery and
Charging Specifications.
Step 4: Safety Gear - Wear all proper safety gear, including, but not limited to a helmet, knee
pads, elbow pads, and wrist guards.
Step 5: Stepping On -Stand directly behind your Smart Glider. Place one foot on the Rubber Foot
Mat, keeping the outstep of your foot at the outer end of the footpads.
Place one foot on the Smart Glider. Keep all your weight on your back foot still on the ground,
otherwise your device will begin to move, making it difficult to step on evenly with your other
foot. When you are ready, shift your weight to the foot already placed on the device and step
on with your second foot quickly and evenly (as described in the diagram below).
TIP–Stay relaxed and step on quickly, confidently and evenly 1-2. Many people overthink this
step, imagine climbing a stair, one foot, then the other. Once your feet are even, try to look up.
Step 6: Staying Balanced - Find your center of gravity. If your weight is distributed correctly on
the foot mats, and your center of gravity is level, you should be able to stand on your Smart
Glider, just as if you were standing on the ground. IF NOT, you may feel like you are moving in a
particular direction, turning, spinning in place, wobbling back and forth, or simply
uncomfortable with the device.
NOTE –On average, it takes 3-5 minutes just to get comfortable standing on the Smart Glider
and maintaining proper balance. Having a spotter will help you feel more secure. The Smart
Glider is an incredibly intuitive device; it senses even the slightest bit of motion, so having any
anxiety or reservation about stepping on may cause you to panic and trigger movement that is
not otherwise natural to you. The best way to overcome that initial anxiety is by having a
spotter.
If you begin to turn in a particular direction, focus on turning in the opposite direction to stop
turning.

When you first begin using your i-Glide, the fastest way to move in your desired direction is to
focus in that direction. You will notice that just thinking about which way you would like to go
will shift your center of gravity, and that subtle movement will propel you in that direction.
Step 7: Riding your Smart Glider - Keeping in mind what we learned in Step 6, apply the
following general principles to the operation of your Smart Glider.
Notice in the diagram above, your center of gravity determines which direction you move,
accelerate, decelerate, and come to a complete stop.
TIP - Try staying relaxed and focus on finding your center of gravity to maintain full control. Tilt
your center of gravity in the direction you wish to move. To turn, focus on the direction you wish
to turn and stay relaxed. The more comfortable you get on the I-glide, the easier you will
maneuver. Remember at higher speeds, it is necessary to shift your weight to overcome the
centrifugal force. For bumps or uneven roads, bend your knees.

Step 8: The Dismount - Stepping off of the Smart Glider can be one of the easiest steps, yet
when done improperly, may cause you to fall. To properly dismount, from a stopped position,
lift one leg up and set your foot back down on the ground (STEPPING BACK). Then step off
completely.
NOTE - A common error is to try and step forward.
TIP –make sure to lift your leg completely off to clear the device when stepping back, otherwise
you can get sent into a tailspin.

4. Special Functions
4.1 Special Functions:
Recalibrating: When the Smart Glider experiences an error, the Running indicator light will
remain red, meaning your Smart Glider will not operate until it is properly recalibrated. To
recalibrate, follow these steps:
1. Place the Smart Glider within its horizontal position against a wall or your box (as if you
will ride on it). Please assure that the Smart Glider stays within this manner and stable
throughout the whole recalibration process.
2. Press the power button and keep it in for a few seconds until the Smart Glider lights
starts flashing.
3. The Smart Glider is now within its calibrating mode.
4. Leave your Smart Glider for 2-3 minutes.
5. Switch the Smart Glider off at the power button.
6. Your Smart Glider should now be reset.
If still not functioning, please contact the EBO team. (info@exclusivebrandsonline.co.za)
5. SMART GLIDER SAFETY PRECAUTIONS –MUST READ
FAILURE TO FOLLOW ANY OF THE FOLLOWING SAFETY PRECAUTIONS CAN AND MAY LEAD TO DAMAGE
TO YOUR I-GLIDE, VOID YOUR MANUFACTURER WARRANTY, LEAD TO PROPERTY DAMAGE, CAUSE
SERIOUS BODILY INJURY, AND CAN LEAD TO SERIOUS INJURY/DEATH.
1. Please wear all appropriate safety and protective gear as previously mentioned in the User
Manual (Section 3) before operating the Smart Glider.
2. Make sure to wear comfortable clothes and flat closed toe shoes when operating your I-glide.
3. Please carefully read the User Manual, which will assist in explaining the basic working principles
and provide tips on how to best enjoy your I-glide experience.
4. Before stepping on your Smart Glider, make sure it is placed flat on level ground, the power is
on, and the Running Indicator light is green. Do not step on if the Running Indicator is red.

5. Do not try to open or modify your Smart Glider, as doing so will void your manufacturer
warranty, and may cause failure to your device leading to serious bodily injury or death.
SAFETY PRECAUTIONS CONTINUED on the following page………
5. Smart Glider SAFETY PRECAUTIONS CONTINUED–MUST READ
6. Do not use the Smart Glider to place yourself or anyone else and their property in danger.
7. Do not operate the Smart Glider while under the influence of drugs and/or alcohol.
8. Do not operate the Smart Glider when you are restless or sleepy.
9. Use your best judgment to keep yourself out of dangerous situations with your I-glide.
10. Do not ride your Smart Glider off of curbs, ramps, or attempt to operate in a skate park, empty
pool, or in any way similar to a skateboard or scooter. The Smart Glider IS NOT A SKATEBOARD.
11. Do not turn sharply, especially at high speeds.
12. Do not continuously spin in place, it will cause dizziness and you will fall and injure yourself.
13. Do not abuse your Smart Glider, doing so can damage your unit and cause failure to the
operating system leading to injury.
14. Do not drive in or near puddles of water, mud and wet sand.
15. The Smart Glider can be used on paved roads that are flat and more rugged terrains.
16. Do not ride in inclement weather: snow, rain, hail, sleek, on icy roads or in extreme heat.
17. Do not ride in or near pools or other large bodies of water.
18. For Bumps and Uneven pavement- Bend your knees when riding on bumpy or uneven pavement
to absorb the shock and vibration and help you keep your balance. If you are unsure if you can
safely ride on a specific terrain, step off and carry your Smart Glider.
19. Do not attempt to ride over bumps or objects greater then ½ inch even when prepared and
bending your knees.
20. PAY ATTENTION- look at where you are riding and be cognoscente of the road conditions,
people, places, property and objects around you.
21. Do not operate the Smart Glider in crowded areas.
22. Operate your Smart Glider with extreme caution when indoors, especially around people,
property, and narrow spaces like doorways and other narrow spaces.
23. Operate your Smart Glider with extreme consideration for people and property at all times.
24. Do not operate the Smart Glider while talking, texting, or looking at your phone.
25. Do not ride your Smart Glider where it is not permitted.
26. Do not ride your Smart Glider near motor vehicles or on public roads.
27. The Smart Glider is intended for use by a single individual, DO NOT attempt to operate the I-
glide with two or more people.
28. Do not carry anything while riding the Smart Glider.
29. Individuals with lack of balance should not attempt to operate the Smart Glider without
assistance.
30. Women who are pregnant or who may become pregnant should not operate the Smart Glider.
31. Young children and the elderly should not operate the Smart Glider without proper instruction
and supervision from a Certified Smart Glider trainer.

32. At higher speeds, always take into consideration longer stopping distances.
33. DO NOT step forward off of your Smart Glider.
SAFETY PRECAUTIONS CONTINUED on the following page………
5. Smart Glider SAFETY PRECAUTIONS CONTINUED–MUST READ
34. Do not attempt to jump on or off your Smart Glider.
35. Do not attempt any stunts or tricks with your Smart Glider.
36. Do not ride the Smart Glider in dark or poorly lit areas.
37. Do not ride the Smart Glider near or over potholes, cracks or uneven pavement.
38. Keep in mind that you are +- 4.3inh. (11cm) taller when operating the Smart Glider. Make sure
to go through doorways safely.
39. Do not exceed the maximum or minimum weight limits.
40. Do not step on the fenders of the Smart Glider.
41. Avoid driving the Smart Glider in unsafe places, including near areas with flammable gas, steam,
liquid, dust, fiber, which could cause fire and explosion accidents.
42. Follow all of the state, local, and federal laws in your respective jurisdiction regarding operation
of the Smart Glider or similar products.
43. Enjoy your Smart Glider safely and responsibly.
If you have any questions and/or concerns, or if you would like more information on safety tips, please
feel free to contact the EBO team and visit our website for more information and tips on how to best
enjoy your Smart Glider experience.
www.exclusivebrandsonline.co.za
6. Weight and Speed Limitations
PLEASE NOTICE- Speed and Weight Limits are set for your own Safety. Please do not exceed the limits
listed in the User Manual.
6.1 Weight Restrictions:
6.1.1 Maximum Weight: 265lbs - 120 kg.
6.1.2 Minimum Weight: 45lbs –20 kg (6.5”; 8” and 8.5”); 30 Kg (10”).
6.2 Speed Limits:
6.2.1 Maximum Speed in Standard Operating Mode: 20 km/h
NOTE- To prevent injury, when top speed is reached, the governor will beep to alert the user and tilt the
user back.

7. Average Operating Range
Please notice the Smart Glider can travel a distance between 20-30 km on a fully charged battery in ideal
conditions. The following are some of the major factors that will affect the operating range of your I-
glide.
Terrain: A smooth, flat surface will increase your driving distance, while driving uphill, as well as
rough or uneven terrain will reduce your distance significantly.
Weight: The weight of the user can affect driving distance; a lighter user will have further range
than a heavier user. Ambient temperature: Please ride and store the I-glide under
recommended temperatures, which will increase driving distance; battery life, and overall
performance of your Smart Glider.
Maintenance: Reasonable battery charging and maintenance will increase the distance.
Overcharging the battery can reduce range.
Speed and Driving Style: Maintaining a moderate speed will increase your distance; while
travelling at high speeds for extended periods, frequent starts, stops, idling, along with frequent
acceleration and deceleration will reduce your overall distance.
8. Battery Information and Specifications
This section is intended to provide you basic information about your battery and charger. Please read
this section carefully to ensure you for user safety and to prolong the life of your battery, as well as
improve battery performance, please follow these instructions:
1. Battery Power:
The Green LED light indicates the Smart Glider is charged. When the Smart Glider is running out
of power it will start to warn the rider with a constant beeping sound and the battery indicator
light will turn red. The Smart Glider is at less than 10% battery capacity, please stop operating
your Smart Glider and charge your battery 2-3 hours utilizing the charger that you received in
your Smart Glider package. To fully recharge your battery please follow the instructions under
Charging your Smart Glider.
2. Battery Specifications:
Content Parameters
Battery: Lithium Battery
Charging time: 2-3h
Voltage: 36V
Initial Capacity: 4.4Ah
Working Temperature: 10°- 50°
Charging Temperature: -15°-50°
Storage Temperature: -20° -50°
Utilizing temperature: -15° -50°

3. BATTERY WARNING:
Failure to follow the Safety Precautions listed in the Battery Warning could lead to serious
bodily injury and death. Seek immediate medical attention if you are exposed to any substance
that is emitted from the battery.
Do not attempt to modify, change, or replace your battery. Do not use your Smart Glider if the
battery begins to emit odor, overheats, or begins to leak. Do not touch any leaking materials,
or breathe fumes emitted. Do not allow children and animals to touch the battery. The battery
contains dangerous substances, do not open the battery, or insert anything into the battery.
Please only use the charger provided by EBO. Do not attempt to charge the Smart Glider if the
battery has discharged or emitted any substances. In that case, the battery should be
abandoned for safety. Please follow all local, state and federal laws in regards to recycling,
handling and disposing of Lithium Ion batteries. The Smart Glider should only be shipped in its
original packaging. Do not throw away your box as you need your Smart Glider packaging for
future use.
9. Charging your Smart Glider
Step 1: Ensure that the charging port is clean and dry. Make sure that there is no dust, debris or
dirt inside the charging port.
Step 2: Plug the charger into the wall, then connect the cable with the power supply (100V ~
240V; 50, 60 Hz), make sure the light on the charger is lit GREEN.
Step 3: Connect the charging cable into the charging port of the Smart Glider. The indicator light
on the charger should change to RED, indicating that your Smart Glider is now being charged.
When the RED indicator light on your charger turns to GREEN, then your Smart Glider is fully
charged. A full charge typically occurs within 2-3 hours.
Step 4: Please unplug the charger from your Smart Glider and from the power outlet.
Important Notes About Charging
If the GREEN light on your charger does not turn RED when you plug it into your Smart Glider, it
could mean you have to check the cables to ensure you have a proper connection; or that your
Smart Glider is already fully charged.
Do not overcharge, as this will affect the life of the battery.
The best charging temperatures are between -15° -50°
Extreme cold and extreme heat will prevent your battery from charging fully.
Make sure to unplug your charger before standing on or operating your Smart Glider, as this can
be very dangerous.
Use only the Smart Glider charger that you received in your box.

NOTE- Only the indicator light on the charger will tell you the status of the battery during charging.
10. Safety Alerts
During operation, if there is a system error or illegal operation performed with your Smart Glider, the
system cannot enter self-balancing mode, so the device will prompt the user in a variety of ways. You
will notice the Running Indicator Light will turn RED and you will hear a beep sound alerting you to take
precaution and cease operation.
The following are common occurrences where you will hear the Safety Alerts; these notices should not
be ignored, but appropriate action be taken to correct any illegal operation, failure or errors.
Prohibited riding surfaces (Ex. High volume water.)
When you step on the Smart Glider, if the platform is tilted more than 10 degrees forward or
backward.
Battery voltage is too low.
The device is still charging.
During operation, the platform self-initiates to tilt due to excess speed.
Overheating, motor temperature is too high.
The device has been rocking back and forth over 30 seconds.
System enters protection mode, the alarm indicator will light up and buzzer will alarm (this
typically occurs when the battery is about to die).
If the platform is tilted forward or backward more than 35 degrees, Smart Glider will power off.
If the tire is blocked, Smart Glider will stop after 2 seconds.
When the battery level has depleted below protection mode, the Smart Glider engine will
power off after 15 seconds.
While sustaining a high discharge current during operation (such as driving up a steep slope for a
long period of time), the Smart Glider engine will power off after 15 seconds.
11. Inspection, Maintenance, and Storage
Your Smart Glider requires routine inspection and maintenance. This chapter describes maintenance
steps and important operating tips.
Before you perform the following operations, ensure the power and charging cable is disconnected.
1. Inspecting and Cleaning your Smart Glider:
Disconnect the charger and turn off your Smart Glider.
Routinely check the body of the Smart Glider and tires for damage or excessive wear.
Avoid using water or other liquids and cleaners on the Smart Glider for cleaning.

The Smart Glider is IP 54 rated. It can withstand a light splash of water, however if water or
other liquids seep into the device, it will cause permanent damage to the internal
electronics.
Wet a clean cloth with clean soapy water, rinse the cloth thoroughly, and wipe the body of
the Smart Glider making sure that water does not get into the power button, charging port,
the foot mats, or tires.
2. Storing your Smart Glider:
Fully charge your battery before storing.
If you are storing your Smart Glider for an extended period of time, please fully charge your
Smart Glider at least once every three months.
If the ambient temperature of the storage location is below -20°, please do not charge. You
must bring the Smart Glider into a warmer environment before charging.
Check under Battery Information and Specifications for more details.
To prevent dust from getting into your Smart Glider, try wrapping it or sealing it with its
original packaging.
Store your Smart Glider indoors, in a dry and suitable temperature.
NOTE -Users who disassemble the Smart Glider will forfeit their right of warranty.
Packing List
1. 1x I-glide
2. 1x Charger
13. Thank You
Thank you for the purchase of your new Smart Glider, and thank for taking the time to read the User
Manual. We trust that the information that you obtained from this manual will help you safely operate,
maintain and enjoy your Smart Glider for years to come. We appreciate your consideration and sincerely
hope you enjoy and share your Smart Glider experience with all of your friends, family members, and
loved ones.

Thank you and welcome to the Smart Glider movement!
Table of contents
Other Exclusive Brands Scooter manuals