Exposure Lights Six Pack Mk.2 User manual

2012 Owner’s Manual
Six Pack
Mk.2

01
Contents
Before Using your light.
Lights Specication.
Soft Shell Pack Contents.
Quick Release bracket
Helmet Mounting.
Light Operation.
Smart Port technology.
Charging Your Light.
Piggyback Battery.
Remote Switch.
Front & Rear Accessories.
Intelligent Thermal Management.
Maintenance
Features covered in this Manual
Long burn times
LED range
Collimated lens technology
Fully weatherproof
2 year warranty
CFD - Cable Free Design
Forged alloy quick release bracket
One size ts all QR bracket
Fuel gauge battery life indicator
Light mode indicator
Reserve fuel tank
Smart Port Technology
Li-ion batteries
Hardwired batteries
Smart Rechargeing
Charge port storm cap
Piggyback plug in battery option
Remote switch available
White Eye Accessory
RedEye rear light accessory options
RedEye Micro rear light accessory
Intelligent Thermal Management (ITM)
British design & manufacture
3
3
3
2
2
5
5
5
7
7
7
8
9
9
9
9
10
11
12
12
12
13
14
2
3
4
5
6
7
8
9
10
11
12
13
14

02
www.exposurelights.com
Please read all instructions before using your EXPOSURE LIGHT
EXPOSURE LIGHTS - the lightest high output production sports lights.
Designed for high performance, EXPOSURE LIGHTS combine the latest
LED technology with a powerful Lithium Ion battery. Before using, please
familiarise yourself with this manual, so that you understand how to operate
and care for your EXPOSURE LIGHT.
WARNING
EXPOSURE LIGHTS are very powerful lighting systems. Always take care
when operating. Do not look directly into the light. This may cause serious
injury. Do not shine directly at others.
EXPOSURE LIGHTS/USE Ltd. accept no liability for any injuries or other
damages arising from the use of their product in any circumstances.
Important Information
EXPOSURE LIGHTS are weatherproof under normal conditions but are
NOT waterproof.
Do NOT submerge lights. If moisture does appear in the unit do not use it
and contact Exposure’s service department.
Never attempt to disassemble the light unit. This will invalidate your
warranty.
Do not attempt to use any other chargers or batteries with the unit. This will
cause damage and could be dangerous.
Long periods of non-use will lower the voltage of the battery. Please follow
the charging instructions and top-up the charge monthly when not in use.
Warranty
Please register your EXPOSURE LIGHT online at www.exposurelights.com.
IMPORTANT: Keep your proof of purchase from your retailer. You will require
this should you have a claim.
EXPOSURE LIGHTS provide a 2-year warranty to the original owner of
the light unit, brackets and charger. This warranty covers material and
manufacture. Accidental damage and neglect are not covered by warranty.
Modications or improper use also void the warranty.
All EXPOSURE LED’s are covered by lifetime warranty, in accordance with
proper use.
Exposure Lights service department :
Tel: +44 (0)1798 344477
E-mail: [email protected]

03
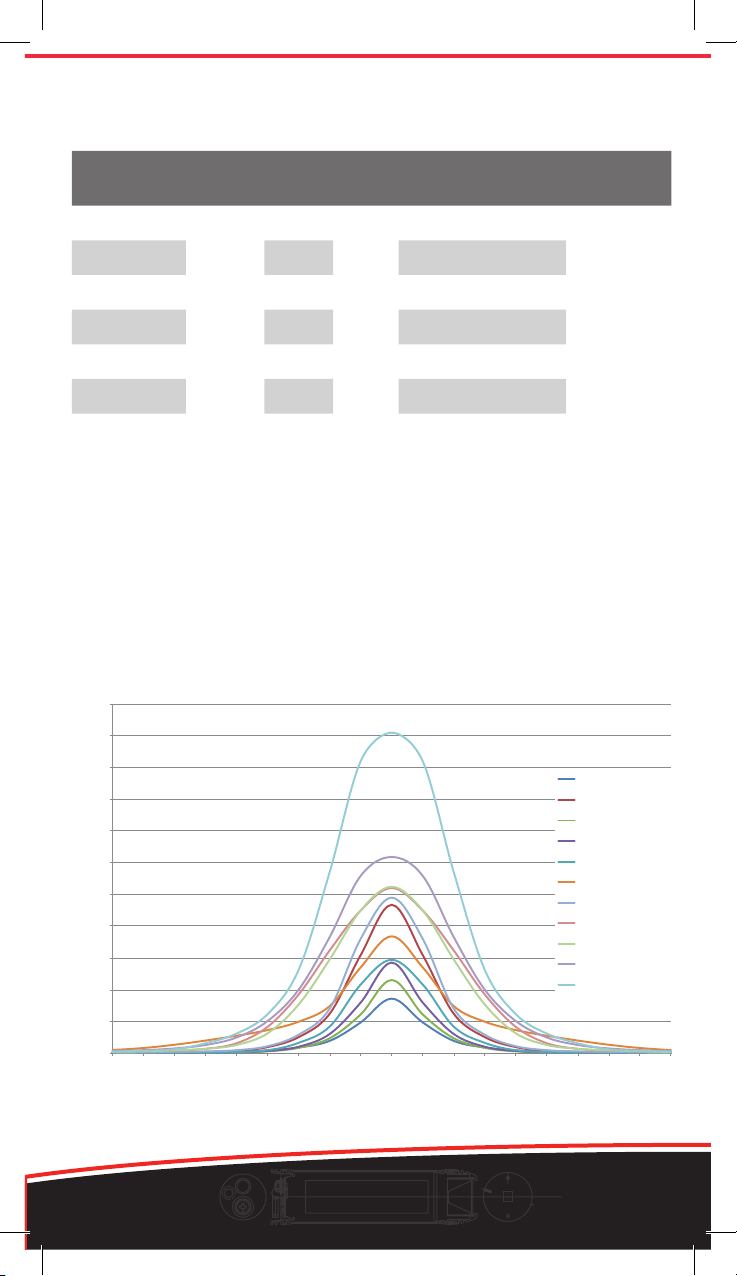
Exposure Lights Specifi cation
Exposure Lights use collimated Lens technology. These high-tech resin
lenses are speci cally designed to optimise light collection from each LED.
A great deal of time is invested in research to ensure the optimal beam and
output is achieved.
Recommended Operating Temperature Range: -15°C / +40°C
LEDs
(Cree XPG)
High
Output
Battery
(mAh) High Medium Low
weight
(gms)
Six Pack Mk.2 6 1925 15600 3 10 24 445
MaXx-D Mk.4 4 1285 10400 3 10 24 304
Toro Mk.3 3 975 7800 3 10 24 245
Race Mk.6 2 645 5200 3 10 24 192
Strada Mk.3 2 645 5200 3 (dip) 8 244
Diablo Mk.3 3 975 2600 1 3 10 112
Joystick Mk.6 1 325 2600 3 10 24 91
Burntimes by setting
- Light Spread - Degrees from Centre +
Luminous Intensity (Lux) at 1.75 m

04
www.exposurelights.com
Joystick and Diablo with helmet bracket
Light Unit
QR Handlebar
bracket
Cleat Cleat bolt
Smart Charger
Smart Charger
25.4 – 26.0 spacer Silicone strip for 31.8
Bracket
bolt
Soft Shell Pack Contents
Please ensure that the following contents are included with your purchase. If
any of the items are missing please contact your place of purchase.
Sixpack, MaXx-D, Toro, Race, Strada.
Light Unit
Lanyard
Short & long
nylon blots
Helmet bracket
lower disc
Helmet bracket upper
LEDs
(Cree XPG)
High
Output
Battery
(mAh) High Medium Low
weight
(gms)
Six Pack Mk.2 6 1925 15600 3 10 24 445
MaXx-D Mk.4 4 1285 10400 3 10 24 304
Toro Mk.3 3 975 7800 3 10 24 245
Race Mk.6 2 645 5200 3 10 24 192
Strada Mk.3 2 645 5200 3 (dip) 8 244
Diablo Mk.3 3 975 2600 1 3 10 112
Joystick Mk.6 1 325 2600 3 10 24 91
High

05
1
2
3
4
Quick Release Bracket – Six Pack, MaXx-D, Toro,
Strada, Race, (Diablo and Joystick with clip)
The Exposure QR bracket is a triumph in design that brings to life the full benet of
Exposure’s principle feature, Cable Free Design (CFD). The light unit is easily and
quickly attached and removed. The bracket stays with the bike and the light will be in
the perfect position every time it is attached.
• Mounting to a 31.8mm bar – Remove the spacer from the bracket. Wrap the
supplied Silicone band, (marked Exposure 31.8) around the handlebar and clamp
bracket over the band to protect the bars. Tighten the clamp with a 4mm hex key.
(Maximum 5Nm)
DO NOT OVER TIGHTEN!
• Mounting to a 25.4 or 26mm bar - Clip the plastic spacer over your bar, attach the
bracket over the spacer and tighten the clamp with a 4mm hex key. (Maximum 5 Nm)
1 Attach the cleat to the light unit using
the provided bolt (Already tted to new
lights).
2 Locate the cleat into the V section of
the bracket and slide forward until the
steel pin “clicks” into place
3 To adjust the horizontal angle of the
light, loosen the cleat bolt. A hole in
the bracket enables access to the bolt
when the light is in the bracket. Use a
4mm hex key to adjust and tighten the
bolt securely (Maximum 5Nm)
4 To release the light from the bracket
pull down on the red button and gently
pull back the light with your hand. This
is a simple one-hand operation.
• Warning - Make sure that brake
and gear cables cannot catch on or
interfere with the light or the bracket or
release button.
Racers beware - check number
boards do not interfere with bracket
button. If the steel pin can not pop-up
fully the light will not be fully engaged
to the bracket and may come off.
QR bracket also available as accessory:
EXPQRBK-10 Bracket Only (no cleat or bolt)
EXPQRBKSET Bracket with clip for Joystick/Diablo/Spark

06
www.exposurelights.com
Handlebar clip - Diablo, Joystick, (Spark)
The QR Clip allows you to mount your Joystick, Diablo or Spark light to the Quick
Release bracket.
• Simply press the light into the QR clip with the
point of the clip towards the front of the light
• Now engage the clip and light into the QR bracket.
A simple cable tie handlebar bracket is also
available as an accessory, as supplied with the
Spark light.
Helmet Mount – Diablo, Joystick, (Spark)
The highly acclaimed Joystick helmet bracket works as a ball joint, to innately
adjust the position of your light. Follow these instructions for set up and position of
the light for riding. The clamp is made up of three parts: Lower clamp disc, upper
clamp with ball joint socket and a nylon clamp bolt.
• Put the shorter plastic bolt through the lower clamp disc and align with a selected
vent on the inside of your helmet.
• Place the upper clamp through the top of the vent to meet the bolt.
• Tighten the bolt. Take care not to damage
your helmet.
• Use the shorter bolt rst and if not long enough then
go to the longer bolt. Do not use the long bolt on
thinner section helmets, as this will stop the ball joint
j working or possibly pop it out.
• Clip the Joystick body into the top part of
the clamp
• The Joystick can be adjusted by rotating the ball joint
when holding the light and is easy to do when you are riding to get the best position.
We suggest you attach the lanyard through the holes provided at the back of the
light unit and loop the lanyard through a vent in your helmet or round the handlebar
if using it there. This is for added security of your light.
EXPHM - Helmet Mount
EXPQRCLIP - Quick release bracket clip
EXPHBZIP - Handlebar zip-tie bracket

07
Light Operation
Multi Function Button
Located on the back of the light unit is the function button.
This operates the light unit and informs you of the mode
setting and the battery power status.
When the light is on and the function button is pressed, the colour of the button for the
rst two seconds informs you which mode has been selected. Thereafter the colour of
the button is your fuel gauge. See below.
Green (High) – Amber (Medium) – Red (Low)
On the Strada model there are just two main modes
Green (High) – Red (Dipped)
Mode Function
• To turn on the light, double click the button; the light is now operating in the brightest
mode.
• To switch between the constant settings, press the button once.
• To activate the ashing mode, press and hold the button, release immediately after
one ash. The ashing mode can be activated from any of the constant modes. To
return to the high mode, press the button once.
• To turn off the light, press and hold the function button. The light will ash once then
twice and the function button will rapid ash red, release the button and the light will
have switched off.
Fuel Gauge Function
After two seconds the function button becomes the fuel gauge. The colour of the button
now indicates the approximate percentage of battery power left.
Button Battery
Green 100% - 50%
Amber 50% - 25%
Red 25% - 5%
Red Flash 5% - Empty
Function
button
When the battery has only 5% charge remaining in whichever mode, the light will
automatically switch to the low setting and the function button will ash red. Light output
will slowly dim over the next hour and this is the extended burn time on reserve power.
The light level of the Diablo will drop far quicker due to the increased voltage drawn
from the battery.
Mode and Fuel Gauge functions will operate as normal when using a remote switch.
When using a Piggyback Battery the function button will only ash green to indicate the
light is charging.

08
www.exposurelights.com
RedEye Micro
RedEye HelmetRedEye
Smart Port Technology Plus (SPT+)
Each EXPOSURE light has the ability to detect the accessory connected to it. With
“Automatic Accessory Recognition” the accessories can be swapped over in a plug
and play fashion. This allows the user to quickly change between accessories to
adapt to the needs of their surroundings.
With Smart Port Technology Plus there is the option to run various accessories from
the Power Port such as the RedEye rear light or the WhiteEye.
All SPT+ accessories work on 2009 (MaXx-2) models onwards, these lights display the
SPT or SPT+ logo etched on the bodywork of the light. They will NOT work on 2008
MaXx model lights.
If you are a cyclist using an Exposure Light you will be aware of how important it is to
be seen from behind as well as from the front to remain safe from other road users.
SPT+ enables Charge Port to become a Power Port to power the RedEye rear lights or
WhiteEye.
You can not run two Smart Port Technology accessories at the same time.
Charger In-Car Charger
Piggy Back Batteries
Beacon

09
Smart Charging Exposure Lights
Before using your Exposure Light please charge it fully.
Use only genuine Exposure Lights chargers. International chargers, in-car chargers and
USB top-up cables are also available.
EXPOSURE LIGHTS use the highest quality Lithium Ion batteries. This allows them to
be recharged at any point during the discharge cycle. Burn times will not be affected by
multiple re-charging.
Re-charging instructions
• Ensure the light unit is turned off.
• Plug the Smart Charger into the power supply and switch on the supply.
The LED on the charger will show green (operational).
• Remove the storm cap from the charge port then insert the charger
connection plug into the light’s charge port. The charger’s LED will show
red when the light unit is charging.
The function button on the light will continuously ash green to inform you
that the charger is connected and functioning.
From empty the light unit
will rapid charge till full - at
this point the LED on the
charger will go from red to
green.
charge port
function button
Charging Times
Six Pack 24 Hrs
MaXx-D Mk.3 16 Hrs
Toro Mk.2 12 Hrs
Race Mk.5 8 Hrs
Strada Mk.2 8 Hrs
Diablo Mk.2 4 Hrs
Joystick Mk.5 4 Hrs
Long periods of non-use will lower the voltage of the battery. If the unit
is being stored for long periods, please ensure the battery is periodically
charged. We suggest once per month.
Exposure Lights from 2008 (MaXx range) onward use the same Smart
chargers. The new 2012 Smart charger now has USB compatibility.

10
www.exposurelights.com
charge port
Piggyback
battery
single cell
Piggyback
battery
triple cell
Piggyback battery
single cell
BURN TIMES (hours approx) WITH PIGGYBACK BATTERIES
Piggyback Battery
A feature of the Exposure range is the ability to extend burn times with
Piggyback batteries.
Piggyback batteries are available as single or triple cells and are
supplied with Velcro attachment strap and tting block. They can be
mounted under the stem, to the helmet, on the light unit itself or carried
in your pocket or backpack.
Remote Recharging
When the light is switched off and the Piggyback battery is plugged in it will
pass charge into the light unit. The cells will average out the available power
between the light unit and the Piggyback battery.
Piggyback batteries give you peace of mind for safety and security by
extending your burn times.
When the Piggyback battery is plugged in, the fuel gauge will not be
operative; the function button will ash green as when charging.
Options available: EXPPB1 – Single cell Piggyback battery
EXPPB3 – Triple cell Piggyback battery
Mode CFD 1 Cell 3 Cell
Six Pack Mk.2 High 3 3.30. 4.3
Med 10 11.40. 15
Low 24 28 36
MaXx-D Mk.4 High 3 3.45 5.15
Med 10 12.30. 17.3
Low 24 30 42
Toro Mk.3 High 3 4 6
Med 10 13.2 20
Low 24 32 48
Race Mk.6 High 3 4.30. 7.3
Med 10 15 25
Low 24 36 60
Mode CFD 1 Cell 3 Cell
Strada Mk.3 High 3 4.5 7.5
Dipped 8 12 20
Diablo Mk.3 High 1 2 4
Med 3 6 12
Low 10 20 40
Joystick Mk. High 3 6 12
Med 10 20 40
Low 24 48 96

11
Remote Switch
Smart Port Technology plus allows you to run various accessories with your Exposure
light such as the Remote Switch.
Available as an accessory, the remote switch simply plugs into the Smart Port on the
back of the light unit. Using the Velcro strap supplied, t the Switch to your handlebar
near the grip or were you want it. You can now turn the light on/off and switch between
modes as normal, without having to touch the light itself. The Function and Fuel Gauge
indicators on the button remain operative when using the Remote Switch.
Use the Remote Switch for easier switching in the dark, especially when wearing
winter gloves, taking advantage of the larger button on the Remote Switch.
Dip your lights. Just as cars dip their headlights for oncoming trafc and cyclists, we
recommend that Exposure Light users respect others in the same way. On the road or on
the bike path our lights are so bright in high mode that it is recommended to “dip” down to
Low light mode when someone is coming towards you. With the Remote Switch this can
be easily and quickly done with two clicks of the button. One more click and you are back
up to high mode. Be seen but also respect others and be safe in the dark.
The Strada model is designed with just two main modes: High Beam and Dipped Beam.
It is supplied as standard with the remote switch. On Low Beam the Strada displays a at
(horizontal) beam pattern that will not dazzle on-coming trafc or cyclists. It is simple to
“toggle” quickly between the two modes.
Warning: Do not plug in the Remote Switch with the Power Port active as the remote
switch will not operate in this case.
Remote Switch ts
MTB handlebars
Remote Switch ts Road handlebars
Smart Port for Remote Switch
Remote
Switch

12
www.exposurelights.com
RedEye Micro: An affordable plug-in rear light for the Joystick or Diablo. There is
minimal drain on burn time for main light when using RedEye Micro. It is a very focused
beam of light. As your head moves about it will catch the eye of the driver behind you. It
is very effective but should be thought of as a supplement to your main rear light on the
bike when cycling.
RedEye rear light accessories and
White Eye accessory.
RedEye rear Light: Encased in tough CNC machined aluminium body and fully
waterproof, the RedEye is possibly the brightest (80 lumens) rear light on the market.
It uses a red P4 LED. Burn times will be reduced on you front light when running the
RedEye.
The 2012 RedEye uses a new bracket that attaches to the seatpost with a silicone
band. The bracket is suitable for posts from 25.0mm to 34.9mm in diameter.
Be clearly seen from the rear both day and night. RedEye comes highly recommended
to cyclists even in daylight hours. It is so bright that you can always be seen with this
accessory.
RedEye Helmet rear light: A neat solution. It is the same as the RedEye but with clip
and short cable. Attach to the body of the Joystick or Diablo. Only to be used when the
light is helmet mounted or handheld.
WhiteEye front accessory: A 240 lumen white P4 LED that clips onto the Joystick or
Diablo in the same way as the RedEye Helmet accessory. Used to boost main beam
output.
WhiteEye tted to Joystick RedEye tted to seat post

13
Intelligent Thermal Management (ITM).
Exposure’s new patented technology combats the loss in ef ciency of
LEDs at elevated temperatures, maintaining optimum output keeping
you shining ‘Brighter for Longer’!
Exposure Lights have undertaken extensive research into the affect
of temperature on LED light output. There is an optimum temperature
where the balance between light output and battery burn time peaks,
beyond this the LED becomes inef cient. The LED draws more current
from the battery resulting in shortened burn time but actually produces
less light. The intelligent circuitry of ITM monitors the temperature of the
LEDs and lowers the power accordingly to cool the LED to the optimum
ef cient operating temperature. The lowering of the power doesn’t
noticeably drop the light output, it only maximises burn times. The
combination of ITM and new improved body designs for increased heat
dissipation ensures that no power is wasted, maximising burn time.
This graph shows the relationship between the Temperature of the LED
and the Light output. As the power to the LED increased the light output
increases but so does the temperature. There is then a peak in light output
beyond which the LED becomes inef cient and light output actually reduces.
ITM continually measures the temperature of the light and by managing the
power holds the light output at the optimally ef cient phase of the curve.
When ITM is active the function button will ash rapidly but still operate as
the Fuel Gauge indicating the level of charge. Once the light has cooled,
ITM will switch off and the function button will stop ashing.
Effect of Temperature on Lumen Output
Temp/Amps
Light
ITM managed
ef cient phase

14
www.exposurelights.com
Maintenance
Inspect and test your EXPOSURE light before every outing in the dark.
Keep your EXPOSURE light clean, and the lenses free of dirt. The lenses
are made of hi-tec plastic but can be scratched. Be careful when cleaning
any mud or dirt from the lens. Never use a high pressure spray or hose on
your EXPOSURE light. Do not use harsh abrasive or corrosive materials to
clean your EXPOSURE light.
Follow all charging instructions. If the unit is being stored for long periods,
please ensure the battery is periodically charged fully. We suggest once
every month. The same applies to Piggyback batteries.
History
Exposure Lights are designed and manufactured to exacting standards in
the UK by USE Ltd (Ultimate Sports Engineering). We have been riding and
racing bikes in the dark since 1997. Unsatised with other lighting systems
we recognised that the future of lighting was LED technology. In 2005 we
launched the Exposure Lights brand and a revolution in lighting technology
began. Our 2012 range is the most advanced, compact, lightweight and
complete lighting range available to day. Thank you for investing in your
Exposure Light. We wish you many happy years of use from it. Welcome
to a better night time experience. Many of our dealers run night cycle rides.
Why not join in or take part in one of the many night events we sponsor.
We design them. We make them. We are here to help.
If you are experiencing any problems with your Exposure Light or
accessories please contact us directly at:
Tel: Exposure/USE Ltd +44 (0)1798 344477
or Service: +44 (0)1798 344471
e-mail: [email protected] or [email protected]
Alternatively contact your Exposure Dealer/Distributor - check web for details
www.exposurelights.com

Designed and made by
www.use1.com
MaXx-D
Mk.4
Strada
Mk.3
Diablo
Mk.3
Toro
Mk.3
Race
Mk.6
Joystick
Mk.6
Table of contents
Other Exposure Lights Bicycle Accessories manuals
Popular Bicycle Accessories manuals by other brands

Burley
Burley Forged Standard Hitch Owner's instruction and safety manual

EVBIKE
EVBIKE EVBAT36V7A Installation and operating instructions

Cateye
Cateye STRADA CADENCE CC-RD200 user manual

Marzocchi
Marzocchi QR20 Plus owner's manual

Topology
Topology DS102 user manual

Crivit Pro
Crivit Pro SP-84 owner's manual