Exposure Lights SIX PACK MK9 User manual
CHARGING
USER GUIDE
SIX PACK MK9 • MAXX D MK11 • TORO MK10 • RACE MK13
STRADA SB • STRADA RS • STRADA SL
IMPORTANT:
• After charging is complete, remove the charging cable from the light (if the light is left
connected with the charger off, the light can switch on)
• Replace the Storm Cap to prevent ingress of mud and grit
• Do not charge the light with the lens face down or in contact with any potentially
combustible surface
• Do not charge the light in an enclosed space
Fully Charge your light before rst use.
Locate the charging port by pulling away the silicone Storm Cap.
Fully insert either the Smart Charger or USB top up cable and begin charging from a mains or USB
supply respectively.
If you are using the Smart Charger the LED on the charger will go red for the rst 95% and then go
green for the trickle charge.
On the back of the light the OLED display screen will show the approximate charge level, once the
light says ‘100%’ leave it charging for a further hour. The percentage shown is most accurate when
the light is in operation.
NOTE: If you are charging your light from when its battery level is very low you may see a code appear
on the OLED screen resembling ‘M00145’. This is a recalibration code and nothing to worry about.
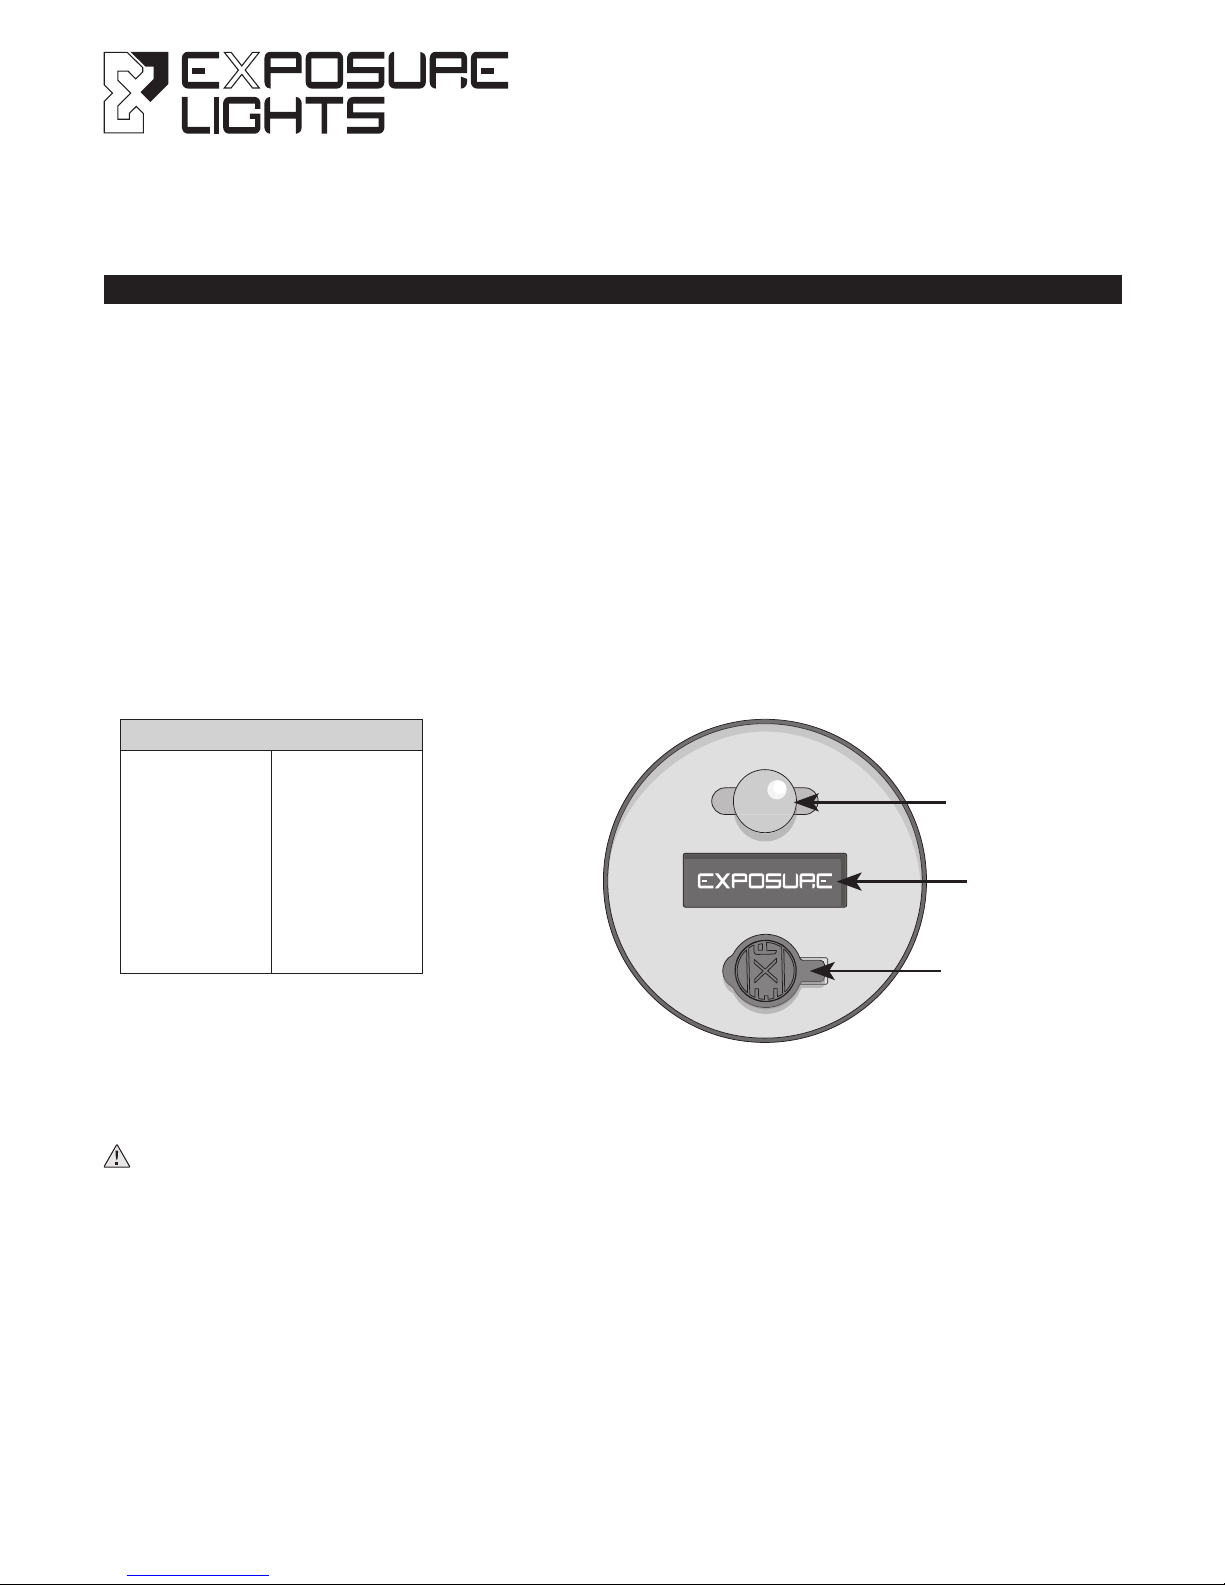
FUNCTION
BUTTON
OLED
SCREEN
STORM CAP
(CHARGE PORT
/SMART PORT)
APPROX MAINS CHARGER TIMES
SIX PACK 8 HRS
MAXX D 6 HRS
TORO 6 HRS
RACE 6 HRS
STRADA SB 6 HRS
STRADA RS 6 HRS
STRADA SL 3 HRS*
*3 hours from 500mA source
with supplied USB cable.
LIGHT OPERATION & BATTERY LIFE
Located on the back of the light is the stainless-steel Function Button, OLED display screen and
two LEDs. The OLED screen and LEDs indicates both mode and battery life remaining.
To turn the light on press the function button twice in quick succession, the light will then turn on in
the brightest mode.
To switch between high, medium and low modes press the function button once, repeat this
process to cycle through the modes.
The LED on the back of the light will initially indicate the mode the light is in:
Green – High.
Amber – Medium.
Red – Low.
After three seconds the LED on the back of the light
will indicate battery life remaining. See Fuel Gauge table (right).
The OLED screen will also display mode and battery life remaining in hours and minutes for
more detail.
To turn the light off hold down the stainless steel function button until the light emits two ashes and
then release. The OLED screen will then display ‘OFF’.
NOTE: If you are using an Exposure Support Cell with the light then the battery life displayed will
not increase, but will count down more slowly.
DAYBRIGHT (STRADA MODELS ONLY)
FLASH MODE
We recommend using your Strada in DayBright mode during daylight hours for your safety.
To activate DayBright your Strada will need to be in Program 1 (see OMS section) and then
activate Flash Mode (see above).
To activate the Flash Mode rst the light needs to be ON. Hold the Function button down and
immediately release after the light emits a ash, the OLED display will then read ‘FLASH’. The Flash
mode can be activated from any of the constant brightness settings.
To return to the constant mode press the Function Button once. NB: The light will then return to the
brightest setting.
In Program 10 for the Off Road lights and Program 5 for the Strada lights the Flash Mode is
replaced with the Morse Code for SOS. For more information about changing programs see the
OMS section of this guide.
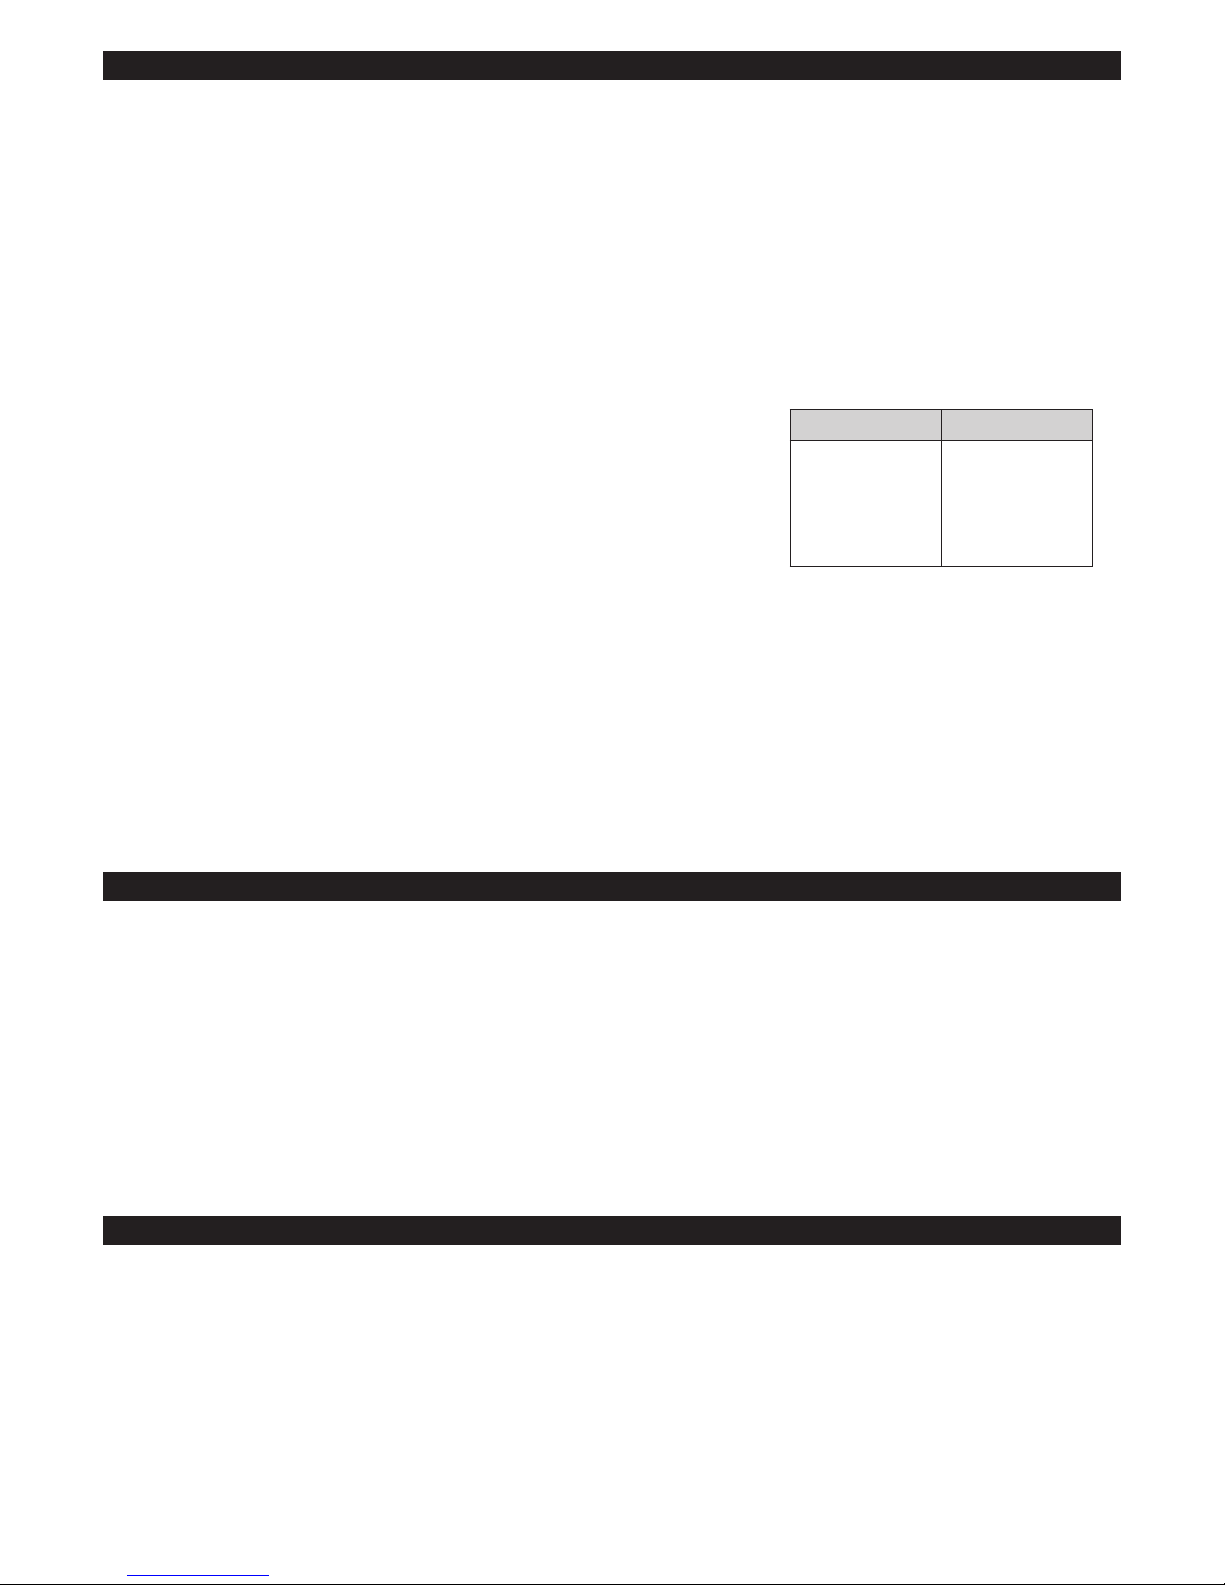
LED BATTERY %
GREEN 100 – 50%
AMBER 50 – 25%
RED 25 – 5%
RED FLASH 5% – Empty
FUNCTION
BUTTON
STORM CAP
(CHARGE PORT
/SMART PORT)

HANDLEBAR MOUNTING
The handlebar bracket is designed for 35mm and 31.8mm handlebar diameters. For 35mm
handlebars remove the black, thermoplastic shim.
For ease of installation remove the light from the bracket. The bracket should be mounted as close
to the stem as possible so that the tapering of the handlebars does not affect the clamp.
If your bike has a 25.4mm diameter handlebar an appropriate bracket can be purchased from your
local Exposure Dealer.
Use a high quality 4mm Allen key to tighten the bolt to 5Nm. Do not over-tighten.
2. To adjust the horizontal angle of the
light, loosen the cleat bolt. Use a 4mm hex
key to adjust and tighten the bolt securely
(Maximum 5Nm).
1. Locate the cleat into the V section of the
bracket and slide forward until the steel pin
“clicks” into place.
3. To release the light from the bracket pull down on the red
button and gently pull back the light with your hand.

NOTE: This info is etched
onto the body of the lights
NOTE: This info is etched
onto the body of the lights
OPTIMISED MODE SELECTOR (OMS)
OMS allows you to select a burn time tailored to your needs from several programs. Burn time and
lumen output are directly proportional, if you double the burn time, you halve the lumen output.
Etched onto the side of the light is a table showing the different modes and burn times available
within these different programs.
To access the different programs, start with the light OFF.
Hold the Stainless Steel Function Button down, the light will emit a set of ashes, keep the Function
Button held down and the OLED screen on the back of the light will say ‘PGM 1’.
To cycle through the different programs, click the Function Button until you reach your desired
program and then release, the OLED screen on the back of the light will then display ‘SET’.
For example, if you want to put your light in Program 4 then you release the Function Button after
the OLED displays ‘PGM 4’. The light will then remain in Program 4, regardless of if it is turned on
or off, until it is reprogrammed.
SIX PACK/MAXX-D/TORO/RACE
MODE
PROGRAM HIGH MEDIUM LOW
1Reex 3 hrs - 12 hrs
2Reex 6 hrs - 18 hrs
3Reex 12 hrs - 24 hrs
4 2 hrs 6 hrs 12 hrs
53 hrs 10 hrs 24 hrs
6 4 hrs 12 hrs 36 hrs
7 2 hrs - 6 hrs
8 3 hrs - 10 hrs
9 4 hrs - 12 hrs
10 10 hrs 24 hrs SOS
STRADA SB/STRADA RS/STRADA SL
MODE
PROGRAM HIGH MEDIUM LOW
1 2 hrs 6 hrs 12 hrs
2 3 hrs 10 hrs 24 hrs
3 4 hrs 12 hrs 36 hrs
4 2 hrs - 6 hrs
53 hrs - 10 hrs
6 4 hrs - 12 hrs
7 10 hrs 24 hrs SOS

SMART PORT TECHNOLOGY+ (SPT+)
REFLEX+ (OFF ROAD LIGHTS ONLY)
The Charge Port also functions as a ‘Smart Port’.
SPT+ works as an output and allows the light to power ancillary Exposure accessories, such as the
RedEye, whilst the light is on. SPT+ can also be used to turn your light into a power bank to charge
your USB devices.
SPT+ will automatically activate when the light is on.
You can also use SPT+ when the light is off, but you will need to activate it. To activate SPT+ hold
down the Function Button and immediately release when the light emits rapid ashes.
The OLED screen on the back of the light will then display ‘SMART PORT ACTIVE’.
You can then charge your devices with the Exposure Boost Cables, which are available from your
local Exposure dealer. However, please test your device before intended use as not all devices
may be compatible.
To deactivate SPT+ simply turn the light on and off again.
NOTE: Ensure that SPT+ is deactivated before charging the light.
Reex+ Technology uses thermistors, gyros and accelerometers built into the light to adapt
brightness based upon air ow, gradient and cornering forces. The light will are up for fast, rough
descents and dim for slow climbing.
Reex+ is found in the High Mode of Programs 1- 3 of the Off Road lights (see OMS section).
Reex+ takes approximately 20 minutes of riding to calibrate to your style and then will remain in
the lights memory, unless the riding conditions or style change.
After a period with no motion the light will dim signicantly to save battery life and will are back up
upon movement.
NOTE: Do not use Reex+ when road riding as the light can are up potentially dazzling other
road users.
INTELLIGENT THERMAL MANAGEMENT (ITM)
Thermistors in the lights circuitry allow automatic temperature regulation, maintaining efciency by
minimising energy wasted as heat, to maximise brightness and burntime. This leads to a longer
lifetime of the LEDs.
For more information please visit:
exposurelights.com
EXPUG5.1
WARRANTY & SERVICE
MAINTENANCE
WARNING
Inspect and test your light and bracket apparatus before every ride.
Keep your light clean and free of dirt, be careful when cleaning any mud or dirt from lens to
avoid scratching.
Never use a high pressure spray or hose on your light.
Do not use harsh abrasive or corrosive materials to clean your light.
For extended periods when your light is not in use fully recharge the light once a month, as a long
duration with no charge is detrimental to the cells.
Please do not send any products back to us without contacting our service team rst to
discuss your issue and for a valid returns number.
All our lights come with a 2 year warranty.
If you have a servicing or technical question you can contact us using the information below. If you
return your light for repair no work will be carried out until you have been contacted with the cost
for the repair. If you are outside of the UK it would be quicker in the rst instance to contact the
local distributor.
+44 (0)1798 839300
Exposure Lights are very powerful lighting systems, please take care when operating. Do not
look directly into the light or shine directly at others, including other road users.
Do not charge the light in an enclosed place, or with the lens in contact with potentially
combustible material.
Exposure Lights / Ultimate Sports Engineering Ltd. accept no liability for any injuries or other
damages arising from the use of their product in any circumstances.
NOTE: Patents apply.
This manual suits for next models
6
Table of contents
Other Exposure Lights Bicycle Accessories manuals


Popular Bicycle Accessories manuals by other brands


Specialized
Specialized Elite CylcoComputer user manual

Sigma
Sigma BC 16.16 manual

Playcore
Playcore Dero Setbacks installation instructions

VDO Cyclecomputing
VDO Cyclecomputing x3dw instruction manual

Cateye
Cateye RAPID X2 manual

buratti meccanica
buratti meccanica Clorofilla Trail Use and maintenance manual


