manuals.online logo
Brands
  1. Home
  2. •
  3. Brands
  4. •
  5. Exsys
  6. •
  7. PCI Card
  8. •
  9. Exsys EX-1074 User manual

Exsys EX-1074 User manual

651
J5: 1x interne
USB 2.0 A-Buchse
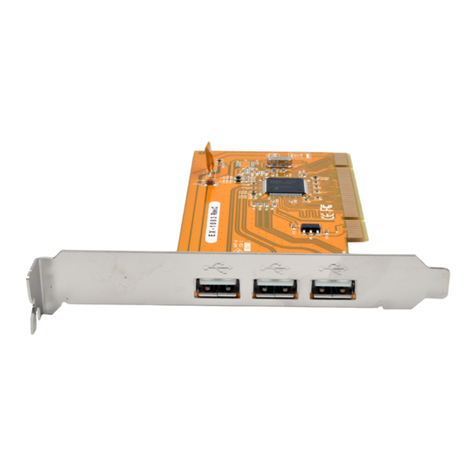
Die EX-1074 ist mit 4 externen USB 2.0 Anschlüssen ausgestattet. Der serielle PCI-Bus
unterstützt optimal die Leistung des schnellen VIA Chipset. Die USB Karte gewährleistet so
eine sichere Datenübertragung und exzellente Performance von bis zu 480Mbit/s! Es ist nicht
möglich die I/O Adressen und Interrupts manuell einzustellen, da die Einstellungen der Karte
vom System (BIOS) und beim installieren des Betriebssystems automatisch vorgenommen
werden. Die USB 2.0 PCI Karten sind voll kompatibel mit Microsoft Windows Standard Open-
HCD Treibern und sind nach den Normen des USB Rev. 2.0 entwickelt worden. Sie haben
einen Dual Speed USB Transceiver. Sie unterstützen den 32- und 64-bit PCI-Bus mit 5 Volt
und 3,3 Volt.
BESCHREIBUNG & TECHNISCHE DATEN
AUFBAU
Kompatibilität: PCI 32-bit oder PCI-X 64-bit, 33Mhz
Betriebssysteme: WIN 9.x/ ME/ 2000/ XP/ Vista/ 7/ 8.x/ 10/ Server 20xx/ MAC/ Linux
Anschlüsse: 4x USB 2.0 A-Buchse extern, 1x USB 2.0 A-Buchse intern
Lieferumfang: EX-1074, Anleitung
Zertifikate: CE / FCC / RoHS / WEEE DE97424562 / WHQL
VIA Chipset
Anleitung
Vers. 1.0 / 30.11.15
EX-1074
J1-J4:
4x externe USB 2.0 A-Buchse
JUMPER EINSTELLUNG & ANSCHLÜSSE
J1-J5:
USB 2.0 Pin‘s
Pin Signal Pin Signal
1VCC 3DATA+
2DATA- 4GND
Achtung!
Bitte Stecker nie mit
Gewalt oder umgekehrt in
den Anschluss stecken!
HARDWARE INSTALLATION
If you are ready with the jumper settings, please proceed with the following installation instructions.
Because there are large differences between PC’s, we can give you only a general installation
guide for the card. Please refer your computer’s reference manual whenever in doubt.
1. Turn off the power to your computer and any other connected peripherals.
2. Remove the mounting screws located at the rear and/or sides panels of your Computer and
gently slide the cover off.
3. If necessary please install now the external power supply to the card like shown at JP1 & J6
above.
4. Locate an available PCI expansion slot and then gently but firmly insert the card. Make sure
that the card is seated and oriented correctly.
5. Then connect the card with a screw to the rear panel of the computer.
6. Gently replace your computer’s cover and the mounting screws.
DRIVER INSTALLATION
All OS
After the hardware installation the OS will recognize the device automatically and install the
drivers.
ÜBERPRÜFEN DES INSTALLIERTEN TREIBER
Open the >Device manager<. Now you should see at „USB-Controller“ the following new entry's:
If you see this or a similar information the device is installed correctly.
VIA Drivers (optional)
If you experience any performance problems or if you want to use older operating systems
which doesn't support USB 2.0 such as Windows 98SE. You can download the driver at our
website www.exsys.de or you can find the driver on our driver CD. Then you can install the
optional VIA Drivers as follows.
Open and run the file “Setup.exe“ by double click on your mouse and follow the setup program
to finish installation process. After that shut down windows and follow the instructions for the
Hardware installation. After installing the card simply start your computer and the card will be
recognized automatically by your system.
J6: Anschluss für Stecker
vom PC-Netzteil
JP1: Stromquelle wählen
PCI oder AUX
J6:
Wenn JP1 auf AUX gestellt ist, muss J6 mit dem Stromanschluss vom
PC Netzteil verbunden werden! Bitte auf die richtige Polarität achten!
Achtung! Stecker nie bei eingeschaltetem PC ein oder ausstecken!
1 +5V
2 GND
3 GND
4 +12V
JP1:
PCI
AUX
PCI = Strom vom PCI-Express BUS (Werkseinstellung)
AUX = Strom vom PC-Netzteil des Rechners
(Zur Entlastung des Mainboards und zur stabilen Stromversorgung
bei Verwendung von Endgeräten mit hohem Stromverbrauch).
Anschluss J6 muss mit PC-Netzteil verbunden werden!
234
HARDWARE INSTALLATION
Beachten Sie bitte die folgenden Installationshinweise. Da es große Unterschiede zwischen PC‘s
gibt, können wir Ihnen nur eine generelle Anleitung zum Einbau der EX-1074 geben. Bei Unklar-
heiten halten Sie sich bitte an die Bedienungsanleitung Ihres Computersystems.
1. Schalten Sie Ihren Rechner und alle angeschlossenen Peripheriegeräte aus und ziehen Sie
bei allen Geräten den Netzstecker.
2. Lösen Sie die Schrauben des Gehäuses auf der Rückseite Ihres Computers und entfernen
Sie vorsichtig das Gehäuse.
3. Gegebenenfalls installieren Sie nun die externe Stromversorgung zur Entlastung des Main-
boards! (siehe Jumper Einstellung und Anschlüsse JP1 & J6)
4. Suchen Sie jetzt einen freien PCI Steckplatz und stecken Sie die Karte vorsichtig in den
ausgewählten PCI Steckplatz ein. Beachten Sie, das die Karte korrekt eingesteckt wird und
das kein Kurzschluss entsteht.
5. Danach befestigen Sie die Karte mit einer Schraube am Gehäuse.
6. Jetzt das Computergehäuse mit den Schrauben wieder schließen.
TREIBER INSTALLATION
Alle Betriebssysteme
Nach Abschluss der Hardware Installation erkennt das Betriebssystem die EX-1074 automa-
tisch und installiert diese.
ÜBERPRÜFEN DES INSTALLIERTEN TREIBER
Öffnen Sie den >Geräte-Manager<. Jetzt müssten Sie unter „ USB-Controller“ folgende
Einträge sehen:
Sind diese oder ähnliche Einträge vorhanden, ist die Karte richtig installiert.
VIA Treiber (optional)
Wenn Sie Probleme mit der Übertragungsgeschwindigkeit haben sollten oder Sie ein altes
Betriebssystem einsetzen möchten welches keine USB 2.0 Unterstützung hat z.B. Windows98
SE. Dann können Sie diesen Treiber von unserer Homepage www.exsys.de herunterladen
oder Sie finden den Treiber auch auf unserer Treiber CD und wird wie folgt installiert.
Starten Sie das File “Setup.exe“ durch Doppelklick auf der Maus. Folgen Sie nun dem Setup
Programm und schließen Sie die Installation ab. Danach fahren Sie Ihren PC herunter und
installieren Sie die Karte wie im Punkt Hardware Installation beschrieben. Danach können Sie
Ihren PC wieder starten und die Karte wird automatisch erkannt.
J5: 1x internal
USB 2.0 A-Port
The EX-1074 supports 4 external and 1 internal USB 2.0 ports. It uses data transfer rates up to
480Mbit/s. The USB 2.0 PCI card design fully utilize the VIA chipset, which represents the
latest in high speed USB interface technology. In combination with the fast PCI-Bus it provides
a secure and very high data transfer on each single port. It is not possible to change the
address or IRQ settings manually, they will be obtained automatically by the system (BIOS)
and operating system. The USB 2.0 PCI cards is full compatible with Microsoft Windows
Standard OpenHCD driver and full compliance with USB Rev. 2.0. There have a Dual-Speed
USB transceiver. It’s supports motherboards with 32- and 64-bit PCI-Bus and the power it’s
support with 5V or 3.3V.
DESCRIPTION & TECNICAL INFORMATION
LAYOUT
Compatibility: PCI 32-bit or PCI-X 64-bit, 33Mhz
Operating system: WIN 9.x/ ME/ 2000/ XP/ Vista/ 7/ 8.x/ 10/ Server 20xx/ MAC/ Linux
Connectors: 4x USB 2.0 A-Port external, 1x USB 2.0 A-Port internal
Extent of delivery: EX-1074, Manual
Certificates: CE / FCC / RoHS / WEEE DE97424562 / WHQL
VIA Chipset
Manual
Vers. 1.0 / 30.11.15
EX-1074
J1-J4:
4x external USB 2.0 A-Port
JUMPER SETTING & CONNECTORS
J1-J5:
USB 2.0 Pin‘s
Pin Signal Pin Signal
1VCC 3DATA+
2DATA- 4GND
Attention!
Never plug in with force
or in wrong direction.
J6: Connector for
PC Power Supply
JP1: Change Power
Source PCI or AUX
J6:
If JP1 is set to AUX, J6 must be connected with pc power supply!
Please make sure you connect the plug in the right direction!
Never connect or release the plug while the PC power is on!
1 +5V
2 GND
3 GND
4 +12V
JP1:
PCI
AUX
PCI = Power from PCI-Express BUS (Factory Setting)
AUX = Power from PC Power Supply
(For safe direct power from pc power supply to provide sufficient
power for devices with high power consumption).
Connector J6 must be connected with PC power supply!
Other Exsys PCI Card manuals

Exsys EX-6450 User manual

Exsys

Exsys EX-6450 User manual

Exsys EX-3516 Reference manual

Exsys

Exsys EX-3516 Reference manual

Exsys EX-60102 User manual

Exsys

Exsys EX-60102 User manual

Exsys EX-41054 User manual

Exsys

Exsys EX-41054 User manual

Exsys EX-11495 User manual

Exsys

Exsys EX-11495 User manual

Exsys EX-44088 User manual

Exsys

Exsys EX-44088 User manual

Exsys EX-44098-2 User manual

Exsys

Exsys EX-44098-2 User manual

Exsys EX-43062 User manual

Exsys

Exsys EX-43062 User manual

Exsys EX-44041-2 User manual

Exsys

Exsys EX-44041-2 User manual

Exsys EX-12005 User manual

Exsys

Exsys EX-12005 User manual

Exsys EX-1083 User manual

Exsys

Exsys EX-1083 User manual

Exsys EX-45034IS User manual

Exsys

Exsys EX-45034IS User manual

Exsys Ex-1083 User manual

Exsys

Exsys Ex-1083 User manual

Exsys EX-6072PoE User manual

Exsys

Exsys EX-6072PoE User manual

Exsys EX-11087 User manual

Exsys

Exsys EX-11087 User manual

Exsys EX-11092-2 User manual

Exsys

Exsys EX-11092-2 User manual

Exsys EX-1062 User manual

Exsys

Exsys EX-1062 User manual

Exsys EX-41021 User manual

Exsys

Exsys EX-41021 User manual

Exsys EX-6074PoE User manual

Exsys

Exsys EX-6074PoE User manual

Exsys EX-11042 User manual

Exsys

Exsys EX-11042 User manual

Exsys EX-6069 User manual

Exsys

Exsys EX-6069 User manual

Exsys EX-44352IS-4K User manual

Exsys

Exsys EX-44352IS-4K User manual

Exsys EX-1072 User manual

Exsys

Exsys EX-1072 User manual

Exsys EX-1093-2 User manual

Exsys

Exsys EX-1093-2 User manual

Popular PCI Card manuals by other brands

Abit WLP-01 user manual

Abit

Abit WLP-01 user manual

STL I-142 user manual

STL

STL I-142 user manual

Areca ARC-5020-3 manual

Areca

Areca ARC-5020-3 manual

ADLINK Technology cPCI-6520 user manual

ADLINK Technology

ADLINK Technology cPCI-6520 user manual

Pentium HOT-541 user manual

Pentium

Pentium HOT-541 user manual

Datapath VisionSD4+1S manual

Datapath

Datapath VisionSD4+1S manual

Hama 62748 Operating	 instruction

Hama

Hama 62748 Operating instruction

Wasco OPTOIO-PCIe32 ULTRA user guide

Wasco

Wasco OPTOIO-PCIe32 ULTRA user guide

DAQ SB3-FRM13 K Series user manual

DAQ

DAQ SB3-FRM13 K Series user manual

SIIG LB-US0314-S1 installation guide

SIIG

SIIG LB-US0314-S1 installation guide

Penguin Edge PCIE-8130-FL quick start guide

Penguin

Penguin Edge PCIE-8130-FL quick start guide

Exar XRT71D00 manual

Exar

Exar XRT71D00 manual

Gigabyte G1.ASSASSIN2 installation guide

Gigabyte

Gigabyte G1.ASSASSIN2 installation guide

SysKonnect SK-9E21D user manual

SysKonnect

SysKonnect SK-9E21D user manual

ADLINK Technology NuDAQ PCI-9114DG user guide

ADLINK Technology

ADLINK Technology NuDAQ PCI-9114DG user guide

Multitech ISIHI-2S quick start guide

Multitech

Multitech ISIHI-2S quick start guide

Encore ENLSA2-2C-PCIE specification

Encore

Encore ENLSA2-2C-PCIE specification

D-Link DWA-X3000 user manual

D-Link

D-Link DWA-X3000 user manual

manuals.online logo
manuals.online logoBrands
  • About & Mission
  • Contact us
  • Privacy Policy
  • Terms and Conditions

Copyright 2025 Manuals.Online. All Rights Reserved.