EzCAP ezcap286 User manual

HD Video Capture
Quick Start Guide
Thanks for purchasing ezcap286 HD Video Capture. The following guides you how to set up. Hope
this device will bring you nice digital experience.
With this ezcap286 HD Video Capture, you can capture up to 1080P video from HD camera with
HDMI or SDI port.
Features/ports and buttons:
1. PWR—DC 12V power supply.
2. FOOTSWITCH—3.5mm port to connect footswitch to capture video.
3 HDMI INPUT—HDMI input.
4 SDI INPUT—SDI input.

5 SOURCE—Switch button to choose the video source between SDI and HDMI.
6 SD—SD slot, for plug SD card(only support FAT32 format) to save video files.
7 LINE OUT—Audio line out.
8 HOST—USB host, for plug USB flash or HDD to save video files.
9 PC—To connect to PC.
10HDMI OUTPUT—By pass the input video source (for both SDI and HDMI) to monitor.
11 SDI OUTPUT—Loops out the input SDI (not for HDMI) to monitor.
12 IR—For connect the IR expand cable for IR remote.
13 REC—Press to record, press again to stop recording.
LEDS:
SDI(yellow)—Will be on when power on. Will be off if switched to HDMI input.
HDMI(yellow)—Will be on when switched to HDMI input.
POWER(green)—Will be on when power on.
720(yellow)—Will be on when under 720P recording mode (set by remote controller).
1080(yellow)—Will be on when under 1080P recording mode (set by remote controller).
REC(red)—Will be on when recording video, will be flash 1 time when capture image.
Remote controller:
REC/STOP—Start and stop recording.
720P—Change record quality to 720P, only effect when
Input source is more than 720P
1080P—Change record quality to 1080P, only effect
when input source is 1080P
SDI/HDMI—Select input source.
SNAPSHOT—To capture one still image with one press
Won’t work during recording.
Connections:
Ezcap286 have 2 input modes: HDMI, SDI . The default source is SDI. You need press “SOURCE”
button to switch to HDMI if you are connecting a HDMI source.

1, Connect power with DC adaptor, by DC12V or DC5V, you also can connect PC/DC5V to PC with
USB cable, but please don’t power together. And power LED and SDI video source LED will light.
2, Plug an USB disk or SD card, just don’t connect together.
3, Connect SDI camera or HDMI camera or other HDMI video source to HDMI input port.
4, With HDMI cable or SDI cable connect HDMI OUTPUT or SDI OUTPUT to monitor. Please use
HDMI OUTPUT to monitor if you input HDMI video source.
5, The “LINE OUT”is for connect to speaker or earphone, it’s not necessary if you don’t need, cause
the HDMI output also with audio output.

Record:
After connection is ready, you should see the pass through video on the screen. You will see the blue
power indicator on.
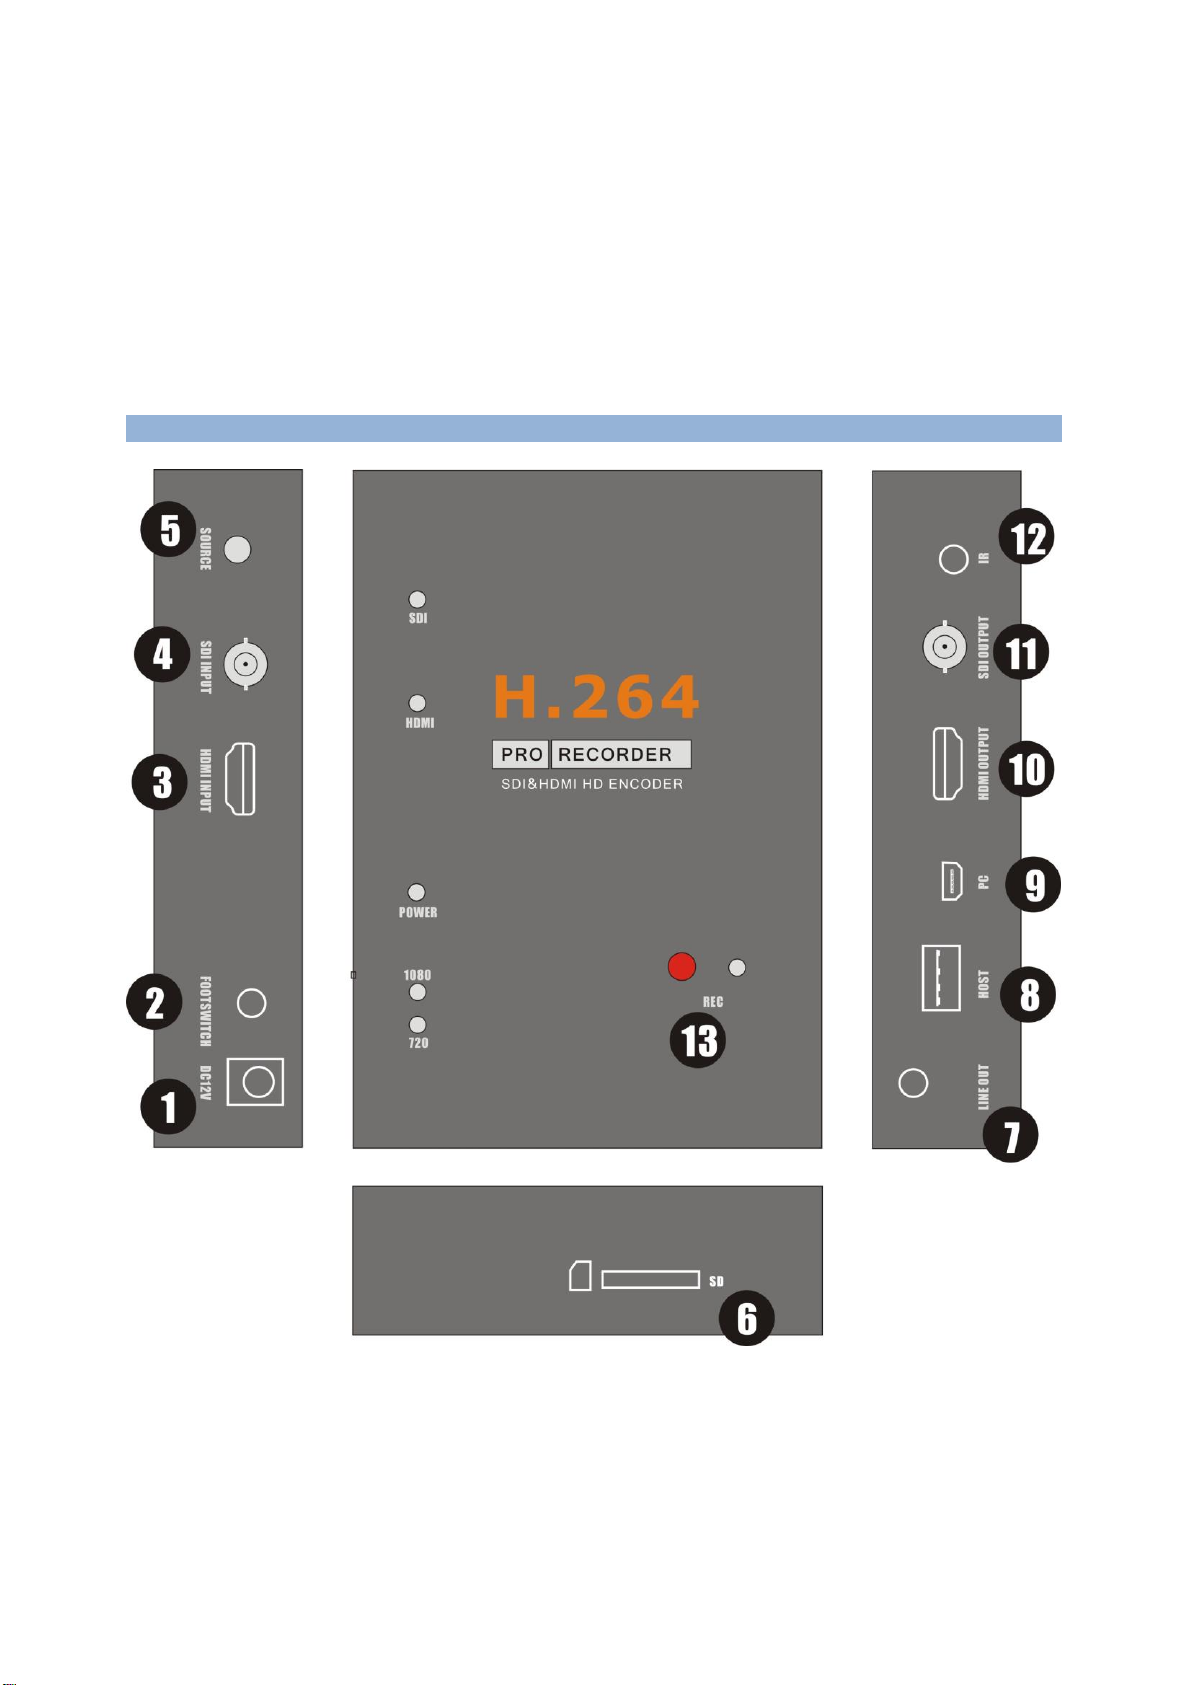
The source LED (orange) will be on default at SDI side, means only SDI input will be pass through
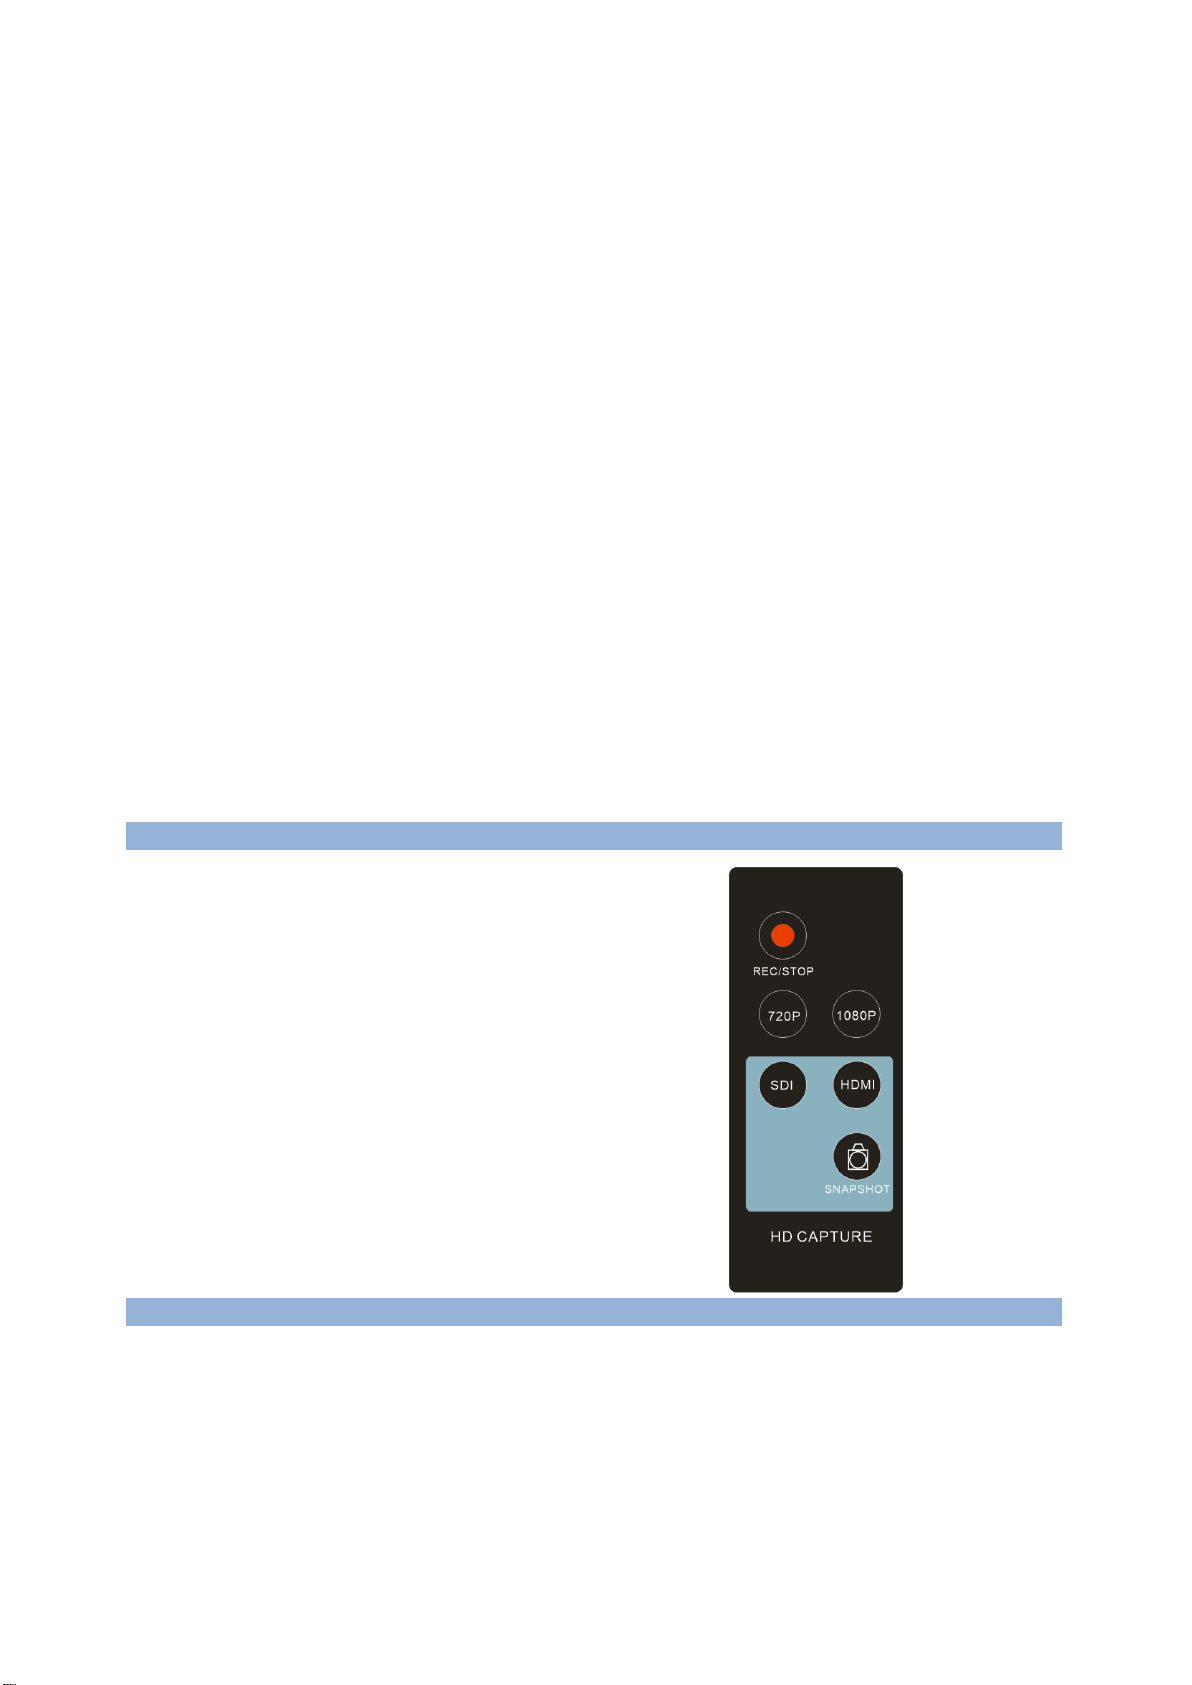
and recording. You can press “SOURCE”button or remote controller to change the input
source to HDMI if you want to input one HDMI video source.
To record video is very simple --- press the record button (or remote controller), then you will see the
REC indicator turns on, it means now recording.
Use SNAPSHOT button of remote controller, you can get a still image by one press, but it is only work
when NOT recording.
There are several reasons for no actions when press record button, you may need check:
1, The input video source disconnected.
2, The USB flash (or SD card) is out of memory.
3, The format for USB flash (or SD card) is not suitable, e.g. exFAT. Ezcap286 supports FAT, FAT32,
and NTFS for USB flash, and only FAT32 for SD card.
4, The USB flash (or SD card) is not connected well.
5, The USB flash (or SD card) is not ready, normally, it will take 4~8 seconds after plug it on.
To stop recording, just press REC button again, will see REC indicator flash few seconds then turns
off, means the record is stop, now you can take off your USB flash (or SD card).
Note: please do not take the memory off when the indicator is flashing. The recording will
automatically stop if the USB flash (or SD card) out of space.
After stop recording, connect the USB flash to computer will see the recorded files: for 1080P
recording, file will be Encode_1080P_1, for 720 or 480p recording, file will be Encode_1.
Every record/stop operation will create a different recording file: Encode_1080P_1, Encode_1080P_2,
Encode_1080P_3…and so on.
The max size per file will be around 1.95GB (around 15 minutes for 1080p video), when you record a
video more than 1.95GB(15 minutes), ezcap286 will partition it in more than 1 file, for example: if you
record a 45 minutes 1080p video by one click recording, you will see 3 files: Encode_1080P_1,
Encode_1080P_1_1, Encode_1080P_1_2…and so on
Sometimes you may find that some recorded video with problems, like: skip. It may caused by you
are using a USB flash on NTFS format, and you haven’t click “safety remove”the device when
disconnect from computer (especially for USB HDD, if not safety remove, may caused serious
problem). You can try to format it to FAT32 if that problem keeps happen.

Firmware and others:
1, Update firmware: you maybe need update firmware for this device for some reason. Copy the
firmware file in to USB disk or SD card, power off the device (unplug power jack), plug USB disk to
device, power on, the indicator will flash 7~8 seconds, and become blue, it means the update is
finished.
2,After long time using, you will see the number of recording file become too big, for example
Encode_1080P_234, but you want it be start from Encode_1080P_0, to do it you just keep press
record button (before power on), then plug the power jack to power on the device, after 3 seconds,
the file number will start from 0.
3, Change the date: you may find out that the date of the recorded file is not synchronous with your
local time. To change the time of ezcap286, you need create a TXTfile name “rtc_setup”(It should be
in including software CD) , type your local date and time with following format (for 2014 July 31
11:00:00): /:2014
/:7
/:31
/:11
/:00
/:00
/:0
Should be exactly same format as it (first line be year, second line be month..etc, end with /:0 , each
line with start “/:”), and save it.
Then copy the rtc_setup file to a SD card or USB flash, connect to ezcap286 then power on, then the
time is set ready.
Edit/Convert recorded files:
The ezcap286 come with a video edit software—Arcsoft ShowBiz 3.5, you can edit your video file with
it.
After install it on computer, and open it.

1, You can combine two or more video in one, just drag them into Showbiz:
2, You can cut a video to two or more:
3, Click “Produce”after editing, you can create DVD or upload video to YouTube:

4, Please click “Create file”to create multiple files for different devices, such as apple, PSP, mobile
phone, etc:

Specifications:
Connections
Interface
USB 2.0 Host, SD card slot
Video Input
Digital: HDMI,SDI
Audio Input
Digital: HDMI,SDI
Video Output
Digital: HDMI (Pass-through from HDMI or SDI), SDI (pas- through from SDI only).
Audio Output
Digital: HDMI (Pass-through from HDMI or SDI), SDI (pas- through from SDI only).
Analog: 3.5mm Stereo (Pass-through from HDMI or SDI).
Applicable Connections with Game Consoles
HDMI
Industry HD camera, HD Medical endoscope, HD camcorder, gameplay, etc
SDI
Industry HD camera, HD Medical endoscope, HD camcorder
Note: HDCP contents cannot be recorded.
Hardware Extra
Codec
Hardware H.264 encoder
User Interface
Record button, source switch button,
3.5mm Foot switch port.
LED indicator for working status.
infrared 3.5mm expand port for remote controller
Dimensions
143(L) × 102(W) × 26(H) mm
Weight
420g
Package Contents
Device
ezcap286 HD Video Capture

Others
DC adaptor (12V3A) , remote controller, remote expand cable, Software CD, Manual
Standards
Storage Media
USB Flash Disk, Portable Hard Disk, SD card
Max Capacity: USB / 2T, SD / 64GB
Note: The exFAT format is not supported.
Resolution
Input / Pass-through:
720 x 480 (60p), 720 x 576 (50p), 1280 x 720p (50p), 1280 x 720p(60p), 1920 x 1080
(50i), 1920 x 1080 (60i), 1920 x 1080 (24p), 1920 x 1080 (25p), 1920 x 1080 (30p),
1920 x 1080 (50p), 1920 x 1080 (60p)
Capture:
720 x 480 (60p), 720 x 576 (50p), 1280 x 720p (50p), 1280 x 720p(60p), 1920 x 1080
(50i), 1920 x 1080 (60i), 1920 x 1080 (24p), 1920 x 1080 (25p), 1920 x 1080 (30p),
1920 x 1080 (25p), 1920 x 1080 (30p)
Note: Up scaling is not supported.
Record Format
Video: MP4, Audio: AAC Stereo
Record Quality
Max: 18Mbps@1080P 30fps
Record File
Max: 2GB / Per File, With RTC (Real Time Clock)
Record Place
Max: 140MB / Minute, 8.4GB / Hour
Power Supply
DC 12V / 3A, or USB 5V/2A
Applications
Software
Arcsoft Showbiz
Video Editing
Timeline / Storyboard edit, Split / Divide Scenes, Multi Trim Scenes …
Video Export
Upload to YouTube
Portable Device: iPod, iPhone, iPod Touch, Apple TV, PSP, PS3, Xbox
File: MPEG 1 / 2 / 4, WMV HD, Quicktime (MOV) …
Operating System
Windows 8 (32 / 64 bit), Windows 7 (32 / 64 bit), Windows Vista (32 / 64 bit)
CPU
Intel Core 2 Duo 2.8GHz, AMD Athlon 64X2 Dual Core 3.0GHz
Memory
4 GB RAM

Graphics Card
VGA card with support for DirectX 10.0c or above
Table of contents
Other EzCAP Media Converter manuals