Ezviz L2 User manual

2
Instruction
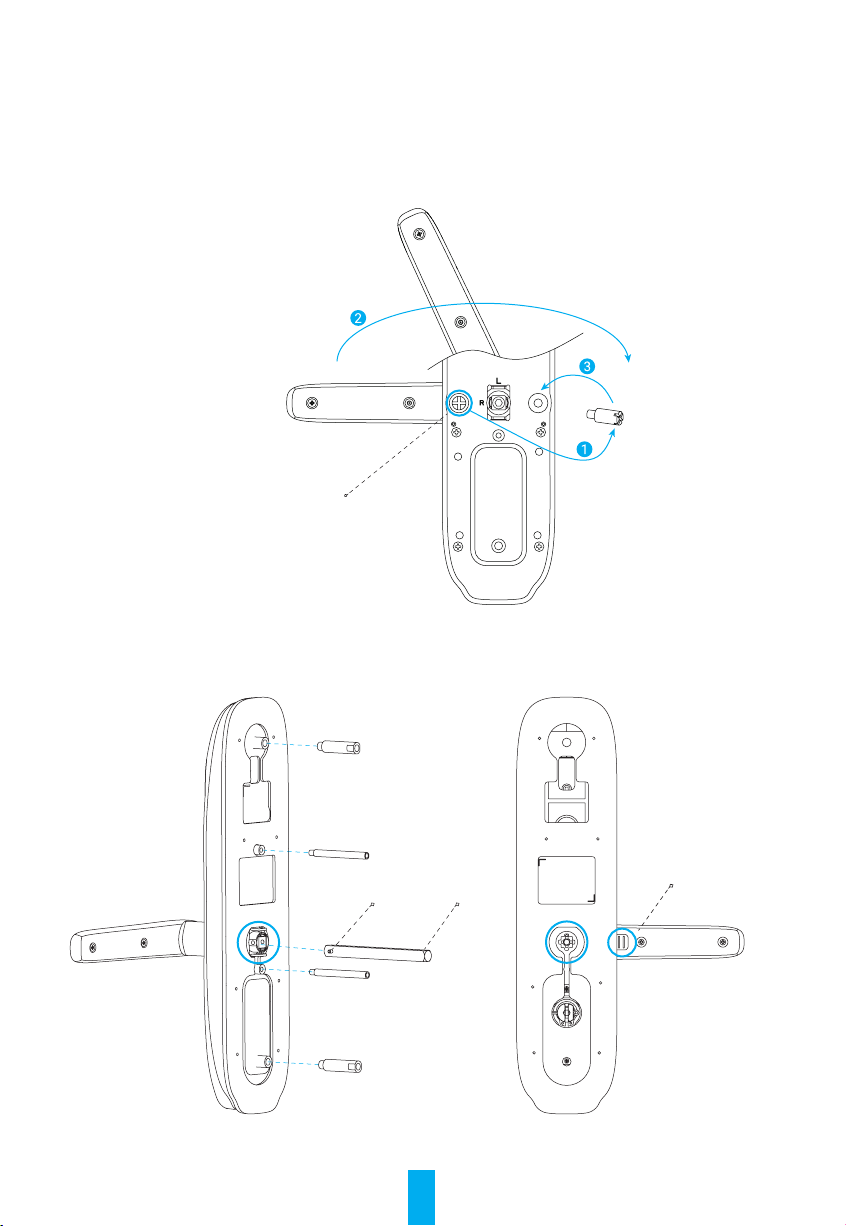
• The installation of EZVIZ Smart Fingerprint Lock (hereinafter referred as to "lock") impacts its normal
operation and service life. It is recommended to let professionals install, and drill hole for lock set in
accordance with hole templet in appendix.
• It is recommended to remove the lock if your house is under decoration, and reinstall it after decoration in
case of lock damage and service life reduction.
• Please note that disinfectant may cause damage to the lock body.
• Once initialized completed, the lock will clear all user information. After lock installation and conguration,
please add ngerprint, password or card as needed.
• When battery voltage is low after using for a while, low voltage alarm alerts. Replace battery timely and pay
attention to positive and negative poles.
• If you leave home or do not use lock for a long time, keep mechanical key with you, and do not leave it
indoors. You should take battery out to ensure lock service life.
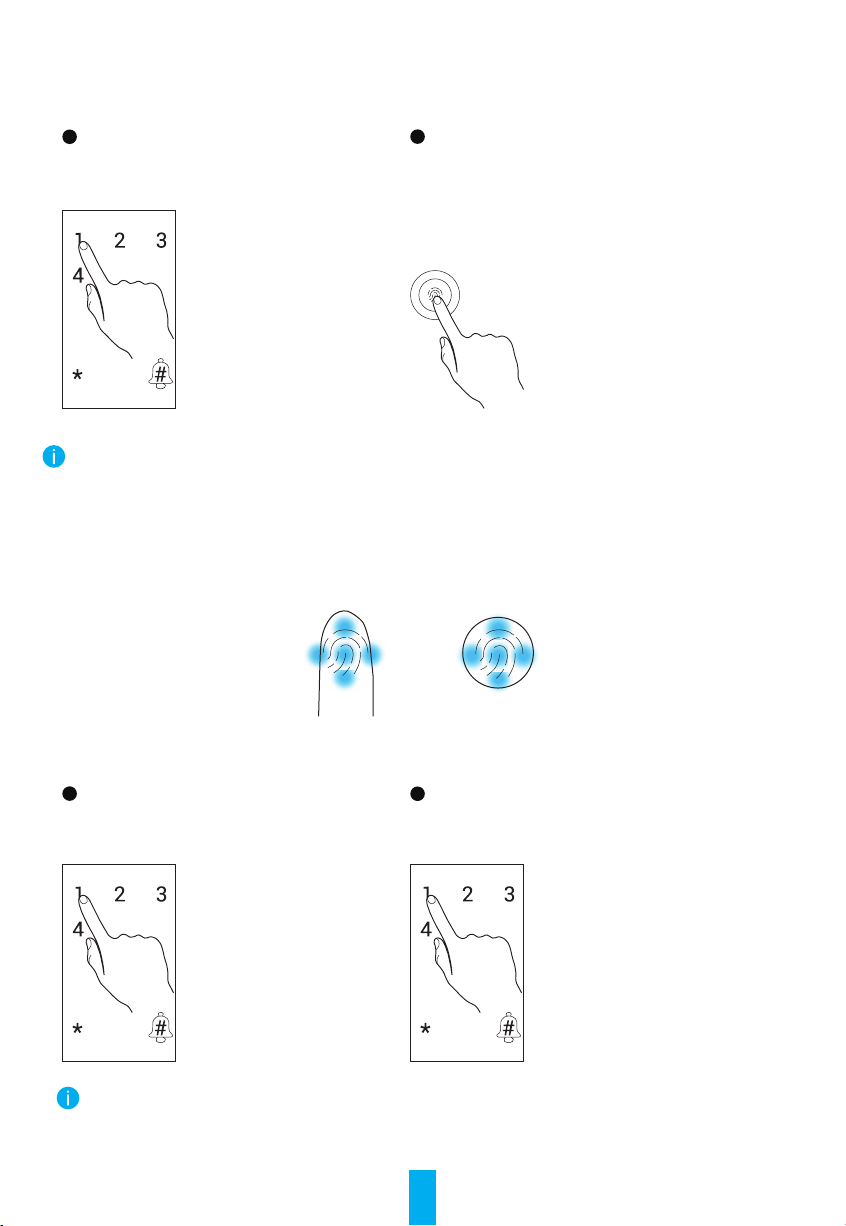
• For users with at or thin ngerprint, it is recommended to use thumb to register ngerprint for inceasing
success rate, and register more than one ngerprint with the same user.
• The lock accommodates up to 50 ngerprints, 50 passwords and 50 cards.
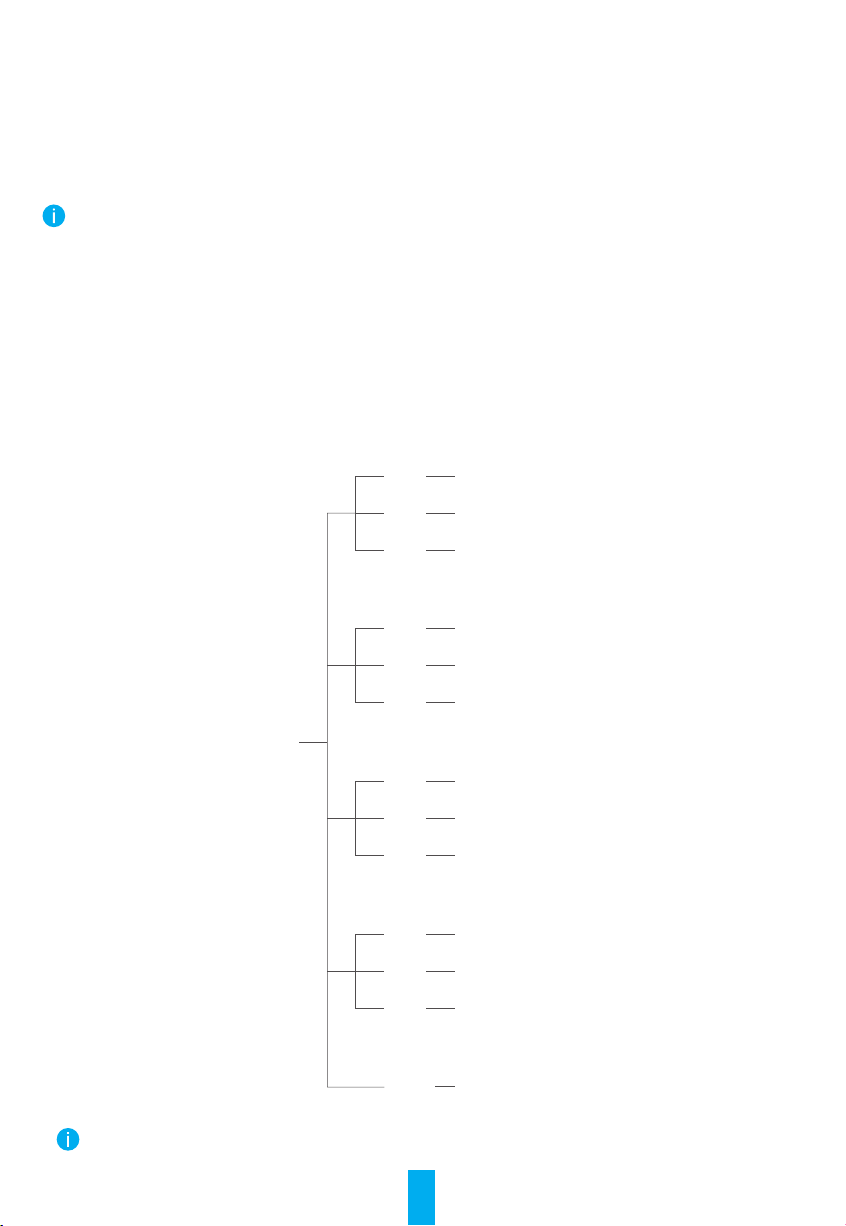
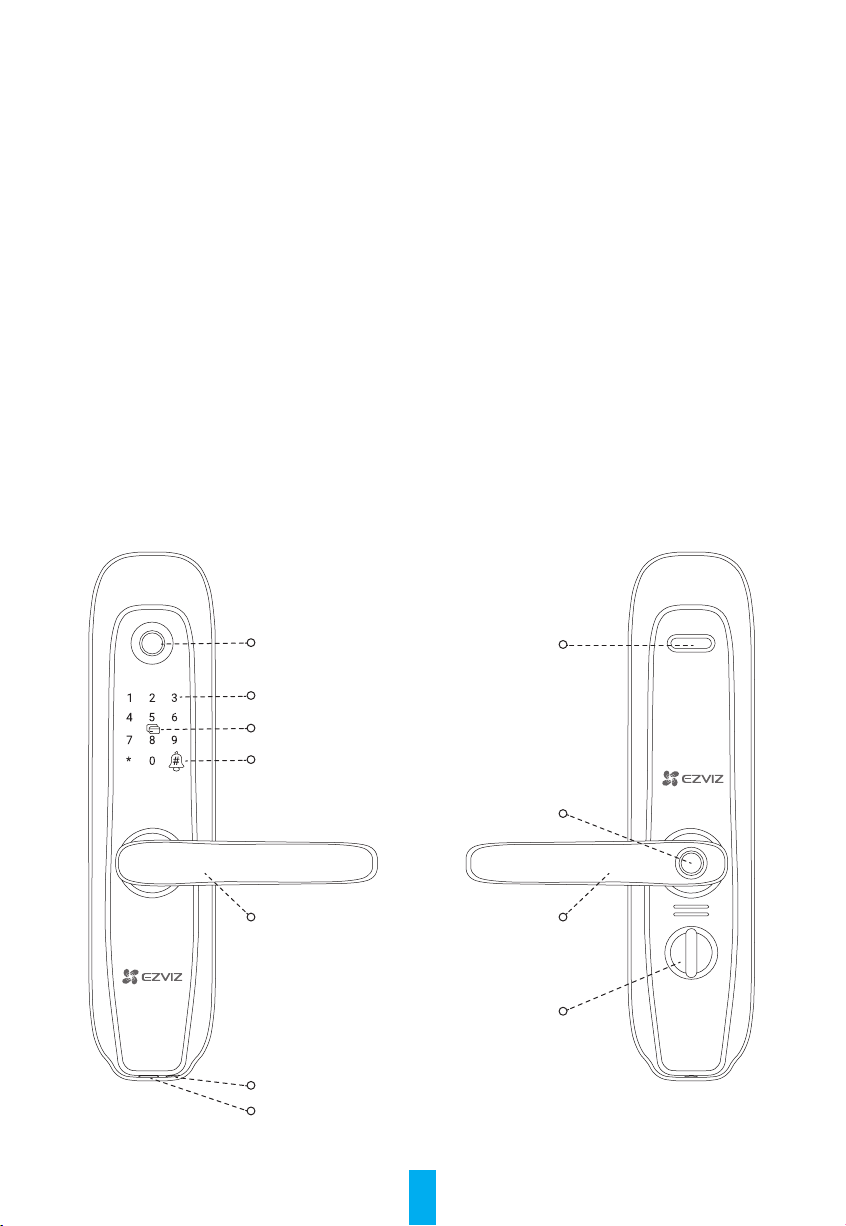
Overview
Indoor
Outdoor
Fingerprint Reader
Keypad
Card Swiping Area
Doorbell Button
Lever Handle
Emergency Power Supply Interface
Mechanical Keyhole
Battery Cover
Anti-Peephole Button
Lever Handle
Secure Knob

3
Lock Installation
Switch Lever Handle Direction (Optional)
1.Switch Lever Handle Direction
- Take off the rubber and remove the reversing screw with screwdriver.
- Rotate the lever handle 180 degrees upwards.
- Screw the reversing screw into the opposite screw hole.
Reversing Screw
2.Conrm Clutch Direction
- Front panel: Insert square rod into sleeve and lift lever handle. Rotate sleeve 90 degrees if lever handle idles.
- Rear panel: Turn on the anti-peephole button. Insert square rod into sleeve and lift lever handle. Rotate
sleeve 180 degrees if lever handle idles.
Elastic Cylinder Pin
Front Panel Rear Panel
Square Rod
Anti-Peephole Button

4
Switch Lock Latch Bolt (Optional)
1
2
3
Uplift the metal here.Rotate the latch bolt 180 degrees.
Turn the central part 90 degrees and
tuck it in.
Push the latch bolt into the
lock body.
Installation Steps
• The standard accessories for this product support installation for 40mm-50mm wooden doors. If the thickness
of the door is beyond this range, please contact your local dealer.
• When xing front and rear panel, do not press internal connection cable.
• When installing front and rear panel, handle with care in case of any panel damage.
1.Drill Hole
The product is applicable to wooden door and burglar-proof metal door. Drill hole in accordance with hole
templet in packing list.
2.Install
Please visit the link below to watch the installation video.
https://support.ezvizlife.com/videos/map?id=38&title=How%20to%20Install%20L2

5
1 Fix lock body into door panel with screws.
Door
Screws
Lock Body
Locating Hole
Hook
2 Insert square rod into front panel and install front panel into door as shown below.
Front Panel
Square
Rod
Locating
Pin
Screwed
Conduit

6
3 Fix the xed plate and rubber pad into the door with ①locating pin and ② tighten sleeve.
Fixed Plate Rubber Pad
4 With the secure knob keeping upright, x the rear panel with screws as shown below.
Rear Panel
Secure Knob
Secure Pick

7
Lock Settings
After installation, remove back cover of battery seat and install 4*AA-sized batteries. Then you can set the
lock as needed.
Please visit the link below to watch the setup video.
https://support.ezvizlife.com/videos/map?id=39&title=How%20to%20Setup%20L2
• Please remove protective lm from lock before rst use.
• Please note that disinfectant may cause damage to the lock body.
Activate Lock
Touch keypad area to activate the lock.
Enter Menu
Press 3571# to enter menu.
• In initial state, enter short code for settings.
• In non-initial state, verify with added ngerprint, password or card rst. Then enter short code for settings.
Menu Index
Menu
11#
12#
13#
Add Fingerprint
Add Password
Add Card
21#
22#
23#
Delete Fingerprint
Delete Password
Delete Card
31#
32#
33#
Clear Fingerprint
Clear Password
Clear Card
41#
42#
43#
High Volume
Low Volume
Mute
3570# Initialize
After every successful setting, you will return to the menu. Then you can enter short code again to set or press *
to exit.

8
Add Fingerprint/Password/Card
Add Fingerprint
1 After entering the menu, press 11# to add
ngerprint.
2 Touch ngerprint reader. Then touch again after
voice prompt and repeat the operation for 5 times
to conrm. The ngerprint number will ash on
the keypad when complete.
• The number of times will be displayed on the keypad each time you touch the ngerprint reader.
• Please keep in mind the ngerprint number, which is required if you want to delete the ngerprint.
• Fingerprint which has been added cannot be added again.
Fingerprint Collection
When collecting ngerprint, please adjust your nger to maximize the ngerprint contact surface as shown
below, which helps to improve ngerprint verication success rate.
Add Password
1 After entering the menu, press 12# to add
password.
2 Enter password (6 to 10 digits) and press #. Then
enter password and press # again to conrm.
The password number will ash on the keypad
when complete.
• Please keep in mind the password number, which is required if you want to delete the password.
• Password which has been added cannot be added again.

9
Add Card
1 After entering the menu, press 13# to add
card.
2 Swipe card. The card number will ash on the
keypad when complete.
• Please keep in mind the card number, which is required if you want to delete the card.
• Card which has been added cannot be added again.
Delete Fingerprint/Password/Card
Delete Fingerprint
1 After entering the menu, press 21# to delete
ngerprint.
2 Enter ngerprint number and press #.
3 The ngerprint number ashes and then
press #.
The current veried ngerprint cannot be deleted.
For example, if you verify with ngerprint 1, then ngerpint 1 cannnot be deleted.

10
Delete Password
1 After entering the menu, press 22# to
delete password.
2 Enter password number and press #.
3 The password number ashes and then
press #.
The current veried password cannot be deleted.
For example, if you verify with password 1, then password 1 cannnot be deleted.
Delete Card
1 After entering the menu, press 23# to delete
card.
2 Enter card number and press #.
3 The card number ashes and then press #.
The current veried card cannot be deleted.
For example, if you verify with card 1, then card 1 cannnot be deleted.

11
Clear Fingerprint/Password/Card
1 After entering the menu,
press 31# to clear ngerprints,
press 32# to clear passwords,
press 33# to clear cards.
2 Press # to conrm.
The current veried method cannot be cleared.
For example, if you verify with ngerprint, then ngerpints cannnot be cleared.
Initialize
1 After entering the menu, press 3570# to
initialize.
2 Press # to conrm.
Volume Control
After entering the menu, press 41# to select High Volume,
press 42# to select Low Volume,
press 43# to select Mute.
Only key sound and verication sound can be muted.

12
Lock Using
Unlock
Normal Unlock
Fingerprint Unlock
Password Unlock
Card Unlock
Key Unlock
When openning the door by mechanical key,
rotate the key and down press the handle.
Please touch the keypad area to activate
the lock before open the door by password.
Scramble Password
The smart lock applies scramble password function. Scramble password increases safety and avoid
password being peeped.
When entering password, you can enter any random number among where there has the right password. Max.
length: 20 digits (scramble password + right password).
For example: the right password is 123456, you can enter xxx123456xxx and end by "#" to conrm, and the
door will unclock.

13
Operation and Management
Emergency Power Supply
When batteries are out of power, connect lock's micro-USB emergency power supply interface with power
bank (or phone supports OTG) to charge lock through micro-USB charging line, and then unlock the door.
Power
Bank
Install Battery
1. Install battery: remove battery cover, install 4*AA-sized batteries in battery seat, and tighten battery cover.
2. Note: install correct batteries in case of explosion.
• When not using batteries for a long time, remove them from battery seat.
• Do not use new batteries with old ones.
• Do not place battery with the (+) and (-) in the wrong way around.
• Dispose used batteries according to the local environmental protection law.
Alarms
1. Tamper Alarm
Once being dismantled by force, the lock will send out alarm lasting about one minute.
2. System Locked Alarm
Verify with wrong ngerprint, password or card 5 times in a row, the system will be locked for 3 minutes.
3. Low Voltage Alarm
Once battery voltage is low, the voice prompt will remind you to replace batteries.
Restore to Factory Settings
1. Remove the battery cover of rear panel and take out batteries.
2. Press reset button for 5 seconds with needle-resemble object, meanwhile put back batteries in the battery
seat.
3. Release reset button and press "#" to conrm after voice prompts.
EXPOSURE TO RADIOFREQUENCY RF
The frequency bands and the nominal limits of transmitted power (radiated and/or conducted) applicable to
this radio device are the following:
Band RF 13.56MHz
Frequency From 13.553MHZ to 13.567MHZ
Power transmission (EIRP) 20mW

14
Maintenance
Daily Maintenance
• Do not let lock contact with corrosive materials to avoid lock damage and impacting its gloss.
• As a key part of the lock, do not hang any object on the lever handle for its exibility directly impacting the
use of the lock.
• If door deforms, it increases friction that combined latch bolt entering the box strike plate and bolt cannot
extend fully. At this time, adjusting strike plate position is needed.
• After using ngerprint reader for a long time, its surface may be stained or wet. Wipe gently with a soft and
dry cloth.
• Replace batteries immediately once battery voltage is low to ensure the normal use of the lock. Pay
attention to the positive and negative poles of batteries when replacing them.
• Keep the mechanical key properly.
• Do not scratch the ngerprint reader and keypad surface with hard, sharp objects.
• When collecting ngerprint, press your nger on the reader horizontally.
• Ask professionals to check the lock if it is not exible or cannot be held in correct position.
• Keep lubricant in the rotating part of the lock to keep it rotate smoothly, and prolong its service life.
• It is recommended to check the lock once every six months or one year, and check whether xed screws
are loose.
• Apply a small amount of graphite powder or pencil powder into lock cylinder slot to ensure the key is
inserted and removed smoothly on regular basis (one year or six months). However, do not apply any
grease to lubricate in case of grease sticking to the pin tumbler spring.
FAQ
Problem Cause Solution
Door cannot open though
verication by ngerprint,
password and card
succeeded.
Lock installation problem. Ask professionals to check the lock.
When verication by ngerprint
or password, lever handle
doesn't return to its position.
Return lever handle to its position, and
then re-enter password or ngerprint.
Door cannot open with
mechanical key.
Incorrect mechanical key. Use correct mechanical key.
Lock cylinder damaged. Ask professionals to check the lock and
replace damaged components after
opening door by other methods.
Lock body damaged.
The key cannot insert to end.
When unlocking by
ngerprint, the door
cannot open.
The ngerprint is invalid. Unlock the door by valid ngerprint, or
password or mechanical key.
The ngerprint has been
deleted.
Large deviation of valid
ngerprint.
Re-verify ngerprint, press nger on the
reader horizontally to reduce deviation;
or unlock the door by password or
mechanical key.
The ngerprint is damaged.
Re-add a ngerprint (it is recommended
to register more than one ngerprint for
the same user); or unlock the door by
password or mechanical key.
The ngers are too dry, wet or
dirty.
Re-verify ngerprint after ngers are in
proper condition.

15
Problem Cause Solution
When unlocking by
ngerprint, the door
cannot open.
The ngerprint deforms for
applying too much pressure
when collecting ngerprint.
Re-verify ngerprint in correct way.
The ngerprint doesn't fully
touch with ngerprint reader
for applying little pressure
when collecting ngerprint.
Verication by ngerprint,
password and card
succeeded, but motor
doesn't work, and door
cannot open.
Connection line loosens.
Ask professionals to check the lock, and
replace damaged components.
Motor fault.
No response of keypad.
Batteries out of power or
install batteries in a wrong
way.
Unlock the lock through external power
supply or mechanical key, and check
batteries.
Connection line between
front lock body and rear one
loosens. Ask professionals to check the lock after
opening door with mechanical key.
Keypad damaged.
No response from
ngerprint reader. Fingerprint reader damaged.
Ask professionals to check the lock and
replace damaged components after
opening door by other methods.
The lock remains open,
and cannot use normally.
Clutch components fault. Ask professionals to check the lock.
The lock has entered
remaining open mode.
Verication by ngerprint, password or
card to cancel remaining open mode.
The main bolt cannot
extend, or extend partially
by uplifting lever handle.
The door deforms, and main
bolt doesn't align with the hole
in the strike plate.
Ask professionals to check the lock.
Appendix
Packing List
1 Front Panel ×1
2 Rear Panel ×1
3 Lock Body ×1
4 Square Rod ×1
5 Card ×2
6Hole Templet ×1
7 Standard Screw Bag ×1
8Lock Body Screw Bag ×1
9 Key Bag ×1
10 AA-sized Battery ×4
11 Manual ×1
Table of contents
Other Ezviz Door Lock manuals
Popular Door Lock manuals by other brands

Assa Abloy
Assa Abloy Yale 8800 Series installation instructions

Dormakaba
Dormakaba PowerPlex 2000 Series installation instructions

Assa Abloy
Assa Abloy Yale YDM3115A user manual

Cygnus
Cygnus EL-180B user manual

Iseo
Iseo PERFORMA Elettrica Assembling instructions

FOLGER ADAM SECURITY
FOLGER ADAM SECURITY 200 Strike parts manual