2 Montage, Installation, Montage, Montaggio
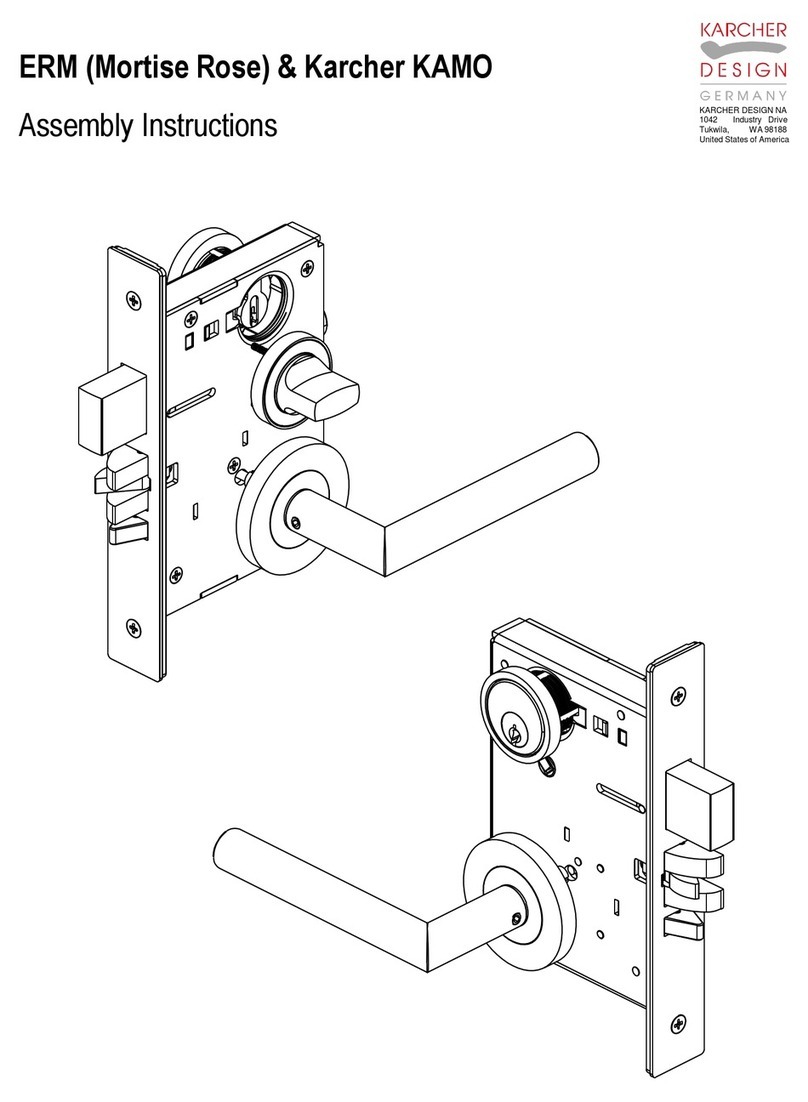
Inhalt, Content, Fournitures, Contenuto
1. Schloss, Lock, Serrure, Serratura
3. Außenmuschel, Exterior plate,
Rosace extérieure , M. ad incasso esterna
7. Madenschraube B, Set screw B,
Vis pointeau B, Vite senza testa B
5. Madenschraube A, Set screw A,
Vis pointeau A, Vite senza testa A
2. Holzschraube, Wood screw, Vis bois, Vite da legno
4. Innenmuschel, Interior plate,
Rosace intérieure, M. ad incasso interna
8. Vierkantstift, Spindle, Carré, Perno quadro
6. Fingermuschel, Finger pull,
Cuvette pour le doig, Conchiglia
1
2
3
8
4
5
6
Inneseite, Interior side,
Intérieur, Lato interno
Außenseite, Exterior side,
Extérieur, Lato esterno
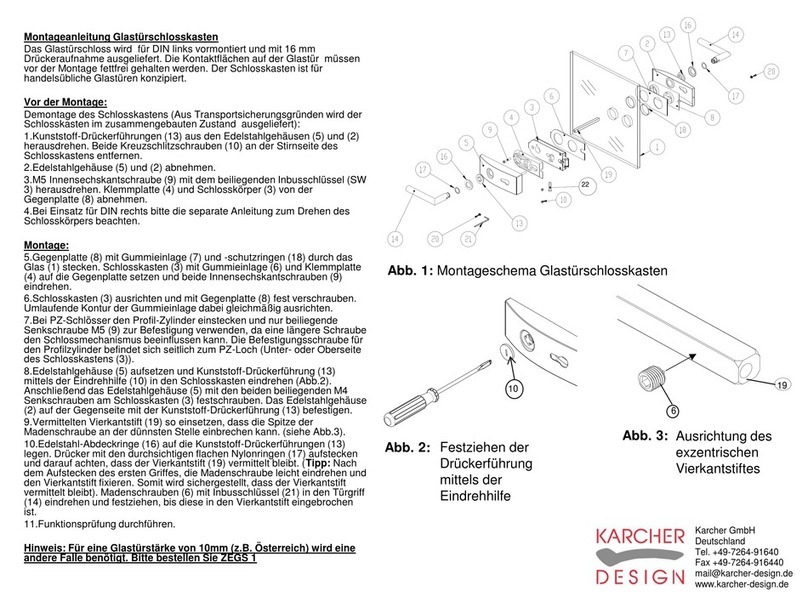
1.Montieren Sie den Schlosskasten
(1) mit den gelieferten
Holzschrauben (2)
2.Schieben Sie den Vierkantstift (8)
der mit der Außenmuschel (3)
verbunden ist durch die Schlossnuss.
Achten Sie darauf, dass der
Vierkantstift so angeordnet ist, dass
die Madenschraube A (5) der
Innenmuschel auf den Spalt des
Vierkantstiftes treffen kann.
3.Platzieren Sie die Außenmuschel in
der vorgesehenen Bohrung und
fixieren Sie diese mit den
Madenschrauben B (7).
4.Stecken Sie die Innenmuschel (4) auf
den Vierkantstift und ziehen Sie
Madenschraube A (5) an. Befestigen
Sie die Innenmuschel zusätzlich mit
Madenschrauben B (7).
5.Stecken Sie die Fingermuschel in die
vorgesehene runde Bohrung und
fixieren Sie diese mit der
mitgelieferten Holzschraube.
1.Install the lock (1) in the door by
using the two wood screws (2)
provided.
2.Insert the spindle (8) of the exterior
plate (3) into the hub of the lock. The
oval notch of the spindle must point
towards the set screw (5).
3.Push the exterior plate (3) into the
pocket designed for this purpose and
fix the plate by using two of the set
screws B (7) provided.
4.Place the interior rose (4) on the
spindle and tighten the set screw A
(5). Also fix the interior plate by using
the two remaining set screws B (7)
provided.
5.Insert the finger pull into the circular
pocket and fix it with one wood screw.
1.Monter et visser la serrure (1) avec
les vis bois fournis. (2)
2.Inserer le carré relié à la rosace
extérieure dans la serrure. Le carré
doit être mis de façon à ce que la vis
pointeau (A5) de la rosace intérieure
rentre dans sa fente.
3.Inserer et fixer la rosace extérieure
avec la vis pointeau B (7).
4.Inserer la rosace intérieure (4) sur le
carré et serrer la vis pointeau A (5).
Terminer la fixation de la rosace
intérieure avec la vis pointeau B (7).
5.Inserer et fixer la cuvette pour le
doigt avec les vis bois fournis.
1.Montare la serratura (1) con le viti da
legno in dotazione (2)
2.Inserire il perno quadro (8) all‘interno
della maniglia ad‘incasso esterna (3)
collegando entrambi alla serratura.
Assicurarsi che il perno quadro sia
posizionato con la fenditura verso
l‘alto, in modo tale che la vite senza
testa A (5) della maniglia ad incasso
interna possa perforarlo.
3.Collocare la maniglia ad incasso
esterna nell‘incavo precedentemente
effettuato fissandola con le viti senza
testa B (7).
4.Inserire la maniglia ad incasso interna
(4) attraverso il perno quadro quindi
avvitare la vite senza testa A (5).
Assicurare ulteriormente la maniglia
ad incasso interna con le viti senza
testa B (7).
5.Collocare la conchiglia nell‘incavo
tondo precedentemente effettuato
fissandola con le viti da legno in
dotazione.
Karcher Design warrants to the original purchaser and first consumer owner that its products shall be free from defects in material or workmanship for 2 years after purchase.
Subject to the conditions stated below, Karcher Design shall repair or replace (at our sole discretion) any defective product at no further charge.This warranty is valid only for
the original purchaser and first consumer owner and is not transferable. This warranty only applies to products purchased directly from an authorized dealer of Karcher Design
products. Our website contains a list of authorized dealers. You may be asked for proof of purchase, so please retain your receipt.To obtain warranty service, please contact
an authorized reseller dealer directly. Do not contact Karcher Design directly with warranty questions. This warranty does not apply to ordinary wear and tear or to damage
caused by conditions beyond Karcher Design’s control, including but not limited to accidents, lack of reasonable care, weather conditions, improper installation or maintenance,
alteration, or abuse. In particular, this warranty does not apply to products that are not intended to be used outdoors (including products made out of wood, leather,
carbon, glass, laminate, and satin nickel) that are in fact used outdoors.
THE REMEDIES DESCRIBED ABOVE ARE YOUR SOLE AND EXCLUSIVE REMEDIES, AND CONSTITUTE KARCHER DESIGN’S ENTIRE LIABILITY FOR ANY BREACH
OF THIS LIMITED WARRANTY. KARCHER DESIGN EXCLUDES AND EXPRESSLY DISCLAIMS LIABILITY FOR ANY CONSEQUENTIAL, INDIRECT, INCIDENTAL OR
SPECIAL DAMAGES OF ANY NATURE ARISING OUT OF THE SALE, INSTALLATION, MAINTENANCE, USE OR FAILURE OF ANY KARCHER DESIGN PRODUCT,
INCLUDING BUT NOT LIMITED TO LOSS OF PROFITS, PROPERTY DAMAGE, DAMAGES TO BUSINESS OR BUSINESS RELATIONS OR DAMAGES FOR LOSS OF
OPERATION. IN ALL EVENTS KARCHER DESIGN’S LIABILITY WILL BE CAPPED AT THE PURCHASE PRICE PAID FOR THE PRODUCT.
Some states do not allow limitations on how long an implied warranty lasts, so the above limitation may not apply to you. Some states do not allow the exclusion or limitation of
incidental or consequential damages, so the above limitation or exclusion may not apply to you. This warranty gives you specific legal rights, and you may also have other rights
which vary from state to state. No representative or employee of Karcher Design is authorized to make any modification or addition to this warranty.
Karcher Design NA, LLC
1024 Industry Dr.
Tukwila WA 98188
Office: 559-475-8274
Fax: 253-236-4469
Limited Warranty (for United States and Canada only)


