fann 100072577 User manual

Cement Curing Autoclave
User Manual
100072577
Revision H

Cement Curing Autoclave User Manual
©2015 Fann Instrument Company
Houston, Texas, USA
All rights reserved. No part of this work covered by the copyright hereon may be
reproduced or copied in any form or by any means (graphic, electronic, or
mechanical) without first receiving the written permission of Fann Instrument
Company, Houston, Texas, USA.
Printed in USA
The information contained in this document includes concepts,
methods, and apparatus which may be covered by U. S. Patents
FANN®reserves the right to make improvements in design,
construction, and appearance of our products without prior notice.
FANN®and the FANN®logo are registered trademarks of Fann Instrument Company
in the United States and/or other countries.
UCA™ is a trademark of Fann Instrument Company.
Contact FANN®
Phone
TELEPHONE:281-871-4482
TOLL FREE:800-347-0450
FAX:281-871-4358
Mail
Fann Instrument Company
P. O. Box 4350
Houston, Texas, 77210 USA
Location
Fann Instrument Company
14851 Milner Road, Gate 5
Houston, Texas 77032 USA
Online
www. fann. com
fannmail@fann. com

Cement Curing Autoclave User Manual
100072577 Revision H ii
Contents
1Introduction.............................................................................................................1
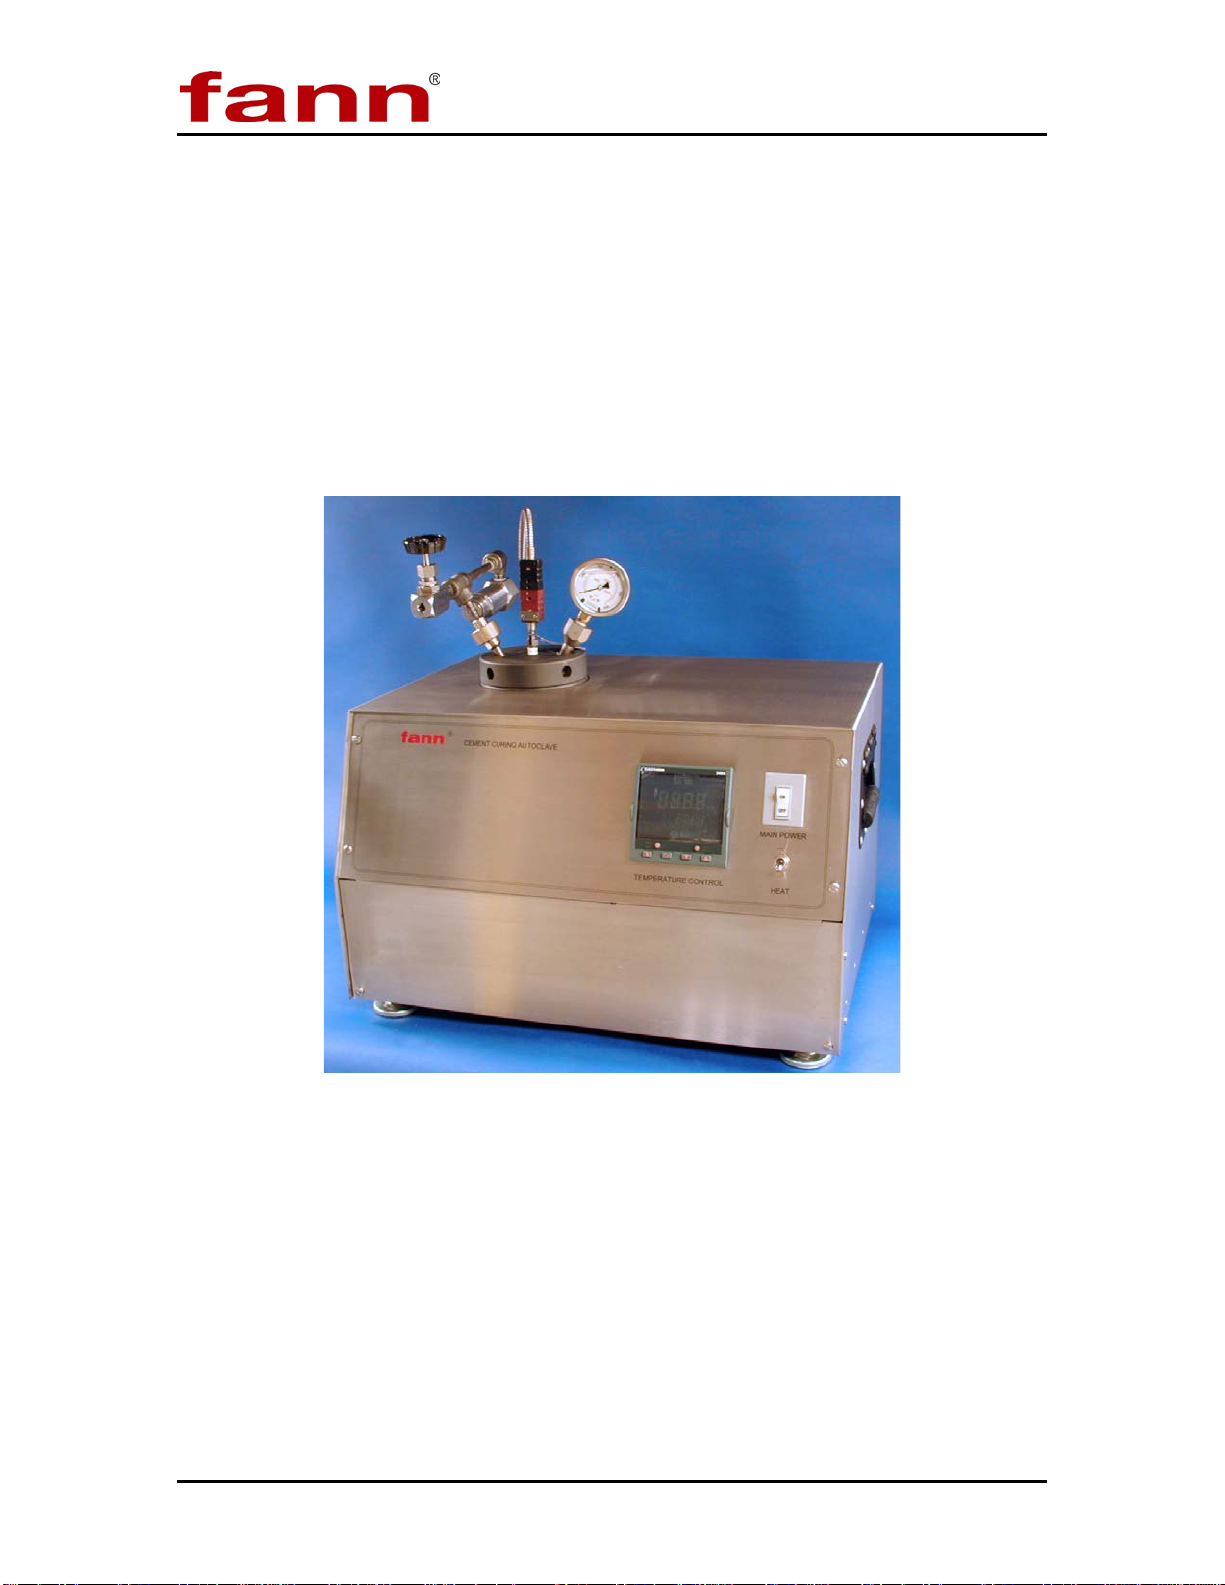
1.1 Cement Curing Autoclave ................................................................................... 1
1.2 Function............................................................................................................... 1
1.3 Features................................................................................................................ 2
2Safety.......................................................................................................................4
2.1 Machine Hazards ................................................................................................. 4
2.2 Ergonomic Considerations................................................................................... 5
3Features and Specifications ..................................................................................6
3.1 Cement Curing Autoclave Mechanical................................................................ 6
3.2 Cement Curing Molds.......................................................................................... 7
3.3 Cement Curing Autoclave Controls and Indicators............................................. 9
3.4 Temperature Controller Configuration.............................................................. 10
3.5 Pressurizing the Cement Curing Autoclave....................................................... 24
4Installation.............................................................................................................26
4.1 Parts of the Cement Curing Autoclave.............................................................. 26
4.2 Other Parts ......................................................................................................... 26
4.3 Locating the Cement Curing Autoclave ............................................................ 26
4.4 Electric Power Supply ....................................................................................... 26
5Operation...............................................................................................................28
5.1 Sample Preparation............................................................................................ 28
5.2 Prepare the Cube Mold ...................................................................................... 28
5.3 Prepare the Cement Slurry................................................................................. 32
5.4 Fill the Molds..................................................................................................... 32
5.5 Place molds into chamber.................................................................................. 35
5.6 Place chamber in heating jacket......................................................................... 39
5.7 Pressurize the chamber ...................................................................................... 41
5.8 Running a test .................................................................................................... 41
5.9 Ending the test ................................................................................................... 43
5.10 Remove the chamber ......................................................................................... 43
5.11 Cleaning the molds, pressure chamber, and autoclave...................................... 44
6Analyzing Results.................................................................................................45
7Troubleshooting and Maintenance......................................................................46

Cement Curing Autoclave User Manual
100072577 Revision H iii
7.1 Eurotherm 2404 Temperature Calibration......................................................... 46
7.2 Troubleshooting Tables ..................................................................................... 46
8Accessories ..........................................................................................................50
8.1 Hand Pressure Pump.......................................................................................... 50
9Parts Lists.............................................................................................................51
10 Warranty and Returns ..........................................................................................66
10.1 Warranty ............................................................................................................ 66
10.2 Return of Items .................................................................................................. 66

Cement Curing Autoclave User Manual
100072577 Revision H iv
List of Figures
Figure 1-1 Cement Curing Autoclave, front view .............................................................2
Figure 1-2 Cement Curing Autoclave, back view............................................................3
Figure 3-1 Manual Needle Valve and Pressure Relief Valve ........................................7
Figure 3-2 Pressure Manifold, Thermocouple, Pressure Gauge.....................................7
Figure 3-3 Cement Mold..................................................................................................8
Figure 3-4 Cement Mold Clamp.....................................................................................8
Figure 3-5 Cement Mold Base.........................................................................................9
Figure 3-6 Temperature Controller, Main Power, Heat switch .......................................10
Figure 3-7 Water Expelled as Lid is Closed...................................................................24
Figure 3-8 Pressure source connected to needle valve.................................................25
Figure 3-9 Initial pressure (left), increased pressure from temperature rise (right).........25
Figure 5-1 Pins align the mold halves............................................................................28
Figure 5-2 Clamps hold mold halves together ...............................................................29
Figure 5-3 Grease mold for base plate..........................................................................30
Figure 5-4 Tighten base plate to mold...........................................................................30
Figure 5-5 Grease mold interior.....................................................................................31
Figure 5-6 Mixing Cement Slurry...................................................................................32
Figure 5-7 Filling mold..................................................................................................33
Figure 5-8 Leveling cement..........................................................................................33
Figure 5-9 Grease cover plate......................................................................................34
Figure 5-10 Cover plate.................................................................................................34
Figure 5-11 Lower mold into chamber – 1....................................................................35
Figure 5-12 Lower mold into chamber – 2....................................................................35
Figure 5-13 Grease chamber threads...........................................................................36
Figure 5-14 Tighten lid ..................................................................................................37
Figure 5-15 Water expelled as lid tightened ..................................................................37
Figure 5-16 Handle spring loaded pin retracted.............................................................38
Figure 5-17 Handle and manifold on chamber...............................................................38
Figure 5-18 Place chamber into autoclave, remove handle...........................................39
Figure 5-19 Attach valve and manifold ..........................................................................40

Cement Curing Autoclave User Manual
100072577 Revision H v
Figure 5-20 Connect thermocouple cable......................................................................40
Figure 5-21 Set initial chamber pressure.......................................................................41
Figure 5-22 Initial pressure (left), increased pressure from temperature rise (right).......42
Figure 7-1 Power fuse holders ......................................................................................47
Figure 8-1 101443558 PUMP ASSY HYD CEMENT CURING AUTOCLAVE, HAND
OPERATED ................................................................................................50
Figure 9-1 100053968 – Installation, Chamber Assembly, Standard, 1200ML, 2 Cube.51
Figure 9-2 101443558 A PUMP ASSY HYD CEMENT CURING AUTOCLAVE, HAND
OPERATED ................................................................................................53
Figure 9-3 100053968 Kit, Installation, Tools & Manual (not shown), Autoclave,
Standard, 1200ml........................................................................................55
Figure 9-4 Assembly, Cement Curing Autoclave...........................................................56
Figure 9-5 Electrical Schematic – 115V Cement Curing Autoclave................................64
Figure 9-7 Electrical Schematic – 230V Cement Curing Autoclave................................65

Cement Curing Autoclave User Manual
100072577 Revision H vi
List of Tables
Table 3-1 Cement Curing Autoclave Specifications ......................................................6
Table 7-1 Problems with General System....................................................................47
Table 7-2 Temperature Problems ................................................................................48
Table 7-3 Pressure Problems ......................................................................................48
Table 7-4 Chamber Lid Problems ................................................................................49
Table 9-1 100053968 NX INSTALLATION, CHAMBER ASSEMBLY, STANDARD,
1200ML, 2 CUBE........................................................................................52
Table 9-2 101443557 A PUMP ASSY HYD CEMENT CURING AUTOCLAVE, HAND
OPERATED ................................................................................................54
Table 9-3 101497200 K CEMENT CURING AUTOCLAVE 115V TWO 2-INCH CUBE
MOLDS.......................................................................................................57
Table 9-4 101533369 J CEMENT CURING AUTOCLAVE 230V TWO 2-INCH CUBE
MOLDS.......................................................................................................60

Cement Curing Autoclave User Manual
100072577 Revision H 1
1 Introduction
1.1 Cement Curing Autoclave
The Cement Curing Autoclave is an apparatus used to cure cement slurry
samples under elevated hydrostatic pressure and temperature. The cement
slurry samples are contained in one or two 2 inch cube molds, surrounded by
water (or oil), within the pressure chamber. The autoclave includes a heating
jacket which completely surrounds the cement curing pressure chamber,
temperature controller, thermocouple, pressure gauge, adjustable pressure
regulator, and manual fill and bleed valve.
The Cement Curing Autoclave requires an external pressure source, such as
compressed nitrogen gas or a hydraulic pump, capable of providing pressure
up to 3,000 PSI.
1.2 Function
The Cement Curing Autoclave cures cement slurry samples under elevated
pressure and temperature to prepare them for destructive compressive-strength
tests. These tests help determine compliance to American Petroleum Institute
(API) Specification 10A, Specification for Cements and Materials for Well
Cementing. This device meets the requirements for pressurized cement curing
equipment found in API Specification 10A, and API Recommended Practice
10B, Recommended Practice for Testing Well Cements.
After the curing period, the samples are removed from the single-cube molds
and tested to determine their compressive strength.
The pressure relief valve prevents the pressure chamber from exceeding 3,000
PSI (20.7 MPa).
The desired temperature for curing the cement samples is set on the
temperature controller, which automatically maintains that temperature
throughout the curing period. The maximum recommended curing
temperature is 400 Degrees F (204 Degrees C). A thermostat in the heating
jacket is set for an upper limit of 450 Degrees F (232 Degrees C) for safety.
The practice of removing the curing chamber and cooling it under
water is very dangerous. It is not recommended because of the
danger of severe burns if touched or accidentally dropped. Also
use extreme caution when placing a hot chamber in water. Hot
steam generated when the water hits the hot chamber can cause
severe burns.

Cement Curing Autoclave User Manual
100072577 Revision H 2
1.3 Features
•Single chassis contains all components in a durable stainless steel case.
•Insulated heating jacket reduces heating of the work area.
•Two two-inch cube molds and covers are included.
•Adjustable pressure relief valve.
•Programmable temperature controller.
•Removable chamber carrying handle.
•Adjustable support feet.
Figure 1-1
Cement Curing Autoclave, front view

Cement Curing Autoclave User Manual
100072577 Revision H 3
Figure 1-2
Cement Curing Autoclave, back view

Cement Curing Autoclave User Manual
100072577 Revision H 4
2 Safety
2.1 Machine Hazards
2.1.1 Pressure
Pressurized air and water lines present a hazard if not
depressurized before maintenance or disassembly.
High pressure hydraulic lines are a hazard because they can hold
up to 3,000 PSI (20.7 MPa). These lines are stainless steel or
reinforced hose. Operators must ensure that the pressure in these
lines has been reduced to zero before attempting to disassemble
any high pressure lines. Open the pressure manifold valve.
Confirm that all pressure in the system has been relieved by
observing the pressure gauge on the top of the chamber.
2.1.2 Temperature
The pressure chamber has an electric heating jacket that can heat
the cement slurry to 400°F (205°C). The metal jacket itself can be
considerably hotter, even over 600°F (315°C). Before removing
the pressure chamber, or performing any work on the heating
jacket, allow it to cool to below 120°F (49°C). Monitor the
temperature by observing the temperature controller display when
the chamber is in the heating jacket.
2.1.3 Steam
Water is commonly used to pressurize the cement slurry being
cured. When heat is applied, there is the potential for the water to
become high temperature steam. Because of the risk of burn, body
parts should be kept away from the manual pressure relief valve
(needle valve) when it is being opened.
As the automatic pressure relief valve opens, small amounts of hot
water and steam will be released, which are a burn hazard.
2.1.4 Electrical
The power source for the Cement Curing Autoclave is 115 or 230
Volts. There are electrically active terminals inside the instrument
when the power switch is turned off. Physically disconnect the
power cord from the outlet and instrument before attempting any
electrical or mechanical maintenance. Refer to the electrical
schematic before performing any maintenance or troubleshooting.

Cement Curing Autoclave User Manual
100072577 Revision H 5
2.2 Ergonomic Considerations
After the Cement Curing Autoclave is installed, it is uncommon for it to be
frequently moved. The physical location needs to have access to the required
electric power source, pressure source (compressed gas or hydraulic pump),
and be sufficiently sturdy to support the combined weight of the Cement
Curing Autoclave, pressure chamber, and cube molds, which is approximately
137 pounds (64 kg).
In routine cement slurry curing, the combined weight of the pressure chamber,
cement molds, cement, pressurizing water or oil, manifold, and handle must
be lifted fully from the heating jacket a distance of 8-1/2 inches (21.6 cm).
This weight varies with the number of molds and the cement slurry being
cured, and approaches 69 pounds (31.4 kg). Placing the top surface of the
Cement Curing Autoclave at 24–36 in (61–91 cm) from the floor is an
appropriate height for most people to lift the cement curing chamber.

Cement Curing Autoclave User Manual
100072577 Revision H 6
3 Features and Specifications
Table 3-1 Cement Curing Autoclave Specifications
Category Specification
Maximum Temperature 400°F (205°C)
Maximum Pressure 3,000 PSI (20.7 mega Pascal [MPa])
Heating Rate 8°F [4. 4°C] per minute maximum
Curing Chamber Volume (empty) 40.1 ounces (oz) (1,200 milliliters [ml])
Width 21.5 inches (in) (54.6 centimeters [cm])
Depth 16.5 in (41.9 cm)
Height 13.5-14.5 in (34.3-36.8 cm)
Weight 116 pounds (lb) (53 kilograms [kg])
Pressure Connection 1/8 Female NPT, located on the manual
pressure release valve
Voltage and Current
Single phase, AC, 50–60 Hertz (Hz) -
115V, 15A, NEMA 5-20P plug or
230V, 10A, NEMA 6–15P plug
3.1 Cement Curing Autoclave Mechanical
The manual needle valve in the pressure manifold controls the pressure going
into the curing chamber. During testing, the needle valve is normally closed.
At the conclusion of a test, after the temperature is below 120 Degrees F (48.9
Deg C), the needle valve can be opened to completely release the pressure.
Pressures above 3,000 PSI (20.68 MPa) are automatically vented by the
pressure relief valve, which functions as an over-pressure safety device.
The chamber pressure is shown on a pressure gauge installed directly into the
top of the curing chamber.

Cement Curing Autoclave User Manual
100072577 Revision H 7
Figure 3-1
Manual Needle Valve and Pressure Relief Valve
Figure 3-2
Pressure Manifold, Thermocouple, Pressure Gauge
3.2 Cement Curing Molds
Two brass alloy molds, internally measuring 2 inches X 2 inches X 2 inches
(5.08 cm X 5.08 cm X 5.08 cm) are provided with each Cement Curing
Autoclave. The two mold halves are aligned with dowel pins, and clamped
together with threaded sleeves. Two flat head screws fasten the bottom plate
to the two mold halves. This arrangement allows the mold to be removed
without damaging the cured cement specimen, and for thorough clean-up.

Cement Curing Autoclave User Manual
100072577 Revision H 8
Figure 3-3
Cement Mold
Figure 3-4
Cement Mold Clamp

Cement Curing Autoclave User Manual
100072577 Revision H 9
Figure 3-5
Cement Mold Base
3.3 Cement Curing Autoclave Controls and Indicators
The main power switch illuminates when electric power is applied to the
cement curing autoclave circuits.
The heat switch, located below the main power switch on the front panel,
enables and disables the heater circuit without interrupting power to the entire
instrument.
The temperature controller regulates the power applied to the heater circuit to
achieve and maintain the desired temperature inside the curing chamber. It
constantly compares the desired temperature (set point) to the temperature
reading from the curing chamber thermocouple and adjusts the heating cycle
to achieve and/or maintain the desired temperature. It continuously displays
the current and set point temperatures.

Cement Curing Autoclave User Manual
100072577 Revision H 10
Figure 3-6
Temperature Controller, Main Power, Heat switch
3.4 Temperature Controller Configuration
The tables in this section contain the factory settings for the Eurotherm
Model 2404 temperature controller when it is configured for the Cement
Curing Autoclave. It is rare that the majority of these settings will need to be
changed. They are provided for reference should the temperature controller
respond in an unexpected manner, and incorrect settings are suspected.

Cement Curing Autoclave User Manual
100072577 Revision H 11

Cement Curing Autoclave User Manual
100072577 Revision H 12
1. Press until the display shows
2. Press to select the Config password (2)
3. ‘Pass’ is displayed momentarily.
Press to Configuration (ConF)
Name
to select
Parameter Description
Value
or to change
Ctrl
Control Type
PID
Act
Control Action
ReU
Cool
Type of Cooling
Lin
Ti.Td
Integral & derivative time units
SEc
dtYP
Derivative type
PU
m-A
Front panel Auto/Man button
EnAb
r-h
Front panel Run/Hold button
EnAb
PwrF
Power feedback
on
Fwd.t
Feed forward type
nonE
Sb.tr
Sensor break output
Sb.OP
FOP
Forced manual output
no
bcd
BCD input function
nonE
GSch
Gain schedule enable
no
LC.HI
0

Cement Curing Autoclave User Manual
100072577 Revision H 13
Press to Process Value (PU) Configuration
Name
to select Parameter Description
Value
or
to change
uniT
Instrument units
ºF
dEc.P
Decimal places in the display
nnn.n
rnG.L
Range low
-199.9
rnG.h
Range high
999.9
Press to Input (iP) Configuration
Name
to select Parameter Description
Value
or to change
inPt
Input type
J.tc
CJC
Cold junction compensation
Auto
imP
Sensor break impedance
Auto
Press to Set Point (SP) Configuration
Name
to select Parameter Description
Value
or
to change
nSP
Number of setpoints
2
rm.tr
Remote tracking
OFF
m.tr
Manual track
OFF
rmP.U
Setpoint rate limit units
PSec
rmt Remote setpoint
configuration nonE
Table of contents
Other fann Test Equipment manuals