fann 21150 User manual

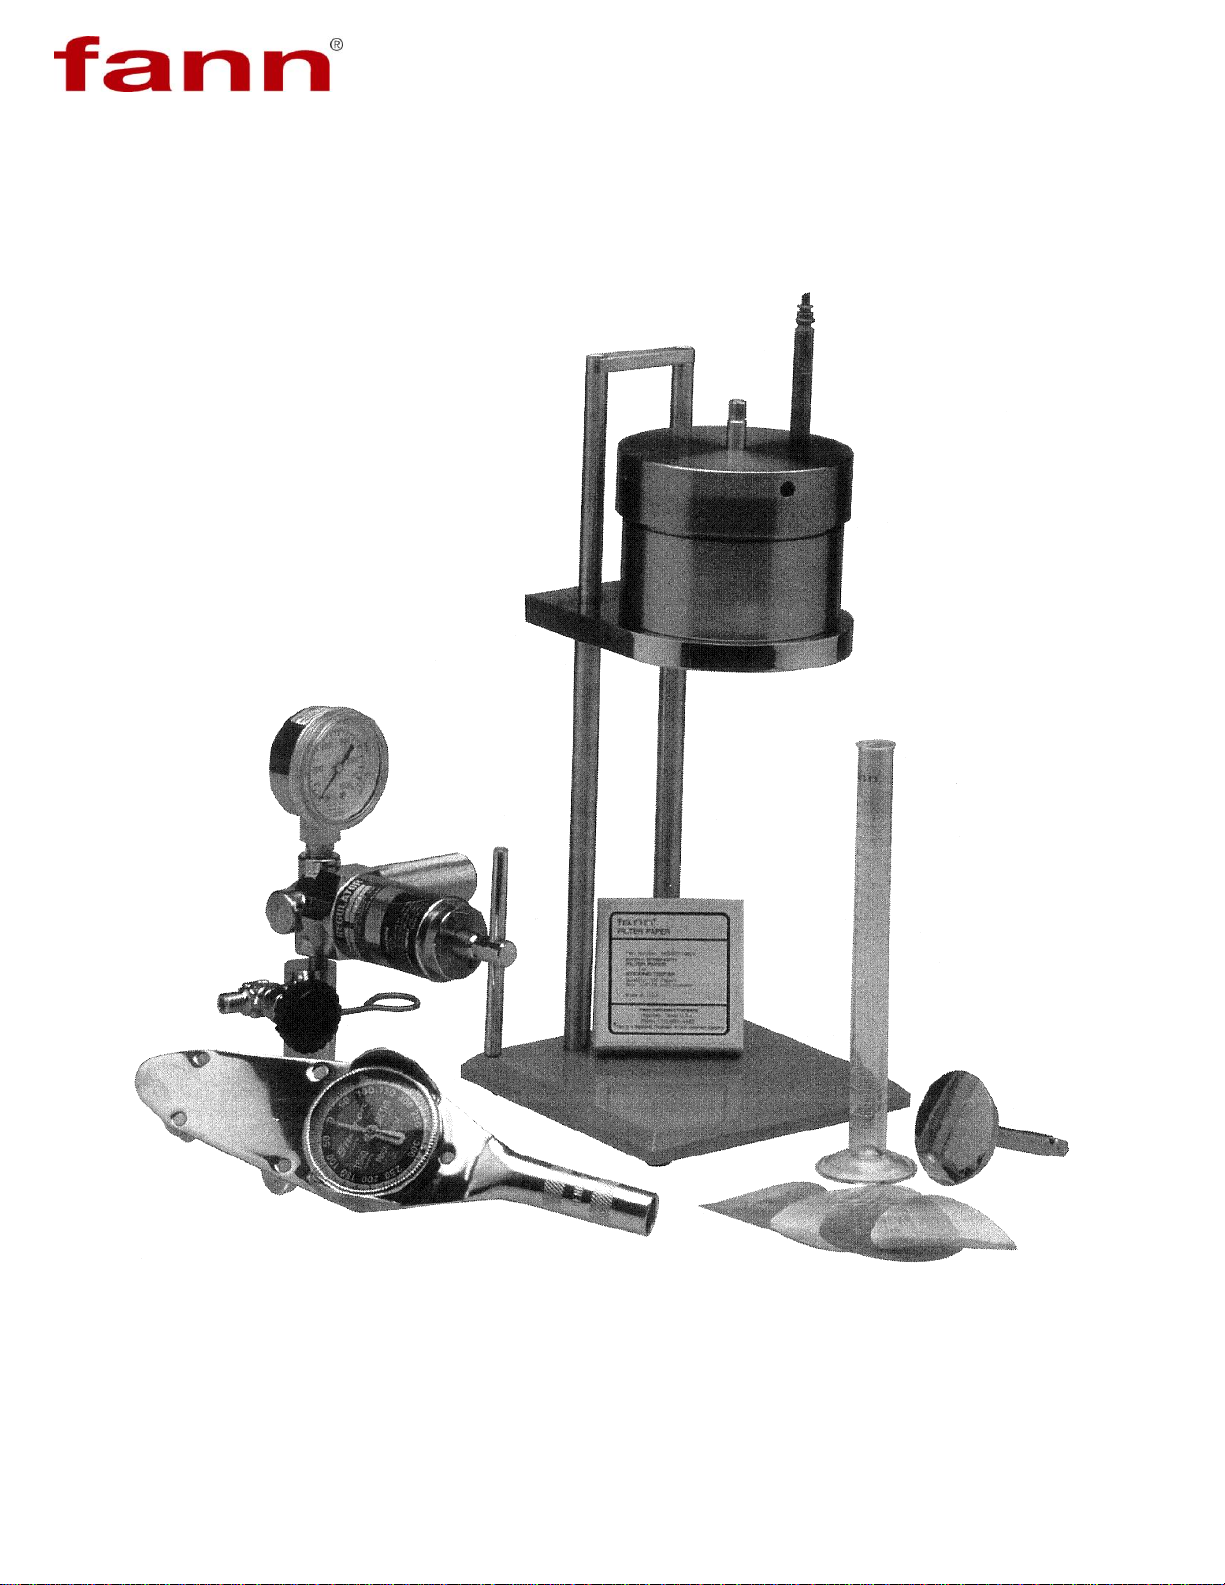
Model 21150 Differential Sticking Tester
Instruction Manual
Instruction Manual Part No. 206907 Rev. D

ii
Copyright 2010
Fann Instrument Company
Houston, Texas, U.S.A.
All rights reserved. No part of this work covered by the copyright hereon may be
reproduced or copied in any form or by any means -- graphic, electronic or mechanical
without first receiving the written permission of Fann Instrument Company, Houston,
Texas, U.S.A.
Printed in U.S.A.
NOTE:
Fann reserves the right to make improvements in design, construction and appearance of
our products without prior notice.
®FANN is a registered trademark of Fann Instrument Company.
Fann Instrument Company
P.O. Box 4350
Houston, Texas, U.S.A. 77210
Telephone: (281) 871-4482
Toll Free: (800) 347-0450
Fax: (281) 871-4358

iii
TABLE OF CONTENTS
1 General Information 1
2 Safety Considerations 3
3 Timed Filtration Test Procedure 7
4 Calculations and Theory of Measurements 13
5 Cleaning and Maintenance 21
6 Parts List 25
FIGURES
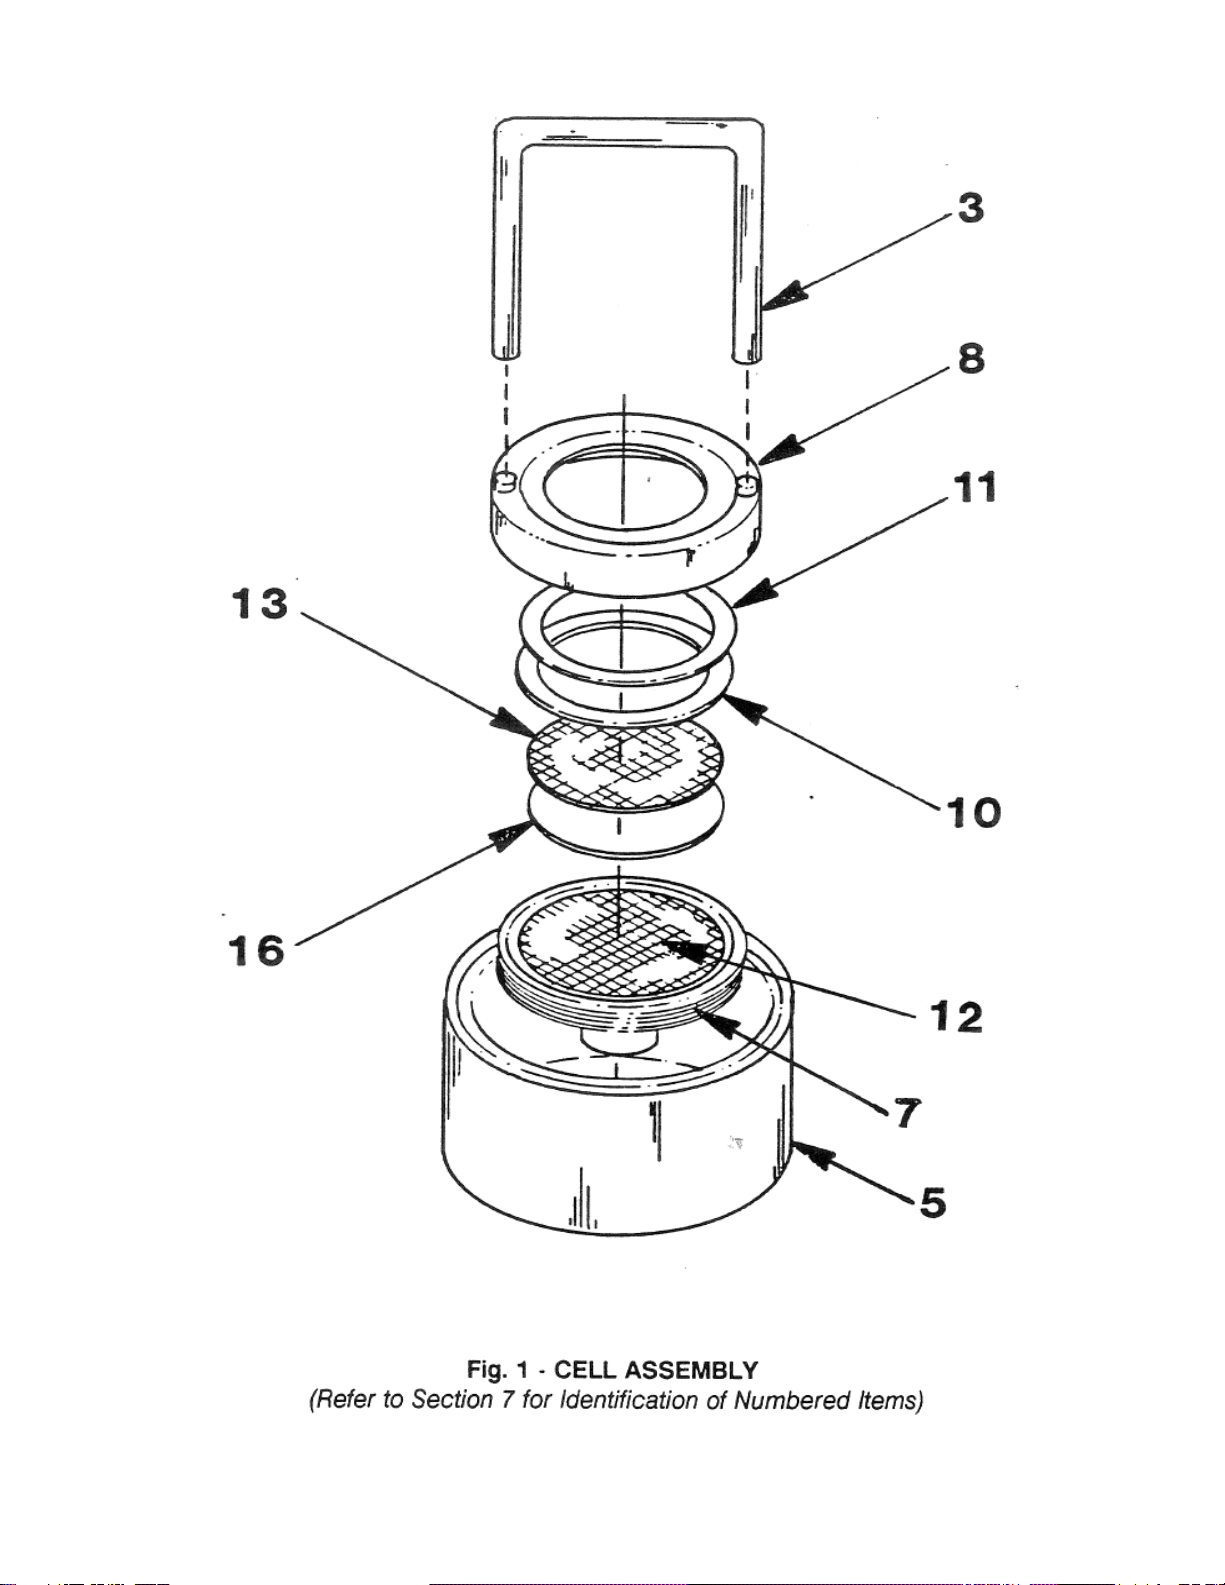
1 Cell Assembly 5
2 Cell Section 6
3 Closing and Opening Cell (Opening shown) 9
4 Sticking The Torque Plate 10
5 Measuring Sticking 10
6 Work Sheet 18
7 Exploded View Pressure Regulator 19
8 Exploded View Differential Sticking Tester 24

iv

1
SECTION 1
GENERAL INFORMATION
The Differential Sticking Tester Apparatus was designed to determine how likely a given
drilling fluid will be to produce a "stuck pipe" situation and how effective a given drilling
fluid treatment or application of spotting fluid in any given drilling fluid would be in reducing
this tendency. This measurement is called the "Stuck Tendency Coefficient". It takes into
account both the stickiness and the cake building capability of the drilling fluid. The "Stuck
Tendency Coefficient" is determined by the Timed Filtrate Test.
The unit can be pressurized by the CO2regulator assembly or from any nitrogen source.
If Nitrogen is to be used, the Differential Sticking Tester must be fitted with a suitable
Nitrogen regulator, gauges, relief valve, hose and fittings. The tests use 477.5 psi (3292
kph) differential pressure applied to a stainless steel vessel of approximately 200 ml
capacity. The measurement can be made using either the flat-faced torque plate or the
12-1/2" (31.75 cm) spherical radius1plate which approximates pipe in casing or collars in
borehole contact geometry. (Both are provided.) In the event of a "sticky" sample that
tends to adhere more to the torque plate than to the filter paper, stainless steel micro-
corrugation disks are provided, along with extra-strength paper (within 2% of standard
paper filtration speed) to ensure success of the test.

2

3
SECTION 2
SAFETY CONSIDERATIONS
Safe operation of the Differential Sticking Tester requires that the operator understand and practice the
correct assembly and operation of the equipment. Improper assembly, operation, or the use of defective
parts poses the possibility of cell leakage or failure which could result in serious injury and damage.
Following is a list of suggestions that should be observed to assure safe operation and maintenance of
the Differential Sticking Tester.
A. Safe Pressurization
1. Always use either Carbon Dioxide or Nitrogen. Never connect the Differential Sticking Tester
to Compressed Air, Oxygen or other non-recommended gas. If Nitrogen is used it must be
supplied in an approved Nitrogen gas cylinder or the nitrogen supply system must be built into
the laboratory. Nitrogen Cylinders must be secured to meet safety standards. Carbon
Dioxide is normally supplied in small cartridges which contain about 900 psi (6206 kPa)
pressure. They are primarily used for field operations. Do not allow these cartridges to be
heated or exposed to fire. They can explode if overheated.
2. Maintain pressure regulators in good condition. Never use oil on pressure regulators. Leaking
pressurization systems should be repaired or replaced. Gauges, fittings and hoses should be
kept in good condition and leaks should be found and corrected. If Nitrogen is being used,
periodically test the safety relief valve to verify they will relieve if excessive pressure should
occur. Never plug or bypass the safety valve.
3. Before pressurizing the Differential Sticking Tester always check to be sure the regulator tee
screw is backed out until free turning thereby putting the regulator in the closed position.
Insert and puncture the CO2cartridge or open the nitrogen gas supply valve, then adjust the
regulator. Do not attempt to pressurize higher than the equipment is rated. When de-
pressurizing, shut off the supply pressure, bleed the system of pressure, and then back out
the regulator Tee screw.
B. Safe Test Cell Maintenance
The Differential Sticking Tester Cell Assembly constitutes a PRESSURE VESSEL.
The Safety Precautions listed should be followed to assure safe operation.
1. Cell material should be compatible with the test sample.
2. Cells that show signs of stress cracking, severe pitting, or have damaged threads must not be
used.
C. Safe Operation
The Differential Sticking Tester is a relatively small and light weight instrument. Observe the following
cautions in its operation to prevent injury and damage due to the instrument slipping on the work
bench or accidentally being knocked off the bench.
1. Before attempting to tighten Cell Cap onto Cell Body, Refer to Fig. 3, make sure Bolt [26], Fig. 2 is
installed and tightened. This will insure the Cell does not slip off the Stage.

4
2. Make sure the instrument is setting flat on the bench and not close to the edge and that the
groove in the lever is fit under the top leg support before pressing down and holding the lever to
stick the torque plate. Refer to Fig. 4. Use caution that the lever does not slip and cause an
accident.

5

6

7
SECTION 3
TIMED FILTRATION STICKING TEST PROCEDURE
(Numbers in [ ] refer to Fig. 1 thru 5)
The general procedure for assembling and operating the instrument is basically the same whether the
test described in Section 3 or Section 4 is being run. Ensure that the apparatus is clean. Refer to
Section 6.
The timed filtration sticking test uses a predetermined sticking time to determine the sticking coefficient.
In this test the stuck tendency coefficient Kst is determined. If the flat plate [9] is used R = 1 with edge
effects considered. Refer to Step B-3 below. If the radius'd plate [15] is used, the stuck surface may be
less than R = 1, R = 1, or R = 1 with edge effects depending on the cake building characteristics of the
drilling fluid. Refer to Step B - 3 below. In this test the bulk sticking coefficient Ksc is determined.
A. Cell Assembly
1. Place a sheet of heavy-duty filter paper, Part #N8805 [16], locking mesh (if used) [13]), rubber
gasket [10], and plastic ring [11] inside the cell.
NOTE: The locking mesh will lock the drilling fluid cake to the paper so that it
cannot invalidate the test results by sticking to the torque plate face
and breaking loose from the filter paper.
2. Holding the gaskets centered, screw the hold-down retainer ring [8] over the gaskets. Use the
ring wrench [3], and tighten securely.
3. Insert the threaded end of one valve stem [17] into the bottom center hole of the cell and
screw in as far as possible hand tight. .
4. Fill the cell to the scribe line with the drilling fluid sample to be tested. This is 1/4 in. (6.3 mm)
from the top.
5. Set the cell on its stand [1], mating two of its holes into the stand tips. If the valve stem in the
lid is in line with the stand columns, this will interfere with the lever [4]. Rotate the cell 90 .
6. Select either the flat bottom torque plate [9], or the radius'd torque plate [15]. Refer to Section
5-B "PLATE SELECTION" for effects of each type of torque plate. Insert the stem of torque
plate [9] or [15] through the lid as far as possible with the polished surface facing down from
the inside of the lid. Be careful not to cut the "O" Ring [21].
7. Assemble the cell cap [6] and torque plate onto the cell, making sure the "O" ring [22] is
properly seated in the lid.
8. Secure the cell to the stand using screws [26]. This will facilitate tightening of the cell cap and
torque wrench usage by one person.
9. Tighten the cell cap, Refer to Fig. 3.
10. Insert the second valve stem [17] into cell cap. Close the valve hand-tight.
11. Set the CO2assemblies [2] over the top end of the top valve stems [17] and insert the locking
pin [27].

8
12. Close the bleed valve on the CO2assembly.
13. Turn the regulator handle counterclockwise until the diaphragm pressure is relieved.
14. Insert the CO2cartridge [25] into the knurled CO2holder. Tighten the holder onto the head,
puncturing the cartridge.
15. Place graduated cylinder [29] under the cell and turn the lower valve stem valve 1/4 turn
counterclockwise from hand-tight.
16. Adjust the regulator to 477.5 PSI (3292 kPa).
B. Running The Sticking Test
1. Verify the torque plate stem is up as far as possible by turning and pulling upward at the same
time.
2. Open the top valve-stem by turning it counterclockwise 1/2 to 3/4 turn using a small adjustable
wrench, then record the time as the start of the test.
3. Allow the drilling fluid to filter for 10 minutes, or until the desired filtrate volume is collected.
4. Catch the groove in the lever (4) under the column top cross support and press the plate
down. Refer to Fig. 4. Continue to hold the torque plate all the way down against the screen
until pressures equalize sufficiently to allow the plate to stick. This is usually about two
minutes and will require 50 to 80 pounds (23 to 36 kg) of force on the end of the lever.
5. Record the filtrate volume at this time.
6. Allow the plate to stick for 10 minutes.
7. Assemble the socket [30] on the torque wrench [24]. Place the torque wrench and socket on
the hex top of the torque plate stem. Position the lever [4] wedged between the columns
above the cell platform to be used as a backup. Refer to Fig. 5.
CAUTION
SHOULD THE FILTER PAPER TEAR WHEN THE TORQUE PLATE IS ROTATED, CELL
PRESSURE WILL BE EXHAUSTED OUT THE FILTRATE VALVE. A STANDARD HPHT BACK
PRESSURE RECEIVER CAN BE SUBSTITUTED FOR THE GRADUATE WHILE THE TORQUE
READINGS ARE TAKEN, OR A LENGTH OF RUBBER OR TYGON TUBING CAN BE AT-
TACHED TO THE VALVE STEM WITH THE OTHER END RESTRAINED IN A CONTAINER
8. Measure the torque by rotating the torque plate in either direction with the torque wrench and
observing its dial.
9. Repeat the torque measurement three to six times, allowing 30 seconds between checks.

9

10

11
10. Record each of these readings, then calculate the average torque reading. Record the plate
sticking time.
11. Turn the regulator handle counterclockwise until the diaphragm pressure is not felt. Then
open the bleed-off valve.
C. Dis-assembly and Cleaning
1. Remove the empty CO2cartridge (if spent.)
2. Remove the torque wrench and socket.
3. Pull pin [26] and remove the CO2assembly [2].
4. Remove the top valve stem [17].
5. Loosen the cell cap [6], then unscrew and remove it. If the torque plate remains stationary
while loosening and unscrewing the cell cap, carefully push it through the lid by its stem.
Refer to Fig. 3.
6. Tip the Sticking Tester with the cell attached to empty the sample.
7. Gently wash the sample from the edge of the torque plate.
8. TWIST the torque plate off the cake. Note the diameter of the depression from the torque
plate if this is less than 2 inches or if any cake is adhering to the edge of the torque plate,
estimate the edge height from the filter paper.
NOTE: If the cake is stuck to the torque plate rather than to the filter paper,
the test is invalid. Repeat the test using the locking mesh in Step
A-1. above.
9. If not already removed in Step 6 above, remove the torque plate from the cell cap, being
careful not to scratch the polished surface.
10. Using the special wrench [3], unscrew the hold down ring, then remove the slip ring, and
gasket. Remove the lock mesh, filter paper, and filter cake together. Examine the cake as
desired.
11. Remove screw [26] then remove the Cell from the stage.
12. Clean all parts thoroughly. Polish surfaces whenever any corrosion is noted.
13. Lubricate threads, and examine all "O" rings and replace as needed. Lubricate all "O" rings
with Lubriseal or a similar lubricant.

12

13
SECTION 4
CALCULATIONS AND THEORY OF MEASUREMENT
A. Stuck Tendency Coefficient
Using the standard test described in Section 3 "Standard Test Procedure" and the 12.5" (31.75
cm) radius'd plate and 477.5 psi (3292 kPa), the average of 6 "break" readings taken within 30
seconds of one another divided by 1000 is known as the STUCK TENDENCY COEFFICIENT
(Kst) of a drilling fluid. This coefficient takes into account both the bulk sticking coefficient and the
cake-building character of the sample (Refer to Fig. 2).
The physical basis for the Stuck Tendency Coefficient is that it takes into account both the static
coefficient of friction of the cake (the bulk sticking coefficient) per unit area of cake and also the
amount of caking that would occur to stick the pipe in the hole. A low caking drilling fluid will not
build up as much around the collars as a high caking drilling fluid. There is a higher bond area for
a higher caking drilling fluid. A very sticky drilling fluid which builds very little cake is safer down
hole than a high cake building drilling fluid with high permeability that sticks a much greater area
at even a factor of one half the bulk coefficient, resulting in a higher Stuck Tendency Coefficient.
B. Selection of Plates--Radius'd or Flat
Generally for direct Kst readings, use the radius'd plate, since only in the case of high caking
drilling fluids will the flat plate provide comparative readings to the radius'd plate. The flat plate
does not take into account collar-to-well bore or drill stem-to-casing geometry for the caking area
component of the Kst coefficient. The difference between the flat plate and radius'd plate in the
Ksc measurements is that the radius'd plate requires measuring stuck area dome diameters less
than 2" (5.08 cm), as well as getting average edge height readings, as is done with both. The
thickness of the cake and the type of plate used determine the parameters for calculation of Kst
and Ksc.
A. Conditions for type of torque plate and drilling fluid cake types are listed below:
1. Radius'd Plate 12.5 inch (31.75 cm) Spherical Radius
Sample Contact less than 1 inch (2.54 cm) radius
Sample contact equal to 1 inch (2.54 cm) radius, edge effects ignored
Sample contact equal to 1 inch (2.54 cm) radius, edge effects considered
2. Flat Plate
Sample contact always equal to 1 inch (2.54 cm), edge effects considered
NOTE: The flat plate will always have a 1 inch (2.54 cm), stuck radius and will
always have at least some edge effects.
In taking into account the edge effects on either plate, the assumption is made that the full pressure of
477.5 psi (3292 kPa) is not achieved on the full height (h) of the cake, but on 2/3 of (h). This is
assumed because the cake is permeable and the pressure drop is a gradient throughout the
thickness of the cake (h) on the vertical edge.

14
B. Derivation-Bulk Sticking Coefficient
The bulk sticking coefficient (Ksc) is the ratio of the force necessary to initiate sliding (Fs) of the
plate to the normal force (Fn) on the plate.
Let Tu = average of reading from torque wrench (inch-pounds)
R = radius of plate (inches)
h = height above flat surface of cake around edge of plate (inches)
P = cell pressure, (psi) differential (inlet to outlet)
r = variable radius
dr = incremental radius
τy= shear on incremental area
Fs= sliding force
Fn= normal force on plate
Ksc = bulk sticking coefficient
Kst = stuck tendency coefficient
A = stuck area, radius'd plate
Ae= stuck area, edge
1. The Sliding Force (Fs)
a. Calculation for use when neglecting edge effects is derived from the measured torque
Tu as follows:
NOTE: R = 1 assumes cake sticking up to, but not around, the edge of the plate.

15
b. Calculation for use when taking into account the edge effects is derived from the
measured torque as follows:
R = 1 inch and assuming that the 477.5 psi (3292 kPa) on the average is achieved only
2/3 the distance of the cake deposition up the edge:
2. The normal force (Fn)
The differential or normal force (Fn) on the plate is derived by multiplying the area by
the differential pressure:
Considering edge effects:
With edge effects R = 1 inch
Then, assuming the recommended pressure of 477.5 psi (3292 kPa)
C. The Bulk Sticking Coefficient (Ksc)
The bulk sticking coefficient Ksc is the ratio of the sliding force to the normal force:

16
1. Ignoring edge effects:
For a standard pressure of 477.5 psi (3292 kPa):
(And for R = 1 inch):
2. Taking into account edge effects:
For a standard pressure of 477.5 psi (3292 kPa) and R = 1 inch
The Stuck Tendency Coefficient (Kst) is:
NOTE: Kst is not valid for the flat plate because the stuck area is either 0 or
3.14 in2(R = 1) and not a variable.
Table of contents
Other fann Test Equipment manuals
Popular Test Equipment manuals by other brands

Protek RC
Protek RC iChecker v3 operating instructions

Power Fist
Power Fist 8494031 user manual

phase II+
phase II+ SRG 2200 instruction manual

HQ Power
HQ Power VDL20ST2 user manual

AutoMeter
AutoMeter BATTERY EXTENDER Maintainer/Tester 9201 operating instructions

TECHNO-AC
TECHNO-AC Success AG-309.15 N Technical Description, Operating Instructions

EMTEST
EMTEST PFM 200N200 user guide

B+K precision
B+K precision 2522C instruction manual

Kyoritsu Electrical Instruments Works, Ltd.
Kyoritsu Electrical Instruments Works, Ltd. 6011A instruction manual

Digi-Shot
Digi-Shot Plus CE4 Tagger manual

DuraSat
DuraSat DUR-line SF 4000 BT quick start guide

B+K precision
B+K precision BK8510B user manual