manuals.online logo
Brands
  1. Home
  2. •
  3. Brands
  4. •
  5. Fantom
  6. •
  7. Vacuum Cleaner
  8. •
  9. Fantom XF732H User manual

Fantom XF732H User manual

Style # XF732H
for Model FM732H
1 HEPA Filter
Style # XF732H
for Model FM732H
1 HEPA Filter
Warning:To reduce the risk of electric shock, the power cord must be
disconnected before removing the dust cup, changing or
cleaning the HEPA filter or performing maintenance/trouble
shooting checks.
Warning:To reduce the risk of electric shock, the power cord must be
disconnected before removing the dust cup, changing or
cleaning the HEPA filter or performing maintenance/trouble
shooting checks.
Cleaning the Rinseable "TapClean" HEPA Dust Cup Filter & Debris Screen Cleaning the Rinseable "TapClean" HEPA Dust Cup Filter & Debris Screen
3. After you have removed the dust cup
cover from the dust cup container,
hold the dust cup
handle with one
hand and twist the
HEPA filter counter
clockwise holding it
from the filter stem
to remove from
the dust cup cover.
4. After you have
removed the
Rinseable “TapClean”
HEPA dust cup filter from
the dust cup, separate the
debris screen from the
HEPA filter cartridge by
holding the top rim of the
filter and twisting the
debris screen counter-
clockwise to unlock the
debris screen from the
filter. Then lift the debris
screen to remove.
Open
Lock
Twist
To remove the dust cup container
from the vacuum:
1. Lift the dust cup handle and lift the
dust cup container out.
2. To remove the Rinseable
“TapClean” HEPA dust
cup filter from the
dust cup container,
hold the dust cup
container from the
handle and turn
counter clockwise
to release the dust
cup cover.
Top Rim
Stem
Warning:After each Use - Always
remove the Rinseable "TapClean" HEPA
Filter from the Dust Cup, then vigorously
“TapClean” HEPA Filter until no more
dust can be removed.
Important: When "TapCleaning" the
HEPA filter, hold the HEPA filter from the
stem and tap ONLY the top rim against
the side of the waste container. NEVER
tap directly on the pleated folds of the
HEPA filter.
5. Rinse the debris screen
under the faucet with
lukewarm water until
clean. Allow to air dry for 24 hours.
Do NOT wash in dishwasher.
6. To replace the debris screen onto the
filter, slip the debris screen over the
filter and twist clockwise to lock in
place.
FANTOM
94 Main Mill Street, Door 16
Plattsburgh, NY 12901
Tel.: 1-800-275-9251
FANTOM
94 Main Mill Street, Door 16
Plattsburgh, NY 12901
Tel.: 1-800-275-9251
IMPORTANT, Please Note : The
Rinseable “TapClean” HEPA Dust Cup
Filter will stop most of the tiniest dust
particles from re-entering the air you
breathe. In fact it stops 99.97% of all
particles as small as 0.3 microns - many
times smaller than a human hair!!!
Because of this incredible filtration
performance, the HEPA Dust Cup Filter
will quickly accumulate dirt inside the
white filter folds, many fine dust particles
that are difficult to see but which will
eventually block or reduce your suction
power - if not cleaned properly. Clean the
HEPA Filter as described in this section,
then reconnect unit and proceed with
vacuuming.)
PLEASE NOTE: The white pleated
filter material in the HEPA Dust Cup
Filter will discolor over time -This is
NORMAL and will NOT affect the
performance of the filter. If the HEPA
Dust Cup Filter
is properly
"TapCleaned”
after each use
and suction
does not return
to 100%, then
we suggest that
the HEPA filter
be “TapCleaned”
vigorously until
no more dust
can be removed, then rinsed under
the faucet and allowed to dry for 24
hours before refitting into the vacuum.
(Fig. A) This should be done once a
month or when suction appears to
be reduced.
Fig. A
Warning: Allow 24
hours for drying before
replacing in unit.
Wash
once a
month or
when
suction
appears
reduced
7. Vigorously “TapClean”
the HEPA Dust Cup
Filter on a hard
surface until no more
dust is observed
falling out from
between the pleats of
the filter.
Important:The suction hole must be
open, free of any obstructions at all
times. Otherwise, the motor will overheat
and could become damaged.
Important:The suction hole must be
open, free of any obstructions at all
times. Otherwise, the motor will overheat
and could become damaged.
9. Insert the Rinseable "TapClean"
HEPA dust cup filter back into the
dust cup.
10.Re-install dust cup into the vacuum.
Close cover and re-attach hose.
8. Reassemble the debris screen to the
HEPA filter cartridge and replace into
dust cup (container). Ensure that the
filter assembly is completely seated
inside the dust cup (container).
Important: Do NOT use the HEPA filter
cartridge without the debris screen in
place.
IMPORTANT:Please note that there
is a safety switch inside the vacuum
where the dust cup is inserted to
prevent the unit from being run
without a dust cup filter in place. If the
dust cup filter has not engaged this
safety switch, the vacuum will NOT
operate. Therefore, ensure that the
dust cup filter is inserted firmly into the
vacuum when assembling.
Rev. 06/04
Printed in Mexico
Rev. 06/04
Printed in Mexico
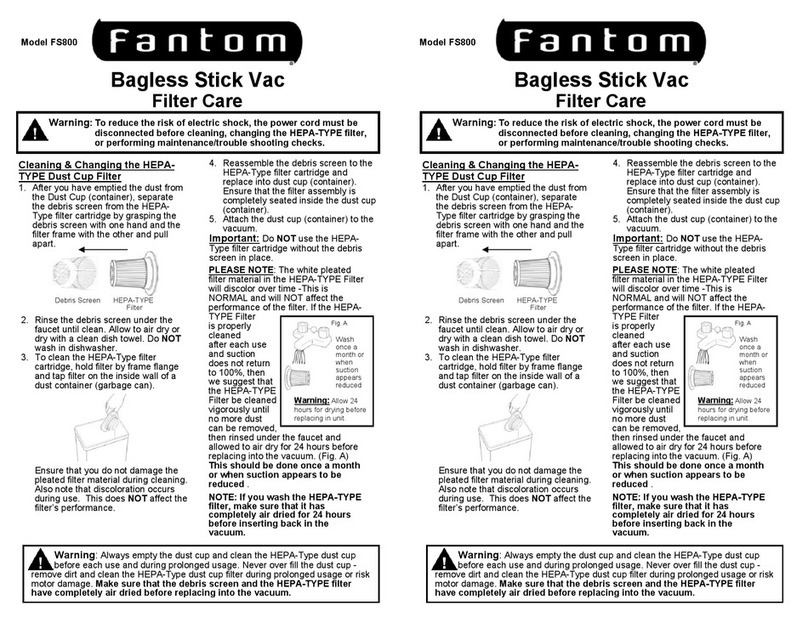
Other Fantom Vacuum Cleaner manuals

Fantom PROMAX 800CM2 User manual

Fantom

Fantom PROMAX 800CM2 User manual

Fantom FANTOM FM743H User manual

Fantom

Fantom FANTOM FM743H User manual

Fantom Magic WF 4000 User manual

Fantom

Fantom Magic WF 4000 User manual

Fantom FM625H User manual

Fantom

Fantom FM625H User manual

Fantom POWER PET BAGGED CANISTER FM765MC 31 User manual

Fantom

Fantom POWER PET BAGGED CANISTER FM765MC 31 User manual

Fantom FM760 User manual

Fantom

Fantom FM760 User manual

Fantom FM742CS User manual

Fantom

Fantom FM742CS User manual

Fantom CV242H User manual

Fantom

Fantom CV242H User manual

Fantom FM655CS User manual

Fantom

Fantom FM655CS User manual

Fantom FM766HG User manual

Fantom

Fantom FM766HG User manual

Fantom FM741HV User manual

Fantom

Fantom FM741HV User manual

Fantom PROVAC P 5000 User manual

Fantom

Fantom PROVAC P 5000 User manual

Fantom FM1310PC User manual

Fantom

Fantom FM1310PC User manual

Fantom FM401 User manual

Fantom

Fantom FM401 User manual

Fantom FM732C User manual

Fantom

Fantom FM732C User manual

Fantom FM604C User manual

Fantom

Fantom FM604C User manual

Fantom FANTOM FM430K User manual

Fantom

Fantom FANTOM FM430K User manual

Fantom CW233H User manual

Fantom

Fantom CW233H User manual

Fantom FM430H User manual

Fantom

Fantom FM430H User manual

Fantom FM744H User manual

Fantom

Fantom FM744H User manual

Fantom FM718 User manual

Fantom

Fantom FM718 User manual

Fantom TRANSFORMER VAC FM604 User manual

Fantom

Fantom TRANSFORMER VAC FM604 User manual

Fantom FM714C User manual

Fantom

Fantom FM714C User manual

Fantom FM760 User manual

Fantom

Fantom FM760 User manual

Popular Vacuum Cleaner manuals by other brands

Vax VX18 Get started

Vax

Vax VX18 Get started

Bissell OptiClean 30C7 SERIES user guide

Bissell

Bissell OptiClean 30C7 SERIES user guide

Scarlett SC-VC80C09 instruction manual

Scarlett

Scarlett SC-VC80C09 instruction manual

Bissell 2281K Series quick start

Bissell

Bissell 2281K Series quick start

Tower Hobbies T113000 Safety and instruction manual

Tower Hobbies

Tower Hobbies T113000 Safety and instruction manual

Ultenic T10 quick start guide

Ultenic

Ultenic T10 quick start guide

ulsonix TURBOCLEAN XX PRO user manual

ulsonix

ulsonix TURBOCLEAN XX PRO user manual

Waeco PowerVac PV-100 operating instructions

Waeco

Waeco PowerVac PV-100 operating instructions

Makita VC002GL instruction manual

Makita

Makita VC002GL instruction manual

LG VB7820HTV manual

LG

LG VB7820HTV manual

DR PILOT XT Safety & Operating Instructions

DR

DR PILOT XT Safety & Operating Instructions

Shark duoclean Powered Lift-Away NV830 Series instructions

Shark

Shark duoclean Powered Lift-Away NV830 Series instructions

VOX electronics MISTRAL 700 operating instructions

VOX electronics

VOX electronics MISTRAL 700 operating instructions

Oreck U4151 user guide

Oreck

Oreck U4151 user guide

Caso MyVac 20 operating manual

Caso

Caso MyVac 20 operating manual

Black & Decker VO1850 manual

Black & Decker

Black & Decker VO1850 manual

iRobot Roomba Combo j5+ user manual

iRobot

iRobot Roomba Combo j5+ user manual

AIGOSTAR 33JRJ instruction manual

AIGOSTAR

AIGOSTAR 33JRJ instruction manual

manuals.online logo
manuals.online logoBrands
  • About & Mission
  • Contact us
  • Privacy Policy
  • Terms and Conditions

Copyright 2025 Manuals.Online. All Rights Reserved.