FARM-MAXX FTC Series User manual

FARM-MAXX
FTC –SERIES 36- 40-48
COMPACT TRACTOR ROTARY
TILLERS
OPERATOR'S & PART’S
MANUAL
Unifarm Machinery Corporation
PO Box 38, Wilson, NC 27893


Congratulation for purchasing your new FARM-MAXX rotary tiller!
This tiller has been designed and manufactured following all safety and quality requirements needed
for a safe and satisfactory use over time.
A careful reading of this manual will permit you to familiarize with your new equipment, and will
provide you all the tools needed to use it safely.
A proper maintenance and knowledge of the safety rules of use will allow to obtain the
best performance and a long service life of the machine.
The Safety Alert Symbol used throughout this manual and on safety
decals of the machine indicates the presence of potential hazard to the
operator. When you see this symbol, be alert and carefully read the
message that follows it.
The Safety Alert Symbol is used in conjunction with following Signal Words, according to the
degree of possible injuries that may result operating the implement:
DANGER
Indicates an imminently hazardous situation that, if not avoided, will result in death or serious injury.
WARNING
Indicates a potentially hazardous situation that, if not avoided, could result in death or serious injury,
and includes hazards that are exposed when guards are removed. It may also be used to alert
against unsafe practices.
CAUTION
Indicates a potentially hazardous situation that, if not avoided, may result in minor or moderate
injury. It may also be used to alert against unsafe practices.
IMPORTANT
Indicates instructions or procedures that, if not observed, can cause damage to equipment or
environment.
NOTE
Indicates helpful information.
READ, UNDERSTAND, and FOLLOW the safety messages following the Safety Alert Symbol and
Signal Words. Failure to comply with safety messages could result in serious bodily injury or death.

TO THE PURCHASER
This manual contains valuable information about your FARM-MAXX rotary tiller. It has
been carefully prepared to give you helpful suggestions for operating, adjusting, servicing
repair parts.
Keep this manual in a convenient place for quick and easy reference. Study it
carefully. You have purchased a dependable and sturdy tiller, but only by proper care and
operation can you expect to get the service and long life designed and built into it.
RIGHT-HAND AND LEFT-HAND sides are determined from viewpoint of tractor seat.
Sometime in the future your tiller may need new parts to replace those are worn or
broken. If so, go to nearest FARM-MAXXdealer and provide him the model and part number.
Customer information
Name
Purchased from
Purchased date
Model No.
Serial No.

TABLE OF CONTENTS
Contents
TO THE PURCHASER ..................................................................................................... 4
1. ABOUT THIS MANUAL ........................................................................................... 1
2. INTRODUCTION ....................................................................................................... 1
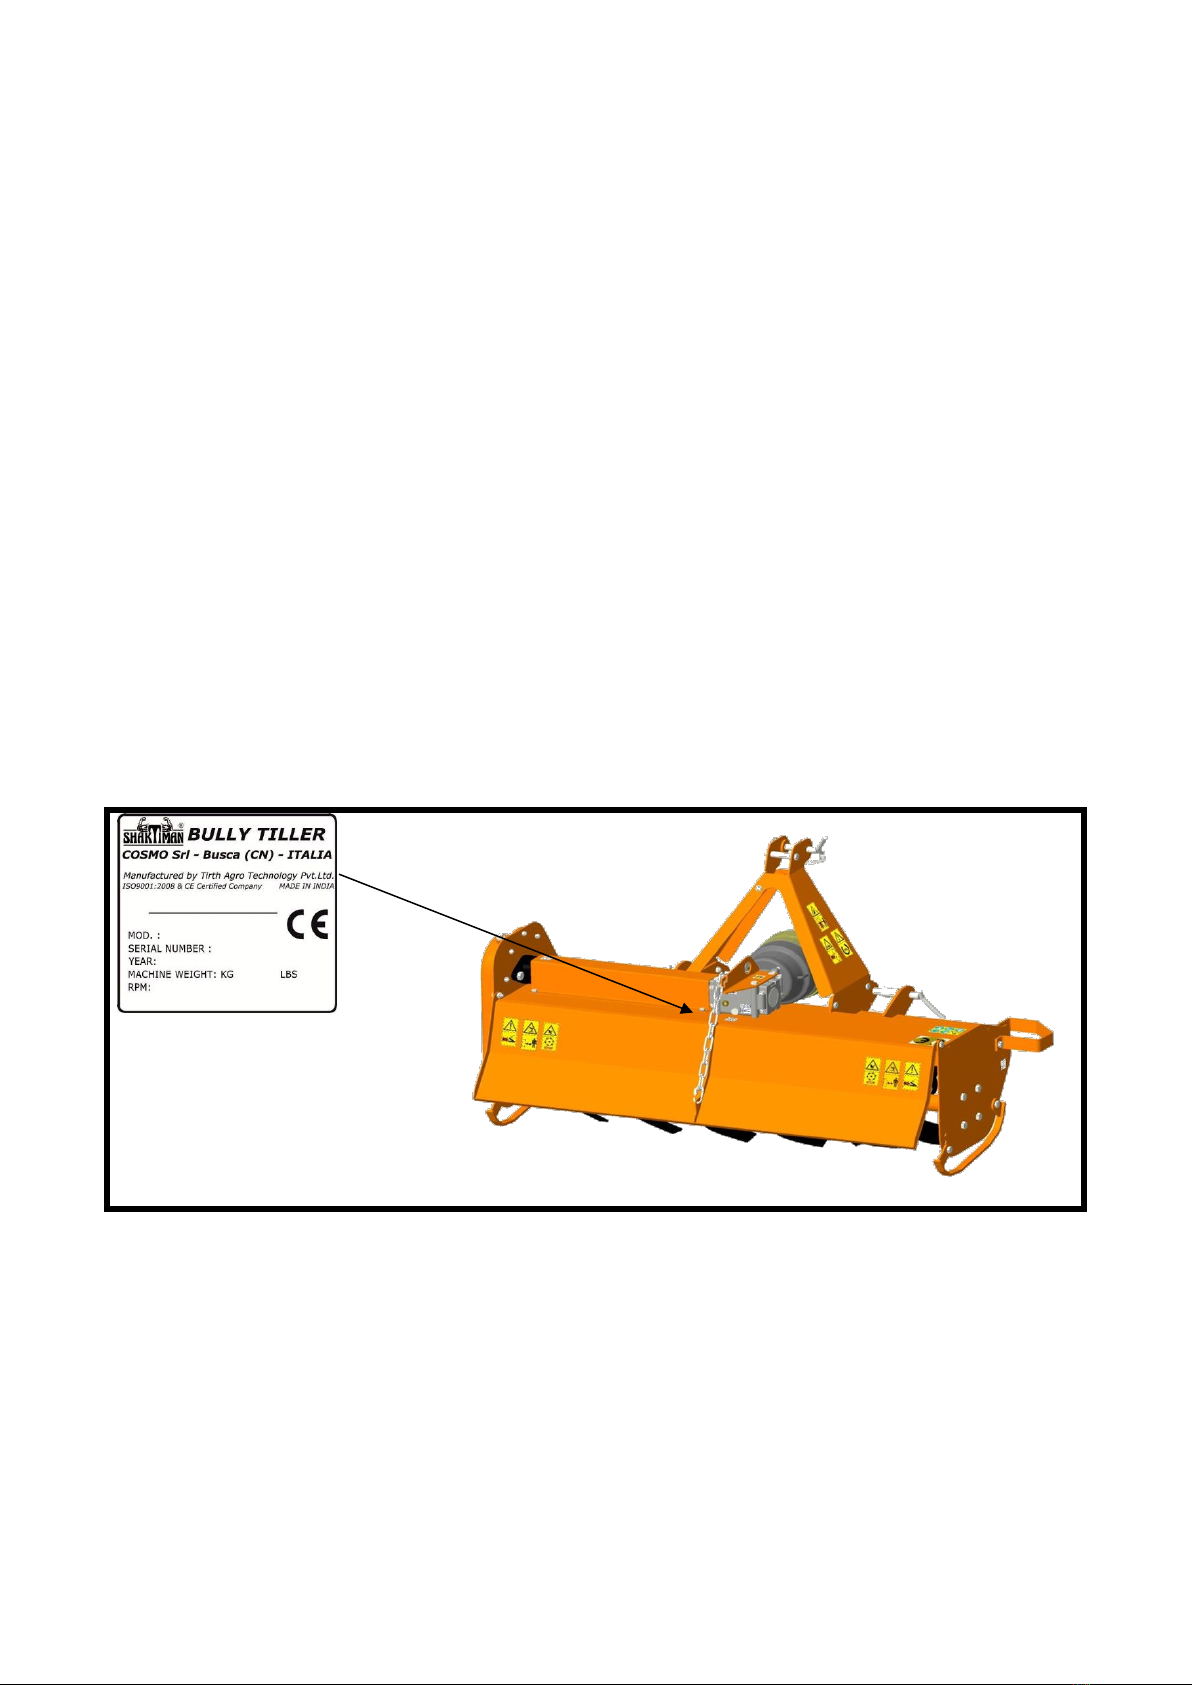
2.1. TILLER IDENTIFICATION ................................................................................................................. 1
2.2. INTENDED USE............................................................................................................................... 1
2.3. MAIN PARTSDESCRIPTION............................................................................................................. 2
2.4. TILLER SPECIFICATIONS.................................................................................................................. 2
3. SAFETY........................................................................................................................ 3
3.1. GENERAL SAFETY INSTRUCTION .................................................................................................... 4
3.2. EQUIPMENT SAFETY INSTRUCTIONS ............................................................................................. 5
3.3. OPERATING SAFETY INSTRUCTIONS .............................................................................................. 6
3.4. TRANSPORTING SAFETY INSTRUCTIONS........................................................................................ 7
3.5. MAINTENANCE SAFETY INSTRUCTIONS......................................................................................... 8
3.6. STORAGE SAFETY INSTRUCTIONS.................................................................................................. 8
3.7. SAFETY LABELS............................................................................................................................... 8
4. SET UP...................................................................................................................... 13
4.1. CONNECTING TO THE TRACTOR .................................................................................................. 13
4.2. DRIVELINE INSTALLATION............................................................................................................ 13
4.3. TRACTOR-TILLER STABILITY ......................................................................................................... 15
5. OPERATING ............................................................................................................ 16
5.1. START UP ..................................................................................................................................... 16
5.2. OPERATING INSTRUCTIONS......................................................................................................... 18
5.3. ADJUSTMENTS ............................................................................................................................. 18
REAR BOARDADJUSTMENT...................................................................................................................... 20
5.4. STOPPING AND DISCONNECTION................................................................................................ 21
5.5. TRASPORTING.............................................................................................................................. 22
6. MAINTENANCE...................................................................................................... 22
6.1. BLADES REPLACEMENT................................................................................................................ 22
6.2. GEARBOX LUBRICATION .............................................................................................................. 23
6.3. SIDE CASE LUBRICATION.............................................................................................................. 24
6.4. BEARING HOUSING LUBRICATION............................................................................................... 25
6.5. DRIVESHAFT MAINTENANCE ....................................................................................................... 26

7. STORAGE................................................................................................................. 27
8. SCRAPPING............................................................................................................. 28
9. TROUBLESHOOTING ........................................................................................... 28
10. TORQUE VALUES TABLE ................................................................................... 29
11. WARRANTY ............................................................................................................ 30
12. SPARE PARTS......................................................................................................... 32
13. EC DECLARATION OF CONFORMITY ............. Error! Bookmark not defined.

1.ABOUT THIS MANUAL
The operator must read the manual for a correct understanding of the hazards that may present
when operating the tiller, as well as for obtain optimum performance from the machine.
The manual is part of the machine, it must be kept in good condition and remain with the machine
even in case of resale, until its demolition. In case of loss or damage, request a new copy to the
Manufacturer or your Dealer.
The information, descriptions and illustrations in this manual describes the state of the product at
the time of its publication, and may not reflect the product in the future.
The Manufacturer reserve the right to make design improvements or changes in specifications
without incurring in any obligation to install them on units previously sold.
Text, illustrations and drawings of this manual cannot be disclosed or transmitted, in whole or in
part, to third parties without the written permission of the Manufacturer. All rights are reserved.
2.INTRODUCTION
2.1. TILLER IDENTIFICATION
Each tiller has a plate for unique identification. Any request for assistance or information regarding
the machine must be directed to the Manufacturer or Dealer always referring to the model and serial
number as shown on the nameplate affixed to the machine:
2.2. INTENDED USE
The FTC-series tillers are designed to be used uniquely for horticultural, agricultural, or commercial
applications, to till soil for seedbed and planting preparation.
They are designed to be mounted on tractors equipped with hydraulic lift and universal three point
hitch that can support the implement weight, and driven by the power of the tractor through the
PTO driveshaft.
The tractors used to operate the FTC-Series tillers must have the following requirements:
Hitch Category: 3-point Cat. I standard.
PTO: 540 RPM, 6-spline, 1 3/8 Z6

Horsepower: As per given in Technical Specification Sheet
DANGER
Any use of the machine other than the intended use is non-intended use, and is to be considered as
unauthorized and dangerous. The manufacturer assumes no liability for damage resulting from non-
intended use.
2.3. MAIN PARTSDESCRIPTION
1. Tiller deck
2. Clevis (lower hitch)
3. Lower hitch pin
4. Upper hitch pin
5. Topmast
6. Implement input connection (tiller PTO)
7. Gearbox
8. Side transmission case
9. Rear board
10. Rotor shaft
11. Tine
12. Parking stand
13. Skid
14. Cardan driveshaft
15. PTO Guard
16. Driveshaft Support
NOTE
Unless otherwise indicated, images shown in this manual refer to the tiller model wise.
2.4. TILLER SPECIFICATIONS

TILLER MODEL
FTC 36
FTC 40
FTC 48
Overall dimensions
mm
1150 x 882 x 687
1345 x 882 x 687
1545 x 882 x 687
Tilling width
in
33"
41"
49"
cm
85
105
125
Recommended
HP
13-17
15-20
20-25
Tractor HP range
3-point Hitch type
-
Cat. I
Cat. I
Cat. I
Frame off-set
in
-
-
-
Number of Flanges on Rotor
No.
4
5
6
Number of tines per Flange
No.
4
4
6
PTO Input speed
rpm
540
540
540
Rotor Shaft Speed
rpm
@540
230
230
230
Standard Tine Construction
-
curved
curved
curved
Transmission type
-
Chain
Chain
Chain
Max Working depth
cm
12
12
12
Rotor tube diameter
mm
52
52
52
Rotor Swing Diameter
mm
386
386
386
Driveline safety device
-
Shear Bolt
Shear Bolt
Shear Bolt
Weight (driveline excluded)
lbs
253
275
297
Kg.
115
125
135
3.SAFETY
Proper use of equipment, a strict observance of the safety messages listed below, and application
of all reasonable practices to avoid any risks, prevents accidents or injury, allows the machine to
work better and longer, and minimized failures. The manufacturer assumes no liability for any
damage resulting from not applying the behavioral rules indicated in this manual.

3.1. GENERAL SAFETY INSTRUCTION
DANGER
The machine must be used only by authorized and well trained operators. The operator must have
read and understood the instructions of this manual, it must make adequate preparation for the
proper use of the machine and must hold a driving license. In case of doubt about the use of the
machine and/or the interpretation of this manual, the operator must contact the Manufacturer or
the Dealer.
WARNING
The manual must always remain with the machine. In case of loss or damage, request a new copy
to the Manufacturer or your Dealer.
WARNING
Follow strictly the rules prescribed by the safety pictograms applied to the machine.
WARNING
Be sure that all safety pictograms are legible. If pictograms are worn, they must be replaced with
others obtained from the Manufacturer, and placed in the position indicated by this manual.
DANGER
Before using the machine, make sure that all safety devices are installed and in good working
conditions. In case of damages of shields, replace them immediately.
DANGER
Is absolutely forbidden to remove or alter safety devices.
DANGER
Before starting, and during operation of the tiller, make sure there are no people or animals in the
operation area: the machine can project material from the back, with risks of serious injury or death.
DANGER
Pay maximum attention to avoid any accidental contact with rotating parts of the machine.
DANGER
During operation, adjustment, maintenance, repairing or transportation of the machine, the operator
must always use appropriate Personal Protective Equipment (PPE).
DANGER
Do not operate the implement while wearing loose fitting clothing that can give rise to entanglement
in parts of the machine.
DANGER
Do not operate the implement when tired, not in good condition or under the influence of alcohol or
drugs.
CAUTION
If the use of the machine is required at night or in conditions of reduced visibility, use the lighting
system of the tractor and possibly an auxiliary lighting system.

3.2. EQUIPMENT SAFETY INSTRUCTIONS
WARNING
Use the tiller for its intended purpose only. Improper use can damage the tiller and cause serious
injury to persons, animals, or death.
DANGER
The machine should be used by a single operator driving the tractor.
WARNING
Any unauthorized modification of the machine may cause problems in safety and relieves the
Manufacturer from any liability for damages or injuries that may result to operators, third parties
and objects.
WARNING
Before using the machine, familiarize yourself with its controls and its working capacity.
WARNING
Do not leave the tiller unattended with tractor engine running.
WARNING
Do not operate tiller on too muddy, sandy or rocky soils.
WARNING
Keep the machine clean from debris and foreign objects which may damage functioning or cause
injury.
WARNING
Do not use the machine if the category of the connecting pins of the tiller does not match that of
the tractor hitch system.
WARNING
Do not use the machine with missing bolts, screws, pins or safety pins.
WARNING
Never use the machine to transport or lift people, animals or objects.
WARNING
Make certain, by adding front ballast, that at least 20% of the total weight (tractor, implement and
ballast) is on the front axle of the tractor, to ensure stability.
WARNING
Before engaging the tractor PTO, make sure the tractor PTO speed is set as required for the tiller
(540 rpm). Do not over speed PTO or machine breakage may result.
DANGER
Do not operate the tiller if the driveshaft is damaged. The driveshaft could be subject to breakage
during operation, causing serious injury or death. Remove the driveshaft and replace it with an
undamaged shaft.

3.3. OPERATING SAFETY INSTRUCTIONS
WARNING
Before using the machine, be sure to have cleared the operating area of obstacles (stones, branches,
debris, etc...). Mark all the obstacles that cannot be eliminated (e.g. by means of flags).
DANGER
Never engage the tractor PTO in the presence of people close to the driveshaft. The body, hair or
clothing of a person can get caught in rotating parts, causing serious injury or death.
DANGER
Before engaging the PTO and during all operations, make sure that no person or animal is in
immediate area of action of the machine. Never use the tiller if people are in his working area.
DANGER
It's absolutely forbidden to stand near the tiller with moving parts.
WARNING
The operator must operate tiller lifting/lowering only from the driving seat of the tractor. Do not
perform lifting maneuvers on side or behind the tractor.
WARNING
Before making changes in direction, turns or going in reverse, slightly lift the tiller from the ground
after disengaging the power take-off, to avoid damage to the machine.
DANGER
In presence of steep slopes (greater than 15 degrees) the tilling action may cause instability of the
tractor, with risk of tipping and consequent serious injury or death hazard. Consult the manual for
the tractor to determine the maximum slope that the tractor is able to deal with.
DANGER
Always disengage the PTO before raising the tiller, and never engage the PTO with the tiller in the
raised position. The machine might throw objects at high speed, causing serious injury or death.
WARNING
Never leave the driver's seat when the tractor is turned on. Before leaving the tractor, lower the
tiller to the ground, disengage the PTO, insert the parking brake, stop engine and remove the key
from the control panel.
DANGER
The PTO shields of tractor and implement side, the driveshaft shielding and the driveshaft retaining
chains must be properly installed and in good condition, to avoid risk of entanglement with serious
injury or death.
DANGER
Before engaging the PTO of the tractor, always make sure that the drive shaft is mounted in the
correct direction, and that its clamping elements are properly connected both to tractor side and to
tiller side.
WARNING

Stop operating immediately if blades strike a foreign object. Repair all damage and make certain
rotor and blades are in good condition before resuming operation.
WARNING
Always disengage the tractor PTO when the driveshaft exceed an angle of 10 degrees up or down
while operating. An excessive angle with driveshaft rotating can break the driveshaft and cause
flying projectiles.
CAUTION
Avoid clutch's overheating caused by too long or frequent slipping of the clutch, since it can damage
the clutch components. Before checking slip clutch, make sure it has cooled. The clutch can be
extremely hot and cause severe burns.
CAUTION
Prolonged use of the tiller can cause overheating of the gearbox. Do not touch the gearbox during
use and immediately after, it could be extremely hot and cause severe burns.
WARNING
All adjustment operations on the tiller must be performed by qualified and trained operators, with
the tractor engine off, the PTO disengaged, the tiller lowered to the ground or on security stands,
the ignition key off and the parking brake set.
3.4. TRANSPORTING SAFETY INSTRUCTIONS
WARNING
Before transporting, determine the stopping characteristics of the tractor and implement.
WARNING
Transport only at speeds where you can maintain control of the equipment.
WARNING
When driving on roads, the implement must be in transport position adequately raised from the road
surface, with tractor lifting hydraulics locked so that the tiller cannot be lowered accidentally.
DANGER
The implement may be wider than the tractor. Pay attention during transporting to persons, animals
or obstacles exposed.
WARNING
When turning, use extreme care and reduce tractor speed.
WARNING
Do not operate the tractor with weak or faulty brakes or worn tires.
CAUTION
Always use tractor lighting system and auxiliary lighting system for an adequate warning to operators
of other vehicles, especially when transporting at night or in conditions of reduced visibility.
DANGER
In case of tiller lifting, make sure that the lifting device chosen is suitable to perform the operation
safely, and use only the lifting points prescribed on tiller.

3.5. MAINTENANCE SAFETY INSTRUCTIONS
WARNING
All maintenance and repairing operations must be performed by qualified and trained operators,
with the tractor engine off, the PTO disengaged, the tiller lowered to the ground or on security
stands, the ignition key off and the parking brake set.
WARNING
Perform repairs and replacements necessary to the machine using only original spare parts provided
by the manufacturer or your dealer.
DANGER
Perform maintenance operations always using appropriate Personal Protective Equipment (protective
eye glasses, hard hat, hearing protection, safety shoes, overall and work gloves, filter mask).
CAUTION
Before any maintenance operation, make sure that the parts which may become hot during use
(friction clutch, gear box...) have cooled.
WARN4435G
Do not perform repairs that you do not know. Always follow the manual instructions and in case of
doubt contact the Manufacturer or your dealer.
DANGER
Do not swallow fuels or lubricants. In case of accidental contact with eyes, rinse well with water and
consult a doctor.
3.6. STORAGE SAFETY INSTRUCTIONS
WARNING
Never leave the tractor unattended with the tiller in lifted position. Accidental operation of lifting
lever or a hydraulic failure may cause sudden drop of unit with injury or death by crushing.
DANGER
Following operation, or before unhooking the tiller, stop the tractor, set the brakes, disengage the
PTO, lower the attached tiller to the ground, shut off the engine, remove the ignition key and wait
for all moving parts to stop.
WARNING
Make sure all parked machines are on a hard, level surface and engage all safety devices.
CAUTION
Place support blocks under tiller as needed to prevent unit from tipping over onto a child and/or an
adult. A tiller that tips over can result in injury or death.
CAUTION
Store the unit in an area away from human activity.
3.7. SAFETY LABELS
The safety labels applied on the machine give fundamental information for using the machine safely.

Make sure safety labels are in good conditions. If pictograms are worn, they must be replaced with
others obtained from the manufacturer and placed in the position indicated by this manual.
Make sure the safety labels are legible. If necessary, wipe them by a cloth, with soap and water.
Safety Labels position and description

Sr.
NO.
SPARE
CODE
DESCRIPTION
DECALS
1
D1090
WARNING: ALWAYS READ
THE OPERATOR MANUAL
2
D1038
MAINTENANCE:TURN OFF
TRACTOR& REMOVE KEY

3
D1095
THROWN OR FYING
OBJECTS HAZARD
4
D1096
ROTATING KNIVES, LOWER
LIMBS HAZARD
5
D1078
HAND HAZARD
6
D1079
ROTATING GEARS
7
D1097
CRUSHING HAZARD BY LINK
LIFTING
8
D1098
IMPLEMENT INPUT
DRIVELINE
9
D1099
TRACTOR PTO RPM &
ROTATION DIRECTION

10
D1122
FINGERS/HANDS CRUSHING
HAZARD
11
D1082
SAFETY EQUIPMENT
12
D1007
OIL FILLING PLUG –NEW
13
D1008
GREASE –NEW
14
D1009
OIL DRAIN PLUG
15
D1006
MAINTAIN OIL LEVEL
16
D1083
LIFTING HOOK JOINT
17
D1108
CE LOGO

4.SET UP
The tiller may or may not be delivered fully assembled. It is equipped with a driveshaft with shear
bolt or torque limiter (clutch discs) and related operating manual.
When the machine is delivered, check that there is no damage to the tiller or driveshaft. In case of
damage or missing parts immediately notify 1.3your dealer.
4.1. CONNECTING TO THE TRACTOR
To connect the tiller to the tractor the operator must do the following:
drive the tractor in reverse, up to align the rear lifting arms to lower hitches of the tiller in parking;
set the tractor's parking brake, stop engine, remove the ignition key and get off the tractor;
connect the lifting arms of the tractor to the lower hitches of the tiller, through the use of the pins
and the relative safety split pins;
raise the tiller until PTOs of tractor and machine are at the same height, then adjust the 3-point
top link so that the front of the machine is leveled to the back (the axis of the tiller PTO must be
parallel to the ground), in order to limit stress transmitted to the tiller through the cardan shaft;
make sure that left side of the tiller is leveled with the right, by adjusting the tractor lifting arms,
then lock the arms to prevent swinging that could compromise the stability of tractor and machine;
finally adjust the parking stand, placing it at the highest point by means of the related elastic pin.
4.2. DRIVELINE INSTALLATION
Before installing the driveshaft, the operator must read the manuals of driveshaft and tractor,
checking in particular that rpm and direction of rotation of the tractor PTO match those of the tiller.
If the direction of rotation of the PTO tractor does not match that of the tiller, contact the
manufacturer or your dealer.

To connect the driveshaft to the tractor and implement, the operator must:
park tractor and tiller on a flat surface, with parking brake set, engine off, and ignition key
removed;
check that safety devices of driveshaft, tiller and tractor are in good condition, otherwise provide
for their replacement;
remove the PTO shield of the tiller through the fixing screws;
position the driveshaft with clutch turned towards the implement side;
insert the clutch hub on the tiller PTO, then ensure its tightening onto shaft through its
fastener;
replace the PTO shield of the tiller through the fixing screws;
insert the driveshaft yoke on the tractor PTO, then ensure its tightening onto shaft through its
fastener;
hook to the tractor and tiller the two retaining chains of the the driveline shielding, to prevent
shielding rotation during functioning of the machine.
Driveline Length Check
Before operating the tiller, ensure that the size of driveshaft is adequate. The driveshaft supplied
with the machine has a standard length, therefore it may need an adaptation of the length,
depending of the tractor which the tiller is combined.
The length of the driveshaft must be such to:
avoid bottom out of the transmission tubes, when the driveshaft is in compressed position (when
tiller is raised up off the ground);
Ensure an overlapping of the transmission tubes enough to transmit the torque required, when
the driveshaft is in max extension (when tiller is in its lowest position in the ground).
When the driveshaft is at its minimum length (max compressed position), there must be at least a
2 cm of distance between the ends of each transmission tube and the yokes side.
When the driveshaft is at its maximum operational extension, there must be an overlap between the
tubes profiles of 15 cm at least.
This manual suits for next models
3
Table of contents
Other FARM-MAXX Farm Equipment manuals
Popular Farm Equipment manuals by other brands

Raven
Raven SmarTrax Spra-Coupe 220 installation manual

Handler
Handler PT-10 FSS manual

Landoll
Landoll Brillion Zone Commander 2511 Operator's manual

Landoll
Landoll Icon 1205 Carry All Service and parts manual

GREAT PLAINS
GREAT PLAINS 2N-2410 Operator's manual

Kverneland
Kverneland Vicon Andex 774 operating manual

Farmi Forest Corporation
Farmi Forest Corporation VALBY HF 231 Operation, maintenance and spare parts

Crary
Crary CWS CASE IH 2162 Owner's manual and parts manual

Raven
Raven SC1 installation manual

Wiesenfield
Wiesenfield WIHE-04201 quick start guide

Nedap
Nedap MPC-2 manual

Keisue
Keisue KES3.0 Micro Farm Installation and operation manual