Fava PT6 User manual

PT6 Kit
Kit generatore sonda cerca coppie e -cavi
Istruzioni d’uso
- 2 -
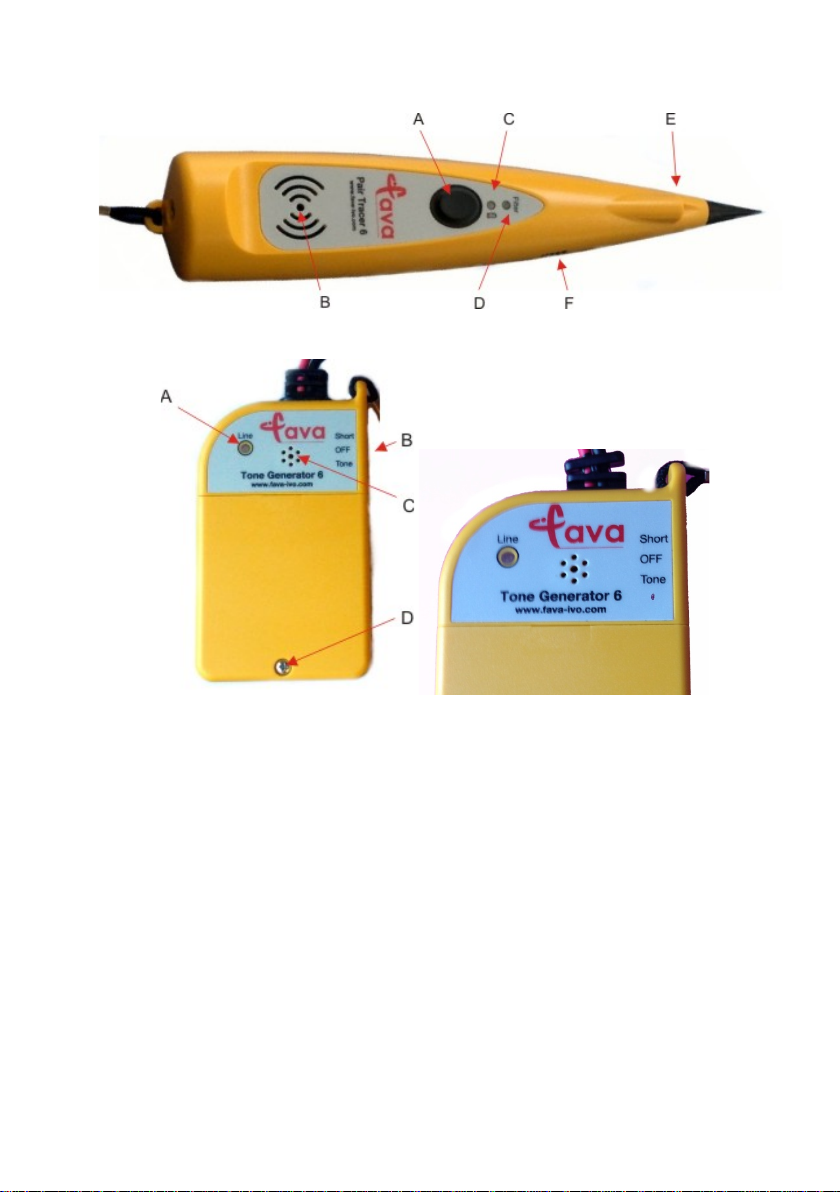
Figura 1
Figura 2
Figura 1 – PT6 – Visione frontale
a. Tasto di accensione
d. LED modalità rejection
b. Altoparlante
e. LED illuminazione
c. LED segnalazione batteria
f. Regolazione sensibilità
Figura 2 – TG6 – Visione frontale
a. LED segnalazione
b. Interruttore
d. Vite comparto batterie
c. Altoparlante
- 3 -
1. Informazioni per la sicurezza
Per l’uso dell’apparecchio osservare le norme
in materia di sicurezza ed antinfortunistiche vi-
genti a livello nazionale nonché le istruzioni di
sicurezza contenute nelle presenti istruzioni
d’uso, che come questa nota sono state redatte
in corsivo.
•Prima dell'uso di prodotti FAVA leggere attentamente le relative istru-
zioni. In caso di dubbi rivolgersi al nostro personale specializzato.
•Qualsiasi riparazione di prodotti FAVA deve essere eseguita da FAVA
o da laboratori specializzati autorizzati, pena perdita validità di garanzia
e responsabilità FAVA.
•Conservare i prodotti FAVA in luoghi puliti e asciutti che presentino un
tasso normale di umidità. I prodotti FAVA non devono essere conservati
a temperature al di sopra degli +80° C, per es. d'estate sul ripiano poste-
riore dell'automobile. Se non indicato diversamente,i prodotti FAVA sono
idonei per ambiti di temperatura tra i -20 e i +60° C durante il funziona-
mento e tra -40 e +80° C durante l'immagazzinaggio.
•Non immergere i prodotti FAVA in acqua, se non espressamente indi-
cato.
•Prodotti FAVA sprovvisti di marchio Ex, non devono mai essere utiliz-
zati in aree esplosive (per es. per fare il pieno ad automobili, aerei etc.).
Prodotti non protetti utilizzati in aree a rischio possono involontaria-
mente essere la causa di esplosioni!
•Il funzionamento sicuro dipende dalla pulizia. Fare in modo che le parti
(connessioni, ecc.) siano sempre puliti e in buono stato.
•Prodotti FAVA possono essere utilizzati esclusivamente per gli usi spe-
cifici previsti.
•Il simbolo qui rappresentato ed apposto sul prodotto o sulla confe-
zione indica che il prodotto deve essere trattato come un
rifiuto speciale. Questa apparecchiatura deve essere
portata nel punto di raccolta appropriato per il riciclag-
gio di apparecchiature elettriche ed elettroniche o ri-
tornata a FAVA all’atto dell’acquisto
di un’apparecchiatura nuova.

- 4 -
2. Descrizione
Serve fondamentalmente per localizzare velocemente e in maniera non
intrusiva coppie telefoniche o qualsiasi tipo di cavo elettrico. La sonda
riesce a rilevare il segnale emesso dal generatore anche a distanza no-
tevole dal generatore stesso ad esempio in armadi di distribuzione o in
scavi per nuove linee. La sonda PT6 del Kit cerca coppie individua la
linea in test generando un segnale acustico conforme alla frequenza
(volume basso se il segnale rilevato è debole, volume alto se il segnale
rilevato è intenso) e accendendo contemporaneamente verde il LED
(Fig. 1/c). Il generatore di segnale del Kit Cercacoppie TG6 emette il
tono di ricerca solo su linee non alimentate.
3. Funzionamento
La connessione a linee elettriche a bassa tensione
(230V
∿
) danneggia irrimediabilmente il PT6 kit e può
causare shock oppure morte dell’utilizzatore.
Per la sicurezza dell’operatore non collegare mai il
generatore di segnale TG6 a conduttori alimentati da
tensione superiore a 30V
∿
rms e 60V
. In tale caso
la garanzia sul prodotto decade immediatamente.
3.1. Accensione e spegnimento
PT6
Per accendere PT6 tenere premuto il tasto (Fig. 1/a). A strumento ac-
ceso il LED bianco (Fig. 1/e) rimane acceso. Appena si rilascia il tasto
(Fig. 1/a) PT6 si spegne.
TG6
Per accendere TG6 spostare l’interruttore (Fig. 2/b) da OFF su SHORT
oppure LINE. Per spegnere spostare l’interruttore su OFF.
3.2. Check corto circuiti
TG6 permette di verificare un possibile corto circuito della coppia in
esame. Procedere come segue:
•Collegare i due cavetti di collegamento ad una coppia in esame.
•Spostare l’interruttore (Fig. 2/b) sulla posizione SHORT.

- 5 -
•Il LED rosso ed un tono segnalano il passaggio di corrente.
Nessuna segnalazione in caso di resistenza della linea mag-
giore a 75 Ohm.
3.3. Ricerca coppia o conduttore
Per identificare con sicurezza un conduttore procedere come segue:
•Aggraffare le due bocche di coccodrillo alla coppia in esame.
•Accendere TG6 spostando l’interruttore su TONE. L’accensione
viene confermata dal LED verde lampeggiante (Fig. 2/a).
•Tramite la sonda PT6 ricercare il tono generato dal trasmettitore
sulla coppia in test. A seconda dell’intensità del segnale ricevuto,
la sonda genera un segnale acustico (Fig. 1/b) e visivo (Fig. 1/c) la
cui intensità varia in funzione della intensità del segnale rilevato
(bassa se il segnale rilevato è debole, alta se il segnale rilevato è
forte). Inoltre il segnale acustico ricalca il tipo di frequenza rilevata
(ad esempio distinguendo 50 Hz dai ca. 1 kHz del generatore).
3.4. Regolazione della sensibilità
La regolazione della sensibilità del segnale ricevuto dalla sonda PT6
avviene tramite la rotellina laterale (Fig. 1/f).
Per aumentare la sensibilità ruotare la rotellina in senso antiorario,
mentre per diminuirla ruotare in senso orario. Per una efficiente identifi-
cazione si raccomanda di impostare dapprima la sensibilità al mas-
simo, successivamente man mano che ci si avvicina alla coppia ricer-
cata - in prossimità della quale il segnale sarà al massimo - ridurre il li-
vello. La massima intensità del segnale acustico/visivo si ha quando la
sonda tocca la coppia ricercata; le coppie adiacenti (non ricercate) se
avvicinate dalla sonda, provocheranno invece un segnale acustico più
debole.
3.5. Modalità Filter
La sonda PT6 ha 2 modalità di funzionamento: normale e modalità Fil-
ter. Per attivare la modalità normale premere una volta il tasto di accen-
sione (Fig. 1/a). Per attivare la modalità Filter (che filtra le interferenze
AC ) premere due volte il tasto di accensione. Il secondo LED di segna-
lazione (Fig. 1/d) si accende verde indicando l’attivazione della fun-
zione Filter.

- 6 -
3.6. Uso di auricolari (acquistabili a parte)
In caso di ambienti molto rumorosi può essere utile utilizzare degli auri-
colari. Allo scopo connettere gli auricolari alla presa jack da 3,5 mm sul
retro della sonda: l’altoparlante integrato viene disattivato.
3.7. Illuminazione supplementare
Per permettere una migliore identificazione e visualizzazione della cop-
pia ricercata PT6 è dotato di un LED bianco ad alta efficienza (Fig. 1/e)
che si accende automaticamente alla pressione del tasto di accen-
sione. In fase di spegnimento la luce del LED si attenua fino a spe-
gnersi.
4. Manutenzione
4.1 Controlli visivi
Verificare regolarmente il prodotto alla ricerca di spaccature, strappi ed ulte-
riori segni di logorio particolarmente sul cavo e bocche di coccodrillo.
4.2 Pulizia
Se necessario, pulire l'apparecchio esternamente, utilizzando un panno
idoneo pulito e solo leggermente inumidito in acqua pulita e successi-
vamente asciugare. In caso di sporco resistente, utilizzare una piccola
quantità di detergente per piatti.
ATTENZIONE
Non utilizzare detergenti aggressivi, alcol, idrocarburi aromatici op-
pure soluzioni di cloro in quanto danneggiano la plastica.
4.3 Sostituzione delle batterie
Entrambi i prodotti sono alimentati tramite quattro batterie tipo AA da 1,5 V.
TG6
Per verificare lo stato di carica della batteria, accendere il generatore
su SHORT e cortocircuitare i cavetti di collegamento: batterie cariche
sono segnalate da un suono forte ed il LED rosso acceso.
PT6
Per verificare lo stato di carica della batteria, accendere la sonda pre-
mendo il tasto e controllare il colore del LED (Fig. 1/c): se rosso indica
batterie deboli .

- 7 -
La sostituzione delle batterieè consigliata ogni 3 anni di uso oppure
quando scariche. Per sostituire le batterie procedere nel modo seguente:
• Spegnere il prodotto (interruttore su OFF).
• Svitare la vite di ritenzione del comparto batterie (Fig. 1 e Fig.
2/d) e sollevare il coperchio di protezione.
• Rimuovere le quattro batterie e sostituirle rispettando la polarità.
• Richiudere il coperchio avvitando la vite.
5. Caratteristiche tecniche
PT6
Caratteristiche meccaniche
Dimensioni 49x245mm
Peso ca. 230 g.
Caratteristiche elettriche
LED bianco
Banda ridotta 1050Hz
Ricezione tono filtrato: 300-3.400Hz (non filtrato: 200-5.000Hz)
Alimentazione 4 batterie tipo AA (LR6)
Durata batterie ca. 180 ore
Temperatura: 0-50°C (lavoro)
TG6
Caratteristiche meccaniche
Dimensioni 118x62x30 mm
Peso ca. 210 g.
Caratteristiche elettriche
Potenza trasmiss. +6dBm @ 600Ω
Frequenza 900 Hz alternati con 1050 Hz a passi 2 Hz
Indicazione corto inferiore a 75Ω
Protezione 120 V∿oppure 110V
Alimentazione 4 batterie tipo AA (LR6)
Durata batterie ca. 250 ore
Temperatura di
lavoro: 0-50°C
Standards
Qualità secondo EN ISO 9001:2008

- 8 -
Compatibilità Elettromagnetica secondo EN 61326-1:2013
Garanzia
Questo prodotto FAVA IVO Srl è garantito contro difetti dei materiali e di fabbricazione per un periodo di
12 mesi dalla data di acquisto. Sul prodotto è applicata in evidenza una etichetta di garanzia che riporta il
marchio FAVA, il nome del prodotto, il codice prodotto, il mese e l’anno di produzione, il numero di serie.
La rimozione di tale etichetta comporta il decadimento della garanzia. Durante il periodo di garanzia FAVA
IVO Srl potrà decidere se riparare, sostituire il prodotto difettoso oppure rifondere al Cliente il prezzo di ac-
quisto. Saranno comunque a carico dell’acquirente tutti i costi di spedizione, tasse comprese, dei prodotti
inviati a FAVA IVO Srl.
Limitazione della garanzia
Quanto sopra non potrà essere applicato a difetti derivanti da manutenzione od uso improprio o inade-
guato da parte del Cliente, dall’esecuzione di modifiche o dallo impiego del prodotto in condizioni ambien-
tali diverse da quelle specificate nel presente manuale. Non sono specificatamente coperte da garanzia
tutte le parti soggette a consumo quali ad esempio i cavi di collegamento, i tappi in gomma, ecc.. Per que-
sto prodotto FAVA IVO Srl non fornisce alcuna garanzia espressa o implicita, comprese, ma non sole, le
garanzie implicite di commerciabilità e di attitudine per specifici usi. FAVA IVO Srl non sarà ritenuto re-
sponsabile per danni accidentali o conseguenti alla fornitura, alle prestazioni e all’uso di questo prodotto.
© Copyright 2014 FAVA IVO Srl
Tutti i diritti sono riservati. É vietata la riproduzione, l’adattamento o la traduzione di qualsiasi parte di que-
sto manuale, senza il preventivo consenso di FAVA IVO S.r.l., tranne dove consentito dalle leggi sul copy-
right. Le informazioni contenute in questo manuale sono soggette a variazioni senza preavviso. Ogni cura
è stata imposta nella raccolta e nella verifica della documentazione contenuta in questo manuale; tuttavia
FAVA IVO S.r.l. non può assumersi alcuna responsabilità derivante dall’utilizzo della stessa. Lo stesso di-
casi per ogni persona o società coinvolta nella creazione e produzione di questo manuale.
e sono marchi Fava Ivo Srl
Pubblicato da: FAVA IVO S.r.l.

- 9 -
Stampato in Italia Rev.2A.IST.00020 17372
PT6 Kit
Leitungssucher
Bedienungsanleitung

- 10 -
Abbildung 1
Abbildung 2
Abbildung 1 – PT6 – Vorderseite
a. Ein/Aus Taste
d. LED rejection mode
b. Lautsprecher
e. LED Taschenlampef.
c. LED Batteriestatus
f. Feineinstellung
Abbildung 2 – TG6 – Vorderseite
a. LED Status
b. Ein-, Sende-, Kurzschluss-
schalter
d. Batteriefach
c. Lautsprecher

- 11 -
1. Sicherheitshinweise
Bitte beachten Sie bei der Benutzung des Geräts die
nationalen Sicherheits- und Unfallverhütungsvor-
schriften und die folgenden Sicherheitshinweise in
dieser Betriebsanleitung, die wie dieser Text in Kur-
sivschrift gefasst sind.
•Lesen Sie vor dem Gebrauch von FAVA-Produkten ausführlich die ent-
sprechende Betriebsanleitung. Fragen Sie im Zweifelsfall unser Fach-
personal.
•Lassen Sie bei allen FAVA-Produkten jegliche Instandsetzungsarbeiten
nur bei FAVA oder von FAVA autorisierten Fachwerkstätten vorneh-
men. In allen anderen Fällen erlischt automatisch unsere Gewährleis-
tung und Haftung für das Produkt.
•Lagern Sie FAVA-Produkte nicht im Freien oder in feuchter Umgebung
sondern stets sauber und trocken bei normaler Luftfeuchtigkeit. FAVA-
Produkte dürfen nicht in Temperaturbereichen über +80° C gelagert wer-
den, z.B. im Sommer nicht auf der Hutablage im Auto.
•Tauchen Sie ein FAVA-Produkt nicht in Wasser, wenn es nicht aus-
drücklich dafür spezifiziert ist.
•FAVA-Produkte, die nicht eigensicher (Ex-geschützt) sind und deshalb
keine spezielle Ex-Kennzeichnung haben, dürfen niemals in explosi-
onsgefährdeter Umgebung betrieben werden (z.B. beim Auftanken von
Autos, Flugzeugen usw.).Ungeschützte Geräte können in solchen Be-
reichen ungewollt Explosionen auslösen!
•Sicherer Betrieb bedingt saubere Geräte. Sorgen Sie dafür, dass die
Geräte stets sauber und in gutem Zustand sind.
•FAVA-Produkte dürfen nur für die vorgesehenen spezifischen Anwen-
dungsfälle benutzt werden.
•Sollen Geräte, die FAVA an Sie geliefert hat, endgültig aus
dem Betrieb genommen werden, können Sie diese an FAVA zurück-
geben. Wir führen diese Altgeräte für Sie dem Recycling bzw.
der umweltgerechten Entsorgung zu.

- 12 -
2. Verwendungszweck
PT6 Kit dient um grundsätzlich schnell Adernpaare oder jeder Art von
Leitungen zu identifizieren.
Die Sonde PT6 ist in der Lage Signale, vom Tonsender ausgesendet,
in Leitungen/Kabel zu verfolgen, sogar bei einer erheblichen Entfer-
nung, auch zum Beispiel, in Verteilern oder Baugruben. Durch die Er-
zeugung eines akustischen Signales (leise bei schwachem und laut
bei starkem Signal) und gleichzeitiges Aufleuchten des grünen LED
(Abb. 1/c) identifiziert die Sonde PT6 die korrekte Leitung. Der Tonsen-
der TG6 kann nur auf nicht belegten Leitungen eingesetzt werden.
3. Inbetriebnahme - Betrieb
Der PT6 Kit Leitungssucher darf nicht an Stromleitun-
gen (230V) angeschlossen werden bzw. berühren, da es
zu schweren Verletzungen oder Tod führen kann.
Für die eigene Sicherheit des Benutzers, schließen
Sie niemals den TG6 Tonsender an einer Leitung/ Mo-
dularbuchse die eine Spannung größer wie 30V
∿
rms
oder 60V
aufweist. In diesem Fall gilt die Garantie
nicht mehr.
3.1. Ein- und Ausschalten
PT6
Zum Einschalten des PT6 die Taste (Abb. 1/a) drücken und festhalten.
Die reinweiße LED leuchtet solange an (Abb. 1/e). Zum Ausschalten
des PT6 lassen Sie die Taste (Abb. 1/a) los.
TG6
Zum Einschalten des TG6, Schiebeschalter (Abb. 2/b) von OFF auf ei-
ner der zwei Positionen SHORT oder LINE schieben.
Um das Gerät auszuschalten, schieben Sie den Schalter auf OFF.
3.2. Durchgangsprüfung/Prüfung von Kurzschlüssen
TG6 ermöglicht einen Kabelkurzschluss zu überprüfen. Gehen Sie wie
folgt vor:
•Die Messleitungen an das zu prüfende Adernpaar anschließen.
•Der Schiebeschalter (Abb. 2/b) auf SHORT schieben.

- 13 -
•Die rote LED und ein Ton zeigen den Stromdurchgang in der
Leitung. Die LED leuchtet nicht auf wenn der Leitungswider-
stand über 75 Ohm liegt.
3.3. Leitungssuchen
Um eine Leitung sicher zu identifizieren, gehen Sie wie folgt vor:
•Die Prüfleitungen an das zu prüfende Adernpaar anschließen.
•TG6 Schiebeschalter auf TONE bringen: die grüne LED (Abb. 2/a)
blinkt.
•Mit der PT6 Sonde verfolgen oder suchen Sie den Ton in dem Ka-
belbündeln. Die Sonde erzeugt ein akustisches (Abb. 1/b) und vi-
suelles (Abb. 1/c) Signal deren Intensität entsprechend der Intensi-
tät des empfangenen Signales variiert (niedrig bei schwachem de-
tektierten Signal, hoch wenn das detektierte Signal stark ist). Au-
ßerdem wiedergibt das akustische Signal dem Typ der erfassten
Frequenz (somit kann man leicht, zum Beispiel, das 50Hz Signal
von dem ca. 1kHz Tonsendersignal unterscheiden).
3.4. Empfindlichkeitseinstellung
Die Regulierung der Signallautstärke der PT6 Sonde erfolgt über dem
seitlichen Drehknopf (Abb. 1/f).
Um die Lautstärke zu erhöhen den Drehknopf gegen den Uhrzeigersinn
drehen und um sie zu verringern den Drehknopf im Uhrzeigersinn dre-
hen. Für eine zielsichere Identifikation wird empfohlen zuerst die Laut-
stärke auf Maximum einzustellen um dann anschließend, je mehr man
sich dem gesuchtem Paar annähert - in deren Nähe das Signal am
höchsten sein wird – die Stärke zu verringern. Das höchste Signalpe-
gel, akustischen und visuell, wird dann erreicht wenn die Spitze der
Sonde das gesuchte Paar berührt; zum Vergleich können die angren-
zenden Paaren untersucht werden, die ein schwächeres akustischen
Signal aufweisen werden.
3.5. Filter Modus
Die PT6 Sonde hat zwei Betriebsarten: normal und filter Modus. Die
normale Modalität wird gleich beim Einschalten aktiv. Um die filter Mo-
dalität zu aktivieren (welche die 50Hz Störungen filtert), drücken Sie
zwei Mal und halten die schwarze Taste (Abb. 1/a) gedrückt: zur Bestä-
tigung leuchtet die grüne LED (Abb.1/d) fix auf.

- 14 -
3.6. Benutzung der Kopfhörer (separat erhältlich)
Bei lauten Umgebungen ist hilfreich ein Kopfhörer zu benützen. Zu dem
Zweck schließen Sie der Kopfhörer an der 3,5mm Klinkenbuchse auf
die Sonderückseite an: der integrierte Lautsprecher wird ausgeschaltet.
3.7. Zusatzbeleuchtung/Taschenlampe
Um eine bessere Identifikation/Visualisierung des gesuchten Paar zu
ermöglichen verfügt die Sonde über eine hoch effiziente weiße LED
(Abb. 1/e). Die LED ist immer an wenn die Sonde einschaltet ist.
4. Wartung
4.1 Sichtkontrollen
Untersuchen Sie regelmäßig das Produkt und achten Sie besonders
bei Kabel und Klemmen auf Brüche, Risse oder Verschleiß.
4.2 Reinigung
Reinigen Sie, wenn erforderlich, das Gerät außen mit einem geeigneten,
nur leicht mit klarem Wasser angefeuchteten sauberen Tuch. Reiben Sie
das Gerät anschließend trocken. Bei starker Verschmutzung verwenden
Sie zusätzlich etwas Spülmittel.
ACHTUNG
Verwenden Sie auf keinen Fall scharfe Reinigungsmittel, Alkohol, Aero-
solsprays und/oder ölhaltige Substanzen zur Reinigung, da diese Flüs-
sigkeiten oft aggressiv sind und das Gehäuse angreifen können.
4.3 Batteriewechsel
TG6
Um den Batteriestatus zu überprüfen, den Tonsender auf SHORT ein-
schalten und Prüfleitungen kurzschließen: in Abhängigkeit zu der Batte-
rieladung wird die LED rot von dunkel auf hell aufleuchten und der Laut-
sprecher einen mehr oder weniger lauten Ton melden.
PT6
Um den Batteriestatus zu überprüfen, die PT6 Sonde einschalten und die
Batterie-LED (Abb. 1/c) überprüfen: wenn die LED rot aufleuchtet sind die
Batterien schwach.

- 15 -
Der Batteriewechsel wird alle drei Jahren empfohlen. Um die Batterien
auszutauschen gehen Sie wie folgt vor:
• Schalten Sie das Gerät aus. (Schalter auf OFF)
• Befestigungsschraube des Batteriefachs abschrauben (Abb. 1 und
Abb. 2/d) und Schutzdeckel aufheben.
• Achtend auf die Polarität, ersetzen Sie die Batterien.
• Der Deckel schließen und festschrauben.
5. Technische Daten
PT6
Mechanische Daten
Abmessungen 49x245mm
Gewicht ca. 230 g.
Elektrischen Daten
LED weiss
Bandbreite 1050Hz (reduziert)
Tonempfang gefiltert: 300-3400Hz (nicht gef.: 200-5000Hz)
Batterien 4 Batterien Typ AA (LR6)
B.lebensdauer ca. 180 Stunden
Temperatur: 0-50°C (Betrieb)
TG6
Mechanische Daten
Abmessungen 118x62x30 mm
Gewicht ca. 210 g.
Elektrische Daten
Ausgangsleistung +6dBm @ 600Ω
Signalart 900 Hz wechselnd mit 1050 Hz in 2 Hz steps
Kurz kleiner als 75Ω
Überspannungsschutz 120 V∿oder 110V
Batterie 4 Batterien Typ AA (LR6)
Lebensdauer ca. 250 Stunden
Temperatur: 0-50°C (Betrieb)
Standards
Qualität nach EN ISO 9001:2008
EMC nach EN 61326-1:2013

- 16 -
Warranty
This product FAVA IVO Srl is guaranteed against defects in materials and workmanship for a period of
12 months from the date of purchase. Product is applied in evidence a warranty label showing the trade-
mark FAVA, product name, product number, the month and year of manufacture, serial number. The re-
moval of this label will void the warranty. During the warranty period FAVA IVO Srl will decide whether
to repair, replace the defective product or refund to Customer the purchase price. Will be charged to the
purchaser all costs, including taxes, of the products sent to FAVA IVO Ltd.
Limitation of Warranty
The above can not be applied to defects resulting from improper or inadequate maintenance or use by the
Customer, the execution of modifications or use of the product by the environmental conditions other than
those specified in this manual. Are not specifically covered by the warranty all consumable parts such
as connecting cables, rubber plugs, etc. .. This product FAVA IVO Srl makes no warranty, express or im-
plied, including, but not limited guarantees implied warranties of merchantability and fitness for spe-
cific uses. FAVA IVO Ltd shall not be liable for incidental or consequential damages with the furnish-
ing, performance or use of this product.
Copyright © 2014 FAVA IVO Srl
All rights are reserved. It is forbidden the reproduction, adaptation, or translation of any part of this man-
ual without the prior consent of FAVA IVO Ltd, except where permitted by copyright laws. The information
contained in this manual are subject to change without notice. Every care has been imposed in the collec-
tion and verification of the documents contained in this manual; However FAVA IVO S.r.l. can not as-
sume liability resulting from its use. The same applies to any person or company involved in the creation
and production of this manual.
und sind Fava Ivo Srl brands
Veröffentlicht von: FAVA IVO S.r.l.
Gedruckt in Italia Rev.2A.IST.00020 17372

- 17 -
PT6 Kit
Tone Generator and Probe
User Manual

- 18 -
Figure 1
Figure 2
Fig. 1 – PT6 – Front View
a. ON/OFF Key
d. LED rejection mode
b. Loudspeaker
e. LED
c. LED Low Battery
f. Volume Control
Fig. 2 – TG6 – Front View
a. LED signalling
b. ON, Tone, Short Switch
d. Battery Compartment
c. Loudspeaker
- 19 -
1. Important safety instructions
For the use of the device notice the national safety
and accident prevention regulations and the follow-
ing safety instructions shown in italics in this in-
struction manual.
•Before using Fava products read completely the appropriate operating
instructions. If in doubt, ask our technical staff..
•If repair work of any kind needs to be done to Fava products, arrange
for it to be performed only by the company Fava or by a specialized
workshop that is authorized by Fava. In all other cases our warranty
and liability for the product shall lapse.
•Do not store Fava products outside or in damp ambient conditions. At
all times keep them clean, dry and at normal air humidity. Fava prod-
ucts must not be stored in areas with a temperature of over +80° C
(+176° F), e.g. in the summertime on the parcel shelf of a car.
•Do not immerse a Fava product into water, if it is not expressly speci-
fied for this purpose.
•Fava products that are not intrinsically safe (explosion-proof) and there-
fore have no special explosion-proof designation must never be oper-
ated in potentially explosive environments (e.g. when refuelling cars,
aircraft etc.). Devices that are not explosion-proof can unintentionally
trigger off explosions in such areas!
•Safe operation requires clean devices. Ensure that the devices (micro-
phones, connectors etc.) are clean and in good condition at all times.
•FAVA products may only be used for the specific application envisaged.
•Should equipment, supplied by Fava, be definitely put out of service
you may return it to Fava. We ensure recycling and/or disposal of out-
dated equipment in compliance with the applicable environ-
ment protection law.
- 20 -
2. Description
PT6 Kit is designed basically to quickly identify or trace telephone, electrical
or alarm wiring. The probe is able to detect the powerful signal generated by
the toner - even at a considerable distance – at the cable termination for ex-
ample in telephone distribution cabinets or in pits. By generating an acoustic
signal (quiet in low and loud the signal is strong) and simultaneous illumina-
tion of the green LED (Fig. 1/c) PT6 probe identifies the correct wire. The
TG6 tone generator can only be used on non-busy lines.
3. Operation
Connection to AC (230V
∿
) power line voltages will dam-
age the instrument and could result in severe injury and
death of the user.
Use caution around voltages above 30 V
∿
rms, or 60
V
. These voltages pose a shock hazard.
Product warranty is voided immediately.
3.1. On/Off
PT6 Probe
To activate PT6 Advanced Tone Probe, push and hold the black on/off
button (Fig. 1/a): the bright white LED headlight (Fig. 1/e) for probing in
dim locations is always on. Releasing the black button (Fig. 1/a)will turn
the unit off.
TG6 Tone Generator
To turn on TG6 Tone Generator, move the switch (Fig. 2/b) from OFF
in one of the two positions: SHORT or LINE.
To turn it off, move the switch to OFF.
3.2. Check short circuit
TG6 can check the test connection for a short circuit. Proceed as fol-
lows:
•Connect the test leads to the inactive wires.
•Switch the tone generator to the SHORT (Fig. 2/b) Position.
•If a short is detected the LINE LED shows steady green and a
warning tone can be heard.
Table of contents
Languages:


